Configure an embedding channel in Quick BI to embed reports into Quick Audience. Then, enable embedding for the reports. To support audience selection in reports, you must configure the audience selection settings. After you enable embedding for a report, you can also configure its embedding settings from within Quick BI.
Embedding channel configuration
A Quick BI administrator must configure the embedding channel before proceeding.
Procedure:
Log on to the Quick BI console.
Choose Developer Center > Publish Channel, and then click Add Channel.
Configure the parameters as described in the following table.
Parameter
Description
Channel Name
Enter a channel name.
Use Quick Audience. If you purchased Quick Audience in multiple regions, use `Quick Audience (Region Name)` to distinguish them.
This name appears in the dialog box when you configure report embedding from Quick BI.
Channel Remarks
Enter remarks for the channel.
Channel Configuration URL
Enter the channel configuration URL. You are redirected to this URL when you configure report embedding.
The URL format for a Quick Audience channel is:
https://<Quick Audience domain name>/analysisInsight/customMenu/menuSetFor public cloud Quick Audience, the domain names are:
Zhangjiakou region:
quicka.aliyun.comShenzhen region:
quicka-shenzhen.aliyun.comShanghai region:
quicka-shanghai.aliyun.com
Click OK to save the configuration.
Enable report embedding
After a report is published, a Quick BI workspace member must enable embedding for the report to embed it into Quick Audience.
Procedure:
Log on to the Quick BI console.
Choose Workbench > Workspace > Dashboards to open the dashboard list.
Right-click the report you want to embed and choose Publish Channel. Or, click the
 icon in the row of the report and choose Publish Channel.
In the dialog box that appears, click Enable Embedding, as shown in the following figure.

After embedding is enabled, a success message is displayed, and a dialog box appears as shown in the following figure. Click Configure for the channel to configure embedding for the report. For the next steps, see Report embedding configuration.

Audience selection configuration
To support audience selection in reports, a Quick BI workspace member must turn on the Generate Audience switch for the report and set the ID fields that can be exported to Quick Audience for each chart.
The audience selection feature is supported only when the data source of the Quick BI report is also a data source used by the Quick Audience workspace. This includes organization data sources and workspace data sources.
The chart types that support audience selection include the following:
Trend charts: line chart, area chart, stacked area chart, 100% stacked area chart, and combination chart
Comparison charts: column chart, stacked column chart, 100% stacked column chart, bar chart, stacked bar chart, and 100% stacked bar chart
Relationship charts: scatter chart and bubble chart
Procedure:
Log on to the Quick BI console.
Choose Workbench > Workspace > Dashboards to open the dashboard list.
Click the name of the report you want to embed, or click the
 icon in the row of the report to open the edit page.
On the Page Settings > Advanced tab, select Allow Audience Generation.

Click to select the chart where you want to enable audience selection. On the Chart Design > Advanced tab, click the
 icon.
icon.In the dialog box, select the audience ID fields to export to Quick Audience. Specify whether the ID field is encrypted. If it is encrypted, select the encryption method, such as MD5, SHA256, or AES. Click OK to save the configuration.
You can set multiple exportable ID fields. At least one ID field is required.
Save the configuration or Publish the dashboard.
 icon.
icon.

Report embedding configuration
After you enable embedding for a report, an organization or workspace administrator in Quick Audience can navigate from Quick BI to Quick Audience to continue the configuration. You can also embed the report from within Quick Audience.
When you configure embedding from Quick BI, you can embed the report into an existing menu, create a new menu for it, or assign the report to a workspace without adding it to a menu.
A menu is the hierarchical structure displayed in the navigation pane on the left when you view reports in Quick Audience. Two-level menus are supported.
Procedure:
Log on to the Quick BI console.
Choose Workbench > Workspace > Dashboards to open the dashboard list.
Right-click the report you want to embed and choose Publish Channel. Or, click the
icon in the row of the report and choose Publish Channel.As shown in the following figure, click Configure for the channel in the dialog box to open the report embedding configuration page.
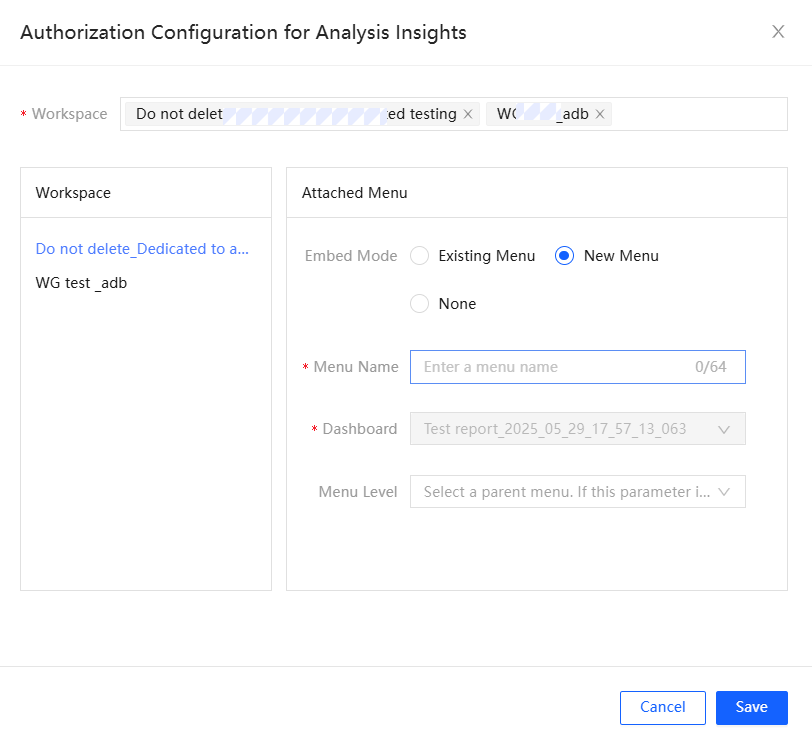
In the dialog box, select one or more workspaces. The selected workspaces are displayed in the list on the left. Click a workspace in the list to configure it on the right.
Attach the report to an existing menu: Select Existing Menu and choose the target menu from the drop-down list.
Create a new menu to attach the report: Select New Menu and enter a name for the new menu. To create a second-level menu, select an existing menu as the parent menu from the drop-down list. To create a first-level menu, do not select a parent menu.
NoteIf you select an existing menu that already contains an embedded report, the menu is updated to display only the newly embedded report.
Assign the report to the workspace without attaching it to a menu: Select Do Not Attach for Now.
After you configure all selected workspaces, click Save to save the configuration.


For more information about next steps, such as embedding reports in Quick Audience or granting permissions to view reports, see Custom menus, embedding, and authorization.