Prerequisites
Version requirements
GoLand 2021.2 or later is installed.
mosn-intellij 1.0.4 or later is installed.
Follow these steps to install the plugin:
On the Goland home page, click Plugins.
Select Installed > Install Plugin from Disk..., and then select mosn-intellij-1.0.4.zip or a later version.
Restart GoLand.
Control plane deployment version requirement:
Upgrade Cloudmesh to version 1.15.0 or later (released in July 2023).
NoteSome features are unavailable in earlier versions. Upgrade to use all features.
Plugin project configuration
In the plugin project, change the configurations in the etc/ant/env_conf file to match the correct environment context:
SOFA_INSTANCE_ID: The Instance ID of the connected tenant. The default value for middleware is 000001.APPNAME: The application name for the container agent.SOFA_ANTVIP_ENDPOINT: The AntVIP for connecting to the staging environment.SOFA_ACCESS_KEY: The AccessKey ID for connecting to the staging environment. Because authentication is disabled by default in the staging environment, no changes are needed.SOFA_SECRET_KEY: The AccessKey secret for connecting to the staging environment. Because authentication is disabled by default in the staging environment, no changes are needed.
Network requirements
If your developer environment and the control plane can communicate directly over the network, no extra configuration is needed.
If your developer network and the control plane are isolated but can interact through the Kubernetes (K8s) forwarding mechanism, you can follow these steps to deploy and upgrade directly in GoLand.
Open local port 7777 and forward it to port 7777 of the MeshServer in the staging environment.
kubectl --kubeconfig <kube config> -n <dsr namespace> port-forward sts/meshserver 7777:7777Configure a direct local connection in the
application.propertiesfile of the plugin project.mesh.server.address=127.0.0.1:7777
For example, to access an ACK environment where the local kubeconfig file is named
ack, run the following command:kubectl --kubeconfig ack -n sofamesh port-forward sts/meshserver 7777:7777
Seamless project upgrades
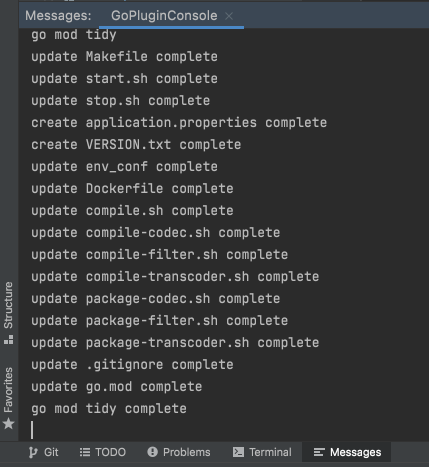
If your project was created with a version of mosn-intellij earlier than 1.0.4, you must refresh it to obtain the latest scaffolding feature set:
Update the makefile.
Update the MOSN compile and startup scripts.
Create plugin version information.
Create the project properties file
application.properties.
To upgrade, follow these steps:
Right-click any folder in the project.
From the menu bar, select Mosn Go Plugin > Refresh.
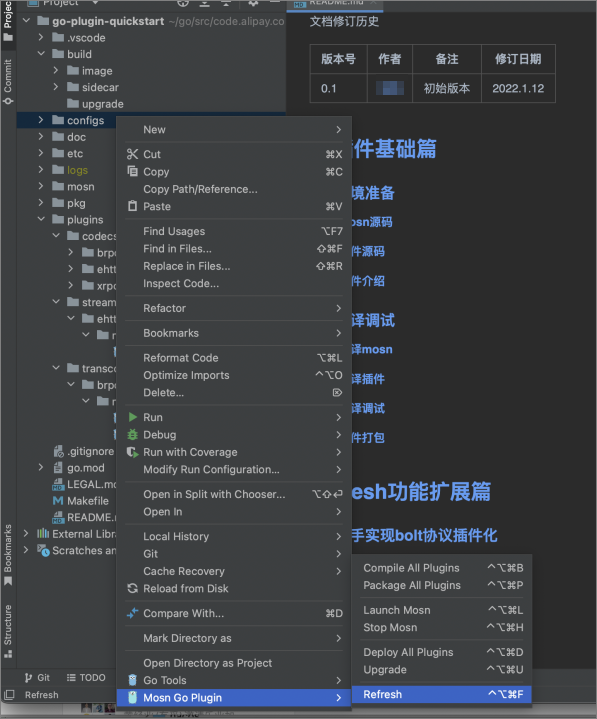
After you run the command, the project structure of the legacy scaffold is automatically refreshed. The following figure shows an example:
Deploy plugins
Step 1: Compile the plugin
Compile a single plugin
You can compile the plugin in GoLand using the UI or a keyboard shortcut. Plugin development is not supported on Windows. To compile a single plugin, you can use the keyboard shortcut  on macOS or Alt+Ctrl+Win+B on Linux. Alternatively, you can right-click a folder within the configs or plugins node and select the corresponding option. Follow these steps:
In the plugins folder, select a specific plugin.
For example, the plugins/codecs/brpc plugin.
You can trigger the GoLand plugin compilation in one of the following ways:
(Recommended) In the plugins/codecs/brpc node, press the keyboard shortcut
on macOS or Alt+Ctrl+Win+B on Linux. This action automatically triggers the GoLand plugin compilation.NoteThe following examples use keyboard shortcuts.
Right-click the plugins/codecs/brpc node and select Mosn Go Plugin > Compile brpc with dependency....
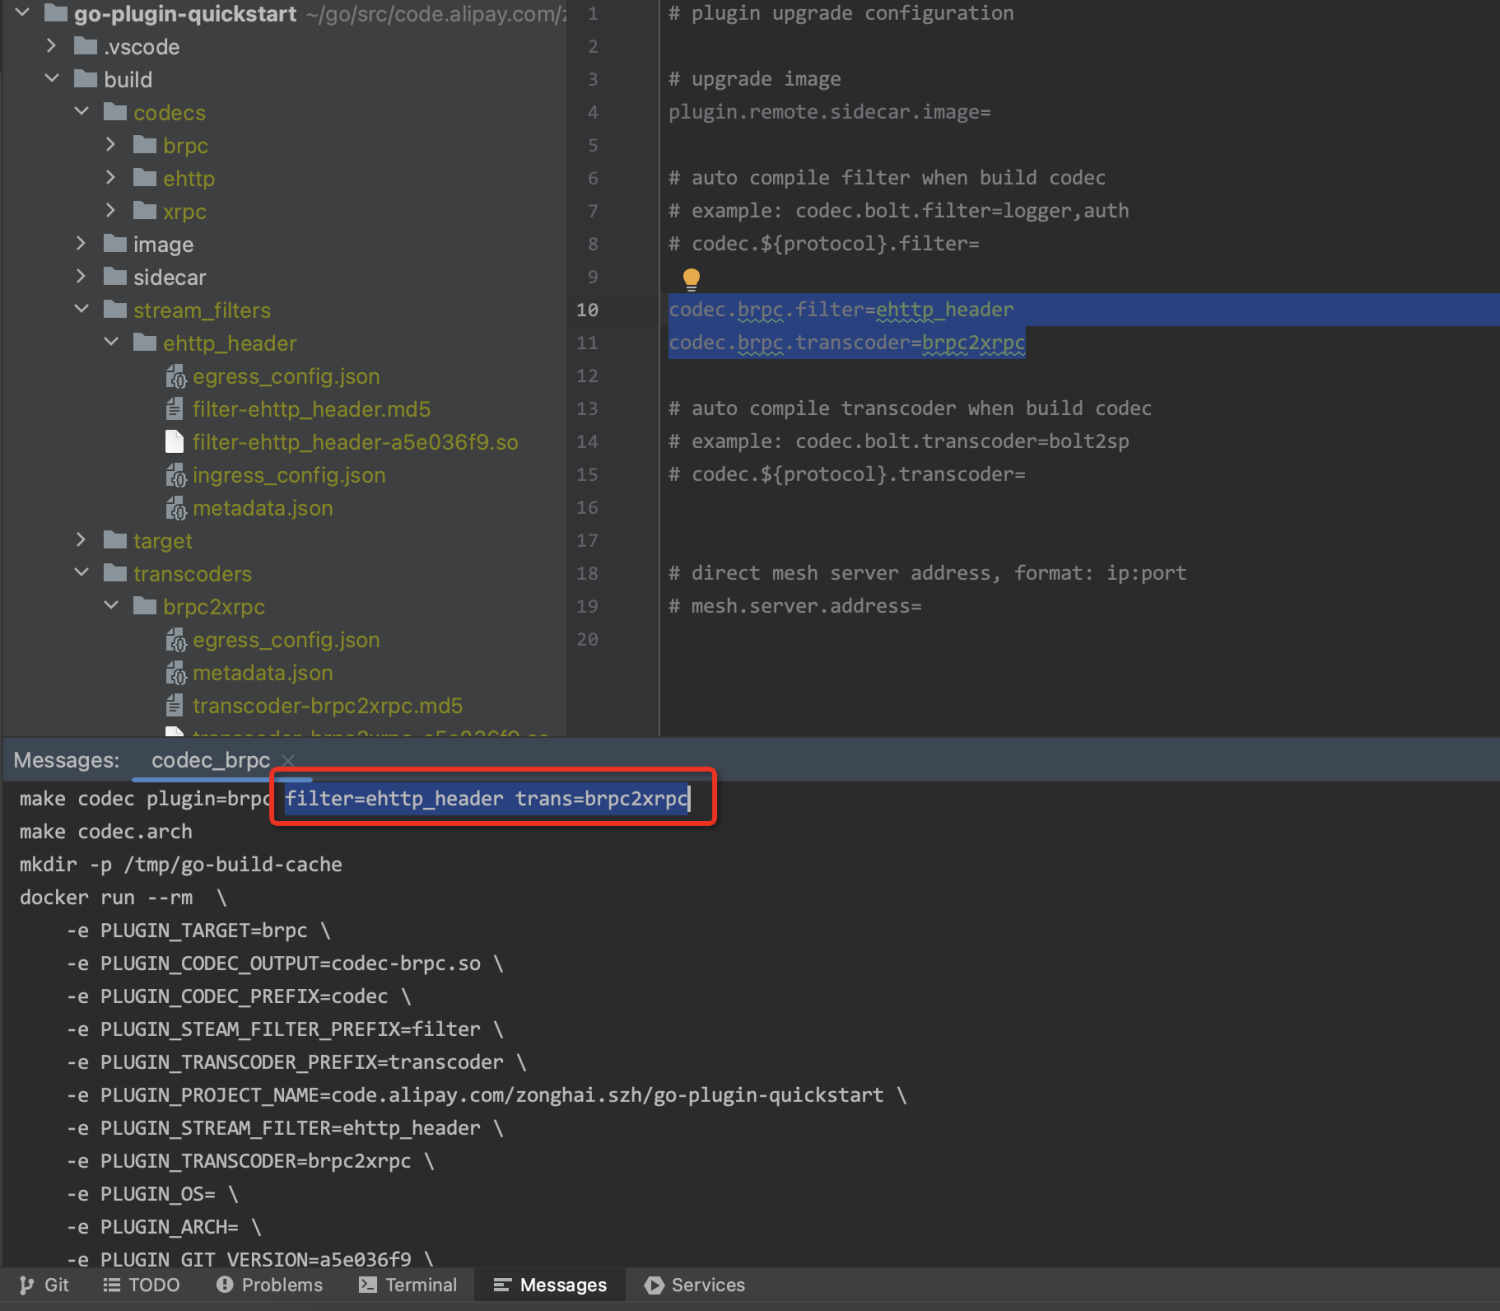
After the plugin is compiled:
The terminal displays compilation information in the format
plugin-type-prefix_plugin-name.The output file, which is the compiled plugin .so file, is stored in the build folder.
To improve local development efficiency, you can configure the protocol plugin compilation to automatically compile associated interceptors and protocol transform plugins. The configuration is as follows:
In the
application.propertiesfile, add the following keys and set${protocol}to the specific protocol name.codec.${protocol}.filter= codec.${protocol}.transcoder=In the plugins/codecs/brpc node, press the keyboard shortcut
on macOS or Alt+Ctrl+Win+B on Linux. This action automatically triggers the GoLand plugin compilation.
Compile multiple plugins
You can compile multiple plugins in the plugins subdirectory at the same time. This method is more convenient and faster, especially for multi-protocol plugin development. To compile multiple plugins of the same type, you can use the keyboard shortcut  on macOS or Alt+Ctrl+Win+B on Linux. Alternatively, you can right-click a direct child folder within the configs or plugins node and select the corresponding option. Follow these steps:
In the plugins folder, select a plugin type node, such as codecs, stream_filters, or transcoders.
For example, select the plugins/codecs protocol plugin type.
In the plugins/codecs node, press the keyboard shortcut. This action automatically triggers the compilation of multiple plugins of the same type in GoLand.
All protocol plugins are compiled in parallel.
Step 2: Package the plugin
Package a single plugin
After you finish testing the source code, you can package it into a plugin unit in GoLand for deployment across multiple environments. To package a single plugin, you can use the keyboard shortcut 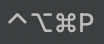 on macOS or Alt+Ctrl+Win+P on Linux. Alternatively, you can right-click a single plugin folder within the configs or plugins node and select the corresponding option. Follow these steps:
In the plugins folder, select a specific plugin.
For example, select the plugins/codecs/brpc plugin.
In the plugins/codecs/brpc node, press the keyboard shortcut. This action automatically triggers plugin packaging in GoLand.
The terminal displays packaging information in the format
plugin-type-prefix_plugin-name.On a macOS machine, the amd64 architecture compilation is automatically triggered before packaging.
The output file, which is a plugin ZIP package, is stored in the
build/targetfolder.
Package multiple plugins
You can package multiple plugins in the plugins subdirectory at the same time. To package multiple plugins of the same type, you can use the keyboard shortcut on macOS or Alt+Ctrl+Win+P on Linux. Alternatively, you can right-click a direct child folder within the configs or plugins node and select the corresponding option. Follow these steps:
In the plugins folder, select a plugin type node, such as codecs, stream_filters, or transcoders.
For example, you can use a protocol type plugin such as plugins/codecs.
In the plugins/codecs node, press the keyboard shortcut. This action automatically triggers the packaging of multiple plugins of the same type in GoLand.
The terminal displays packaging information in the format
plugin-type-prefix_plugin-name.On a macOS machine, the amd64 architecture compilation is automatically triggered before packaging.
The output files, which are plugin ZIP packages, are stored in the
build/targetfolder.
Step 3: Deploy the plugin
Deploy a single plugin
After the plugin passes local tests, you can upload the plugin unit package from GoLand to the Service Mesh console. This simplifies the subsequent Sidecar injection configuration. To deploy a single plugin, you can use the keyboard shortcut  on macOS or Alt+Ctrl+Win+D on Linux. Alternatively, you can right-click a single plugin folder within the configs or plugins node and select the corresponding option. Follow these steps:
In the configs folder, select a specific plugin.
An example is the configs/codecs plugin.
In the configs/codecs node, press the keyboard shortcut. This action automatically triggers the plugin deployment in GoLand.
The terminal displays packaging information in the format
plugin-type-prefix_plugin-name.On a macOS machine, the amd64 architecture compilation is automatically triggered before packaging.
The file is automatically deployed to the Service Mesh console.
After the deployment is complete, you can view the plugin information in the Service Mesh console:
Deploying through GoLand eliminates the need to manually upload plugin packages, which simplifies the development process. After deployment, you can associate the plugin in the Sidecar injection rule. For more information, see Upload and deploy an HTTP plugin.
Deploy multiple plugins
You can deploy multiple plugins in the plugins subdirectory at the same time. To deploy multiple plugins of the same type, you can use the keyboard shortcut on macOS or Alt+Ctrl+Win+D on Linux. Alternatively, you can right-click a direct child folder within the configs or plugins node and select the corresponding option. Follow these steps:
In the plugins folder, select a plugin type node, such as codecs, stream_filters, or transcoders.
For example, the configs/codecs plugin is a Protocol Type plugin.
In the configs/codecs node, press the keyboard shortcut. This action automatically triggers the deployment of multiple plugins of the same type in GoLand.
The terminal displays packaging information in the format
plugin-type-prefix_plugin-name.On a macOS machine, the amd64 architecture compilation is automatically triggered before packaging.
The files are automatically deployed to the Service Mesh console.
After the deployment is complete, you can view the plugin information in the Service Mesh console:
Upgrade plugins
If API changes cause incompatibilities between a plugin and the Sidecar runtime, you can use the plugin upgrade mechanism. This mechanism automatically aligns the plugin's dependencies with the Sidecar runtime version, and then compiles, uploads, and deploys the plugin. This simplifies the upgrade process.
How it works
GoLand uses the Sidecar injection rule that you select, which contains all used plugins and the Sidecar container image to be upgraded. It retrieves the remote image locally, scans for common dependencies between your local project and the Sidecar container image, and updates the local plugin dependencies to match the Sidecar container image dependencies. Then, it automatically triggers the compilation, packaging, and deployment of the new plugin unit.
GoLand detects the plugins in use based on the selected injection rule and compares them with the local project. If a plugin belongs to the current project, GoLand triggers an upgrade and deployment. If a plugin does not belong to the current project, a message prompts you about the missing plugin after deployment.
To reduce unnecessary upgrades, include all plugins within a single project to upgrade them all at once.
Prerequisites
You have an active Sidecar plugin injection rule that is associated with plugins.
Before you start the upgrade, complete the following steps:
Create the new Sidecar image and version for the upgrade.
On the Sidecar Version Management page in the Service Mesh console, create the new Sidecar image and version for the upgrade.
In the GoLand control panel (right-click the project root directory and select Mosn Go Plugin > Deploy), select the Sidecar injection rule to upgrade and the new Sidecar image and version.
Upgrade the Sidecar injection rule.
After the upgrade is triggered, find the Sidecar injection rule in the Service Mesh console and click Upgrade to generate a new injection rule. In the new rule, select the new Sidecar image and version that match those in the GoLand control panel, and then confirm the automatically associated plugin upgrade information.
Re-inject the Sidecar.
On the Service Catalog page in the Service Mesh console, click the application name to go to the application details page. If a Sidecar is already injected, click Take Offline and then click Inject. The application then uses the new version of the plugin.
Upgrade procedure
The following example provides instructions:
Assume that in the Service Mesh console, the bRPC protocol plugin is associated with the brpc2ehttp protocol transform plugin.
The following figure shows an example:
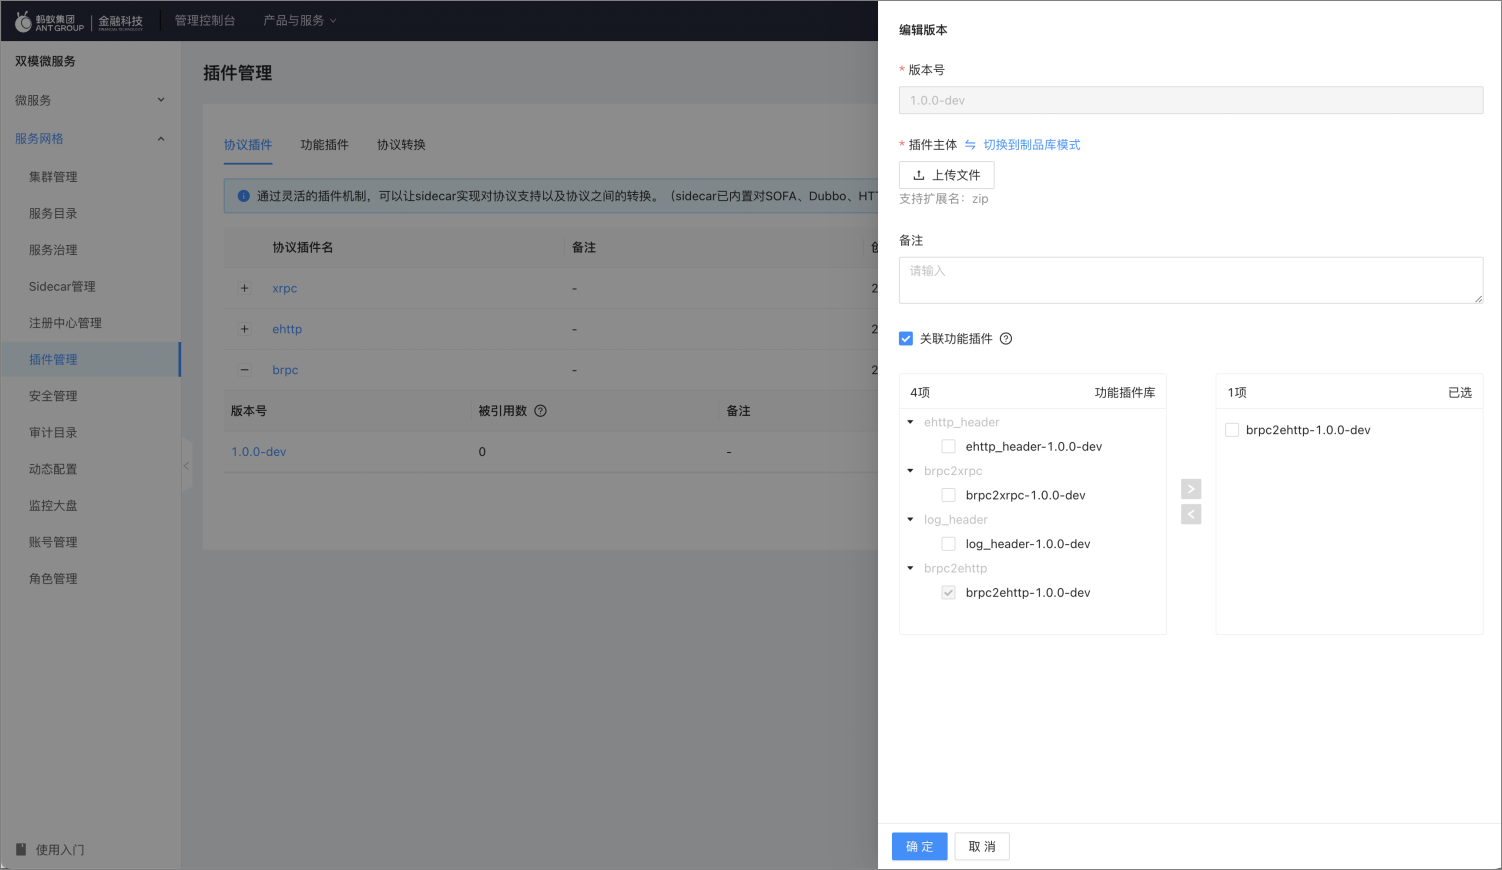
The brpc2ehttp protocol transform plugin contains transform rules. The content of the rules is arbitrary and for testing purposes only.
The following figure shows an example:
The Sidecar injection rule references the protocol plugin
brpc 1.0.0-dev.
This example shows how to upgrade the brpc1.0.0-dev plugin to version brpc1.0.1-dev. Follow these steps:
Add a new Sidecar version.
On the Sidecar Version Management page in the Service Mesh console, add a new Sidecar version and enter the necessary image and dependency version information.
The dependency versions are typically included in the project delivery.
Upgrade the plugin.
In the GoLand control panel, right-click the project root directory and select Mosn Go Plugin > Deploy. The upgrade panel appears.
The Mesh Server Address is automatically obtained from the registry based on the AntVIP address configured in the prerequisites, or it shows the local forwarding address 127.0.0.1.
Select the correct injection rule to retrieve the plugins in use. Specify the upgraded plugin version and the correct Sidecar image for the upgrade.
If the image does not exist locally, GoLand first pulls the image and then performs the local dependency upgrade, compilation, and packaging operations.
NoteIf your environment cannot pull the image, you can use the
docker saveanddocker loadcommands to load the image locally. Then, use thedocker tagcommand to change the image name to match the name of the upgrade image.After all plugins are deployed, a message indicates that all plugins have been successfully deployed.
You can associate the confirmation plugin.
In the Service Mesh console, confirm that the new versions of the plugins are uploaded and that their relationships, including plugin configurations, are correctly associated. Then, manually trigger the upgrade rule to confirm the association of the new plugins.
On the Sidecar Version Management page in the Service Mesh console, find the Sidecar injection rule for the old plugin and click Upgrade on the right.
Make sure this is the same injection rule that you selected for the upload in GoLand.
In the configure parameters step, select the upgraded Sidecar version, which includes the image.
Make sure this is the same image that you selected for the upload in GoLand.
Click Save.
A prompt appears to disable the old injection rule and enable the new one.
Re-inject the Sidecar.
To apply the plugin, go to the Service Catalog page and click the application name to view its details. If a Sidecar is already injected, click Take Offline and then click Inject. The application then uses the new version of the plugin.