Build a text-to-image retrieval system using DashVector and the Chinese CLIP model from ModelScope . The Muge multimodal dataset serves as the image corpus.
Workflow

The process has two main stages:
-
Image data embedding and storage. Convert Muge dataset images into vectors using the Chinese CLIP embedding API, then write them to DashVector.
-
Text query retrieval. Convert a text query into a vector using the same Chinese CLIP model, then retrieve similar images from DashVector.
Prerequisites
1. Prepare an API key
-
Activate DashVector. Activate DashVector.
-
Create a DashVector API key. Manage API keys.
2. Prepare the environment
This tutorial uses the CLIP Enormous model (224 resolution) from ModelScope, trained on ~200 million Chinese image-text pairs. Install the following dependencies:
Install Python 3.7 or a later version.
# Install the DashVector client
pip3 install dashvector

# Install ModelScope
# ModelScope 0.3.7 or later is required. The default version is usually later than 0.3.7, but check to be sure.
# Update the image or use the following method.
pip3 install --upgrade modelscope -f https://modelscope.oss-cn-beijing.aliyuncs.com/releases/repo.html
# Install decord separately.
# pip3 install decord
# The ModelScope installation may have other dependencies. The dependencies for the current version are listed below.
# pip3 install torch torchvision opencv-python timm librosa fairseq transformers unicodedata2 zhconv rapidfuzz
3. Prepare the data
This tutorial uses the Muge multimodal dataset validation set. Load it through the ModelScope dataset API.
from modelscope.msdatasets import MsDataset

dataset = MsDataset.load("muge", split="validation")
Steps
Replace your-xxx-api-key and your-xxx-cluster-endpoint with your actual API key and cluster endpoint.
1. Embed and store image data
The Muge multimodal dataset validation set contains 30,588 images. Extract their embedding vectors using the CLIP model and store them in DashVector along with base64-encoded image data for later display.
import torch
from modelscope.utils.constant import Tasks
from modelscope.pipelines import pipeline
from modelscope.msdatasets import MsDataset
from dashvector import Client, Doc, DashVectorException, DashVectorCode
from PIL import Image
import base64
import io


def image2str(image):
    image_byte_arr = io.BytesIO()
    image.save(image_byte_arr, format='PNG')
    image_bytes = image_byte_arr.getvalue()
    return base64.b64encode(image_bytes).decode()


if __name__ == '__main__':
    # Initialize the DashVector client
    client = Client(
      api_key='{your-dashvector-api-key}',
      endpoint='{your-dashvector-cluster-endpoint}'
    )

    # Create a collection: Specify the collection name and vector dimensions. The CLIP Enormous model produces vectors with 1024 dimensions.
    rsp = client.create('muge_embedding', 1024)
    if not rsp:
        raise DashVectorException(rsp.code, reason=rsp.message)

    # Generate image embeddings in batches and store the vectors.
    collection = client.get('muge_embedding')
    pipe = pipeline(task=Tasks.multi_modal_embedding,
                    model='damo/multi-modal_clip-vit-huge-patch14_zh',
                    model_revision='v1.0.0')
    ds = MsDataset.load("muge", split="validation")

    BATCH_COUNT = 10
    TOTAL_DATA_NUM = len(ds)
    print(f"Start indexing Muge validation data. Total data size: {TOTAL_DATA_NUM}, Batch size: {BATCH_COUNT}")
    idx = 0
    while idx < TOTAL_DATA_NUM:
        batch_range = range(idx, idx + BATCH_COUNT) if idx + BATCH_COUNT <= TOTAL_DATA_NUM else range(idx, TOTAL_DATA_NUM)
        images = [ds[i]['image'] for i in batch_range]
        # Generate image embedding vectors with the Chinese CLIP model.
        image_embeddings = pipe.forward({'img': images})['img_embedding']
        image_vectors = image_embeddings.detach().cpu().numpy()
        collection.insert(
            [
                Doc(
                    id=str(img_id),
                    vector=img_vec,
                    fields={'png_img': image2str(img)}
                )
                for img_id, img_vec, img in zip(batch_range, image_vectors, images)
            ]
        )
        idx += BATCH_COUNT
    print("Finished indexing Muge validation data.")
The model runs on CPU by default. Running on a GPU improves performance.
2. Retrieve data using a text query
With the image data stored, convert a text query into a vector using the same CLIP model, then retrieve similar images through the DashVector API.
import torch
from modelscope.utils.constant import Tasks
from modelscope.pipelines import pipeline
from modelscope.msdatasets import MsDataset
from dashvector import Client, Doc, DashVectorException
from PIL import Image
import base64
import io
def str2image(image_str):
image_bytes = base64.b64decode(image_str)
return Image.open(io.BytesIO(image_bytes))
def multimodal_search(input_text):
# Initialize the DashVector client
client = Client(
api_key='{your-dashvector-api-key}',
endpoint='{your-dashvector-cluster-endpoint}'
)
# Get the collection that was previously stored.
collection = client.get('muge_embedding')
# Get the embedding vector for the text query.
pipe = pipeline(task=Tasks.multi_modal_embedding,
model='damo/multi-modal_clip-vit-huge-patch14_zh', model_revision='v1.0.0')
text_embedding = pipe.forward({'text': input_text})['text_embedding'] # 2D Tensor, [number of texts, feature dimensions]
text_vector = text_embedding.detach().cpu().numpy()[0]
# Retrieve vectors with DashVector.
rsp = collection.query(text_vector, topk=3)
image_list = list()
for doc in rsp:
image_str = doc.fields['png_img']
image_list.append(str2image(image_str))
return image_list
if __name__ == '__main__':
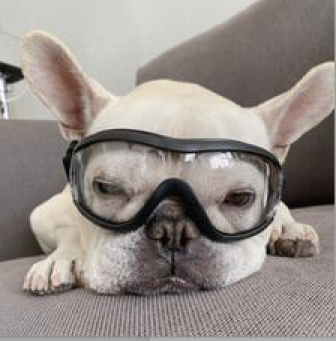
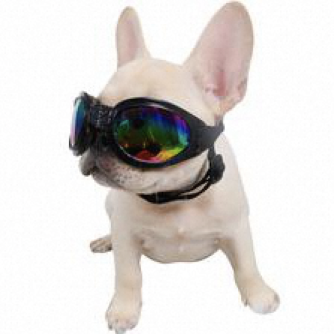
text_query = "a dog wearing glasses"
images = multimodal_search(text_query)
for img in images:
# Note: The show() function may require you to install necessary image browser components to work on a Linux server.
# Run this code on a server that supports Jupyter Notebook.
img.show()
Run the code. The output is as follows: