This document describes how to archive data by creating a data archiving task.
Background information
OceanBase Developer Center (ODC) lets you schedule data archiving from a source database to a destination database. This process helps prevent performance degradation that can be caused by a large volume of online data.
This document uses an example to demonstrate how to archive the employee table from the odc_test database to the test2 database in the same project.
The data in this document is for demonstration purposes only. Replace it with your actual data as needed.
Notes
Prerequisites:
The table to be archived must have a primary key. For OceanBase MySQL and MySQL data sources, you can also archive a table with a non-null unique index.
The database user for the archiving task must have read/write permissions and access to internal views. For more information, see View user permissions, Overview of users and permissions, and Modify user permissions.
Ensure that the fields in the source table are compatible with those in the destination table. The data archiving feature does not handle field compatibility issues.
For homogeneous archiving, table schema synchronization is not supported for subpartitions. For heterogeneous databases, schema synchronization and automatic table creation are not supported.
Supported archiving paths:
OceanBase MySQL to OceanBase MySQL.
OceanBase Oracle to OceanBase Oracle.
OceanBase MySQL or OceanBase Oracle to Object Storage Service (OSS), COS, OBS, or S3.
Archiving is not supported in the following cases:
Archiving is not supported for conditions that contain a LIMIT statement.
Tables that contain foreign keys cannot be archived.
Supported paths for automatic table creation
OceanBase Oracle to OceanBase Oracle.
OceanBase MySQL to OceanBase MySQL.
Supported paths for table schema synchronization
OceanBase MySQL to OceanBase MySQL.
Create a data archiving task
In the SQL Developer window, edit the SQL statement to create the employee table.
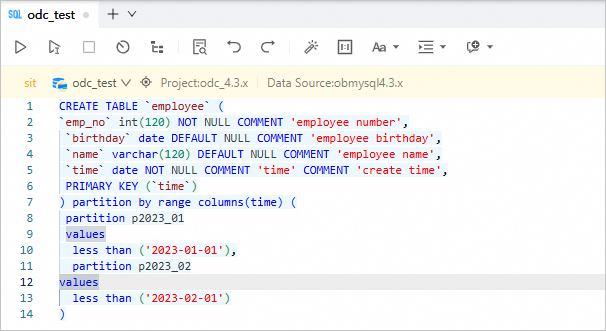
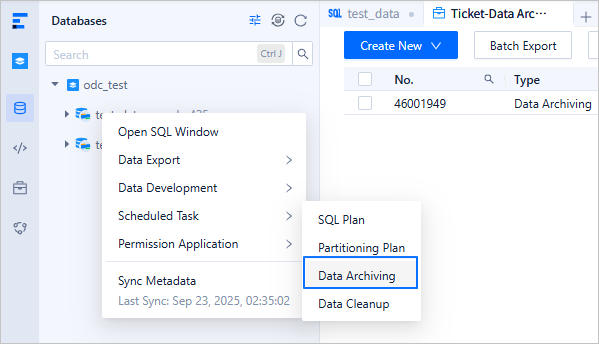
CREATE TABLE `employee` (
`emp_no` int(120) NOT NULL COMMENT 'employee number',
 `birthday` date DEFAULT NULL COMMENT 'employee birthday',
 `name` varchar(120) DEFAULT NULL COMMENT 'employee name',
 `time` date NOT NULL COMMENT 'create time',
 PRIMARY KEY (`time`)
) partition by range columns(time) (
 partition p2023_01
 values
  less than ('2023-01-01'),
  partition p2023_02
values
  less than ('2023-02-01')
)
In the database list, right-click the database name and choose Scheduled Task > Data Archiving to open the Create Data Archiving Task page. Alternatively, in the navigation pane on the left, choose Ticket > Data Archiving > Create Data Archiving Task.
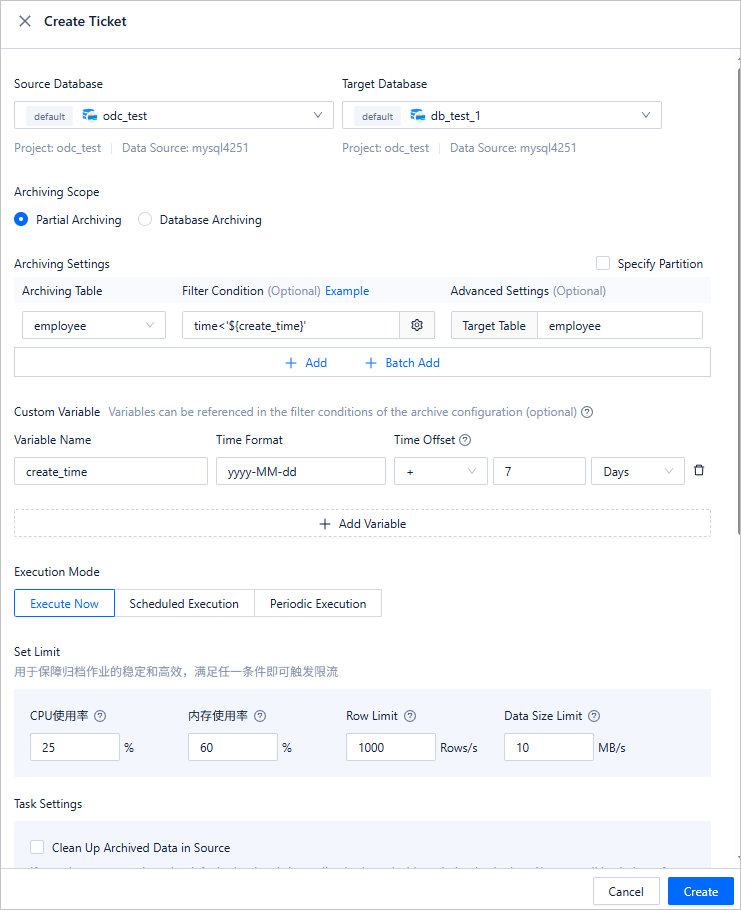
On the Create Data Archiving Task page, enter the following information.
Item
Description
Source Database
Select the database that contains the table.
NoteODC V4.2.2 and later versions support selecting a MySQL database to archive its data to an OceanBase database.
Destination Database
Select the database to which you want to archive the table.
NoteODC V4.2.2 and later versions support selecting a MySQL database to archive data from an OceanBase database to it.
Archiving Scope
Partial Archiving: Archive specific tables from the source database.
Configure the filter condition using constants or variables defined in the custom variable settings. For example:
time<'${create_time}', wherecreate_timeis a variable name from the variable configuration andtimeis a field in the archived table.NoteConditions for associated tables can be configured in the filter condition settings.
Select Specify Partition to archive data from specific partitions.
Click +Add to add a single table to archive.
Click +Batch Add to add multiple tables to archive.
Full Database Archiving: Archive all tables in the source database.
Custom Variable
Optional. Define variables and set time offsets to filter and archive specific rows.
Execution Mode
Select Execute Immediately, Scheduled Execution, or Periodic Execution to set the task execution mode.
Throttling Policy
Configure the following parameters:
CPU Usage: The program automatically pauses if the CPU usage of the OceanBase database exceeds this value.
Memory Usage: The program automatically pauses if the memory usage of the OceanBase database exceeds this value.
Row Rate Limit: Limits the number of data rows processed per second to this value.
Data Size Limit: Limits the amount of data processed per second to a value around this number.
Task Settings
Clean Archived Data from Source: If selected, data is cleaned from the source based on the specified conditions. By default, cleaning is immediate and without a backup. The cleaning task can be rolled back after completion.
Specify Task Duration: If the task is not completed within the specified duration, its execution is paused until the next scheduled cycle.
Enable Destination Table Schema Synchronization: Before the task runs, a schema comparison is performed. If the source and destination table schemas are inconsistent, the table is skipped.
Insert Policy: During data archiving, ignore or update duplicate data.
Search Policy: Supports full table scan and conditional matching.
Description
Enter a description of up to 200 characters in the Description text box. This is optional.
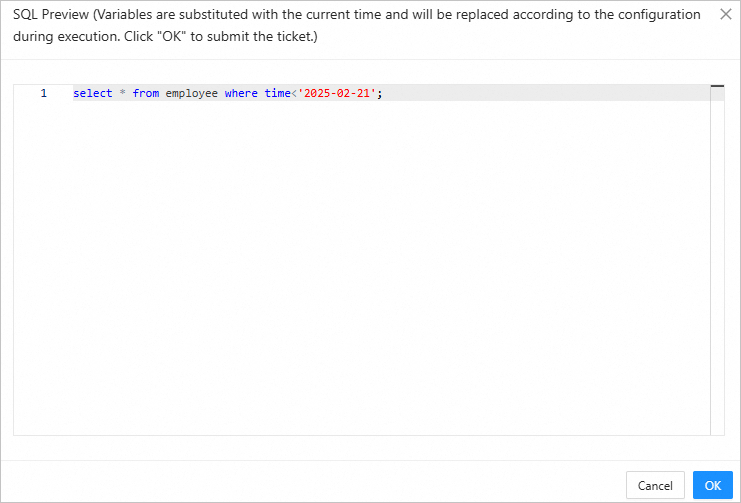
Click Create. Then, preview the archiving SQL statement and click OK to create the data archiving task.
After the task is created, you can view its details in the list on the Data Archiving page under Ticket.

View a data archiving task
Task information
On the Data Archiving page, find the task in the list and click View in the Actions column.

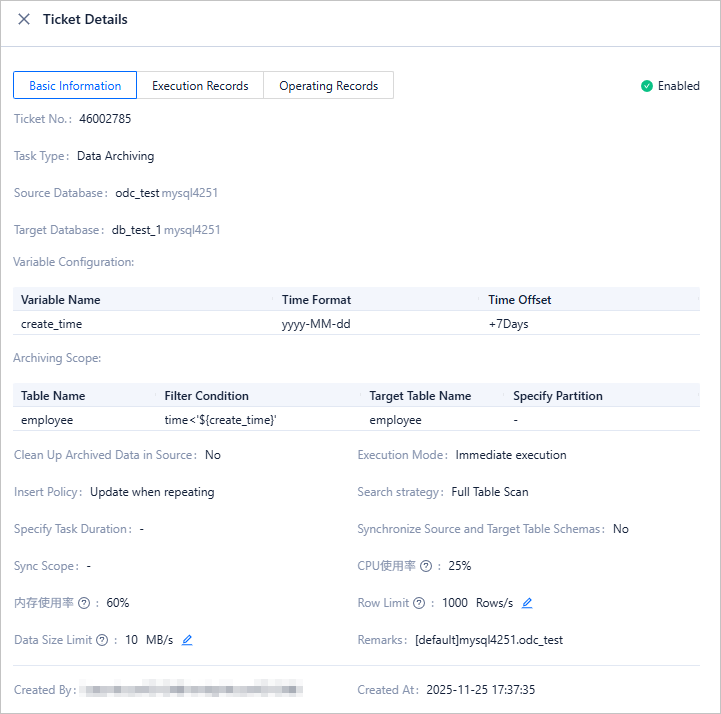
In the task details panel, click the Task Information tab to view details such as the task type, source database, destination database, variable configuration, archiving scope, and execution mode.
Click Rerun in the lower-right corner. ODC copies the task information to the Create Data Archiving Task panel, allowing you to quickly create a new task.
Execution records
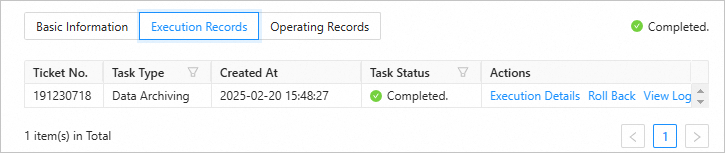
In the task details panel, click the Execution Records tab to view the task status and execution details.
Operation records
In the task details panel, click the Operation Records tab to view the task's approval status and change history.

Import a data archiving task
After you migrate an instance from ApsaraDB for OceanBase to OB Cloud, you can also migrate the data archiving tasks for that instance to OB Cloud.
Step 1: Export data archiving tasks from ApsaraDB for OceanBase
In the ApsaraDB for OceanBase Management Console, click Instance List in the navigation pane on the left.
In the Actions column for the desired instance, click Switch to Alibaba Cloud Marketplace.
After the instance is switched, click Process Data Development Tasks in the Actions column for that instance.
On the Process Data Development Tasks page, click View and Export All to export the scheduled tasks to your local computer.


Step 2: Import data archiving tasks to OB Cloud
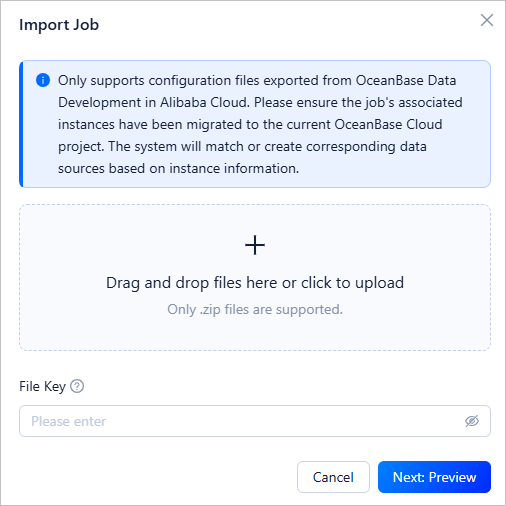
Log on to the OB Cloud console and choose DataService Studio > Lifecycle. On the Lifecycle page, click the ... icon and choose Import Job.
Upload the downloaded configuration file for the data archiving task.

Data archiving performance
Performance test results and details for data archiving will be available soon.