This topic describes how to add, modify, copy, and delete public IP whitelists for a cluster instance in the DashVector console.
Background information
To enhance security, DashVector uses public IP whitelists to control access.
If no public IP whitelist is configured for a cluster instance, all IP addresses are allowed to access the instance by default.
If a public IP whitelist is configured for a cluster instance, only the IP addresses in the whitelist are allowed to access the instance.
Prerequisites
Procedure
Log on to the Vector Retrieval Service DashVector console.
Click Cluster List. Move the pointer to the Actions column of the cluster that you want to manage and click Details.
Click Access Control and then click Public IP Whitelist to add, modify, copy, and delete public IP whitelists.
Add an IP whitelist
Click Add IP Whitelist.
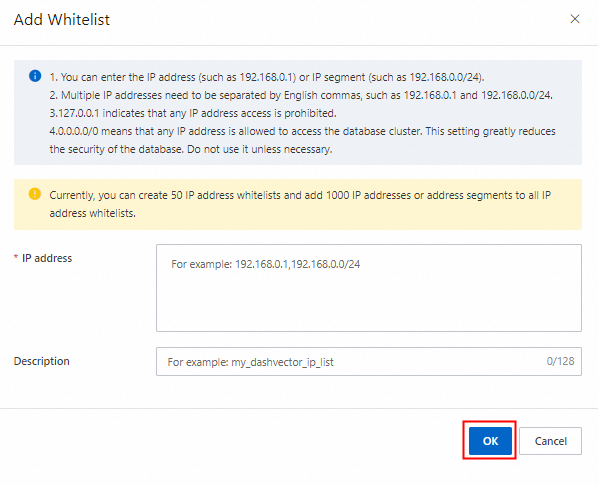
On the Add Whitelist page, enter the IP addresses and a description, and then click OK.
 Note
Note1. You can enter an IP address, such as 192.168.0.1, or a CIDR block, such as 192.168.0.0/24.
2. Separate multiple IP addresses or CIDR blocks with commas, such as 192.168.0.1,192.168.0.0/24.
3. A value of 127.0.0.1 denies access from all IP addresses.
4. The CIDR block 0.0.0.0/0 allows access from all IP addresses to the database cluster. This setting significantly reduces the security of the database cluster. Do not use this setting unless necessary.
5. In the description field, enter a note for the IP whitelist, such as my_dashvector_ip_list, to make it easier to manage. The description can be up to 128 characters long.
ImportantEach cluster instance supports up to 50 IP whitelists. A total of 1,000 IP addresses or CIDR blocks can be added across all whitelists.
Modify an IP whitelist
Move the pointer to the Actions column of the IP whitelist that you want to edit and click Edit to modify the IP addresses and description.
After you make the changes, click OK.
Copy an IP whitelist
Move the pointer to the Actions column of the IP whitelist that you want to copy and click Copy.
The copied IP whitelist is displayed as the first entry in the list.
Delete an IP whitelist
Move the pointer to the Actions column of the IP whitelist that you want to delete and click Delete. In the dialog box that appears, read the message and click OK to delete the IP whitelist.
WarningAfter an IP whitelist is deleted, it cannot be recovered and must be reconfigured. Proceed with caution.