Connection authorization
To use the Experience Insight Agent, you must first authorize access to your shop's data. We currently support the following platforms: Tmall and Taobao, Douyin, JD.com, and Pinduoduo. The scope of data authorization includes customer service chat, reviews, refunds, and product Q&A.
Tmall and Taobao data authorization (Sycm)
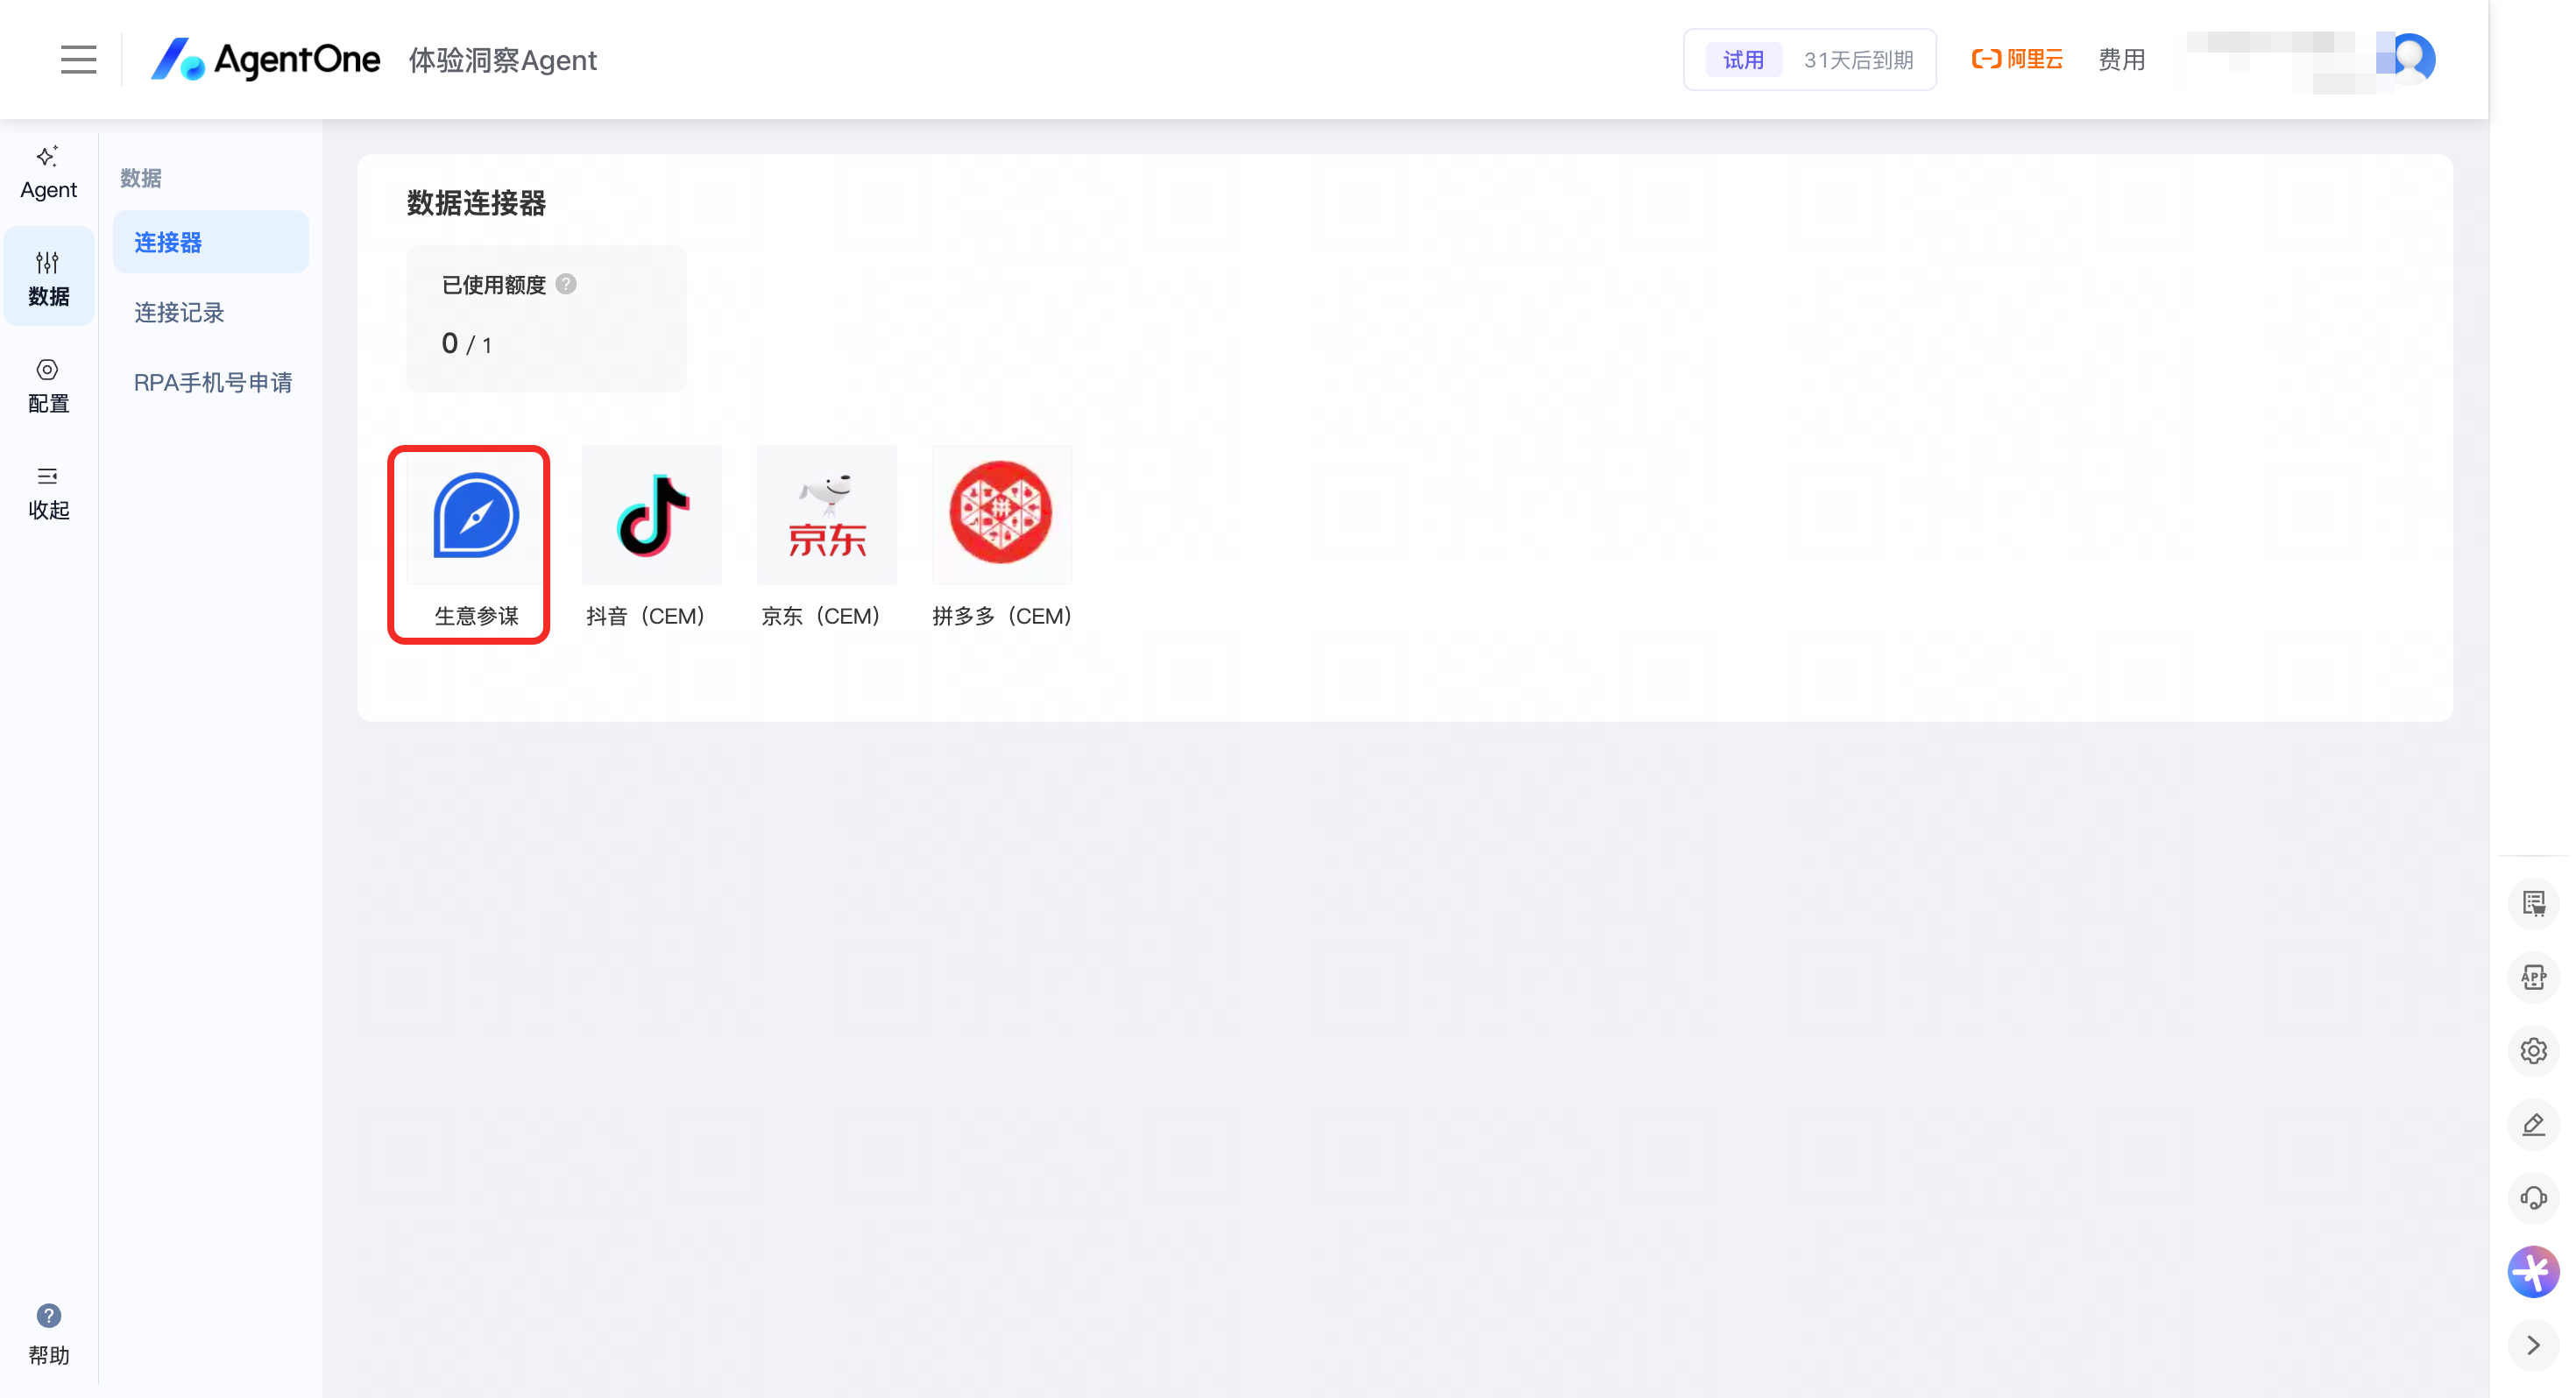
Step 1: Request authorization
Navigate to Data > Connectors > Sycm > Add Shop > Request Authorization.
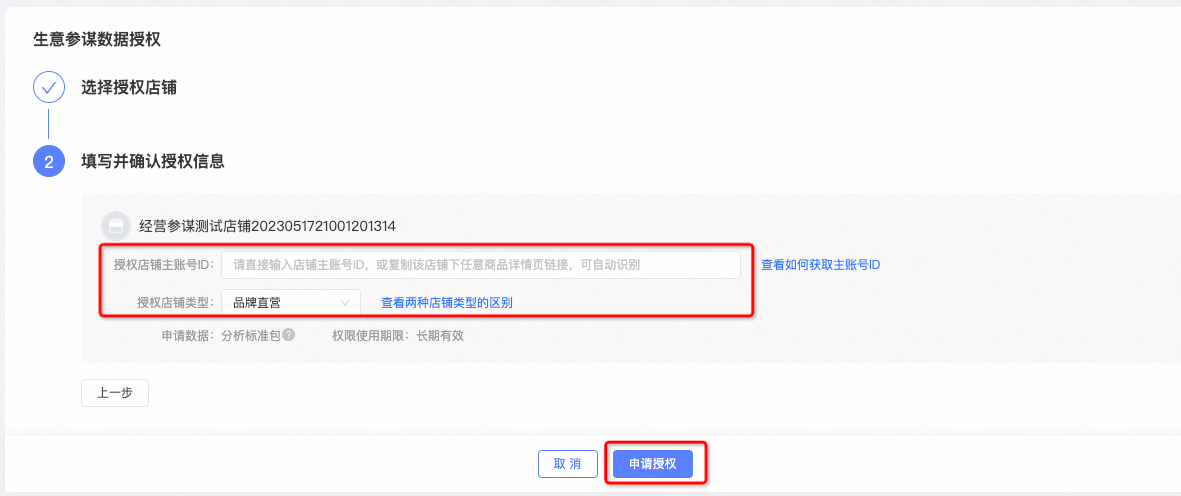
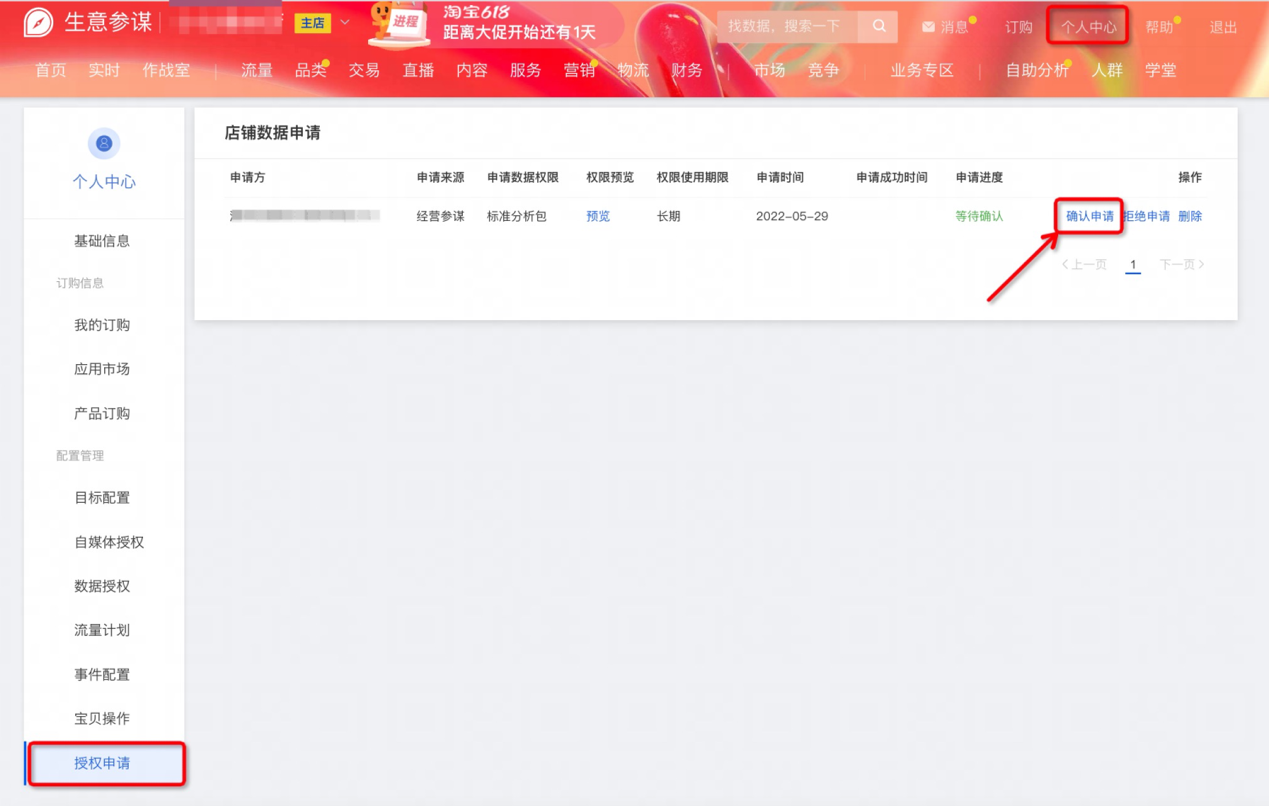
Step 2: Grant authorization
After submitting the authorization request, log in to Sycm at https://sycm.taobao.com/portal/error.htm, and navigate to Personal Center > Authorization Requests > Grant Authorization.
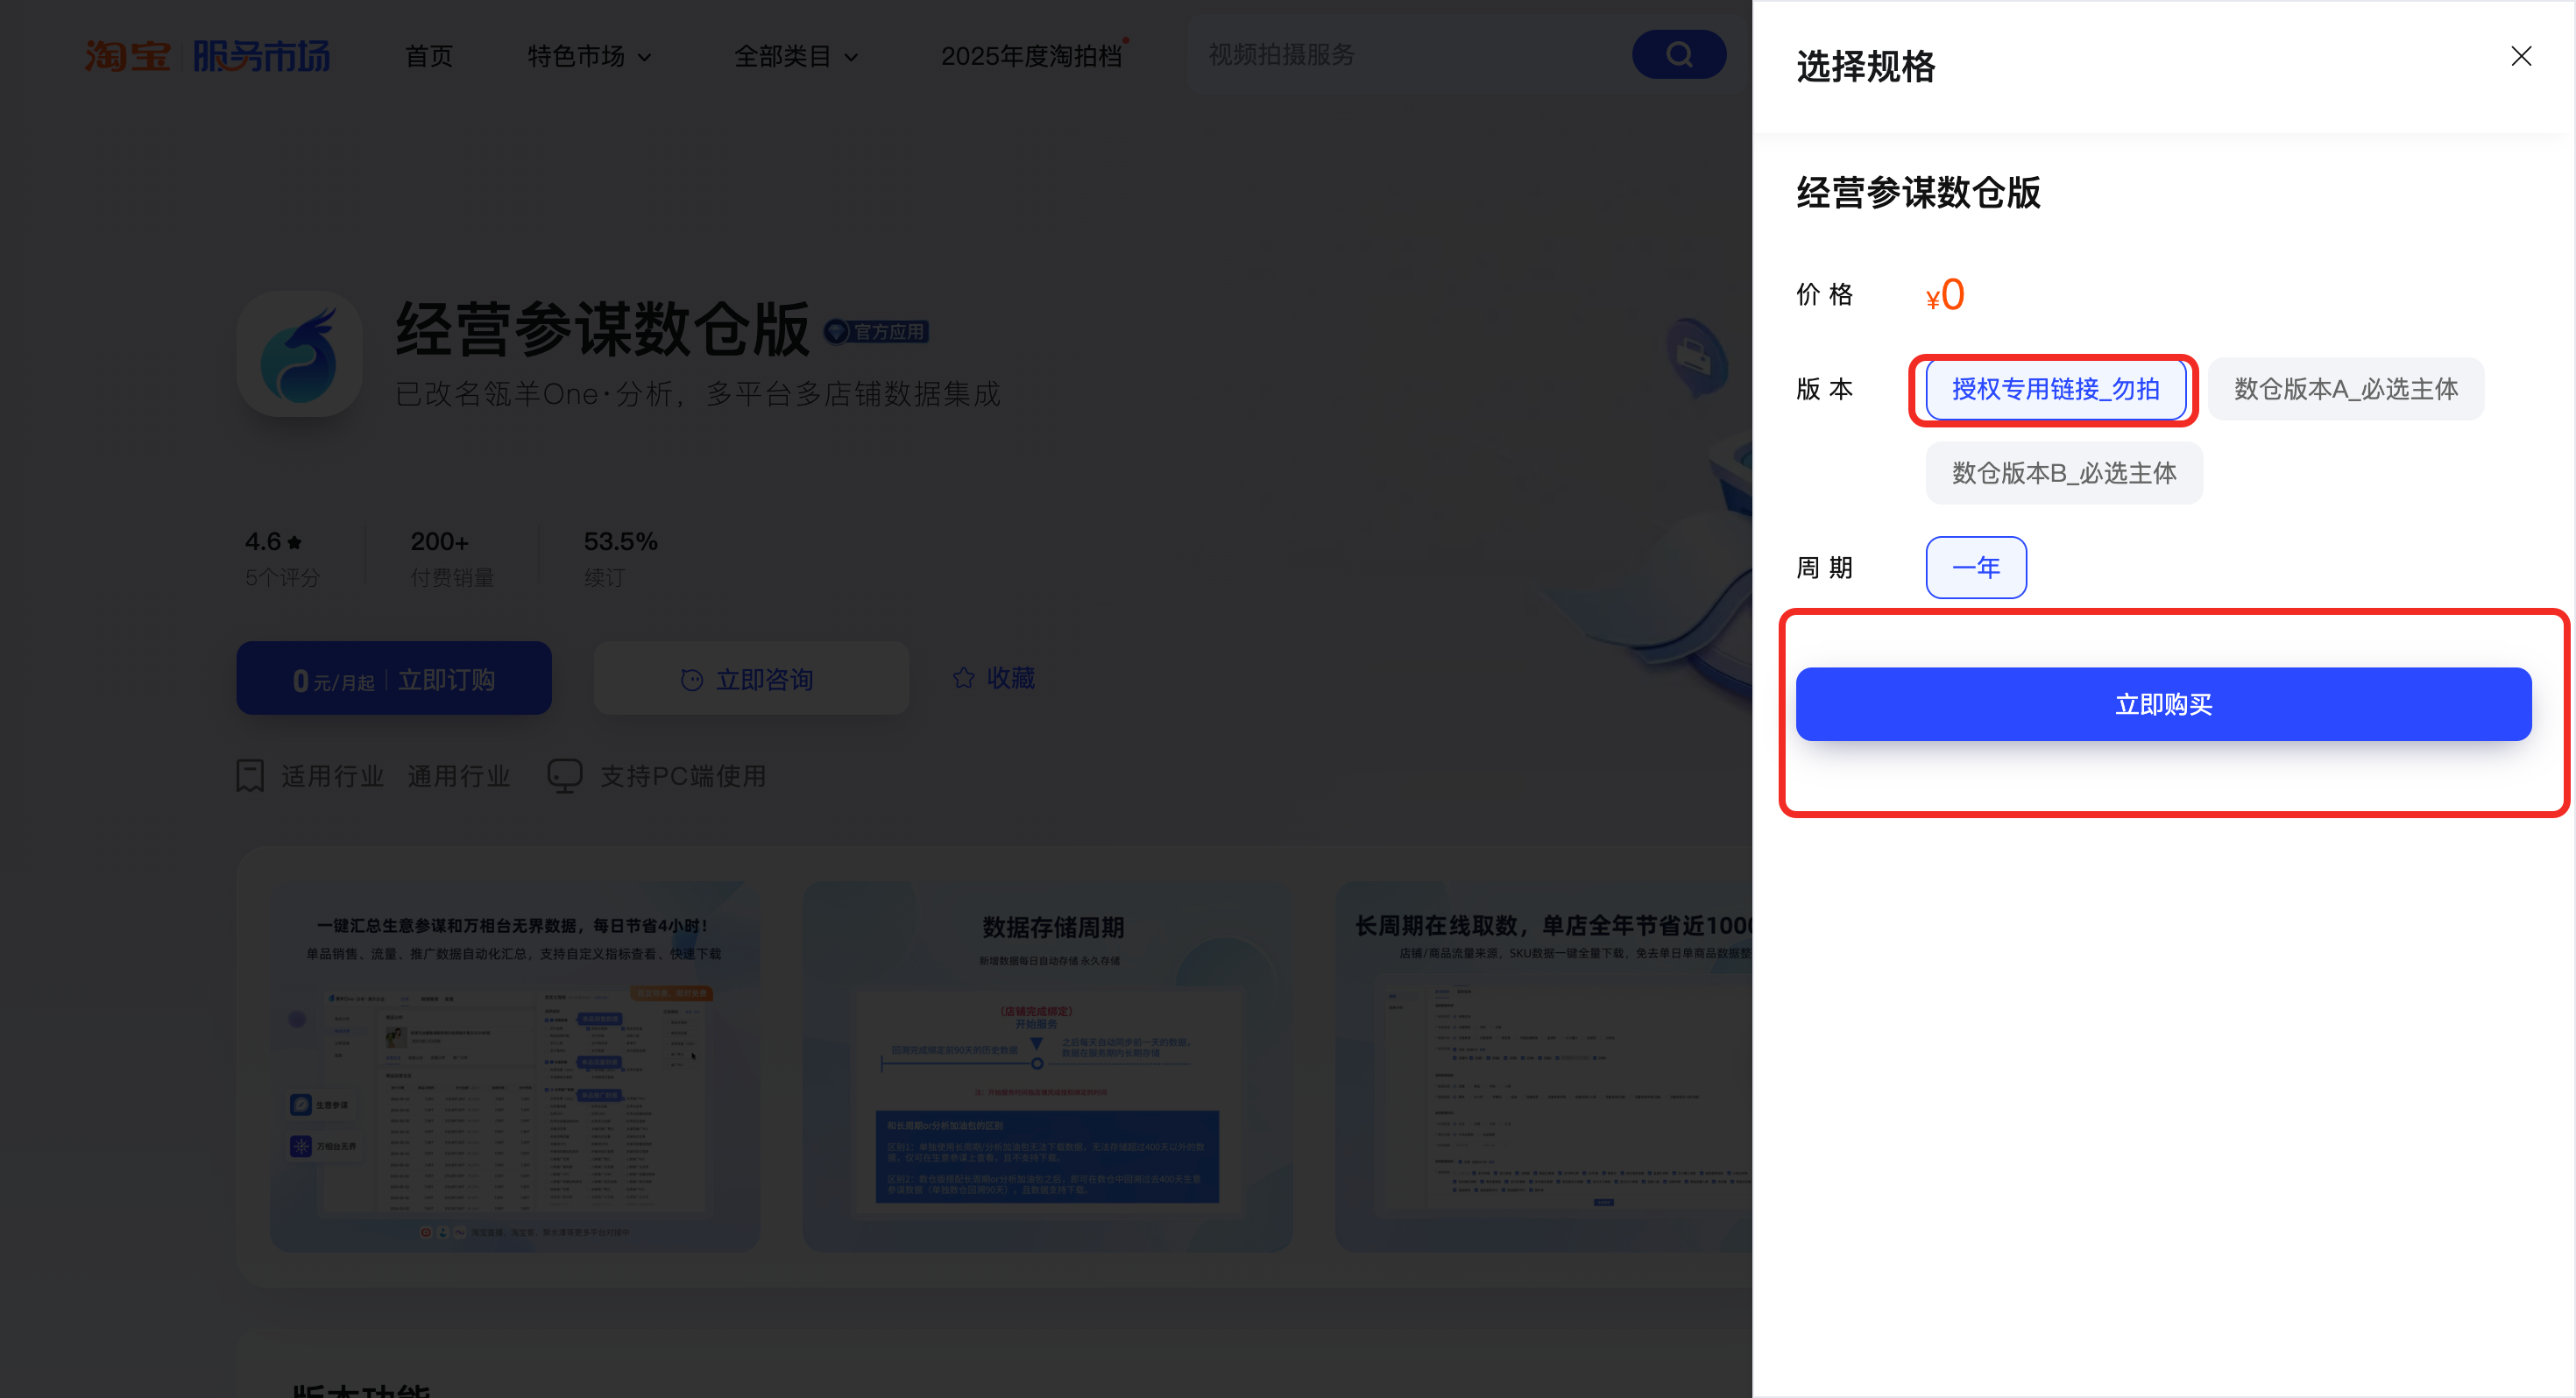
Step 3: Subscribe in the Service Marketplace
To ensure the security and compliance of your shop's data authorization, Lingyang has partnered with Taobao to update the authorization process. In addition to the existing Sycm authorization, you must subscribe to an application in the Qianniu Service Marketplace. This subscription record determines the data authorization period for your Sycm tenant. To ensure your data is synchronized, follow these steps:
Designate one of your company's Sycm-authorized shops as the primary shop. We recommend choosing a shop that you plan to operate long-term.
Using the primary shop account, click the link below to subscribe to "Marketing Data Warehouse Treasure." Select the "One Year" option for a free subscription: https://fuwu.taobao.com/ser/detail.htm?spm=a1z13.fuwu_search_result_2023.0.0.1c295acazFbRAJ&service_code=FW_GOODS-1001214808&tracelog=search&from_key=%E6%95%B0%E4%BB%93
JD.com, Douyin, and Pinduoduo authorization
Request a mobile number
To create a sub-account for data collection, you can obtain a mobile number from our platform. To apply, navigate to Data > RPA Mobile Number Application > Request Account and follow the instructions.
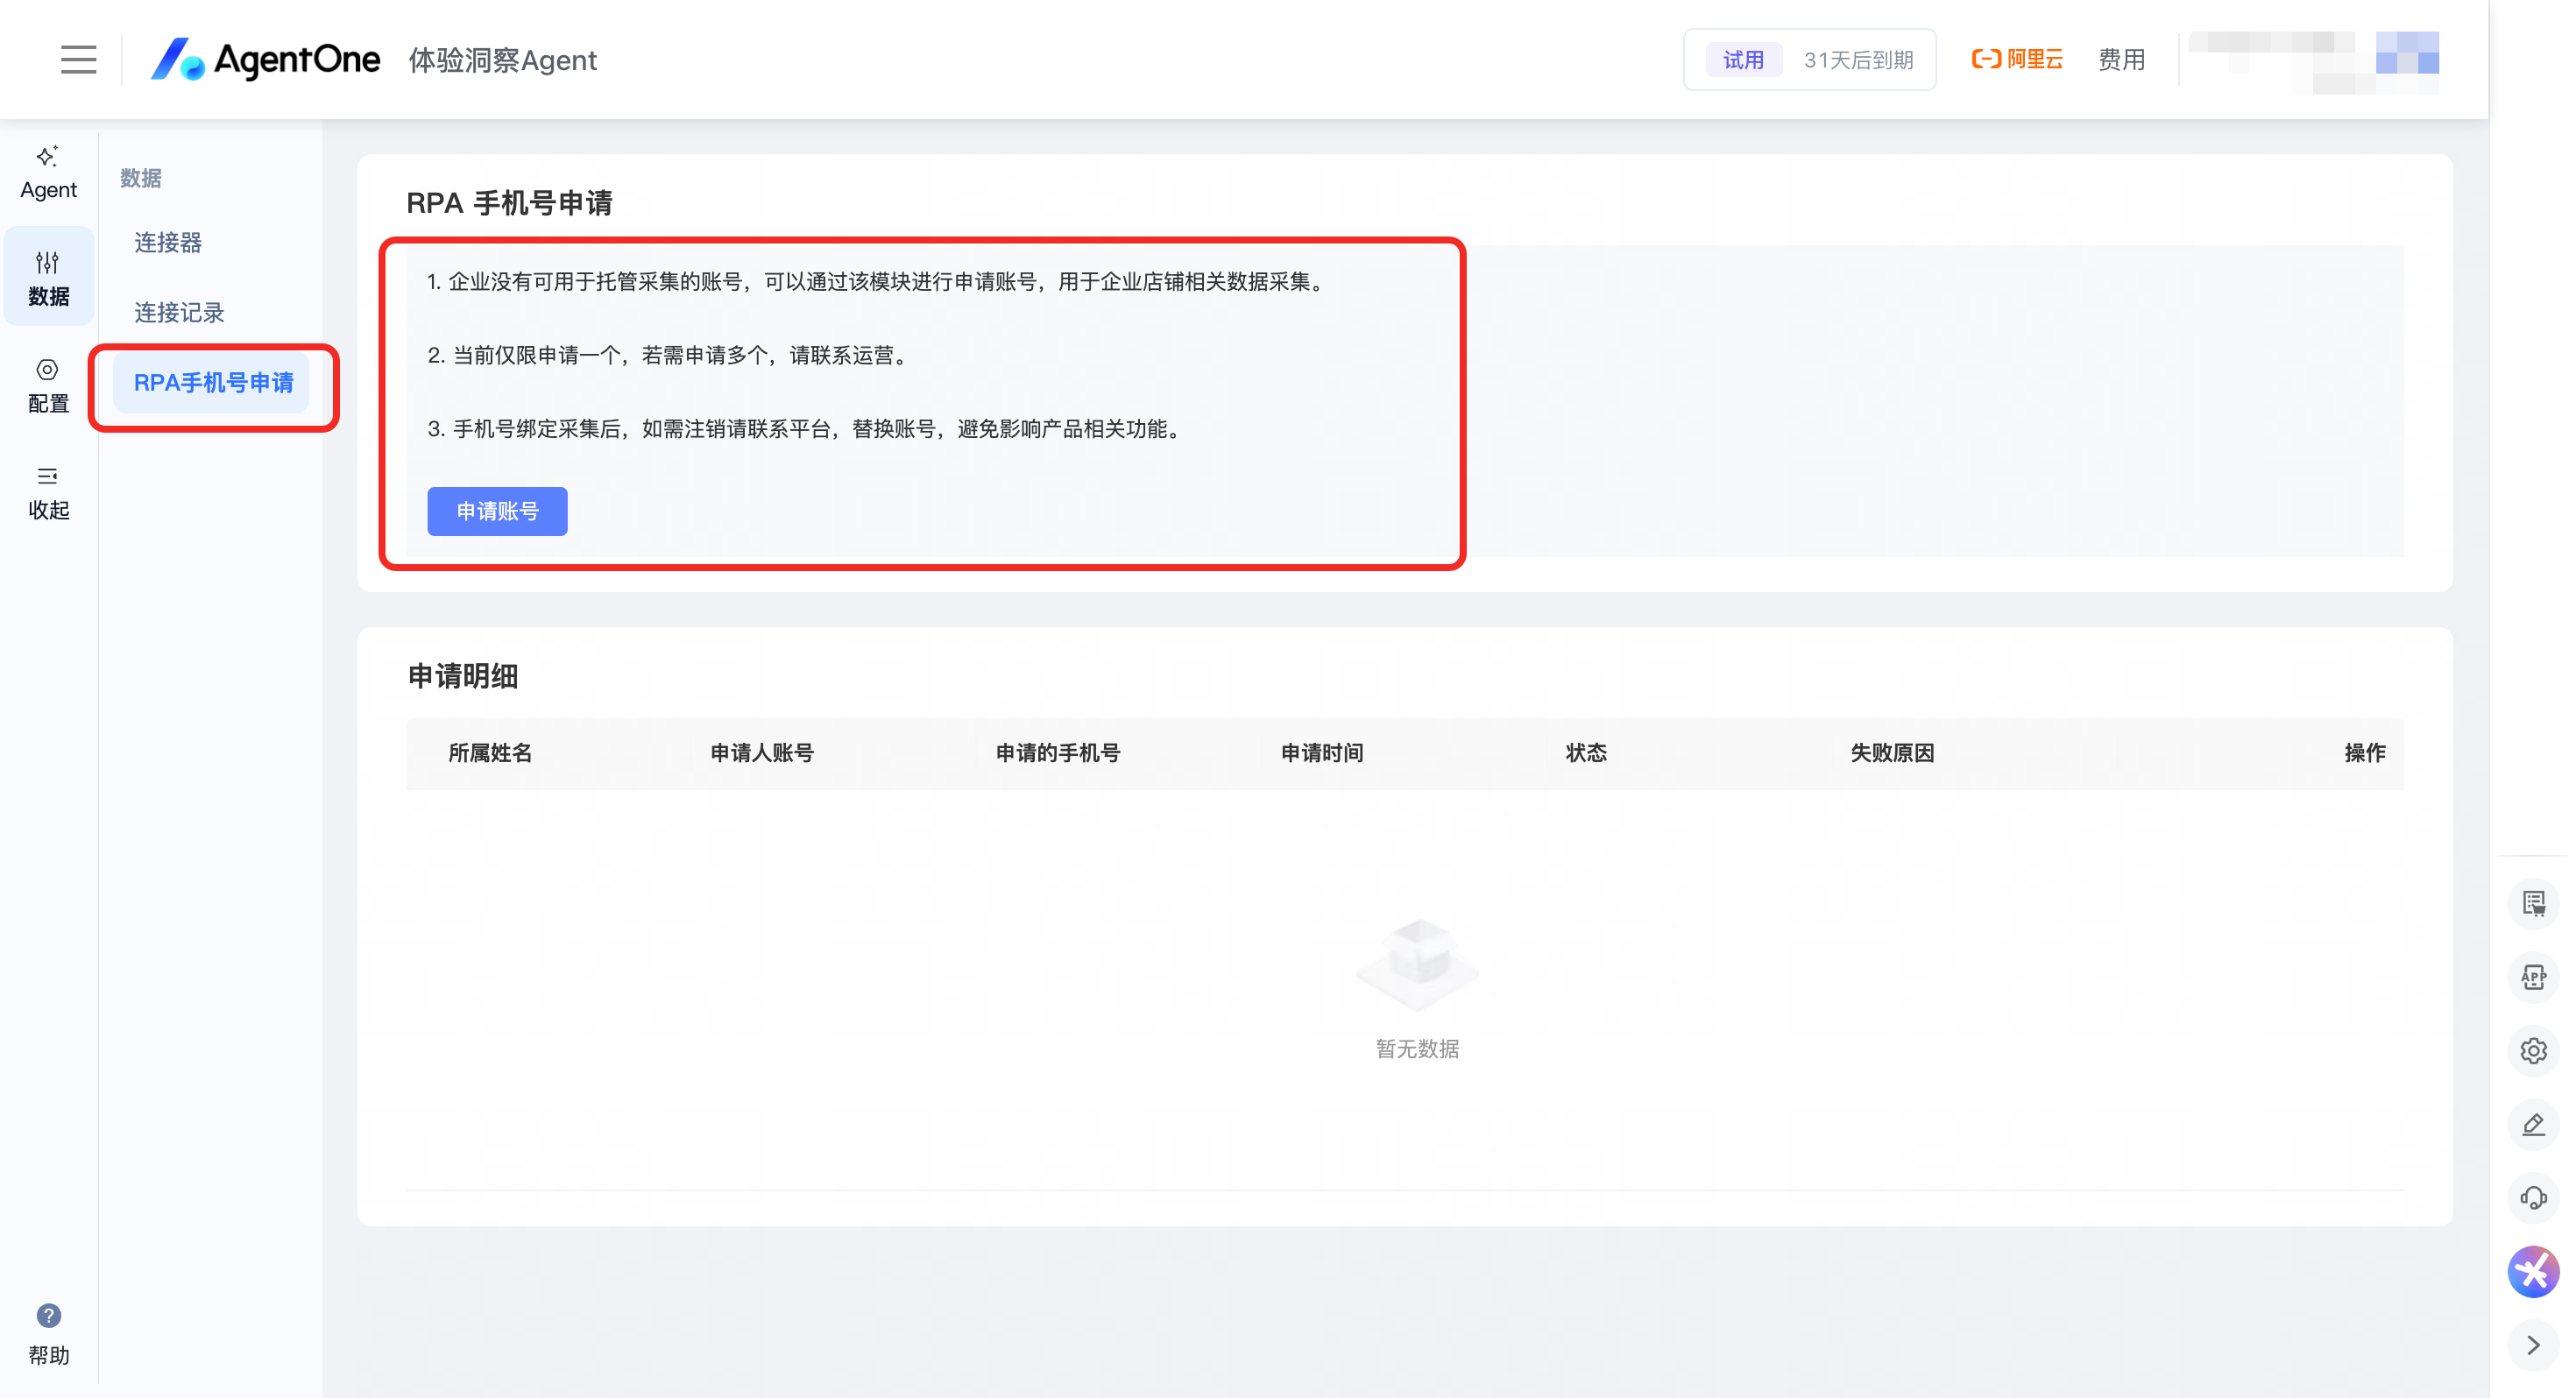
The application process takes approximately 2-3 days. After your request is approved, proceed to the "Authorization process" section.
Authorization process
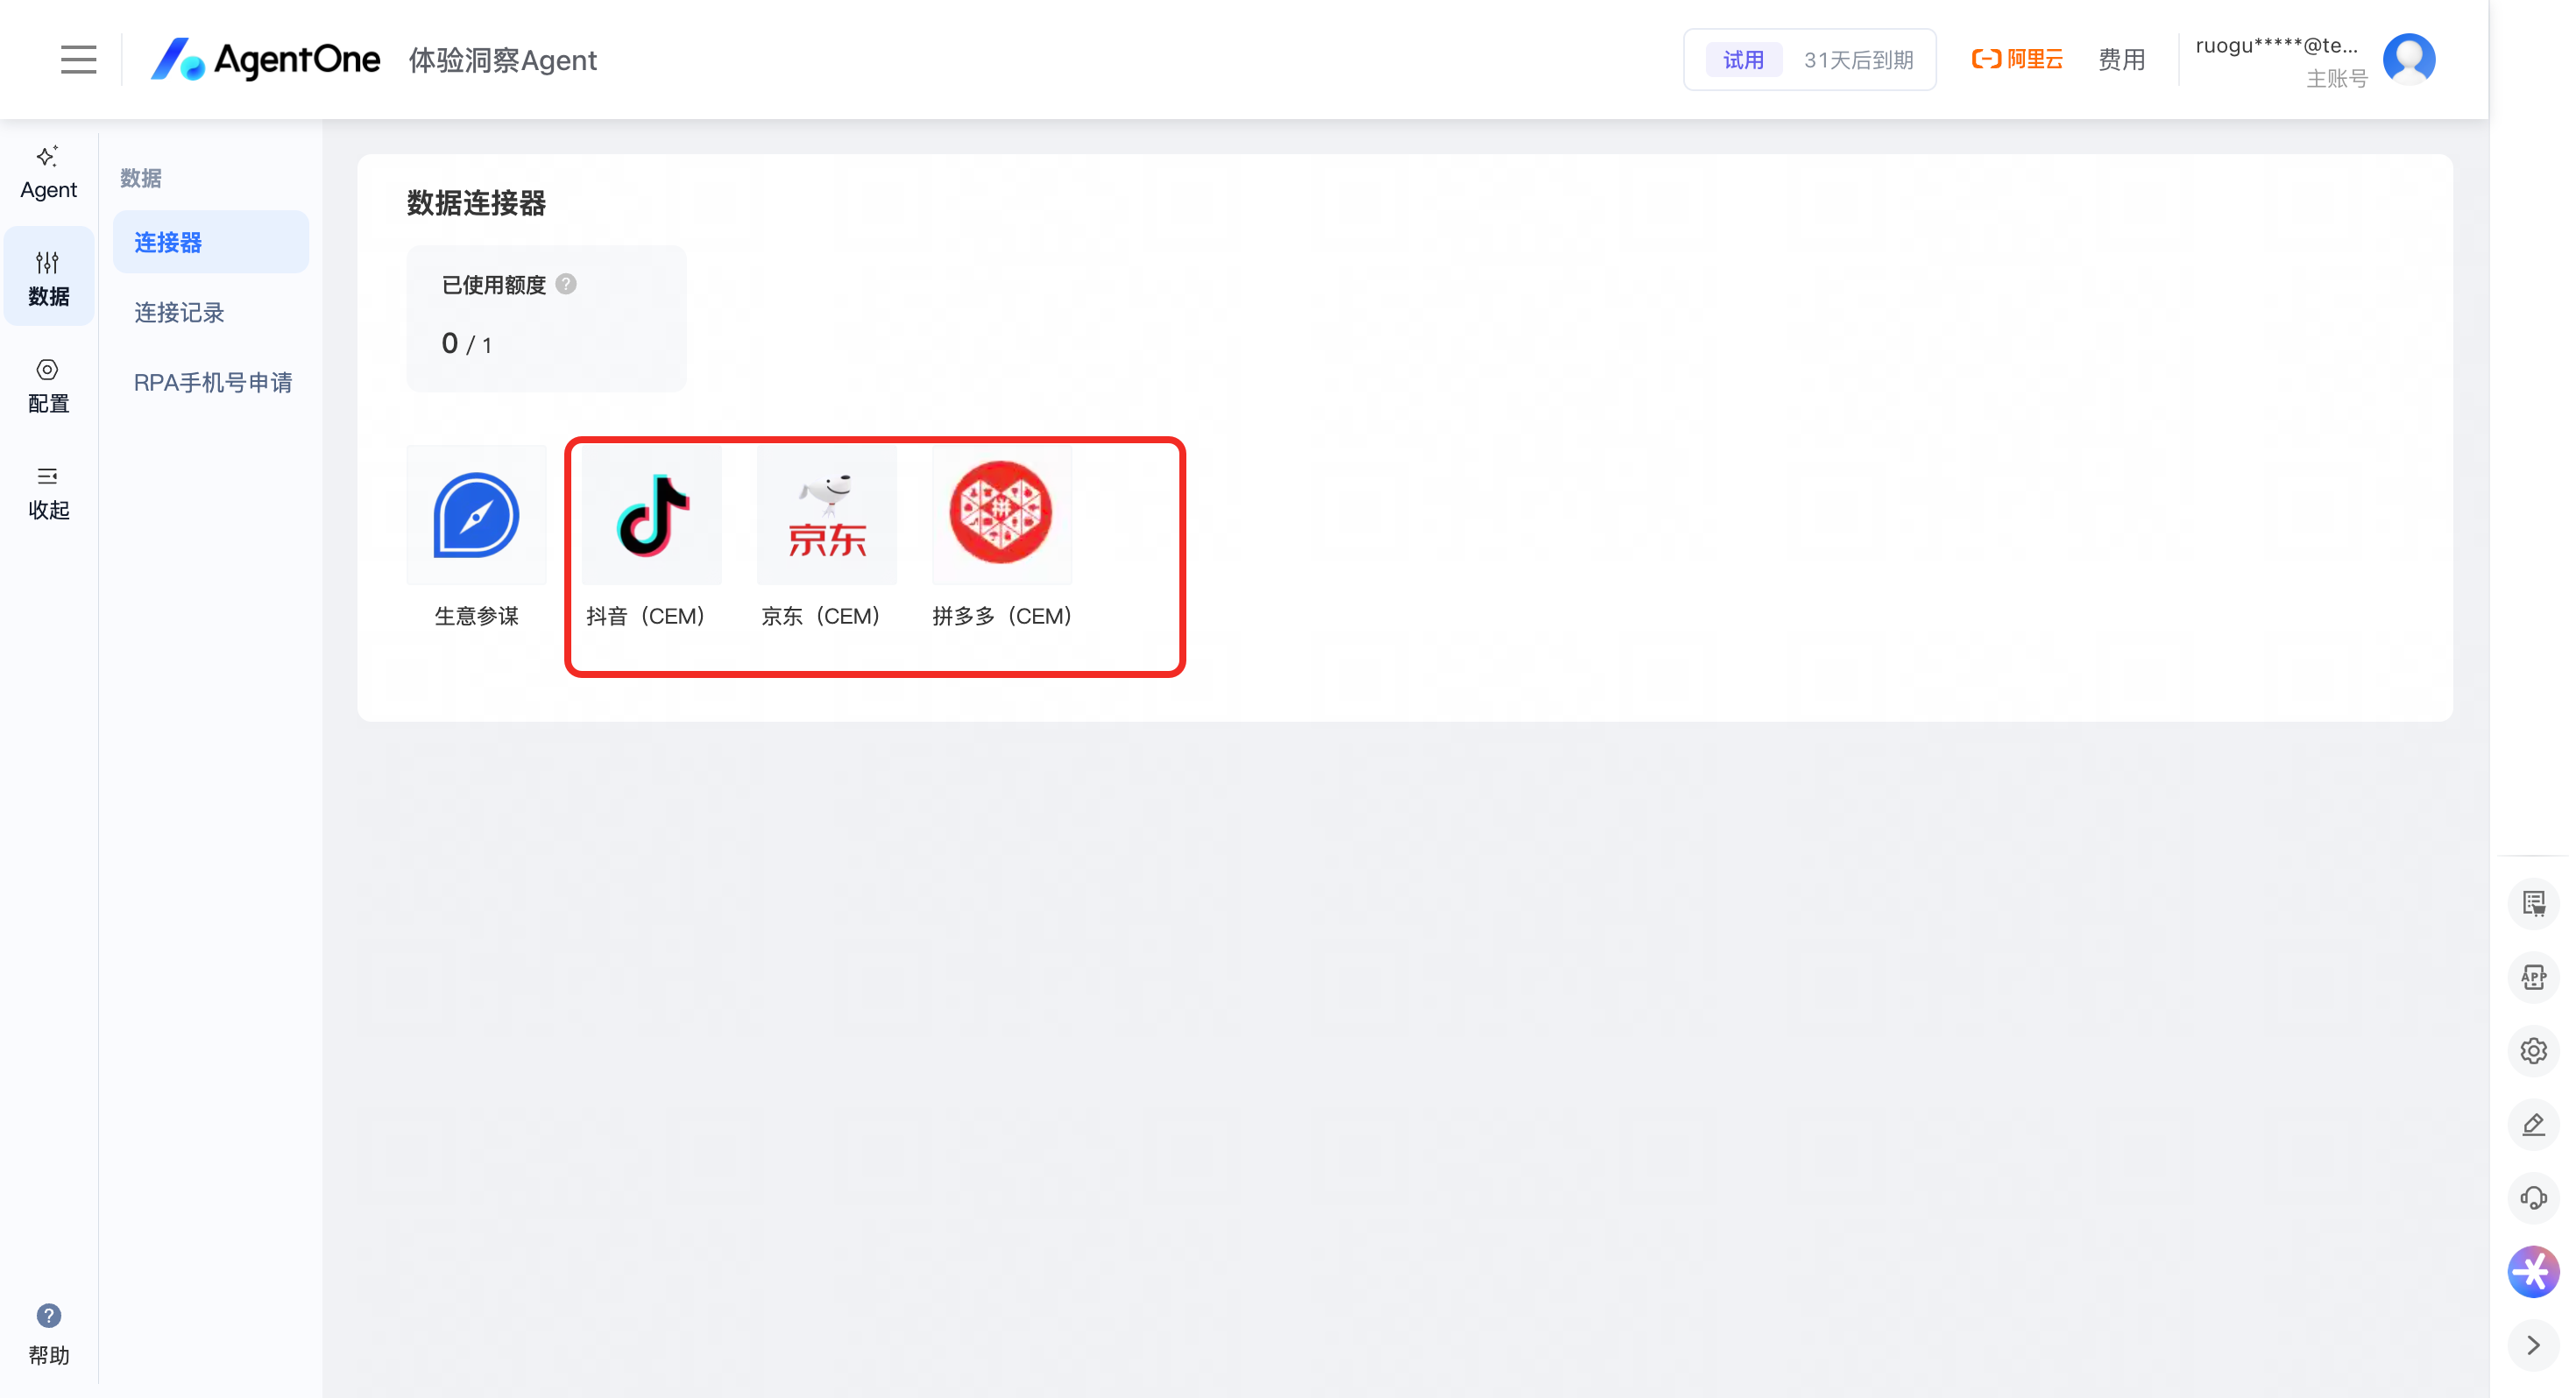
Step 1: Find the required connector
For JD.com, select: JD.com (CEM)
For Douyin, select: Douyin (CEM)
For Pinduoduo, select: Pinduoduo (CEM)
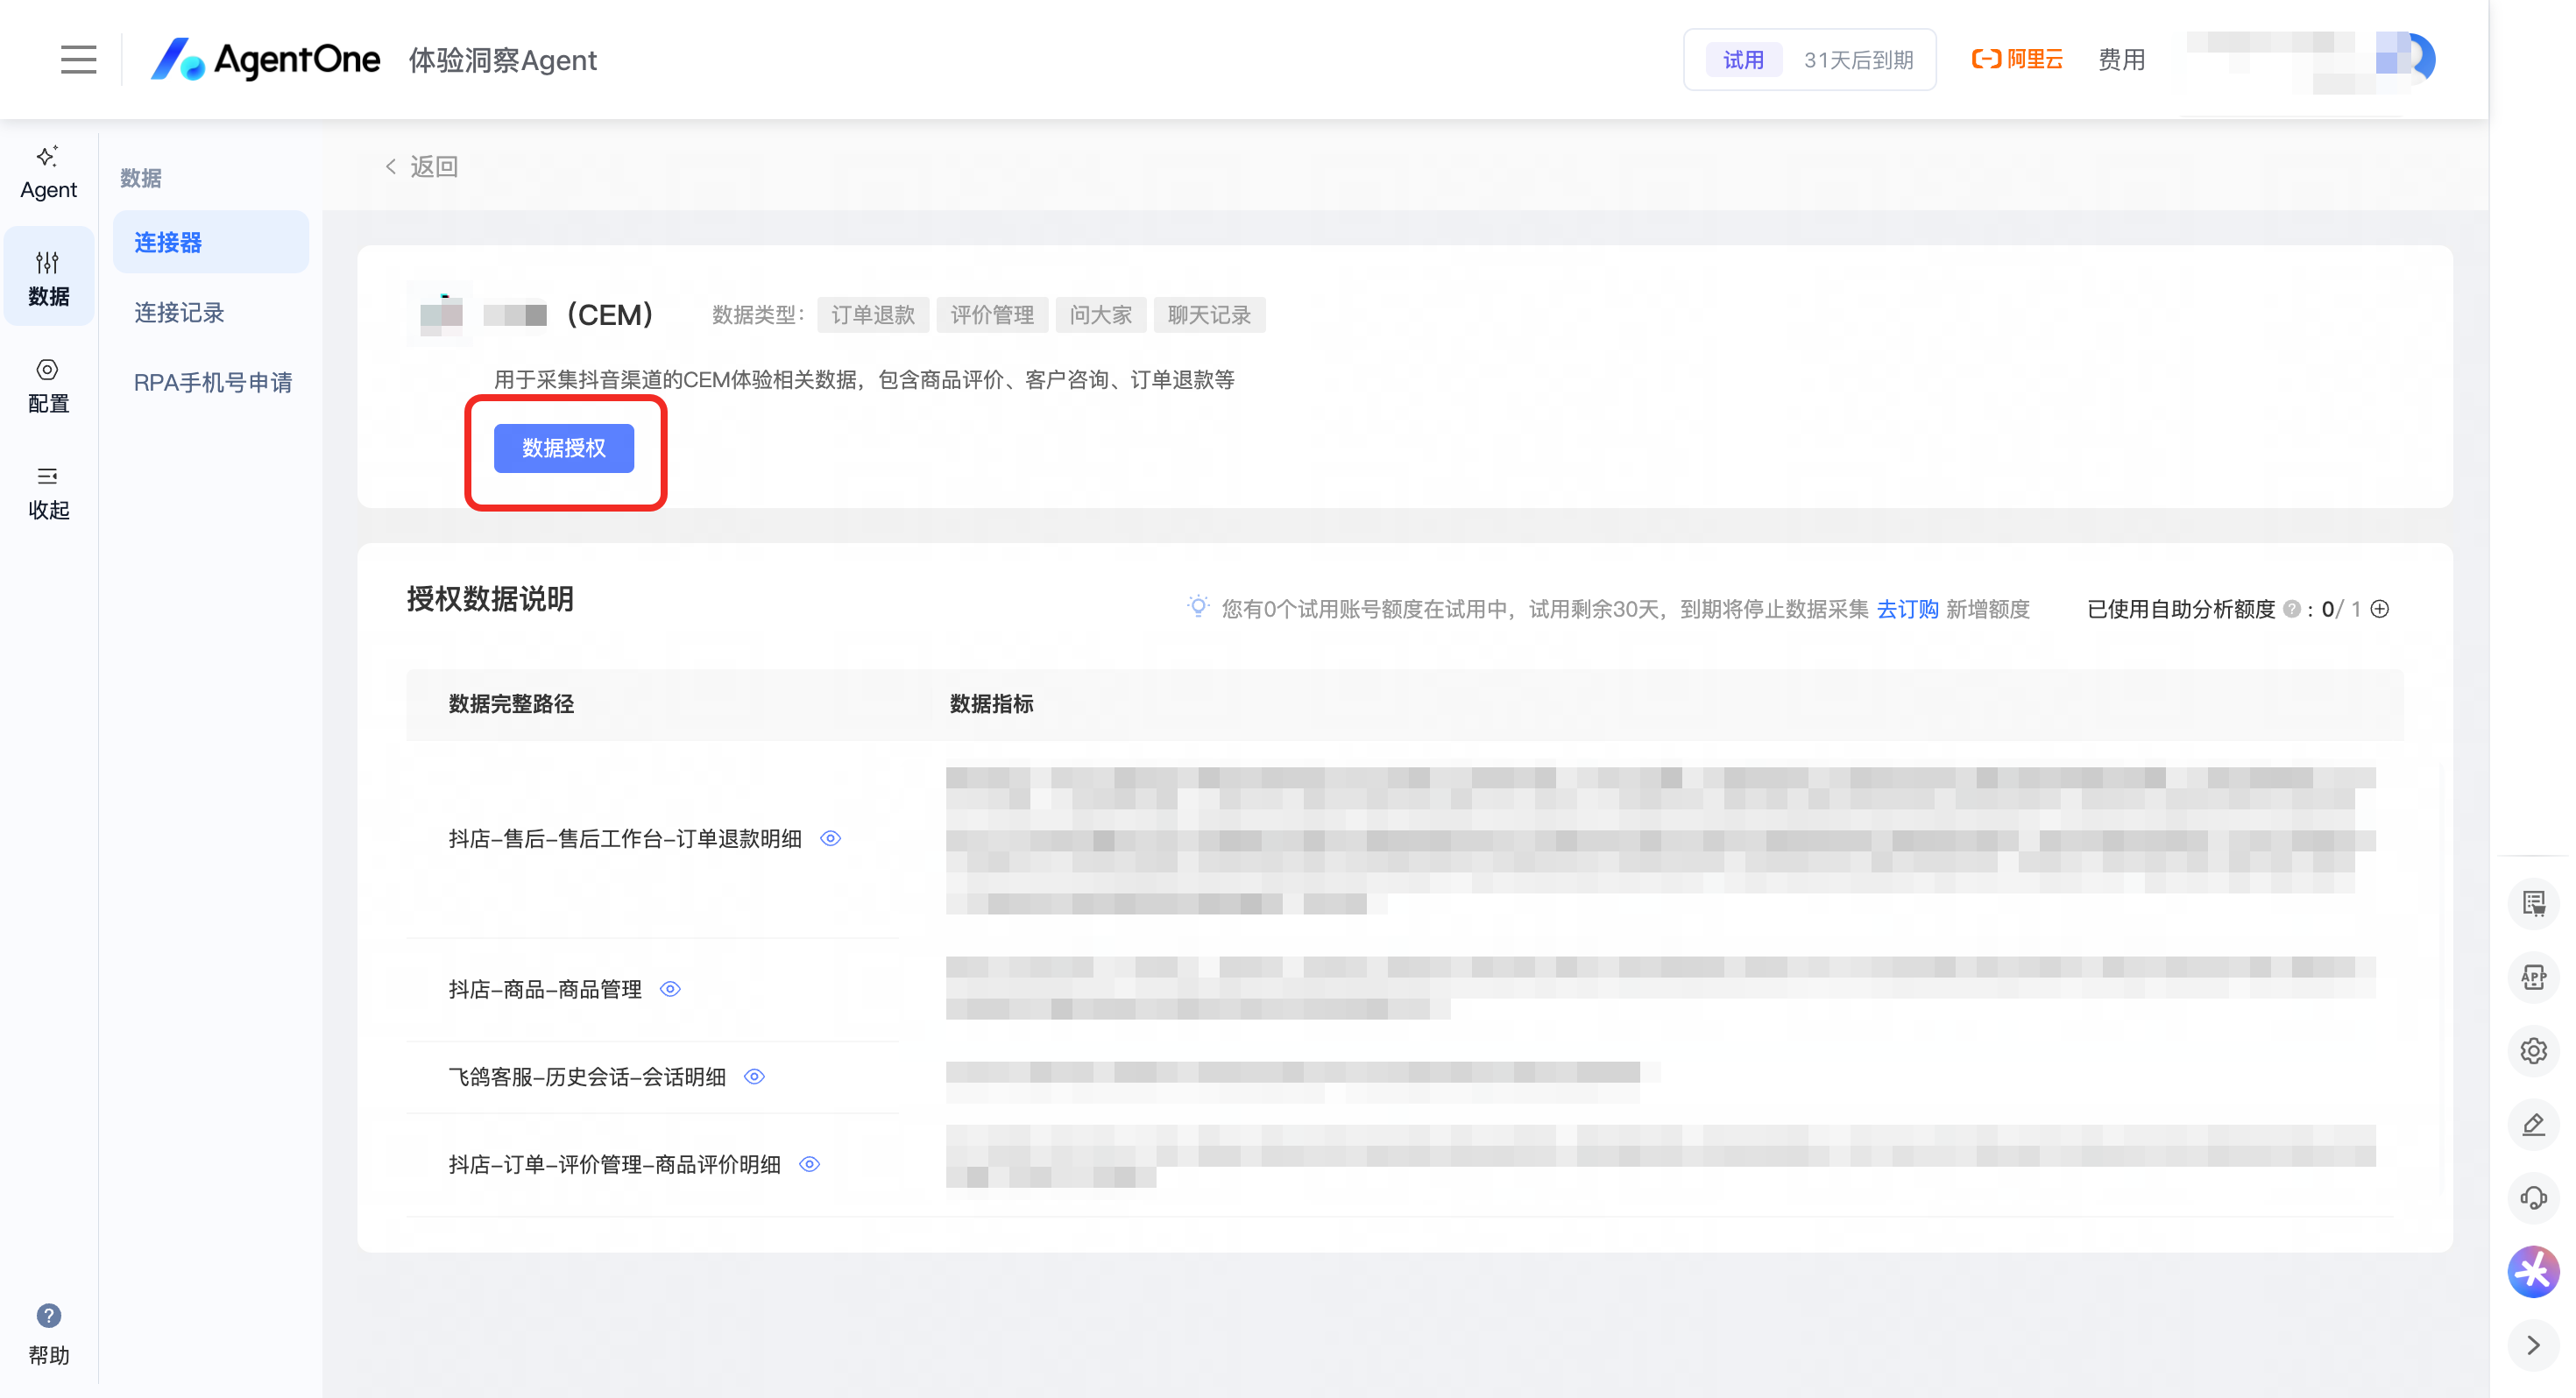
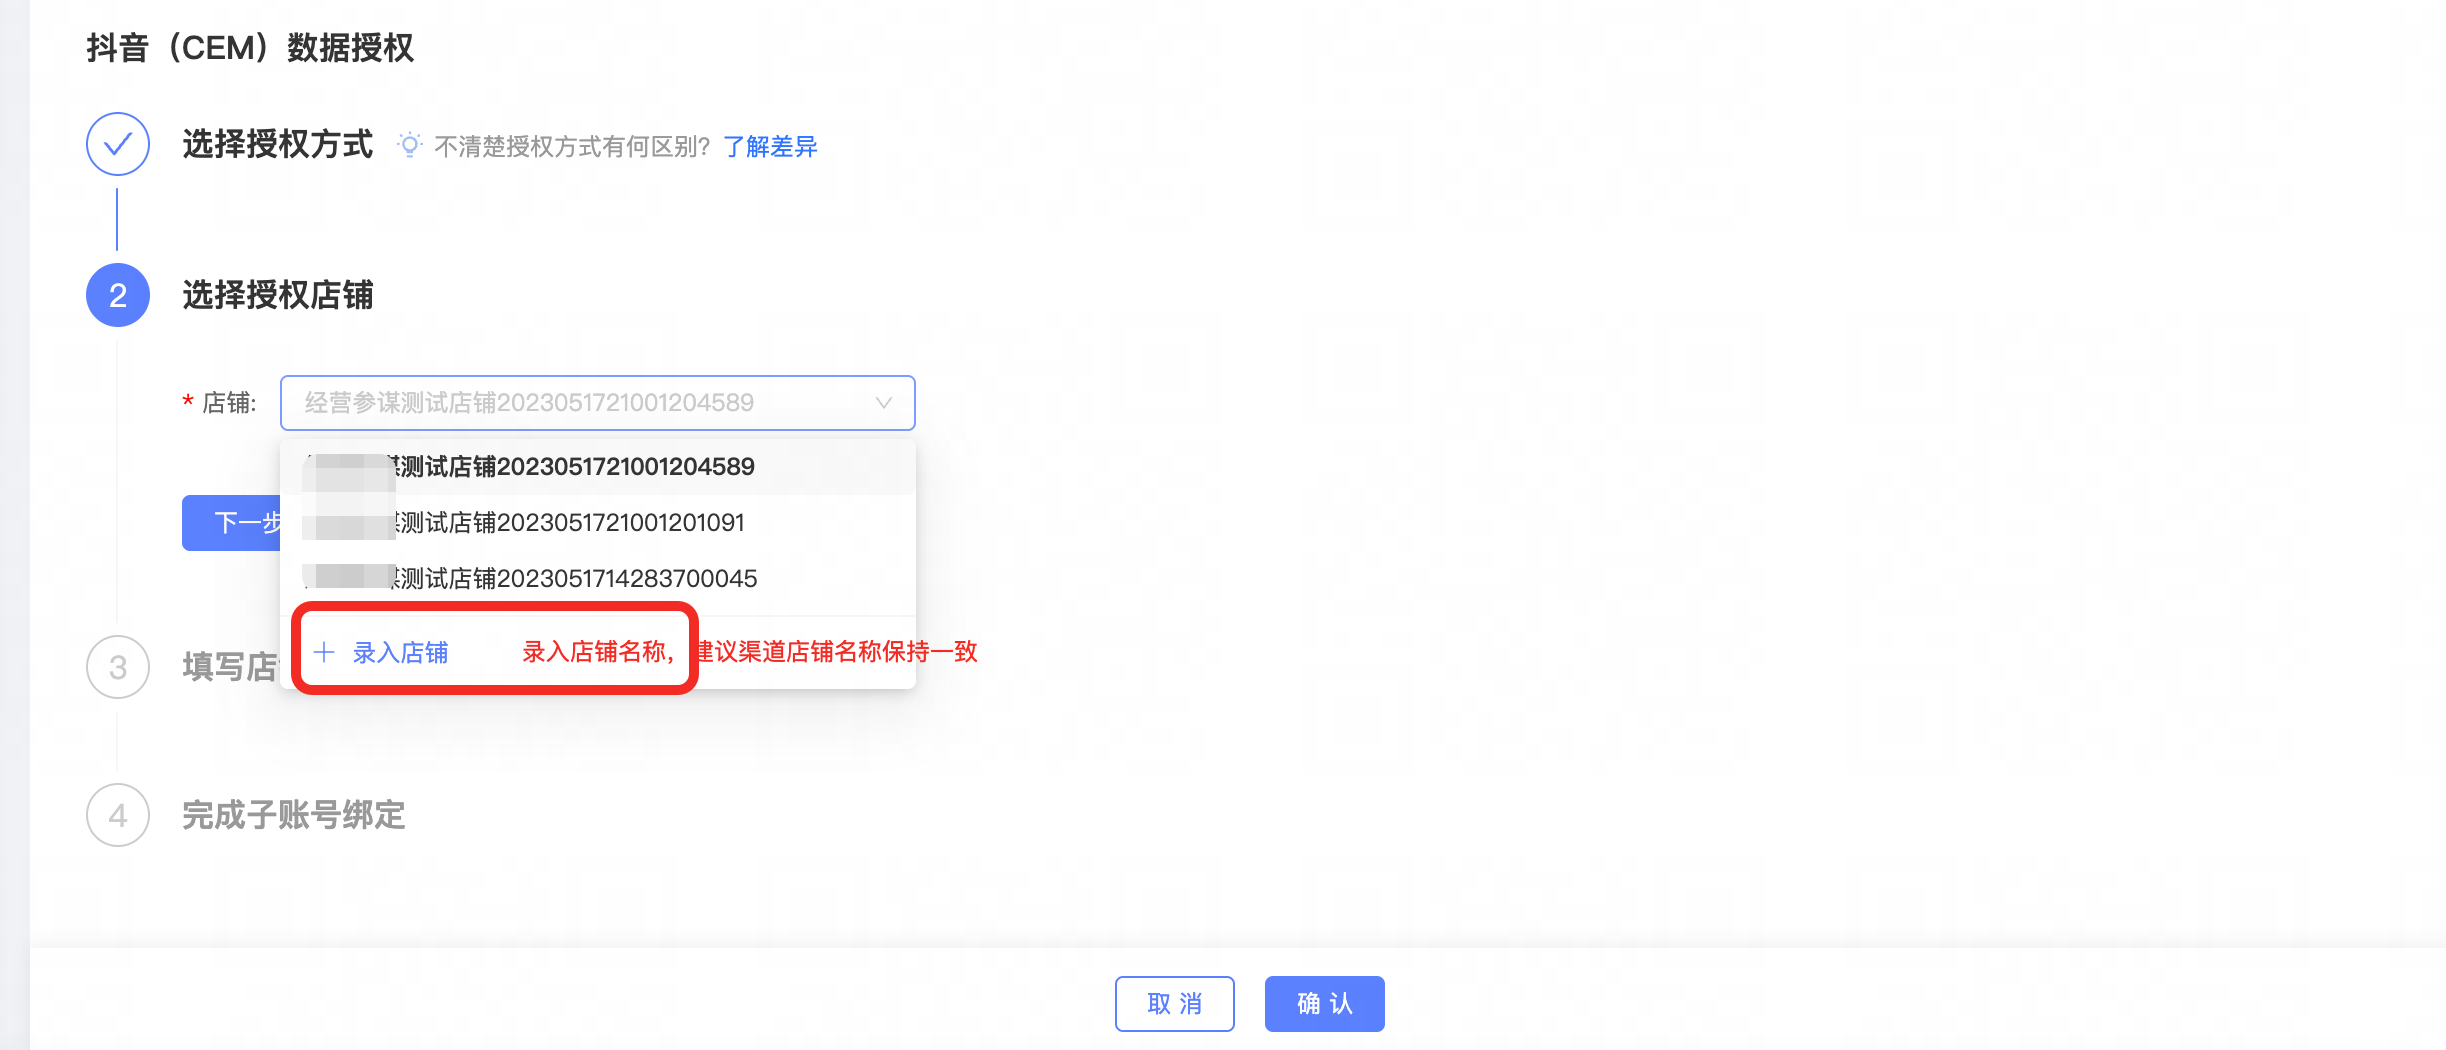
Step 2: Start shop authorization
Step 3: Select automated collection (Hosted Mobile Number)
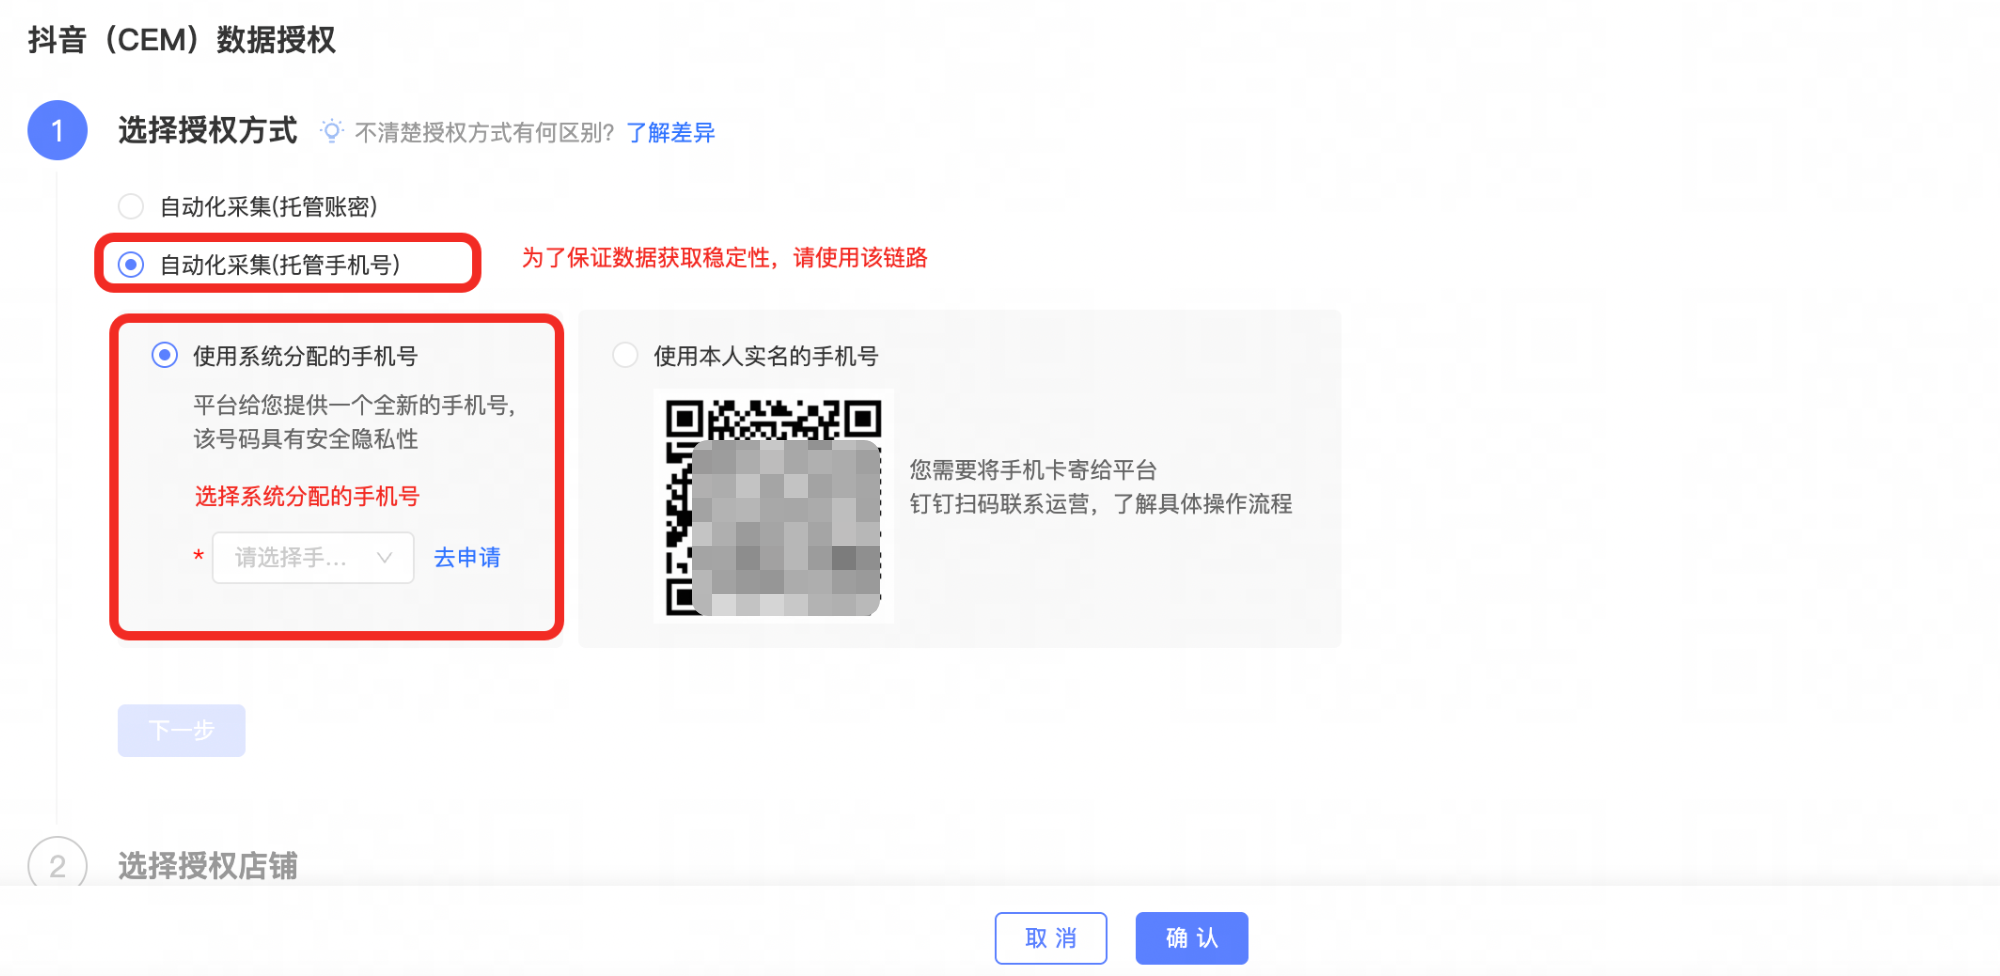
Step 4: Add your shop
Shop Name: We recommend using the same name as the shop you are connecting on the platform.
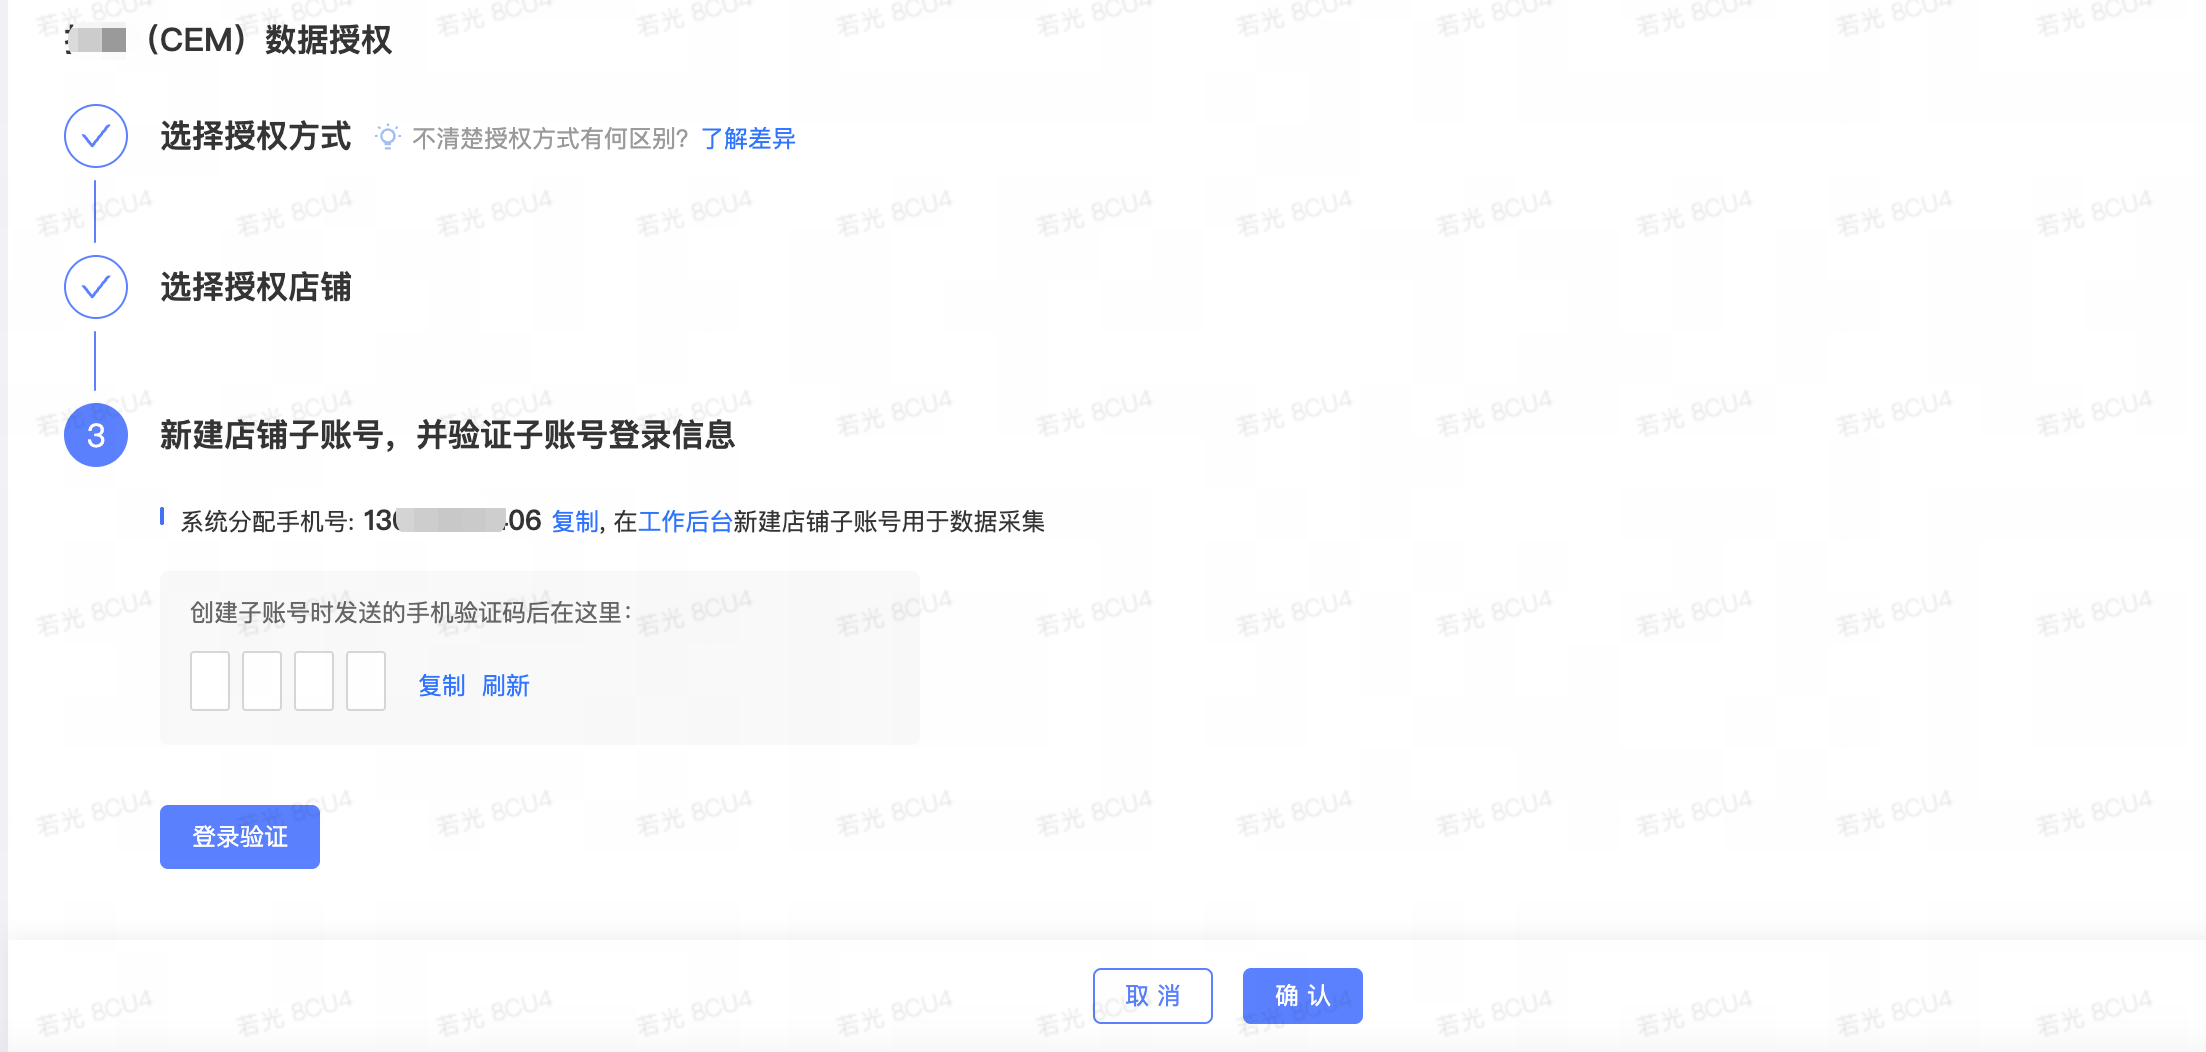
Step 5: Create a shop sub-account
Follow the system instructions to create a dedicated sub-account for RPA collection. Use the System-Assigned Mobile Number to create the sub-account in the JD.com Jingmai, Douyin D-Store, or Pinduoduo merchant admin panel. Then, for each shop under this sub-account, grant the permissions listed below:
Required permissions for JD.com Jingmai
No. |
Data source |
Business module |
Functional module |
Permissions |
Type |
1 |
JD.com—Jingmai |
Jingmai |
Account Creation |
Recommended: Create a dedicated account and password for data collection. |
/ |
2 |
JD.com—Jingmai |
Jingmai |
Product Management |
Jingmai > Product Management > Product Reviews |
Reviews |
3 |
JD.com—Jingmai |
Jingmai |
Product Management |
Jingmai > Product Management > Product Q&A |
Q&A |
4 |
JD.com—Jingmai |
Jingmai |
Product Management |
Jingmai > Product Management > Product List |
Product Information |
5 |
JD.com—Jingmai |
Jingmai |
JD Customer Service Manager |
1. Jingmai > Customer Service > Customer Service Manager 2. JD Customer Service Manager > Dongdong Search > Chat History Search |
Customer Service Chat 01 |
6 |
JD.com—Jingmai |
Jingmai |
JD Customer Service Manager |
1. Jingmai > Customer Service > Customer Service Manager 2. JD Customer Service Manager > Dongdong Search > Customer Inquiry Search |
Customer Service Chat 02 |
7 |
JD.com—Jingmai |
Jingmai |
After-sales Customer Service |
Jingmai > After-sales > Self-Service After-sales |
Refunds |
Required permissions for Douyin D-Store
No. |
Data source |
Business module |
Functional module |
Path |
Type |
1 |
D-Store Merchant Admin Panel |
Merchant Admin Panel |
Account Creation |
Recommended: Create a dedicated account and password for data collection. |
/ |
2 |
D-Store Merchant Admin Panel |
Merchant Admin Panel |
Orders |
D-Store > Orders > Review Management |
Reviews + Q&A |
3 |
D-Store Merchant Admin Panel |
Merchant Admin Panel |
Customer Service |
1. D-Store > Customer Service 2. Feige > Data > Conversation History |
Customer Service Chat 01 |
4 |
D-Store Merchant Admin Panel |
Merchant Admin Panel |
Customer Service |
1. D-Store > Customer Service 2. Feige > Conversation History > Conversation Details |
Customer Service Chat 02 |
5 |
D-Store Merchant Admin Panel |
Merchant Admin Panel |
Products |
D-Store > Products > Product Management |
Product Information |
6 |
D-Store Merchant Admin Panel |
Merchant Admin Panel |
After-sales |
D-Store > After-sales > After-sales Workbench |
Refunds |
Required permissions for Pinduoduo Merchant Admin Panel
No. |
Data source |
Business module |
Functional module |
Path |
Type |
1 |
Pinduoduo Merchant Admin Panel |
Merchant Admin Panel |
Account Creation |
Recommended: Create a dedicated account and password for data collection. |
/ |
2 |
Pinduoduo Merchant Admin Panel |
Merchant Admin Panel |
Products |
Pinduoduo Merchant Admin Panel > Product Management > Review Management |
Reviews |
3 |
Pinduoduo Merchant Admin Panel |
Merchant Admin Panel |
Products |
Pinduoduo Merchant Admin Panel > Product Management > Product List |
Product Information |
4 |
Pinduoduo Merchant Admin Panel |
Merchant Admin Panel |
Orders |
Pinduoduo Merchant Admin Panel > Shipping Management > Order Lookup |
Order Information |
5 |
Pinduoduo Merchant Admin Panel |
Merchant Admin Panel |
Customer Service |
Pinduoduo Merchant Admin Panel > Duoduo Customer Service > Chat History |
Customer Service Chat |
6 |
Pinduoduo Merchant Admin Panel |
Merchant Admin Panel |
After-sales |
Pinduoduo Merchant Admin Panel > After-sales Management > After-sales Workbench |
Refunds |
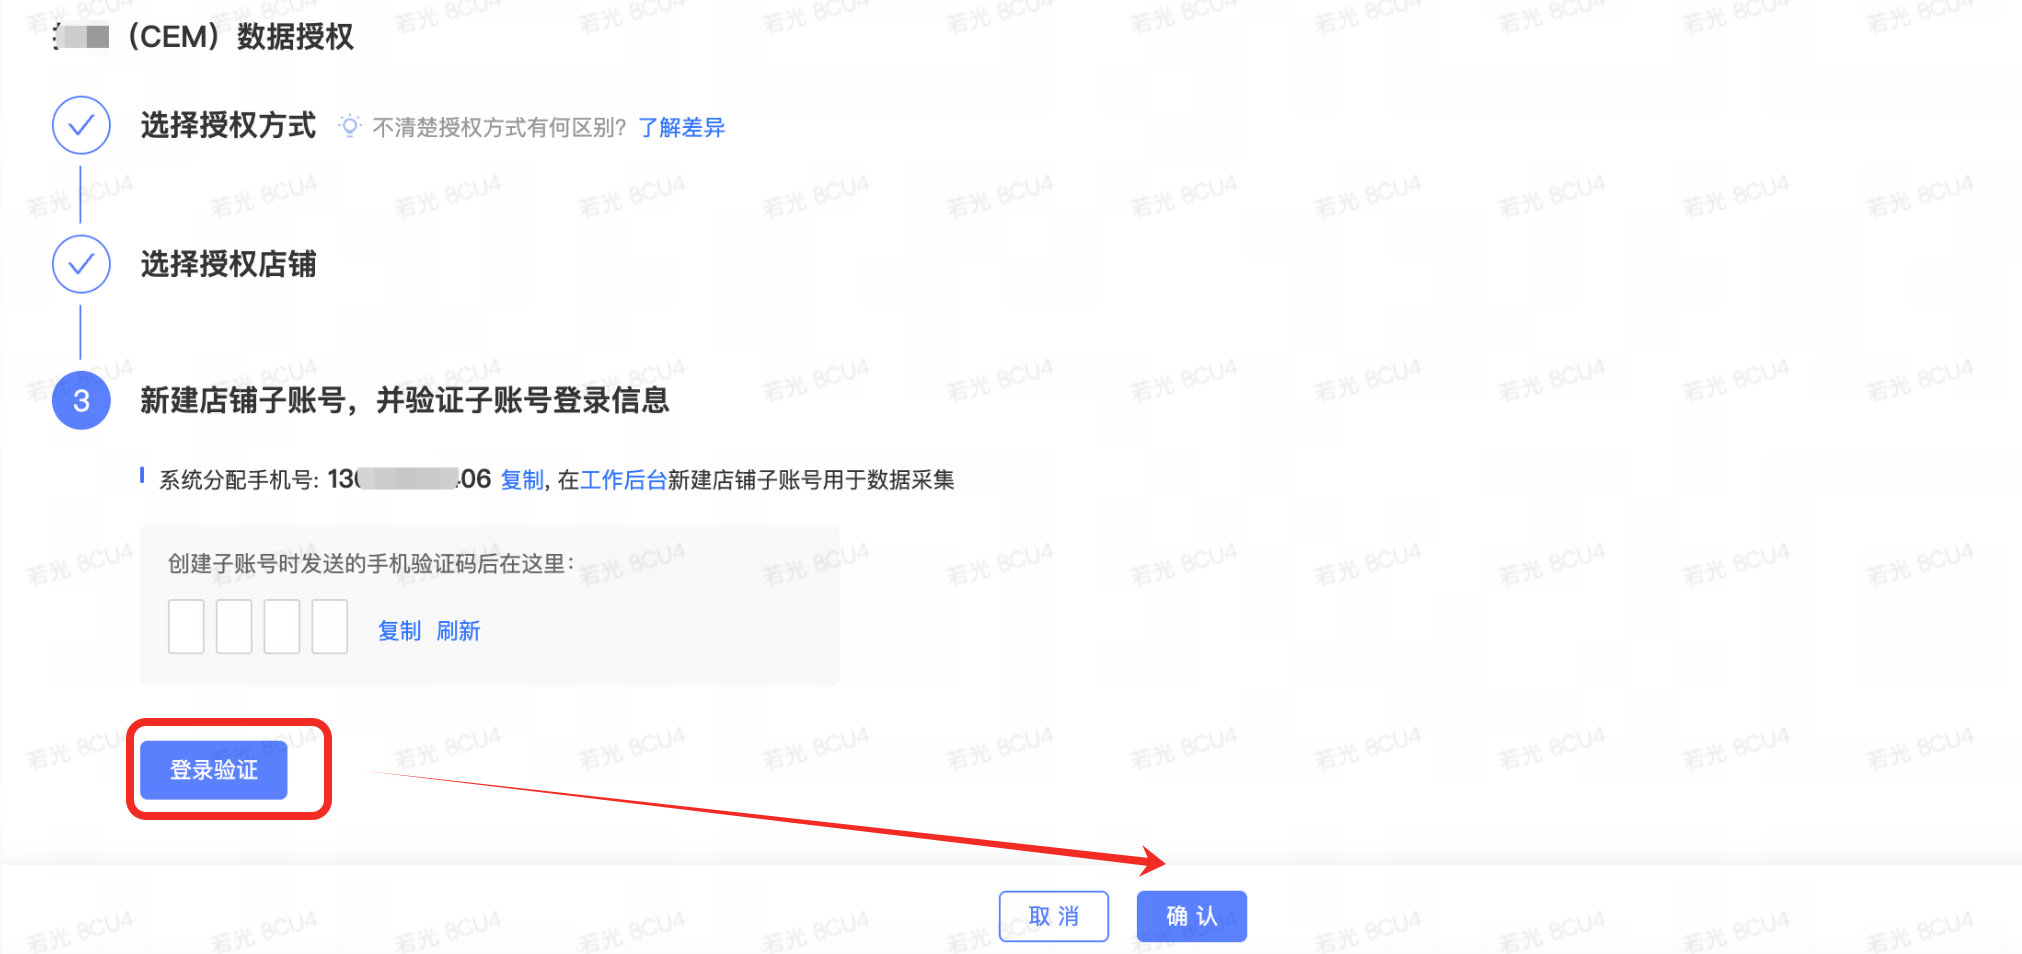
Step 6: Verify login and complete authorization
After creating the sub-account, click Login Verification to complete the authorization. Once verification is successful, click Confirm. A credit will be used from your account.
Note: We recommend checking the data connection status the following day (T+1).