This feature is available only to paid customers and is no longer sold to new customers.
The Customer Resources feature lets you manage customers, unassigned customers, and customer groups.
Customer
In Customer Management, you can view basic information for customers added by sales associates, edit customer tags, and assign sales associates.
Customer List
The customer list shows the customer's name, phone number, assigned sales associate, assigned outlet, and the time they were added. A customer can be friends with multiple sales associates on WeCom. However, a customer is assigned to only the first sales associate they add as a friend. This sales associate is referred to as the customer's assigned sales associate. Other sales associates are considered regular friends.
Associated outlets are the outlets of all sales associates who are friends with the customer. A customer can be associated with multiple outlets.
The "time added" indicates when the customer and the assigned sales associate became connected. You can sort the list by this time.
You can click a customer's name to go to the Social Interaction backend and view their details.
Search and filter the customer list
You can search by customer name, phone number, or assigned sales associate. The customer name search supports fuzzy match. The phone number search requires an exact match. The assigned sales associate search supports fuzzy match.
You can expand the filter options to filter by the customer's associated outlet, tags, or status.
After setting the filter conditions, click Query to display the results. You can click Reset to clear all filter conditions.
Edit customer tags
You can edit tags for a single customer or for multiple customers in a batch. To edit tags for a single customer, click the Edit Tags button in the list. To edit tags for multiple customers, select the customers and click the Edit Tags button under Business Operations in the upper-left corner of the list.
Tags are created in the Social Interaction backend.
Reassign a sales associate to a customer
You can reassign a customer to a different sales associate, but only to a sales associate who is on the customer's friends list. For example, if a customer has added multiple sales associates as friends, you can assign the customer to any of them. After the assignment, the customer's relationship is transferred to the new sales associate. If a customer has only one sales associate as a friend, they cannot be reassigned.
When a customer removes a sales associate from their friends list, the relationship changes as follows:
If the sales associate was the customer's only friend, the sales associate can no longer contact the customer. The sales associate must send a new friend request. The backend marks the customer as lost.
If a customer with multiple sales associate friends removes their assigned sales associate, the system automatically assigns the customer to another sales associate on their friends list.
If a customer has multiple sales associates as friends and removes one who is not their assigned sales associate, the assignment remains unchanged.
Miniapp Customer Management
On the miniapp frontend, sales associates can view all customers who have added them as friends. From the customer list, they can perform quick operations, such as sending broadcast messages, distributing coupons, and creating customer groups. Click a customer's name to view their profile. On the customer profile page, you can add tags and notes, send coupons, and start a chat.
Click a customer's name to open the customer details page. On this page, you can view the customer's detailed properties. Sales associates can edit this information. The details page also displays the customer's associated outlets, the time they were assigned to the sales associate, and their exclusive sales associate.
Unassigned Customers
An unassigned customer is a customer who appears in the User Operations application but has not been added as an external contact by a sales associate. For example, a customer may be unassigned if they provided authorization information through the Smart Retail miniapp or were imported by the brand.
Scenario: Assign unassigned existing customers to a sales associate for outreach.
Query and filter unassigned customers
Querying and filtering by customer status
You can query the assignment status of all customers. There are three statuses: Unassigned, Assigned, and Unreachable.
Unassigned: A customer who has not yet been assigned to a sales associate.
Assigned: A customer who has been assigned to a sales associate in the backend and is waiting for the sales associate to add them as a friend.
Unreachable: A customer who has been assigned to a sales associate but cannot be reached. A sales associate can mark the customer as "Unreachable" in the miniapp.
To view the reason a customer is unreachable, filter for customers with the Unreachable status. Then, hover over Unreachable in the Customer Status column for that customer. The reason entered by the sales associate in the miniapp is displayed.
To query or filter by customer status, select a status, such as Unassigned, Assigned, or Unreachable, from the customer status bar and click Query to display the corresponding customers.
To cancel the query or filter, click Reset.
Querying and filtering
You can search by Assigned Sales Associate to find customers who are assigned to a specific sales associate.
You can filter by customer tags to find unassigned customers with specific tags.
You can filter by customer status to find customers who are unassigned, assigned, or unreachable.
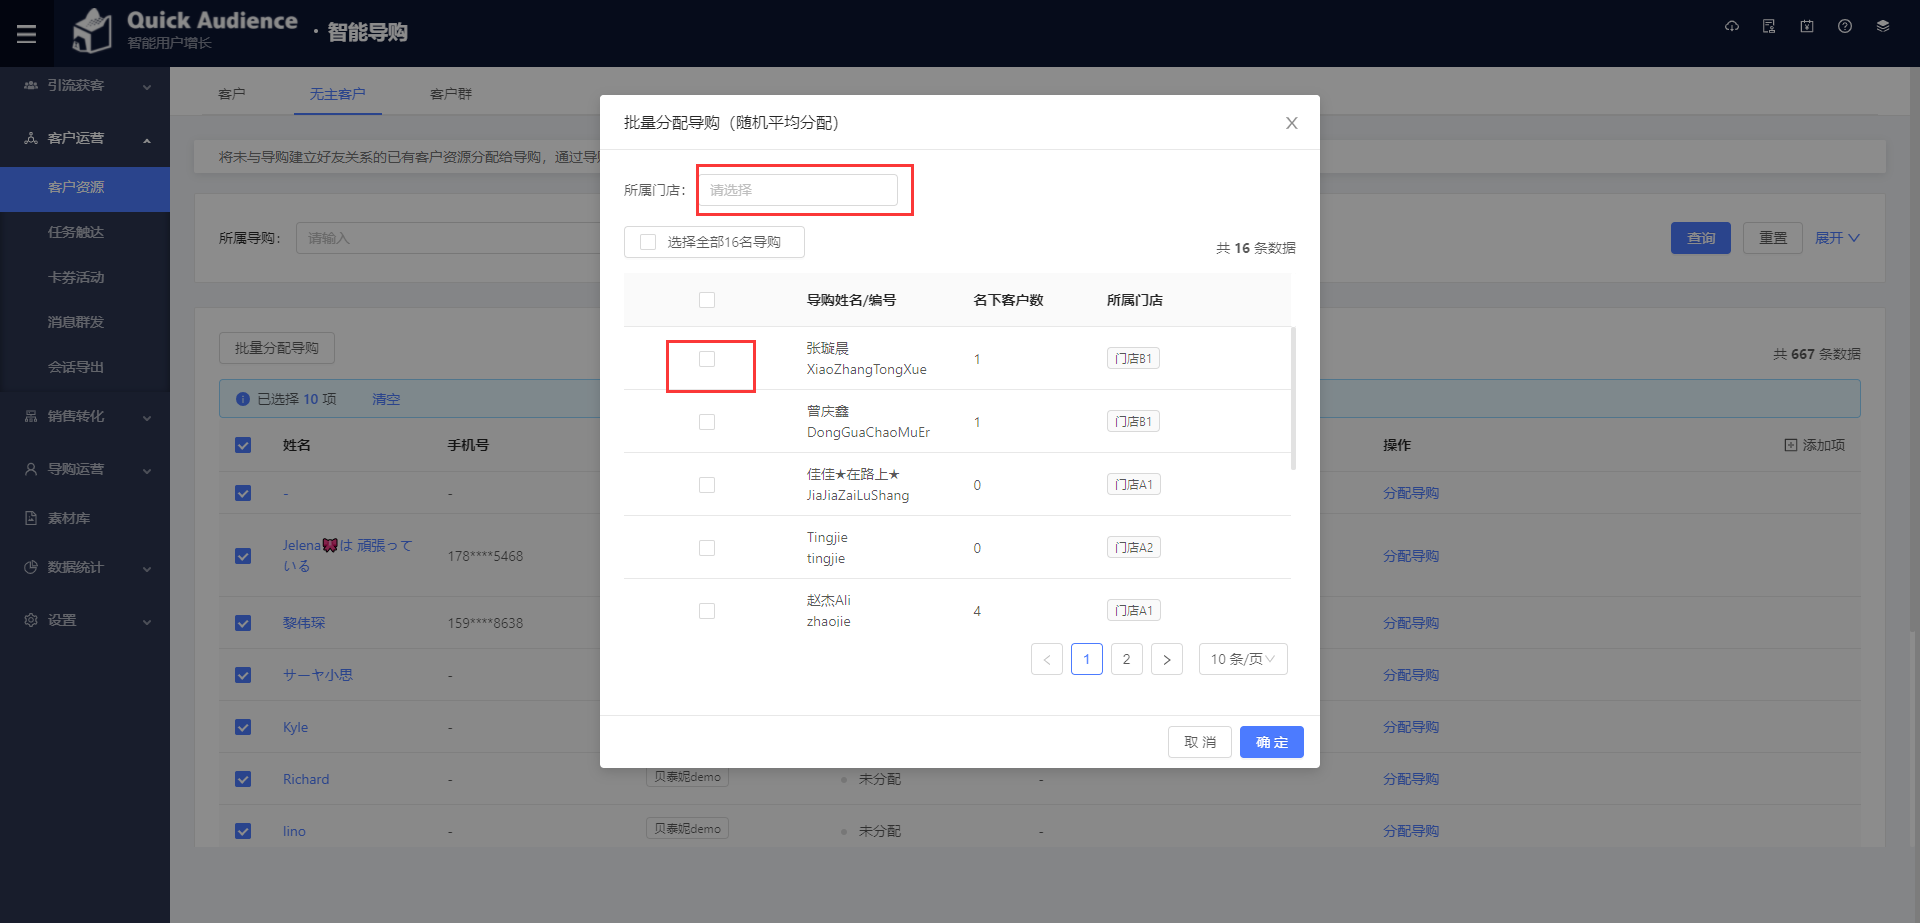
Assign a sales associate
To assign a single customer: Click Assign Sales Associate in the row for that customer.
Filter sales associates by Assigned Outlet.
Select a sales associate. You cannot select more than one per customer.
Click Confirm to complete the assignment.
To assign sales associates in a batch:
Select the customers.
Click Batch Assign Shopping Guide to assign a shopping guide to multiple customers.
Filter sales associates by Assigned Outlet.
Select one or more sales associates.
Click Confirm.
Notes:
When you assign multiple customers to multiple sales associates, the system distributes the customers randomly and evenly. Each customer is assigned to at most one sales associate.
If there are more customers than sales associates, some associates will be assigned more customers. If there are fewer customers than sales associates, some associates will not be assigned any customers.
The Select All button selects all sales associates that match the filter, not just those on the current page.
Change an assigned sales associate
Filter for customers with the Assigned status.
Follow the steps in "Assign a sales associate" to select a different sales associate, then click Confirm.
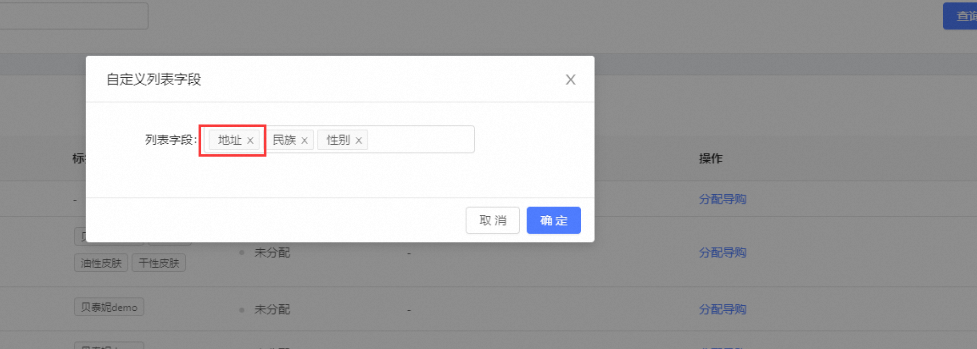
Customize list fields
The default list fields are Name, Phone, Tags, Customer Status, Assigned Sales Associate, and Actions.
In addition to the default fields, you can add three custom fields to help staff better understand customers and assist with assignments.
Click + Add Item to open the Custom Field Selection dialog box.
Click the × icon to remove a list field.
Alternatively, you can click a blank area in the box to select or deselect list fields.

Miniapp operations for unassigned customers
View assigned customer messages
If a sales associate is assigned a new customer by the brand, they will receive notifications in WeCom and the miniapp.
A message prompt appears on the WeCom home page, which is the Messages page. Find the "The company has assigned you a new customer" message and click Enter Miniapp to open the Customers to Add list in the miniapp.
A message prompt also appears in the miniapp. Click the message to open the Customers to Add list.
Search for customers: On the Customers to Add list, you can view customers who have been assigned to you and are waiting to be added. You can also search for customers by entering a partial name or phone number.
Add an assigned customer
To make a call, click Call.
To copy the phone number to add the customer on WeChat, click Copy.
Click a customer to view their detailed information on the Customer Profile page.
Mark a customer as reached
After adding a customer as a friend, mark them as reached. On the Customer Information page, click Added and then Confirm. The customer is then immediately removed from the Customers to Add list.
Marks fail to trigger for customers
If you cannot add the customer as a friend, mark them as unreachable. On the Customer Information page, select the reason they are unreachable and click Confirm. If you select Other, you must enter a reason before clicking Confirm. The customer is then immediately removed from the Customers to Add list.
Customer Groups
Group Management
On the Customer Groups page, you can view information about customer groups created by sales associates in WeCom. You can also organize these groups based on different operational goals and strategies. The customer group data is synchronized from WeCom.
Group List
The group list displays the groups you have created, with ungrouped customer groups shown by default.
The group list displays the group name, description, number of members, and owner. You can select a customer group and edit its description to specify its operational purpose.
You can select a single customer group to move it to a different group, or select multiple customer groups to move them in a batch. The selected groups can only be moved to one destination group at a time.
Click a group name to view details about the group, including member names, join times, join methods, the group owner's name, and group announcements. Sales associates are marked in the member list to distinguish them from customers.
Group Organization
The navigation pane on the left displays the group list, which includes the name of each group and the number of customer groups it contains. The main pane on the right displays the customer groups that belong to the selected group. Note that each customer group can belong to only one group.
The default group is "Ungrouped", which contains all customer groups that have not been assigned to a group. The default group cannot be edited or deleted.
You can add new groups, edit their names, and assign customer groups to them. You can also create empty groups for later use. This lets you organize your customer groups by moving them into the appropriate groups.
The new group appears at the top of the group list on the left. The 'Ungrouped' item is always pinned to the top.
You can edit a group's name or delete the group. If you delete a group, all customer groups within it are automatically moved to the "Ungrouped" group.
Search and filter
You can perform a global fuzzy search by group name or apply a global filter by group owner name.
After you set the search or filter criteria, a new results page is displayed. This page does not display the group list. Instead, a 'Group' column is added to the chat list, which allows operators to view group information.