Administrators can configure webhooks to connect to your first-party systems, such as a Customer Relationship Management (CRM) system, or third-party systems. This lets you send coupons to users from the Quick Audience console. The Reach Marketing and Automated Marketing modules both support webhooks.
The procedure is as follows:
Complete the webhook integration for your first-party or third-party system. For more information, see Webhook integration documentation.
If the webhook requires string parameters that are passed by value, such as constants or parameters from an API, an administrator must configure these parameters before creating the webhook. For more information, see Parameter management.
An administrator creates a webhook to connect to a first-party or third-party system. For more information, see Create a webhook.
An administrator tests the webhook to ensure messages can be sent successfully. For more information, see Test a webhook.
An administrator grants permissions to non-administrator users who need to use the webhook. For more information, see Grant permissions.
Administrators and authorized users create webhook tasks in the Reach Marketing module or configure webhook components in the Automated Marketing module. This allows them to send marketing messages by calling the first-party or third-party system. For more information, see Create a webhook task and Marketing action - Webhook component.
Create a webhook
Procedure:
Go to Workspace > Configuration Management > Marketing Configuration > Webhook Management to view the webhook list.
Click Create Webhook in the upper-right corner.
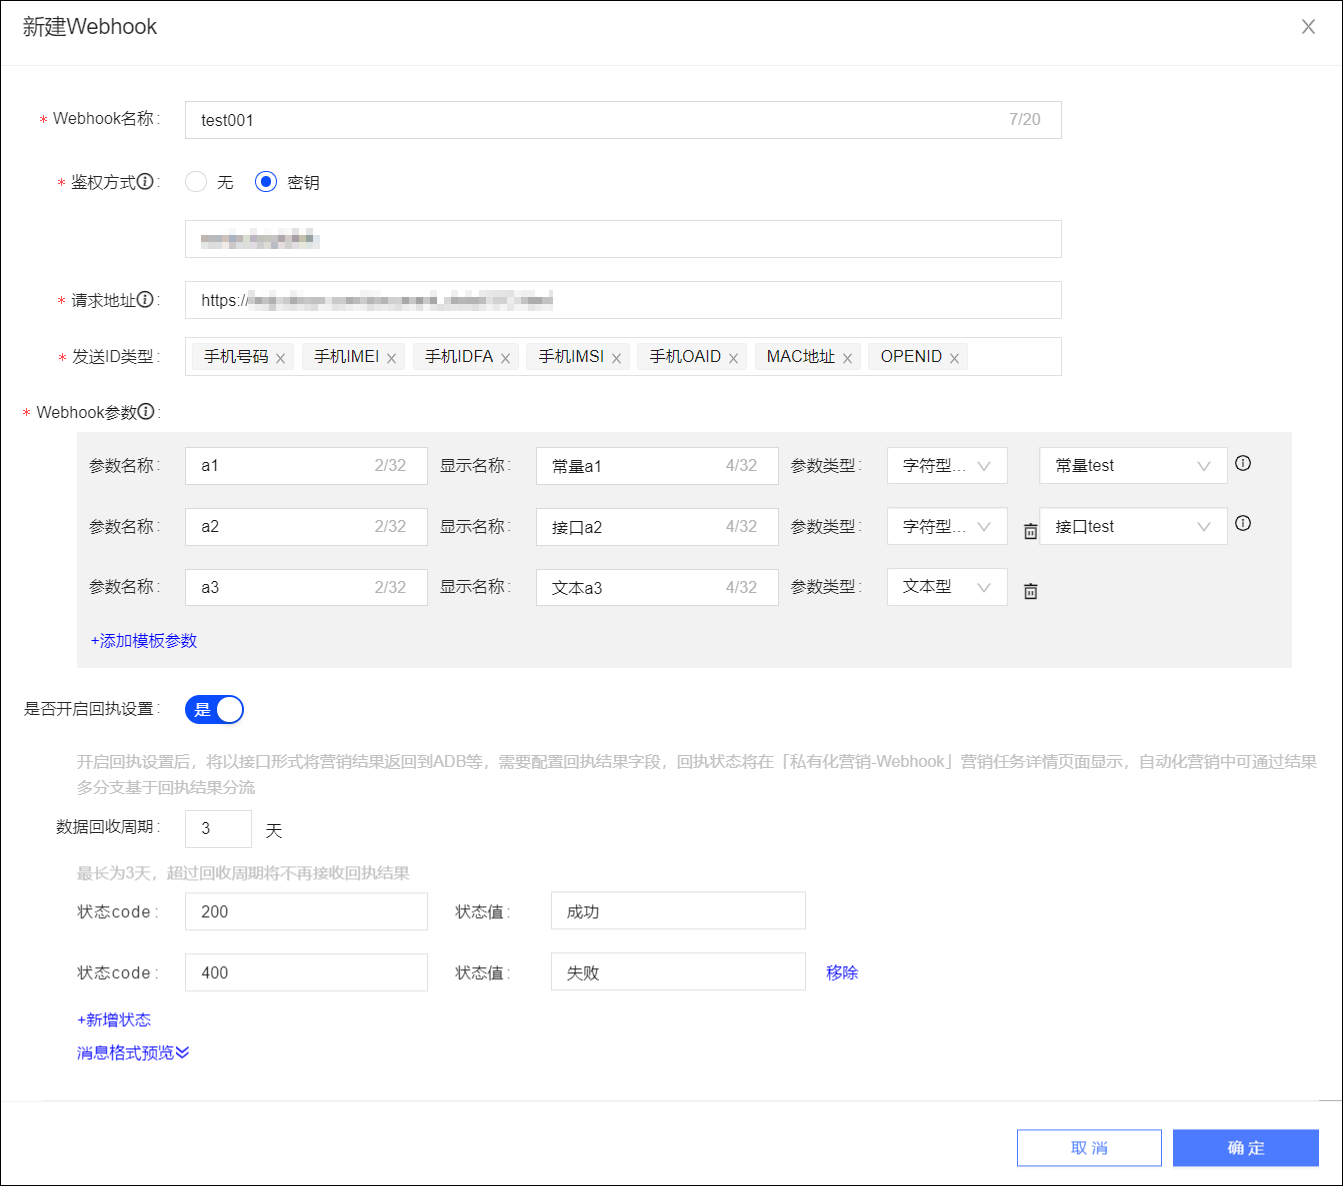
In the dialog box that appears, configure the parameters as described in the following table.
Parameter
Description
Webhook Name
Enter a name for the webhook.
Authentication Method
Select an authentication method:
None: No authentication is performed.
Key: Authenticates using a key. You must enter the key below.
Request URL
Enter the API endpoint URL that will receive push messages. The URL must be a complete address starting with http or https.
Use the HTTPS protocol to improve data transmission security.
Send ID Type
Select the ID types that are allowed for sending. You can select multiple types. However, you can only select one ID type for each task.
All ID types available for the current audience are supported.
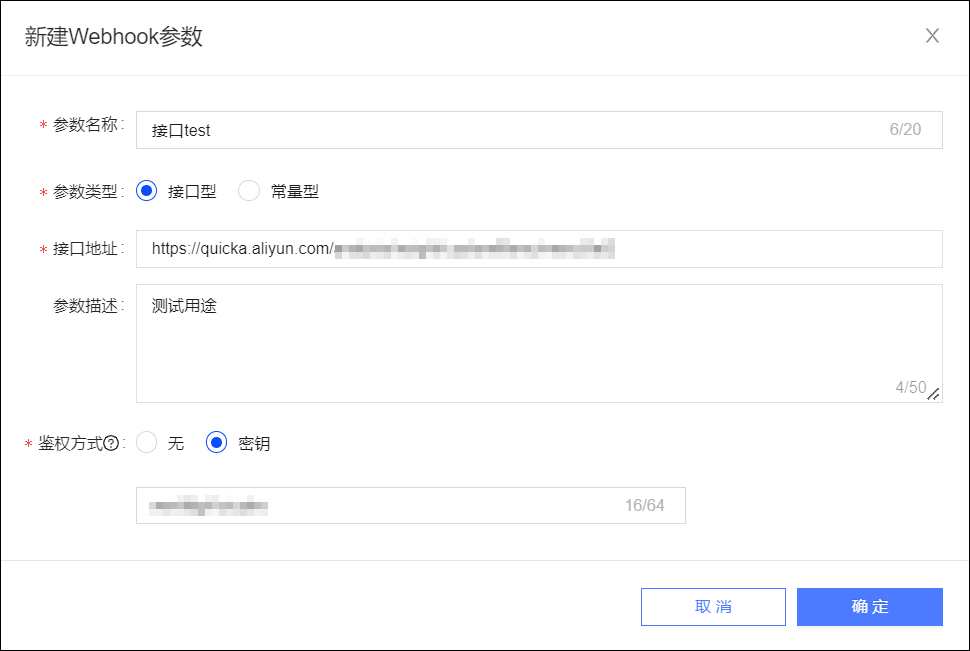
Webhook Parameters
You can define webhook parameters. When you use this webhook to create different marketing tasks, you can flexibly define the values of these parameters. For example, if a first-party or third-party system has a message template like "Discount event at {address}", {address} is a parameter. You must specify a value for it when you create a marketing task.
Parameter Name
Display Name: The parameter name displayed on the marketing task creation page.
Parameter Type: The data type of the parameter. Supported types are String, Numeric, Text, Date, and String (Parameter Call).
For String (Parameter Call), you must select the constant or API to use. The constant or API must be configured in advance. For more information, see Parameter management.
Click Add Template Parameter to add a webhook parameter.
Enable Receipt Settings
Select whether to enable receipt settings. This allows the first-party or third-party system to report sending results back to the analysis source of this workspace. The results are displayed on the marketing task details page or used in the multi-branch component of automated marketing.
If you enable this feature, you must set the following:
Data collection period: After this period, Quick Audience will no longer accept sending results.
Status code, Status value: In the receipt, the status code indicates the sending result, such as 200. The status value is the corresponding result description, such as "Success".
You can have multiple pairs of status codes and values. Click Add Status to add a new pair.
Click Preview Message Format to view the HTTP POST request body format based on the configured parameters. For more information, see Webhook integration documentation.
Click OK to save the configuration.
Test Sending
Before you use a webhook for marketing, you should test it to ensure it works correctly.
You can also test the webhook when you create a marketing task. For more information, see Create a webhook task and Marketing action - Webhook component.
Procedure:
Click the
 icon.
icon.In the dialog box that appears, select the ID type to test, and enter a test ID and the webhook parameter values.
NoteYou can test only one ID type at a time. You must test the ID type that the marketing task is configured to send.
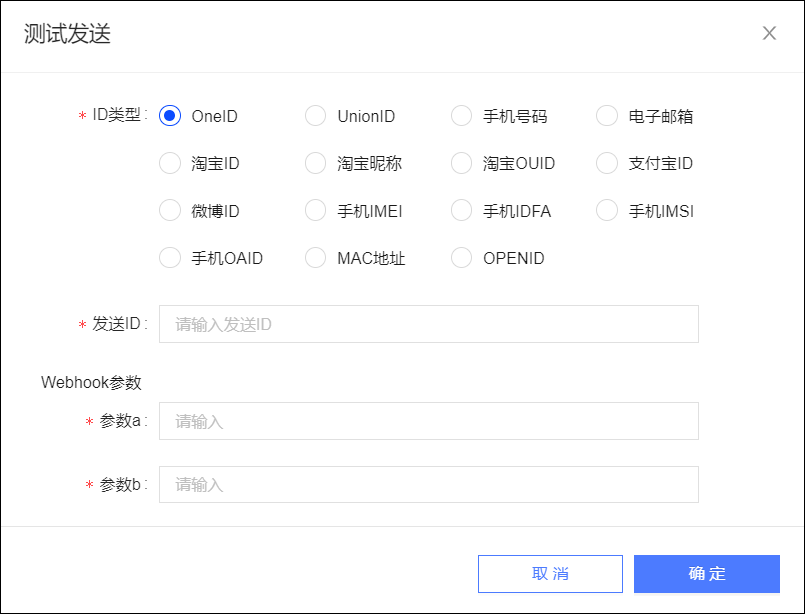
Click OK. The system calls the first-party or third-party system through the webhook to send a message to the test ID.
The dialog box indicates whether the test was successful.
If the test is successful: Check whether the first-party or third-party system received the webhook request and whether the test ID received the message. If not, you can click Download Log in the dialog box to troubleshoot the issue.
If the test fails: Click Download Log in the dialog box to troubleshoot the issue.
The information from the most recent test is also displayed in the webhook list, as shown in the following figure.
Grant permissions
Workspace members who are not administrators must be assigned a role that includes the 'User Marketing-Reach Marketing-Webhook' permission. They must also be granted permission by an administrator to use the specific webhook before they can create marketing tasks.
To grant permissions:
Click the
 icon and select Grant to go to the authorization page.
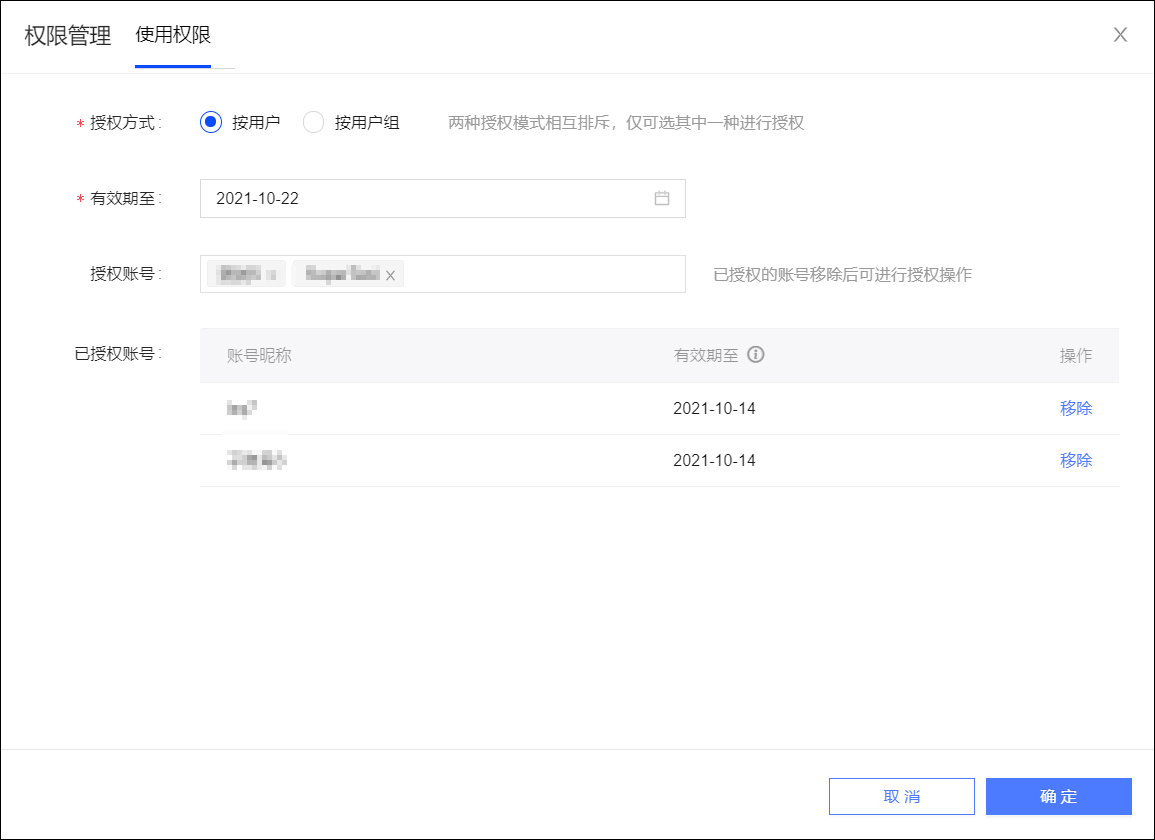
Select an Authorization Method: By User or By User Group.
NoteThe two authorization methods are mutually exclusive. You can only choose one. If you grant permissions using one method and then switch to the other, the previous permissions are revoked and only the new permissions take effect.
The authorized user accounts or user groups and their authorization expiration dates are displayed below.
To revoke permissions: Click Remove next to the account or user group. The change takes effect immediately.
To grant permissions: Select one or more accounts or user groups to authorize. Then, set an expiration date and click OK.
Shutdown/startup
A webhook is enabled by default after it is created, which lets you test and use it. You must disable a webhook before you can edit or delete it.
Use the switch on the right to disable  or enable
  the webhook.
Edit
After you disable a webhook, you can edit it.
Click the  icon to open the edit page. The subsequent steps are the same as those for creating a webhook.
You cannot edit a webhook that is enabled. You must disable it first.
If receipt settings were enabled before you edit the webhook, you cannot modify or delete the configured status codes or status values.
Copy
Click the icon and select Copy. A new configuration page opens that contains the same settings as the original webhook. You can modify the settings and click OK.
A new webhook created by copying is disabled by default. You must manually enable it before you can test or use it.
Delete
You can delete a webhook after you disable it, provided that it is not being used by any marketing tasks.
Click the icon and select Delete. Then, confirm the deletion to remove the webhook.
Parameter management
If a webhook requires string parameters that are passed by value, such as constants or parameters from an API, an administrator must configure these parameters before creating the webhook.
API-based: The parameter value is passed by an API call. When creating a webhook task, Quick Audience retrieves all parameter values from the API for you to select from.
For API development specifications, see Webhook API Parameter Integration Documentation.
Constant-based: The parameter value is a fixed constant. You can set multiple constant values to choose from when you create a webhook task.
Create a parameter
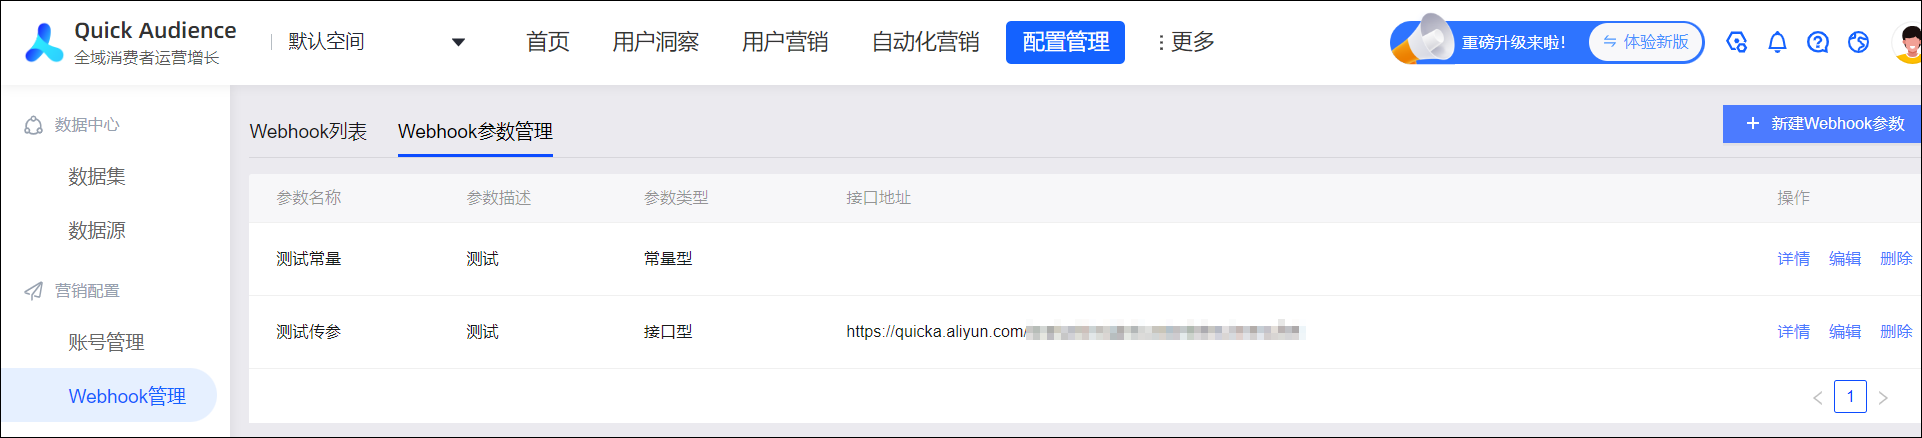
Go to Workspace > Configuration Management > Marketing Configuration > Webhook Management > Webhook Parameter Management to view the webhook parameter list.

Click Create Webhook Parameter in the upper-right corner.
In the dialog box that appears, configure the parameters. The configuration methods for API-based and constant-based parameters are different:
API-based:
Parameter
Description
Parameter Name
Enter a name for the API.
Parameter Type
Select API-based.
API URL
Enter the URL of the API that passes the parameter.
Parameter Description
Description of input parameters.
Authentication Method
Select an authentication method:
None: No authentication is performed.
Key: Authenticates using a key. You must enter the key below.
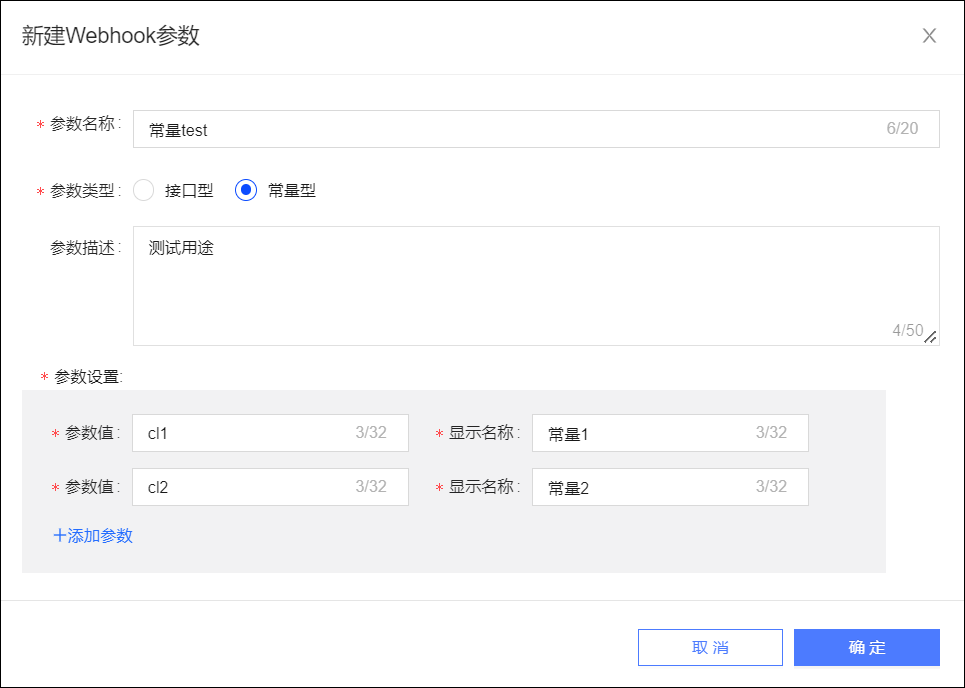
Constant-based:
Parameter
Description
Parameter Name
You can enter the interface name.
Parameter Type
Select Constant-based.
Parameter Description
Enter a description for the parameter.
Parameter Settings
Enter the parameter value and its corresponding display name. When you create a webhook task and select content for a constant-based parameter, the options are shown as display names.
Click Add Parameter to add another parameter.
Click OK to save the configuration.
Manage parameters
The parameter list provides the following actions:
Details: Click to view parameter details.
Edit: Click to edit the parameter. The configuration steps are the same as those for creating a parameter.
Delete: Click and confirm in the dialog box to delete the parameter. You can delete only parameters that are not in use.
Webhook integration documentation
Webhook integration involves the following aspects. You can develop your integration based on the message formats and examples provided in this document.
HTTP endpoint server
To integrate with Quick Audience webhooks, you must develop an HTTP server. Quick Audience sends POST requests with a timeout of 10 seconds. The POST requests sent by Quick Audience and the receipt requests sent from your system must include the following required common parameters.
URL Parameter |
Meaning |
Example |
timestamp |
UNIX timestamp in seconds |
1631865523 |
nonce |
32-bit random string |
2e6eceb5737b473284c930c8ef79090e |
Example request URL:
{webhook_configuration_url}?timestamp=1631865523&nonce=2e6eceb5737b473284c930c8ef79090eHeader |
Meaning |
Description |
X-QA-Hmac-Signature |
Authentication signature |
Used when authentication is enabled. For more information, see the authentication method section below. If authentication is not enabled, this header is an empty string "". |
Authentication method
Authentication is performed using a key. When you configure the webhook, you can enable authentication and enter a key.
Quick Audience uses the key you provide, along with the `timestamp` and `nonce` URL parameters, to generate an HmacSHA256Hex signature. This signature is passed in the `X-QA-Hmac-Signature` request header. When your service receives the request, it must perform the same HmacSHA256Hex calculation using the URL parameters and the key configured for the webhook. If the calculated value matches the signature from the request header, you can verify that the request originated from Quick Audience. The same process applies when your system reports receipts.
Parameter |
Meaning |
Example |
key |
The key configured for the webhook |
123456789 |
Example signature algorithm:
public String makeSignature(String key, String timestamp, String nonce) {
   String str = generateStr(key, timestamp, nonce);
    return HmacUtils.hmacSha256Hex(key, str.replaceAll("\\s+", ""));
}

/**
 * Concatenate the strings to be signed
 */
public static String generateStr(String key, String timestamp, String nonce){
    String[] array = new String[] { key, timestamp, nonce};
    StringBuffer sb = new StringBuffer();
    // Sort the strings
    Arrays.sort(array);
    for (int i = 0; i < 3; i++) {
        sb.append(array[i]);
    }
    return sb.toString();
}
Webhook request
The request is an HTTP POST request that is sent from Quick Audience to your system. The request body contains the trigger information for a single user.
Field Name |
Field Type |
Description |
user_profile |
Map<String,String> |
A key-value map that passes the user ID. The value of `target_type` indicates the ID type (see the list below, in uppercase). The value of `target_id` is the specific target ID. |
params |
Map<String,Object> |
A key-value map that passes the parameters specified during webhook configuration. For any parameter type, including parameter calls, all parameter fields are converted to strings when the request is sent. When a text type contains variables, the variable values are directly filled into the `params` parameter. See the example below. |
callback_params |
Map<String,String> |
These are Quick Audience request parameters, including task ID, component ID, and other information. You must include them as-is in the receipt report. |
process_info |
Map<String,String> |
Contains instance information from the process flow, which may differ for each user. |
POST header information:
After you read the header information, you must decode it using `java.net.URLDecoder#decode(java.lang.String, java.lang.String)` with UTF-8 encoding. The header may contain the following information:
processId=Automated marketing campaign ID
processName=Automated marketing campaign name
processSchedulerId=ID for each recurring schedule of the automated marketing campaign
processSchedulerName=Name for each recurring schedule of the automated marketing campaign: a string concatenating the campaign ID and the schedule time
processSchedulerStartTime=Start time of the automated marketing campaign schedule, in UNIX timestamp format
processNodeId=Automated marketing campaign node ID (the same for each schedule)
processNodeName=Automated marketing campaign node name (the same for each schedule)
activityId=ID of the main activity associated with the sub-activity
activityName=Name of the main activity associated with the sub-activity
subActivityId=Associated sub-activity ID
subActivityName=Associated sub-activity name

jobId=Deprecated: Same as processId. Use processId instead.
jobName=Deprecated: Same as processName. Use processName instead.
nodeId=Deprecated: Same as processNodeId. Use processNodeId instead.
nodeName=Deprecated: Same as processNodeName. Use processNodeName instead.
taskStartTimestamp=Deprecated: Same as processSchedulerStartTime, in UNIX timestamp format. Use processSchedulerStartTime instead.
processInstanceId=Deprecated: For backward compatibility. Same as processSchedulerId.
processInstanceName=Deprecated: For backward compatibility. Same as processSchedulerName.
processInstanceStartTime=Deprecated: For backward compatibility. Same as processSchedulerStartTime.

taskId=Field does not exist. Same as processNodeInstanceId. Not compatible.
processNodeInstanceId=Field does not exist. Not compatible.
processNodeInstanceStartTime=Field does not exist. Not compatible.
nodeStartTimestamp=Field does not exist. Same as processNodeInstanceStartTime. Not compatible.
Example POST body structure (This example is for a single user. A batch typically contains 1 to 100 users):
[
    {
        "user_profile": {
            "target_type": "OPEN_ID",
            "target_id": "1917810",
            "customer_id": "Unique customer ID. Use this ID to report events."
        },
        "params": {
            "define_item1": "Coupon ID",
            "define_item2": "Example coupon content. The user's address is Beijing." // Beijing is the value filled in for the ${city} variable.
        },
        "callback_params": {
            "task_id": "Deprecated",
            "Webhook_id": "13312313",
            "send_time": "1625037472000",
            "nodeId": "Node ID",
            "instanceId": "Instance ID",
            "actionId": "Action execution instance ID",
            "customerId": "User ID, customerId",
        },
        "process_info": {
            "processInstanceId": "New version: Instance ID for each user's automated marketing campaign within a schedule.",
            "processInstanceStartTime": "New version: Start time of the instance for each user's automated marketing campaign within a schedule, in UNIX timestamp format.",
            "processNodeInstanceId": "New version: Automated marketing campaign node instance ID (different each time).",
            "processNodeInstanceStartTime": "New version: Start time of the node instance for each user's automated marketing campaign within a schedule, in UNIX timestamp format.",
            "groupId":"New version: Group ID",
            "groupName":"New version: Group name"
        }
    }
]
Supported user ID types:
User ID Type |
Meaning |
ONEID |
OneID |
Email address |
|
MOBILE |
Mobile number |
TAOBAO_ID |
Taobao ID |
TAOBAO_NICK |
Taobao nickname |
OUID |
Taobao OUID |
IMEI |
IMEI |
IMSI |
IMSI |
IDFA |
IDFA |
MAC_ORG |
MAC address |
WEIBO_ID_ORG |
Weibo ID |
ALIPAY_ID |
Alipay ID |
UNION_ID |
WeChat UnionID |
OAID |
OAID |
OPEN_ID |
WeChat OpenID |
Quick Audience stores IDs using Plaintext, AES, MD5, or SHA256 encryption. Before an ID is sent to your system, Quick Audience decrypts any AES-encrypted IDs. Therefore, the IDs sent to your system can be in Plaintext, MD5, or SHA256 format. Your system can be configured to support MD5 or SHA256 decryption based on how the IDs are used.
After your system receives the request, it must return a response to Quick Audience.
Response body format:
{
 "code":"OK",      // Request status code. "OK" (uppercase) indicates success. Other values are error codes defined by your system.
  "message":"",    // Description of the status code. Optional.
}
Report receipts
After your system executes the marketing task, it must report a receipt to Quick Audience to provide feedback on the result.
HTTP request URL:
http://${region_domain_name}/restapi/thirdservice/webhook/receiveWebHookCallBack?timestamp=1631865523&nonce=2e6eceb5737b473284c930c8ef79090ePOST Body: A list that contains the merged receipt information for multiple users.
Field |
Type |
Description |
msg_id |
String |
A 32-bit unique message ID generated by your system. |
status |
String |
The result status, which is the status code defined in the webhook configuration, such as 200. |
cst_id |
String |
The ID of the reached user, which is `user_profile.customer_id`. |
send_time |
String |
UNIX timestamp in milliseconds. |
callback_params |
Map<String,String> |
The `callback_params` from the webhook request. Return them as is. |
Example receipt message:
[
    {
        "msg_id": "Unique ID provided by your service",
        "status": "Receipt status",
        "cst_id": "Customer ID (customerId)",
        "send_time": "Receipt sending time, in UNIX timestamp format",
        "callback_params": {
            "return_parameters_as_is": "Return the parameters from the call as is"
        }
    }
]
Receipt response:
Success: {"code":200, "message":"Success"}
Failure: {"code":99999, "message":"Error message for each item, in JSON format"}
Partial failure: {"code":99998, "message":"Error message for each item, in JSON format"}
FAQ
What is the difference between webhook parameters, variables, constants, and APIs?
Webhook parameters are available in several types. The following figure shows the differences between these types and their usage.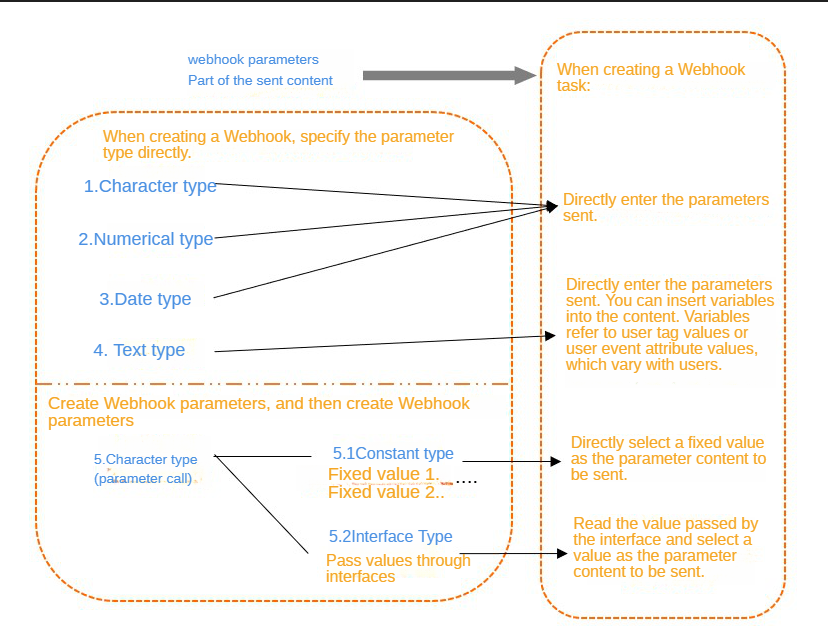
Where:
Constants and APIs are two methods for assigning values to String (Parameter Call) type parameters.
Variables are inserted into Text type parameters, and their content can be different for each user.