Synchronize data from a self-managed PostgreSQL database to an ApsaraDB RDS for PostgreSQL instance
Use Data Transmission Service (DTS) to continuously synchronize data from a self-managed PostgreSQL database to an ApsaraDB RDS for PostgreSQL instance. DTS supports schema synchronization, full data synchronization, and incremental data synchronization, so you can migrate with minimal downtime.
Prerequisites
Before you begin, make sure you have:
A self-managed PostgreSQL database and an ApsaraDB RDS for PostgreSQL instance. To create an RDS instance, see Create an instance.
A destination database version equal to or later than the source database version. Earlier destination versions may cause compatibility issues. For supported version combinations, see Overview of data synchronization scenarios.
Enough free storage on the RDS instance to hold all data from the self-managed PostgreSQL database.
A superuser account on the self-managed PostgreSQL database, and a schema owner account on the RDS instance. See Permissions required for database accounts.
Billing
Synchronization type | Cost |
Schema synchronization and full data synchronization | Free |
Incremental data synchronization | Charged. See Billing overview. |
Supported synchronization topologies
One-way one-to-one synchronization
One-way one-to-many synchronization
One-way cascade synchronization
One-way many-to-one synchronization
For details, see Synchronization topologies.
Supported objects
Category | Objects |
Schema and table | SCHEMA, TABLE (including PRIMARY KEY, UNIQUE KEY, FOREIGN KEY, built-in data types, and DEFAULT CONSTRAINT) |
Other database objects | VIEW, PROCEDURE (PostgreSQL 11 or later), FUNCTION, RULE, SEQUENCE, EXTENSION, TRIGGER, AGGREGATE, INDEX, OPERATOR, DOMAIN |
SQL operations that can be synchronized
Type | Statements |
DML | INSERT, UPDATE, DELETE |
DDL | Only for tasks created after October 1, 2020. See DDL synchronization limits. |
Permissions required for database accounts
Database | Required permissions | Reference |
Self-managed PostgreSQL database | superuser | CREATE USER and GRANT |
RDS instance | Schema owner permissions |
Limits
Source database limits
Tables to be synchronized must have PRIMARY KEY or UNIQUE constraints, and all fields must be unique. Otherwise, the destination database may contain duplicate records.
If you create a data synchronization task without selecting Schema Synchronization, make sure the destination table has the same PRIMARY KEY or NOT NULL UNIQUE constraints as the source table.
If you select tables as the sync objects and need to rename tables or columns in the destination database, a single task supports up to 5,000 tables. For more than 5,000 tables, configure multiple tasks or sync the entire database instead.
DTS cannot synchronize temporary tables, internal triggers, or internal procedures and functions written in C. DTS can synchronize custom parameters of COMPOSITE, ENUM, and RANGE types. Tables must have PRIMARY KEY, FOREIGN KEY, UNIQUE, or CHECK constraints.
WAL log requirements:
Set
wal_leveltological.For incremental-only synchronization: retain write-ahead logging (WAL) logs for more than 24 hours.
For full + incremental synchronization: retain WAL logs for at least 7 days. After full synchronization completes, you can reduce the retention period to more than 24 hours.
If WAL logs are not retained for the required duration, DTS may fail to read them, causing task failure or data loss.
The
max_wal_sendersandmax_replication_slotsvalues must each be greater than the sum of: the number of currently used replication slots in the source database, plus the number of DTS instances whose source is this database.If a primary/secondary switchover occurs on the source database while a synchronization task is running, the task fails. After the switchover, log on to the secondary database to delete the replication slot prefixed with
dts_sync_.If the source database has long-running transactions during incremental synchronization, WAL logs generated before those transactions commit may accumulate and exhaust disk space.
If the source is a Cloud SQL for PostgreSQL instance on Google Cloud Platform, you must set the Database Account parameter to a database account with the
cloudsqlsuperuserpermission. When you select the objects to be synchronized, you must select only objects that the specified account is authorized to manage. Otherwise, you must grant the OWNER permission on the selected objects to the specified account.A
cloudsqlsuperuseraccount cannot manage data owned by othercloudsqlsuperuseraccounts.If a single incremental data change exceeds 256 MB, the synchronization task fails and cannot be recovered. Reconfigure the task.
During schema synchronization and full data synchronization, do not execute DDL statements that change database or table schemas. The task will fail.
If the source database undergoes a major version upgrade while a task is running, the task fails and cannot be recovered. Reconfigure the task.
Other limits
A single data synchronization task can sync data from only one database. To sync from multiple databases, create a separate task for each.
DTS cannot synchronize tables that have cross-schema inheritance relationships.
If you select a schema as the sync object: when you create a table in the schema or rename a table with RENAME, run the following statement before writing data to the table:
ALTER TABLE schema.table REPLICA IDENTITY FULL;Replace
schemaandtablewith the actual names. Run this statement during off-peak hours without holding a table lock to avoid deadlocks.DTS does not validate metadata such as sequences. Manually verify sequence validity before and after the task.
After you switch your workloads to the destination database, newly written sequences do not continue from the maximum value in the source. Update the starting value of sequences in the destination database before the cutover.
DTS creates the following temporary tables in the source database during synchronization. Do not delete them while the task is running. They are automatically deleted when the DTS instance is released:
public.dts_pg_classpublic.dts_pg_attributepublic.dts_pg_typepublic.dts_pg_enumpublic.dts_postgres_heartbeatpublic.dts_ddl_commandpublic.dts_args_session
DTS adds a heartbeat table named
dts_postgres_heartbeatto the source database to track synchronization latency.DTS creates a replication slot prefixed with
dts_sync_on the source database and uses it to read incremental logs from the last 15 minutes. The slot is automatically deleted when the task is released or fails. If a primary/secondary switchover occurs, manually delete the slot from the secondary database.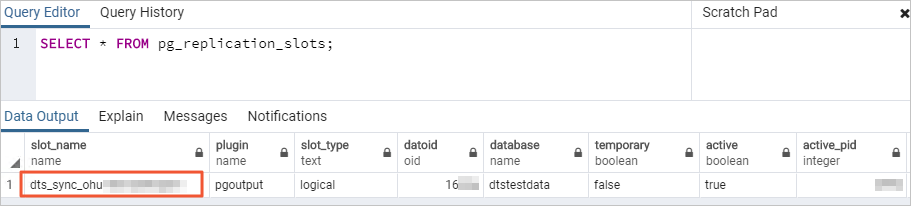
Evaluate the performance impact on both databases before starting synchronization, and schedule the task during off-peak hours. During initial full synchronization, DTS uses read and write resources on both databases, which increases server load.
During initial full synchronization, concurrent INSERT operations cause table fragmentation in the destination database. The tablespace used by the destination database will be larger than that of the source database after full synchronization completes.
If DTS is the only source writing to the destination database, you can use Data Management Service (DMS) to run online DDL operations on source tables during synchronization. See Change schemas without locking tables.
If data from other sources is written to the destination database during synchronization, data inconsistency may occur. Running online DDL statements in DMS while other sources write to the destination can cause data loss.
If you use a privileged or superuser account for the destination database, and the tables being synchronized contain foreign keys, triggers, or event triggers, DTS temporarily sets
session_replication_roletoreplicaat the session level. If the destination account does not have sufficient permissions, manually setsession_replication_roletoreplica. Cascade UPDATE or DELETE operations on the source during this period may cause data inconsistency. After the task is released, resetsession_replication_roletoorigin.If a DTS task fails, DTS technical support will attempt to restore it within 8 hours. During restoration, the task may be restarted and certain task parameters may be modified (database parameters are not changed). For parameters that may be modified, see Modify instance parameters.
DDL synchronization limits
DDL synchronization is only available for tasks created after October 1, 2020.
For tasks created before May 12, 2023: create triggers and functions in the source database before configuring the task. See Use triggers and functions to implement incremental DDL migration for PostgreSQL databases.
To use a data synchronization task created before May 12, 2023 to synchronize DDL operations, you must create triggers and functions in the source database to capture DDL information before you configure the data synchronization task. For more information, see Use triggers and functions to implement incremental DDL migration for PostgreSQL.
Data of the BIT type cannot be synchronized during incremental synchronization.
For DDL synchronization, the source database account must be a privileged account and the database minor version must be 20210228 or later. Supported DDL statements:
CREATE TABLEandDROP TABLEALTER TABLE: RENAME TABLE, ADD COLUMN, ADD COLUMN DEFAULT, ALTER COLUMN TYPE, DROP COLUMN, ADD CONSTRAINT, ADD CONSTRAINT CHECK, ALTER COLUMN DROP DEFAULTTRUNCATE TABLE(PostgreSQL 11 or later)CREATE INDEX ON TABLE
DDL statements that cannot be synchronized:
Statements with CASCADE or RESTRICT modifiers
DDL from sessions that have run
SET session_replication_role = replicaDDL executed by invoking functions
DDL mixed with DML in the same commit
DDL for objects not selected for synchronization
Prepare the source database
The examples in this section use a self-managed PostgreSQL database running on Linux.
DTS uses PostgreSQL's logical replication to capture changes from the source database. Logical replication requireswal_level = logicalso that the write-ahead log includes enough information to reconstruct row-level changes. Themax_wal_sendersandmax_replication_slotsparameters control how many concurrent replication connections and slots the source database can maintain.
Step 1: Check and configure WAL settings
Log on to the server hosting the self-managed PostgreSQL database.
Query the number of currently used replication slots:
SELECT count(1) FROM pg_replication_slots;Open
postgresql.confand set the following parameters. The values ofmax_wal_sendersandmax_replication_slotsmust each exceed the sum of: the current number of used replication slots plus the number of DTS instances targeting this database.# Replication settings wal_level = logical # Change requires restart max_wal_senders = 10 # Max number of walsender processes; change requires restart max_replication_slots = 10 # Max number of replication slots; change requires restartRestart the database after saving these changes.
Step 2: Allow DTS server access
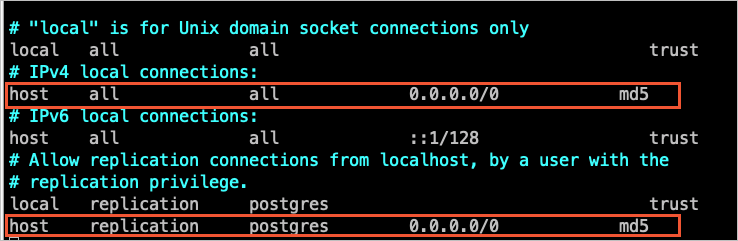
Add the CIDR blocks of DTS servers to pg_hba.conf. Add only the CIDR blocks for DTS servers in the same region as the destination database. See Add the CIDR blocks of DTS servers.
After updating pg_hba.conf, run the following statement or restart the database to apply the changes:
SELECT pg_reload_conf();Skip this step ifpg_hba.confalready contains0.0.0.0/0. For reference on the file format, see The pg_hba.conf file.
Step 3: Create the destination database and schema
In the RDS instance, create a database and schema that match the source. Schema names in the source and destination databases must be identical. See Create a database and Manage accounts by using schemas.
Additional steps for PostgreSQL 9.4.8 to 10.0
If your source database version is in the range PostgreSQL 9.4.8 to 10.0, complete the following steps before configuring the synchronization task.
1. Compile and install PostgreSQL from source
Log on to the server.
Download the source code for your PostgreSQL version from the PostgreSQL official website.
Run the following commands to configure, compile, and install:
Important- The operating system version must be compatible with the GNU Compiler Collection (GCC) version used. - If
sudo ./configurefails with an error such asreadline library not found, add the--without-readlineflag:sudo ./configure --without-readline. - If you install PostgreSQL using another method, compileali_decodingin a test environment with the same OS and GCC versions.sudo ./configure sudo make sudo make install
2. Compile and install the ali_decoding extension
Download ali_decoding.
Copy the
ali_decodingdirectory into thecontribdirectory of the compiled PostgreSQL installation.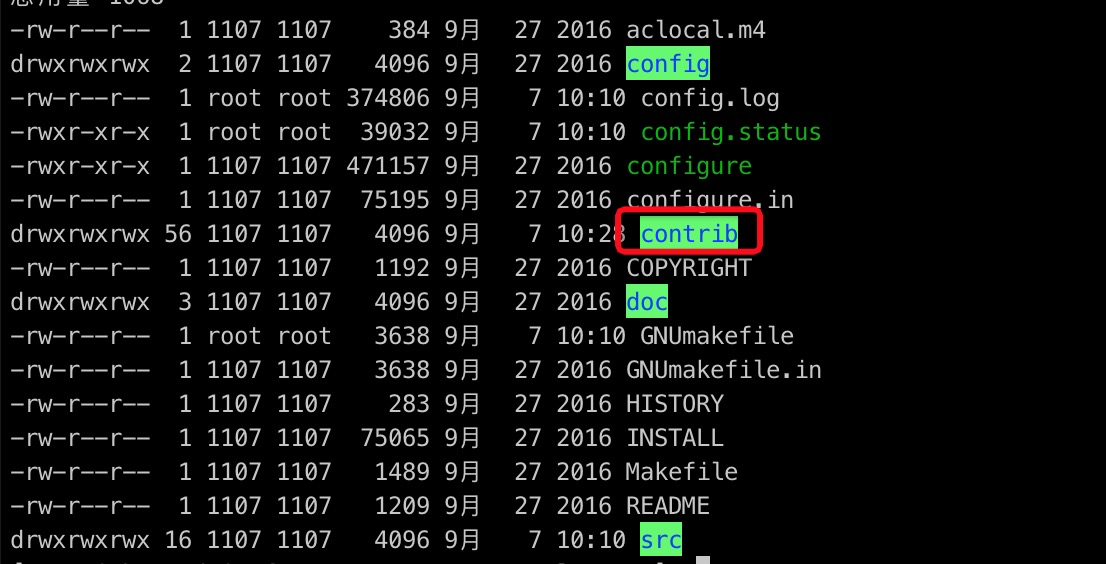
In the
ali_decodingdirectory, replace the content of theMakefilewith the following:# contrib/ali_decoding/Makefile MODULE_big = ali_decoding MODULES = ali_decoding OBJS = ali_decoding.o DATA = ali_decoding--0.0.1.sql ali_decoding--unpackaged--0.0.1.sql EXTENSION = ali_decoding NAME = ali_decoding ifdef USE_PGXS PG_CONFIG = pg_config PGXS := $(shell $(PG_CONFIG) --pgxs) include $(PGXS) else subdir = contrib/ali_decoding top_builddir = ../.. include $(top_builddir)/src/Makefile.global include $(top_srcdir)/contrib/contrib-global.mk endifIn the
ali_decodingdirectory, compile and install the extension:sudo make sudo make installCopy the generated files to the directories shown below.

Create the destination database and schema in the RDS instance, as described in Step 3: Create the destination database and schema.
Configure the synchronization task
Step 1: Open the Data Synchronization page
Use either the DTS console or the DMS console.
DTS console:
Log on to the DTS console.
In the left navigation pane, click Data Synchronization.
In the upper-left corner, select the region where the synchronization instance will reside.
DMS console:
The layout may vary depending on your DMS console mode. See Simple mode and Customize the layout and style of the DMS console.
Log on to the DMS console.
In the top navigation bar, move the pointer over Data + AI and choose DTS (DTS) > Data Synchronization.
From the drop-down list next to Data Synchronization Tasks, select the target region.
Step 2: Create the task
Click Create Task to open the task configuration page.
If the page shows a New Configuration Page button in the upper-right corner, click it to switch to the new version.
If Back to Previous Version is displayed instead, you are already on the new configuration page. The new version is recommended.
Step 3: Configure source and destination databases
After configuring both databases, read the Limits shown on the page. Skipping this step may cause the task to fail or result in data inconsistency.
Section | Parameter | Description |
N/A | Task name | A name for the DTS task. DTS generates one automatically. Specify a descriptive name for easy identification. Names do not need to be unique. |
Source database | Database type | Select PostgreSQL. |
Access method | Select Cloud Enterprise Network (CEN). | |
Instance region | The region where the self-managed PostgreSQL database resides. | |
CEN instance ID | The ID of the Cloud Enterprise Network (CEN) instance connecting to the source database. | |
Connected VPC | The virtual private cloud (VPC) connected to the source database. | |
Domain name or IP | The IP address of the source database server. | |
Port number | The service port of the source database. Default: 3433. | |
Database name | The name of the source database. | |
Database account | The source database account. For required permissions, see Permissions required for database accounts. | |
Database password | The password for the database account. | |
Encryption | Whether to encrypt the connection. For this example, select Non-encrypted. To use SSL encryption: select SSL-encrypted, upload CA certificate, and optionally upload Client certificate, Private key of client certificate, and specify Private key password of client certificate. For SSL setup on RDS, see SSL encryption. | |
Destination database | Database type | Select PostgreSQL. |
Access method | Select Alibaba Cloud Instance. | |
Instance region | The region where the RDS instance resides. | |
Instance ID | The ID of the RDS instance. | |
Database name | The name of the destination database in the RDS instance. | |
Database account | The destination database account. For required permissions, see Permissions required for database accounts. | |
Database password | The password for the database account. | |
Encryption | Whether to encrypt the connection. Configuration is the same as the source database encryption settings above. |
Step 4: Test connectivity
Click Test Connectivity and Proceed at the bottom of the page.
DTS server CIDR blocks must be added to the security settings of both source and destination databases. See Add the CIDR blocks of DTS servers.
If the source database access method is not Alibaba Cloud Instance, click Test Connectivity in the CIDR Blocks of DTS Servers dialog box that appears.
Step 5: Configure sync objects
In the Configure Objects step, set the following parameters.
Parameter | Description |
Synchronization types | Incremental Data Synchronization is selected by default. Also select Schema Synchronization and Full Data Synchronization for a complete migration with minimal downtime. After the precheck, DTS syncs historical data first, then transitions to ongoing incremental sync. Note Selecting Schema Synchronization causes DTS to sync table schemas including foreign keys from the source to the destination. |
Processing mode of conflicting tables | Precheck and report errors (default): verifies that no identically named tables exist in the destination before starting. If matching names are found, the precheck fails and the task cannot start. Use object name mapping to rename destination tables if deletion or renaming is not possible. Ignore errors and proceed: skips the check for duplicate table names. Warning This may cause data inconsistency. During full synchronization, existing destination records with matching primary or unique keys are retained. During incremental synchronization, they are overwritten. If schemas differ, synchronization may fail or only sync partial columns. |
Synchronization topology | Select One-way Synchronization. |
Capitalization of object names in destination instance | Controls the case of database, table, and column names in the destination. Default is DTS default policy. See Specify the capitalization of object names. |
Source objects | Select objects from the Source Objects list and click the |
Selected objects | To rename a single object: right-click it and follow the instructions in Map the name of a single object. To rename multiple objects: click Batch Edit in the upper-right corner. See Map multiple object names at a time. To filter SQL operations for a specific object: right-click it and select the SQL operations to sync. To filter rows by condition: right-click a table and specify WHERE conditions. See Specify filter conditions. Note Renaming an object may cause dependent objects to fail synchronization. |
 icon to add them to Selected Objects. You can select columns, tables, or schemas.
Step 6: Configure advanced settings
Click Next: Advanced Settings and configure the following parameters.
Parameter | Description |
Dedicated cluster for task scheduling | By default, DTS schedules the task to the shared cluster. To improve stability, purchase a dedicated cluster. See What is a DTS dedicated cluster. |
Retry time for failed connections | How long DTS retries after a connection failure. Valid values: 10–1,440 minutes. Default: 720 minutes. Set to more than 30 minutes. If DTS reconnects within this window, the task resumes. Otherwise, it fails. Note If multiple tasks share the same source or destination database, the shortest retry time among them takes precedence. DTS instance charges continue during retries. |
Retry time for other issues | How long DTS retries after DDL or DML failures. Valid values: 1–1,440 minutes. Default: 10 minutes. Set to more than 10 minutes, and less than the retry time for failed connections. |
Enable throttling for full data synchronization | Limits queries per second (QPS) to the source database, requests per second (RPS) for full synchronization, and data sync speed (MB/s) to reduce load on the destination. Only displayed when Full Data Synchronization is selected. |
Enable throttling for incremental data synchronization | Limits RPS and data sync speed (MB/s) for incremental synchronization to reduce destination load. |
Environment tag | A tag to identify the DTS instance. Select based on your environment (for example, production or development). |
Configure ETL | Whether to enable extract, transform, and load (ETL). Select Yes to enter data processing statements. See Configure ETL in a data migration or data synchronization task. Select No to skip. |
Monitoring and alerting | Select Yes to receive alerts when the task fails or synchronization latency exceeds a threshold. Configure the alert threshold and notification settings. See Configure monitoring and alerting. |
Step 7: Configure data verification
Click Next Step: Data Verification to set up verification. See Configure a data verification task.
Step 8: Run the precheck
Click Next: Save Task Settings and Precheck.
To preview the API parameters for this configuration, move the pointer over Next: Save Task Settings and Precheck and click Preview OpenAPI parameters.
DTS runs a precheck before the task can start. The task only begins after the precheck passes.
If the precheck fails, click View Details next to each failed item, resolve the issues, and click Precheck Again.
For alert items that can be safely ignored: click Confirm Alert Details, then Ignore, and confirm. Then click Precheck Again. Ignoring alerts may result in data inconsistency.
Step 9: Purchase the synchronization instance
Wait until the Success Rate reaches 100%, then click Next: Purchase Instance.
On the Buy page, configure the following parameters.
Section | Parameter | Description |
New instance class | Billing method | Subscription: pay upfront; more cost-effective for long-term use. Pay-as-you-go: billed hourly; suitable for short-term use. Release the instance when no longer needed to avoid unnecessary charges. |
Instance class | DTS provides instance classes with varying synchronization speeds. Select based on your data volume and throughput requirements. See Instance classes of data synchronization instances. | |
Subscription duration | Available when Subscription is selected. Options: 1–9 months, 1 year, 2 years, 3 years, or 5 years. | |
Resource group settings | Resource group | The resource group for the instance. Default: default resource group. See What is Resource Management? |
Select Data Transmission Service (Pay-as-you-go) Service Terms, then click Buy and Start. In the dialog box, click OK.
After the instance is purchased, the task starts automatically. Monitor its progress in the task list.
Verify and cut over
Verify data consistency
After the task reaches the incremental synchronization phase, verify that data in the source and destination databases is consistent before switching your workloads.
For a comprehensive check, use the DTS data verification feature. See Configure a data verification task.
Switch workloads to the destination database
Before switching workloads, confirm that synchronization latency is at or near 0. You can monitor the latency from the task list in the DTS console.
Before the cutover:
Stop writes to the source database to allow any remaining changes to sync.
Wait for the synchronization latency to reach 0.
Update the starting value of sequences in the destination database. Newly written sequences do not continue from the maximum value in the source after the cutover.
After the cutover, if session_replication_role was set to replica during synchronization, reset it to origin.