Magento2 is a powerful open source e-commerce platform that provides a flexible architecture and rich features to support the construction of complex online stores. Magento2 optimizes performance, improves user experience, and simplifies management operations. Magento2 is suitable for small and medium-sized business and large enterprises. This topic describes how to build a Magento2 e-commerce website on an Elastic Compute Service (ECS) instance that runs Ubuntu.
For more information about Magento2, visit the Adobe Commerce official website.
Background information
In this topic, an ECS instance that has the following configurations is used:
Instance type: ecs.c7.large
-
Operating system: Ubuntu 22.04 64-bit public image
CPU: 2 vCPUs
Memory: 4 GiB
NoteTo build a Magento2 server, the memory of the selected instance type must be at least 4 GiB.
In this topic, you must use the following software versions based on the software dependencies described in the Magento2 official website:
Composer 2.7: Composer is used to install and manage the code library of Magento2 and all required third-party libraries.
OpenSearch 2.12: OpenSearch provides product search features, including quick search for products, filtering options, and relevance sorting.
MySQL 8.0: MySQL is used to store all business data, such as product information, orders, and customer information.
PHP 8.3: PHP is used to execute all PHP code logic and communicate with databases and other services to obtain data.
NGINX 1.24: NGINX is the frontend server that processes static file requests and serves as a reverse proxy to forward dynamic content requests to the backend PHP service.
Prerequisites
-
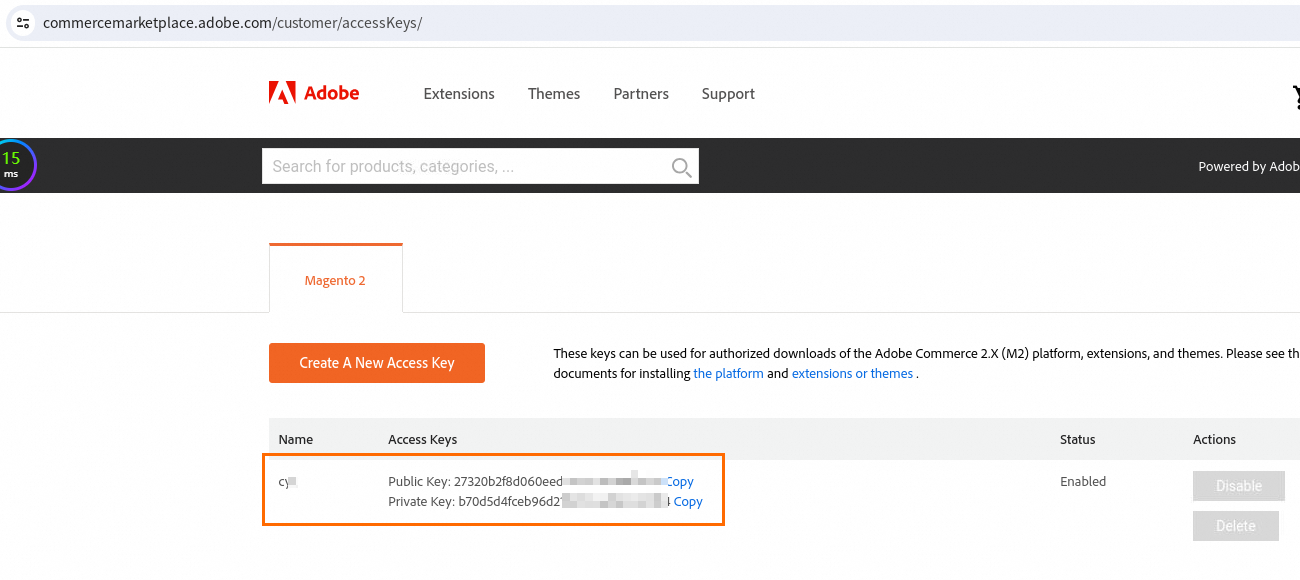
Obtain your personal keys from Adobe Commerce, as shown below. For instructions, see Adobe Commerce.
-
A public IP address is automatically assigned to the ECS instance. Alternatively, an elastic IP address (EIP) is associated with the ECS instance. For instructions on how to enable public bandwidth, see Enable public bandwidth.
Port 22 is open in an inbound rule of a security group to which the ECS instance belongs. For information about how to add a security group rule, see Add a security group rule.
Docker is installed on the ECS instance. For information about how to install Docker, see Install Docker.
An LNMP stack (Linux, NGINX, MySQL, and PHP) is deployed. For information about how to deploy an LNMP stack, see the Deploy an LNMP stack section of the "Deploy an LNMP stack" topic.
NoteThe LNMP stack uses the following software versions: NGINX 1.24, MySQL 8.0, and PHP 8.3.
Check and change the version numbers in the following steps.
Procedure
Step 1: Install PHP dependencies
-
Install the core PHP package and specific extensions.
Install the core PHP package, which contains several extensions.
sudo apt-get install php8.3-cli php8.3-common php8.3-fpm php8.3-mysql php8.3-zip php8.3-gd php8.3-curl php8.3-intl php8.3-mbstring php8.3-soap php8.3-xml php8.3-bcmath php8.3-sqlite3 php8.3-opcache-
Install additional PHP extensions.
sudo apt-get install php8.3-bcmath php8.3-curl php8.3-gd php8.3-intl php8.3-mbstring php8.3-soap php8.3-xml php8.3-zip php8.3-sqlite3 -
Restart the web server to apply the changes.
sudo systemctl restart nginx
Configure the php.ini files.
Open the php.ini files in the Vim editor.
sudo vim /etc/php/8.3/fpm/php.ini
sudo vim /etc/php/8.3/cli/php.ini
Modify the following content in the php.ini files. Then, save and close the files.
memory_limit = 2G
max_execution_time = 1800
zlib.output_compression = On
Restart the PHP FastCGI Process Manager (PHP-FPM) service.
sudo systemctl restart php8.3-fpm
Step 2: Create a Magento2 database
Connect to MySQL.
mysql -u root -pWhen you are prompted to enter a password, enter the password of the MySQL root user.
Execute the following MySQL statements in sequence to create and configure a database. In this example, a database named magento is created, and the username used to log on to the database is magento.
CREATE DATABASE magento;
CREATE USER 'magento'@'localhost' IDENTIFIED BY 'magento';
GRANT ALL PRIVILEGES ON magento.* TO 'magento'@'localhost';
FLUSH PRIVILEGES;
EXIT;
Verify the database.
mysql -u magento -pNoteIf the MySQL monitor is displayed, the database is created. If an error is displayed, execute the preceding MySQL statements again.
Step 3: Download and install OpenSearch
-
Before you use Docker to install OpenSearch, perform the following operations:
Disable memory paging and swapping on the ECS instance to improve performance.
sudo swapoff -a-
Increase the number of memory mappings available for OpenSearch.
Modify the sysctl.conf file.
sudo vi /etc/sysctl.conf-
Add
vm.max_map_count=262144 Check whether the configuration is added.
sudo sysctl -p
cat /proc/sys/vm/max_map_count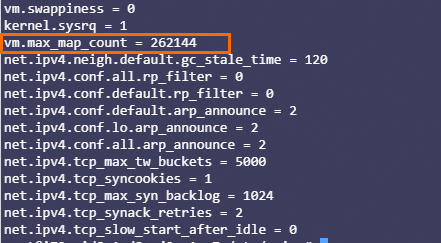
-
Run OpenSearch in a Docker container.
Pull an OpenSearch image.
sudo docker pull opensearchproject/opensearch:2-
Deploy OpenSearch in a container to check whether Docker runs as expected.
sudo docker run -d \ -p 9200:9200 \ -p 9600:9600 \ -e "discovery.type=single-node" \ -e "OPENSEARCH_INITIAL_ADMIN_PASSWORD=admin" \ -e "plugins.security.disabled=true" \ opensearchproject/opensearch:latestNoteThis example sets
plugins.security.disabledtotrueto disable SSL for the HTTP and Transport layers for testing. Send a request to port 9200. The default username and password are admin.
sudo curl -k http://localhost:9200 -ku admin:adminThe following command output is returned:
{
  "name" : "a937e018****",
  "cluster_name" : "docker-cluster",
  "cluster_uuid" : "GLAjAG6bTeWE****_d-CLw",
  "version" : {
    "distribution" : "opensearch",
    "number" : <version>,
    "build_type" : <build-type>,
    "build_hash" : <build-hash>,
    "build_date" : <build-date>,
    "build_snapshot" : false,
    "lucene_version" : <lucene-version>,
    "minimum_wire_compatibility_version" : "7.10.0",
    "minimum_index_compatibility_version" : "7.0.0"
  },
  "tagline" : "The OpenSearch Project: https://opensearch.org/"
}
Display all containers that are running and copy the container ID of the OpenSearch node that you are testing.
sudo docker container ls-
Configure NGINX for the search engine.
-
Ensure that your global /etc/nginx/nginx.conf contains
include /etc/nginx/conf.d/*.conf;to load the other configuration files in the following sections.vi /etc/nginx/nginx.conf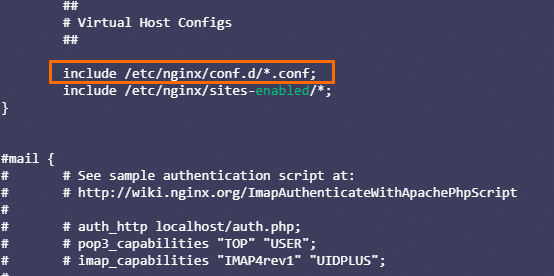
Configure NGINX as a proxy.
Use the Vim editor to create a file that contains the following content.
sudo vim /etc/nginx/conf.d/magento_es_auth.confserver { listen 8080; location /_cluster/health { proxy_pass http://localhost:9200/_cluster/health; } }Restart NGINX.
sudo service nginx restartRun the following command to check whether the proxy runs as expected:
sudo curl -u admin:admin -i http://localhost:8080/_cluster/health?prettyThe following command output is returned.
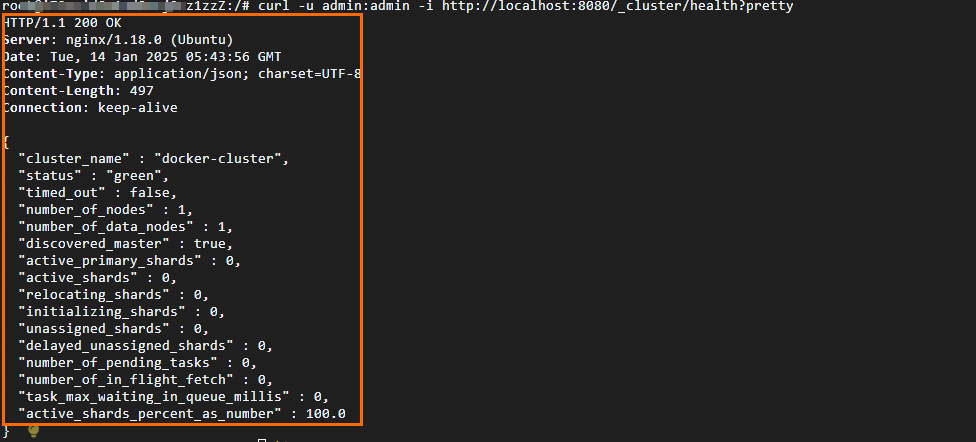
-
Step 4: Download and install Composer
-
Install a decompression tool.
Composer depends on the
unziporp7zipcommand-line tools to decompress files. Run the following command to install them.sudo apt-get install unzip sudo apt-get install p7zip-full Run the following commands to install Composer:
php -r "copy('https://getcomposer.org/installer', 'composer-setup.php');" php -r "if (hash_file('sha384', 'composer-setup.php') === 'dac665fdc30fdd8ec78b38b9800061b4150413ff2e3b6f88543c636f7cd84f6db9189d43a81e5503cda447da73c7e5b6') { echo 'Installer verified'; } else { echo 'Installer corrupt'; unlink('composer-setup.php'); } echo PHP_EOL;" php composer-setup.php php -r "unlink('composer-setup.php');"-
By placing
composer.pharin a directory that is in your PATH, you can call composer from any directory.sudo mv composer.phar /usr/local/bin/composer -
View the version of Composer.
composer --version
Step 5: Download and install Magento2
Create an editor project by using the access key pair that you obtained for Magento2 from the Adobe Commerce website. Set the project name to magento.
cd /var/www/html/
sudo composer create-project --repository-url=https://repo.magento.com/ magento/project-community-edition magento
When you are prompted to enter a password, enter your identity authentication key.
NoteThe identity authentication key is the private key of the access key pair that you obtained in the Prerequisites section.
Downloading the Magento2 software package requires 5 minutes to 10 minutes to complete.

-
Configure the read and write permissions.
cd /var/www/html/magento find var generated vendor pub/static pub/media app/etc -type f -exec chmod g+w {} + find var generated vendor pub/static pub/media app/etc -type d -exec chmod g+ws {} + chown -R :www-data . chmod u+x bin/magento -
Install Magento2.
You must use the command line to install Adobe Commerce. In this example,
db-hostis on the same computer (localhost), anddb-name,db-user, anddb-passwordare allmagento.sudo bin/magento setup:install \ --base-url=http://196.****.*.1/ \ # Public IP address of the ECS instance --db-host=localhost \ # Database host --db-name=magento \ # Database name --db-user=magento \ # Database username --db-password=magento \ # Database password --admin-firstname=admin \ # First name of the backend administrator --admin-lastname=admin \ --admin-email=cy****sper@email.com \ # Administrator's email address --admin-user=admin \ # Backend login username --admin-password=admin*** \ # Backend login password --language=en_US \ # Website language --currency=USD \ --timezone=America/Chicago \ --use-rewrites=1 \ --search-engine=opensearch \ --opensearch-host=localhost \ --opensearch-port=9200 \ --opensearch-enable-auth=1 \ --opensearch-username=admin \ --opensearch-password=admin \ --opensearch-index-prefix=magento2 -
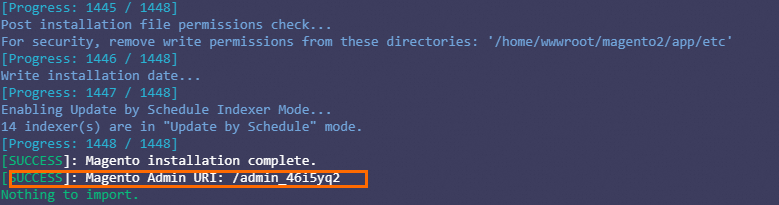
After the installation is complete, the content shown in the following figure is displayed.

The Magento Admin URI is the URL for the administrator backend. This URL will be accessible after you configure Nginx. Example:
http://47.****.**.72/admin_46i****. Configure NGINX for forwarding.
Create a file named magento.conf that is dedicated to Magento2.
sudo vim /etc/nginx/conf.d/magento.confCopy and paste the following code to the file, save the file, and then exit the Vim editor.
upstream fastcgi_backend {
  server  unix:/run/php/php8.3-fpm.sock;
}
server {
  listen 80;
  server_name ip;
  set $MAGE_ROOT /var/www/html/magento;
  include /var/www/html/magento/nginx.conf.sample;
}
Check whether the syntax is correct.
nginx -tRestart NGINX.
sudo systemctl restart nginx
Visit the Magento2 website
-
In a browser, navigate to
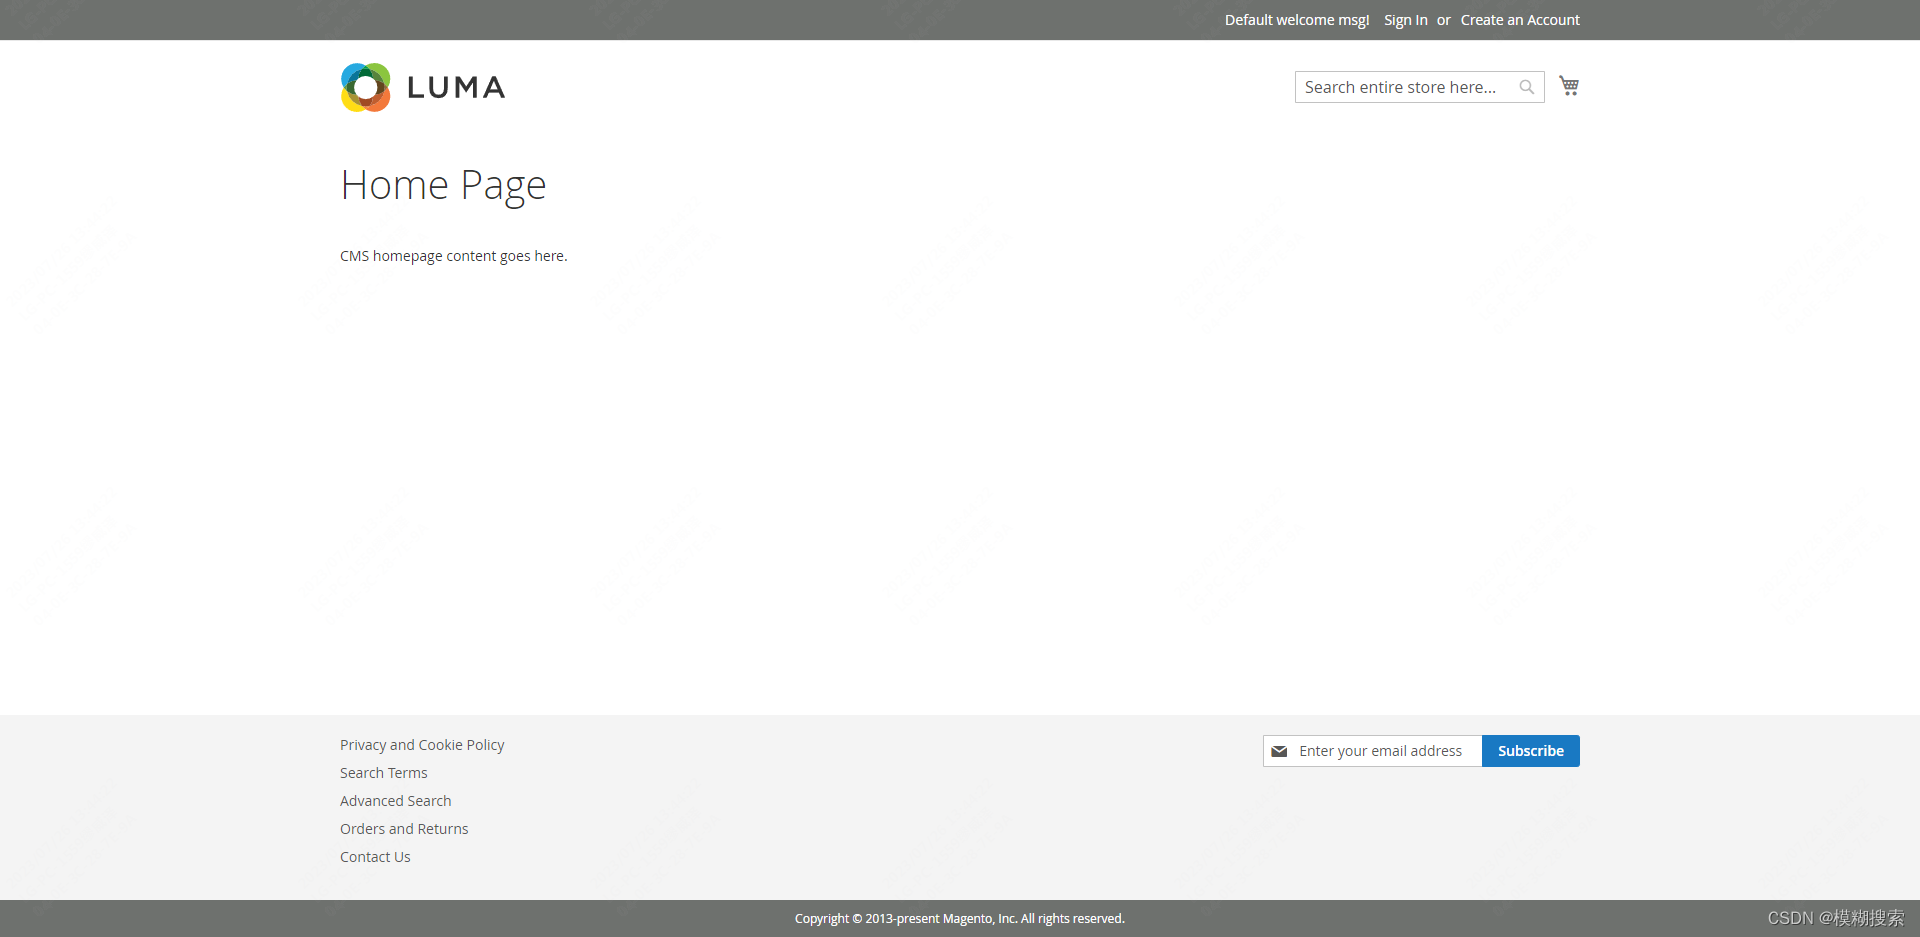
http://<Public IP address of your ECS instance>to view the default home page, as shown in the following figure. -
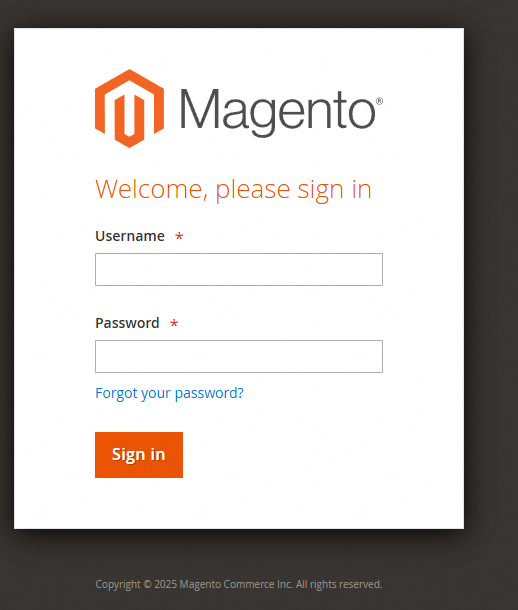
Access
http://<Public IP address of the ECS instance>/admin_46i****, and enter the backend logon accountadminand login passwordadmin***to log in.
FAQ
To resolve the issue, you must update the image repository.

-
View the default image repository.
composer config -l -g Change the global image repository.
sudo composer config -g repo.packagist composer https://mirrors.aliyun.com/composer/
