The Secure Sockets Layer (SSL) protocol is a common method used to protect data transmitted over the Internet. This topic describes how to bind an SSL certificate from a trusted certification authority (CA) to an EDAS application.
Purchase an SSL certificate
To configure SSL for an application, you must first obtain an SSL certificate signed by a certification authority (CA). A CA is a trusted third party that issues certificates. If you do not have an SSL certificate, you can purchase one from a certificate provider.
Alibaba Cloud SSL Certificates: To use an Alibaba Cloud SSL certificate, see Select and purchase a certificate.
Other third-party CAs: To obtain a certificate from a third-party CA, see the documentation provided by the CA.
Bind an SSL certificate to an application deployed from a WAR package
To bind an SSL certificate to an application deployed from a WAR package, package the certificate file into the WAR package. Then, deploy the application using the WAR package. Finally, modify the Connector parameter in the server.xml file for the Tomcat configuration.
Package the certificate file into the WAR package and record the path of the certificate file. For example, jks_path.
Log on to the EDAS console and deploy the application using the packaged WAR file. For more information, see Create and deploy an application in an ECS cluster.
-
In the left-side navigation pane, choose . In the top navigation bar, select a region. In the upper part of the Applications page, select a microservices namespace from the Microservices Namespace drop-down list. Then, click the name of the application that you want to manage.
On the Basic Information page of the application, in the Application Settings section, click Edit to the right of Tomcat Context.
In the Application Settings dialog box, expand Advanced Settings.
NoteThe Advanced Settings feature is available only for applications deployed from WAR packages.
In the server.xml file, modify the Connector parameter with the following configuration. Then, click Configure Tomcat.
<Connector port="8443" protocol="HTTP/1.1" SSLEnabled="true" scheme="https" secure="true" keystoreFile="../app/{app_ID}/{app_name}/{jks_path}" keystoreType="PKCS12" keystorePass="jks_password" clientAuth="false" SSLProtocol="TLS" connectionTimeout="15000" maxParameterCount="1000" maxThreads="400" maxHttpHeaderSize="16384" maxPostSize="209715200" acceptCount="200" useBodyEncodingForURI="true" URIEncoding="ISO-8859-1">Restart the application for the changes to take effect.
Bind an SSL certificate to an application deployed from a JAR package
To bind an SSL certificate to an application deployed from a JAR package, first modify the application.properties file to enable the SSL configuration. Then, package the certificate file into the JAR package and deploy the application. Finally, on the Application Settings page, change the application port for Tomcat to 8443.
Modify the
application.propertiesfile to enable the SSL configuration. The following code provides an example:server.ssl.enabled=true server.ssl.key-store=classpath:{jks} server.ssl.key-store-password=jks_password server.ssl.key-store-type=JKSPlace the certificate file in the resources path, which is at the same level as the application.properties file. Then, package the application into a JAR file.
Deploy the application using the packaged JAR file. For more information, see Create and deploy an application in an ECS cluster.
-
Log on to the EDAS consoleEDAS console.
-
In the left-side navigation pane, choose . In the top navigation bar, select a region. In the upper part of the Applications page, select a microservices namespace from the Microservices Namespace drop-down list. Then, click the name of the application that you want to manage.
On the Basic Information page of the application, in the Application Settings section, click Edit to the right of Tomcat Context.
In the Application Settings dialog box, set Application Port to 8443 and click Configure Tomcat.
Restart the application for the changes to take effect.
Bind an SSL certificate to an application deployed from an image
You can use Docker images created from WAR or JAR packages to deploy applications. To bind an SSL certificate to an application deployed from an image, perform the following steps.
Create an image from a WAR package
To bind an SSL certificate to an application deployed from an image created from a WAR package, modify the Tomcat configuration parameters and package the certificate file into the Docker image.
Download Ali-Tomcat. Save and decompress the package to a directory, such as d:\work\tomcat\.
In the server.xml file of Tomcat, modify the Connector configuration. The following code provides an example:
<Connector port="8443" protocol="HTTP/1.1" SSLEnabled="true" scheme="https" secure="true" keystoreFile="../app/{app_ID}/{app_name}/{jks_path}" keystoreType="PKCS12" keystorePass="jks_password">Place the modified server.xml file and the certificate file in the same directory as the Dockerfile. Then, add the following two commands to the Dockerfile.
ADD server.xml ${CATALINA_HOME}/conf/
ADD {jks} ${CATALINA_HOME}/conf/
Package the image and deploy it.
Create an image from a JAR package
To bind an SSL certificate to an application deployed from an image created from a JAR package, first modify the application.properties file to enable the SSL configuration. Then, package the certificate file into the JAR package that is used to create the image. Finally, modify the application port in the Dockerfile to enable the SSL configuration.
Modify the configuration parameters and generate the JAR package. For more information, see Bind an SSL certificate to an application deployed from a JAR package.
In the start.sh file of the Dockerfile, modify the port by setting
server.port=8443.Package the image and deploy it.
Bind an SLB instance to an EDAS application
Bind an Internet-facing SLB instance to an application deployed in an ECS cluster and configure the listener protocol as HTTPS.
You must create an SLB instance in the SLB console in advance. For more information, see Create an instance.
-
Log on to the EDAS consoleEDAS console.
-
In the left-side navigation pane, choose . In the top navigation bar, select a region. In the upper part of the Applications page, select a microservices namespace from the Microservices Namespace drop-down list. Then, click the name of the application that you want to manage.
On the Basic Information page of the application, in the Application Settings section, click Add to the right of Internet-facing SLB.
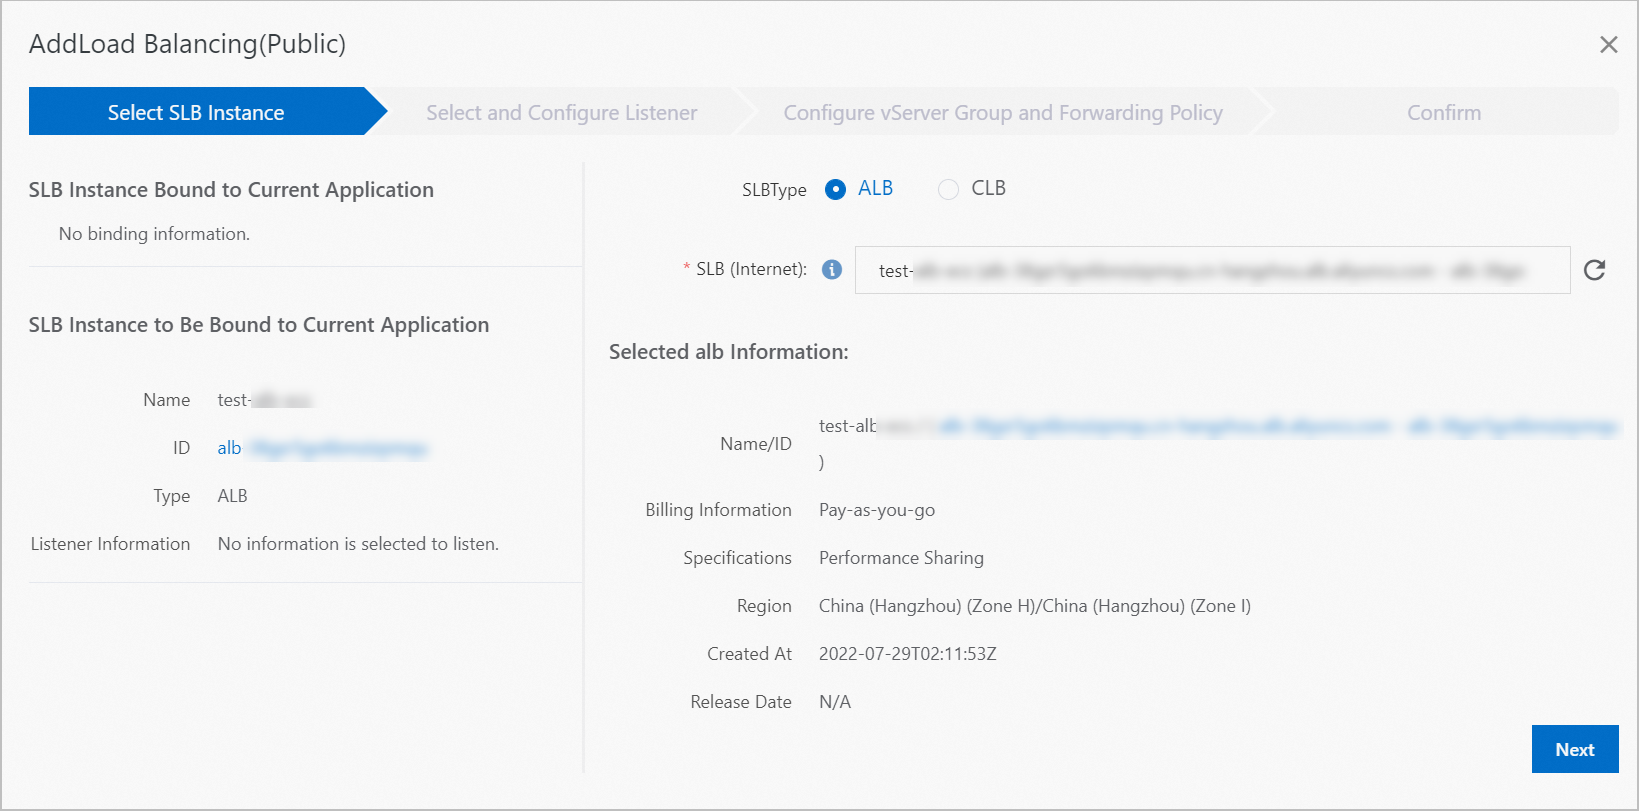
In the Add Internet-facing SLB dialog box, bind an SLB instance to the application. For more information, see Bind a dedicated SLB instance to an application.
 Important
Set the listener port to 443.
Verify the SSL connection
In the address bar of your browser, enter the IP address or domain name of the application with the https:// prefix. If you can access the home page of the application, the SSL certificate is bound successfully.
More information
For more information about how to use an SLB instance to configure an SSL certificate for an application, see Add an HTTPS listener.