When you deploy containerized applications, you need to run custom logic during container startup and shutdown, and continuously verify that containers are healthy and ready to serve traffic. Enterprise Distributed Application Service (EDAS) integrates Kubernetes lifecycle hooks and container probes so you can manage these behaviors directly from the EDAS console.
How lifecycle hooks work
Kubernetes provides two lifecycle hooks for containers:
| Hook | When it runs | Typical use case |
|---|---|---|
| PostStart | Immediately after a container is created, concurrently with the container ENTRYPOINT | Load resources, register the service with a discovery system, or send a startup notification |
| PreStop | Before a container is terminated; the hook handler must execute before the request to delete the container is sent to the Docker daemon | Deregister the service, drain connections, or save state before shutdown |
Hook behaviors:
PostStart runs concurrently with ENTRYPOINT. The container process may not be fully initialized when the PostStart hook runs. Do not rely on the application being ready inside PostStart logic. You do not need to pass parameters to the hook handler.
PreStop blocks termination. The hook handler must be executed before the request that is initiated to delete the container is sent to the Docker daemon. The Docker daemon sends a SIGTERM signal to delete the container, regardless of the execution result of the hook handler. If the hook exceeds the
TerminationGracePeriodSecondstimeout, Kubernetes force-kills the container.At-least-once delivery. A hook may be called multiple times for a single event. Design hook handlers to be idempotent.
If a hook handler fails, the container is restarted based on its restart policy. Check the application change records in EDAS for failure details.
For more information, see Container Lifecycle Hooks in the Kubernetes documentation.
How container probes work
EDAS supports two Kubernetes container probes:
| Probe | Purpose | On failure |
|---|---|---|
| Liveness | Checks whether the container is still running and healthy | Kubernetes terminates and restarts the container based on the restart policy |
| Readiness | Checks whether the container is ready to receive traffic | Kubernetes removes the pod from service endpoints until the probe succeeds |
If no liveness probe is configured, Kubernetes assumes the container is always healthy. If no readiness probe is configured, Kubernetes considers the container ready as soon as it starts.
For more information, see Pod Lifecycle in the Kubernetes documentation.
Probe modes
Both liveness and readiness probes support the following check modes:
| Mode | How it works | Success condition |
|---|---|---|
| Exec | Runs a command inside the container | Exit code is 0 |
| HttpGet | Sends an HTTP GET request to a container endpoint | Response status code is 200--399 |
| TcpSocket | Opens a TCP connection to a specified port on the container | The port is reachable |
HttpGet parameters
When you use HttpGet mode, configure the following parameters:
| Parameter | Description | Default |
|---|---|---|
| Host | IP address or hostname for the request | Pod IP address |
| Path | URL path for the request | / |
| Port | Port number for the request | (Required) |
| Scheme | Protocol: HTTP or HTTPS | HTTP |
| HttpHeaders | Custom HTTP request headers | None |
Probe timing parameters
These parameters control when and how often probes run:
| Parameter | Description | Valid values | Default |
|---|---|---|---|
| InitialDelaySeconds | Seconds to wait after the container starts before the first probe runs | 1--1000 | 0 |
| PeriodSeconds | Seconds between consecutive probe checks | 1--1000 | 10 |
| TimeoutSeconds | Seconds before a single probe check times out | 1--1000 | 1 |
| SuccessThreshold | Consecutive successes required after a failure before the probe is considered successful. For liveness probes, this value must be 1. | 1--1000 | 1 |
| FailureThreshold | Consecutive failures required after a success before the probe is considered failed | 1--1000 | 3 |
Prerequisites
Before you begin, ensure that you have:
An EDAS account with access to the EDAS console
A Kubernetes cluster configured in EDAS
An application deployed or ready to deploy in a Kubernetes cluster
Configure hooks and probes during application creation
Log on to the EDAS console.
In the left-side navigation pane, choose Application Management > Applications.
In the top navigation bar, select a region. In the upper part of the page, select a namespace.
In the upper-left corner, click Create Application.
In the Basic Information step, set the following parameters and click Next. The following table describes the Java runtime sub-options:
Parameter Description Cluster Type Select Kubernetes Clusters Application Runtime Environment Select the runtime environment for your application. Options: Java (Custom, Java, Tomcat, or EDAS-Container (HSF)), PHP, or Node.js, C++, Go, and Other Languages Option When to use Configurable parameters Custom Deploy with a custom container image None Java Deploy a Dubbo or Spring Boot application with a JAR package Java Environment Tomcat Deploy a Dubbo or Spring application with a WAR package Java Environment, Container Version EDAS-Container (HSF) Deploy an HSF application with a WAR or FatJar package Java Environment, Pandora Version, Ali-Tomcat Version In the Configurations step, configure the environment information, basic information, deployment method, and resource parameters. Click Next.
In the Advanced Settings step, expand the Application Life Cycle Management section. Configure the lifecycle hooks and probes as described in Set up lifecycle hooks and Set up liveness and readiness probes.
Click Create Application.
On the Creation Completed page, review the Basic Information, Configurations, and Advanced Settings sections. Click Create Application to confirm.
After the deployment finishes, go to the Application Overview page and click View Details to open the Change List page. Monitor the deployment progress there. When the pod status shows as running in the Basic Information section, the application is deployed.
Configure hooks and probes for an existing application
Log on to the EDAS console.
In the left-side navigation pane, choose Application Management > Applications.
In the top navigation bar, select a region. In the upper part of the page, select a namespace.
From the Cluster Type drop-down list, select Container Service or Serverless Kubernetes Cluster. Find the target application and click its name.
On the Overview or Basic information page, choose Deploy > Deploy in the upper-right corner.
On the Select Deployment Mode page, select a deployment mode and click Start Deployment.
Configure the deployment parameters, then expand the Application Life Cycle Management section. Configure the lifecycle hooks and probes as described in Set up lifecycle hooks and Set up liveness and readiness probes.
Click OK.
Clicking OK restarts the application. Perform this operation during off-peak hours.
Set up lifecycle hooks
PostStart and PreStop hooks support two configuration modes: Exec and HttpGet.
Exec mode
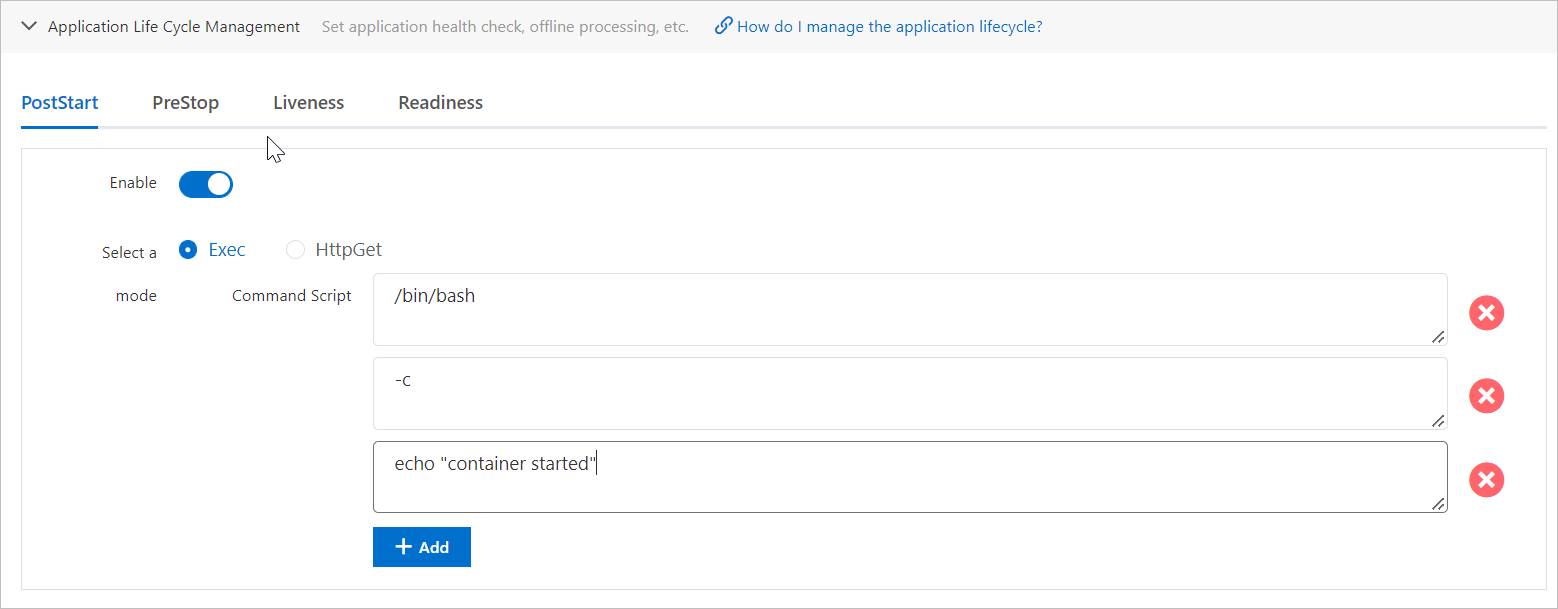
Exec mode runs a command inside the container to perform tasks such as running scripts or writing startup flags.
Example: Run echo "container started" after a container is created.
Enter the command using one of these methods:
Split parameters: Enter each part of the command as a separate argument. Best for short commands with few arguments.

Shell wrapper: Start a shell process and pass the full command as a string. Best for long commands or commands with multiple arguments.
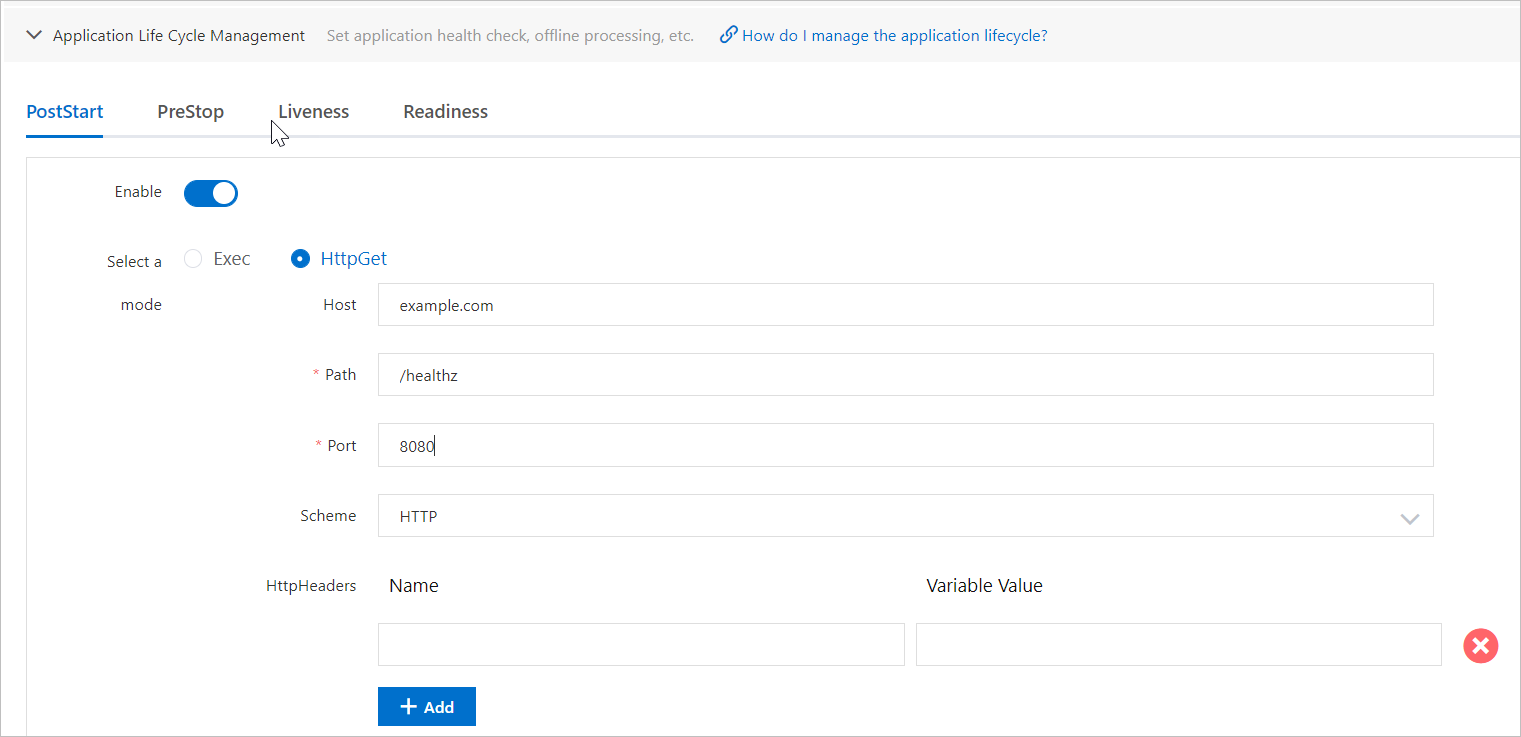
HttpGet mode
HttpGet mode sends an HTTP GET request to a specified endpoint when the lifecycle event fires.
Example: Send a GET request to http://example.com:8080/healthz after the container starts.
TerminationGracePeriod
Set the TerminationGracePeriod configuration to control how long Kubernetes waits for a pod to shut down gracefully. The PreStop hook must complete and the application must process the SIGTERM signal within this timeout. If the timeout expires, Kubernetes force-kills the container.
Set up liveness and readiness probes
Example: Liveness probe with TcpSocket
The following screenshot shows a liveness probe configured in TcpSocket mode:
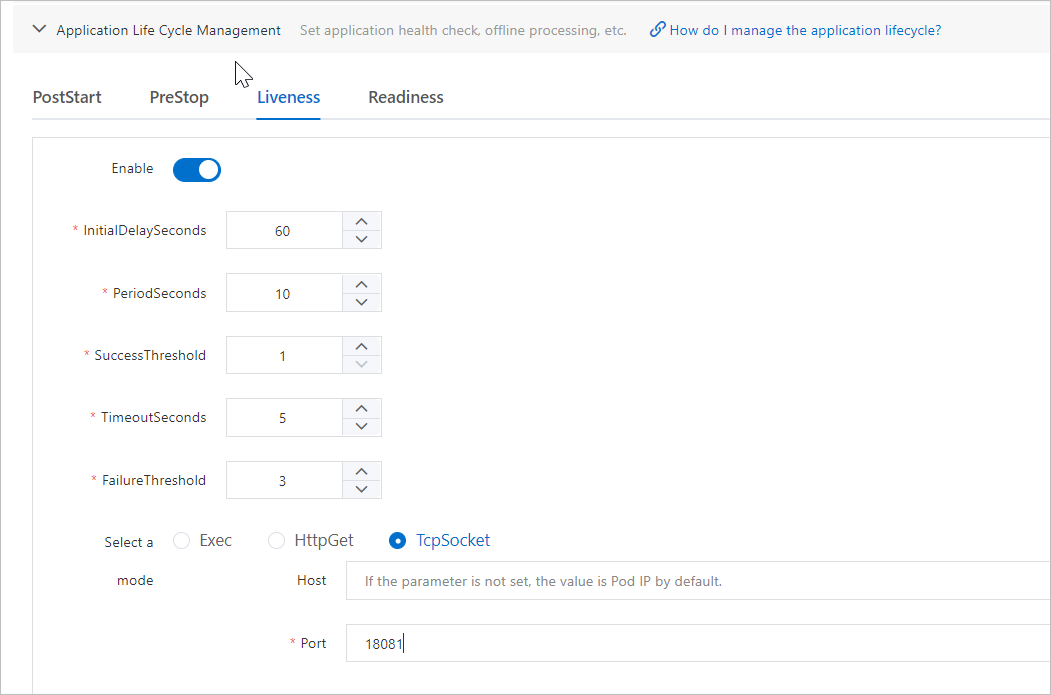
This configuration behaves as follows:
| Parameter | Value | Effect |
|---|---|---|
| Host | (empty) | Uses the pod IP address |
| Port | 18081 | Probes TCP port 18081 |
| InitialDelaySeconds | 60 | Waits 60 seconds after container startup before the first check |
| PeriodSeconds | 10 | Runs a check every 10 seconds |
| SuccessThreshold | 1 | One successful check marks the pod as alive |
| TimeoutSeconds | 5 | Each check times out after 5 seconds |
| FailureThreshold | 3 | Three consecutive failures trigger a container restart |
Verify the configuration
After deploying an application with lifecycle hooks, verify that the hooks ran correctly.
Example: If you configured a PostStart hook to run echo "Hello from the postStart handler" > /usr/share/message, verify the result:
Open the web shell for the application instance in the EDAS console.
Run the following command:
cat /usr/share/messageConfirm that the output contains
Hello from the postStart handler.
Support
If you have questions or suggestions about using Container Service for Kubernetes (ACK) and Serverless Kubernetes clusters in EDAS, submit a . You can also join the DingTalk group 23197114 for community support.
References
Container Lifecycle Hooks - Kubernetes documentation
Pod Lifecycle - Kubernetes documentation