If you specify multiple containers when you create an application, EDAS mounts volumes only to the main application container. For sidecar or init containers, you must use VolumeMounts to mount the required directories to them. This topic describes how to mount a volume for a sidecar container by configuring custom volumes when you create or deploy an application.
Background information
EDAS supports configuring volumes for Kubernetes application pods by mounting persistent storage, local storage, or configurations. However, these configurations are mounted only to the main application container. If your application has multiple containers, you must configure custom volumes. The procedure is as follows:
Define the volumes that the pod requires.
When you configure multiple containers, such as sidecar or init containers, use VolumeMounts to mount the required directories to them.
Limits
Only Kubernetes applications are supported.
Create mount resources
Create the resources that you need to mount, such as configuration items, secrets, or persistent volume claims (PVCs), based on your business needs. For more information, see:
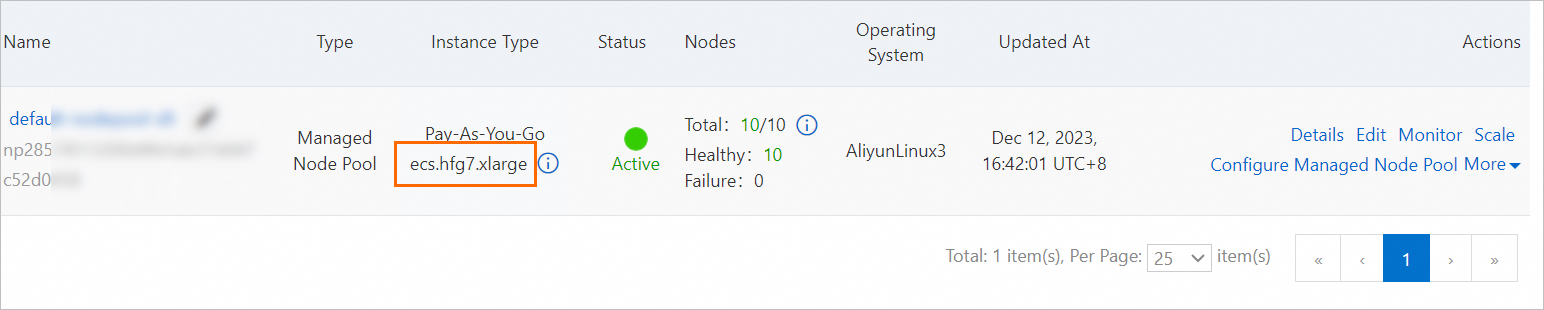
When you create a PVC, ensure that the disk type and the ECS instance type match. Otherwise, the mount operation fails. For more information about the mapping between disk types and ECS instance types, see Instance families.
To view the ECS instance type:
Log on to the Container Service for Kubernetes (ACK) console. In the navigation pane on the left, choose Clusters.
On the Clusters page, click the name of the target cluster. In the navigation pane on the left, choose .
On the Node Pools page, view the instance type.
Mount a volume for a sidecar container
Log on to the EDAS console. In the navigation pane on the left, click . In the top menu bar, select a microservices namespace. In the upper-left corner of the Applications page, click Create Application.
On the Basic Information tab, configure the settings and click Next.
On the Configurations tab, configure the environment context, basic information, deployment method, and resource parameters for the application. Then, click Next.
On the Advanced Settings tab, expand the Custom Volumes section and enter the following code to define the volumes.
volumes: - name: test-emptydir-vol emptyDir: {} - name: test-secret-vol secret: defaultMode: 420 secretName: test-secret - name: test-configmap-vol configMap: defaultMode: 420 name: test-configmap - name: test-pvc-vol persistentVolumeClaim: claimName: test-pvctest-secret: The name of the secret that you created. Replace it as needed.test-configmap: The name of the configuration item that you created. Replace it as needed.test-pvc: The name of the PVC that you created. Replace it as needed.
On the Advanced Settings tab, expand the Sidecar & Init Container section. Click + Add Sidecar Container. In the sidecar container configuration, define the VolumeMounts. At the bottom of the page, click Next.
name: busybox
image: busybox:latest
command: ["tail","-f" ,"/dev/null"]
volumeMounts:
  - name: test-emptydir-vol
    mountPath: /tmp/emptydir
  - name: test-secret-vol
    mountPath: /tmp/secret
  - name: test-configmap-vol
    mountPath: /tmp/configmap
  - name: test-pvc-vol
    mountPath: /tmp/pvc
After you configure the advanced settings, click Create Application. In the Creation Completed step, click Create Application.
In the Confirm Application Change Precheck dialog box, click Start Precheck.
After the data in the dialog box is refreshed, confirm the precheck items and results and click Continue.
(Optional) If you modify the preceding precheck items, click Check Again.
The application requires several minutes to be deployed. During the process, you can view the change records to track the deployment progress of the application on the Change List page. After you deploy the application, go to the Application Overview page to view the running status of pods. If the pods are in the running state, the application is deployed. You can click the running status of pods to view the Deployments, pods, and advanced configurations of the application instances.
On the Overview page of the application, in the Basic Information section, click View Details to the right of Status.
In the Application Configuration Details panel, in the Container Group (Pod) section, click Terminal in the Actions column to connect to the sidecar container. Run the following commands to check the directory mount status.
cd /tmp
ls -lah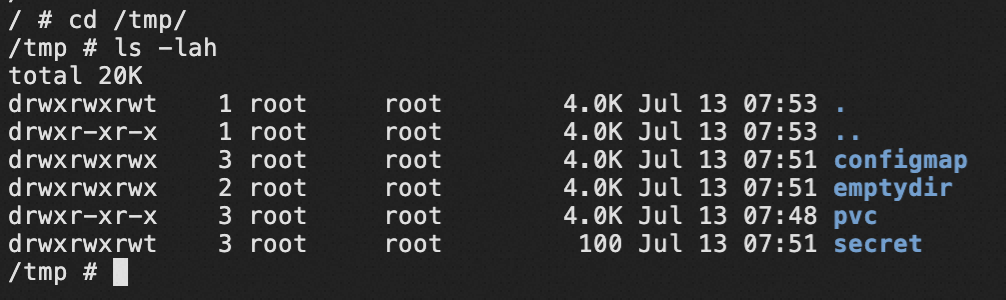
If the directories exist, the mount was successful.