Configure scheduling rules
When you create or deploy an application in a Container Service for Kubernetes (K8s) cluster, you can modify the scheduling rules for its application instances. You can deploy pod instances across multiple zones and nodes to enhance application availability. This topic describes how to configure scheduling rules.
Configure scheduling rules when you create an application
-
Log on to the EDAS console. In the left-side navigation pane, choose . The Applications page appears. In the top navigation bar, select a region. In the upper part of the page, select a namespace. In the upper-left corner, click Create Application.
- On the Basic Information tab, select the cluster type and application runtime environment, and then click Next at the bottom of the page.
Parameter Description Cluster Type Select Kubernetes Cluster. Application Runtime Environment Select an application runtime environment based on the type of the application. - Java:
- Custom: Select this option to use a custom image to deploy the application in a K8s cluster.
- Java: Select this option to use a universal JAR package to deploy a Dubbo or Spring Boot application. You can change the Java environment after you select this option.
- Tomcat: Select this option to use a universal WAR package to deploy a Dubbo or Spring application. You can change the Java environment and container version after you select this option.
- EDAS-Container (HSF): Select this option to use a WAR or FatJar package to deploy a High-speed Service Framework (HSF) application. You can change the Java environment, Pandora version, and Ali-Tomcat version after you select this option.
- PHP: Select this option to deploy a PHP application that runs on Apache HTTP Server.
- Node.js, C++, Go...: Select this option to use a custom image to deploy a microservice application developed in any language.
- Java:
-
In the Configurations step, configure the environment information, basic information, and deployment method for the application, set the related resource parameters, and then click Next.
- On the Advanced Settings tab, expand Scheduling Rules, and set the scheduling mode and rules.
- Select Built-in Configuration:
Parameter Description Zone scheduling - Default scheduling: Instances are scheduled based on cluster resources by default. All instances might be deployed to a single zone, which provides basic availability.
- Multi-zone deployment: Instances are deployed to as many zones as possible using anti-affinity to ensure high availability.
Node scheduling - Default scheduling: Instances are scheduled based on the resource loads of nodes by default.
- Multi-node deployment: Instances of the same application are deployed to as many nodes as possible to ensure high availability.
- Select Custom Configuration:
If the built-in scheduling rules for nodes and zones do not meet your requirements for complex scenarios, you can use the custom configuration feature provided by EDAS to design scheduling rules for your business.
Table 1. Add a node affinity scheduling rule Parameter Description Selector Specify the node scheduling rule by setting Node Label Key, Operator, and Node Label Value.
Weight The weight of the rule. Valid values: 0 to 100. The default value is 1. 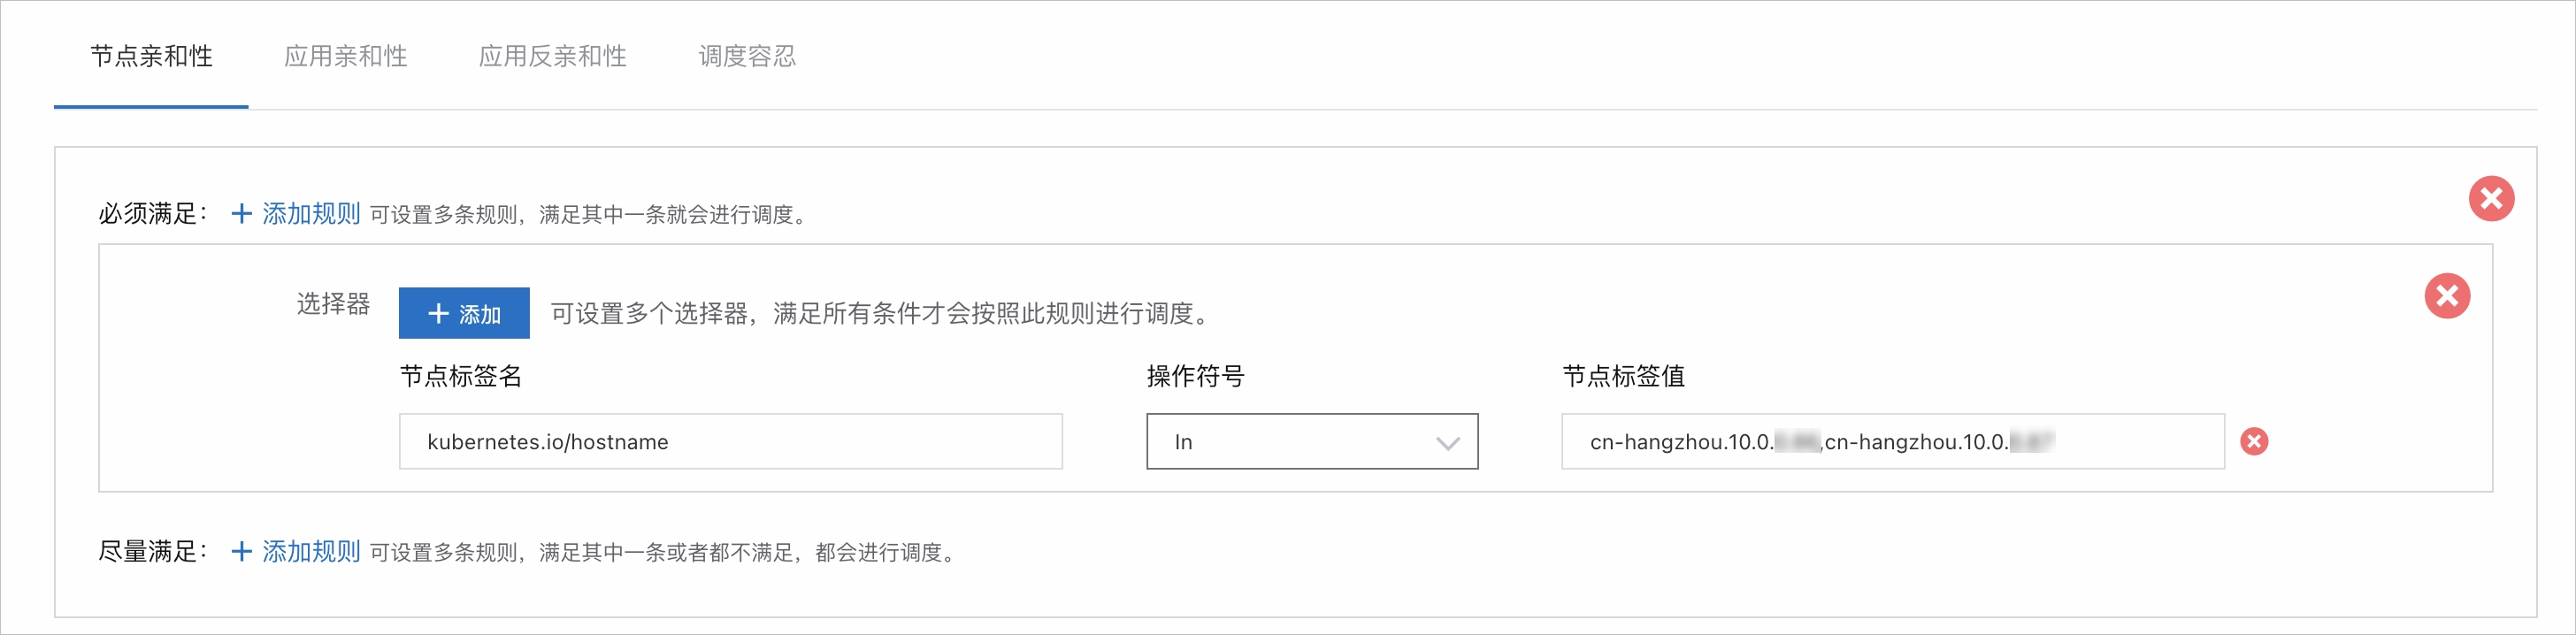
Table 2. Add a pod affinity scheduling rule Parameter Description Kubernetes Namespace The Kubernetes namespace that is associated with the application. Topology domain A logical grouping used for management in a K8s cluster, such as a node, zone, or region. Selector Specify the scheduling constraints by setting Application Label Key, Operator, and Application Label Value. Weight The weight of the rule. Valid values: 0 to 100. The default value is 1. 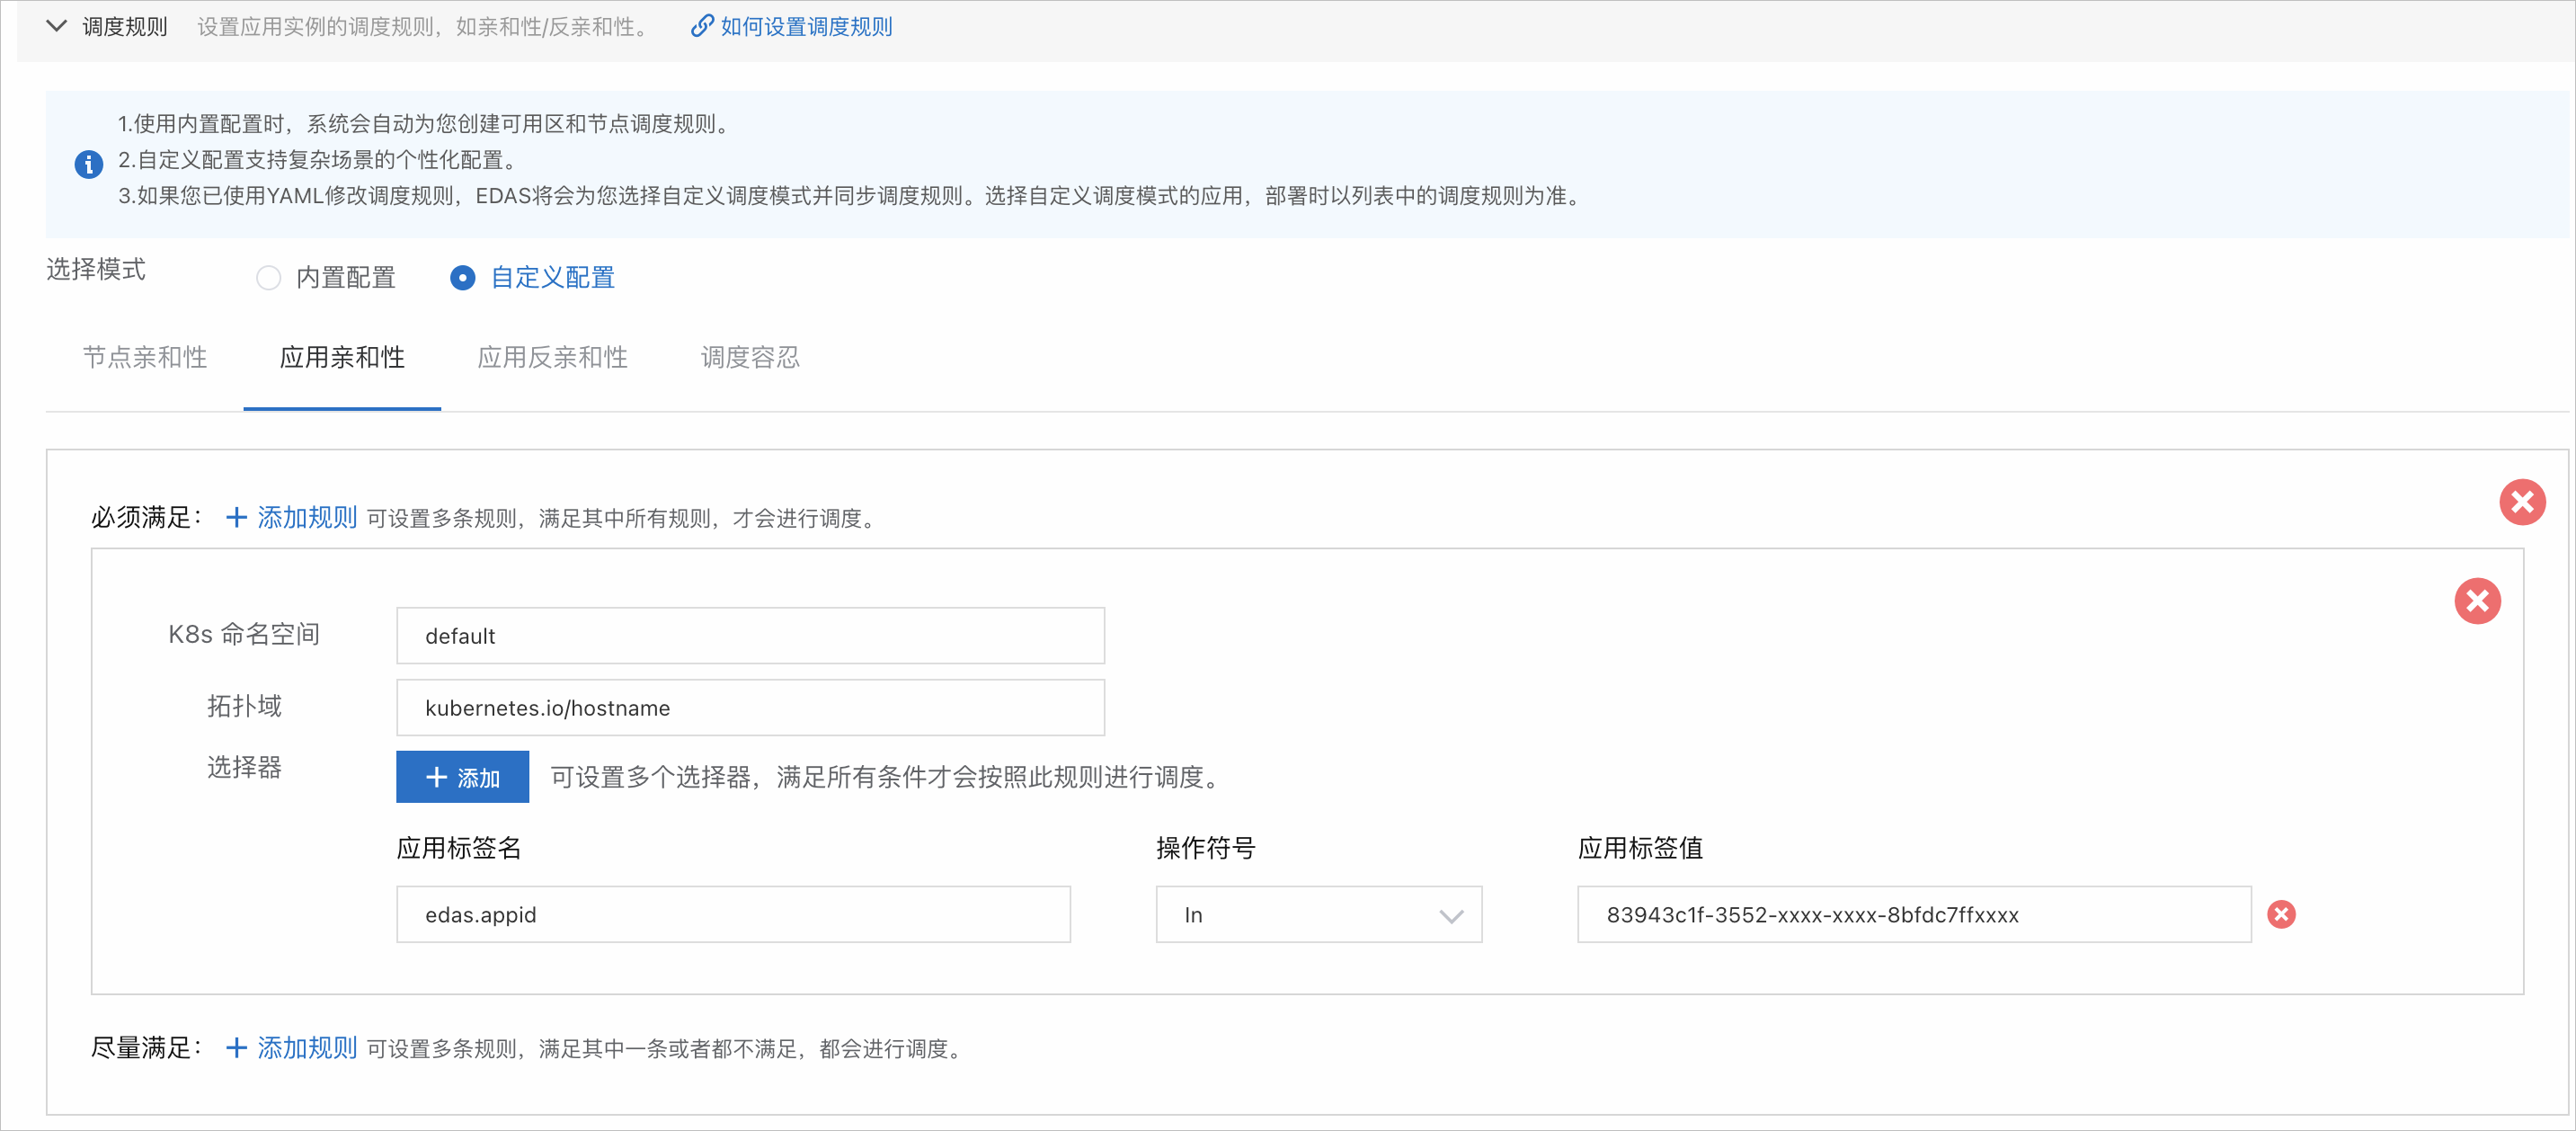
Table 3. Add a pod anti-affinity scheduling rule Configuration Item Description Kubernetes Namespace The Kubernetes namespace that is associated with the application. Topology domain A logical grouping used for management in a K8s cluster, such as a node, zone, or region. Selector Specify the scheduling constraints by setting Application Label Key, Operator, and Application Label Value. Weight The weight of the rule. Valid values: 0 to 100. The default value is 1. 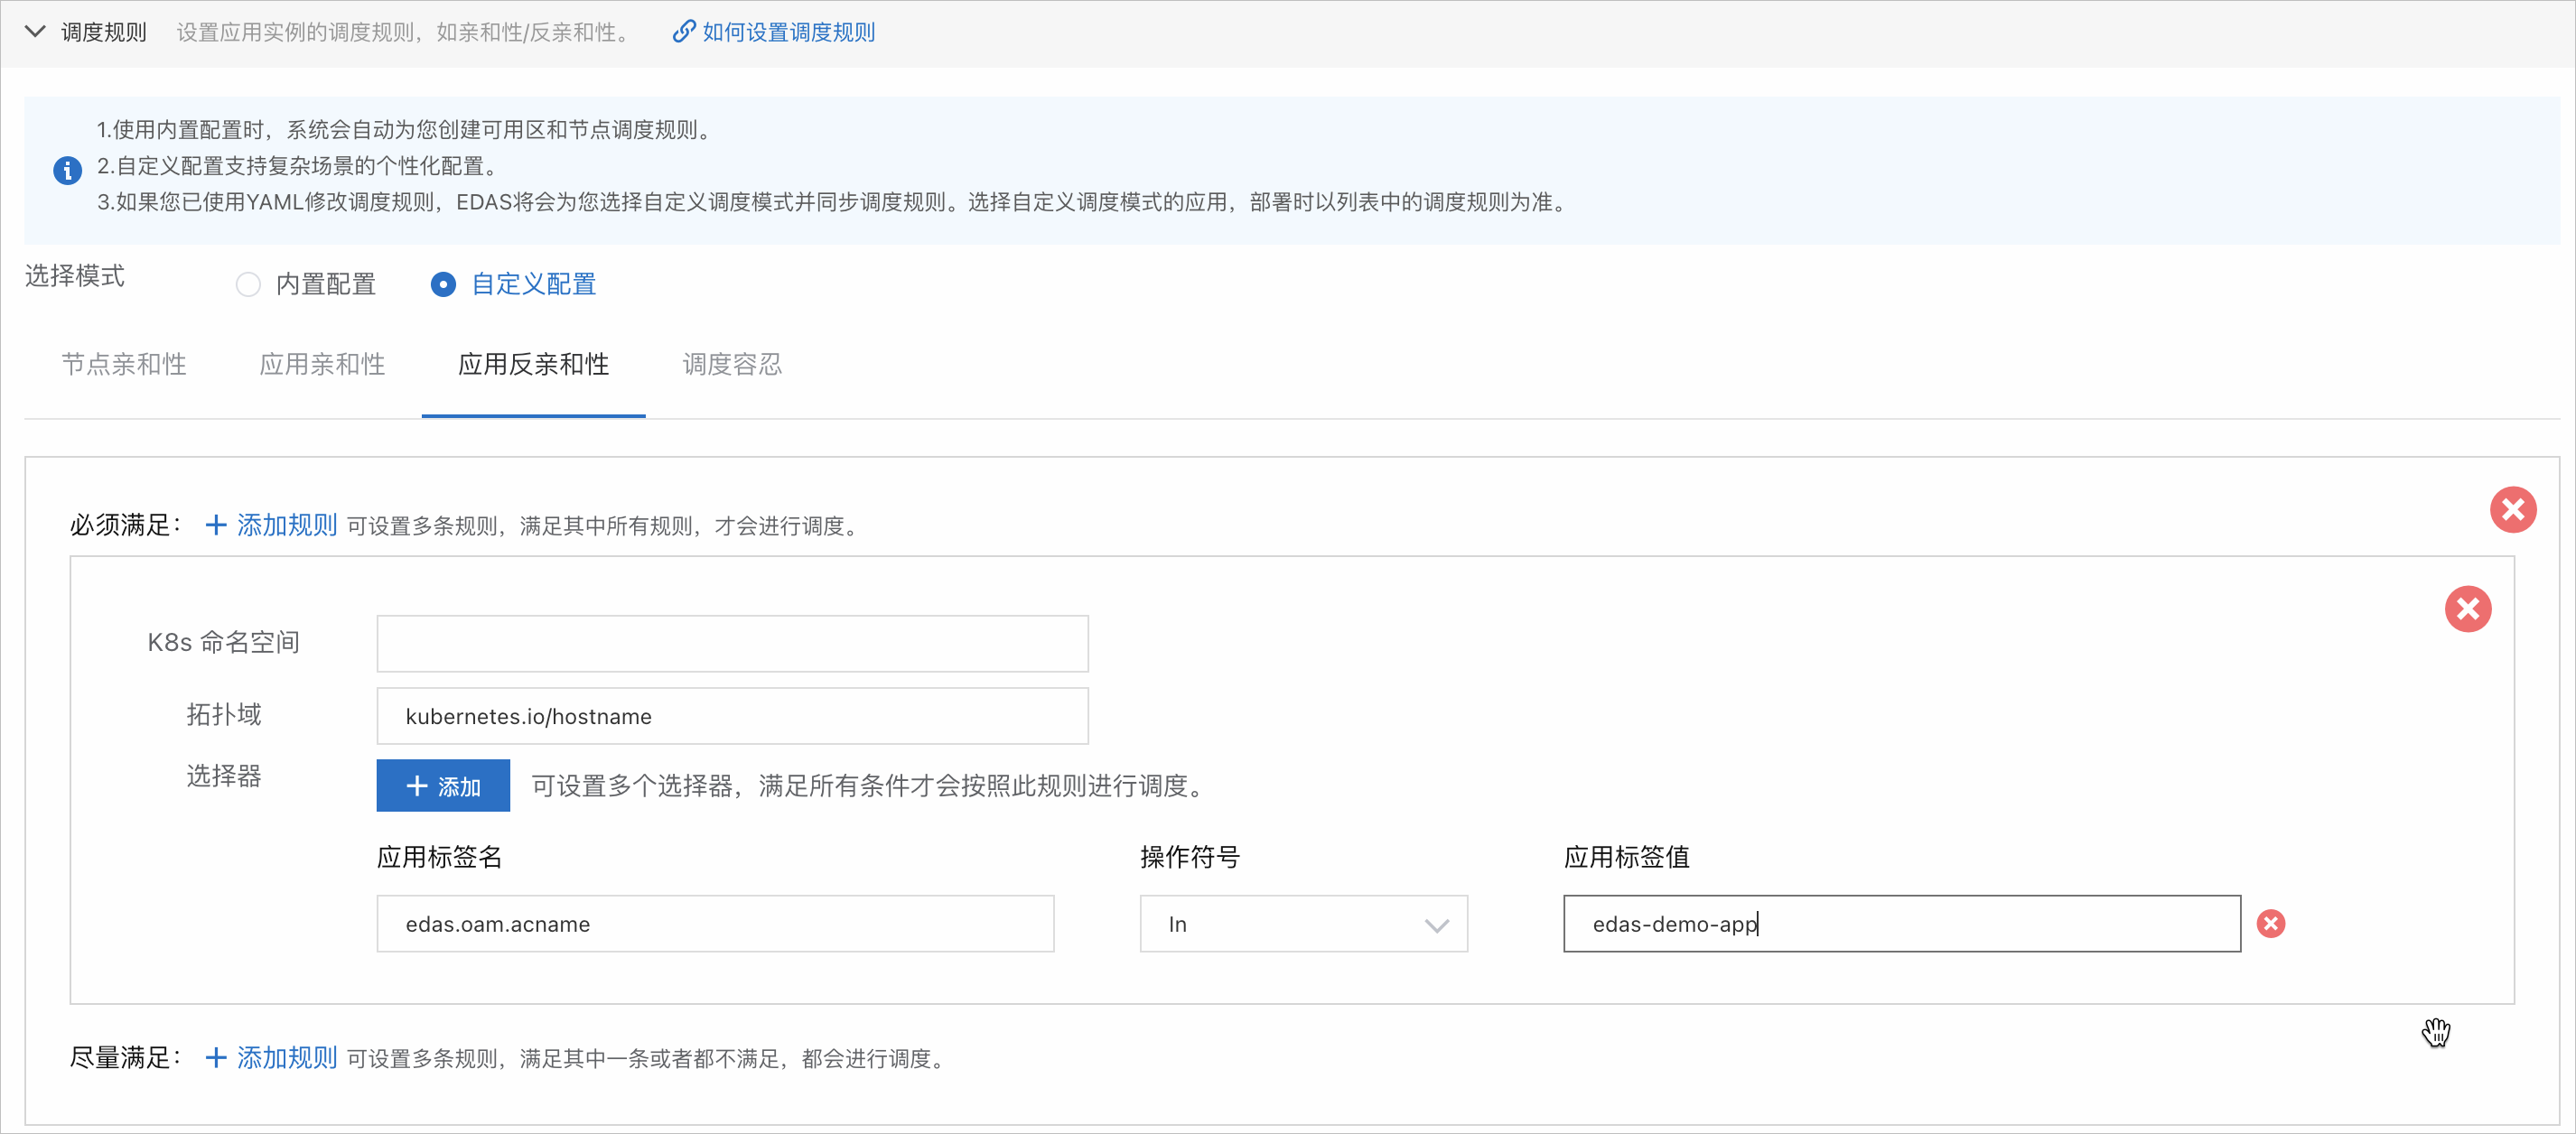
Table 4. Add a toleration scheduling rule Configuration Item Description Tag Name The object to which the toleration rule applies. Operator The operator defines how the rule affects scheduling. Tag Value The value that corresponds to the key. A toleration matches a taint based on the Key, Value, Operator, and Effect. Effect The effect that is applied after a taint on a node is matched. Toleration Period (seconds) You can set this parameter only if Effect is set to NoExecute.
This parameter specifies the amount of time that a pod can continue to run on a node after a taint is matched. If you do not specify this parameter, the pod can run on the node indefinitely. - Select Built-in Configuration:
-
Click Create Application.
-
On the Creation Completed page, check the information in the Basic Information, Configurations, and Advanced Settings sections. Then, click Create Application.
In the upper part of the Application Overview page, click View Details. On the Change List page, view the application change process. Wait several minutes until the application is deployed. After the application change process is complete, view the status of the instance in the Basic Information section of the Application Overview page. If the status shows that a pod is running, the application is deployed.
Configure scheduling rules when you update an application
You can configure scheduling rules when you create an application, or configure and update them when you deploy the application.
-
Log on to the EDAS consoleEDAS console.
-
In the left-side navigation pane, click . In the top navigation bar, select a region. In the upper part of the page, select a namespace. Select Container Service or Serverless Kubernetes Cluster from the Cluster Type drop-down list. Then, find the application that you want to deploy and click the application name.
-
On the Overview or Basic information page, choose in the upper-right corner.
-
On the Select Deployment Mode page, select a deployment mode and click Start Deployment in the upper-right corner of the specified deployment mode section.
- Set the environment and deployment package information, expand Scheduling Rules, complete the configuration, and then click OK.
- Select Built-in Configuration:
Parameter Description Zone scheduling - Default scheduling: Instances are scheduled based on cluster resources by default. All instances might be deployed to a single zone, which provides basic availability.
- Multi-zone deployment: Instances are deployed to as many zones as possible using anti-affinity to ensure high availability.
Node scheduling - Default scheduling: Instances are scheduled based on the resource loads of nodes by default.
- Multi-node deployment: Instances of the same application are deployed to as many nodes as possible to ensure high availability.
- Select Custom Configuration:
If the built-in scheduling rules for nodes and zones do not meet your requirements for complex scenarios, you can use the custom configuration feature provided by EDAS to design scheduling rules for your business.
Table 1. Add a node affinity scheduling rule Parameter Description Selector Specify the node scheduling rule by setting Node Label Key, Operator, and Node Label Value.
Weight The weight of the rule. Valid values: 0 to 100. The default value is 1. Table 2. Add a pod affinity scheduling rule Parameter Description Kubernetes Namespace The Kubernetes namespace that is associated with the application. Topology domain A logical grouping used for management in a K8s cluster, such as a node, zone, or region. Selector Specify the scheduling constraints by setting Application Label Key, Operator, and Application Label Value. Weight The weight of the rule. Valid values: 0 to 100. The default value is 1. Table 3. Add a pod anti-affinity scheduling rule Configuration Item Description Kubernetes Namespace The Kubernetes namespace that is associated with the application. Topology domain A logical grouping used for management in a K8s cluster, such as a node, zone, or region. Selector Specify the scheduling constraints by setting Application Label Key, Operator, and Application Label Value. Weight The weight of the rule. Valid values: 0 to 100. The default value is 1. 
Table 4. Add a toleration scheduling rule Configuration Item Description Tag Name The object to which the toleration rule applies. Operator The operator defines how the rule affects scheduling. Tag Value The value that corresponds to the key. A toleration matches a taint based on the Key, Value, Operator, and Effect. Effect The effect that is applied after a taint on a node is matched. Toleration Period (seconds) You can set this parameter only if Effect is set to NoExecute.
This parameter specifies the amount of time that a pod can continue to run on a node after a taint is matched. If you do not specify this parameter, the pod can run on the node indefinitely.Important The application restarts after you click OK. Perform this operation during off-peak hours. - Select Built-in Configuration:
DingTalk group for ACK and Serverless Kubernetes clusters
If you have questions or suggestions about using Container Service for Kubernetes (ACK) and Serverless Kubernetes clusters in EDAS, you can join the DingTalk group by searching for the ID 23197114 in DingTalk.