SchedulerX supports configuring access policies for Resource Access Management (RAM) users and user groups in batches. RAM helps you avoid sharing your Alibaba Cloud account keys with other users and reduces security risks by allowing you to assign the least privilege required. This topic describes how to grant permissions for specific operations to RAM users.
Quick start configurations
This section provides two quick start methods for granting SchedulerX access permissions to RAM users. These methods offer different levels of control. Choose the method that meets your requirements. For more granular custom policy configurations, see Sample custom policy configurations.
Grant RAM users permissions to create resources
By default, a RAM user cannot create, view, or manage any SchedulerX resources. After you grant a RAM user the permission to create resources, the RAM user can read and write all resources that they create.
Procedure:
Log on to the Resource Access Management (RAM) console.
Create a custom policy. For more information, see Create custom policies. Use the following policy script to grant a RAM user the permissions to create namespaces and application groups in all namespaces. The RAM user will have permissions only for the application groups that they create. To grant permissions for application groups and resources created by other RAM users, see the Sample custom policy configurations section in this topic.
{
    "Version": "1",
    "Statement": [
        {
            "Action": ["edas:CreateSchedulerxNamespace*",
                       "edas:CreateSchedulerxAppGroup*"],
            "Effect": "Allow",
            "Resource": "acs:edas:*:*:*"
        }
    ]
}
(Optional) Create a user or user group. For more information, see Create a RAM user or Create a RAM user group. Skip this step if a user or user group already exists.
Assign the access policy that you configured in Step 2 to a single user. For more information, see Grant permissions to a RAM user.
Assign the access policy from Step 2 to a user group and add users to the group.
Assign the access policy to the user group. For more information, see Grant permissions to a RAM user group.
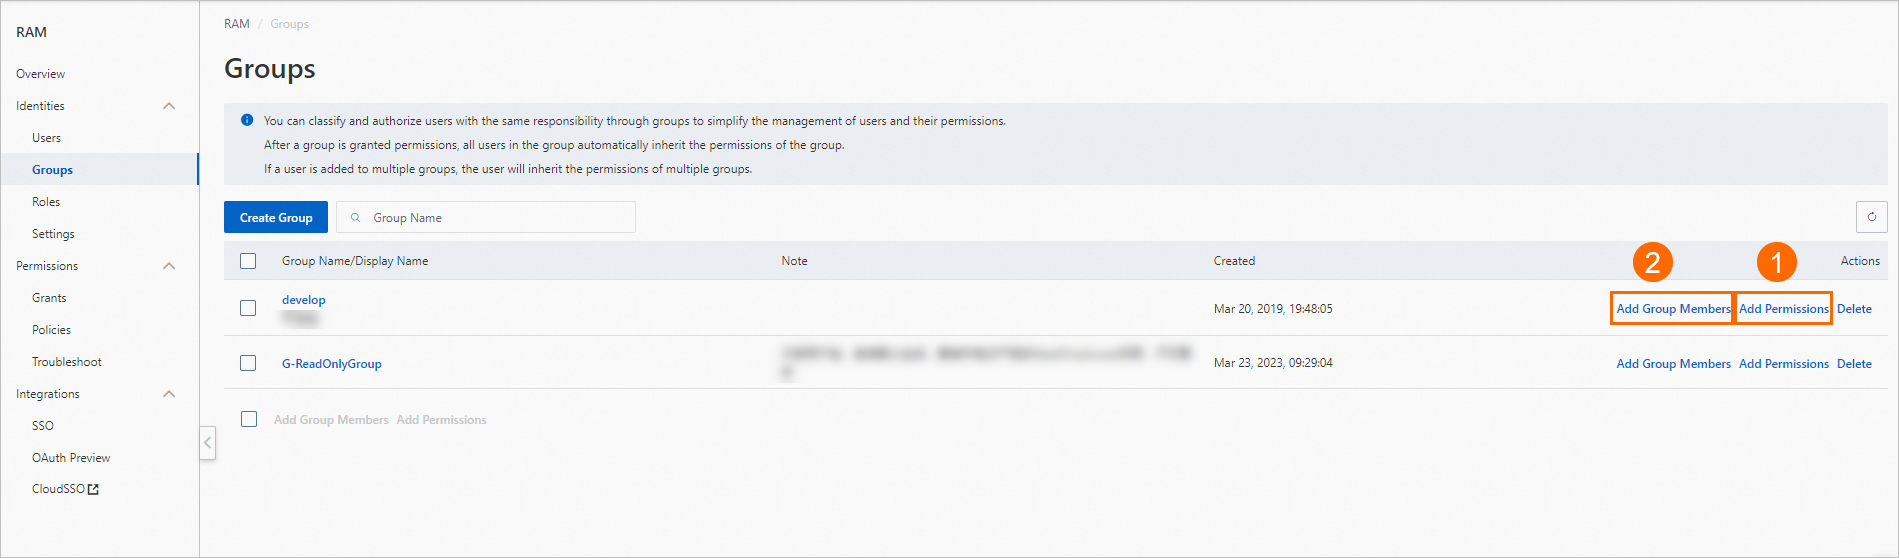
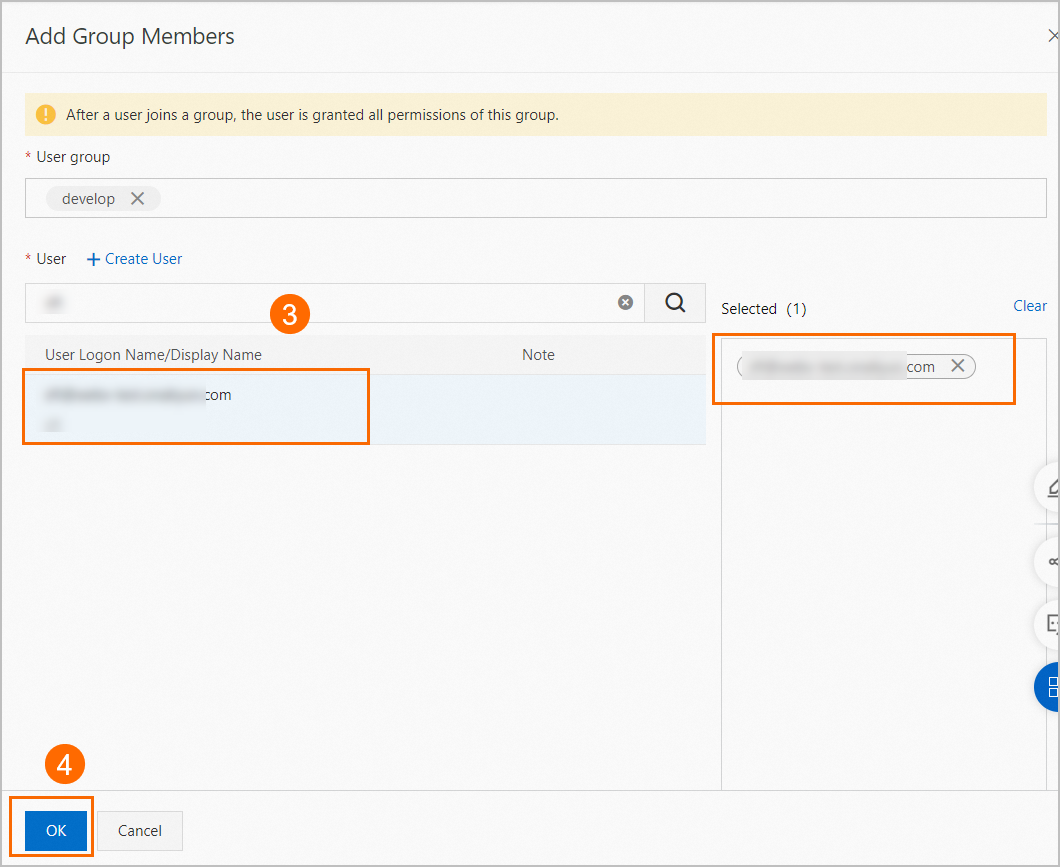
Add users to the user group that has the access policy. For more information, see Method 2: Add a RAM user to a RAM user group on the Groups page.
Create resources as an administrator and then grant permissions to RAM users
In typical software project management, only Operations and Maintenance (O&M) engineers can create resources, while developers have only read-only and operational permissions. You can create an administrator role for an O&M engineer to grant them permissions to manage all resources on the Distributed Task Scheduling Platform. The administrator can then create the required namespaces and application groups. The administrator can also create and assign access policies for other RAM users who need to operate on these namespaces or application groups.
Procedure:
Log on to the RAM console.
Create a custom policy. For more information, see Create custom policies. Use the following policy script to grant a RAM user SchedulerX administrative permissions. This permission allows the user to manage all SchedulerX resources under the Alibaba Cloud account.
{
  "Statement": [
    {
      "Action": "edas:*Schedulerx*",
      "Effect": "Allow",
      "Resource": [
                "acs:edas:*:*:*"
            ]
    }
  ],
  "Version": "1"
}
(Optional) Create a user or user group. For more information, see Create a RAM user or Create a RAM user group. Skip this step if a user or user group already exists.
Assign the access policy that you configured in Step 2 to a single user. For more information, see Grant permissions to a RAM user.
Assign the access policy from Step 2 to a user group and add users to the group.
Assign the access policy to the user group. For more information, see Grant permissions to a RAM user group.
Add users to the user group that has the access policy. For more information, see Method 2: Add a RAM user to a RAM user group on the Groups page.
SchedulerX permissions
By default, an Alibaba Cloud account has the permissions to manage all of its resources. For access control, you can use Resource Access Management (RAM) to assign access policies. SchedulerX uses RAM users and user groups to simplify the batch assignment of access policies, which eliminates the need to grant permissions to individual users one by one. SchedulerX access policies also support shared system policy configurations.
System policy | Description |
AdministratorAccess | Manage all Alibaba Cloud resources. This includes permissions to perform all operations on all resources in SchedulerX. |
The following sections describe the details of custom access policies for SchedulerX. In RAM, an access policy consists of an Action and a Resource. You can create access policies based on the rules defined by SchedulerX.
Basic structure of a custom policy
{
  "Statement": [
    {
      "Action": "edas:*", // The Action to perform. For more information, see the next section, "Action".
      "Effect": "Allow",
      "Resource": "*"     // The object of the action. For more information, see the next section, "Resource".
    }
  ],
  "Version": "1",
}
Action
SchedulerX defines the Action element with the following structure:
edas:${type}Schedulerx*The ${type} parameter can be one of the following four values: Read, Manage, Delete, and Create. The operations related to these values are described in the following table:
Type | Related operations |
Create | Create namespaces, applications, tasks, and workflows. |
Manage |
|
Delete | Delete namespaces, application groups, tasks, and workflows. |
Read | Query application groups, tasks, task instances, workflows, and online instances. |
Resource
SchedulerX defines the Resource element with the following structure:
acs:edas:${regionid}:${accountid}:namespace/${namespace_id}/${resourceType}/${resourceId}Parameter | Description |
| The region where the resource resides. To specify all regions, set this parameter to |
| The account whose resources you want to access. The default value is |
| The ID of the namespace.
|
| The resource type. Set the value to JobGroup, which indicates an application group for tasks in SchedulerX. |
| The ID of the resource specified by To obtain the
|


Sample custom policy configurations
Grant a RAM user management permissions on all resources
This policy grants permissions to manage all operations and resources in SchedulerX.
{
    "Version": "1",
    "Statement": [
        {
            "Effect": "Allow",
            "Action": [
                "edas:*Schedulerx*"
            ],
            "Resource": [
                "acs:edas:*:*:*"
            ]
        }
    ]
}
Grant a RAM user read-only permissions on all resources
This policy grants read-only permissions for all resources in SchedulerX. This allows the user to view all resource information in SchedulerX.
{
    "Version": "1",
    "Statement": [
        {
            "Effect": "Allow",
            "Action": [
                "edas:ReadSchedulerx*"
            ],
            "Resource": [
                "acs:edas:*:*:*"
            ]
        }
    ]
}
Grant a RAM user permissions for all actions in a specified namespace
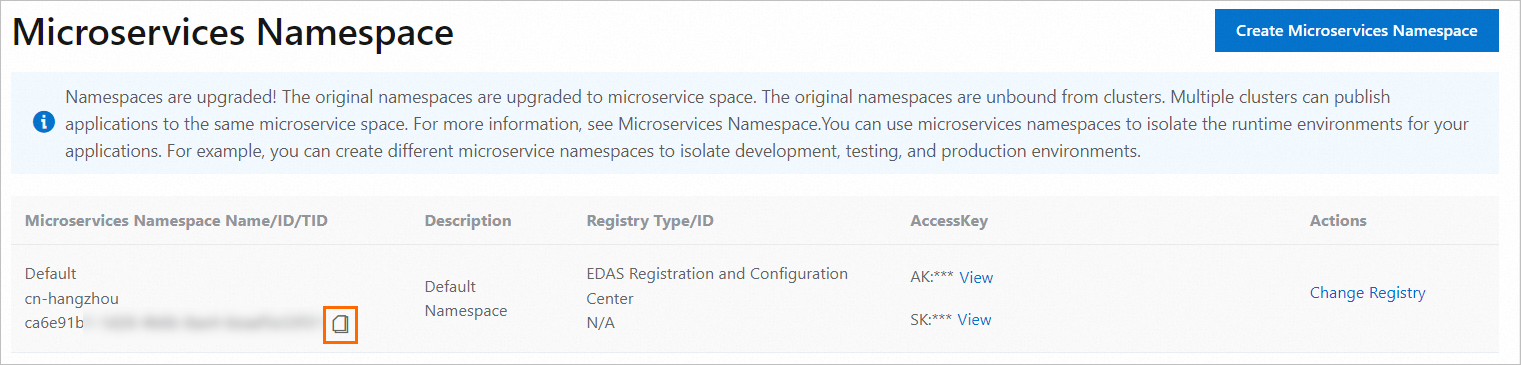
This policy grants management permissions for all application and task resources in one or more specified namespaces. Obtain the namespace IDs from the microservices namespace page in the EDAS console and add them to the policy. The following example grants management permissions for scheduling-related resources in two namespaces: Namespace-ID-01 and Namespace-ID-02. You can also change the Action to limit the operations on these resources. For example, if you set the Action to "edas:ReadSchedulerx*", the policy grants only read-only permissions for the two namespaces.
{
    "Version": "1",
    "Statement": [
        {
            "Effect": "Allow",
            "Action": [
                "edas:*Schedulerx*"
            ],
            "Resource": [
                "acs:edas:*:*:namespace/Namespace-ID-01/*",
              	"acs:edas:*:*:namespace/Namespace-ID-02/*"
            ]
        }
    ]
}
Grant a RAM user permissions for all actions in a specified application
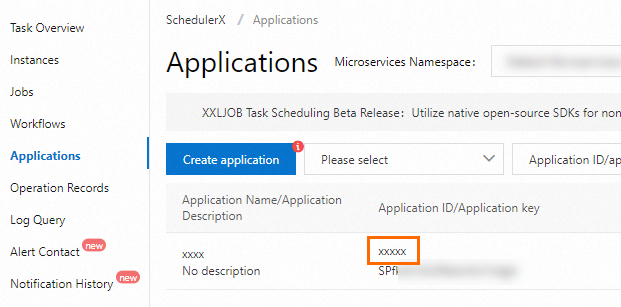
This policy grants management permissions for resources that belong to specific applications in SchedulerX. In the Resource element, you can specify the application IDs for the JobGroup in the corresponding namespace to set the access permissions for that application. You can also use a prefix with an asterisk (*) to quickly configure permissions for a batch of application groups. For example, "TestGroup*" specifies all applications with the "TestGroup" prefix.
{
    "Version": "1",
    "Statement": [
        {
            "Effect": "Allow",
            "Action": [
                "edas:*Schedulerx*"
            ],
            "Resource": [
                "acs:edas:*:*:namespace/Namespace-ID-01/JobGroup/TestGroup*",
              	"acs:edas:*:*:namespace/Namespace-ID-02/JobGroup/AppGroup"
            ]
        }
    ]
}