SchedulerX 2.0 lets you schedule HTTP tasks in either Serverless or Agent mode. You can configure these tasks in the console. This topic describes how to configure an HTTP task.
Introduction to HTTP Jobs
The following table describes the differences between the execution modes for an HTTP task and the limits of each mode.
Execution mode |
Serverless |
Agent |
Client required |
No. Requests are initiated by SchedulerX. |
Yes. Requests are initiated by the connected clients. |
Request methods |
GET and POST are supported. |
|
Parsing Results |
An HTTP response must be in the JSON format. The server-side determines whether a request is successful by parsing a specified key and checking if its value matches the configured value. |
|
Second-level tasks supported |
No. Only minute-level scheduling is supported. |
Yes. |
Are internal URLs supported? |
No. In Serverless mode, the request URL must be accessible over the public network. If the HTTP interface address is in the ip:port format, the machine requires public network access. |
Yes. |
Task name parsing |
If a task name is in Chinese, the backend can decode the name using |
|
Create an HTTP task
You can create an HTTP task using the GET or POST request method.
GET
To use the GET request method, you can add the configuration to the client and then create the task in the console.
Step 1: Basic configuration
Add the GET method configuration in the client.
The following code shows an example configuration. For more information about how to connect a client to SchedulerX, see Connect a Spring Boot application to SchedulerX.
@GET
@Path("hi")
@Produces(MediaType.APPLICATION_JSON)
public RestResult hi(@QueryParam("user") String user) {
    TestVo vo = new TestVo();
    vo.setName(user);
    RestResult result = new RestResult();
    result.setCode(200);
    result.setData(vo);
    return result;
}
Create an HTTP task in the console.
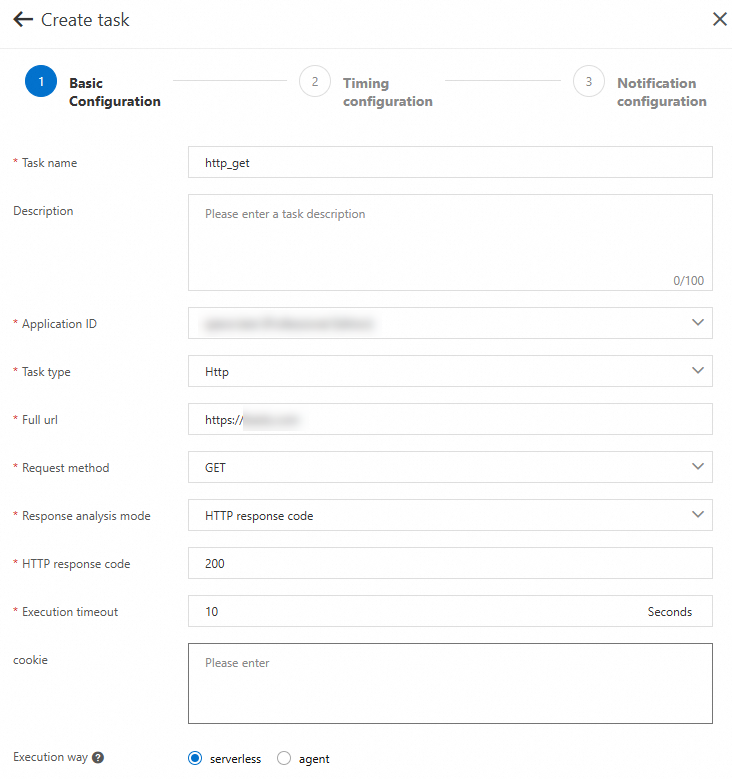
The following figure shows the required configurations for an HTTP task that uses the GET method. For more information about how to create a scheduling task, see Create a scheduling task.
The following table describes the parameters for a Serverless HTTP task.
Parameter
Description
Task name
The name of the task.
Description
A brief description of the task to make it easier to search for later.
Application ID
Select the target application.
Task type
The type of the task. Supported types include Java, Shell, Python, Go, http, xxljob, and DataWorks. If you select Shell, Python, or Go, a script editor appears. In this example, select http.
Full URL
Enter the full URL, including
http://.Execution Mode
In this example, select GET.
Response parsing mode
Select a response parsing mode. The following modes are supported:
HTTP response code
The response is based on the HTTP response code. You must set a standard HTTP request response code.
Custom JSON
Response validation key and value.
The server-side expects the HTTP request result to be in JSON format. It verifies the result based on the specified key and value.
{
  "code": 200,
  "data": "true",
  "message": "",
  "requestId": "446655068791923614103381232971",
  "success": true
}
In the preceding sample code, you can check if the key is `Success` and the value is `true`, or if the code is `200`.
Custom string
The task execution is considered successful if the returned string exactly matches the custom string.
Return check key
This applies only to responses in JSON format. This is the key to check for a successful response.
Return check value
This applies only to responses in JSON format. This is the value to check for a successful response.
Execution timeout (seconds)
The maximum timeout is 30 seconds for the Basic Edition and 120 seconds for the Professional Edition. An error is reported if a timeout occurs.
Cookie
For example,
key1=val1;key2=val2. Separate multiple values with a semicolon (;). The maximum length is 300 bytes.After the task is created, click Run Once in the Actions column on the Task Management page.
The following result indicates that the task was successfully executed.
Step 2: Configure time-based scheduling
In the Time-based Scheduling step, set the time-based and advanced configuration parameters, and then click Next.
The scheduled parameters are as follows:
Configuration Name
Significance
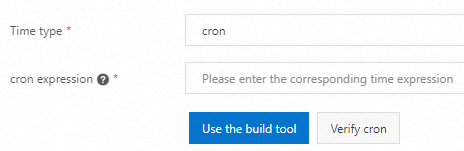
Time type
none: The task is typically triggered by a workflow instead of being scheduled.
cron: The task is scheduled using a cron expression.
api: An API call triggers the task.
fixed_rate: A fixed frequency.
second_delay: The task is scheduled to run after a fixed delay in seconds.
onetime: The task runs only once.
cron expression (This option is available only when the Time type is set to cron.)
Enter a cron expression. You can enter an expression that follows the cron syntax, or use a tool to generate and validate one.
Fixed frequency (only available when the Time Type is set to fixed_rate)
Enter a fixed frequency in seconds. Only values greater than 60 are supported. For example, a value of 200 means the task is scheduled every 200 s.
Fixed delay (Only available when Time type is set to second_delay)
Enter a fixed delay in seconds. The value must be between 1 and 60. For example, a value of 5 means the task is scheduled with a 5 second delay.
If you set Time type to cron, you can configure advanced settings. The following table describes the advanced configuration parameters.
Configuration Name
Description
Time offset
The offset of the data timestamp relative to the scheduled time. You can get this value from the context during scheduling.
Time zone
Select a time zone as needed. You can select from common countries or regions, or use the standard GMT format.
Step 3: Configure alerts
HTTP tasks support alerts for errors. You can set alert conditions when you create a task to receive notifications for issues such as timeouts or unexpected return values.
In the Alert Configuration step, set the alert parameters and contacts, and click Finish.

POST
To use the POST request method, you can add the configuration to the client and then create the task in the console.
Step 1: Basic configuration
Add the POST configuration in the client.
The following code shows the configuration for the POST method. For more information about how to connect a client to SchedulerX, see Connect a Spring Boot application to SchedulerX.
import com.alibaba.schedulerx.common.constants.CommonConstants;

@POST
@Path("createUser")
@Produces(MediaType.APPLICATION_JSON)
public RestResult createUser(@FormParam("userId") String userId,
        @FormParam("userName") String userName) {
    TestVo vo = new TestVo();
    System.out.println("userId=" + userId + ", userName=" + userName);
    vo.setName(userName);
    RestResult result = new RestResult();
    result.setCode(200);
    result.setData(vo);
    return result;
}
Create an HTTP task in the console.
The following figure shows the required configurations for an HTTP task. For more information about how to create a scheduling task, see Create a scheduling task.
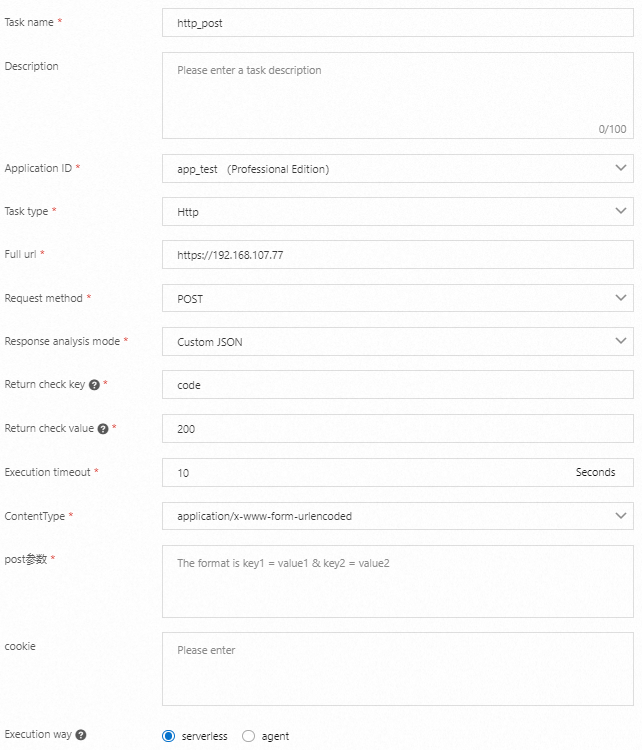
Parameter
Description
Full URL
Enter the full URL, including
http://.Response parsing mode
Select a response parsing mode. The following modes are supported:
HTTP response code
The response is based on the HTTP response code. You must set a standard HTTP request response code.
Custom JSON
Response validation key and value.
The server-side expects the HTTP request result to be in JSON format. It verifies the result based on the specified key and value.
{
  "code": 200,
  "data": "true",
  "message": "",
  "requestId": "446655068791923614103381232971",
  "success": true
}
In the preceding sample code, you can check if the key is `Success` and the value is `true`, or if the code is `200`.
Custom string
The task execution is considered successful if the returned string exactly matches the custom string.
Return check key and Return check value
The server-side expects the HTTP request result to be in JSON format. It verifies the result based on the specified key and value.
{
  "code": 200,
  "data": "true",
  "message": "",
  "requestId": "446655068791923614103381232971",
  "success": true
}
In the preceding sample code, you can check if the key is `Success` and the value is `true`, or if the code is `200`.
Execution timeout (seconds)
The maximum timeout is 30 seconds. An error is reported if a timeout occurs.
Parameters
The POST form parameters. For example,
key1=val1;key2=val2.
Step 2: Configure time-based scheduling
In the Time-based Scheduling step, set the time-based and advanced configuration parameters, and then click Next.
The following table describes the time-based parameters.
Configuration Name |
Significance |
Time type |
|
The Cron expression is available only when the Time type is set to cron. |
Enter a cron expression. You can enter an expression that follows the cron syntax, or use a tool to generate and validate one. |
Fixed frequency (only available when the Time type is set to fixed_rate) |
Enter a fixed frequency in seconds. Only values greater than 60 are supported. For example, a value of 200 means the task is scheduled every 200 s. |
Fixed delay (Only available when Time type is set to second_delay) |
Enter a fixed delay in seconds. The value must be between 1 and 60. For example, a value of 5 means the task is scheduled with a 5 second delay. |
If you set Time type to cron, you can configure advanced settings. The following table describes the advanced configuration parameters.
Configuration Name |
Significance |
Time offset |
The offset of the data timestamp relative to the scheduled time. You can get this value from the context during scheduling. |
Time zone |
Select a time zone as needed. You can select from common countries or regions, or use the standard GMT format. |
Step 3: Configure alerts
HTTP tasks support alerts for errors. You can set alert conditions when you create a task to receive notifications for issues such as timeouts or unexpected return values.
In the Alert Configuration step, you can set the alert parameters and contacts, and then click Finish.

Get basic task information
The basic information of an HTTP task is included in the header. To retrieve the basic information, add the following dependency to the pom.xml file in your client.
<dependency>
    <groupId>com.aliyun.schedulerx</groupId>
    <artifactId>schedulerx2-common</artifactId>
    <version>1.6.0</version>
</dependency>
The following example shows how to retrieve basic task information using the GET method.
import com.alibaba.schedulerx.common.constants.CommonConstants;

@GET
@Path("hi")
@Produces(MediaType.APPLICATION_JSON)
public RestResult hi(@QueryParam("user") String user,
        @HeaderParam(CommonConstants.JOB_ID_HEADER) String jobId,
        @HeaderParam(CommonConstants.JOB_NAME_HEADER) String jobName) {
    TestVo vo = new TestVo();
    vo.setName("armon");
    // If the task name is in Chinese, you need to decode it using URLDecode.
    String decodedJobName = URLDecoder.decode(jobName, "utf-8");
    System.out.println("user=" + user + ", jobId=" + jobId + ", jobName=" + decodedJobName);
    RestResult result = new RestResult();
    result.setCode(200);
    result.setData(vo);
    return result;
}
The following table describes the basic information that you can retrieve.
CommonConstants constant |
Key |
Value description |
JOB_ID_HEADER |
schedulerx-jobId |
The task ID. |
JOB_NAME_HEADER |
schedulerx-jobName |
The task name. Only English names are supported. |
SCHEDULE_TIMESTAMP_HEADER |
schedulerx-scheduleTimestamp |
The timestamp of the scheduled time. |
DATA_TIMESTAMP_HEADER |
schedulerx-dataTimestamp |
The data timestamp. |
GROUP_ID_HEADER |
schedulerx-groupId |
The application ID. |
USER_HEADER |
schedulerx-user |
The username. |
MAX_ATTEMPT_HEADER |
schedulerx-maxAttempt |
The maximum number of retries for the instance. |
ATTEMPT_HEADER |
schedulerx-attempt |
The current number of retries for the instance. |
JOB_PARAMETERS_HEADER |
schedulerx-jobParameters |
The task parameters. |
INSTANCE_PARAMETERS_HEADER |
schedulerx-instanceParameters |
The task instance parameters. An API call is required to trigger them. |
Verify results
You can view the execution results of HTTP tasks on the task execution history page. For an example of a successful result, see GET.
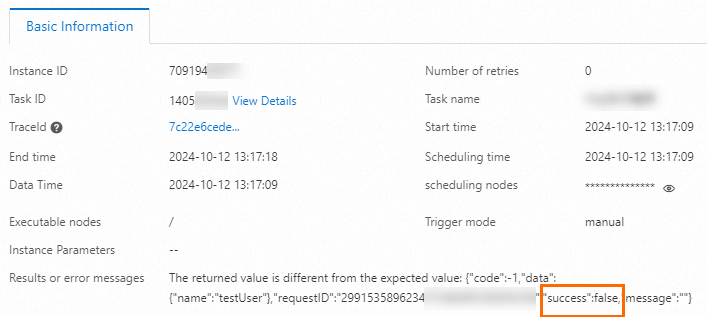
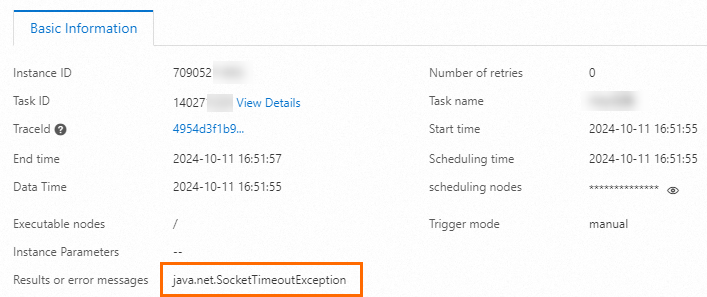
If the task execution fails, click Details to view the reason for the failure, as shown below.
The return value is different from the expected value.
The execution timed out.