This topic describes how to use Apsara DevOps to deploy an application as a Java Archive (JAR) or Web Application Archive (WAR) package to an Enterprise Distributed Application Service (EDAS) Elastic Compute Service (ECS) cluster. The procedure is demonstrated using a sample code repository from Apsara DevOps.
Prerequisites
Upload your service code to a code repository.
Deployment procedure
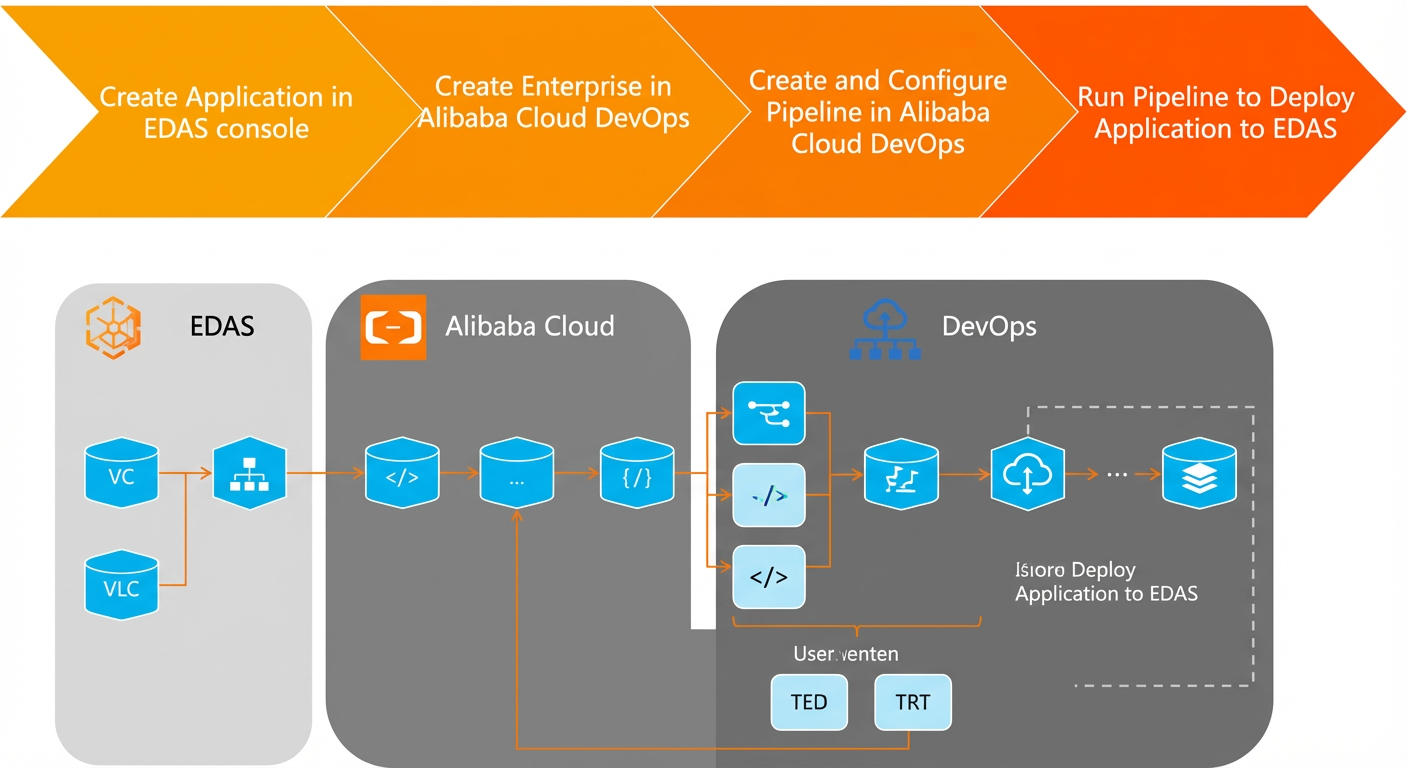
If your application is already deployed on EDAS, you do not need to create a new one. If this is your first time deploying an application to EDAS, create an application in the EDAS console. This allows Apsara DevOps to push the service code to the application.
After you create the application in EDAS, create an organization in Apsara DevOps and navigate to Flow.
Configure the pipeline for application integration and deployment based on the EDAS application type.
After you configure the pipeline, run it to deploy the application to EDAS.
Step 1: Create an application in the EDAS console
If you do not have an application in EDAS, you must create one first. This topic uses a Spring Cloud application deployed with a JAR package to an ECS cluster as an example. For more information, see Create and deploy an application in an ECS cluster.
The deployment method (JAR or WAR) that you select in the EDAS console must match the method configured in the Apsara DevOps pipeline. For example, if you use a JAR package to deploy the application in EDAS, the build stage in the Apsara DevOps pipeline must be configured to build and upload a JAR package.
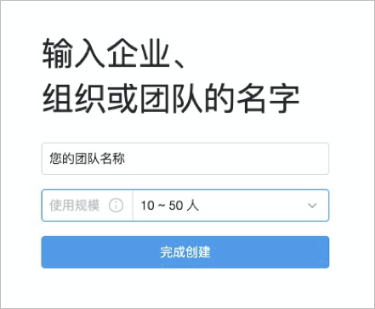
Step 2: Create an organization in Apsara DevOps
If this is your first time using Apsara DevOps Flow, create an enterprise in Apsara DevOps.
Log on to Apsara DevOps Flow.
Enter the enterprise, organization, or team name, select a Usage Scale, and then click Create.
Step 3: Create a pipeline in Apsara DevOps
Log on to Apsara DevOps Flow.
In the left navigation pane, click My Pipelines, and then click New Pipeline in the upper-right corner.
In the Select a Pipeline Template dialog box, select Other · Empty Template and click Create.
After the pipeline is created, you are redirected to the Add Pipeline Source page.
Step 4: Configure the pipeline
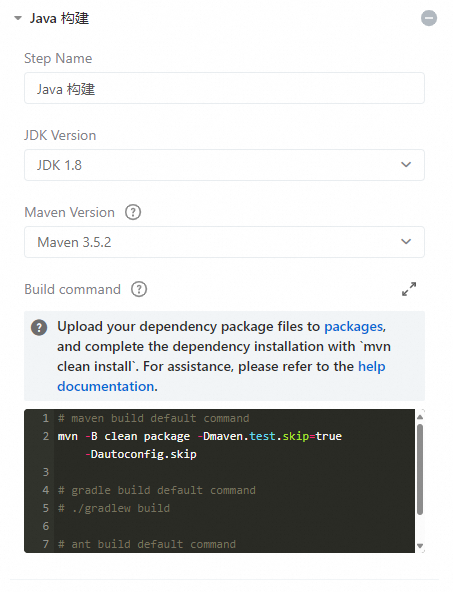
In the Stage 1 area of the pipeline, click Empty Task. In the Edit panel, configure the Task Name and Build Cluster, enable Download Pipeline Source, and add task steps.
Add the following steps:
In the Task Steps area, click Add Step. From the drop-down list, select and configure the parameters for the step.
Parameter
Description
Step Name
Enter a custom name for the step.
JDK Version
Select the required Java version from the drop-down list.
Maven Version
Select the required Maven version from the drop-down list.
Build Command
The custom build command.
Click Add Step. From the drop-down list, select and configure the parameters for the step.
Parameter
Description
Step Name
Enter a custom name for the step. If you do not change it, the default name is used.
Artifact Name
Enter a custom name for the output, such as default. This name is used to distinguish different outputs from multiple builds and is used in the deployment task.
Upload File
Set the path to the project file.
In the New Stage area, click New Task. In the Select Task Group panel, click Deploy in the navigation pane on the left, and then select EDAS ECS Application Release.
In the Edit panel, configure the task information.
The following table describes the task information to configure.
Parameter name
Description
Task Name
A custom name for the task.
Build Cluster
You can select a different build cluster for the task.
Download Pipeline Source
You can select whether to download the pipeline source for the task. If you enable this option, the source files you configured for the pipeline are downloaded to the corresponding working directory.
Select Service Connection
Select the service that the task connects to. If no service connection exists, click Add Service Connection and follow the on-screen instructions to add one. Select the service authorization for the task. This allows Apsara DevOps to deploy applications on EDAS.
NoteIf you have not granted authorization before, when you create a new service connection, click Create New next to the Service Authorization/Certificate field. Complete the Alibaba Cloud RAM authorization as prompted, and then configure the connection.
Region
Select the region where the application created in Step 1: Create an application in the EDAS console is located.
Namespace
Select the namespace where the application is located.
Application
Select the application that you created in Step 1: Create an application in the EDAS console.
Package
Select the artifact name that was created in the Upload Build Output (for EDAS/SAE) step in Step 1 of Step 4: Configure the pipeline.
Release Batches
Select a number of batches to perform a phased release.
Wait Time Between Batches
The waiting time between consecutive release batches.
Batch Method
You can select Manual Confirmation or Automatic Confirmation. For example, if you want to observe the result of the first batch before proceeding, select Manual Confirmation.
(Optional) Task Plugins
You can configure task plugins to send pipeline notifications as needed.
DingTalk Robot Notification Plugin
Webhook URL: Configure the webhook URL of the DingTalk robot. For information about how to create a DingTalk robot, see DingTalk Robot Configuration.
Runtime: You can select when the task plugin sends notifications.
Email Notification
Email Address: Configure the email addresses to send notifications to.
Runtime: You can select when the task plugin sends notifications.
Webhook Notification Plugin
Webhook URL: Configure the webhook URL to send notifications to. The URL must be accessible over the public network.
Runtime: You can select when the task plugin sends notifications.
WeCom Robot Notification Plugin
Lark Robot Notification Plugin
After you complete the configuration, click Save Only or Save and Run in the upper-right corner of the page.
Step 5: Deploy the application to EDAS using Apsara DevOps
After you configure the pipeline, click Save and Run in the upper-right corner of the pipeline page. In the Run Configuration dialog box, select a code branch and click Run.
In this example, the application has two instances and the pipeline is configured for a phased release that requires manual confirmation. After the Build task is successful, the deployment task in the New Stage pauses. You can perform the following operations:
Click Release Details to go to the EDAS console and view the change details.
Click Continue Release to proceed with the release to the next batch.
Select to stop the current pipeline run.
Select to view the operational logs of the pipeline.
Select to cancel the current task run.
Click Continue Release and wait for the pipeline run to complete.
Verify the result
After the deployment is marked as successful in Apsara DevOps, log on to the EDAS console to view the change records for the application. Look for a Deploy Application change record that is related to Apsara DevOps. If this record exists and its status is successful, the application was deployed successfully.
FAQ
How do I use Apsara DevOps to deploy an application to EDAS using an image?
You can use Apsara DevOps to deploy an application as an image to an EDAS Kubernetes (K8s) cluster. For more information, see Deploy a Java application to an ECS cluster using Apsara DevOps 2020.
Can applications written in languages other than Java be deployed to EDAS using Apsara DevOps? What deployment methods can be used?
Yes, applications written in languages other than Java can be deployed to EDAS using Apsara DevOps and the Image deployment method. When you use image deployment, you must ensure that your application code includes a Dockerfile. For more information about the deployment procedure, see Deploy a Java application to an ECS cluster using Apsara DevOps 2020.
DingTalk group for ACK and Serverless Kubernetes clusters
If you have questions or suggestions about using Container Service for Kubernetes (ACK) and Serverless Kubernetes clusters in EDAS, you can join the DingTalk group by searching for the ID 23197114 in DingTalk.