This topic describes how to use a DataWorks Function Compute node to invoke Function Compute and add watermarks to incremental PDF files in OSS.
Prerequisites
You have activated DataWorks. For more information, see Activate DataWorks.
You have activated Function Compute. For more information, see Activate Function Compute.
You have activated OSS. For more information, see Activate OSS.
Limitations
The Function Compute feature is available only in workspaces that reside in the following regions: China (Hangzhou), China (Shanghai), China (Beijing), China (Zhangjiakou), China (Shenzhen), China (Chengdu), China (Hong Kong), Singapore, Malaysia (Kuala Lumpur), Indonesia (Jakarta), Germany (Frankfurt), UK (London), US (Silicon Valley), and US (Virginia).
Step 1: Deploy the watermarking application
Log on to the Function Compute console. In the left-side navigation pane, choose .
On the Applications page, click Create Application and select Create Application from Template. On the File Processing tab, find the Add Watermarks to PDF Files card, move your pointer over the card, and then click Create Now.
 Note
NoteThe source code for the "Add Watermarks to PDF Files" application is available on GitHub. This application adds a watermark with specified content to a PDF file in OSS and writes the processed file back to the same OSS path.
On the Create Application page, select Deploy Directly. Select a Region and an OSS Bucket Name. You can keep the default values for the other settings if you do not have specific requirements. Then, click Create and Deploy Default Environment.
On the application details page, the deployment is complete when the Deployment Status reads Deployment Successful.

Step 2: (Optional) Test the function
You can configure parameters for Create New Test Event to simulate an event that triggers the function. This action adds a watermark to a PDF file and returns the processed file to the same directory in the bucket.
Prepare test data in OSS. Go to the Bucket List page and select the OSS bucket name that you specified when you created the application.
On the Files page, create a directory named
DataworksPDFand uploadexample.pdfto this directory.
On the application details page, click the function name under Function Resources to go to the Function Details page.

On the Code tab of the function details page, click the
 icon next to Test Function and select Configure Test Parameters from the drop-down list.
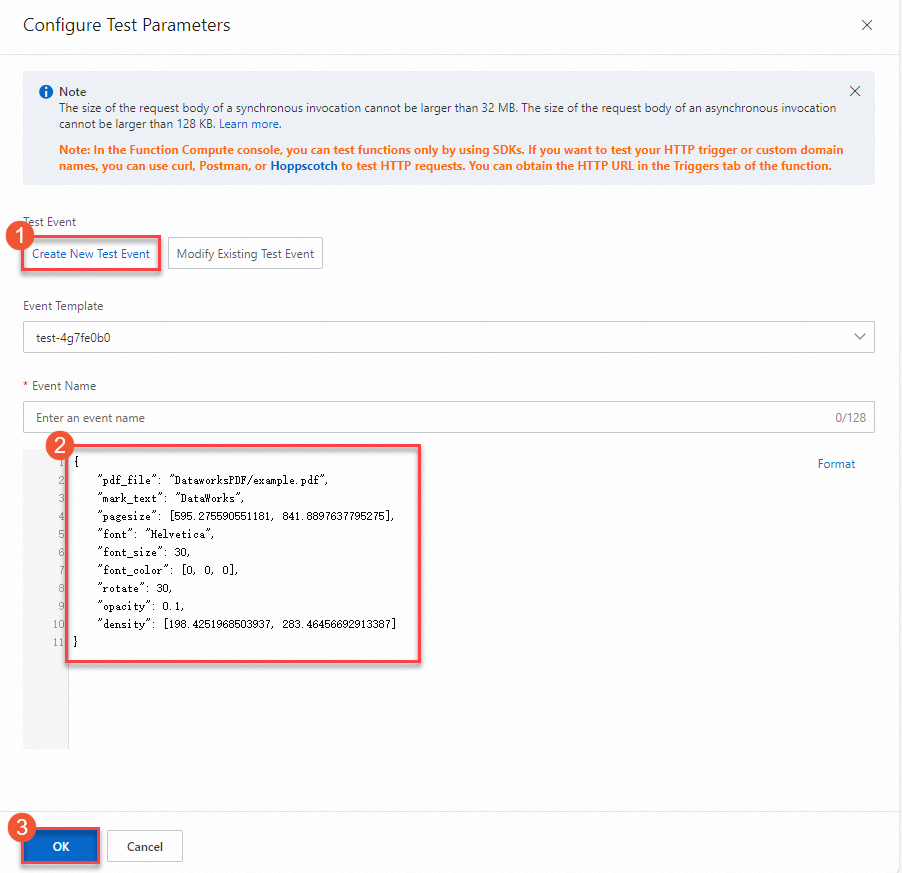
In the Configure Test Parameters panel, select Create New Test Event or Edit Existing Test Event, enter the parameters, and click OK.

Event Name: Enter a name for the event.
Event Content: In the code editor, enter the content in JSON format. The following example is used in this topic:
ImportantYou must remove the comments (lines starting with
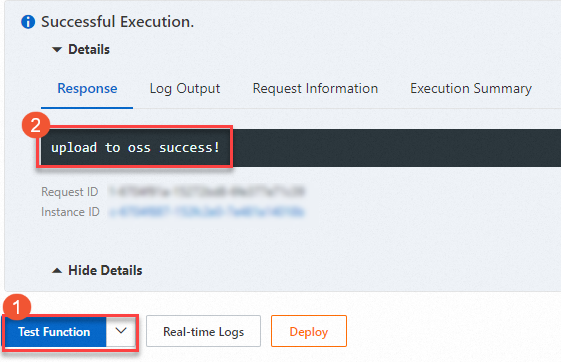
//) from the following JSON example. Standard JSON does not support comments, and they will cause validation to fail.// The following configuration adds the watermark text "DataWorks" to the PDF file (DataworksPDF/example.pdf). For details about each parameter, see the comments. { "pdf_file": "DataworksPDF/example.pdf", // The path of the PDF file in the OSS bucket. "mark_text": "DataWorks", // The watermark text. This parameter is required if you add a watermark to a PDF file. "pagesize": [595.275590551181, 841.8897637795275], // (Optional) The page size. Default: A4 (21 cm × 29.7 cm), where 1 cm = 28.346456692913385 points. "font": "Helvetica", // (Optional) The font. Default: Helvetica. For Chinese characters, you can use zenhei or microhei. "font_size": 20, // (Optional) The font size. Default: 30. "font_color": [0, 0, 0], // The font color in RGB format. Default: black. "rotate": 30, // (Optional) The rotation angle. Default: 0. "opacity": 0.1, // (Optional) The opacity. Default: 0.1. A value of 1 indicates that the content is fully opaque. "density": [198.4251968503937, 283.46456692913387] // (Optional) The watermark density, which defines the spacing between watermarks. Default: [141.73228346456693, 141.73228346456693], which corresponds to (7 cm, 10 cm). This means the horizontal and vertical spacing between watermarks is 7 cm and 10 cm, respectively. }Click Test Function. After the execution succeeds, you can view the watermarked PDF file in the same OSS path as the source file. In this example, a file named
example_out.pdfis generated.The following figure shows the files in OSS.

Step 3: Configure a Function Compute node
Log on to the DataWorks console.
In the left-side navigation pane, click Workspaces.
In the top navigation bar, switch to the region that you specified in Step 1: Deploy the watermarking application.
In the Workspace List, click the target workspace name to go to the Workspace Details page. If you do not have a workspace in the current region, you need to create a workspace. For more information, see Create a workspace.
In the left-side navigation pane of the workspace details page, choose to open the DataWorks data development page.
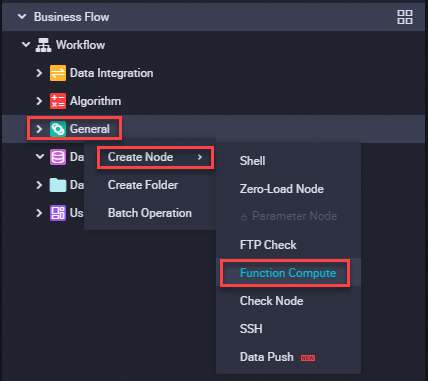
Click the name of the target business workflow. Right-click the General node in the expanded workflow and choose . In the dialog box that appears, enter a Name for the node and click Confirm to create the Function Compute node.
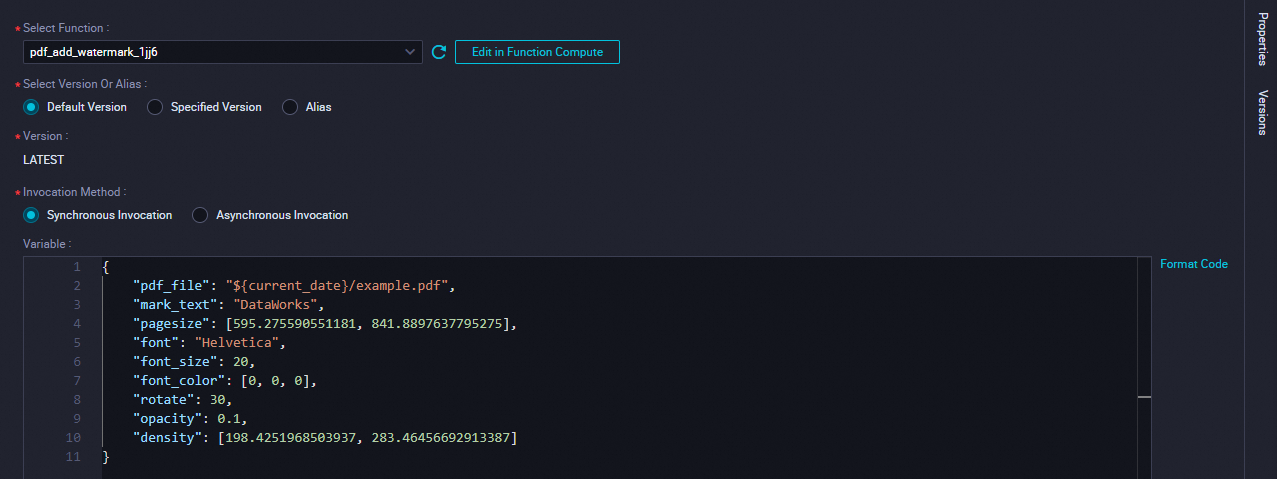
Configure the parameters for the Function Compute node.
Parameter
Description
Select a function
Select the function name that you specified when you created the application.
Select a version or an alias
Select the version or alias to use when the function is invoked. The default version is LATEST. For more information, see Version management and Alias management.
Invocation type
Select Sync. For more information about invocation types, see Synchronous invocation and Asynchronous invocation.
Event
The parameters are used to call the function. This topic uses and modifies the JSON content from Test function event content to incrementally add watermarks to PDF files in OSS every day.
// The following configuration adds a watermark to the PDF file located at ${current_date}/example.pdf. { "pdf_file": "${current_date}/example.pdf", // The path of the PDF file in the OSS bucket. "mark_text": "DataWorks", // The watermark text. This parameter is required if you add a watermark to a PDF file. "pagesize": [595.275590551181, 841.8897637795275], // (Optional) The page size. Default: A4 (21 cm × 29.7 cm), where 1 cm = 28.346456692913385 points. "font": "Helvetica", // (Optional) The font. Default: Helvetica. For Chinese characters, you can use zenhei or microhei. "font_size": 20, // (Optional) The font size. Default: 30. "font_color": [0, 0, 0], // The font color in RGB format. Default: black. "rotate": 30, // (Optional) The rotation angle. Default: 0. "opacity": 0.1, // (Optional) The opacity. Default: 0.1. A value of 1 indicates that the content is fully opaque. "density": [198.4251968503937, 283.46456692913387] // (Optional) The watermark density, which defines the spacing between watermarks. Default: [141.73228346456693, 141.73228346456693], which corresponds to (7 cm, 10 cm). This means the horizontal and vertical spacing between watermarks is 7 cm and 10 cm, respectively. }NoteIn the value of
pdf_file, which is${current_date}/example.pdf,${current_date}indicates a variable namedcurrent_date.When DataWorks schedules a task, it replaces the
${current_date}variable with the actual value. You can use this variable in scheduling parameters. For example, if a task is executed on October 9, 2024,pdf_fileis2024-10-09/example.pdf. If it is executed on October 10, 2024,pdf_fileis2024-10-10/example.pdf.Your business system must generate the PDF files in the corresponding path before the task runs.
For this example, you must upload a PDF file that matches the path
${current_date}/example.pdfto OSS before you run the task. An example is2024-10-09/example.pdf.
After configuring the node, click the
icon to assign a constant value to the code variable and run a test to verify its logic. For example, setting current_date=2024-10-09instructs Function Compute to add a watermark to the2024-10-09/example.pdffile in OSS.Configure the scheduling properties for the node. In the right-side pane, click Scheduling Configurations. In the Parameters section, set the parameters. For this example, add a parameter named
current_datewith the value$[yyyy-mm-dd]. This represents the current year, month, and day when the task runs. For more information about how to configure scheduling parameters, see Supported formats for scheduling parameters. For more information about scheduling properties, see Overview of task scheduling properties.
 icon to assign a constant value to the code variable and run a test to verify its logic. For example, setting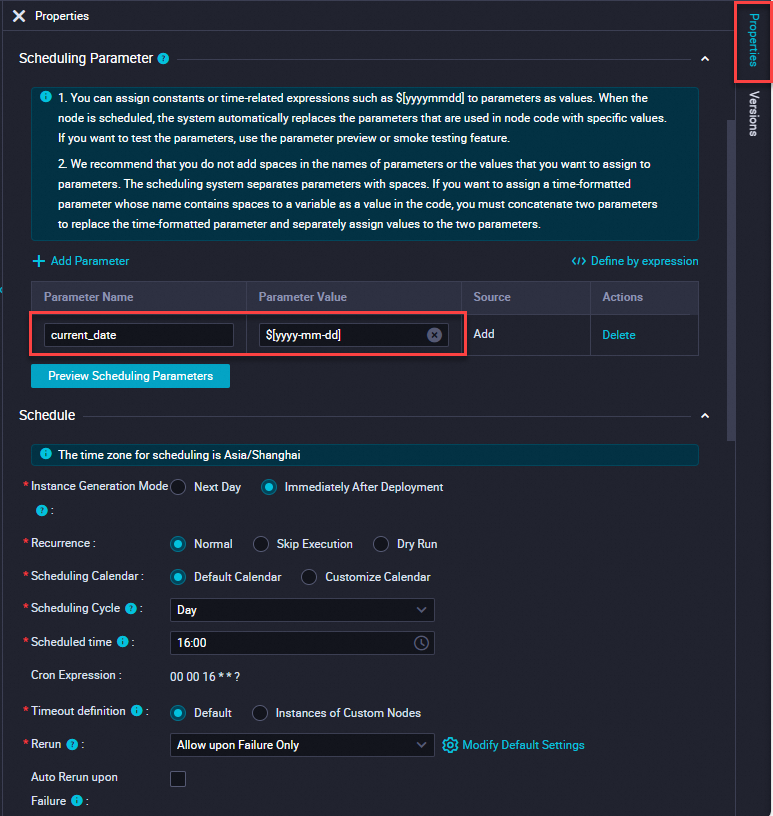
Step 4: Commit and deploy the node
-
Save and commit the node.
Click the
and icons in the toolbar to save and commit the node. In the commit dialog box, enter a change description and, if required, select the options for code review and smoke testing.Note-
You must configure the Rerun attribute property and the Parent Nodes in the scheduling properties before you can commit the node.
-
If code review is enabled, the code of a submitted node must be approved by a reviewer before the node can be deployed. For more information, see Code review.
-
To ensure that the scheduled node runs as expected, we recommend that you perform smoke testing on the task before you deploy it. For more information, see Smoke testing.
-
-
Optional. Deploy the node.
If you are using a workspace in standard mode, you must click Deploy in the upper-right corner to deploy the node after you commit it. For more information, see Workspaces in standard mode and Deploy tasks.
 and
and  icons in the toolbar to save and commit the node. In the commit dialog box, enter a change description and, if required, select the options for code review and smoke testing.
Next steps
After the task is committed and deployed, you can manage it in the DataWorks Operation Center.
To learn more, see this best practice: Use a Function Compute node in DataWorks to send emails.