This document shows you how to deploy a DeepSeek-OCR model from development to production on the FunModel platform. Using the DevPod cloud development environment, you will learn how to develop, debug, package, and deploy DeepSeek-OCR model services. This process enables seamless collaboration between development and Operations and Maintenance (O&M).
Prerequisites
Basic requirements
Have an Alibaba Cloud account.
Log on to the FunModel console and follow the on-screen instructions to complete configurations, such as RAM role authorization.
Important: If you are using the old console, click the "New Console" button in the upper-right corner to switch to the new console.
Technical knowledge: You must have a basic understanding of Python and deep learning model deployment.
Environment preparation
Complete the environment setup and basic tests in the DeepSeek-OCR QuickStart guide to familiarize yourself with basic DevPod operations.
Development and debugging
This section describes how to develop a production-grade DeepSeek-OCR model service in a DevPod environment.
DevPod environment advantages
The DeepSeek-OCR DevPod provides the following:
Pre-configured environment: The environment includes pre-installed deep learning frameworks, such as PyTorch, vLLM, and Transformers.
GPU resources: Ready-to-use GPU computing power without requiring local configuration.
Persistent storage: The NAS mount path
/mnt/{model_name}automatically saves model files.Unified workspace: You can develop, debug, and deploy in the same environment to eliminate discrepancies.
Model servitization development
Why is servitization necessary?
The official DeepSeek-OCR provides command-line scripts that are suitable for local testing but not for direct use in a production environment. To integrate Optical Character Recognition (OCR) capabilities into your business systems, you must encapsulate them as an HTTP API service:
Comparison dimension | Command-line script | HTTP service |
Access method | Requires logging on to a server to execute | Remote calls through an HTTP API |
Business integration | Difficult to integrate into business systems | Can be called by any language through HTTP |
Concurrency capability | Single-process serial processing | Supports concurrent requests from multiple users |
Extensibility | Difficult to scale out horizontally | Can deploy multiple instances for load balancing |
Create the server-side code
In DevPod, create a server.py file to encapsulate the model as a FastAPI service:
# Execute in the DevPod terminal
cd /workspace/DeepSeek-OCR/DeepSeek-OCR-master/DeepSeek-OCR-vllm
touch server.py
Then, open server.py in the Web IDE and write the servitization code.
Core code analysis
The following is the core implementation of a production-grade DeepSeek-OCR service that supports batch processing of images and PDFs:
1. Model initialization and configuration
# Configure environment variables
if torch.version.cuda == '11.8':
    os.environ["TRITON_PTXAS_PATH"] = "/usr/local/cuda-11.8/bin/ptxas"
os.environ['VLLM_USE_V1'] = '0'
os.environ["CUDA_VISIBLE_DEVICES"] = '0'

# Register and load the model
ModelRegistry.register_model("DeepseekOCRForCausalLM", DeepseekOCRForCausalLM)

llm = LLM(
    model=MODEL_PATH,
    hf_overrides={"architectures": ["DeepseekOCRForCausalLM"]},
    block_size=256,
    max_model_len=8192,
    max_num_seqs=max(MAX_CONCURRENCY, 100),
    gpu_memory_utilization=0.9,  # Use 90% of GPU memory
    disable_mm_preprocessor_cache=True
)
2. API interface design
class InputData(BaseModel):
    """Supports mixed input of images and PDFs"""
    images: Optional[List[str]] = None  # List of image URLs
    pdfs: Optional[List[str]] = None    # List of PDF URLs

class RequestData(BaseModel):
    """Request model, supports custom prompts"""
    input: InputData
    prompt: str = '<image>\nFree OCR.'  # Default prompt

class ResponseData(BaseModel):
    """Returns OCR recognition results"""
    output: List[str]
3. Asynchronous concurrent processing
async def process_items_async(items_urls: List[str], is_pdf: bool, prompt: str):
    """
    Asynchronously process a list of image/PDF URLs
    - Concurrently download files
    - Use a thread pool for image pre-processing
    - Return batch inference inputs
    """
    loop = asyncio.get_event_loop()

    # Concurrently download all files
    download_tasks = [loop.run_in_executor(None, download_file, url)
                      for url in items_urls]
    contents = await asyncio.gather(*download_tasks)

    # Process images in a thread pool
    with ThreadPoolExecutor(max_workers=NUM_WORKERS) as executor:
        process_tasks = [
            loop.run_in_executor(executor, process_single_image_sync, img, prompt)
            for img, prompt in processing_args
        ]
        processed_results = await asyncio.gather(*process_tasks)

    return processed_results, num_results_per_input
4. Batch inference interface
@app.post("/ocr_batch", response_model=ResponseData)
async def ocr_batch_inference(request: RequestData):
    """
    Batch OCR processing interface
    - Supports mixed input of images and PDFs
    - Automatically handles multi-page PDF scenarios
    - Returns structured recognition results
    """
    # Process images and PDFs
    all_batch_inputs = []
    if request.input.images:
        batch_inputs_images, counts_images = await process_items_async(
            request.input.images, is_pdf=False, prompt=request.prompt
        )
        all_batch_inputs.extend(batch_inputs_images)

    if request.input.pdfs:
        batch_inputs_pdfs, counts_pdfs = await process_items_async(
            request.input.pdfs, is_pdf=True, prompt=request.prompt
        )
        all_batch_inputs.extend(batch_inputs_pdfs)

    # Batch inference
    outputs_list = await run_inference(all_batch_inputs)

    # Reorganize results (merge multi-page PDFs)
return ResponseData(output=final_outputs)Local testing
Start the service
In the DevPod terminal, start the inference service:
cd /workspace/DeepSeek-OCR/DeepSeek-OCR-master/DeepSeek-OCR-vllm
python server.py
The service starts at http://127.0.0.1:8000.
Test a single image
curl -X POST http://127.0.0.1:8000/ocr_batch \
  -H "Content-Type: application/json" \
  -d '{
    "input": {
      "images": [
        "https://paddle-model-ecology.bj.bcebos.com/paddlex/imgs/demo_image/paddleocr_vl_demo.png"
      ]
    },
    "prompt": "<image>\n<|grounding|>Convert the document to markdown."
  }'
Test a PDF document
curl -X POST http://127.0.0.1:8000/ocr_batch \
  -H "Content-Type: application/json" \
  -d '{
    "input": {
      "pdfs": [
        "https://images.devsapp.cn/test/ocr-test.pdf"
      ]
    },
    "prompt": "<image>\nFree OCR."
  }'
Test mixed inputs
curl -X POST http://127.0.0.1:8000/ocr_batch \
  -H "Content-Type: application/json" \
  -d '{
    "input": {
      "images": [
        "https://paddle-model-ecology.bj.bcebos.com/paddlex/imgs/demo_image/paddleocr_vl_demo.png"
      ],
      "pdfs": [
        "https://images.devsapp.cn/test/ocr-test.pdf"
      ]
    },
    "prompt": "<image>\nFree OCR."
  }'
Remote debugging
DevPod supports remote debugging through a proxy address, which is convenient for testing with tools such as Postman.
Obtain the proxy address
In the DevPod console, click the Quick Access tab.
Obtain the proxy path. The following is an example:
https://devpod-e***a-lwt***jyw.cn-hangzhou.ide.fc.aliyun.com/proxy/8000/
Test using the proxy address
The following is an example:
curl -X POST \
  "https://devpod-e***a-lwt***jyw.cn-hangzhou.ide.fc.aliyun.com/proxy/8000/ocr_batch" \
  -H "Content-Type: application/json" \
  -d '{
    "input": {
      "pdfs": ["https://images.devsapp.cn/test/ocr-test.pdf"]
    },
    "prompt": "<image>\nFree OCR."
}'You can also use API testing tools, such as Postman or Insomnia, to debug through a graphical user interface for a more intuitive and convenient experience.
Image building and deployment
After the model service is verified in the development environment, you can package it into a container image and deploy it to the production environment.
Build an image
DevPod provides a one-click build feature to package the current development environment into a standard container image:
In the DevPod console, you can click Create Image.
Select an ACR instance and configure the image information.
The system automatically builds the image and pushes it to the specified container repository.
Details: For more information, see Image Building and ACR Integration.
Deploy the model
After the image is built and pushed, it is stored in ACR. You can then deploy it as a FunModel model service with one click.
After building the image, click Deploy Now.
Configure service parameters, such as the startup command, listener port, and timeout period.
Click Start Deployment to automatically deploy the model service.
Verify the deployment
After the deployment is complete, you can verify the service in the following ways:
Online debugging: You can use the Online Debugging feature in the FunModel console to run a quick test.
API call: Obtain the service domain name and call the service through an HTTP client.
Performance testing: Use a stress testing tool to verify concurrent processing capabilities.
Monitoring and iteration
FunModel provides comprehensive monitoring and O&M capabilities:
Monitoring metrics
Performance monitoring: View real-time GPU utilization, request latency, and throughput.
Log analysis: Centrally collect all instance logs and support keyword retrieval and error tracking.
Call statistics: View the number of API calls, success rates, and error distribution.
Change management
Deployment records: A complete record is kept for every configuration change, such as instance type, timeout period, and scaling policies.
Version rollback: You can perform quick rollbacks to stable historical versions.
Phased release: You can gradually switch to a new version based on traffic ratios.
Iteration process
When you need to optimize the model or fix issues:
Discover issues: Locate issues through the monitoring dashboard or log analysis.
Develop fixes: Directly modify and test the code in DevPod.
Verify the solution: Fully verify the effectiveness of the fix in the development environment.
Build and deploy: Create a new image and deploy it to the production environment with one click.
Monitor the results: Use monitoring to verify that the issue is resolved.
The entire process is completed in a unified environment. This avoids issues caused by environmental inconsistencies and achieves seamless collaboration between development and O&M.
Best practices summary
Core advantages
The key advantages of using DevPod to deploy the DeepSeek-OCR model service are:
Environment consistency: The development, testing, and production environments are identical, which eliminates environment drift issues.
Resource elasticity: You can allocate GPU resources on demand. Use low-spec instances during development to save costs and scale out as needed in production.
Workflow integration: You can complete all operations in a single workspace without switching between multiple platforms.
Zero learning curve: You can focus on business value without needing to master complex concepts such as Kubernetes or Dockerfile.
Rapid iteration: The entire cycle from code modification to online verification can be shortened to minutes.
Two workflow patterns
FunModel supports two workflows based on team size and engineering requirements:
DevFlow1: One-click deployment flow (Recommended for individuals and small teams)
This flow is suitable for scenarios that require rapid idea validation and iterative optimization.
Features:
No need to write a Dockerfile
Complete builds and deployments with one click
Suitable for rapid prototype validation
Lowers the engineering barrier
Flowchart:
Procedure:
Development phase: Write code, install dependencies, and debug features in DevPod.
Build phase: Click Create Image to automatically package the current environment into an image.
Deployment phase: Click Deploy Now to configure the service parameters and publish the service.
Iteration phase: If you discover an issue, you can modify it directly in DevPod, then rebuild and deploy.
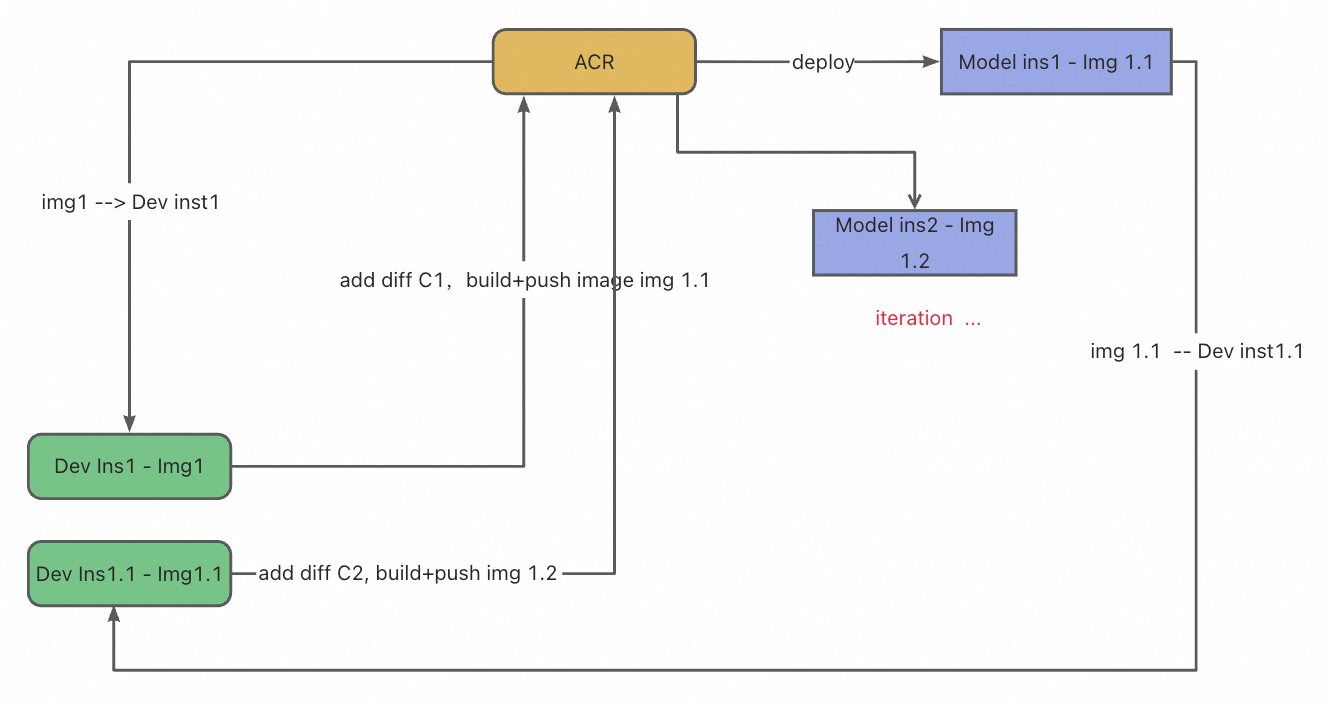
DevFlow2: Standard engineering flow (Recommended for enterprise teams)
This flow is suitable for teams that pursue engineering standards and long-term maintainability.
Features:
Version control for code and configurations
Supports multi-person collaboration and code reviews
Can be integrated with CI/CD pipelines
Traceable and reproducible deployment process
Flowchart:

Procedure:
Development preparation: Start DevPod from a specific commit in a Git repository to ensure a consistent baseline.
Feature development: Perform code iteration, dependency installation, and integration testing in DevPod.
Deployment preparation: Write or adjust the Dockerfile to precisely configure the image build logic.
Build and test: The system builds the image according to the Dockerfile and performs end-to-end testing.
Code commit: Commit the code and the Dockerfile to the Git repository together.
Automatic publishing: Automatically build the image and deploy it to the production environment through a CI/CD pipeline.