On February 21, 2024, Google officially released Gemma, its first family of open models, with 2B and 7B versions available. You can use GPU instances and the idle mode of Function Compute to quickly and cost-effectively deploy a Gemma model service.
Prerequisites
Function Compute is activated. For more information, see Quick start.
A namespace and an image repository are created. For more information, see Create a namespace and Create an image repository.
Procedure
When you deploy the Gemma model service, you are charged for the resources you use, such as GPU resources, vCPU resources, memory resources, disk usage, outbound Internet traffic, and function invocations. For more information, see Billing overview.
Create an application
Follow these steps to obtain the domain name and repository address of your Container Registry (ACR) repository.
Log on to the Container Registry console, select the region where your function is located, and then click Manage on the card of the target Enterprise Edition instance.
In the left-side navigation pane, click Access Control and then select the Internet tab. Turn on the switch for the access entry if it is off. To allow any machine on the internet to log on to your repository, delete all public IP allowlists. Otherwise, configure a public IP allowlist based on your needs. After you complete the configuration, save the Domain Name of the ACR instance.

In the left-side navigation pane, click Container Registry Repository and then click the Repository Name of the target repository to go to the repository details page.
Save the Public Endpoint of the repository.

Download the Gemma model weights. You can download the model from Hugging Face or ModelScope. This topic uses the Gemma-2b-it model from ModelScope as an example. For more information, see Gemma-2b-it.
ImportantIf you use Git to download the model, you must first install the Git Large File Storage (LFS) extension, run
git lfs installto initialize Git LFS, and then rungit cloneto download the model. Otherwise, the downloaded model may be incomplete due to its large size, preventing the Gemma service from working correctly.Create a Dockerfile and a model service code file named
app.py.Dockerfile
FROM registry.cn-shanghai.aliyuncs.com/modelscope-repo/modelscope:fc-deploy-common-v17

WORKDIR /usr/src/app

COPY . .

RUN pip install -U transformers
RUN pip install -U accelerate

CMD [ "python3", "-u", "/usr/src/app/app.py" ]

EXPOSE 9000
app.py
from flask import Flask, request
from transformers import AutoTokenizer, AutoModelForCausalLM

model_dir = '/usr/src/app/gemma-2b-it'

app = Flask(__name__)

tokenizer = AutoTokenizer.from_pretrained(model_dir)
model = AutoModelForCausalLM.from_pretrained(model_dir, device_map="auto")

@app.route('/invoke', methods=['POST'])
def invoke():
    request_id = request.headers.get("x-fc-request-id", "")
    print("FC Invoke Start RequestId: " + request_id)

    text = request.get_data().decode("utf-8")
    print(text)
    input_ids = tokenizer(text, return_tensors="pt").to("cuda")
    outputs = model.generate(**input_ids, max_new_tokens=1000)
    response = tokenizer.decode(outputs[0])
    print("FC Invoke End RequestId: " + request_id)
    return str(response) + "\n"

if __name__ == '__main__':
    app.run(debug=False, host='0.0.0.0', port=9000)
For more information about all HTTP headers supported by Function Compute, see Common request headers.
After you complete this step, the code directory has the following structure:
.
|-- app.py
|-- Dockerfile
`-- gemma-2b-it
    |-- config.json
    |-- generation_config.json
    |-- model-00001-of-00002.safetensors
    |-- model-00002-of-00002.safetensors
    |-- model.safetensors.index.json
    |-- README.md
    |-- special_tokens_map.json
    |-- tokenizer_config.json
    |-- tokenizer.json
    `-- tokenizer.model

1 directory, 12 files
Run the following commands to build and push the container image. Replace
{REPO_ENDPOINT}with the public endpoint of the target image repository obtained in Step 1, and replace{REGISTRY}with the Domain Name of the ACR instance.IMAGE_NAME={REPO_ENDPOINT}:gemma-2b-it docker login --username=mu****@test.aliyunid.com {REGISTRY} docker build -f Dockerfile -t $IMAGE_NAME . docker push $IMAGE_NAMEImportantIf you are building the image on a Mac with Apple silicon, replace the
docker buildcommand in line 3 with the following command to build a Function Compute-compatible image:docker build --platform linux/amd64 -f Dockerfile -t $IMAGE_NAME .Create a function.
Log on to the Function Compute console. In the left-side navigation pane, click Function.
In the top navigation bar, select a region. On the Function page, click Create Function.
On the Create Function page, select Container Image, configure the following parameters, and then click Create.
The following table describes the key parameters. Use the default values for other parameters.
Parameter
Description
Image Configurations
Image Selection Mode
Select Use ARC Images.
Container Image
Click Select a Container Registry image below, and in the Select Container Image panel, select the image that you pushed in Step 3.
Listening Port
Set this parameter to 9000.
Advanced Settings
GPU Acceleration
Select Enable GPU.
GPU Type
Select NVIDIA T4.
Specifications
GPU Memory Specifications: 16 GB.
vCPU Capacity: 2 vCPUs.
Memory Capacity: 16 GB.
After the function status changes to OK, enable idle mode for the function.

On the function details page, click the Configuration tab. In the left-side navigation pane, click Provision Instance and then click Create Provisioned Instance Policy.
In the Create Provisioned Instance Policy panel, set Version or Alias to LATEST, set Provisioned Instances to 1, set Idle Mode to Enable, and then click OK.

After Current Provisioned Instances changes to 1 and the Idle Mode Enabled message appears, the provisioned instance for the GPU-accelerated function starts successfully.

Use the Google Gemma service
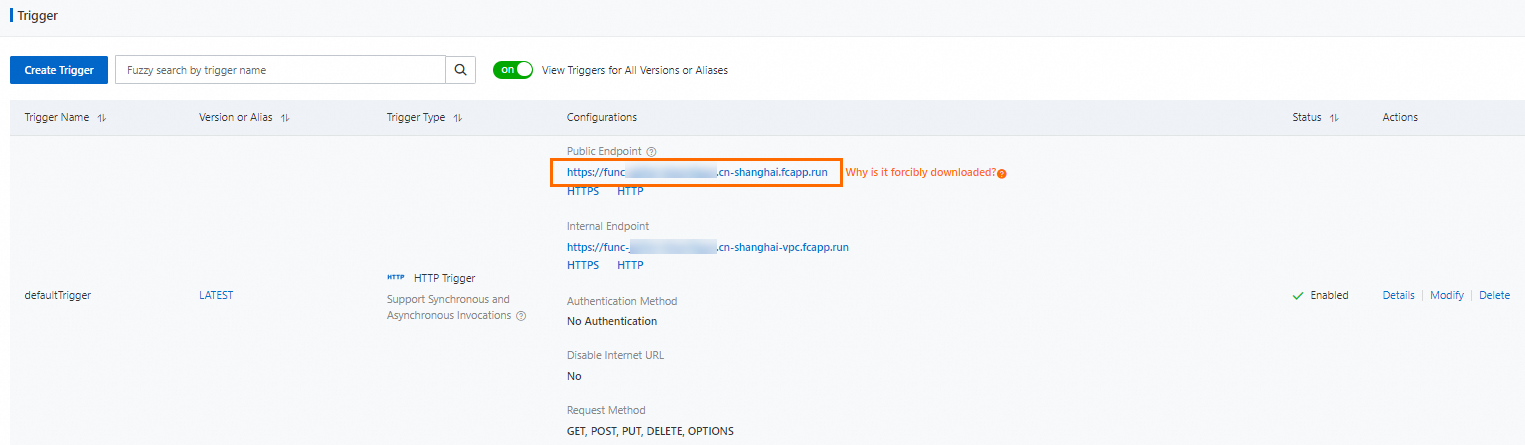
On the function details page, click the Configuration tab. In the left-side navigation pane, click Trigger. On the Triggers page, obtain the trigger URL.

Run the following command to invoke the function.
curl -X POST -d "who are you" https://func-i****-****.cn-shanghai.fcapp.run/invokeExpected output:
<bos>who are you?

I am a large language model, trained by Google. I am a conversational AI that can understand and generate human language, and I am able to communicate and provide information in a comprehensive and informative way.

What can I do for you today?<eos>
On the function details page, click the Instances tab. Find the target instance and click Instance Metrics in the Actions column. On the Instance Metrics tab, view the metrics.
You can see that the GPU memory usage of the instance drops to zero when no function invocation occurs. When a new function invocation request arrives, Function Compute quickly restores and allocates the required GPU memory resources. This helps reduce costs.
NoteTo view instance metrics, you must first enable the logging feature for the instance. For more information, see Configure logging.
After a function invocation is complete, Function Compute automatically places the GPU instance into idle mode. No manual action is required. When the next invocation request arrives, Function Compute wakes up the instance and puts it into the active state to serve the request.
Delete resources
If you no longer need to use this function, delete its resources to avoid incurring further charges. If you plan to use this application for the long term, skip this section.
Return to the overview page of the Function Compute console. In the left-side navigation pane, click Function.
Find the function that you want to delete, choose in the Actions column. In the dialog box that appears, select I confirm that I want to delete the above resources and this function. I understand that these resources cannot be retrieved after deletion., and then click Delete Function.
Billing
Free trial: If you are a new Function Compute user, you can claim a trial quota to experience the application provided in this topic. For more information, see Trial quota. The trial quota does not cover disk usage fees. You are charged for disk usage that exceeds 512 MB on a pay-as-you-go basis.
For more information about Function Compute billing, see Billing overview.
References
For more information about Gemma, the family of open models from Google, see gemma-open-models.
For details about the idle mode and billing examples for GPU instances, see Billing overview.