Function Compute supports WebSocket connections through HTTP triggers. The function runs as a WebSocket server — it accepts the connection upgrade, processes incoming messages, and sends responses back to the client over the same persistent connection.
How it works
A WebSocket session in Function Compute follows this flow:
-
The client sends an HTTP upgrade request to the HTTP trigger endpoint.
-
Function Compute performs authentication (if configured) and routes the request to a function instance.
-
The function instance handles the connection and processes messages until the connection closes or the execution timeout is reached.
-
When the timeout is reached, Function Compute forcibly closes the connection and the client receives status code 1006.
Function Compute is stateless. For functions with concurrency greater than 1, there is no guarantee that multiple connections from the same client go to the same instance. If your use case requires coordinating messages across multiple connected clients — such as a chat room — plan for external state storage (Redis, Memcached, Kafka, or a database) before you build. See Sticky sessions (session affinity) for details.
Prerequisites
Before you begin, ensure that you have:
-
A function using the Node.js 14 runtime. For setup instructions, see Create a function
Step 1: Create a trigger
-
Log on to the Function Compute console. In the left-side navigation pane, click Functions.
-
In the top navigation bar, select a region. On the Functions page, click the function you want to manage.
-
On the function details page, click the Configurations tab. In the left-side navigation pane, click Triggers, then click Create Trigger.
-
In the Create Trigger panel, configure the following parameters and click OK.
| Parameter | Description | Example |
|---|---|---|
| Trigger type | The type of trigger to create. Select HTTP Trigger. | HTTP Trigger |
| Name | The name of the HTTP trigger. | http-trigger |
| Version or alias | The function version or alias for which to create the trigger. Defaults to LATEST. | LATEST |
| Request methods | The HTTP methods that can invoke this trigger. WebSocket requires at least GET. | GET, POST, PUT, DELETE |
| Disable internet URL | Whether to block access from public endpoints. When set to Yes, invoking the function via a public endpoint returns access denied due to function internet URL is disable. Use a custom domain name instead. |
No |
| Authentication method | How HTTP requests are authenticated. Options: No Authentication (anonymous access), Signature Authentication (see Configure signature authentication), JWT Authentication (see Configure JWT authentication). | No Authentication |
After the trigger is created, you can update Version or alias, Request methods, Disable internet URL, and Authentication method at any time.
Step 2: Write and deploy the code
-
On the function details page, click the Code tab. In the WebIDE, open
index.jsand replace its contents with the following Node.js code.The WebSocket server must listen on
0.0.0.0, not127.0.0.1orlocalhost. If you do not set a custom port, port9000is used by default.const WebSocket = require('ws'); const WebSocketServer = WebSocket.Server; const wss = new WebSocketServer({ host: "0.0.0.0", port: 9000, }); wss.on('connection', function (ws, req) { console.log(`[SERVER] connection()`); ws.on('message', function (message) { ws.send(`${message}`, (err) => { if (err) { console.log(`[SERVER] error: ${err}`); } }); }) });The directory structure in the WebIDE looks like this:

-
In the WebIDE terminal, run the following command to install the
wsdependency.npm install wsAfter installation,
package-lock.jsonis generated automatically. The updated directory structure looks like this:
-
Click Deploy Code to deploy your function.
Step 3: Test the function
-
On the function details page, click the Triggers tab to view and copy the public endpoint URL.

-
Paste the trigger URL into Postman and change the scheme from
httpstowss. For more information, see Postman.
Billing
WebSocket connections are billed the same way as HTTP requests — as long-lived HTTP calls.
-
Concurrency = 1: billing starts when the connection is established and stops when it closes.
-
Concurrency > 1: billing starts when the first connection is received by an instance and stops when the last connection on that instance closes. Multiple simultaneous connections on the same instance are billed as one.
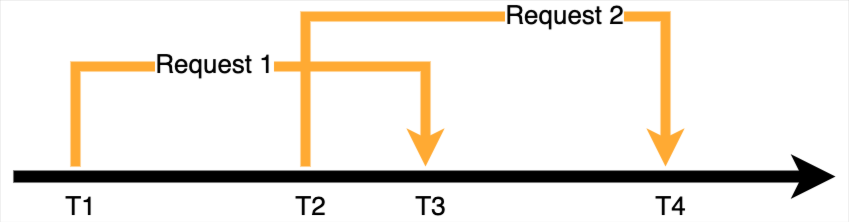
Example: A function with concurrency set to 2. The first request arrives at T1 and closes at T3. The second request arrives at T2 and closes at T4. The billable duration is T4−T1. The overlapping period T2–T3 is billed only once.
Usage notes
Request timeout
Function Compute applies the same execution timeout to WebSocket and HTTP requests. If a WebSocket connection's time to live (TTL) exceeds the configured execution timeout, Function Compute forcibly closes the connection. The client receives status code 1006.
Connection keepalive and reconnection
Function Compute closes the connection when the execution timeout is reached. Intermediate network nodes — such as a NAT Gateway — may also close idle connections before the timeout. To keep a connection alive, use Ping and Pong frames from the WebSocket protocol.
If your application needs connections longer than the maximum supported timeout, or requires a stable logical connection across reconnects, add a client-side reconnection mechanism. The following libraries implement this: Reconnecting-WebSocket and Socket.IO.
Sticky sessions (session affinity)
Function Compute is stateless. For functions with high concurrency, there is no guarantee that multiple requests from the same client are routed to the same instance. Use external storage — such as Redis, Memcached, Kafka, or a database — to share state across instances.
Example: In a chat room, different users may connect to different function instances. Use the pub/sub feature in Redis to route messages: when a user joins a room, subscribe them to that room's channel; when a user sends a message, the function publishes it to the channel so all subscribers receive it.
More examples
The following repositories contain WebSocket examples for custom runtimes and custom containers.
| Runtime type | Python | Node.js | Golang |
|---|---|---|---|
| Custom runtime | Python | Node.js | Golang |
| Custom container | Python | Node.js | Golang |
FAQ
Why won't my WebSocket function execute?
If you just created the trigger, wait about 10 seconds for the cache to update, then try again.
If the problem persists, check two things: whether all dependency packages are installed correctly (see Install third-party dependencies for a function), and whether your server is listening on 0.0.0.0 and port 9000 (or your configured custom port) — 127.0.0.1 and localhost do not work.
Troubleshooting pre-handshake errors
Errors before the WebSocket handshake completes fall into two categories: request errors (4xx) and function errors (5xx).
| Error type | Status code | Cause | Billed |
|---|---|---|---|
| Request error | 400 | Request exceeds trigger limits. See HTTP trigger overview. | No |
| 400 | Authenticated function invocation is missing the Date or Authorization header. |
No | |
| 403 | Signature is incorrect or expired. Signatures are valid for 15 minutes from the Date header value. |
No | |
| 403 | Request uses a method not configured on the trigger. WebSocket requires the GET method. | No | |
| 404 | No HTTP trigger exists for the function. | No | |
| User throttling | 429 | User concurrency limit reached. Reduce concurrency or contact the Function Compute team to raise the limit. | No |
| System error | 500 | Function Compute system error. Retry the request. | No |
| System throttling | 503 | Function Compute system throttling. Retry with exponential backoff. | No |
For errors that occur after the handshake, the cause is in your function code. Check your function logs for details. See View invocation logs.
What's next
-
Configure triggers using the Serverless Devs tool. See Common commands of Serverless Devs.
-
Configure triggers using SDKs. See SDKs.
-
Modify or delete an existing trigger. See Manage triggers.