This tutorial uses public GitHub event data to show how to build a real-time data warehouse with Hologres and DataWorks Data Integration. Using DataV as an example, it demonstrates connecting Hologres to a business intelligence (BI) tool for real-time analysis of large-scale data.
Architecture
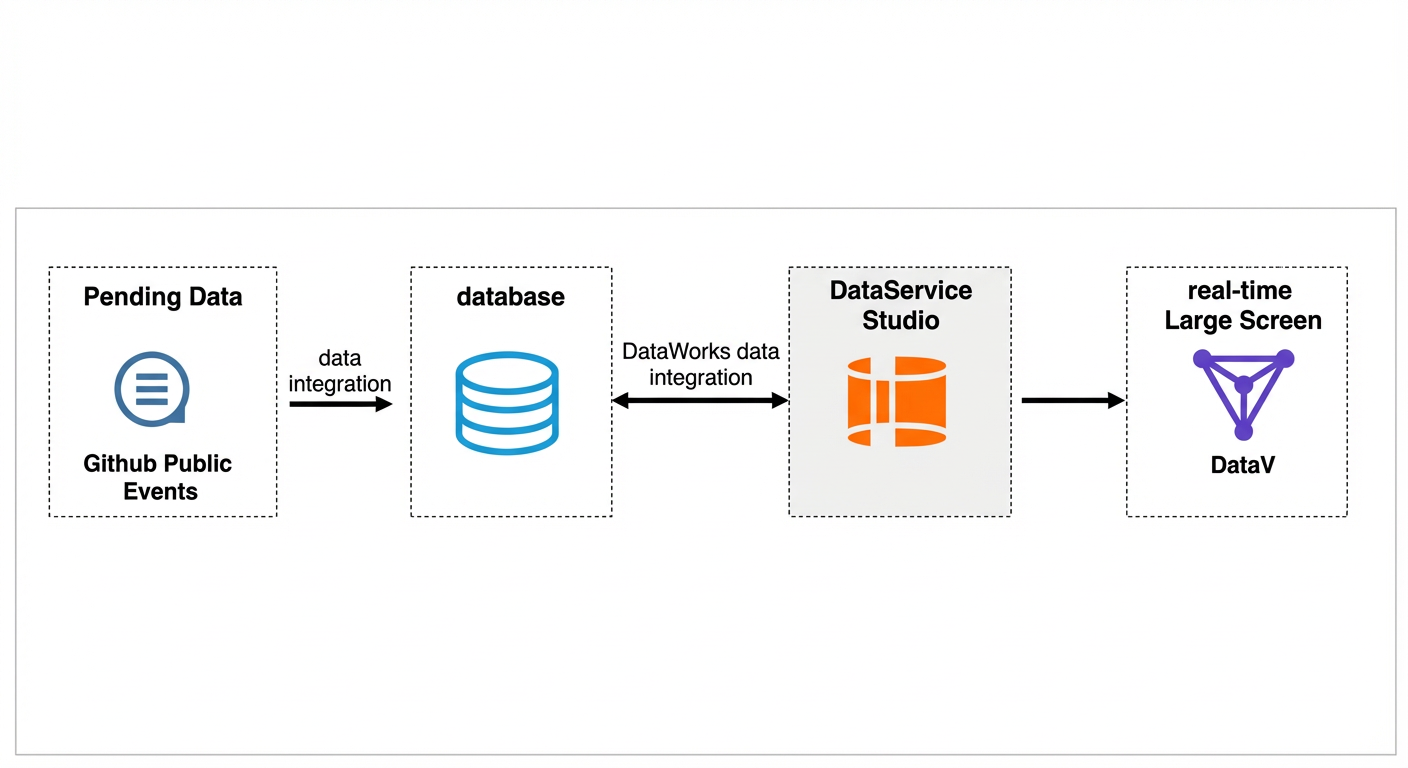
The architecture includes the following components:
Data to be processed:
This tutorial uses GitHub public events as sample data. For more information about the dataset, see Business and data overview.
-
Database
This tutorial uses an RDS for MySQL database. You can use DataWorks Data Integration to synchronize data from the database to Hologres. For a list of other supported data sources, see Supported data sources and synchronization solutions.
-
Data service
Hologres is a real-time data warehouse engine that is compatible with the PostgreSQL protocol. It supports real-time writing and updating of large-scale data and allows you to query data immediately after it is written.
Real-time data dashboard:
This tutorial uses DataV as an example to show how to view and analyze data on a real-time data dashboard.
Procedure
Prerequisites
This tutorial uses public GitHub event data that is already stored in a public MySQL database. You do not need to integrate the GitHub data into the database. You will use DataWorks Data Integration to synchronize this data from the database to Hologres for analysis. Before you start, prepare the following resources.
-
Prepare a Hologres environment
You must activate Hologres, and then create and connect to a database. You will run commands in this database to read data. You can also apply for a free Hologres resource package to try the core steps of this tutorial. For information about the free resource package and how to apply for it, see Free Trial for New Users.
NoteTo ensure network connectivity between Hologres and DataWorks, make sure that the DataWorks resource group and Hologres use the same VPC. For more information, see Network connectivity overview.
-
Prepare an RDS for MySQL environment
This tutorial provides a public MySQL environment. If you need to synchronize your own data, you must activate an RDS for MySQL instance. For more information, see Quickly create an RDS for MySQL instance.
-
Prepare a DataWorks environment
-
Activate DataWorks and create a workspace. For more information, see Activate DataWorks and Create a workspace.
-
By default, new DataWorks resource groups do not have public network access. To ensure network connectivity between the public MySQL database (which is on the public internet) and DataWorks, you must configure a NAT Gateway for the bound VPC and associate an EIP with it. For more information, see Network connectivity overview.
Note-
If you have not activated DataWorks in any region (you are a new user), you can select the DataWorks resource group option when you activate DataWorks. The system automatically assigns you a pay-as-you-go new resource group.
-
New users can also purchase and use a new resource group on the Resource group list page. For instructions, see Use a Serverless resource group. If you are an existing user and want to purchase a new resource group, you must submit a ticket.
-
For details about the billing of new resource groups, see Billing for Serverless resource groups.
-
-
(Optional) Purchase an exclusive resource group for data integration, bind it to your DataWorks workspace, and bind a VPC to the resource group. For more information, see Use an exclusive resource group for data integration.
To ensure network connectivity between Hologres and DataWorks, make sure that the DataWorks resource group and Hologres use the same VPC.
NoteThis step is required only if you have previously purchased and used an earlier version of resource groups.
-
(Optional) Prepare a data dashboard product, such as DataV
This topic uses DataV as an example to demonstrate how to build a data dashboard.
Create a Hologres internal table
You must first create a Hologres internal table and its corresponding indexes. This table will be used for real-time data writes.
-- Create a schema to create an internal table and import data.
CREATE SCHEMA IF NOT EXISTS hologres_dataset_github_event;
DROP TABLE IF EXISTS hologres_dataset_github_event.hologres_github_event;
BEGIN;
CREATE TABLE hologres_dataset_github_event.hologres_github_event (
  id bigint PRIMARY KEY,
  actor_id bigint,
  actor_login text,
  repo_id bigint,
  repo_name text,
  org_id bigint,
  org_login text,
  type text,
  created_at timestamp with time zone NOT NULL,
  action text,
  commit_id text,
  member_id bigint,
  language text
);
CALL set_table_property ('hologres_dataset_github_event.hologres_github_event', 'distribution_key', 'id');
CALL set_table_property ('hologres_dataset_github_event.hologres_github_event', 'event_time_column', 'created_at');
CALL set_table_property ('hologres_dataset_github_event.hologres_github_event', 'clustering_key', 'created_at');
COMMENT ON COLUMN hologres_dataset_github_event.hologres_github_event.id IS 'Event ID';
COMMENT ON COLUMN hologres_dataset_github_event.hologres_github_event.actor_id IS 'Initiator ID';
COMMENT ON COLUMN hologres_dataset_github_event.hologres_github_event.actor_login IS 'Initiator login name';
COMMENT ON COLUMN hologres_dataset_github_event.hologres_github_event.repo_id IS 'Repository ID';
COMMENT ON COLUMN hologres_dataset_github_event.hologres_github_event.repo_name IS 'Repository name';
COMMENT ON COLUMN hologres_dataset_github_event.hologres_github_event.org_id IS 'ID of the organization that owns the repository';
COMMENT ON COLUMN hologres_dataset_github_event.hologres_github_event.org_login IS 'Name of the organization that owns the repository';
COMMENT ON COLUMN hologres_dataset_github_event.hologres_github_event.type IS 'Event type';
COMMENT ON COLUMN hologres_dataset_github_event.hologres_github_event.created_at IS 'Event time';
COMMENT ON COLUMN hologres_dataset_github_event.hologres_github_event.action IS 'Event action';
COMMENT ON COLUMN hologres_dataset_github_event.hologres_github_event.commit_id IS 'Commit ID';
COMMENT ON COLUMN hologres_dataset_github_event.hologres_github_event.member_id IS 'Member ID';
COMMENT ON COLUMN hologres_dataset_github_event.hologres_github_event.language IS 'Programming language';
COMMIT;
Write data to Hologres using DataWorks
-
Create the data sources required for the synchronization task.
-
Log on to the DataWorks console and select the region where your workspace resides.
-
In the left-side navigation pane, click . From the drop-down list, select the workspace, and then click Go to Management Center.
-
In the left-side navigation pane, choose Data source > Data source list. On the Data source page, click Add data source.
-
Follow the on-screen instructions to create a MySQL data source and a Hologres data source.
MySQL source
Parameter
Description
Data source name
Enter a custom name.
Configuration method
Select JDBC.
JDBC URL
Click Add URL and configure the following parameters:
-
IP address: rm-bp1z69dodhh85z9qa.mysql.rds.aliyuncs.com
-
Port: 3306
Database
github_events_share
Username
workshop
Password
workshop#2017
This password is for tutorial purposes only. Do not use it in production environments.
Authentication option
Select No Authentication.
Hologres destination
Parameter
Description
Data source name
Enter a custom name.
Authentication method
The default is Alibaba Cloud account and RAM role.
Alibaba Cloud account
Select Current Alibaba Cloud account.
Region
Select the region where your Hologres instance resides.
Hologres instance
Select the Hologres instance that you created.
Database
Enter the name of the Hologres database that you created.
Default access identity
Select Alibaba Cloud Account.
Authentication option
Select No Authentication.
-
-
-
Create a single-table real-time synchronization task.
You can configure the real-time synchronization task in DataStudio in DataWorks. For detailed instructions, see Configure a real-time synchronization task (legacy).
-
On the data synchronization task page, configure the Input and Output nodes. The key parameters are described below:
Node
Type
Configuration
Description
Input
MySQL
Data source
Select the MySQL data source that you created.
For more information about configuring a MySQL node, see Configure MySQL input.
Table
Select
github_public_event.Output
Hologres
Data source
Select the Hologres data source that you created.
For more information about configuring a Hologres node, see Configure Hologres output.
Table
Select the created table
hologres_dataset_github_event.hologres_github_event.Field mapping
Select Same-name Mapping.
-
On the right side of the data synchronization task page, click Basic Settings and select the exclusive resource group for data integration or the new resource group that you created.
NoteNew users can use only new resource groups, and the consumed CUs must be set to 2 CU.
-
-
Submit and publish the real-time synchronization task. For more information, see Submit and publish a real-time synchronization task.
-
In the Operation Center > Real-time task O&M > Real-time synchronization task panel, start the task. For more information, see O&M and tuning for single-table real-time synchronization.
After the data is synchronized, go to Hologres to perform real-time data analysis.
NoteThe public MySQL data source retains data from the last 7 days. A full, one-time synchronization first syncs this historical data. After this initial sync completes, real-time data is continuously written to Hologres.
Query real-time data
Run the following sample command in Hologres to query the most active projects today:
SELECT
    repo_name,
    COUNT(*) AS events
FROM
    hologres_dataset_github_event.hologres_github_event
WHERE
    created_at >= CURRENT_DATE
GROUP BY
    repo_name
ORDER BY
    events DESC
LIMIT 5;
The following is a sample result:
repo_name events
--------------------------------------+---------
Hardwaregore/gimmie-commits 59672
happyfish2024/mins 12626
bullet-dev-team/demo-app-env-list 9002
bullet-dev-team/python-pyramid-public 8255
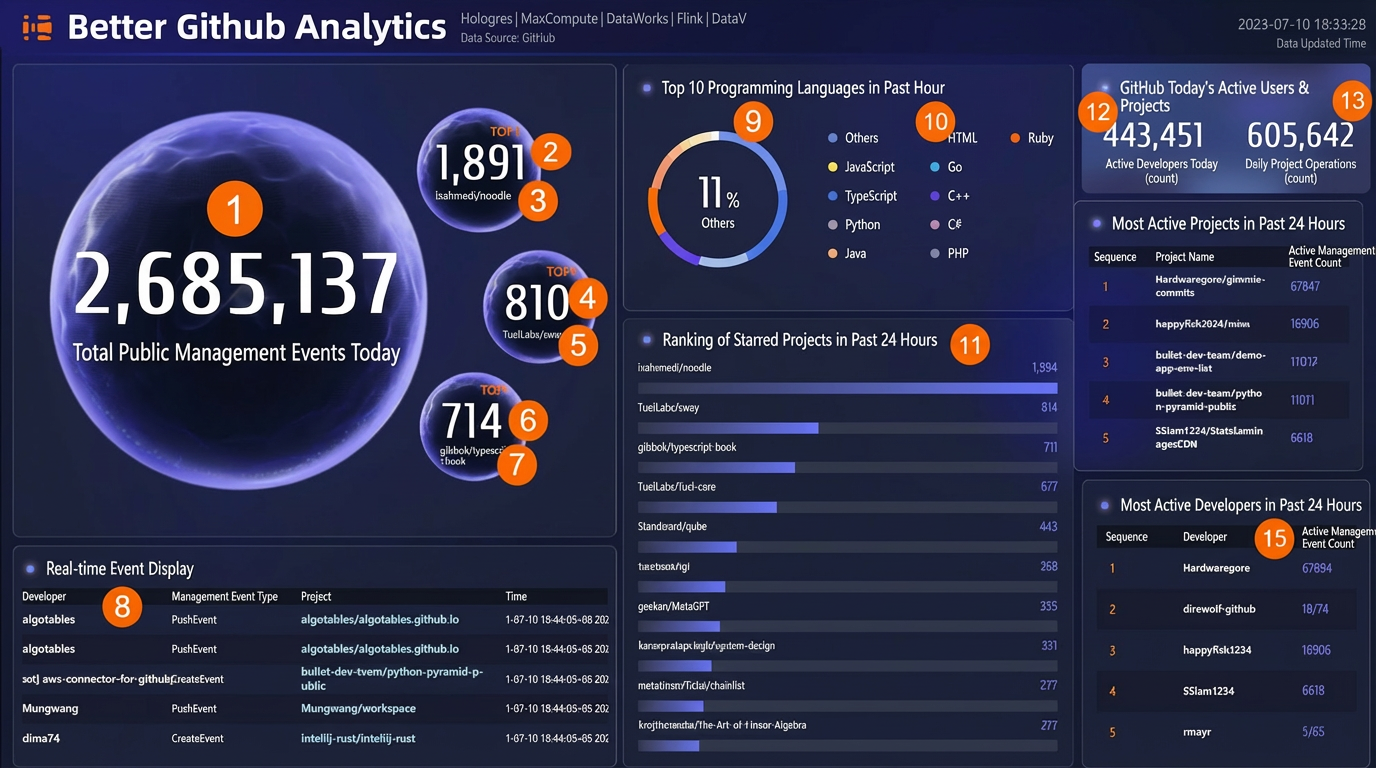
SSlam1234/StatSlamImagesCDN 6618(Optional) Build a dashboard with DataV
You can use a DataV dashboard template to quickly build a real-time dashboard for GitHub event data based on a Hologres data source.
-
Create a Hologres data source.
In DataV, add the Hologres instance and database as a new data source. For more information, see DataV.
-
Create a visualization application.
-
Log on to the DataV console.
-
On the Workspace page, click Create PC screen.
Select the Real-time analysis of GitHub event data with Hologres template.
-
Modify the data source of the components in the template.
For example, for the Total number of public events today component in the upper-left corner:
-
Click the number box for Total number of public events today. In the right-side pane, click Data source and set Data source type to Hologres. In the SQL editor, enter the query
select count(*) from hologres_dataset_github_event.hologres_github_event where created_at >= date_trunc('day', now());to get and display the total number of daily public events in real time. -
For Select an existing data source, select the data source that you created.
If the table name and schema in your Hologres instance are the same as in this tutorial, you do not need to modify the SQL statement.
-
The dashboard then displays the refreshed, real-time data.
-
Update the data source and table name for all other components as shown in the following figure.
-
-
In the upper-right corner, click Publish to complete the dashboard setup.
You can also click Preview to preview the real-time updates on the dashboard.
-