This topic describes how to import data from a MaxCompute partitioned table into a Hologres partitioned table.
Prerequisites
-
You have purchased and activated a Hologres instance. For more information, see Purchase a Hologres instance.
-
You have activated MaxCompute and created a project. For more information, see Activate MaxCompute.
-
You have activated DataWorks and created a workspace. For more information, see Create a workspace.
Background
Using a foreign table in Hologres to access MaxCompute data is a common data ingestion pattern. For recurring imports, you can use the powerful scheduling and job orchestration capabilities of DataWorks to configure a single, periodic job that automates the import workflow. For more information, see DataWorks job example.
Because the job is complex, you can use the DataWorks migration assistant to import the job example file into your project. This provides you with a ready-to-use workflow that you can then customize by changing parameters or scripts to fit your specific business needs. For more information, see Import the DataWorks job using the migration assistant.
Usage notes
-
A temporary table is used to ensure atomicity. The data is attached to the partitioned table only after the import is complete. This avoids the need for manual cleanup operations, such as deleting tables, if an import task fails.
-
When you update data in a child partition, you must delete the old child table and attach the new temporary table within a single transaction to ensure transactional consistency.
-
The following conditions must be met to import a DataWorks job using the migration assistant:
-
Your DataWorks edition must be Standard Edition or later. For more information, see DataWorks editions.
-
The DataWorks workspace must be bound to MaxCompute and Hologres data sources. For more information, see Configure a workspace.
-
The DataWorks workspace must still use the legacy DataStudio. The migration assistant does not support workspaces that have been upgraded to the new Data Studio. In an upgraded workspace, importing the resource package fails verification with the message
The migration assistant does not support workspaces that use the new Data Studio. In that case, create the job manually by following the Procedure in this topic.
-
Procedure
-
Prepare MaxCompute data
-
Log on to the DataWorks console, switch to the destination region, and in the left-side navigation pane, choose . Click Go to Data Analysis. In the left-side navigation pane, click the
 icon to go to the SQL Query page.
 -
On the SQL Query page, enter the following SQL statement to create a partitioned table and click Run.
DROP TABLE IF EXISTS odps_sale_detail; -- Create a partitioned table named sale_detail. CREATE TABLE IF NOT EXISTS odps_sale_detail ( shop_name STRING ,customer_id STRING ,total_price DOUBLE ) PARTITIONED BY ( sale_date STRING ) ; -
On the SQL Query page, enter the following SQL statement to import data into the partitioned table and click Run.
-- Add the 20210815 partition to the source table.
ALTER TABLE odps_sale_detail ADD IF NOT EXISTS PARTITION(sale_date='20210815')
;
-- Write data to the partition.
INSERT OVERWRITE TABLE odps_sale_detail PARTITION(sale_date='20210815') VALUES
('s1','c1',100.1),
('s2','c2',100.2),
('s3','c3',100.3)
;
-- Add the 20210816 partition to the source table.
ALTER TABLE odps_sale_detail ADD IF NOT EXISTS PARTITION(sale_date='20210816')
;
-- Write data to the partition.
INSERT OVERWRITE TABLE odps_sale_detail PARTITION(sale_date='20210816') VALUES
('s1','c1',100.1),
('s2','c2',100.2),
('s3','c3',100.3)
;
-- Add the 20210817 partition to the source table.
ALTER TABLE odps_sale_detail ADD IF NOT EXISTS PARTITION(sale_date='20210817')
;
-- Write data to the partition.
INSERT OVERWRITE TABLE odps_sale_detail PARTITION(sale_date='20210817') VALUES
('s1','c1',100.1),
('s2','c2',100.2),
('s3','c3',100.3)
;
-- Add the 20210818 partition to the source table.
ALTER TABLE odps_sale_detail ADD IF NOT EXISTS PARTITION(sale_date='20210818')
;
-- Write data to the partition.
INSERT OVERWRITE TABLE odps_sale_detail PARTITION(sale_date='20210818') VALUES
('s1','c1',100.1),
('s2','c2',100.2),
('s3','c3',100.3)
;
-
-
Create tables in Hologres
-
Create a foreign table
-
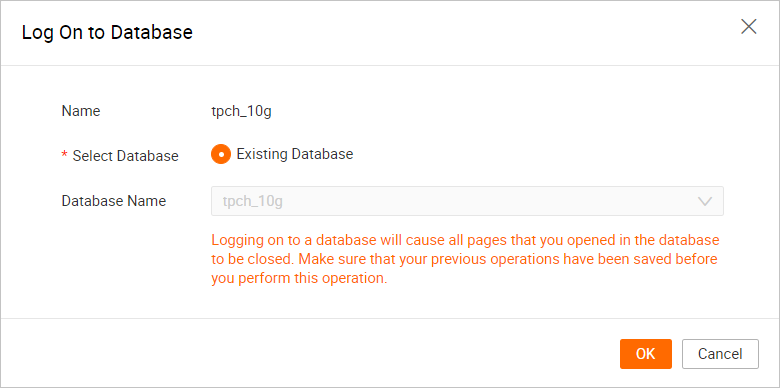
Log on to the database.
-
On the HoloWeb development page, click Metadata Management.
-
On the Metadata Management page, double-click the name of the database you created in the directory tree on the left, and then click OK.
-
-
Create a foreign table
-
On the SQL Editor page, click the
 icon in the upper-left corner to create a new SQL query.
 -
On the new Ad-hoc Query page, select your Instance Name and Database. In the SQL editor, enter the following statement and click Run.
DROP FOREIGN TABLE IF EXISTS odps_sale_detail;
-- Create a foreign table.
IMPORT FOREIGN SCHEMA maxcompute_project LIMIT to
(
    odps_sale_detail
)
FROM SERVER odps_server INTO public
OPTIONS(if_table_exist 'error',if_unsupported_type 'error');
-
-
-
Create a partitioned table (internal table)
-
Log on to the database.
-
On the HoloWeb development page, click Metadata Management.
-
On the Metadata Management page, double-click the name of the database you created in the directory tree on the left, and then click OK.
-
-
Create a partitioned table
-
On the SQL Editor page, click the
icon in the upper-left corner to create a new SQL query. -
On the new Ad-hoc Query page, select your Instance Name and Database. In the SQL editor, enter the following statement and click Run.
DROP TABLE IF EXISTS holo_sale_detail;
-- Create a Hologres partitioned table (internal table).
BEGIN ;
CREATE TABLE IF NOT EXISTS holo_sale_detail
(
    shop_name TEXT
    ,customer_id TEXT
    ,total_price FLOAT8
    ,sale_date TEXT
)
PARTITION BY LIST(sale_date);
COMMIT;
-
-
-
-
Import partition data to a Hologres temporary table
On the Ad-hoc Query page, enter the following statement in the SQL editor and click Run.
This SQL statement imports the 20210816 partition of the odps_sale_detail partitioned table in the hologres_test project of MaxCompute into the 20210816 partition of the holo_sale_detail partitioned table in Hologres.
NoteHologres V2.1.17 and later support Serverless Computing. For scenarios such as large-scale offline data import, large ETL jobs, and high-volume queries on foreign tables, you can use Serverless Computing to run these tasks. This feature uses additional serverless resources instead of your instance resources, which improves instance stability and reduces the probability of out-of-memory (OOM) errors. You do not need to reserve extra computing resources for your instance, and you are charged only for the tasks you run. For more information about Serverless Computing, see Serverless Computing. For instructions on how to use Serverless Computing, see Use Serverless Computing.
-- Clean up any potential temporary tables. BEGIN ; DROP TABLE IF EXISTS holo_sale_detail_tmp_20210816; COMMIT ; -- Create a temporary table. SET hg_experimental_enable_create_table_like_properties=on; BEGIN ; CALL HG_CREATE_TABLE_LIKE ('holo_sale_detail_tmp_20210816', 'select * from holo_sale_detail'); COMMIT; -- (Optional) We recommend that you use Serverless Computing to run large-scale offline data imports and ETL jobs. SET hg_computing_resource = 'serverless'; -- Insert data into the temporary table. INSERT INTO holo_sale_detail_tmp_20210816 SELECT * FROM public.odps_sale_detail WHERE sale_date='20210816'; -- Reset the configuration to ensure that non-essential SQL queries do not use serverless resources. RESET hg_computing_resource; -
Attach the temporary table to the Hologres partitioned table
On the Ad-hoc Query page, enter the following statement in the SQL editor and click Run.
-
If an old child table exists, you must first delete it, and then attach the temporary table to the Hologres partitioned table.
This SQL statement deletes the child table holo_sale_detail_20210816 and binds the temporary table holo_sale_detail_tmp_20210816 to the 20210816 partition of the holo_sale_detail partitioned table.
-- Replace the child table if it exists. BEGIN ; -- Delete the old child table. DROP TABLE IF EXISTS holo_sale_detail_20210816; -- Rename the temporary table. ALTER TABLE holo_sale_detail_tmp_20210816 RENAME TO holo_sale_detail_20210816; -- Attach the temporary table to the specified partitioned table. ALTER TABLE holo_sale_detail ATTACH PARTITION holo_sale_detail_20210816 FOR VALUES IN ('20210816') ; COMMIT ; -
If no old child table exists, attach the temporary table directly to the Hologres partitioned table.
This SQL statement binds the temporary table holo_sale_detail_tmp_20210816 to the 20210816 partition of the partitioned table holo_sale_detail.
BEGIN ;
-- Rename the temporary table.
ALTER TABLE holo_sale_detail_tmp_20210816 RENAME TO holo_sale_detail_20210816;
-- Attach the temporary table to the specified partitioned table.
ALTER TABLE holo_sale_detail ATTACH PARTITION holo_sale_detail_20210816
FOR VALUES IN ('20210816');
COMMIT ;
-
-
Run ANALYZE on the Hologres partitioned table
On the Ad-hoc Query page, enter the following statement in the SQL editor and click Run.
This SQL statement runs
ANALYZEon theholo_sale_detailpartitioned table to collect statistics, which helps the query planner generate efficient execution plans. When you runANALYZEon a partitioned table, you only need to run it on the parent table.-- Run ANALYZE on the parent table of the partitioned table after a large data import. ANALYZE holo_sale_detail; -
Clean up expired child partitions (optional)
In a production environment, data has a lifecycle, and you must clean up partitions that are past their retention period.
On the Ad-hoc Query page, enter the following statement in the SQL editor and click Run.
This SQL statement cleans up the 20210630 partition.
DROP TABLE IF EXISTS holo_sale_detail_20210630;
DataWorks job example
In daily operations, you often need to schedule the preceding SQL statements on a recurring basis. You can use DataWorks for scheduling and orchestration, and use one scheduled job to cover both scenarios. Read the following sections carefully so you can update parameters or scripts to match your business needs when you import the DataWorks job using the migration assistant. The following figure shows the overall workflow.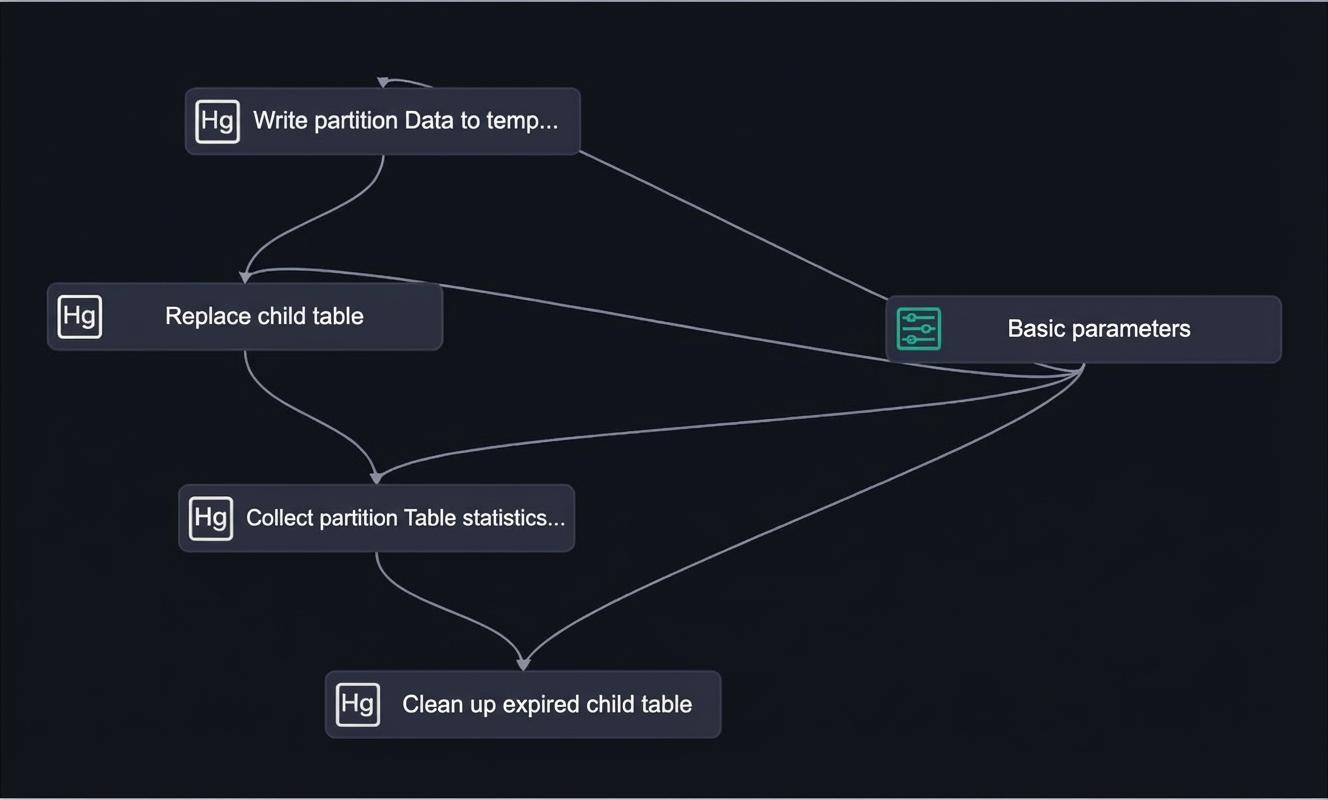
Workflow modules
-
Basic parameters
Basic parameters manage all parameters used in the workflow. The main parameters are as follows.
Id
Parameter
Type
Value
Description
1
datepre31
variable
${yyyymmdd-31}
A parameter that controls the cleanup of expired partitions. This value specifies that partitions from 31 days ago are cleaned up.
2
datetime1
variable
$bizdate
A parameter that controls partition creation.
3
holo_table_name
constant
holo_sale_detail
The name of the Hologres partitioned table.
4
odps_project
constant
hologres_test
The name of the MaxCompute project.
5
odps_table_name
constant
odps_sale_detail
The name of the MaxCompute partitioned table.
6
partition_key
constant
sale_date
The partition key of the MaxCompute table.
-
Write partitioned data to a temporary table
This step is a Hologres SQL module. The SQL code is as follows.
NoteHologres V2.1.17 and later support Serverless Computing. For scenarios such as large-scale offline data import, large ETL jobs, and high-volume queries on foreign tables, you can use Serverless Computing to run these tasks. This feature uses additional serverless resources instead of your instance resources, which improves instance stability and reduces the probability of out-of-memory (OOM) errors. You do not need to reserve extra computing resources for your instance, and you are charged only for the tasks you run. For more information about Serverless Computing, see Serverless Computing. For instructions on how to use Serverless Computing, see Use Serverless Computing.
-- Clean up any potential temporary tables.
BEGIN ;
DROP TABLE IF EXISTS ${holo_table_name}_tmp_${datetime1};
COMMIT ;
-- Create a temporary table.
SET hg_experimental_enable_create_table_like_properties=on;
BEGIN ;
CALL HG_CREATE_TABLE_LIKE ('${holo_table_name}_tmp_${datetime1}', 'select * from ${holo_table_name}');
COMMIT;
-- (Optional) We recommend that you use Serverless Computing to run large-scale offline data imports and ETL jobs.
SET hg_computing_resource = 'serverless';
-- Insert data into the temporary table.
INSERT INTO ${holo_table_name}_tmp_${datetime1}
SELECT *
FROM public.${odps_table_name}
WHERE ${partition_key}='${datetime1}';
-- Reset the configuration to ensure that non-essential SQL queries do not use serverless resources.
RESET hg_computing_resource;
You must bind the basic parameters as an upstream input for this module. In the Node Context configuration for this node, the Input Parameters of This Node section contains five parameters:
datetime1,holo_table_name,odps_project,odps_table_name, andpartition_key. The value source for all parameters is the upstream nodeholo_doc_test.501890067_out. Add them manually. The Output Parameters of This Node section is empty. -
Replace a child table
This step is a Hologres SQL module that replaces an existing child table. The operations are performed within a transaction to ensure atomicity. The SQL code is as follows.
-- Replace the child table if it exists.
BEGIN ;
-- Delete the existing child table.
DROP TABLE IF EXISTS ${holo_table_name}_${datetime1};
-- Rename the temporary table.
ALTER TABLE ${holo_table_name}_tmp_${datetime1} RENAME TO ${holo_table_name}_${datetime1};
-- Attach the temporary table to the specified partitioned table.
ALTER TABLE ${holo_table_name} ATTACH PARTITION ${holo_table_name}_${datetime1}
FOR VALUES IN ('${datetime1}');
COMMIT ;
You must bind the basic parameters as an upstream input for this module. In the Node Context, under Input Parameters of This Node, manually add the parameters
datetime1andholo_table_name. Set their value sources to the upstream node outputshologres_doc_test.502282431_out:datetime1andhologres_doc_test.502282431_out:holo_table_name, respectively. -
Collect statistics for the partitioned table
This step is a Hologres SQL module that collects statistics for the parent table. The SQL code is as follows.
-- Run ANALYZE on the parent table of the partitioned table after a large data import.
ANALYZE ${holo_table_name};
You must bind the basic parameters as an upstream input for this module. In the Node Context, under Input Parameters of This Node, click Add and manually add the parameter
holo_table_name. Set its value source toholo_doc_test.501890067_out:holo_table_name. -
Clean up expired child tables
In production environments, data has a lifecycle, and you must clean up partitions that are past their retention period.
This example shows how to store only the partitions of the last 31 days in Hologres. Because the parameter is set to datepre31=${yyyymmdd-31}, the SQL code to delete expired child tables is as follows. Before you delete a child table of a physical partitioned table, you must first detach it from the parent table (DETACH PARTITION) and then execute DROP TABLE. Otherwise, the child table remains attached to the parent table.
-- Clean up expired child tables: Detach the child partition first, and then drop the table.
BEGIN ;
ALTER TABLE ${holo_table_name} DETACH PARTITION ${holo_table_name}_${datepre31};
DROP TABLE IF EXISTS ${holo_table_name}_${datepre31};
COMMIT ;
For example, if
bizdateis 20200309, thendatepre31is 20200207. This correctly sets the date for partition cleanup.You must also bind the basic parameters as an upstream input for this module. In the Node Context panel, in the Input Parameters of This Node section, click Add and manually add two parameters: parameter name
datepre31with the value source set to the upstream node outputholo_doc_test.501890067_out:datepre31; and parameter nameholo_table_namewith the value source set to the upstream node outputholo_doc_test.501890067_out:holo_table_name.
Import a DataWorks job with the migration assistant
This section relies on the DataWorks migration assistant and applies only to workspaces that still use the legacy DataStudio. If your workspace has been upgraded to the new Data Studio, importing the resource package fails verification. Create the job manually by following the Procedure in this topic.
-
Because the job is complex, you can use the DataWorks migration assistant to import the provided job package into your project. This provides a pre-configured DataWorks job described in this topic, which you can then customize by changing parameters or scripts to fit your specific business needs.
-
For a detailed introduction to the DataWorks migration assistant, see Introduction and Practices of DataWorks Migration Assistant.
-
Download the following job package: DataWorks job package.
-
Open the DataWorks migration assistant. For more information, see Open the migration assistant.
-
In the left-side navigation pane of the migration assistant, click .
-
On the DataWorks import page, click Create Import Task in the upper-right corner.
-
In the Create Import Task dialog box, configure the parameters.
Parameter
Description
Import Package Name
A custom name. The import name can contain uppercase letters, lowercase letters, Chinese characters, digits, underscores (_), and periods (.).
Upload Method
The method for uploading the file.
-
Upload Local File: Use this method to upload an export package file of 30 MB or less to the DataWorks workspace.
-
OSS Endpoint: If an export package file is larger than 30 MB, upload the file to OSS and then enter the file URL in your DataWorks workspace. To obtain the file URL, go to the file details page in the OSS console, find the File Url section, and copy the URL. For more information about how to upload files, see Upload files. For more information about how to obtain an OSS download link, see Share files.
Remarks
A brief description of the import task.
-
-
Click OK to go to the Import Task Settings page, and then configure the mappings.
-
Click Start Import in the lower-left corner, and in the Confirm dialog box, click OK.
-
After the import succeeds, the scheduled job described above appears in your Data Development module.
-
Related DDL statements also appear in your manual workflow.
-