Android SDK integration
This topic describes how to use the Alibaba Cloud IDaaS IFAA SDK for Android. It covers SDK integration, core features, and provides code examples to help you quickly implement local biometric authentication based on the IFAA standard.
Overview
SDK and demo package
SDK & Demo main file: Contains the core development kit and sample code to help you quickly integrate and test. For more information, see SDK & Demo Download.
Authentication service SDK: Provides a complete identity authentication module that supports multiple verification methods.
AppSignGet.apk tool: Gets the signature information for an application with a specified package name in a single click, simplifying the signature configuration process. For more information, see AppSignGet.apk.
Before you begin
Prerequisites
If your application uses the phone number authentication service, ensure that the terminal device has 4G network access. China Unicom and China Mobile also support 3G, but this may increase API response times. After the phone number authentication is authorized, the service is immediately available for China Unicom and China Telecom users. China Mobile users may need to wait up to 10 minutes for the service to become active.
Integration workflow
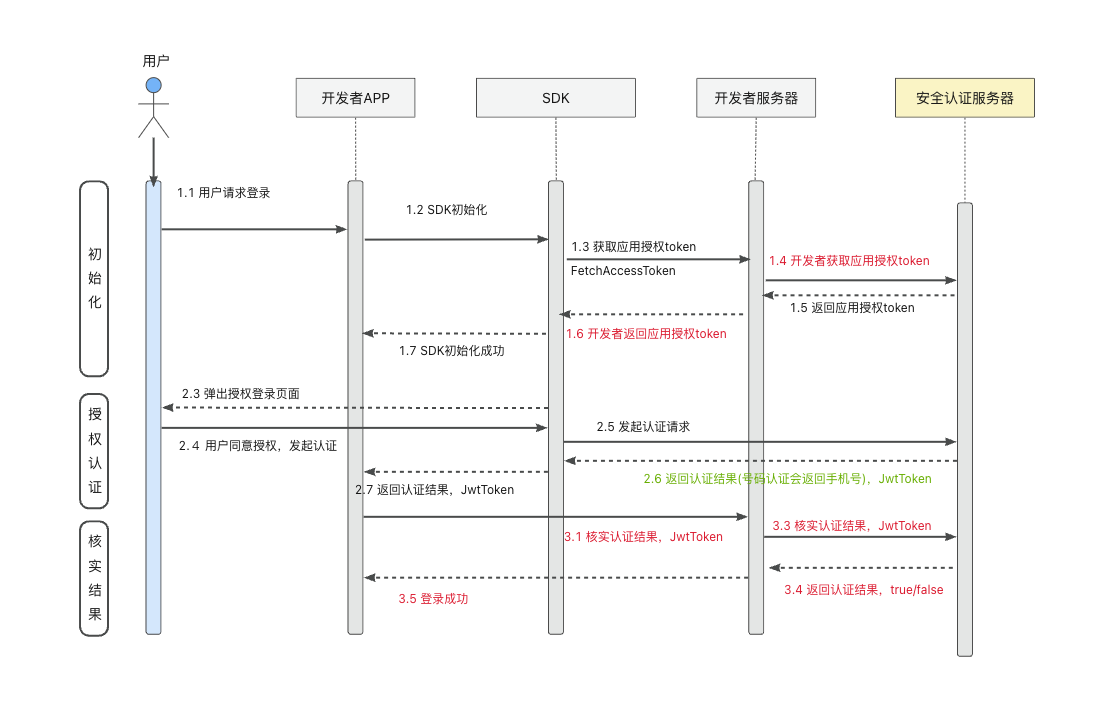
Run the demo project
Unzip the Android demo project.
Update the package name, app ID (
appId), and app key (appKey) with your values.Modify the
FetchAccessTokenCallBackImpl.fetchAccessTokenmethod to fetch the application access token.
Set up the development environment
Your application must run on Android 5.0 (API level 21) or later, support AndroidX, and have a compileSdk version of 30 or higher.
Import the AAR files. Copy the downloaded SDK files into your project's
libsdirectory.app/libs ├── auth_number_product-2.12.4-SNAPSHOT-log-online-standard-release.aar ├── crashshield-2.1.4-release.aar ├── doraemonlibrary_v1.0.8_release.aar ├── etas-release.aar ├── gson-2.8.0.jar ├── logger-2.1.4-release.aar └── main-2.1.4-release.aarAdd dependencies.
// ...
}
}
    lintOptions { abortOnError false }
}
dependencies {
    implementation 'com.android.support:appcompat-v7:28.0.0'
    implementation 'com.android.support.constraint:constraint-layout:1.0.2'
    implementation project(path: ':doraemonlibrary')
    implementation fileTree(dir: 'libs', include: ['*.aar', '*.jar'], exclude: [])
    testImplementation 'junit:junit:4.13.2'
    implementation('com.squareup.okhttp3:okhttp:3.12.0')
    implementation('com.alibaba:fastjson:1.1.55.android')
}
Configure ProGuard rules. If you enable code obfuscation, add the following rules to your ProGuard configuration file.
# Keep the public classes of ETAS from being obfuscated
-keep public class com.esandinfo.etas.ETASManager** { *; }
-keep public class com.esandinfo.etas.EtasResult** { *; }
-keep public class com.esandinfo.etas.IfaaBaseInfo {*;}
-keep public class com.esandinfo.etas.IfaaBaseInfo$* {*;}
-keep public class com.esandinfo.etas.IfaaCommon {*;}
-keep public class com.esandinfo.etas.IfaaCommon$* {*;}
-keep public class com.esandinfo.etas.model.json.** {*;}
-keep public class com.esandinfo.etas.biz.** {*;}
-keep public class com.esandinfo.etas.IfaaRequestBaseInfo {*;}
-keep public class com.esandinfo.etas.callback.** {*;}
-keep public class com.esandinfo.etas.utils.IfaaClient {*;}
# Keep the original IFAA interfaces from being obfuscated
-keep class org.ifaa.** {*;}
# Keep all native methods from being obfuscated
-keepclasseswithmembernames class * {
native <methods>;
}
# Phone number authentication configuration
-keep public class  R.drawable.authsdk*
-keep public class  R.layout.authsdk*
-keep public class  R.anim.authsdk*
-keep public class  R.id.authsdk*
-keep public class  R.string.authsdk*
-keep public class  R.style.authsdk*
# Keep the SDK classes from being obfuscated
-keep class com.idsmanager.doraemonlibrary.** {*;}
Add permissions.
<uses-permission android:name="android.permission.INTERNET" />   <!--Network permission-->
<uses-permission android:name="android.permission.USE_FINGERPRINT" />   <!--Fingerprint permission-->
<uses-permission android:name="android.permission.MANAGE_FINGERPRINT" />  <!--Fingerprint management permission-->
<uses-permission android:name="cn.org.ifaa.permission.USE_IFAA_MANAGER" />    <!--Face permission-->
<uses-permission android:name="android.permission.USE_FACERECOGNITION" />
<uses-permission android:name="oppo.permission.USE_FACE" /> <!--Face permission for specific vendors-->
<uses-permission android:name="android.permission.CAMERA" /><!--Camera permission, requires user consent-->
<uses-permission android:name="android.permission.ACCESS_WIFI_STATE" /> <!--Check Wi-Fi state-->
<uses-permission android:name="android.permission.ACCESS_NETWORK_STATE" /> <!--Check network state-->
<uses-permission android:name="android.permission.CHANGE_NETWORK_STATE" /> <!--Switch network channel-->
<uses-permission android:name="android.permission.WRITE_EXTERNAL_STORAGE" /> <!--Cache local information-->
<uses-permission android:name="android.permission.CHANGE_WIFI_STATE" /> <!--Toggle Wi-Fi state for handling mobile network issues on certain devices in China-->
Configure network permissions. Modify
AndroidManifest.xml.<?xml version="1.0" encoding="utf-8"?> <manifest xmlns:android="http://schemas.android.com/apk/res/android" xmlns:tools="http://schemas.android.com/tools" package="com.idsmanager.doraemondemoactivity"> ... <application ... android:networkSecurityConfig="@xml/network_security_config" > ... </manifest>In the
resdirectory, create anxmldirectory and anetwork_security_config.xmlfile within it.<?xml version="1.0" encoding="utf-8"?> <network-security-config> <base-config cleartextTrafficPermitted="true" /> <domain-config cleartextTrafficPermitted="true" > <domain includeSubdomains="true">enrichgw.10010.com</domain> <!-- China Unicom internal 5G request domain. You must add this. --> <domain includeSubdomains="true">onekey.cmpassport.com</domain> <!-- China Mobile internal request domain. You must add this. --> </domain-config> </network-security-config>Declare Activities. Add the following Activity declarations to
AndroidManifest.xml.<!--Unicom/Telecom Authorization Page--> <!--To avoid animation glitches, do not use the authsdk_activity_dialog theme if you are not using window mode.--> <!--If you use the authsdk_activity_dialog theme, you must not specify a fixed screenOrientation (like portrait or sensorPortrait). On Android 8.0, specifying an orientation for a windowed activity will cause a crash. Set it to 'behind' and specify the orientation on the preceding activity.--> <!--This is required for using the pop-up dialog mode.--> <activity android:name="com.mobile.auth.gatewayauth.LoginAuthActivity" android:configChanges="orientation|keyboardHidden|screenSize" android:exported="false" android:launchMode="singleTop" android:theme="@style/authsdk_activity_dialog" /> <!--Secondary Pop-up Dialog--> <activity android:name="com.mobile.auth.gatewayauth.PrivacyDialogActivity" android:configChanges="orientation|keyboardHidden|screenSize" android:exported="false" android:launchMode="singleTop" android:screenOrientation="behind" android:theme="@style/authsdk_activity_dialog" /> <!--Agreement Page WebView--> <activity android:name="com.mobile.auth.gatewayauth.activity.AuthWebVeiwActivity" android:configChanges="orientation|keyboardHidden|screenSize" android:exported="false" android:launchMode="singleTop" android:screenOrientation="behind" />Support packages.
androidx.appcompat:appcompat:1.3.1com.android.support.constraint:constraint-layout:1.0.2or a later version.
Use the
signingReporttask in Android Studio Gradle to get the app's MD5 signature value. Remove the colons and convert the resulting string to lowercase.NoteThe signatures for debug and release builds are different. Do not use the debug signature for production testing.
SDK usage
Integrate the security authentication client SDK into your app and complete the API integration on the server side. To obtain the app key and service key, see Application Management.
IFAA authentication SDK method reference
Initialization
For this method, you need to call the server-side SDK's Fetch Access Token API, create a custom callback function, and then pass the token back to the mobile SDK through FetchAccessTokenCallBackImpl.
/**
  * Initialize DoraemonManager.
  *
  * @param context
  * @param appId   The app ID. Find this on the Application Details page in the console.
  * @param appKey  The app key. Find this on the Application Management page and click Copy Key.
  * @param fetchAccessTokenCallBack Callback for fetching the access token.
*/
DoraemonManager.init(context, appId, appKey, new FetchAccessTokenCallBackImpl(), new DoraemonCallback() {
   @Override
   public void onFailure(Exception e) {
       Log.e(TAG, "DoraemonManager init failed", e);
       MainActivity.this.showToast("SDK initialization failed! " + e.getMessage());
   }
   @Override
   public void onSuccess(Object data) {
       Log.e(TAG, "DoraemonManager init success");
       MainActivity.this.showToast("SDK initialization successful!");
   }
});
FetchAccessTokenCallBackImpl must fetch the access token and return it to the SDK. The following is an example:
public class FetchAccessTokenCallBackImpl implements FetchAccessTokenCallBack {
    private static final String TAG = FetchAccessTokenCallBackImpl.class.getSimpleName();
    /**
     * Callback method to fetch the access token.
     *
     * @return
     */
    @Override
    public AccessTokenInfoResult fetchAccessToken(FetchAccessTokenRequest fetchAccessTokenRequest) {
        AccessTokenInfoResult callbackResult = new AccessTokenInfoResult();
        try {
            AccessTokenInfo accessTokenInfo =new AccessTokenInfo();
            /**
             * TODO: Fetch the application access token.
             * You must implement a server-side API as described in the documentation to get the token,
             * and then return it here. The token must be obtained synchronously.
             * https://help.aliyun.com/zh/idaas/security-authentication/developer-reference/fetchaccesstoken?spm=a2c4g.11186623.0.i1
             */
            accessTokenInfo.setAccess_token(?);
            accessTokenInfo.setRefresh_token(?);
            accessTokenInfo.setExpires_in(?);
            callbackResult.setSuccess(true);
            callbackResult.setMessage("Successfully fetched access token.");
            callbackResult.setAccessTokenInfo(accessTokenInfo);
        } catch (Exception e) {
            Log.e(TAG, "getAccessTokenRun exception", e);
            callbackResult.setSuccess(false);
            callbackResult.setMessage(e.getMessage());
        }
        return callbackResult;
    }
}
Biometric registration (fingerprint, face)
/**
  * Register for biometric authentication.
  * @param ifaaAuthTypeEnum
  * @param userID
  * @param doraemonCallback
  */
DoraemonManager.ifaaRegist(IfaaBaseInfo.IFAAAuthTypeEnum.AUTHTYPE_FINGERPRINT, userID, new DoraemonCallback() {
     @Override
     public void onFailure(Exception e) {
         Log.e(TAG, "Fingerprint registration failed", e);
         MainActivity.this.showToast("Fingerprint registration failed! " + e.getMessage());
     }
     @Override
     public void onSuccess(Object data) {
         Log.e(TAG, "Fingerprint registration success");
         MainActivity.this.showToast("Fingerprint registration successful! " + data);
     }
});
Biometric login (fingerprint, face)
/**
  * Log in with biometric authentication.
  *
  * @param ifaaAuthTypeEnum
  * @param userID
  * @param doraemonCallback
  */
DoraemonManager.ifaaLogin(IfaaBaseInfo.IFAAAuthTypeEnum.AUTHTYPE_FINGERPRINT, userID, new DoraemonCallback() {
     @Override
     public void onFailure(Exception e) {
         Log.e(TAG, "Fingerprint login failed", e);
         if (e instanceof AppException) {
             MainActivity.this.showToast("Fingerprint login failed! code=" + ((AppException) e).getCode() + " message=" + e.getMessage());
         } else {
             MainActivity.this.showToast("Fingerprint login failed! " + e.getMessage());
         }
     }
    @Override
    public void onSuccess(Object data) {
          Log.e(TAG, "Fingerprint login success");
          MainActivity.this.showToast("Fingerprint login successful! " + data);
    }
 });
Getting supported biometric types
/**
  * Get the list of supported biometric types.
  *
  * @param context The application context.
  * @return
*/
List<IfaaBaseInfo.IFAAAuthTypeEnum> supportBIOTypes = DoraemonManager.getSupportBIOTypes(MainActivity.this);
Biometric deregistration
/**
  * Cancel a biometric registration.
  * @param ifaaAuthTypeEnum The authentication type.
  * @param userID The user ID.
  * @param doraemonCallback The callback method.
  */
DoraemonManager.ifaaCancelRegist(authtypeFingerprint, userID, new DoraemonCallback() {
     @Override
     public void onFailure(Exception e) {
          Log.e(TAG, "Cancellation failed", e);
          MainActivity.this.showToast("Cancellation failed! " + e.getMessage());
     }
      @Override
      public void onSuccess(Object data) {
          Log.e(TAG, "Cancellation successful");
          MainActivity.this.showToast("Cancellation successful! " + data);
      }
});
SDK version
DoraemonManager.getVersion()Verify JWT token
Finally, you must verify the JWT token to ensure the authenticity and validity of the authentication result.