Debug a driver
After you code a device driver, you must debug it. The debugging process includes compiling and packaging the driver, uploading the driver, setting up the environment, creating a Thing Specification Language (TSL) model, creating a device, deploying the driver, viewing debugging information, debugging data communication, and replacing the driver locally.
Prerequisites
Before you begin, ensure that you have created an edge instance. This step prepares the runtime environment for device drivers that are developed using the C language software development kit (SDK). For more information, see Set up a Standard Edition environment on Ubuntu 16.04.
1. Compile and package the driver
For more information about driver packaging requirements, see Driver packaging notes at the end of this topic.
- Download the sample code.
git clone https://github.com/aliyun/linkedge-thing-access-sdk-c.git - Go to the linkedge-thing-access-sdk-c directory and compile the sample.
cd linkedge-thing-access-sdk-c make prepare && make && make install - View the compiled output of the sample.
cd build/bin/demo/demo_led/ && ls -lIf a similar output is displayed, the sample is compiled and packaged.

2. Upload and publish the driver
For more information about the operations and parameters, see Publish a driver.
- In the IoT Edge console, click Driver Management in the navigation pane on the left. Then, click the Self-developed Drivers tab.
- On the Self-developed Drivers tab, click Create Driver.
Set the driver parameters. For more information, see Publish a driver in the cloud.
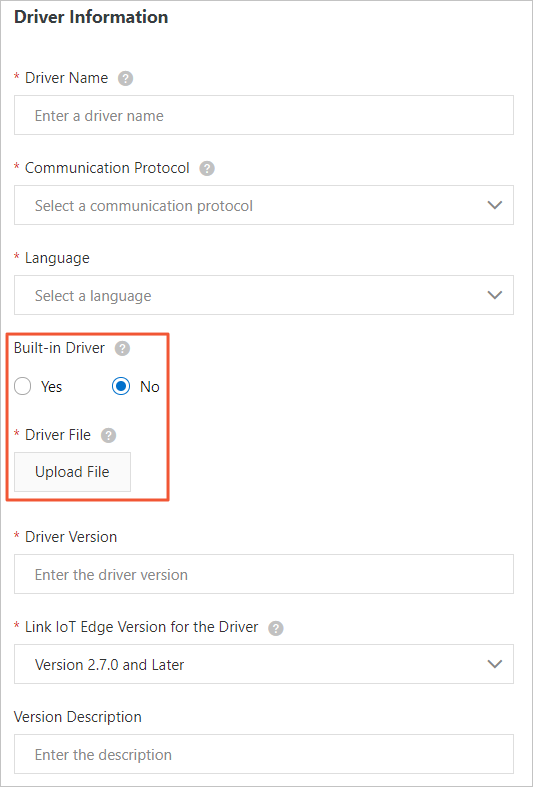
In this example, set Built-in Driver to No. Then, under Driver File, upload the compiled and packaged led_driver.zip file.
- After you set the parameters and upload the driver file, click OK. The driver that you created appears on the Self-developed Drivers tab.
3. Assign the driver and device to the edge instance
The driver is deployed to the edge instance, which is the environment that you set up in the Prerequisites section.
- In the navigation pane on the left, click Edge Instances. Find the edge instance that you created and click View in the Actions column.
- On the Instance Details page, click the Devices & Drivers tab. Then, click the
+icon next to All Drivers. - In the Assign Driver panel, select Self-developed Drivers. Find the custom driver that you created and click Assign in the Actions column. Then, click Done.
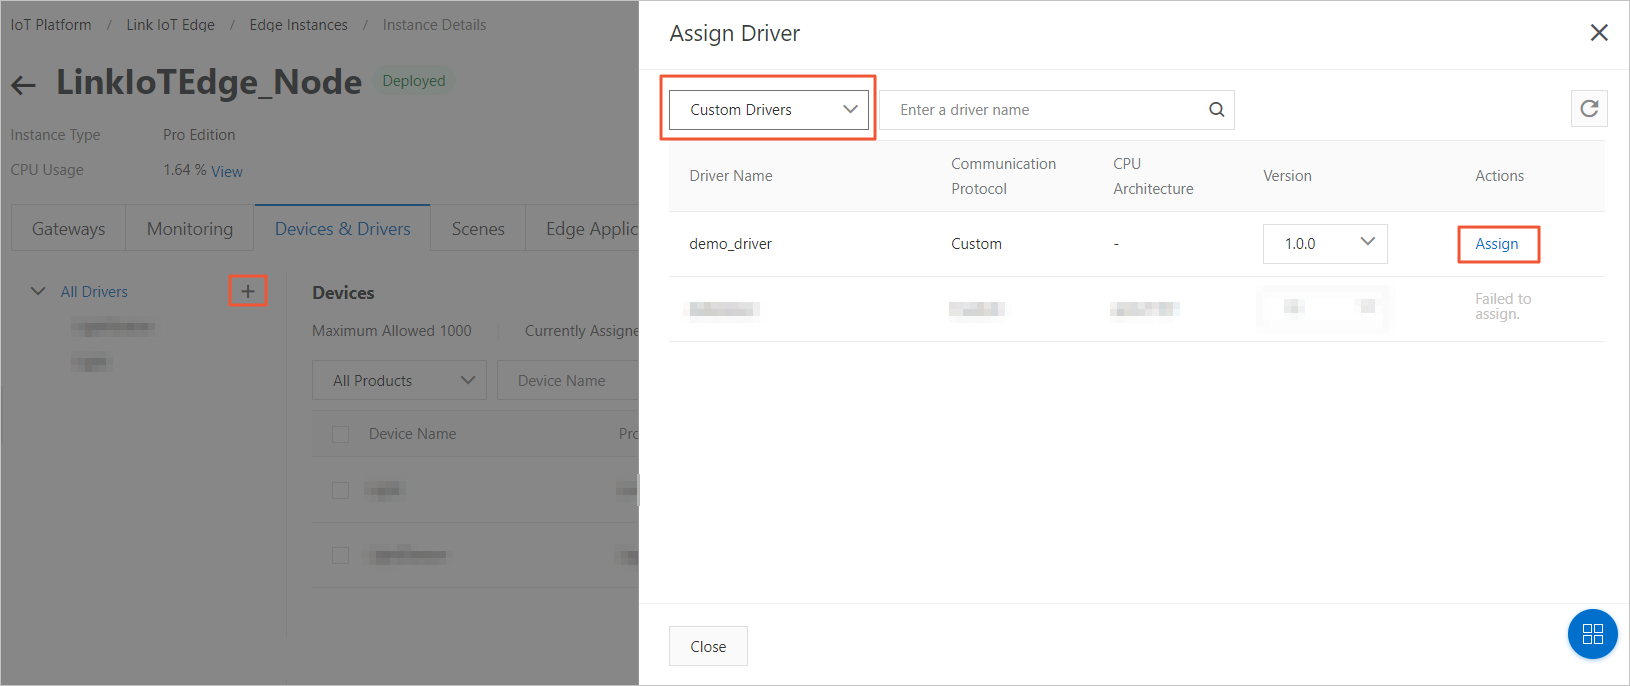
- Select the assigned custom driver demo_driver and click Assign Sub-device to assign a device to the edge instance for the demo_driver driver.
- In the Assign Sub-device panel that appears, click Add Sub-device.
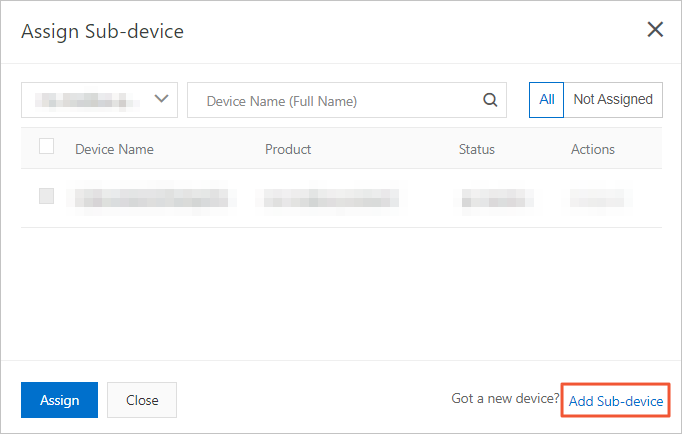
- In the Add Device dialog box, click Create Product to create a product.
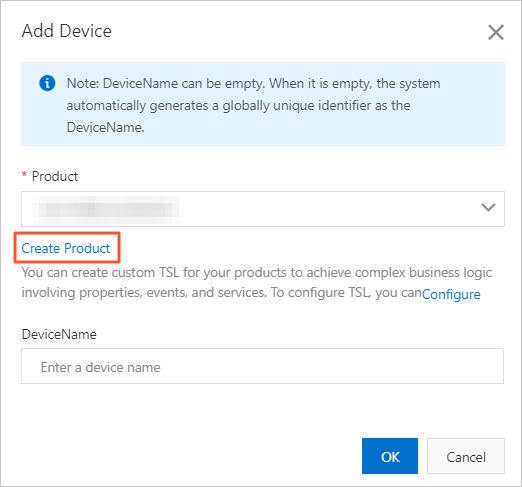
- In the Create Product dialog box, set the parameters and click Done.
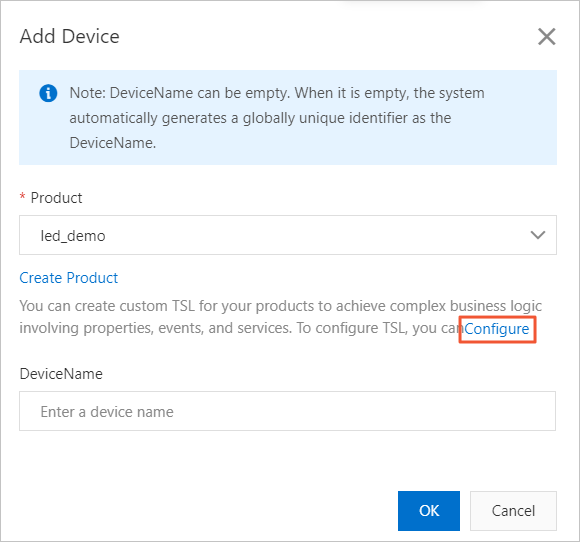
Table 1. Parameter description Parameter Description Product NameThe name of the product. The name must be unique within your account. It can contain Chinese characters, letters, digits, underscores (_), hyphens (-), at signs (@), and parentheses (()). The name must be 4 to 30 characters long. One Chinese character counts as two characters.CategorySelect a category to define a Thing Specification Language model for the product. Here, select Custom Category.Gateway ProtocolYou must select Custom. Authentication MethodSelect an authentication method for your device. For more information, see Device security and authentication.Product DescriptionAdd a description for the product. This can be empty. - Return to the Add Device dialog box and click Configure to add custom features to the product.

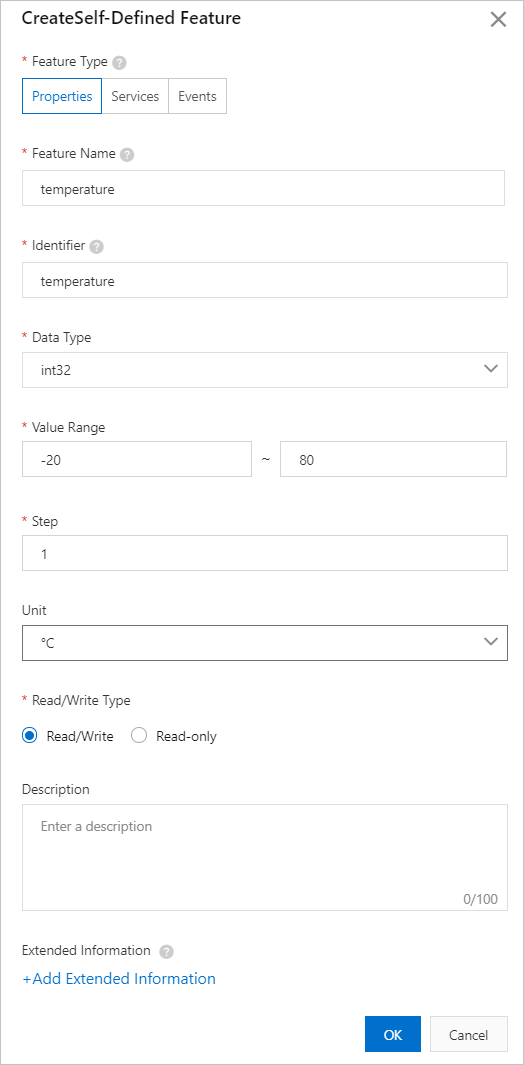
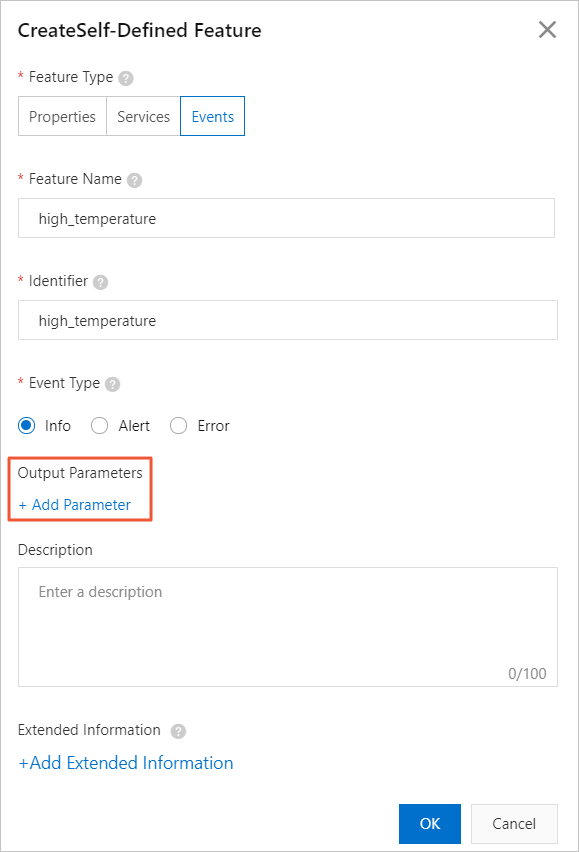
The system redirects you to the Product Details page in the IoT Platform console. On the Feature Definition tab, refer to Add a TSL model individually to add properties and events to the product.
- Add a property
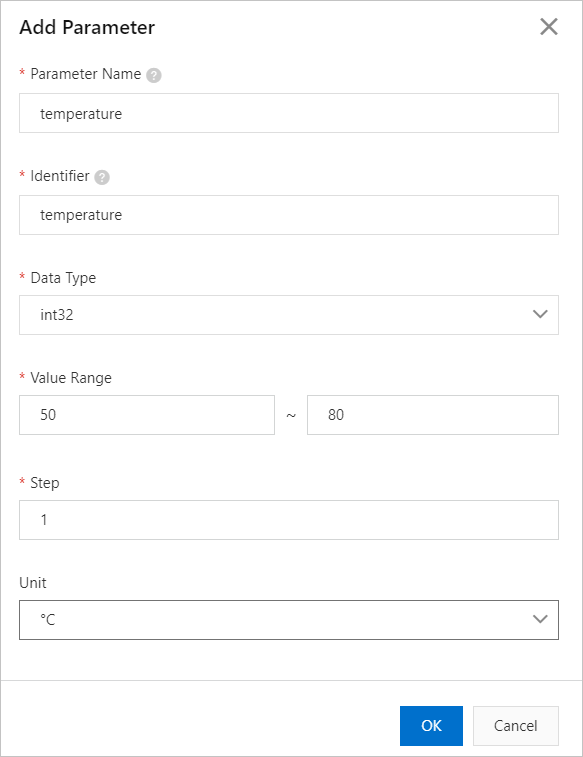
- Add an event
The output parameters are set as shown in the following figure.
- Add a property
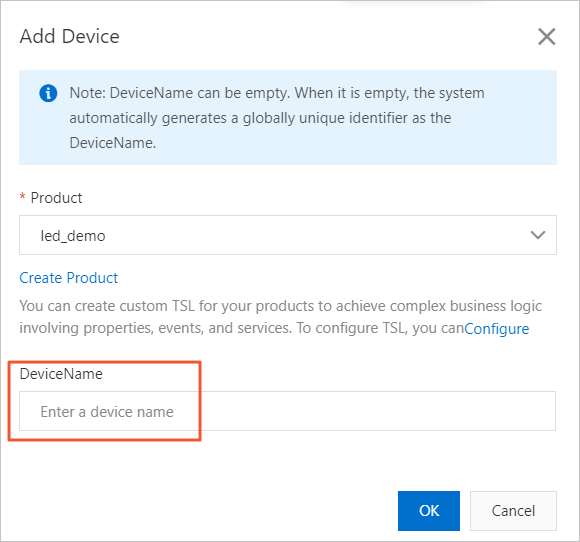
- Return to the Add Device dialog box and add a device.
- In the Assign Sub-device dialog box, find the device that you created and click Assign in the Actions column to assign the device to the edge instance.
- In the Assign Sub-device panel that appears, click Add Sub-device.
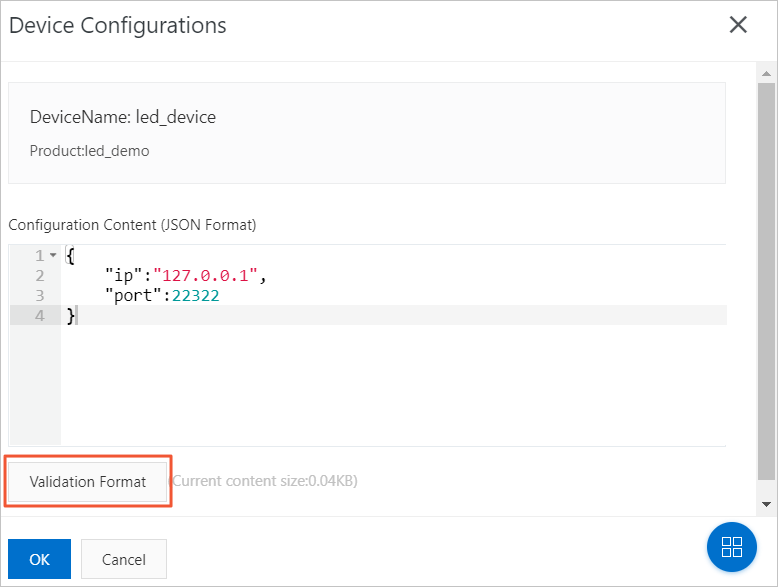
- After you assign the device to the edge instance, find the device and click Device Configurations in the Actions column to configure the device.
Enter the configuration in JSON format. The content cannot exceed 1 KB. Click Validate Format. After the validation is successful, click OK.
- (Optional) If the Protocol Type of the driver is LoRaWAN, you must perform an ABP activation configuration after you assign a sub-device.
- Find the sub-device that is associated with the LoRaWAN driver and click ABP activation configuration in the Actions column.
- Set the ABP activation parameters.
Note Activation By Personalization (ABP) is an activation method for LoRaWAN devices.
Table 2. Parameter description Parameter Description DevEUI The extended unique identifier of the device. Enter a 16-digit hexadecimal value, such as d896e0000900****.DevAddr The device address. Enter an 8-digit hexadecimal value, such as 66be****.AppSKey The application session key. Enter a 32-digit hexadecimal value, such as 623bd505f042090b5af660954509****.NwkSKey The network session key. Enter a 32-digit hexadecimal value, such as e1336a94a03aa3beae55b737acda****.Class The specific class of the node. Valid values are A, B, and C. Uplink FPort The uplink application port. The value must be in the range of 1 to 223. Downlink FPort The downlink application port. The value must be in the range of 1 to 223. - Click OK to save the configuration.
4. Deploy the edge instance
- On the Instance Details page, click Deploy in the upper-right corner to deploy the edge instance. After the deployment is successful, Deployed appears next to the instance name.
- View debugging information.
After the instance is deployed, you can view the connection and running status of the device. You can view this information in the Alibaba Cloud IoT Platform console or in the driver's operational logs in the edge gateway environment.
- View the status in the console:
- On the Instance Details page, click the Devices & Drivers tab. Select the custom driver demo_driver and view the device connection status.
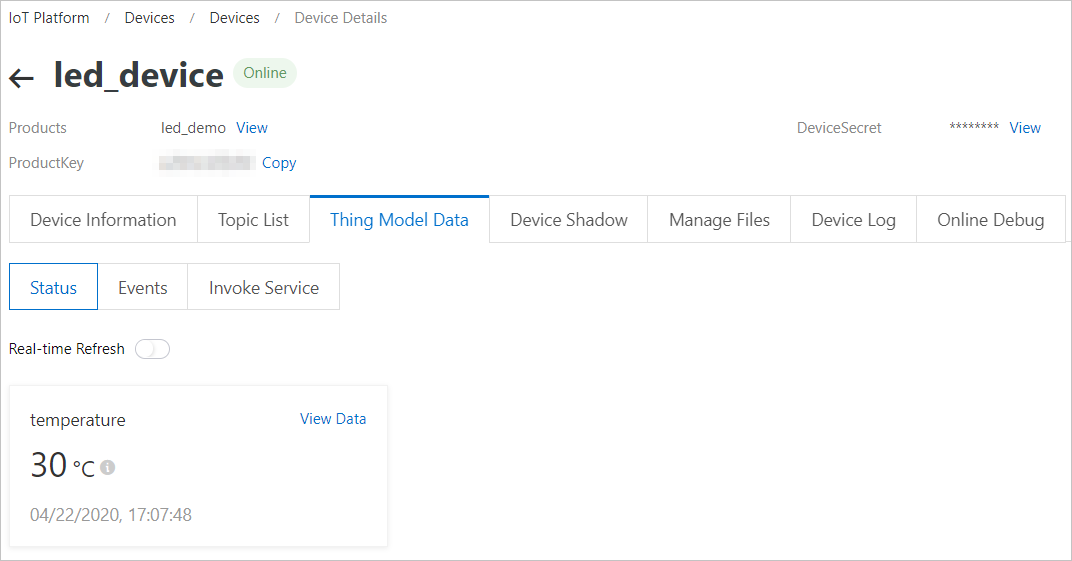
- Find the device and click View in the Actions column. You are redirected to the Device Details page in the IoT Platform console.
- Choose the tab to view the data that is reported by the device.
- On the Instance Details page, click the Devices & Drivers tab. Select the custom driver demo_driver and view the device connection status.
- View the status on your local machine:
- Run the
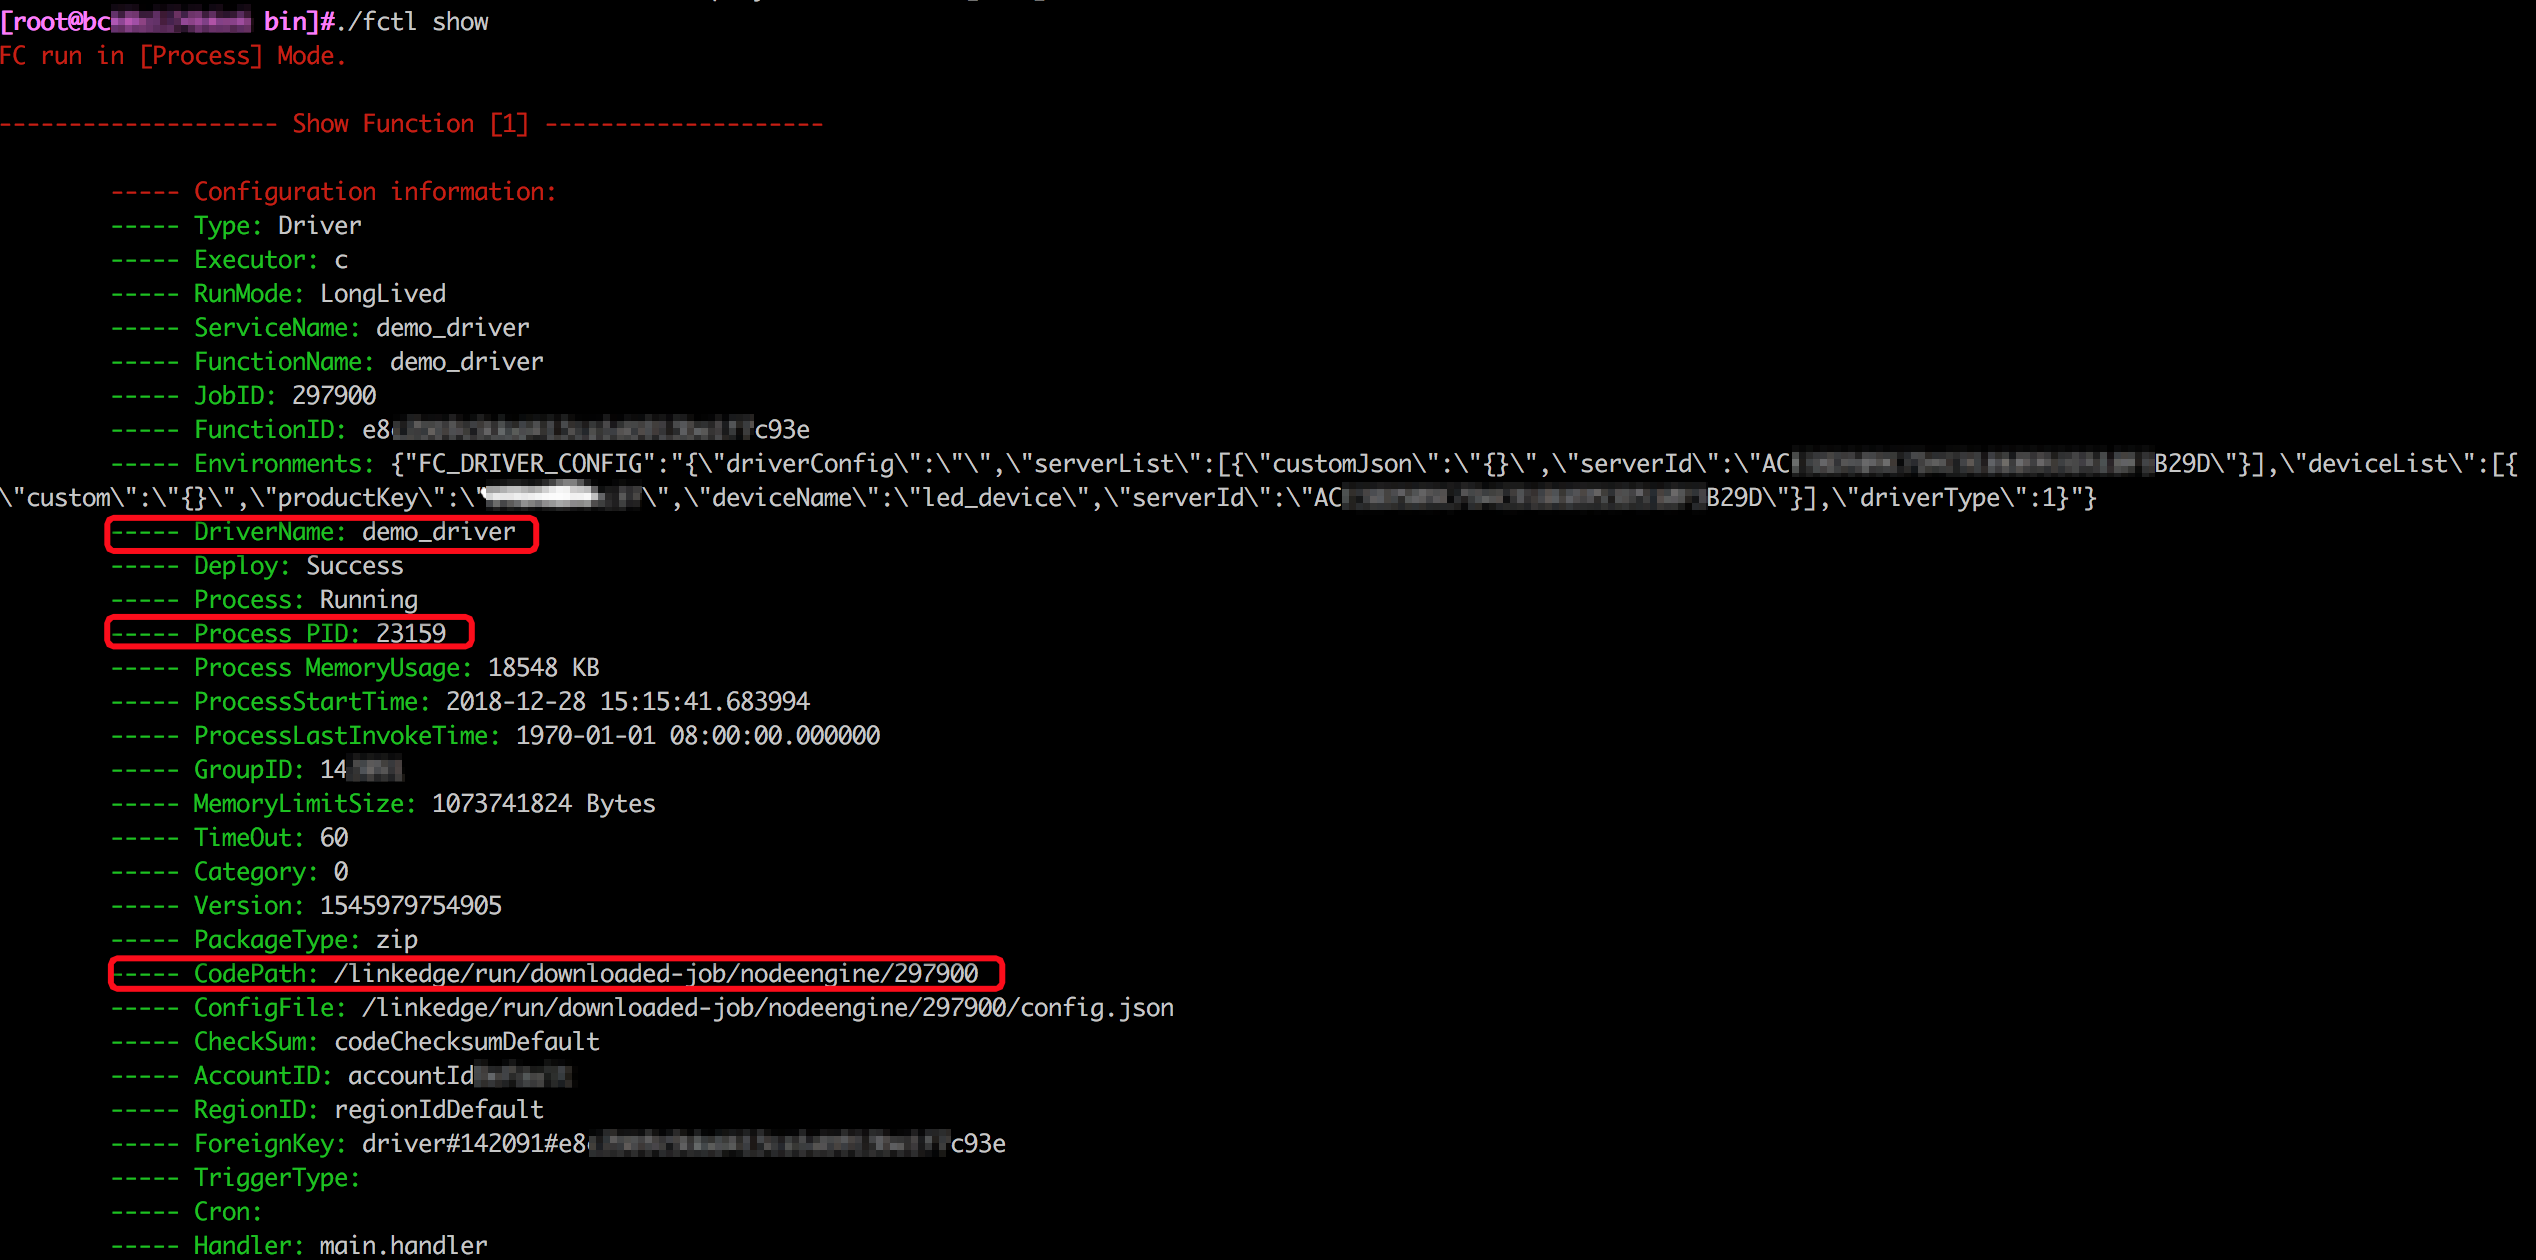
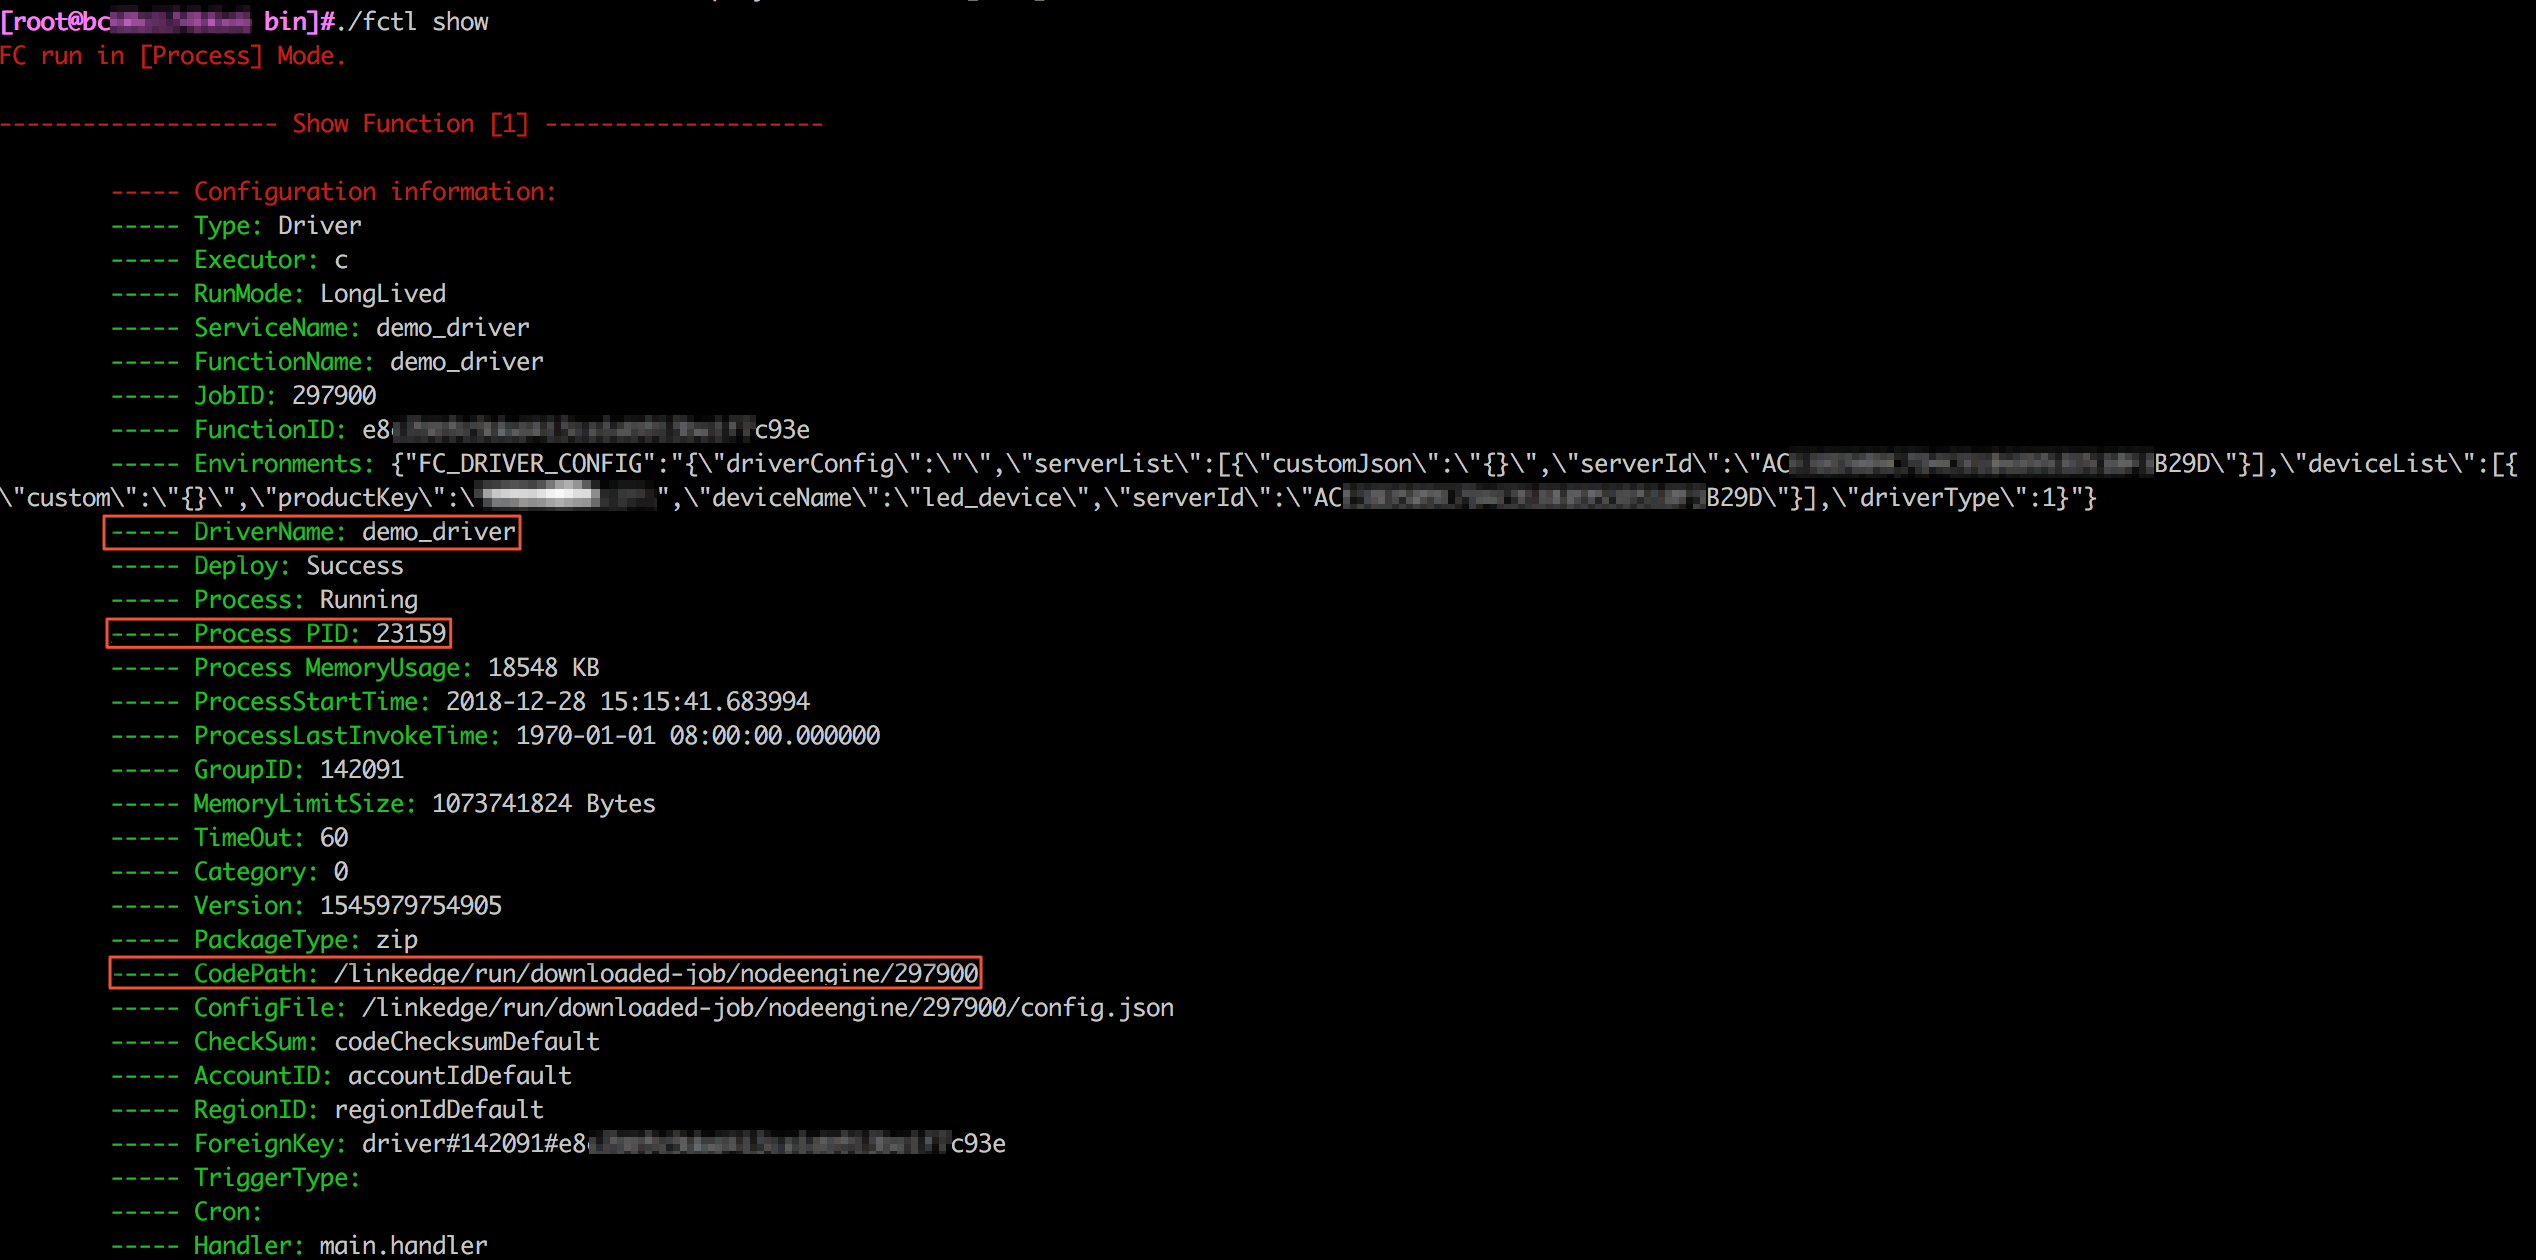
./fctl showcommand to view the deployment path of the driver.cd /linkedge/gateway/build/bin/ ./fctl showA similar output is displayed.
Table 3. Parameter description Field Name Description DriverName The name of the driver. This is the name that you specified in the 2. Upload and publish the driver step. CodePath The path where the driver is deployed in the edge gateway. Process PID The process ID after the driver starts. - The driver generates operational logs at runtime. You can view these logs to check the running status of the driver. The log files for each custom driver are stored in the /linkedge/run/logger/fc-base directory. The log file for each driver is located at /linkedge/run/logger/fc-base/xxxx/log_xxxx.txt.
Note In the driver log file path, xxxx is the name that you specified when you uploaded the driver.
cd /linkedge/run/logger/fc-base/demo_driver && ls -lThe following figure shows the details.
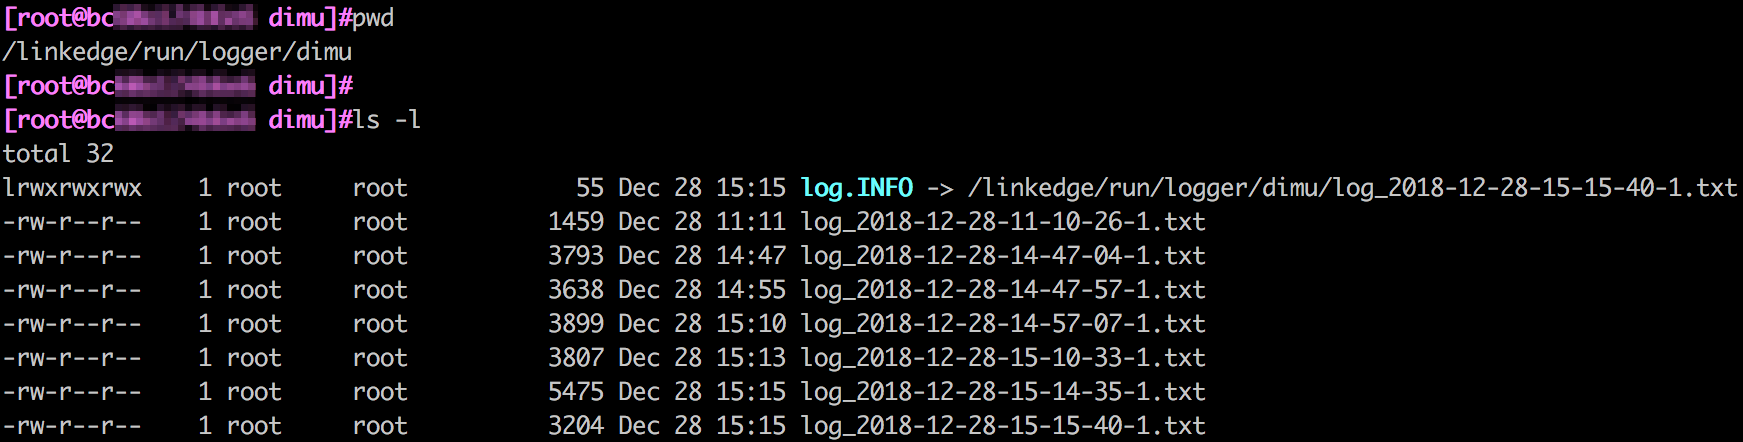
You can view the running status of most drivers in their operational logs. However, you may need to check other logs to determine the current running status. For example, if a device fails to go online, you can view thedimulog. The log file path is /linkedge/run/logger/dimu/log_xxxxx.txt.cd /linkedge/run/logger/dimu ls -lThe output is similar to the following example.
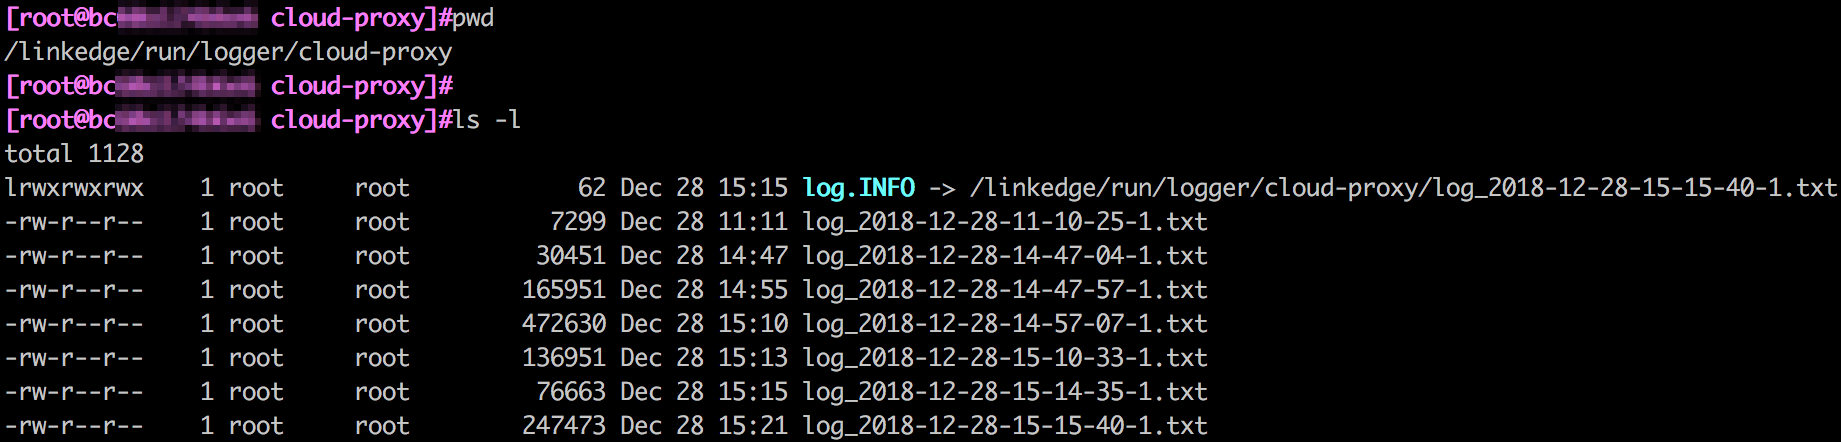
If the device is online but reports data abnormally, you can view thecloud_proxylog. The operational log file generated by cloud_proxy is located at /linkedge/run/logger/cloud-proxy/log_xxxxx.txt.cd /linkedge/run/logger/cloud-proxy ls -lThe following figure shows the details.
- Run the
- View the status in the console:


5. Debug data communication
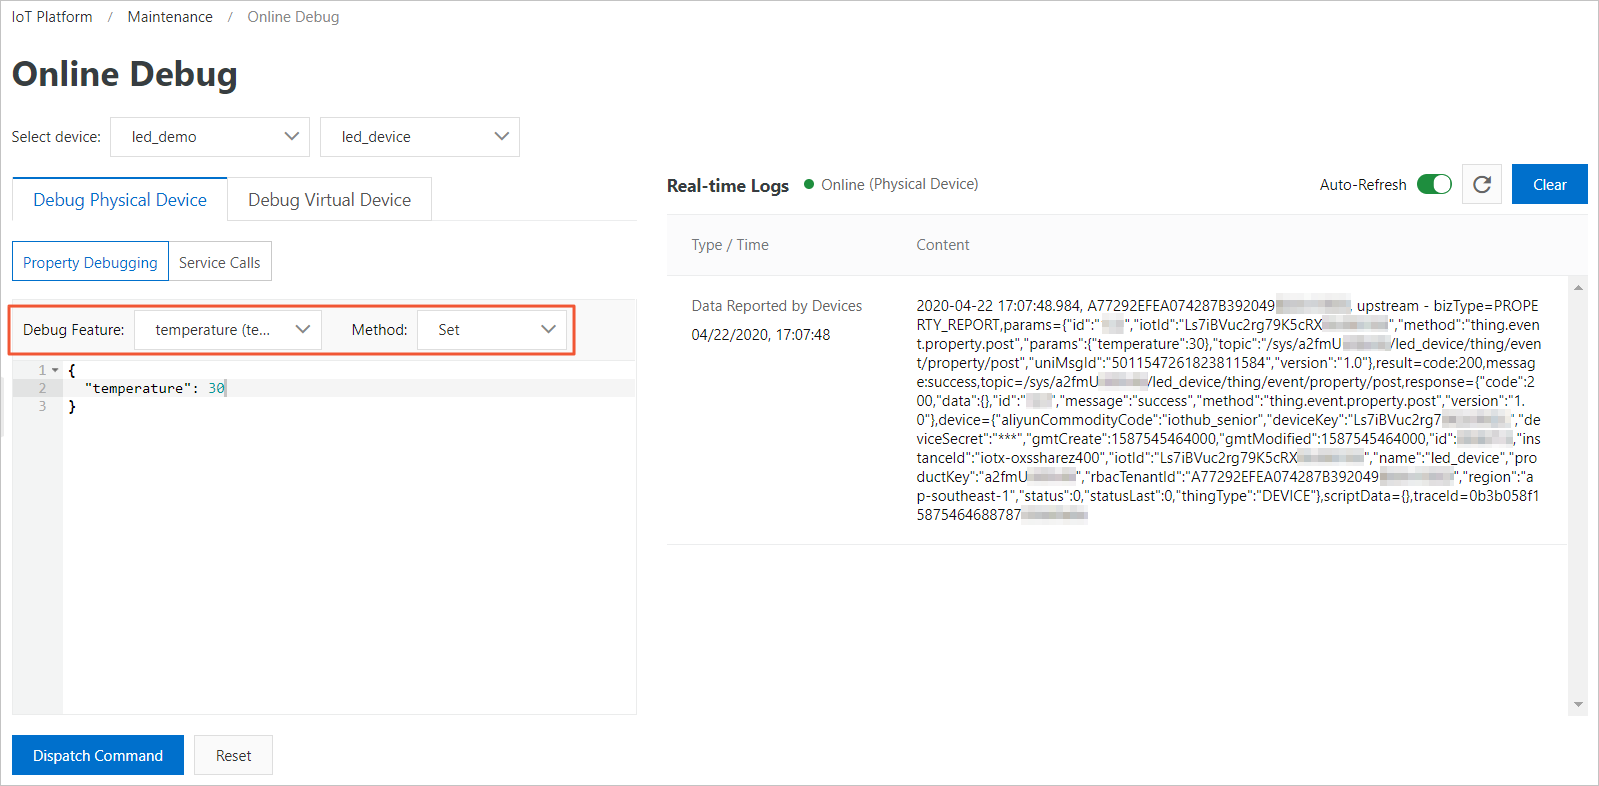
If the device is online, you can use the Online Debugging feature in the Alibaba Cloud IoT Platform console to debug the driver and the device. On the feature page, you can also view data that is reported by the device in real time and trigger requests to call device services.
- In the IoT Platform console, choose . On the Online Debugging page, select the product and device that you want to debug.
- Select the features and services that you want to debug, start the debugging process, and view the real-time operational logs of the device.
6. (Optional) Replace the driver locally
If you find issues during debugging, you may need to modify and recompile the driver code. In this case, you can replace the driver on your local machine with the new version.
- Find the driver's location. You can use the fctl command to find the location. For more information about the fields, see the debugging information.
cd /linkedge/gateway/build/bin/
./fctl show
- Use the CodePath to find the driver's directory and replace the driver file.
- Use the Process PID as the driver's process ID and run the kill -9 Pid command to restart the driver.
kill -9 Pid # Pid is the driver's process ID, which is the Process PID obtained from the fctl command. - After you replace the driver and complete the debugging, you can publish the driver to the IoT Platform console. For more information, see 2. Upload and publish the driver.
You have now successfully debugged and published the driver.
Driver dependency notes
Device drivers may have third-party library dependencies based on the protocol and business scenario. IoT Edge has specific rules for third-party library dependencies that vary by development language.
- C SDK:
C is a compiled language. If the compilation target environment and the runtime environment are different, the driver may fail to run. Therefore, for drivers developed using the C SDK, make sure that the compilation environment is the same as the runtime environment.
The driver package contains the driver program and the dynamic libraries on which it depends. If the driver has third-party library dependencies, you must package the dynamic libraries together with the driver program.
- Node.js SDK:
When you develop a driver using the Node.js SDK, if the driver has third-party library dependencies, you must develop the driver in the IoT Edge runtime environment. Then, run the following command in the driver directory to install the dependencies.
npm install third_party_library_name - Python SDK:
When you develop a driver using the Python SDK, if the driver has third-party library dependencies, you must develop the driver in the IoT Edge runtime environment. Then, run the following command in the driver directory to install the dependencies.
pip3 install -t . third_party_library_name
Driver packaging notes
After you develop and debug a driver using an IoT Edge SDK, you must package the output into a .zip file. Make sure that the driver binary or the index source file is in the root directory of the .zip package.
The packaging rules differ for each SDK.
- Drivers developed with the C SDK
For drivers developed in C, the driver package must contain the driver program and the dynamic libraries on which it depends. If the driver program has library dependencies, you must place them in a specific location. This location is the `lib` folder in the driver program's current path. Perform the following steps:
- Name the driver program executable file `main`.
- Create a `lib` folder in the same directory as the `main` file.
- Copy all dynamic libraries that the `main` file depends on to the `lib` folder.
- Use the `zip` command to compress the `main` file and the `lib` folder into a ZIP package.
zip -r your_driver_name.zip main lib
- Drivers developed with the Python SDK
A driver package must contain an index.py file that defines a handler function. A driver is a function that runs continuously in the Function Compute application engine. Therefore, the driver package must contain an index.py file with a defined handler function.
When the driver runs, it loads the index.py file. The handler function that is defined by Function Compute in this file is not called. Therefore, you must place the driver code outside the handler function to ensure that the code is executed immediately when the index.py file is loaded. For more information, see Python SDK.
- Drivers developed with the Node.js SDK
The driver package must contain an index.js file in which a handler function is defined.
When the driver runs, it loads the index.js file. The handler function that is defined by Function Compute in this file is not called. Therefore, you must place the driver code outside the handler function to ensure that the code is executed immediately when the index.js file is loaded. For more information, see Node.js SDK.