Integrate the SDK on a WAN module that supports TCP
This topic describes how to integrate the SDK on a wide area network (WAN) module that supports TCP.
This topic is based on Link SDK v3.0.1.
The Link SDK is a software development kit (SDK) from Alibaba Cloud IoT that connects devices to IoT Platform for features such as identity authentication and data communication. Integrating the Link SDK into a communication module provides the following benefits:
Device manufacturers do not need to manage the connection to IoT Platform on the microcontroller unit (MCU). Instead, they can connect by calling the AT commands that the module provides. This method avoids increasing the resource consumption of the MCU.
Alibaba Cloud features certified module models, purchase links, and development guides on the certified partner page. This helps device manufacturers and service providers (SPs) purchase certified communication modules to connect to IoT Platform.
The following figure shows how to develop a device using a module with an integrated SDK.
The development flow for device manufacturers is as follows:
Purchase a module that has the Alibaba Cloud Link SDK integrated.
Use the AT commands provided by the module on the MCU to connect to Alibaba Cloud and to send and receive data from IoT Platform.
Deploy cloud services on IoT Platform to manage the device.
For module vendors, the tasks to complete on the module are as follows:
Integrate the Link SDK into the module correctly.
Provide the AT commands for the MCU to call to connect to IoT Platform.
The following sections describe only how to integrate the MQTT feature of the SDK into the module. We recommend that module vendors integrate as many SDK features as possible, such as over-the-air (OTA) updates and Thing Specification Language (TSL) models. The more features you integrate, the less development work is required from device manufacturers on the MCU side.
Perform operations on the Alibaba Cloud IoT Platform
To verify that the integrated SDK runs correctly on the module, you must connect a test device to IoT Platform. To do this, create a product on IoT Platform and then create a device instance for that product to obtain the device credentials.
Log on to the IoT Platform console. Module vendors must register an Alibaba Cloud account. Registration is free.
After you log on to the IoT Platform console, create a product. For more information, see Create a product. You can obtain the ProductKey and ProductSecret from the product page.
Add a test device. For more information, see Create a device. You can obtain the DeviceName and DeviceSecret from the device page.
SDK integration development process
Module vendors must follow this development process to integrate the SDK on a module.

SDK configuration and code extraction
Configure the SDK
The SDK contains many features. This section describes how to configure the features required for this scenario.
Run the configuration command
Linux
Go to the root directory of the SDK and run the following command:
make menuconfigWindows
Run config.bat in the root directory of the SDK.
config.bat
Both methods start the SDK configuration tool. The interface is shown in the following figure:
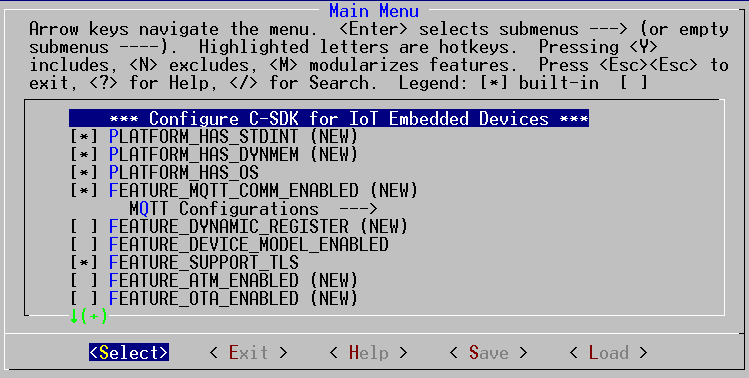
Enable required SDK features
In the feature configuration interface, press the space bar to select or clear a feature. Use the up and down arrow keys on the keypad to switch between features. To view the description of an option, move the highlight to that option and press the 'h' key. A help text appears that explains the option and the effects of enabling or disabling it.
If the compilation environment has the standard header file <stdint.h>, enable the following option:
PLATFORM_HAS_STDINT
If an embedded operating system runs on the target system, enable the following option:
PLATFORM_HAS_OS
You must enable the following three configurations because the module supports TCP but not MQTT:
FEATURE_MQTT_COMM_ENABLED: Use the MQTT API provided by the SDK to communicate with the cloud.
FEATURE_MQTT_DEFAULT_IMPL: Use the built-in MQTT client implementation in the SDK. You must implement the procedures for creating and establishing TCP connections and for sending and receiving data.
FEATURE_MQTT_DIRECT: The device specifies the IoT Platform site.
We recommend that you enable FEATURE_SUPPORT_TLS to encrypt data communication with IoT Platform. To reduce the adaptation workload, this option is not enabled in this topic.
You do not need to enable other features.
Extract the source code for selected features
Run extract.sh in the root directory of the SDK, or extract.bat on Windows. The code for the selected features is placed in the output folder.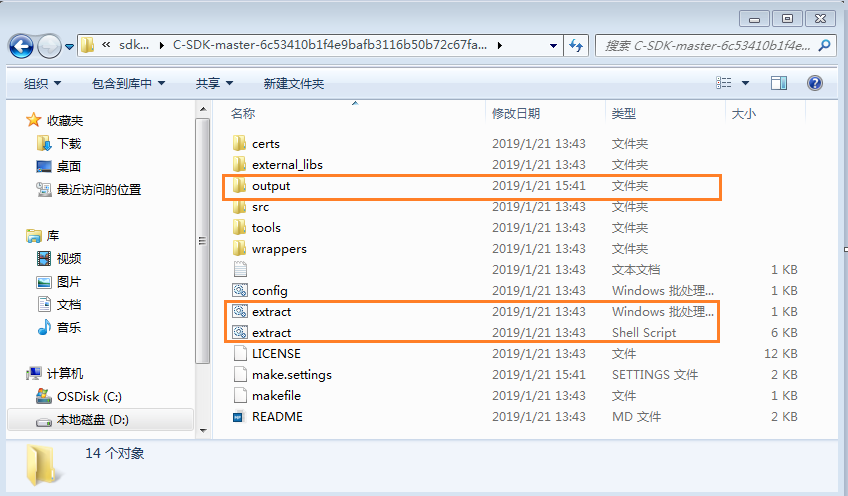
Add the SDK code files to your compilation environment
Copy the Link SDK code files from the output directory to your project directory. Then, modify your compilation environment or development tool to integrate these code files.
You must integrate the code files in the dev_sign, infra, mqtt, and wrappers directories, which are located under the eng directory.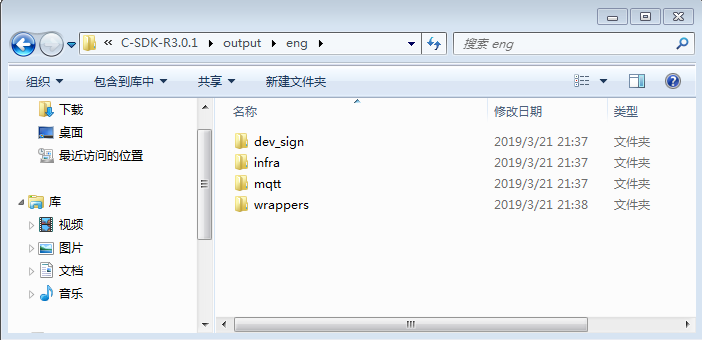
Implement HAL porting functions
The Link SDK is designed to run on different operating systems or even on MCUs that do not have an operating system. Therefore, system-related operations are defined as Hardware Abstraction Layer (HAL) functions that you must implement. Additionally, because communication modules use different operating systems, TCP-related operations are also defined as HAL functions that you must implement.
All HAL functions are located in the output/eng/wrappers/wrapper.c file.
Port the related HAL functions
System-related HAL
Mandatory functions
Function name | Description | |
1 | HAL_Malloc | Corresponds to malloc() in the standard C library. Allocates a block of available memory of the size specified by the input parameter and returns the start address. |
2 | HAL_Free | Corresponds to free() in the standard C library. Releases the memory space pointed to by the input parameter. |
3 | HAL_Printf | Corresponds to printf() in the standard C library. Displays character text on the terminal based on the input format string. If your development environment has better debugging methods, you do not need to implement this function. |
4 | HAL_Snprintf | Similar to printf, but the output is stored in a specified buffer instead of being displayed on the terminal. |
5 | HAL_UptimeMs | Returns a uint64_t value that indicates the number of milliseconds that have elapsed since the device started. |
6 | HAL_SleepMs | Sleeps for the number of milliseconds specified by the input parameter. For example, if the parameter is 10, the function sleeps for 10 ms. |
For more information about these functions, see the official SDK documentation.
Additionally, reference HAL implementations are available in the wrappers/os directory of the unzipped SDK package, not the code extraction directory. Check whether a reference implementation for your OS is available. If one is not available, you must create your own implementation.
Optional functions
If the module does not run an OS, or if the MQTT API of the SDK is not called in multiple threads, you do not need to modify the related function implementations in wrapper.c. In a scenario with an OS where the application calls the MQTT API in multiple threads, you must port the following functions:
** ** | Function name | Description |
1 | HAL_MutexCreate | Creates a mutex. The return value can be passed to HAL_MutexLock/Unlock. |
2 | HAL_MutexDestroy | Destroys a mutex identified by the input parameter. |
3 | HAL_MutexLock | Locks a mutex. If the mutex is held by another thread, the current thread sleeps. Otherwise, it continues. |
4 | HAL_MutexUnlock | Unlocks a mutex. Other threads that are sleeping on this mutex will then acquire the lock and continue execution. |
5 | HAL_SemaphoreCreate | Creates a semaphore. The return value can be passed to HAL_SemaphorePost/Wait. |
6 | HAL_SemaphoreDestroy | Destroys a semaphore identified by the input parameter. |
7 | HAL_SemaphorePost | Increments the specified counting semaphore to release other waiting threads. |
8 | HAL_SemaphoreWait | Waits on the specified counting semaphore and decrements it. |
9 | HAL_ThreadCreate | Creates a thread based on the configuration parameters. |
TCP-related HAL
MQTT communicates over TCP. Module vendors must implement the following four TCP HAL functions.
Ordinal number | Function name | Description |
1 | HAL_TCP_Establish | Establishes a TCP connection. Note: * The input parameter 'host' is a domain name that must be converted to an IP address. * The return value is the TCP socket number. |
2 | HAL_TCP_Destroy | Closes a TCP connection. The input parameter is the return value of HAL_TCP_Establish. A return value of 0 indicates success. |
3 | HAL_TCP_Write | Sends data over the TCP connection. Note: * This function takes a timeout period. If the data is not fully sent before the timeout, the function must return. * If the TCP connection is disconnected, the function must return a negative value less than 0. |
4 | HAL_TCP_Read | Reads and returns data within a specified time. The input parameters of this function specify the maximum length of data that can be received. If data of this maximum length is read from the TCP connection, the function can return immediately. |
Product-related HAL
The following HAL functions are used to obtain the product's identity authentication information. Device manufacturers must design a method to burn the device credentials onto the device and then use these HAL functions to read and provide the credentials to the SDK:
Ordinal number | Function name | Description |
1 | HAL_GetProductKey | Gets the |
2 | HAL_GetDeviceName | Gets the |
3 | HAL_GetDeviceSecret | Gets the |
For more information about these functions, see the official SDK documentation.
Note: In actual product development, the device manufacturer sends these parameters to the module using AT commands. During debugging, the module vendor can directly return the ProductKey, DeviceName, and DeviceSecret of the created test device in these functions.
Implement product features using the example
Module vendors can refer to eng/examples/mqtt_example.c in the output folder for feature debugging. Device manufacturers can copy this file to their product project, modify it, and use it.
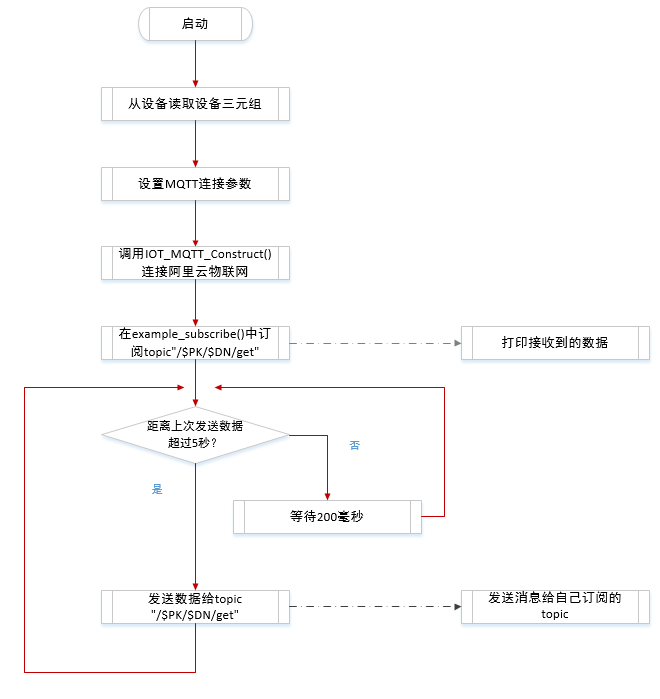
This example connects the device to Alibaba Cloud, subscribes to a specified topic, and sends data to that topic. This means that messages reported by the device are sent back to the device by IoT Platform. The following figure shows an overview of the process:
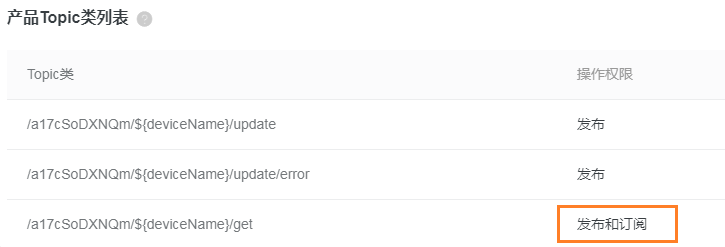
Note: On IoT Platform, you must change the default permission for this topic from 'Subscribe' to 'Publish and Subscribe', as shown in the following figure:
Starting from the main() function, which is the program entry point, the first step is to call the HAL functions provided by the module to obtain the product's identity information:
int main(int argc, char *argv[])
{
    void                   *pclient = NULL;
    int                     res = 0;
    int                     loop_cnt = 0;
    iotx_mqtt_param_t       mqtt_params;

    HAL_GetProductKey(DEMO_PRODUCT_KEY);
    HAL_GetDeviceName(DEMO_DEVICE_NAME);
    HAL_GetDeviceSecret(DEMO_DEVICE_SECRET);

    EXAMPLE_TRACE("MQTT example");
Note:
The three HAL_GetXXX functions retrieve the device credentials. Module vendors can fill in the credential information of the test device in the corresponding HAL functions.
Next, specify the MQTT connection parameters. You can modify the parameters as needed:
/* Initialize MQTT parameter */
    memset(&mqtt_params, 0x0, sizeof(mqtt_params));
    mqtt_params.port = sign_mqtt.port;
    mqtt_params.host = sign_mqtt.hostname;
    mqtt_params.client_id = sign_mqtt.clientid;
    mqtt_params.username = sign_mqtt.username;
    mqtt_params.password = sign_mqtt.password;
    mqtt_params.request_timeout_ms = 2000;
    mqtt_params.clean_session = 0;
    mqtt_params.keepalive_interval_ms = 60000;
    mqtt_params.read_buf_size = 1024;
    mqtt_params.write_buf_size = 1024;
    mqtt_params.handle_event.h_fp = example_event_handle;
    mqtt_params.handle_event.pcontext = NULL;
    pclient = IOT_MQTT_Construct(&mqtt_params);
Call the IOT_MQTT_Construct() API to trigger the SDK to connect to IoT Platform. If the return value is not NULL, the connection is successful. Then, call example_subscribe to subscribe to data from a specified topic:
res = example_subscribe(pclient);
The content of the example_subscribe function is as follows:
Note:
Device manufacturers must subscribe to their desired topics and register the corresponding handler functions based on their product design.
In the example code, the first orange circle highlights the code that specifies the topic format: /$ProductKey/$DeviceName. This topic is generated by default when you create a product on IoT Platform.
The second orange circle highlights the code that generates the topic content.
The third box in the figure shows how to subscribe to a specified topic and the handler function for data received from that topic.
The following section demonstrates the MQTT publish feature, which reports business messages to IoT Platform:
 while (1) {
        if (0 == loop_cnt % 20) {
            example_publish(pclient);
        }

        IOT_MQTT_Yield(pclient, 200);

        loop_cnt += 1;
    }
Note:
The preceding code periodically sends a fixed message to IoT Platform. Device manufacturers should upload data to IoT Platform only when necessary, based on their product features.
You can delete the example_publish(pclient) statement in the main function to avoid periodically sending invalid data to IoT Platform.
IOT_MQTT_Yield allows the SDK to receive data from the MQTT broker. The waiting time is 200 ms. If you have many messages or high real-time requirements, you can reduce this value.
The following is the body of the example_publish function: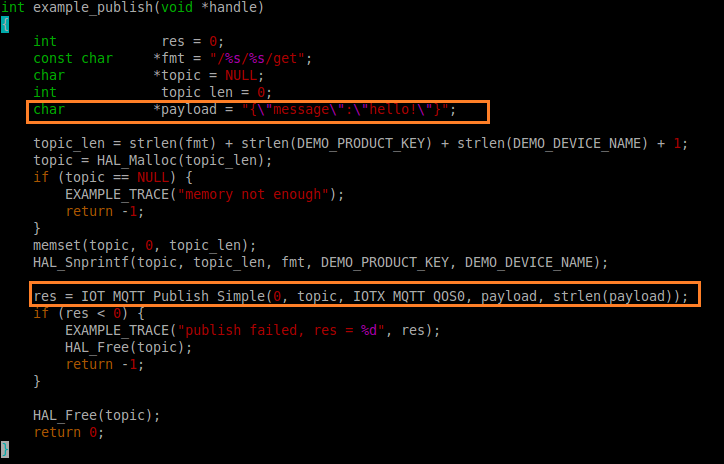
In the figure, the first box shows the content of the message to be sent. The second box shows the call to the SDK-provided API to send the message to the specified topic.
Upload the module vendor code and module model
If module vendors want to submit their modules to Alibaba Cloud IoT for certification, they must report their vendor code and module model. This allows IoT Platform to collect statistics on the number of devices connected through a specific module vendor and a specific module model from that vendor.
Before you integrate the SDK, contact us to obtain the module vendor code and module model. Send a message using the following template to contact us.
Subject: Device Connection Link SDK Product - Module/Chip Model ApplicationAfter the module establishes a connection with IoT Platform, copy and call the following function to report the information. The 'pid' parameter is the module vendor code, and 'mid' is the model code:
#define PID_STRING_LEN_MAX          32  /* Maximum length of the PID string */
#define MID_STRING_LEN_MAX          32  /* Maximum length of the MID string */


int example_report_pid_mid(void *pclient, const char *product_key, const char *device_name, const char *pid, const char *mid)
{
    int res = 0;
    iotx_mqtt_topic_info_t topic_msg;

    const char topic_frag1[] = "/sys/";
    const char topic_frag2[] = "/thing/deviceinfo/update";
    char topic[sizeof(topic_frag1) + sizeof(topic_frag2) + IOTX_PRODUCT_KEY_LEN + IOTX_DEVICE_NAME_LEN] = {0};

    const char payload_frag1[] = "{\"id\":\"0\",\"version\":\"1.0\",\"params\":[{\"attrKey\":\"SYS_MODULE_ID\",\"attrValue\":\"";
    const char payload_frag2[] = "\",\"domain\":\"SYSTEM\"},{\"attrKey\":\"SYS_PARTNER_ID\",\"attrValue\":\"";
    const char payload_frag3[] = "\",\"domain\":\"SYSTEM\"}],\"method\": \"thing.deviceinfo.update\"}";
    char payload[sizeof(payload_frag1) + sizeof(payload_frag2) + sizeof(payload_frag3) + PID_STRING_LEN_MAX + MID_STRING_LEN_MAX] = {0};

    if (strlen(pid) > PID_STRING_LEN_MAX || strlen(mid) > MID_STRING_LEN_MAX) {
        return -1;
    }

    /* Assemble the MQTT topic string */
    memcpy(topic, topic_frag1, strlen(topic_frag1));
    memcpy(topic + strlen(topic), product_key, strlen(product_key));
    memcpy(topic + strlen(topic), "/", 1);
    memcpy(topic + strlen(topic), device_name, strlen(device_name));
    memcpy(topic + strlen(topic), topic_frag2, strlen(topic_frag2));

    /* Assemble the MQTT payload string. The payload contains the PID and MID strings. */
    memcpy(payload, payload_frag1, strlen(payload_frag1));
    memcpy(payload + strlen(payload), mid, strlen(mid));
    memcpy(payload + strlen(payload), payload_frag2, strlen(payload_frag2));
    memcpy(payload + strlen(payload), pid, strlen(pid));
    memcpy(payload + strlen(payload), payload_frag3, strlen(payload_frag3));

    topic_msg.qos = IOTX_MQTT_QOS0;
    topic_msg.retain = 0;
    topic_msg.dup = 0;
    topic_msg.payload = (void *)payload;
    topic_msg.payload_len = strlen(payload);

    /* Use the MQTT publish API to send the message that contains the PID and MID information. */
    res = IOT_MQTT_Publish(pclient, topic, &topic_msg);
    if (res < 0) {
        return -1;
    }

    return 0;
}
Feature debugging
The following screenshots are based on the mqtt_example.c example.
How to check whether the device is connected to Alibaba Cloud
Note: The /${productKey}/${deviceName}/get topic has only 'Subscribe' permission by default. In the IoT Platform console, you must change the permission to 'Publish and Subscribe' to prevent messages sent to IoT Platform from being discarded. This change is required to ensure that the example program runs without errors.
The following output is printed to the serial port by the HAL_Printf function when the example runs. The information highlighted in orange indicates that the device is successfully connected to IoT Platform:
How to check whether the device successfully sent data to the cloud
Log on to the IoT Platform console, select the specified device, and check whether messages from the device have been received, as shown in the following figure: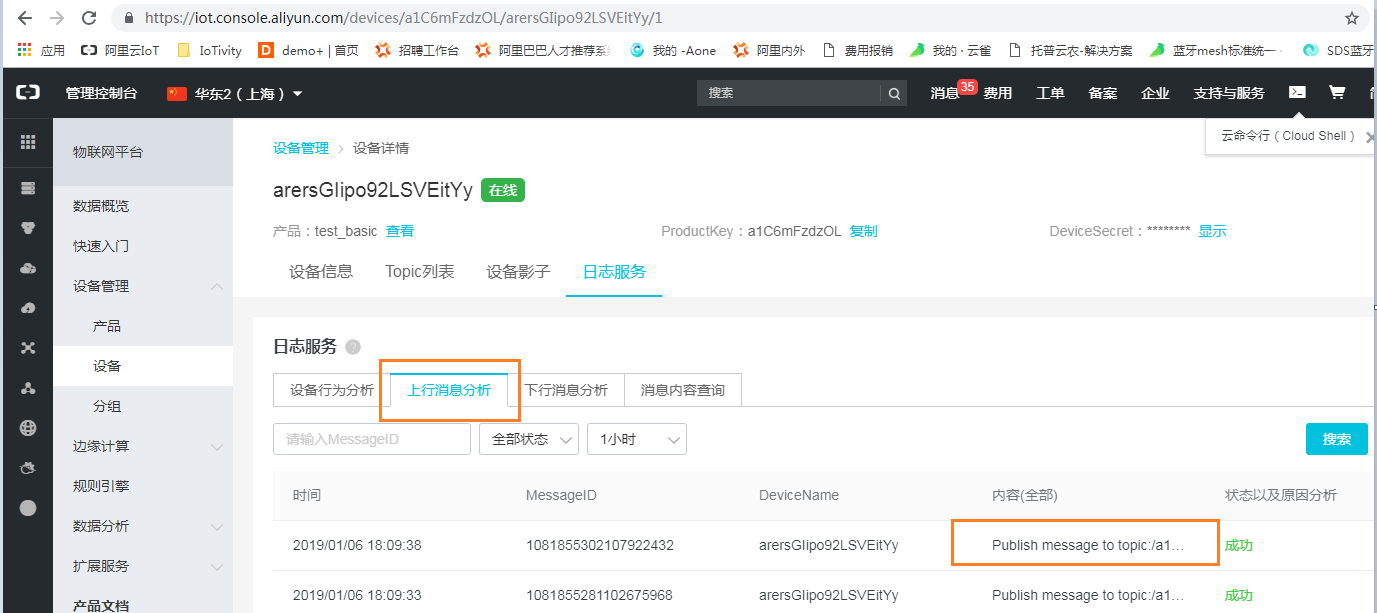
Note: The content in the preceding figure shows only the topic to which the message was sent. The message content is not displayed.
How to check whether the device can successfully receive data from the cloud
In the 'Mobile Terminated Message Analytics' section of the console, you can see the messages sent by IoT Platform to the device: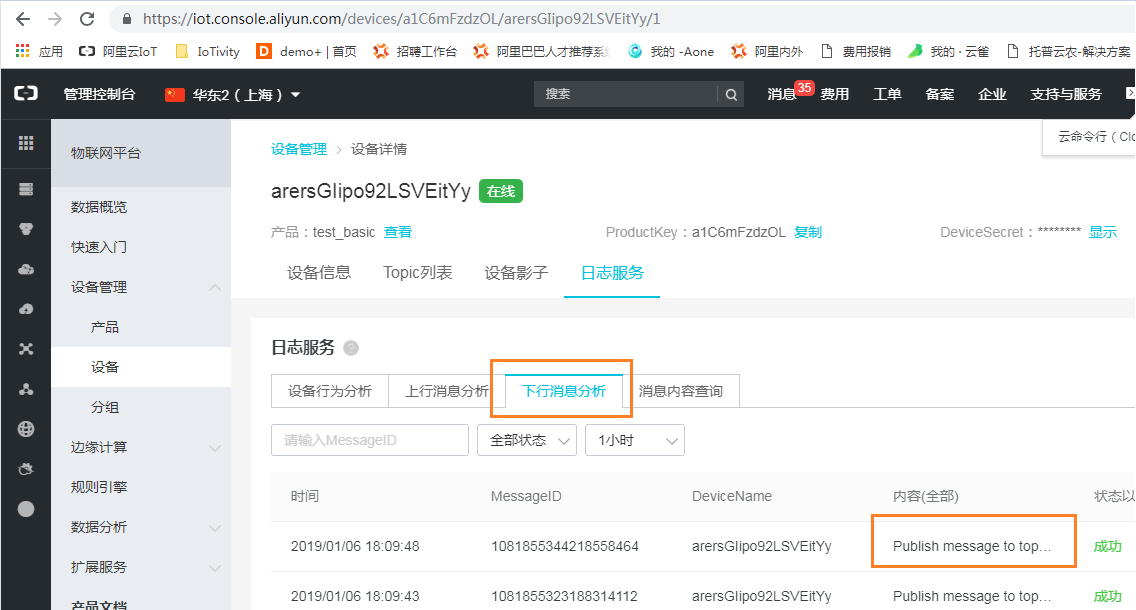
You can also check on the device side whether data from IoT Platform has been received. The following log information is printed by the example code when it receives data from IoT Platform:
AT command implementation
If the module does not provide a development environment for custom development and an external MCU runs the product's business logic, the module vendor must also provide AT commands for the MCU to call. Because the module previously supported only TCP, you must provide interfaces for MQTT connection configuration, connection initiation, disconnection, subscription, and publishing.
The following are the recommended AT commands to add. The module vendor can also merge or split these commands and define their format:
Command | Description |
Alibaba Cloud device credential settings | Sets the ProductKey, ProductSecret, DeviceName, and DeviceSecret for the device. |
Alibaba Cloud region settings | Alibaba Cloud IoT provides multiple cloud sites in regions such as China, the United States, and Japan. This allows the MCU to specify the Alibaba Cloud IoT site and port information for the connection. |
Establish MQTT connection | Establishes a connection to the Alibaba Cloud MQTT broker. This command can specify the MQTT clean session, keep-alive interval, and request timeout period. |
Disconnect MQTT connection | Disconnects the MQTT connection from Alibaba Cloud IoT. |
Subscribe to a topic | Subscribes to messages from a topic. |
Unsubscribe from a topic | Unsubscribes from messages from a topic. |
Send data to a topic | Sends data to a specified topic. |
Note: When the MCU sends the device credentials to the module using an AT command, we recommend that you store the credentials in global variables and return them in the HAL_GetProductKey, HAL_GetDeviceName, and HAL_GetDeviceSecret HAL functions. This way, you do not need to modify the example program.