Remotely control a Raspberry Pi server
You can use Alibaba Cloud IoT Platform to implement pseudo-NAT traversal and remotely control a Raspberry Pi server that does not have a public IP address. This topic describes the implementation process and provides code samples that use a Raspberry Pi server as an example.
Background information
For example, you can use a Raspberry Pi to build a server in your company or at home to run simple tasks, such as starting a script or downloading files. However, if the Raspberry Pi does not have a public IP address and you are not in the company or at home, you cannot control the server. If you use other intranet penetration tools, you may experience frequent disconnections. To solve these problems, you can use the RRPC (synchronous remote procedure call) feature of Alibaba Cloud IoT Platform, combined with the JSch library, to remotely control the Raspberry Pi server.
Remote control process
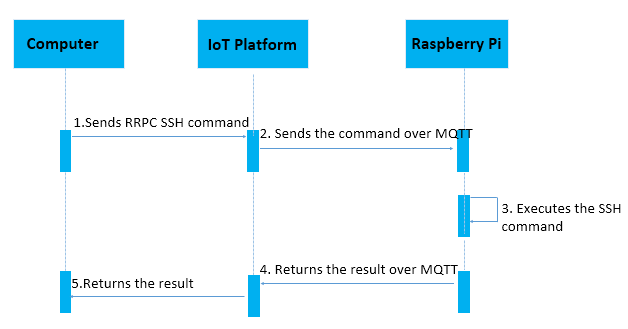
The following steps describe how to remotely control a Raspberry Pi server using IoT Platform:
- On your computer, call the IoT Platform RRPC interface to send a Secure Shell (SSH) instruction.
- After IoT Platform receives the instruction, it sends the SSH instruction to the Raspberry Pi server over Message Queuing Telemetry Transport (MQTT).
- The server executes the SSH instruction.
- The server encapsulates the execution result of the SSH instruction into an RRPC response and sends the response to IoT Platform over MQTT.
- IoT Platform sends the RRPC response to your computer.
Download the SDKs and demos
To remotely control a Raspberry Pi using IoT Platform, you must develop applications using the server-side software development kit (SDK) and the device-side SDK.
- Install the IoT Platform server-side SDK on your computer. You can use the server-side Java SDK demo for server-side development.
- Install the IoT Platform device-side SDK on the Raspberry Pi. You can use the device-side Java SDK demo for device-side development.
The following sections provide development examples for the server-side SDK and the device-side SDK.
Device-side SDK development
After you download and install the device-side SDK and the SDK demo, add the project dependencies and the following Java files to your project.
You can export the project as a JAR package to run on the Raspberry Pi.
- Add dependencies to the pom.xml file.
<!-- Device-side SDK --> <dependency> <groupId>com.aliyun.alink.linksdk</groupId> <artifactId>iot-linkkit-java</artifactId> <version>1.1.0</version> <scope>compile</scope> </dependency> <dependency> <groupId>com.google.code.gson</groupId> <artifactId>gson</artifactId> <version>2.8.1</version> <scope>compile</scope> </dependency> <dependency> <groupId>com.alibaba</groupId> <artifactId>fastjson</artifactId> <version>1.2.83</version> <scope>compile</scope> </dependency> <!-- SSH client --> <!-- https://mvnrepository.com/artifact/com.jcraft/jsch --> <dependency> <groupId>com.jcraft</groupId> <artifactId>jsch</artifactId> <version>0.1.55</version> </dependency> - Add the SSHShell.java file to execute SSH instructions.
public class SSHShell { private String host; private String username; private String password; private int port; private Vector<String> stdout; public SSHShell(final String ipAddress, final String username, final String password, final int port) { this.host = ipAddress; this.username = username; this.password = password; this.port = port; this.stdout = new Vector<String>(); } public int execute(final String command) { System.out.println("ssh command: " + command); int returnCode = 0; JSch jsch = new JSch(); SSHUserInfo userInfo = new SSHUserInfo(); try { Session session = jsch.getSession(username, host, port); session.setPassword(password); session.setUserInfo(userInfo); session.connect(); Channel channel = session.openChannel("exec"); ((ChannelExec) channel).setCommand(command); channel.setInputStream(null); BufferedReader input = new BufferedReader(new InputStreamReader(channel.getInputStream())); channel.connect(); String line = null; while ((line = input.readLine()) != null) { stdout.add(line); } input.close(); if (channel.isClosed()) { returnCode = channel.getExitStatus(); } channel.disconnect(); session.disconnect(); } catch (JSchException e) { e.printStackTrace(); } catch (Exception e) { e.printStackTrace(); } return returnCode; } public Vector<String> getStdout() { return stdout; } } - Add the SSHUserInfo.java file to authenticate the SSH username and password.
public class SSHUserInfo implements UserInfo { @Override public String getPassphrase() { return null; } @Override public String getPassword() { return null; } @Override public boolean promptPassphrase(final String arg0) { return false; } @Override public boolean promptPassword(final String arg0) { return false; } @Override public boolean promptYesNo(final String arg0) { if (arg0.contains("The authenticity of host")) { return true; } return false; } @Override public void showMessage(final String arg0) { } } - Add the Device.java file to create an MQTT connection.
public class Device { /** * Create a connection. * * @param productKey The ProductKey of the product. * @param deviceName The name of the device. * @param deviceSecret The secret of the device. * @throws InterruptedException */ public static void connect(String productKey, String deviceName, String deviceSecret) throws InterruptedException { // Initialize parameters. LinkKitInitParams params = new LinkKitInitParams(); // Set MQTT initialization parameters. IoTMqttClientConfig config = new IoTMqttClientConfig(); config.productKey = productKey; config.deviceName = deviceName; config.deviceSecret = deviceSecret; params.mqttClientConfig = config; // Set the device certificate information for initialization. Pass the following parameters: DeviceInfo deviceInfo = new DeviceInfo(); deviceInfo.productKey = productKey; deviceInfo.deviceName = deviceName; deviceInfo.deviceSecret = deviceSecret; params.deviceInfo = deviceInfo; // Initialize. LinkKit.getInstance().init(params, new ILinkKitConnectListener() { public void onError(AError aError) { System.out.println("init failed !! code=" + aError.getCode() + ",msg=" + aError.getMsg() + ",subCode=" + aError.getSubCode() + ",subMsg=" + aError.getSubMsg()); } public void onInitDone(InitResult initResult) { System.out.println("init success !!"); } }); // Make sure that the subsequent steps are performed only after the initialization is successful. You can extend the delay as needed. Thread.sleep(2000); } /** * Publish a message. * * @param topic The topic to which the message is sent. * @param payload The content of the message to send. */ public static void publish(String topic, String payload) { MqttPublishRequest request = new MqttPublishRequest(); request.topic = topic; request.payloadObj = payload; request.qos = 0; LinkKit.getInstance().getMqttClient().publish(request, new IConnectSendListener() { @Override public void onResponse(ARequest aRequest, AResponse aResponse) { } @Override public void onFailure(ARequest aRequest, AError aError) { } }); } /** * Subscribe to a topic. * * @param topic The topic to which you want to subscribe. */ public static void subscribe(String topic) { MqttSubscribeRequest request = new MqttSubscribeRequest(); request.topic = topic; request.isSubscribe = true; LinkKit.getInstance().getMqttClient().subscribe(request, new IConnectSubscribeListener() { @Override public void onSuccess() { } @Override public void onFailure(AError aError) { } }); } /** * Unsubscribe from a topic. * * @param topic The topic from which you want to unsubscribe. */ public static void unsubscribe(String topic) { MqttSubscribeRequest request = new MqttSubscribeRequest(); request.topic = topic; request.isSubscribe = false; LinkKit.getInstance().getMqttClient().unsubscribe(request, new IConnectUnscribeListener() { @Override public void onSuccess() { } @Override public void onFailure(AError aError) { } }); } /** * Disconnect. */ public static void disconnect() { // Deinitialize. LinkKit.getInstance().deinit(); } } - Add the SSHDevice.java file. The SSHDevice.java file contains the main method. This method is used to receive RRPC instructions, call
SSHShellto execute the SSH instructions, and send RRPC responses. In the SSHDevice.java file, you must specify the device certificate information (ProductKey, DeviceName, and DeviceSecret), and the SSH username and password.public class SSHDevice { // ===================Parameters to be configured start=========================== // The ProductKey of the product. private static String productKey = ""; // The name of the device. private static String deviceName = ""; // The secret of the device. private static String deviceSecret = ""; // The topic for message communication. You can use it directly. You do not need to create or define it. private static String rrpcTopic = "/sys/" + productKey + "/" + deviceName + "/rrpc/request/+"; // The domain name or IP address for SSH access. private static String host = "127.0.0.1"; // The SSH username. private static String username = ""; // The SSH password. private static String password = ""; // The SSH port number. private static int port = 22; // ===================Parameters to be configured end=========================== public static void main(String[] args) throws InterruptedException { // Downstream data listener. registerNotifyListener(); // Create a connection. Device.connect(productKey, deviceName, deviceSecret); // Subscribe to the topic. Device.subscribe(rrpcTopic); } public static void registerNotifyListener() { LinkKit.getInstance().registerOnNotifyListener(new IConnectNotifyListener() { @Override public boolean shouldHandle(String connectId, String topic) { // Process only messages from a specific topic. if (topic.contains("/rrpc/request/")) { return true; } else { return false; } } @Override public void onNotify(String connectId, String topic, AMessage aMessage) { // Receive the RRPC request and send an RRPC response. try { // Execute the remote command. String payload = new String((byte[]) aMessage.getData(), "UTF-8"); SSHShell sshExecutor = new SSHShell(host, username, password, port); sshExecutor.execute(payload); // Obtain the command output. StringBuffer sb = new StringBuffer(); Vector<String> stdout = sshExecutor.getStdout(); for (String str : stdout) { sb.append(str); sb.append("\n"); } // Send the output back to the server. String response = topic.replace("/request/", "/response/"); Device.publish(response, sb.toString()); } catch (UnsupportedEncodingException e) { e.printStackTrace(); } } @Override public void onConnectStateChange(String connectId, ConnectState connectState) { } }); } }
Server-side SDK development
After you download and install the server-side SDK and the SDK demo, add the project dependencies and the following Java files to your project.
- Add dependencies to the pom.xml file. Important For the latest version of the server-side SDK, see Java SDK usage notes.
<!-- Server-side SDK --> <dependency> <groupId>com.aliyun</groupId> <artifactId>aliyun-java-sdk-iot</artifactId> <version>7.38.0</version> </dependency> <dependency> <groupId>com.aliyun</groupId> <artifactId>aliyun-java-sdk-core</artifactId> <version>4.5.6</version> </dependency> <!-- commons-codec --> <dependency> <groupId>commons-codec</groupId> <artifactId>commons-codec</artifactId> <version>1.8</version> </dependency> - Add the OpenApiClient.java file to call the IoT Platform OpenAPI.
public class OpenApiClient { private static DefaultAcsClient client = null; public static DefaultAcsClient getClient(String accessKeyID, String accessKeySecret) { if (client != null) { return client; } try { IClientProfile profile = DefaultProfile.getProfile("cn-shanghai", accessKeyID, accessKeySecret); DefaultProfile.addEndpoint("cn-shanghai", "cn-shanghai", "Iot", "iot.cn-shanghai.aliyuncs.com"); client = new DefaultAcsClient(profile); } catch (Exception e) { System.out.println("create OpenAPI Client failed !! exception:" + e.getMessage()); } return client; } } - Add the SSHCommandSender.java file. The SSHCommandSender.java file contains the main method, which is used to send SSH instructions and receive SSH instruction responses. In the SSHCommandSender.java file, you must specify your AccessKey information, the device certificate information (ProductKey and DeviceName), and the SSH instruction.
public class SSHCommandSender {


    // ===================The start of the segment in which you configure the required parameters.===========================

    // The AccessKey ID of your Alibaba Cloud account.

    private static String accessKeyID = "";

    // The AccessKey secret of your Alibaba Cloud account.

    private static String accessKeySecret = "";

    // The instance ID.

    private static String instanceId = "";

    // The ProductKey of the product.

    private static String productKey = "";

    // The DeviceName of the device.

    private static String deviceName = "";

    // ===================The end of the segment in which you configure the required parameters.===========================


    public static void main(String[] args) throws ServerException, ClientException, UnsupportedEncodingException {


        // The remote Linux command.

        String payload = "uname -a";


        // Create an RRPC request.

        RRpcRequest request = new RRpcRequest();

        request.setIotInstanceId(instanceId);

        request.setProductKey(productKey);

        request.setDeviceName(deviceName);

        request.setRequestBase64Byte(Base64.encodeBase64String(payload.getBytes()));

        request.setTimeout(5000);


        // Obtain the client that is used to send requests.

        DefaultAcsClient client = OpenApiClient.getClient(accessKeyID, accessKeySecret);


        // Send an RRPC request.

        RRpcResponse response = (RRpcResponse) client.getAcsResponse(request);


        // Process RRPC responses.

        // The result that is returned after the execution of the response.getSuccess() function indicates only that the RRPC request is sent. The returned response does not indicate whether the request is received by the device or whether the device returned a response based on the result.

        // You must check the RrpcCode to determine the result. For more information, see https://help.aliyun.com/document_detail/69797.html.

        if (response != null && "SUCCESS".equals(response.getRrpcCode())) {

            // The output.

            System.out.println(new String(Base64.decodeBase64(response.getPayloadBase64Byte()), "UTF-8"));

        } else {

            // Failed to obtain the output and print the related RRPC response code.

            System.out.println(response.getRrpcCode());

        }

    }


}