Harmony
This document describes how to integrate the ApsaraVideo Real-time Communication (ARTC) software development kit (SDK) into your HarmonyOS project to build a simple real-time audio and video interactive application for scenarios such as interactive streaming and video calls.
Feature description
Before you begin, understand the following key concepts:
ARTC SDK: An SDK provided by Alibaba Cloud that helps developers quickly implement real-time audio and video interaction.
Global Realtime Transport Network (GRTN): A globally distributed network engineered for real-time media, ensuring ultra-low latency, high-quality, and secure communication.
Channel: A virtual room that users join to communicate with each other. All users in the same channel can interact in real time.
Host: A user who can publish audio and video streams in a channel and subscribe to streams published by other hosts.
Viewer: A user who can subscribe to audio and video streams in a channel but cannot publish their own.
Basic process for implementing real-time audio and video interaction:

Call
setChannelProfileto set the scenario, and calljoinChannelto join a channel:Video call scenario: All users are hosts and can both publish and subscribe to streams.
Interactive streaming scenario: Roles must be set using
setClientRolebefore joining a channel. For users who will publish streams, set the role to host. If a user only needs to subscribe to streams, set the role to viewer.
After joining the channel, users have different publishing and subscribing behaviors based on their roles:
All users can receive audio and video streams within that channel.
A host can publish audio and video streams in the channel.
If a viewer wants to publish streams, call the
setClientRolemethod to switch the role to host.
Sample project
The Alibaba Cloud ARTC SDK provides an open source sample project for real-time audio and video interaction. You can download the project or view the sample source code.
Prerequisites
DevEco Studio 5.0.3.900 Release or later.
HarmonyOS NEXT SDK that supports API Version 12 or later.
A HarmonyOS device that supports audio and video, running HarmonyOS NEXT 5.0.0.102 or later with API Version 12. The "Allow debugging" option must be enabled.
For more information about configuring a physical device for debugging, see the official HarmonyOS documentation.
The HarmonyOS device is connected to the internet.
You have registered a Huawei developer account and completed identity verification.
Create a project (Optional)
Open DevEco Studio and click Create Project.
Select Application and choose a template. This example uses the Empty Ability template.
Configure the project information, such as project name, package name, save path, and SDK version.
Click Finish and wait for the project to sync.
Integrate the SDK
Automatic integration with ohpm (Recommended)
In the entry directory, configure the oh-package.json file as follows:
"dependencies": {
    "@aliyun_video_cloud/alivcsdk_artc":"x.y.z",
}
Run the following command:
ohpm install @aliyun_video_cloud/alivcsdk_artcDownload the SDK for manual integration
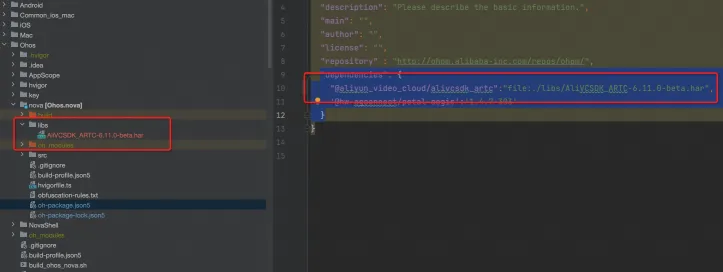
Download the latest version of the ARTC SDKDownload SDK and place it in the `libs` directory of your project. In your project, configure the reference as follows:
"dependencies": {
    "@aliyun_video_cloud/alivcsdk_artc":"file:./libs/AliVCSDK_ARTC-x.y.z.har",
  }
Implementation steps
This section explains how to use the ARTC SDK to build a basic real-time audio and video application. You can copy the complete code sample into your project to test the functionality. The steps below explain the core API calls.
The following diagram shows the basic workflow for implementing a video call:

1. Request permissions
Go to the entry/src/main/ets/entryability directory, open the EntryAbility.ets file, and add the required permissions.
import { abilityAccessCtrl, AbilityConstant, common, Permissions, UIAbility, Want } from '@kit.AbilityKit';
import { hilog } from '@kit.PerformanceAnalysisKit';
import { window } from '@kit.ArkUI';
import { BusinessError } from '@kit.BasicServicesKit';

const permissions: Array<Permissions> = ['ohos.permission.MICROPHONE','ohos.permission.CAMERA','ohos.permission.KEEP_BACKGROUND_RUNNING'];
// To use UIExtensionAbility, replace common.UIAbilityContext with common.UIExtensionContext
function reqPermissionsFromUser(permissions: Array<Permissions>, context: common.UIAbilityContext): void {
  let atManager: abilityAccessCtrl.AtManager = abilityAccessCtrl.createAtManager();
  // requestPermissionsFromUser checks the authorization status of permissions to decide whether to display a pop-up window
  atManager.requestPermissionsFromUser(context, permissions).then((data) => {
    let grantStatus: Array<number> = data.authResults;
    let length: number = grantStatus.length;
    for (let i = 0; i < length; i++) {
      if (grantStatus[i] === 0) {
        // User granted permission. You can continue to access the target operation.
      } else {
        // User denied permission. Prompt the user that permission is required to access the features of the current page and guide them to the system settings to enable the permission.
        return;
      }
    }
    // Permission granted.
  }).catch((err: BusinessError) => {
    console.error(`Failed to request permissions from user. Code is ${err.code}, message is ${err.message}`);
  })
}

export default class EntryAbility extends UIAbility {
  onCreate(want: Want, launchParam: AbilityConstant.LaunchParam): void {
    hilog.info(0x0000, 'testTag', '%{public}s', 'Ability onCreate');
  }

  onDestroy(): void {
    hilog.info(0x0000, 'testTag', '%{public}s', 'Ability onDestroy');
  }

  onWindowStageCreate(windowStage: window.WindowStage): void {
    // Main window is created, set main page for this ability
    hilog.info(0x0000, 'testTag', '%{public}s', 'Ability onWindowStageCreate');
    reqPermissionsFromUser(permissions, this.context);
    windowStage.loadContent('pages/Login', (err) => {
      if (err.code) {
        hilog.error(0x0000, 'testTag', 'Failed to load the content. Cause: %{public}s', JSON.stringify(err) ?? '');
        return;
      }
      hilog.info(0x0000, 'testTag', 'Succeeded in loading the content.');
    });
  }

  onWindowStageDestroy(): void {
    // Main window is destroyed, release UI related resources
    hilog.info(0x0000, 'testTag', '%{public}s', 'Ability onWindowStageDestroy');
  }

  onForeground(): void {
    // Ability has brought to foreground
    hilog.info(0x0000, 'testTag', '%{public}s', 'Ability onForeground');
  }

  onBackground(): void {
    // Ability has back to background
    hilog.info(0x0000, 'testTag', '%{public}s', 'Ability onBackground');
  }
}
2. Authentication token
An authentication token is required to join an ARTC channel and verify the user's identity. For more information, see Token-based authentication. You can generate a token using a single parameter or multiple parameters. The method used to generate the token determines which joinChannel API of the SDK you must call.
Production and release phase:
Because generating a token requires an AppKey, hardcoding the AppKey on the client is a security risk. For production environments, you must generate the token on your application server and send it to the client.
Development and testing phase:
During development and testing, if your application server does not have the logic to generate tokens, you can temporarily generate a token using the token generation logic in the APIExample. The following code provides an example:
import util from '@ohos.util';
import { TokenParams } from 'configmanager/src/main/ets/common/Constants';

export class TokenJsonUtils {
  /**
   * Builds a token JSON object
   * @param params The parameter object
   * @returns A JSON string
   */
  static buildTokenJson(params: TokenParams): string {
    const jsonObj: TokenParams = {
      appid: params.appid,
      channelid: params.channelid,
      userid: params.userid,
      nonce: params.nonce,
      timestamp: params.timestamp,
      token: params.token
    };

    return JSON.stringify(jsonObj);
  }

  /**
   * Encodes a JSON string to Base64
   * @param jsonString The JSON string
   * @returns A Base64-encoded string
   */
  static async encodeJsonToBase64(jsonString: string): Promise<string> {
    try {
      const encoder = new util.TextEncoder();
      const data = encoder.encodeInto(jsonString);

      const base64 = new util.Base64();
      const encoded = await base64.encodeToString(data);

      return encoded.replace(/\n/g, '').replace(/\r/g, '');
    } catch (error) {
      console.error('Base64 encoding failed:', error);
      return '';
    }
  }

  /**
   * The complete token generation process
   * @param params Token parameters
   * @returns A Base64-encoded token JSON
   */
  static generateCompleteToken(params: TokenParams): Promise<string> {
    // 1. Build the JSON
    const jsonString = TokenJsonUtils.buildTokenJson(params);
    console.log('Generated JSON:', jsonString);

    // 2. Base64 encode
    const base64String = TokenJsonUtils.encodeJsonToBase64(jsonString);
    console.log('Base64 encoding result:', base64String);

    return base64String;
  }
}
3. Import ARTC SDK classes
Import the relevant classes and interfaces from the ARTC SDK:
import {
  AliRtcEngine,
  AliRtcVideoEncoderConfiguration,
  AliRtcEngineAuthInfo,
  AliRtcEngineEventListener,
  AliRtcChannelProfile,
  AliRtcClientRole,
  AliRtcAudioProfile,
  AliRtcAudioScenario,
  AliRtcVideoMirrorMode,
  AliRtcRotationMode,
  AliRtcVideoEncoderOrientationMode,
  AliRtcVideoTrack,
  AliRtcVideoCanvas,
  AliRtcRenderMode,
  AliRtcRenderMirrorMode,
  AliRtcXComponentController
} from '@aliyun_video_cloud/alivcsdk_artc';
4. Create and initialize the engine
Create the RTC engine
Call the getInstance method to create an AliRTCEngine instance.
private rtcEngine: AliRtcEngine | null | undefined;

this.rtcEngine = AliRtcEngine.getInstance('', this.context);
Initialize the engine
Call
setChannelProfileto set the channel profile toAliRTCSdkInteractiveLive(interactive mode).Depending on your application requirements, you can choose the interactive mode for interactive entertainment scenarios or the communication mode for one-to-one or one-to-many calls. Selecting the correct mode ensures a smooth user experience and efficient use of network resources. Choose the mode that best fits your application scenario.
Mode
Stream Ingest
Stream Pulling
Mode Description
Interactive mode
Role-based restrictions apply. Only users with the streamer role can ingest streams.
Participants can flexibly switch roles throughout the process.
No role restrictions. All participants have permission to pull streams.
In interactive mode, events such as a streamer joining or leaving a meeting, or starting a live stream, are sent to viewers in real time. This ensures viewers are aware of the streamer's status. Conversely, viewer activities are not reported to the streamer, which keeps the streamer's workflow uninterrupted.
In interactive mode, the streamer role is responsible for live interaction, while the viewer role primarily receives content and does not typically participate in the interaction. If your business needs might change and you are unsure whether viewers will need to participate, it is best to use interactive mode by default. This mode offers high flexibility, allowing you to adapt to different interaction needs by adjusting user role permissions.
Communication mode
No role restrictions. All participants have permission to ingest streams.
No role restrictions. All participants have permission to pull streams.
In communication mode, meeting participants are aware of each other's presence.
Although this mode does not differentiate user roles, it effectively corresponds to the streamer role in interactive mode. The purpose is to simplify operations, letting users achieve the required functionality with fewer API calls.
Call
setClientRoleto set the user role toAliRTCSdkInteractive(streamer) orAliRTCSdkLive(viewer).NoteBy default, the streamer role ingests and pulls streams. The viewer role only pulls streams, and has preview and stream ingest disabled.
When a user switches roles within a channel, the system automatically adjusts the stream ingest status:
Switching from streamer to viewer ("going off-mic"): The system stops ingesting the local audio and video stream. Subscriptions to remote streams are not affected, and the user can continue to watch other participants.
Switching from viewer to streamer ("going on-mic"): The system starts ingesting the local audio and video stream. Subscriptions to remote streams are not affected, and the user can continue to watch other participants.
// Set the channel profile to interactive mode. For RTC, always use AliRTCSdkInteractiveLive.
this.rtcEngine.setChannelProfile(AliRtcChannelProfile.AliEngineInteractiveLive);
// Set the user role. Use AliRTCSdkInteractive for both stream ingest and pulling. Use AliRTCSdkLive for only pulling streams.
this.rtcEngine.setClientRole(AliRtcClientRole.AliEngineClientRoleInteractive);
Set common callbacks
If the SDK encounters an exception during runtime, it first attempts to recover automatically using an internal retry mechanism. For errors that cannot be resolved internally, the SDK notifies your application through predefined callbacks.
The following are key callbacks for unrecoverable errors that your application must listen for and handle:
Cause of Exception
Callback and Parameters
Solution
Description
Authentication failed
The `result` in the `onJoinChannel` callback returns `AliRtcErrJoinBadToken`.
When this error occurs, the application needs to check if the token is correct.
If authentication fails when a user actively calls an API, the system returns an authentication failure error in the API's callback.
Authentication is about to expire
onWillAuthInfoExpire
When this exception occurs, the application needs to get the latest authentication information and then call `refreshAuthInfo` to refresh it.
An authentication expiration error can occur in two situations: when a user calls an API or during program execution. Therefore, the error is reported through either an API callback or a separate error callback.
Authentication expired
onAuthInfoExpired
When this exception occurs, the application needs to have the user rejoin the channel.
An authentication expiration error can occur in two situations: when a user calls an API or during program execution. Therefore, the error is reported through either an API callback or a separate error callback.
Network connectivity abnormal
The `onConnectionStatusChange` callback returns `AliRtcConnectionStatusFailed`.
When this exception occurs, the application needs to have the user rejoin the channel.
The SDK can automatically recover from network disconnections for a certain period. However, if the disconnection time exceeds a preset threshold, it will time out and disconnect. The application should then check the network status and guide the user to rejoin the meeting.
Kicked offline
onBye
AliRtcOnByeUserReplaced: When this exception occurs, check if the user IDs are the same.AliRtcOnByeBeKickedOut: When this exception occurs, it means the user was kicked by the service. The user needs to rejoin the channel.AliRtcOnByeChannelTerminated: When this exception occurs, it means the channel was destroyed. The user needs to rejoin the channel.
The RTC service provides a feature for administrators to actively remove participants.
On-premises device abnormal
onLocalDeviceException
When this exception occurs, the application needs to check if permissions and device hardware are normal.
The RTC service supports device detection and diagnostic capabilities. When an on-premises device exception occurs, the RTC service notifies the client through a callback. If the SDK cannot resolve the issue, the application needs to intervene to check if the device is functioning correctly.
const listener = new AliRtcEngineEventListener()
listener.onJoinChannel((resultCode: number, channel: string, elapsed: string) => {
  console.info(`Join channel result: result=${resultCode}, channel=${channel}, userId=${this.UserId}, elapsed=${elapsed}`);

  const resultText = resultCode === 0
    ? `User ${this.UserId} joined ${channel} successfully`
    : `User ${this.UserId} failed to join ${channel}! Error: ${resultCode}`;

  prompt.showToast({
    message: resultText,
    duration: 2000
  });
})
  .onLeaveChannel((resultCode: number) => {
    console.info(`Leave channel result: result=${resultCode}`);
    prompt.showToast({
      message: 'Leave Channel',
      duration: 2000
    });
  })

// Set the callback
this.rtcEngine.setRtcEngineEventListener(listener);
5. Set audio and video properties
Set audio properties
Call setAudioProfile to set the audio encoding mode and audio scenario.
this.rtcEngine.setAudioProfile(
  AliRtcAudioProfile.AliEngineHighQualityMode,
  AliRtcAudioScenario.AliEngineSceneDefaultMode
);
Set video properties
You can set properties such as the resolution, bitrate, and frame rate for the published video stream.
// Set the video encoding configuration
const videoConfig: AliRtcVideoEncoderConfiguration = new AliRtcVideoEncoderConfiguration();
videoConfig.dimensions.width = 640;
videoConfig.dimensions.height = 480;
videoConfig.frameRate = 20;
videoConfig.bitrate = 1200;
videoConfig.keyFrameInterval = 2000;
videoConfig.orientationMode = AliRtcVideoEncoderOrientationMode.AliEngineVideoEncoderOrientationModeAdaptive;
videoConfig.min_bitrate = 0;
videoConfig.forceStrictKeyFrameInterval = 0;
videoConfig.mirrorMode = AliRtcVideoMirrorMode.AliEngineVideoMirrorModeDisabled;
videoConfig.rotationMode = AliRtcRotationMode.AliEngineRotationMode_0;
this.rtcEngine.setVideoEncoderConfiguration(videoConfig);
6. Set stream ingest and pulling properties
Set the audio and video stream ingest properties and the default behavior for pulling streams from all users:
Call
publishLocalAudioStreamto ingest the audio stream.Call
publishLocalVideoStreamto ingest the video stream. For a voice-only call, you can set this to false.
// Publish the local audio stream
this.rtcEngine.publishLocalAudioStream(true);

// Publish the local video stream
this.rtcEngine.publishLocalVideoStream(true);

// Set default subscription to all remote audio and video streams
this.rtcEngine.setDefaultSubscribeAllRemoteAudioStreams(true);
this.rtcEngine.setDefaultSubscribeAllRemoteVideoStreams(true);

// Explicitly subscribe to all remote audio and video streams
this.rtcEngine.subscribeAllRemoteAudioStreams(true);
this.rtcEngine.subscribeAllRemoteVideoStreams(true);
Note
By default, the SDK uses an automatic stream ingest and pulling mode. In this mode, the SDK automatically ingests the audio and video stream and subscribes to all user streams in the channel. You can call the APIs mentioned above to disable this automatic mode.
7. Start local preview
Call
setLocalViewConfigto set the local rendering view and configure the local video display properties.Call the
startPreviewmethod to start the local video preview.
try {
  // Set the local view configuration
  if (this.aliRtcVideoCanvas) {
    this.rtcEngine.setLocalViewConfig(
      this.aliRtcVideoCanvas,
      this.componentController,
      AliRtcVideoTrack.AliEngineVideoTrackCamera
    );
  }

  // Start the local video preview
  this.rtcEngine.startPreview();
  this.ShowPreview = true;

  console.info('Local preview started');

} catch (error) {
  console.error('Failed to start preview:', error);
}
8. Join a channel
Call joinChannel to join a channel. If the token is generated using a single-parameter rule, call the single-parameter AliRtcEngine interface of the SDK. If it is generated using a multi-parameter rule, call the multi-parameter AliRtcEngine interface of the SDK. After you call the method to join the channel, the result is returned in the onJoinChannelResult callback. A result of 0 indicates that you have successfully joined the channel. Otherwise, check if the provided token is invalid.
this.rtcEngine.joinChannelWithToken(token, null, null, 'username');Note
After a user joins the channel, stream ingest and pulling are performed based on the parameters that were set before joining.
By default, the SDK automatically ingests and pulls streams to reduce the number of API calls that the client needs to make.
9. Set the remote view
When you initialize the engine, you must set the mAliRtcEngine.setRtcEngineNotify callback. You must then set the remote view for the remote user in the onRemoteTrackAvailableNotify callback. The following code shows an example:
// Get the surfaceId of the XComponent
stream.surfaceId = stream.xcomponentController.getXComponentSurfaceId();

// Configure the video canvas
if (!stream.canvas) {
  stream.canvas = new AliRtcVideoCanvas();
}

// Set the surfaceId
stream.canvas.surfaceId = stream.surfaceId;
stream.canvas.renderMode = AliRtcRenderMode.AliRtcRenderModeAuto;
stream.canvas.mirrorMode = AliRtcRenderMirrorMode.AliRtcRenderMirrorModeAllNoMirror;

// Set the remote view configuration
this.rtcEngine.setRemoteViewConfig(
  stream.canvas,
  this.componentController,
  stream.uid,
  AliRtcVideoTrack.AliRtcVideoTrackCamera
);
10. Leave the channel and destroy the engine
When the audio and video interaction is complete, you must leave the channel and destroy the engine. To end the interaction, perform the following steps:
Call
stopPreviewto stop the video preview.Call
leaveChannelto leave the channel.
private destroyRtcEngine(): void {
  // Stop the preview
  this.rtcEngine.stopPreview();
  // Leave the channel
  this.rtcEngine.leaveChannel();
  // Destroy the instance
  AliRtcEngine.destroyInstance();
  this.rtcEngine = null;
}