Nginx reverse proxy for File Storage NAS
This topic describes how to use Nginx as a reverse proxy for File Storage NAS.
Background
Nginx is a lightweight, high-performance web server and reverse proxy. Reverse proxying is a common Nginx use case. A reverse proxy accepts connection requests from clients over the internet, forwards the requests to servers on an internal network, and then returns the results from the servers to the clients.
An origin server cannot be accessed directly from an external network. It requires a proxy server that is publicly accessible but resides in the same network as the origin server. Alternatively, the origin server and the proxy server can be the same server but use different ports.
In this example, one Nginx server serves as a reverse proxy and four Nginx servers serve as proxy servers, with NAS as the backend storage. NAS stores shared data, such as cache files for the proxy servers, back-to-origin files, or static data files uploaded by users. Different proxy servers share access to the data on NAS to ensure data synchronization. This prevents data inconsistency and avoids redundant back-to-origin requests that waste bandwidth. The following figure shows the network topology.
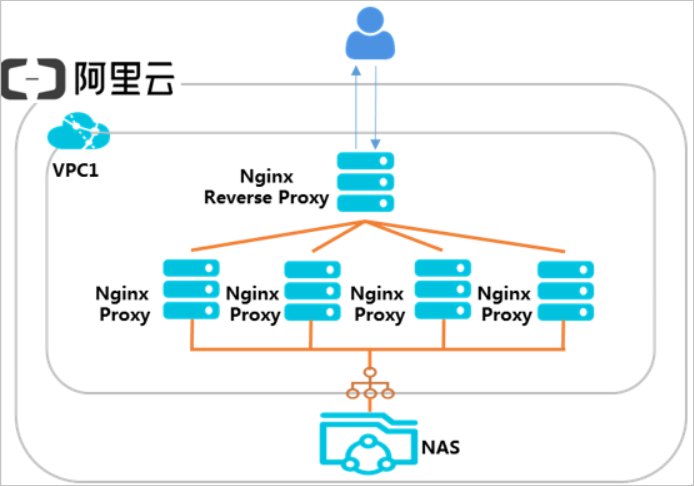
This example uses an ECS instance running CentOS.
Step 1: Deploy the Nginx reverse proxy server
-
Install Nginx.
sudo yum install nginx -
Configure the reverse proxy to forward traffic to the backend proxy servers.
-
Run the following command to open the /etc/nginx/nginx.conf file.
vim /etc/nginx/nginx.conf -
Add the following configuration to the /etc/nginx/nginx.conf file.
http {
upstream web{
         server 10.10.0.10;
         server 10.10.0.11;
         server 10.10.0.12;
         server 10.10.0.13;
      }
      server {
          listen 80;
              location / {
                   proxy_pass http://web;
               }
      }
}
-
Step 2: Create a file system and a mount target
-
Create an NFS file system in the same region as your ECS instance. For more information, see Create a General-purpose NAS file system.
-
Create a mount target for your Virtual Private Cloud (VPC). For more information, see Create a mount target.
Step 3: Deploy the Nginx proxy servers
-
Run the following command to install Nginx.
sudo yum install nginx -
Run the following command to install the NFS client.
sudo yum install nfs-utils -
Run the following command to mount the file system to the Nginx web directory.
sudo mount -t nfs -o vers=4.0,file-system-id.region.nas.aliyuncs.com:/ /usr/share/nginx/html/Replace file-system-id.region.nas.aliyuncs.com:/ with the domain name of your mount target.
-
Create a test file in the Nginx web root directory.
echo "This is Testing for Nginx&NAS"> /usr/share/nginx/html/index.html -
Repeat the preceding steps to configure the other three Nginx proxy servers. Ensure that you mount the same NFS file system on each server.
-
Verify the configuration.
To verify the configuration, confirm that all Nginx proxy servers can access the
index.htmlfile.In a web browser, navigate to
www.test.com. If the page displays the textThis is Testing for Nginx&NAS, the Nginx reverse proxy is configured correctly.