Configure a general-purpose industry template
Prerequisites
-
You have created an Alibaba Cloud account and completed real-name verification.
-
The first time you log on to the console after creating an Alibaba Cloud account, you are prompted to create an AccessKey.
-
An AccessKey is required to create and use an application. Your main account must have an AccessKey.
-
After creating an AccessKey for your main account, you can also create an AccessKey for a RAM user and use the RAM user to access the application. Grant the required permissions to the RAM user. For more information, see Access authorization rules.
Create an application
Procedure:
-
Create and purchase an application.
-
Configure the application: define an application schema, define an index schema, configure a data source, and complete the creation.
-
Run a search test.
-
Use the Search Algorithm Center and advanced features such as query analysis and sort configuration.
In the console, select a region and an instance type, and then click Create Instance.
1. Purchase an application
You can purchase an application on a subscription or pay-as-you-go basis.
On the purchase page, select an Edition (Industry Algorithm Edition, High-Performance Search Edition, Vector Search Edition, or Recall Engine Edition), enter an Application Name, select an Industry Type and Cluster Preference, configure Storage Capacity and Compute Resources as needed, select a resource group, and then click Buy Now.
On the confirmation page, verify the configuration information, select the Terms of Service checkbox, and click Activate Now. After the service is activated, the message Congratulations! Your service has been activated. appears. It typically takes 1 to 5 minutes to provision the new instance. You can click Management Console to manage the instance.
2. Configure the application
After the application is initialized, its status changes to Pending Configuration. You can then click Configure to define the application schema.
2.1 Define an application schema
OpenSearch provides four methods for creating an application schema. The Advanced edition of OpenSearch also supports multiple tables for complex business scenarios.
Data relationships between primary and secondary tables
When you create multiple tables for an application by manually defining an application schema, the data relationships between tables must follow these rules:
-
Primary and secondary tables support only N:1 or 1:1 relationships. 1:N relationships are not supported. This means that in a multi-table relationship, the "many" side must be the primary table, and there can be only one primary table.
-
Primary and secondary tables must be associated by using a foreign key in the primary table that references the primary key of the secondary table.
-
A maximum of two levels of association is supported. The following multi-table data associations are supported:
-
Table A->Table B, Table B->Table C
-
Table A->Table D
-
Multi-table data associations of more than two levels are not supported.
-
Table A->Table B, Table B->Table C, Table C->Table D
-
Circular multi-table data associations are not supported.
-
Table A->Table B, Table B->Table A
-
Data model
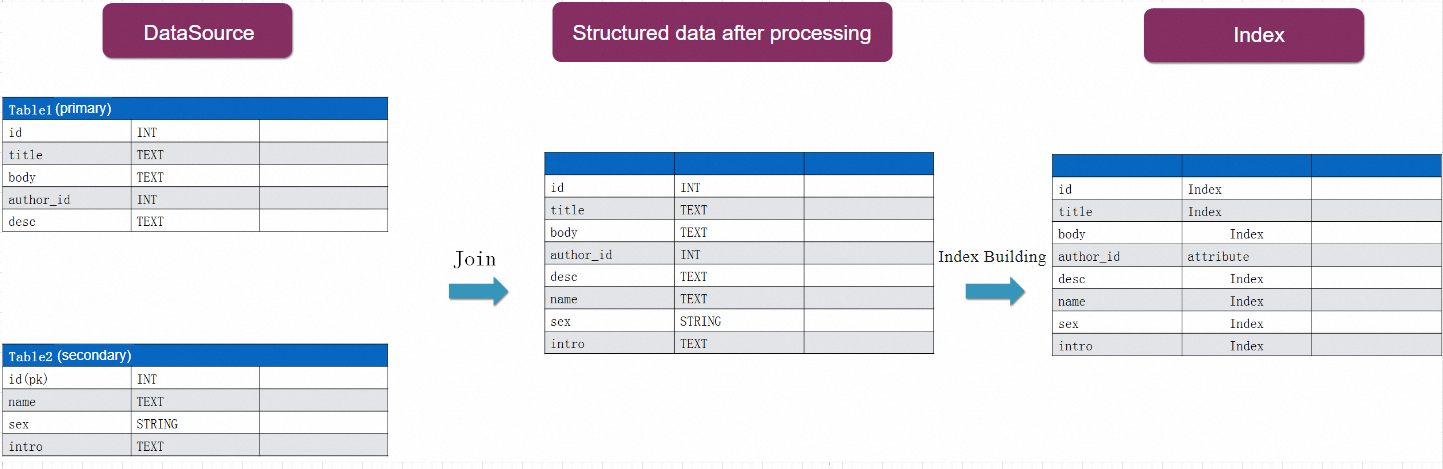
Define an application schema:
1. From a template: You can save a custom application schema as a template and use it to quickly create new applications. If your template contains custom analyzers, you must create them in the new instance before you import the template configuration.
2. From an uploaded file: You can upload a data file (JSON format only). The system automatically parses the file and creates an initial application schema. You must review and redefine details such as field types.
3. From a data source: This method is suitable for scenarios where you synchronize data from sources such as RDS or MaxCompute. You can quickly create an initial application schema from the source table schema, which reduces manual effort and minimizes errors. The following example uses RDS. The procedure is similar for other data sources. For more information, see Configure an RDS data source.
Click the From a data source tab. In the panel that appears, select a data source type (RDS, MaxCompute, or POLARDB), and click + New Database. In the Connect to Database dialog box, enter the RDS Instance ID, Database Name, Username, and Password, and then click Connect.
4. Manual creation: Use this method if the preceding three scenarios do not apply.
When you create a schema manually, enter a Table Name, select the table type (primary table or secondary table), and configure the fields by setting the Field Name, primary key, and Type. You can add up to 10 tables. After completing the configuration, click Next.
2.2 Define an index schema
-
Fields used in a QUERY clause must be created as an index. Fields of floating-point types cannot be created as an index. For more information about tokenization methods, see Table schema for Industry Algorithm Edition.
-
Fields used in a FILTER clause, a SORT clause, or functions that have explicit field requirements must be created as attribute fields.
-
Fields with tokenized types, such as
TEXTandSHORT_TEXT, cannot be configured as attribute fields. Only fields with numeric or non-tokenized types, such asint,int_array,float,float_array,double,double_array,literal, andliteral_array, can be configured as attribute fields.
The index schema configuration page has three sections: Index Fields (to configure the inverted index, where you can set the index name, included fields, and analysis method), Attribute Fields (to configure the forward index, which is used for filtering, statistics, aggregation, and sorting), and Default Display Fields (to specify the fields displayed in search results).
2.3 Configure a data source
First, associate a data source. After the association is successful, select a data table, click >> to add it, and then click Confirm.
After you confirm, the field mapping page appears.
This page displays the mapping between OpenSearch table fields and data source fields. Fields with the same name are automatically mapped. If the names are different, you can click + Add Data to manually add a mapping.
On the field mapping page, you can also configure data processing plug-ins. For more information, see Data processing plug-ins.
Available plug-ins include HTMLTagRemover, JsonKeyValueExtractor, KeyValueExtractor, and StringCatenateExtractor. After you select a plug-in, you can configure parameters such as Field List and Field Delimiter.
Note
To keep index data synchronized with your data source in real time, use Data Transmission Service (DTS).
2.4 Complete the creation
After configuring the application schema, index schema, and data source, the message Application configured successfully appears. Click Return to Application List to return to the instance management page.
3. Run a search test
After the data is uploaded, you can test the search feature. The console provides a Search Test page for this purpose. The page provides query clauses and query parameters that you can configure based on your search requirements. For more information, see the API overview and SDK overview. The following example shows how to use the Search Test page. Click the + icon next to a clause or parameter, select the required item from the drop-down list, enter the content, and then click Search to test the query.
How to use
1. In the left-side navigation pane, choose **Feature Extensions** > **Search Test**. Enter the required QUERY clause.
At the top of the page, select the application and environment to test. In the query input box, enter a search query, such as id:'300'. You can add clauses, such as the CONFIG clause, in the Clauses section. Click Search to view the results.
2. You can also add more clauses and parameters.
Clause descriptions
Query: QUERY clause.
Filter: FILTER clause.
Sort: SORT clause.
Distinct: DISTINCT clause.
Aggregate: AGGREGATE clause.
Custom clause: KVPAIR clause.
Pagination clause: CONFIG clause.
Parameter descriptions
fetch_fields (Displayed fields): Specifies the fields to return in the search results. Separate multiple fields with semicolons (;).
qp (Query processor): Specifies the name of the query analysis configuration.
first_rank_name (Coarse-grained sorting): Specifies the name of the basic sorting configuration.
second_rank_name (Fine-grained sorting): Specifies the name of the custom sorting configuration.
summary (Configures result summaries): For more information, see Search result summary.
Category prediction and original query: Specifies the name of the category prediction configuration and the query.
re_search (Re-search strategy): For more information, see Search processing.
user_id (User ID) and biz (Business info): For more information, see Search processing.
A/B Test: Specifies the name of the A/B test.
disable: Specifies the feature to disable. For example, disable=qp.
For detailed procedures, see the documentation for each advanced feature.