1. Overview
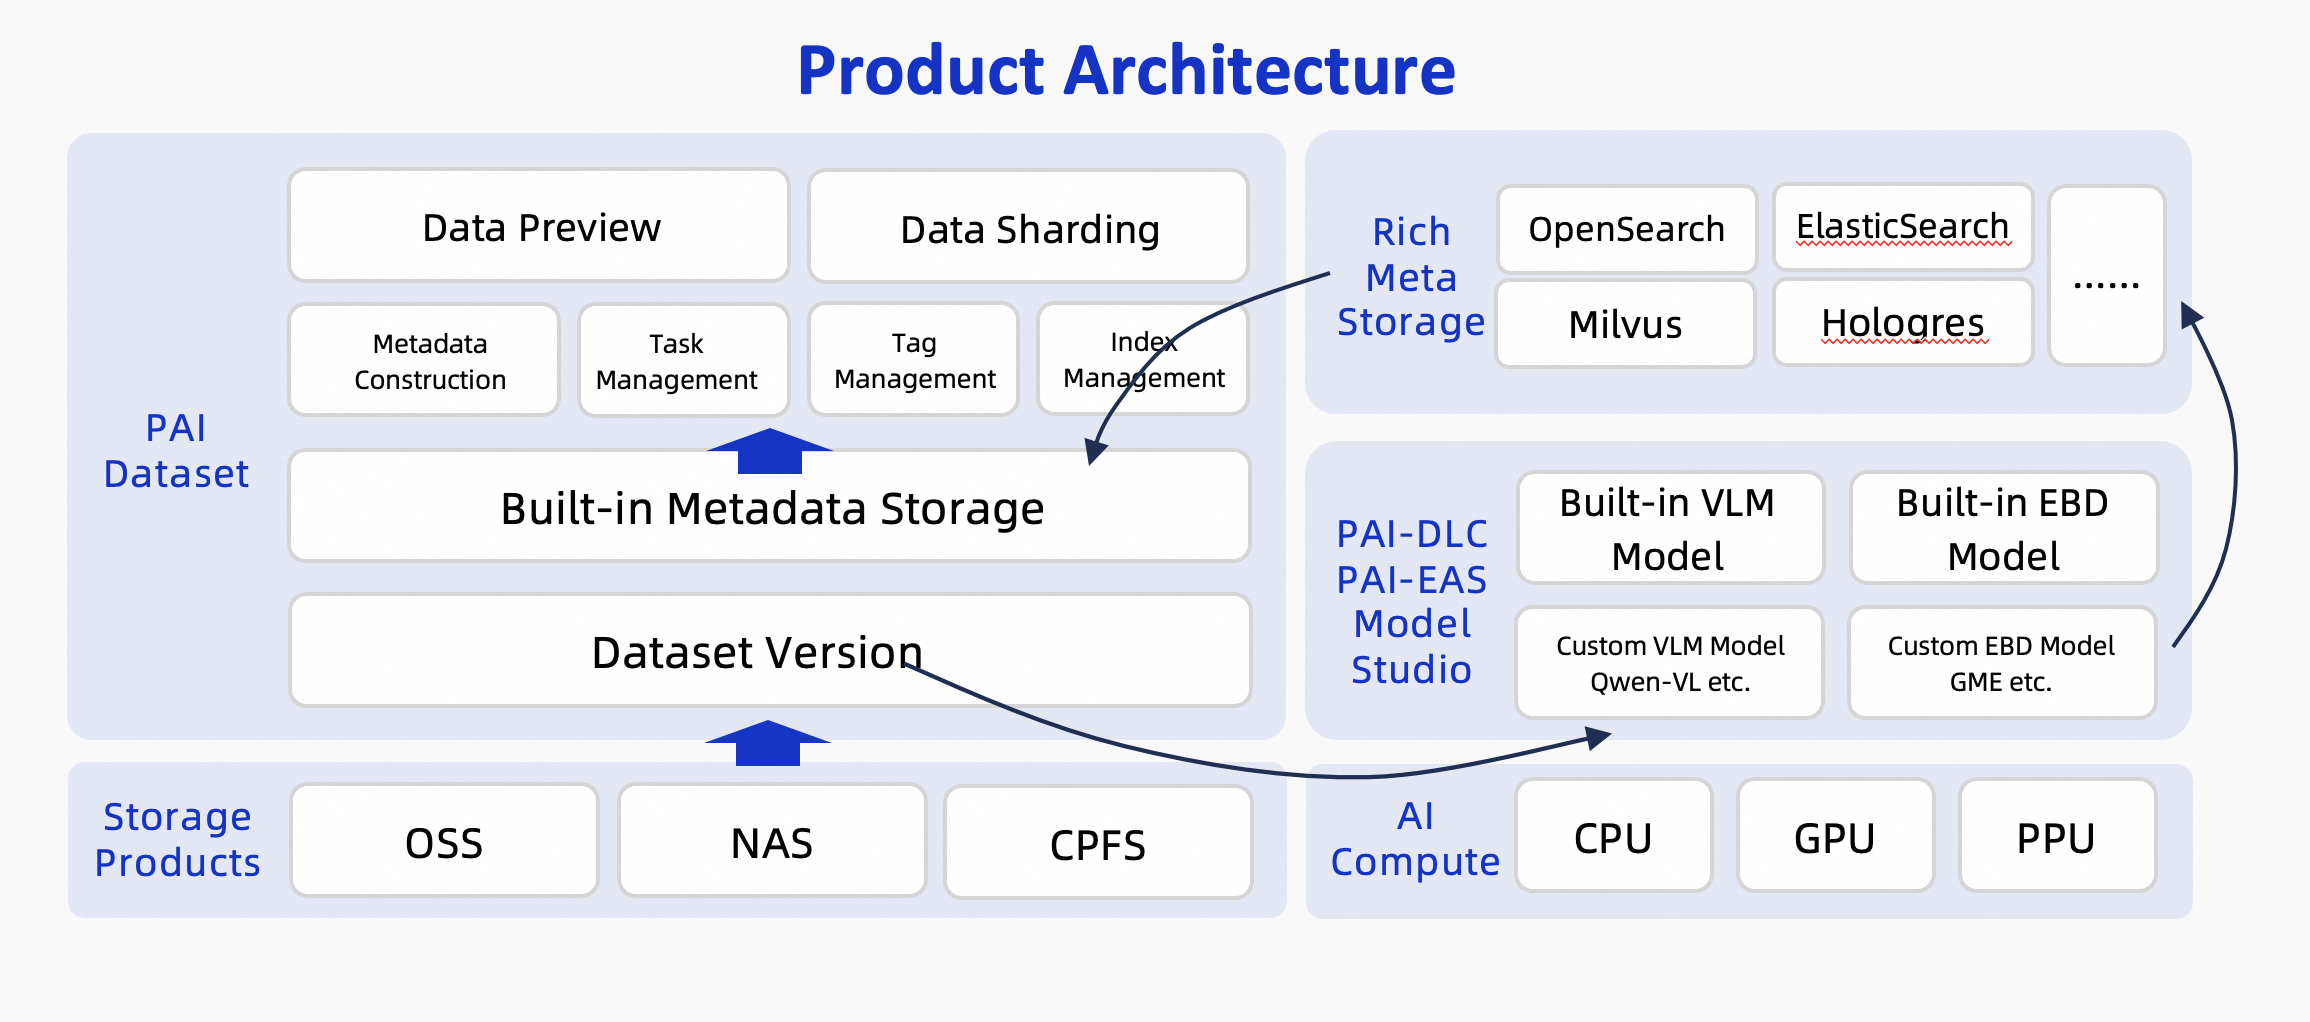
Multimodal data management lets you preprocess multimodal data, such as images, with multimodal large language models and embedding models. This process generates rich metadata through smart tagging and semantic indexing. You can use this metadata to search and filter for specific data subsets for downstream tasks like data annotation and training. Additionally, the PAI dataset provides a comprehensive OpenAPI to simplify integration with your custom platforms. The following figure shows the product architecture.
Limitations
Multimodal data management in PAI has the following limitations:
-
Regions: This feature is supported in the following regions: China (Hangzhou), China (Shanghai), China (Shenzhen), China (Ulanqab), China (Beijing), China (Guangzhou), Singapore, Germany (Frankfurt), US (Virginia), China (Hong Kong), Japan (Tokyo), Indonesia (Jakarta), US (Silicon Valley), Malaysia (Kuala Lumpur), and Korea (Seoul).
-
Storage type: Multimodal data management in PAI supports only data stored in Object Storage Service (OSS).
-
File types: This feature supports only image files in the following formats: jpg, jpeg, png, gif, bmp, tiff, and webp.
-
File quantity: A single dataset version supports up to 1,000,000 files. To increase this limit, contact PAI PDSA.
-
Models:
-
Tagging models: You can use the Qwen-VL-Max/Plus models from the Model Studio platform.
-
Indexing models: You can use multimodal embedding models from Model Studio, such as tongyi-embedding-vision-plus, and GME models from PAI Model Gallery. These models must be deployed to PAI-EAS.
-
-
Metadata storage:
-
Metadata: PAI securely stores metadata in its built-in metadatabase.
-
Embedding vectors: You can store embedding vectors in the following vector databases:
-
Elasticsearch (Vector Search Edition, version 8.17.0 or later)
-
OpenSearch (Vector Search Edition)
-
Milvus (version 2.4 or later)
-
Hologres (version 4.0.9 or later)
-
Lindorm (Vector Engine Edition)
-
-
-
Dataset processing modes: You can run smart tagging tasks and semantic indexing tasks in full mode and incremental mode.
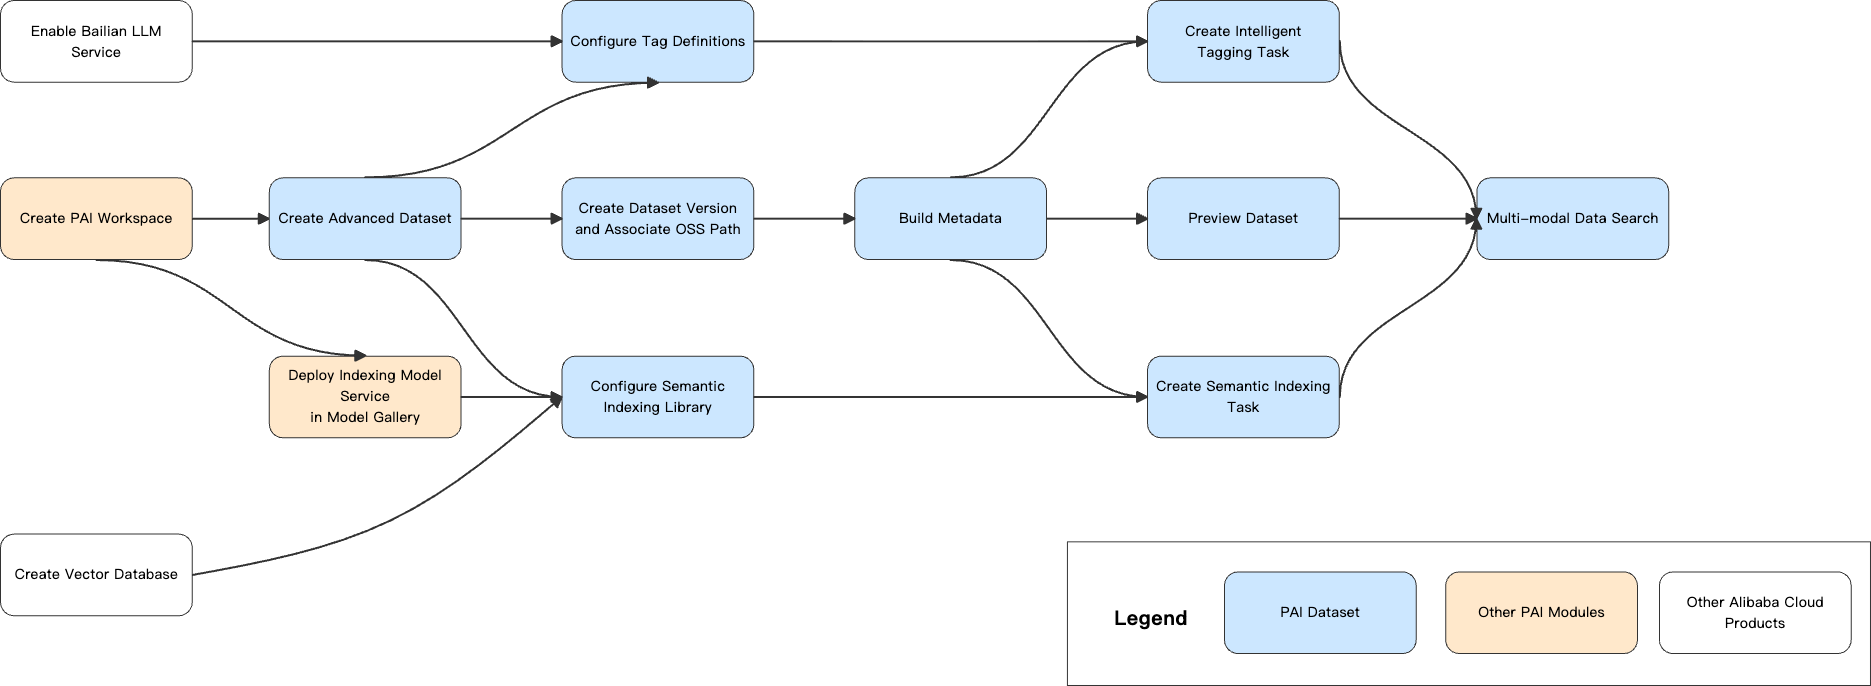
3. Workflow
3.1 Prerequisites
3.1.1 Activate PAI and grant permissions
-
Use your root account to activate PAI and create a workspace. Log on to the PAI console, select a Region in the upper-left corner, and then authorize and activate the product.
-
Authorize your account. You can skip this step if you use a root account. If you use a RAM user, you must have the workspace administrator role. For more information about account authorization, see the Member role configuration section in Create and manage workspaces.
3.1.2 Get the Model Studio API key
To activate Model Studio and create an API key, see Obtain an API key.
3.1.3 Create a vector database
Create a vector database instance
Multimodal dataset management currently supports the following Alibaba Cloud vector databases:
-
Elasticsearch (Vector Search Edition, version 8.17.0 or later)
-
OpenSearch (Vector Search Edition)
-
Milvus (version 2.4 or later)
-
Hologres (version 4.0.9 or later)
-
Lindorm (Vector Engine Edition)
To create an instance for each vector database, see the documentation for the respective cloud product.
Configure network and whitelist settings
-
Public network access
If your vector database instance has a public endpoint, add the following IP addresses to the instance's public network access whitelist. This allows the multimodal data management service to access the instance over the public network. To configure an Elasticsearch whitelist, see Manage IP address whitelists for public or private network access.
Region
IP addresses
China (Hangzhou)
47.110.230.142, 47.98.189.92
China (Shanghai)
47.117.86.159, 106.14.192.90
China (Shenzhen)
47.106.88.217, 39.108.12.110
China (Ulanqab)
8.130.24.177, 8.130.82.15
China (Beijing)
39.107.234.20, 182.92.58.94
-
Private network access
To apply for this option, submit a ticket.
Create a vector index table (Optional)
The system automatically creates an index table. You can skip this step unless you need to create a custom one.
In some vector databases, a vector index table is also called a collection or an index.
The schema for the index table must match the following definition:
This section provides a Python example for creating a semantic index table in Elasticsearch. For other vector databases, see their respective product documentation.
3.2 Create a dataset
-
Go to your PAI workspace. In the left-side navigation pane, choose AI Asset Management > Datasets > Create Dataset.
-
Configure the following key dataset parameters. You can keep the default values for the others.
-
Storage: Object Storage Service (OSS).
-
Type: Premium.
-
Content Type: Image.
-
OSS Path: Select the OSS storage path for the dataset. If you have not prepared a dataset, you can download the sample dataset retrieval_demo_data, upload it to OSS, and then try out the multimodal data management feature.
NoteImporting a file or folder only records its path and does not copy the data.
For Import Format, you can select File or Folder. In Application Configuration, the Default Mount Path is /mnt/data/.
Click OK to create the dataset.
-
3.3 Create connections
3.3.1 Create a smart tagging connection
-
Go to your PAI workspace. In the left-side navigation pane, choose AI Asset Management > Connection > Model Service > Create Connection.
-
Select Alibaba Cloud Model Studio Service and configure the Model Studio API key.
-
After the connection is created, the Alibaba Cloud Model Studio Service appears in the list.
3.3.2 Create a semantic indexing connection
-
If you plan to use the Model Studio Semantic Indexing model service, you can skip this step. In the left-side navigation pane, click Model Gallery, find and deploy a GME multimodal retrieval model to obtain an EAS service. The deployment takes about 5 minutes. The deployment is complete when the status changes to Running.
ImportantWhen you no longer need the index model, stop and delete the service to avoid further charges.
You can select the GME-2B retrieval model (2B parameters) or the GME-7B retrieval model and click the corresponding Deploy button to start the deployment.
-
Go to your PAI workspace. In the left-side navigation pane, choose AI Asset Management > Connection > Model Service > Create Connection.
-
Configure the model connection information based on whether you chose the Model Studio Semantic Indexing model or a custom-deployed EAS semantic indexing model.
Model Studio
-
Connection Type: Select General Multimodal Embedding Model Service.
-
Service Provider: Select Third-party Model Service.
-
Model Name: tongyi-embedding-vision-plus
-
base_url:
https://dashscope.aliyuncs.com/api/v1/services/embeddings/multimodal-embedding/multimodal-embedding -
API key: Obtain an API key and enter it.
Custom EAS
-
Connection Type: Select General Multimodal Embedding Model Service.
-
Service Provider: Select PAI-EAS Model Service.
-
EAS Service: Select the GME multimodal retrieval model that you just deployed. If the service provider is not in your account, select Third-party Model Service.
In the Select EAS service dialog box, select the target model service whose status is Running.
-
-
After the connection is created, the model connection service appears in the list.
3.3.3 Create a vector database connection
-
In the left-side navigation pane, choose AI Asset Management > Connection > Database > Create Connection.
-
The multimodal retrieval service supports vector databases such as Milvus, Lindorm, OpenSearch, Elasticsearch, and Hologres. This section uses Elasticsearch as an example to describe how to create a database connection. Select Elasticsearch and configure parameters such as uri, username, and password. For more information, see Create a database connection.
The connection formats for each vector database are as follows:
Milvus
uri: http://xxx.milvus.aliyuncs.com:19530
database: {your_database}
token: root:{password}
OpenSearch
uri: http://xxxx.ha.aliyuncs.com
username: {username}
password: {password}
Hologres
host: xxxx.hologres.aliyuncs.com
database: {your_database}
port: {port}
access_key_id={password}
Elasticsearch
uri: http://xxxx.elasticsearch.aliyuncs.com:9200
username: {username}
password: {password}
Lindorm
uri: xxxx.lindorm.aliyuncs.com:{port} username: {username} password: root:{password} -
After the connection is created, you can see the vector database connection in the list.
3.4 Create a smart tagging task
3.4.1 Create a smart tag definition
In the left-side navigation pane, choose AI Asset Management > Datasets > Intelligent Tag Definition > Create Intelligent Tag Definition to open the tag configuration page. The following is a configuration example:
-
Guide Prompt: You are a seasoned driver with extensive experience on both highways and urban roads.
-
Tag Definition:
3.4.2 Create an offline smart tagging task
-
Click Custom Dataset, click a dataset name, and then click the Dataset jobs tab.
-
On the jobs page, click Create job > Smart tag, and configure the task parameters.
-
Dataset Version: Select the version to label, such as v1.
-
Labeling Model Connection: Select the Model Studio model connection that you created.
-
Smart Labeling Model: Supported models include Qwen-VL-Max and Qwen-VL-Plus.
-
Max Concurrency: This value depends on the specifications of the EAS model service. For a single GPU, the recommended maximum concurrency is 5.
-
Intelligent Tag Definition: Select the Smart Tag Definition that you just created.
-
Labeling Mode: Supports Increment and Full modes.
-
-
After the Smart Tagging task is created, it appears in the task list. You can click the links in the Actions column to view logs or stop the task.
NoteWhen you start a Smart Tagging task for the first time, the system builds the metadata. This process may take a long time.
3.5 Create a semantic indexing task
-
Click a dataset name to open its details page, then in the Index Configuration section, click the edit icon.
-
Configure the index.
-
Index Model Connection: Select the index model connection that you created in section 3.3.2.
-
Index Database Connection: Select the index database connection that you created in section 3.3.3.
-
Index Table: Enter the name of the index table created in the Create a vector index table (Optional) step, for example, dataset_embed_test.
Click Save and then Refresh Now. This creates a Semantic Indexing task that updates the semantic index for all files in the selected dataset version. You can click Semantic Indexing Task in the upper-right corner of the dataset details page to view the task details.
NoteWhen you start a Semantic Indexing task for the first time, the system builds the metadata. This process may take a long time.
If you click Cancel instead of Refresh Now, you can create the task manually by following these steps:
On the dataset details page, click the Dataset jobs tab to go to the jobs page.
Click Create job > Semantic Indexing, configure the dataset version, and set the maximum concurrency based on the EAS model service specifications. The recommended maximum concurrency is 5 for a single GPU. Click Confirm to create the Semantic Indexing task.
-
3.6 Preview data
-
After the Smart Tagging and Semantic Indexing tasks are complete, go to the dataset details page and click View Data to preview the images in that dataset version.
-
On the View Data page, you can preview the images in the dataset version. You can switch between "Gallery View" and "List View".
-
Click a specific image to view a larger version and see the tags it contains.
The details page displays the image's Metadata (filename, file type, storage path, file size, and last modified time) and Smart tags (including Algorithm tags and User tags).
-
Click the checkbox in the upper-left corner of a thumbnail to select it. You can also hold down the Shift key and click a checkbox to select multiple rows of data at once.
After making a selection, the number of selected items appears at the bottom of the page, where you can perform manual labeling or cancel the selection.
3.7 Basic data search (combined search)
-
In the left-side toolbar of the View Data page, you can perform an Index Retrieval and a Search by Tag. Press Enter or click Search to start.
-
Index Retrieval by text keyword: Based on the Semantic Indexing results, this feature searches by matching keyword vectors with image index vectors. In Advanced Settings, you can set parameters such as top-k and the score threshold.
-
Index Retrieval by image: Based on the Semantic Indexing results, upload an image from your local computer or select one from OSS to search for matching images in the dataset by comparing vectors. In Advanced Settings, you can set parameters such as top-k and the score threshold.
-
Search by Tag: Based on the Smart Tagging results, this feature finds images by matching keywords with image tags. You can combine the following search logic: Include Any of Following (NOT), Include All Following (AND), and Exclude Any of Following (NOT).
-
Metadata: You can search for files by filename, storage path, and last modified time.
All of the preceding search conditions are combined with an AND operator.
3.8 Advanced data search (DSL)
For Advanced search, you can use a DSL search. DSL is a domain-specific language for expressing complex retrieval conditions. It is ideal for advanced retrieval scenarios and supports features such as grouping, Boolean logic (AND/OR/NOT), range comparisons (>, >=, <, <=), property existence (HAS/NOT HAS), token matching (:), and exact matching (=). For more information about the syntax, see Retrieve a list of dataset file metadata.
For example, you can enter the following DSL query to filter for image files: (FileType = "image" OR ContentType = "application/json") AND ThumbnailMode = "h_200" AND MaxResults = 50.
3.9 Export search results
The purpose of this step is to export the search results as a file list index for subsequent model training or data analysis.
After the retrieval is complete, you can click the Export Results button at the bottom of the page. Two export modes are supported:
3.9.1 Export as a file
-
Click Export as file. On the configuration page, set the export content and the destination OSS directory, and then click OK.
On the export configuration page, for Export Content, you can select Text, Image, Audio, Video, and Human Labels. For Export Type, select Export File, and set the Export Path to the destination OSS directory.
-
To view the export progress, choose AI Asset Management > Job > Dataset jobs in the left-side navigation pane.
-
Use the exported results. After the export is complete, you can mount the exported result file and the original dataset to the appropriate training environment, such as a DLC or DSW instance. You can then write code to read the exported result file index and load the target files from the original dataset for model training or analysis.
3.9.2 Export to a logical dataset version
You can import the retrieval results of a Premium dataset into a version of another logical dataset. You can then use the data in that logical dataset version with the dataset SDK.
-
Click Export to logical dataset version, select the target logical dataset, and then click Confirm.
In the export dialog box, select the Target Dataset and Base Dataset Version, and set the Import Scope (all files or selected files). For Import Mode, you can select Merge and Overwrite and select the tag types to import (Smart tags or Human labels).
If no logical dataset is available for selection, create one as described in the following section:
-
Use the logical dataset. After the import task is complete, the target logical dataset contains the exported metadata. You can use the SDK to load and use the data. For information about how to use the SDK, see the dataset details page.
from pai_datasets.load import load_dataset

dataset = load_dataset(dataset_id="xxx",
    dataset_version="v1",
    region="cn-hangzhou",
    cache_dir=CACHE_DIR,
    keep_in_memory=True)
To install the SDK, run the following command:
pip install https://pai-sdk.oss-cn-shanghai.aliyuncs.com/dataset/pai_dataset_sdk-1.0.0-py3-none-any.whl
4. Fine-tune a custom semantic indexing model (Optional)
You can fine-tune a custom semantic search model. After the model is successfully deployed in EAS, you can create a model connection by following the steps in 3.3.2 for use in subsequent multimodal data management.
4.1 Data preparation
This topic provides sample data. You can click retrieval_demo_data to download it.
4.1.1 Data format
Each data sample is saved as a single line in JSON format in a dataset.jsonl file. Each sample must contain the following fields:
-
image_id: A unique identifier for the image, such as the image name or a unique ID. -
tags: A list of text tags associated with the image. The tags are an array of strings.
Example format:
{
    "image_id": "c909f3df-ac4074ed",
    "tags": ["silver sedan", "white SUV", "city street", "snowing", "night"],
}
4.1.2 File structure
Place all image files in a folder named images. Place the dataset.jsonl file in the same directory as the images folder.
Example directory structure:
├── images
│   ├── image1.jpg
│   ├── image2.jpg
│   └── image3.jpg
└── dataset.jsonl The filename dataset.jsonl and the folder name images are required and cannot be changed.
4.2 Model training
-
In the Model Gallery, find retrieval-related models. Select a suitable model for fine-tuning and deployment based on your required model size and compute resources.
Fine-tuning VRAM (bs=4)
Fine-tuning (4 × A800) train_samples/second
Deployment VRAM
Vector dimension
GME-2B
14 GB
16.331
5 GB
1536
GME-7B
35 GB
13.868
16 GB
3584
-
For example, to train the GME-2B model, click Train, then enter the data address and model output path to start the training.
On the training configuration page, the Training Dataset field defaults to the sample data path. You can specify a custom Model Name and Version Description, and set the Model Output Path to an OSS directory.
4.3 Model deployment
Once training is complete, click Deploy on the training task to deploy the model.
To deploy the original GME model, click the Deploy button on the model's tab in the Model Gallery.
After the deployment is complete, you can find the EAS Endpoint and Token on the page. Click View Invocation Information to see details for public endpoint invocation and VPC endpoint invocation.
4.4 Service invocation
Input parameters
|
Parameter |
Type |
Required |
Example |
Description |
|
model |
String |
Yes |
pai-multimodal-embedding-v1 |
Specifies the model type. This field supports custom models and future versions of the base model. |
|
contents.input |
list(dict) or list(str) |
No |
input = [{'text': text}] input=[xxx,xxx,xxx,...] input = [{'text': text},{'image', f"data:image/{image_format};base64,{image64}"}] |
The content to be embedded. Currently, only |
Response parameters
|
Parameter |
Type |
Example |
Description |
|
status_code |
Integer |
200 |
The HTTP status code. 200: The request was successful. 204: The request was partially successful. 400: The request failed. |
|
message |
list(str) |
['Invalid input data: must be a list of strings or dict'] |
The error message. |
|
output |
dict |
See the following table. |
The embedding result. |
The result returned by DashScope is a {'output', {'embeddings': list(dict), 'usage': xxx, 'request_id':xxx}}. For now, you can ignore the 'usage' and 'request_id' fields.
If an input item fails, a reason for the failure is added to the top-level message field.
|
Parameter |
Type |
Example |
Description |
|
index |
Integer |
0 |
The index of the corresponding item in the input |
|
embedding |
List[Float] |
[0.0391846,0.0518188,.....,-0.0329895, 0.0251465] 1536 |
The resulting embedding vector. |
|
type |
String |
"text" |
The type of the embedded content, for example, |
Sample output:
{
    "status_code": 200,
    "message": "",
    "output": {
        "embeddings": [
            {
                "index": 0,
                "embedding": [
                    -0.020782470703125,
                    -0.01399993896484375,
                    -0.0229949951171875,
                    ...
                ],
                "type": "text"
            }
        ]
    }
}
4.5 Model evaluation
The following table shows the evaluation results on our sample data, using this evaluation file:
|
Original model precision |
Fine-tuned model precision (1 epoch) |
|
|
gme2b |
Precision@1 0.3542 Precision@5 0.5280 Precision@10 0.5923 Precision@50 0.5800 Precision@100 0.5792 |
Precision@1 0.4271 Precision@5 0.6480 Precision@10 0.7308 Precision@50 0.7331 Precision@100 0.7404 |
|
gme7b |
Precision@1 0.3958 Precision@5 0.5920 Precision@10 0.6667 Precision@50 0.6517 Precision@100 0.6415 |
Precision@1 0.4375 Precision@5 0.6680 Precision@10 0.7590 Precision@50 0.7683 Precision@100 0.7723 |
4.6 Using the model
After a fine-tuned embedding model is successfully deployed to EAS, you can create a model connection for subsequent multimodal data management by following the steps in 3.3.2.