One of the core challenges for agent applications is their forgetfulness. They cannot remember historical interactions, user preferences, or long-term context. PolarDB memory management is a managed service that provides long-term memory for AI applications. It stores key information in a PolarDB cluster and uses intelligent retrieval and dynamic context injection. This lets your AI applications remember everything to build smarter, more personalized user experiences.
If you have any questions about PolarDB memory management, search for the group number in DingTalk to join our support group. You can directly at sign (@) our experts in the group and ask your questions. DingTalk group number: 34560007316.
How it works
PolarDB memory management creates an isolated Schema in your PolarDB for PostgreSQL cluster to store and manage the memory of your AI applications. When your application interacts with a user, it sends the conversation content to the memory management service. The service uses a large language model (LLM) to automatically extract, summarize, and structure information. It then stores the processed memory in PolarDB. In subsequent interactions, the application can retrieve relevant memories from the service at any time. It injects these memories as context into new prompts. This allows the LLM to provide more accurate and consistent responses.
Core concepts
Memory Project: An independent memory management unit that corresponds to one of your AI applications. At the database level, each project corresponds to an independent
Schemato ensure data isolation.Long-term Memory: Information that is persistently stored in PolarDB. It saves knowledge across different stages and records the following:
Factual memory: User preferences, account details, and domain-specific facts.
Episodic memory: Summaries of past interactions or completed tasks.
Semantic memory: Relationships between concepts, which allows the agent to reason about them later.
AI Agent: Your AI application that integrates memory management capabilities, such as an intelligent chatbot or a personal assistant.
Scope
Before you use PolarDB memory management, make sure your environment meets the following conditions. This section helps you quickly determine if the feature is suitable for you, and is not a preparation guide.
Cluster type: Centralized PolarDB for PostgreSQL clusters. PolarDB for PostgreSQL Distributed Edition clusters are not supported.
Database engine: PostgreSQL 16.
Billing
Component fees: PolarDB memory management charges fees for resource components. The fees are calculated based on the component specifications (CPU and memory) you select and the subscription duration.
Storage fees: Data and files generated by PolarDB memory management are stored in the storage space of the PolarDB for PostgreSQL cluster.
Model fees: The models used in PolarDB memory management, such as qwen3-max, text-embedding-v4, or qwen3-rerank, are all models from Alibaba Cloud Model Studio. For detailed billing rules, see Model invocation billing.
Traffic and bandwidth: No fees are charged.
Prepare the cluster environment
Before you create a memory project, you must prepare a PolarDB for PostgreSQL cluster that meets the requirements and create a dedicated database for it.
Prepare a cluster: Use an existing cluster or purchase a new PostgreSQL 16 cluster based on your business needs.
Create a privileged account: Prepare a privileged account to create the Memory Management module. If you already have a privileged account, you can skip this step.
Create a database: Create a logical database to store data related to memory projects.
Configure the IP address whitelist: Configure the cluster whitelist to ensure that your application can securely connect to the database.
Quick start
Step 1: Create a memory management project
Go to the PolarDB console. Click Clusters in the navigation pane on the left. Find a destination cluster that meets the requirements specified in Scope, and then open its details page. In the navigation pane on the left, select and click Create AI Application.
On the purchase page, select the appropriate configuration based on your needs:
Configuration item
Description
Billing Method
Subscription: An upfront payment method. When you create an application, you select resources with defined specifications and pay for them in advance. The longer the subscription duration, the larger the discount. This method is suitable for scenarios with stable, long-term business requirements.
Pay-as-you-go: A pay-as-you-go billing method. When you create an application, you select resources with defined specifications but do not need to pay in advance. You are billed based on the actual usage duration. This method is suitable for scenarios with flexible business requirements.
Engine
Fixed as PolarDB.
Region
Select the geographic location where the application is deployed.
NoteYou cannot change the region after the application is purchased.
The application must be in the same region as the PolarDB for PostgreSQL cluster. Therefore, select the same region as the PolarDB for PostgreSQL cluster.
Create the application in the same region as the ECS instance you want to connect to. Otherwise, they cannot communicate over the internal network (private network) and must use the public network, which prevents optimal performance.
Architecture
Select AI Application.
Ecosystem
Automatically filled with the database ecosystem of the source PolarDB cluster. You do not need to enter it manually.
Source PolarDB Cluster
Select the PolarDB cluster for which you want to create the application.
Version
Automatically filled with the database version of the source PolarDB cluster. You do not need to enter it manually.
AI Application
Select Memory Management.
Memory Engine
Select mem0.
Component Set
An AI application can contain multiple resource components. We recommend selecting at least two components to support high availability for memory management.
AI Application Name
Enter a custom application name.
NoteThe name cannot start with http:// or https:// and must be 2 to 256 characters long.
Network Type
Fixed as Virtual Private Cloud (VPC).
VPC Network
Automatically filled with the VPC of the source PolarDB cluster. You do not need to enter it manually.
Zone and vSwitch
Configure the vSwitch for your VPC network. We recommend selecting the same vSwitch as the primary zone of your PolarDB for PostgreSQL cluster to achieve optimal network performance.
If your existing vSwitches do not meet your requirements, you can create a new one by clicking Create vSwitch.
Project Name
An independent memory management unit that corresponds to one of your AI applications. At the database level, each project corresponds to an independent
Schemato ensure data isolation.Database Name
Enter the database name for the project.
LLM Model
A large language model. You cannot change this after selection. Supported models include the following:
qwen3-max
qwen-plus
Embedding Model
A text-to-vector model. You cannot change this after selection. Supported versions include the following:
text-embedding-v4
text-embedding-v3
ReRank Model
A model used in the memory ReRanker process. You cannot change this after selection. Supported versions include the following:
qwen3-rerank
gte-rerank-v2
Database Account
Enter the privileged account for the PolarDB for PostgreSQL cluster.
Account Password
Enter the password for the privileged account.
Security Group
Configure the security group for the application.
Quantity
Select the number of applications to purchase.
NoteYou can purchase only one AI application of the same type per PolarDB for PostgreSQL cluster.
This setting is available only when the Billing Method is set to Subscription.
Subscription Duration
Select the subscription duration for the application.
NoteThis setting is available only when the Billing Method is set to Subscription.
Auto-renewal
Configure whether to enable auto-renewal. To avoid service interruptions due to missed renewals, we recommend enabling auto-renewal.
NoteThis setting is available only when the Billing Method is set to Subscription.
After successful purchase, return to the AI Applications page of the cluster to view the newly created application.
NoteThe system takes 3 to 5 minutes to create the application. Please wait patiently.
Step 2: Get the endpoint and access credentials
Retrieve the endpoint: On the AI Applications page, click your Application ID to go to the application details page. In the Basic Information tab, find the Topology section and view the private endpoint.
NoteYou must apply for a public endpoint separately. Click the Apply button to apply.
A public endpoint provides only an IP address and port, not a domain name. If you need a domain name, bind one yourself.
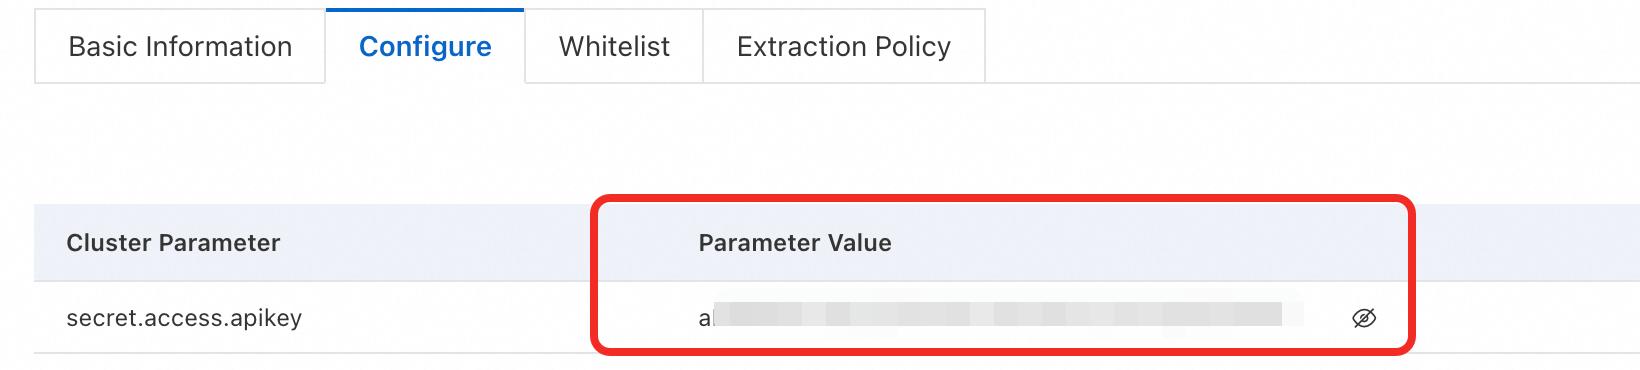
Retrieve configuration information: On the Mem0 Memory Store list page, click your Application ID/Name to go to the details page. In the Configure tab, view the related configuration information.
Step 3: Configure the whitelist
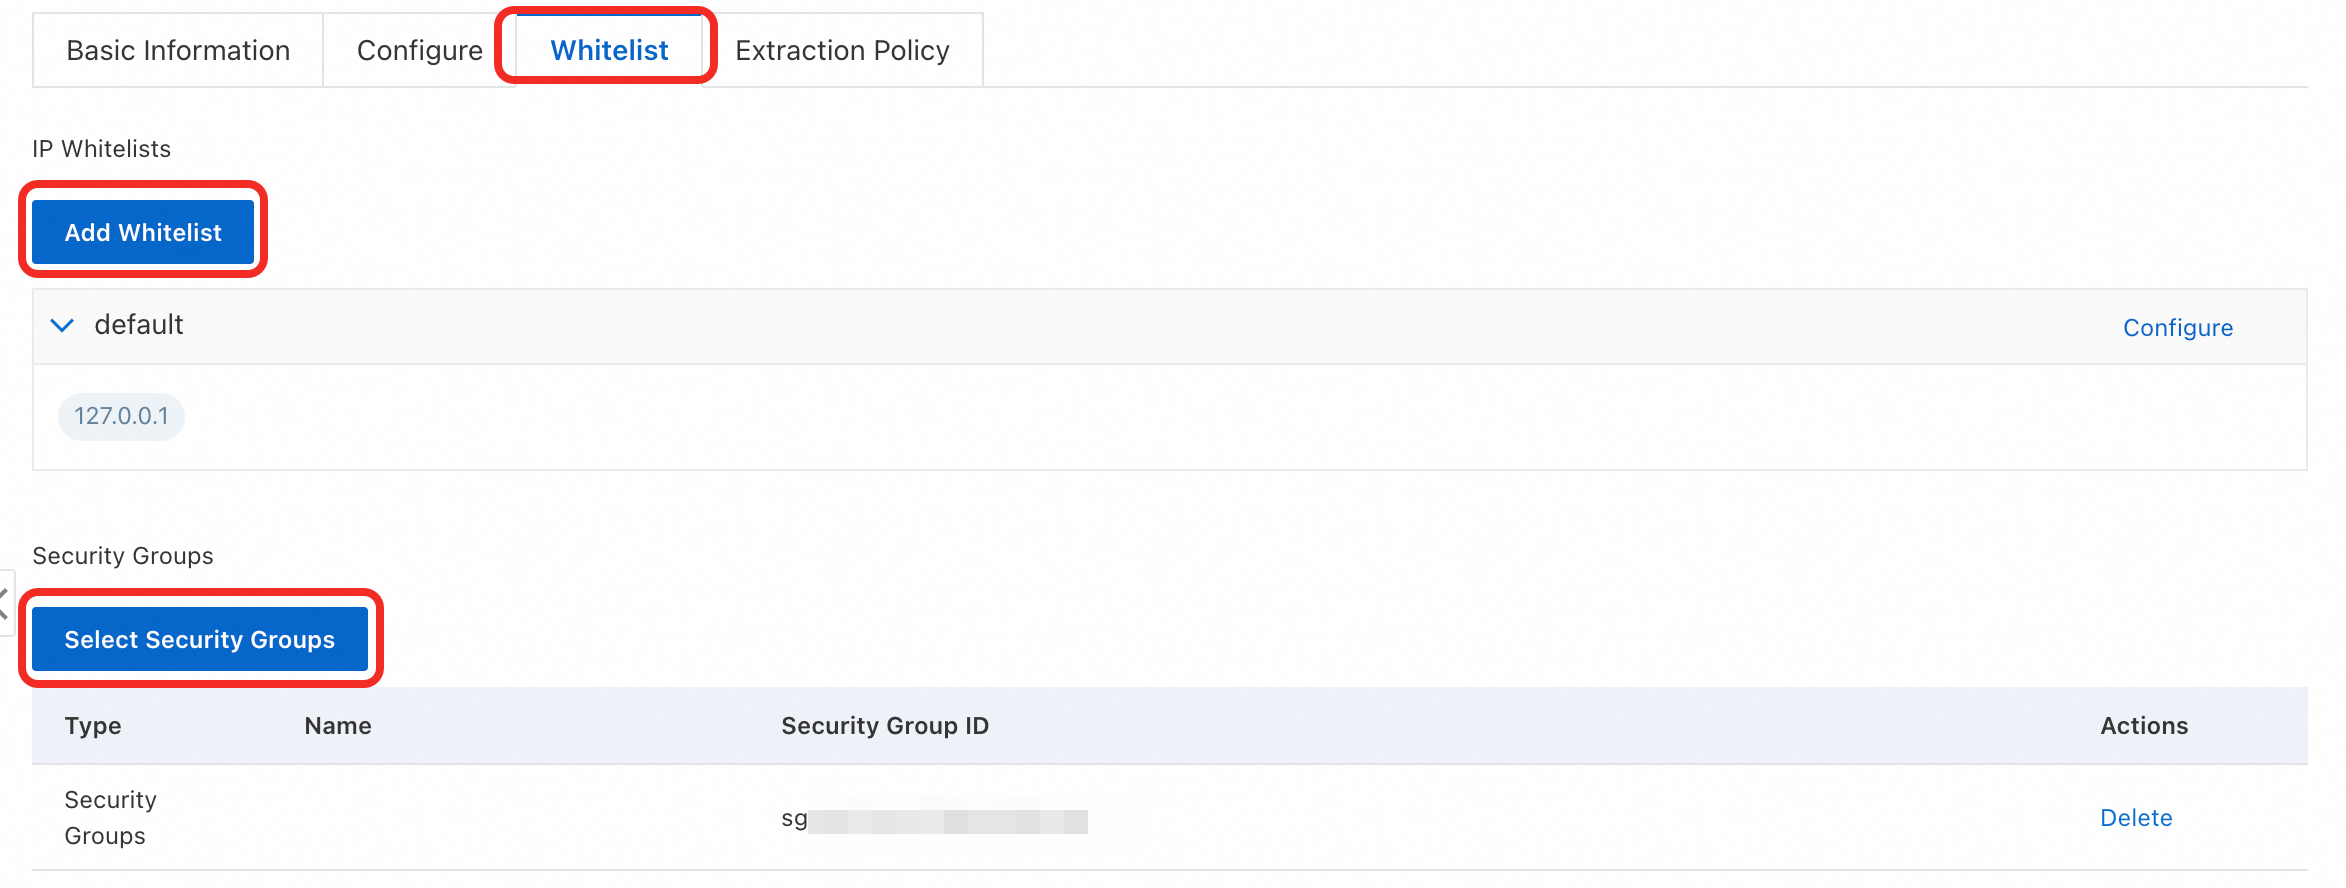
On the AI Applications page, click your Application ID to go to the application details page. In the Whitelist tab, click Add Whitelist, Select Security Groups, or Configure an existing whitelist group.
The application whitelist and cluster whitelist are independent. You must configure them separately.
If your ECS instance needs to access the application, go to the ECS Instance Details page to retrieve the ECS instance's IP address and add it to the IP whitelist.
If your ECS instance and application are in the same VPC, you can enter the private IP address of the ECS or its VPC CIDR block.
If your ECS instance and application are in different VPCs, you can add the ECS public IP address or its security group to the whitelist.
If your local server, computer, or other cloud servers need to access the application, add their public IP addresses to the IP whitelist.
Step 4: (Optional) Configure parameters and custom extraction policies
Parameter description
You can adjust the following parameters on the Configure tab of memory management to optimize service performance and results.
Changing some parameters triggers a service restart. Perform these changes during off-peak hours.
secret.access.apikey: Your access credential.memserver.POLAR_GRAPH_EMBEDDING_THRESHOLD: The threshold used when extracting memories to determine whether to create a new graph node. When adding relationships to an existing graph, the service compares vector similarity between extracted memories and existing nodes. If the similarity is greater than the threshold, the service uses the existing node. If the similarity is less than the threshold, the service creates a new node. The default threshold is0.7.memserver.POLAR_GRAPH_MAXCONN: The maximum number of concurrent connections for the memory service.
Custom extraction policies (Prompts)
Memory management uses built-in Prompt templates (extraction policies) to guide the LLM on how to extract and summarize memories from conversations. You can customize these Prompts to fit specific business scenarios.
Policy types
Only session summarization and semantic memory policies are supported.
For each policy type (such as session summarization), only one policy can be active at a time.
Operation Instructions
Manage these policies on the Extraction Policies tab of memory management.
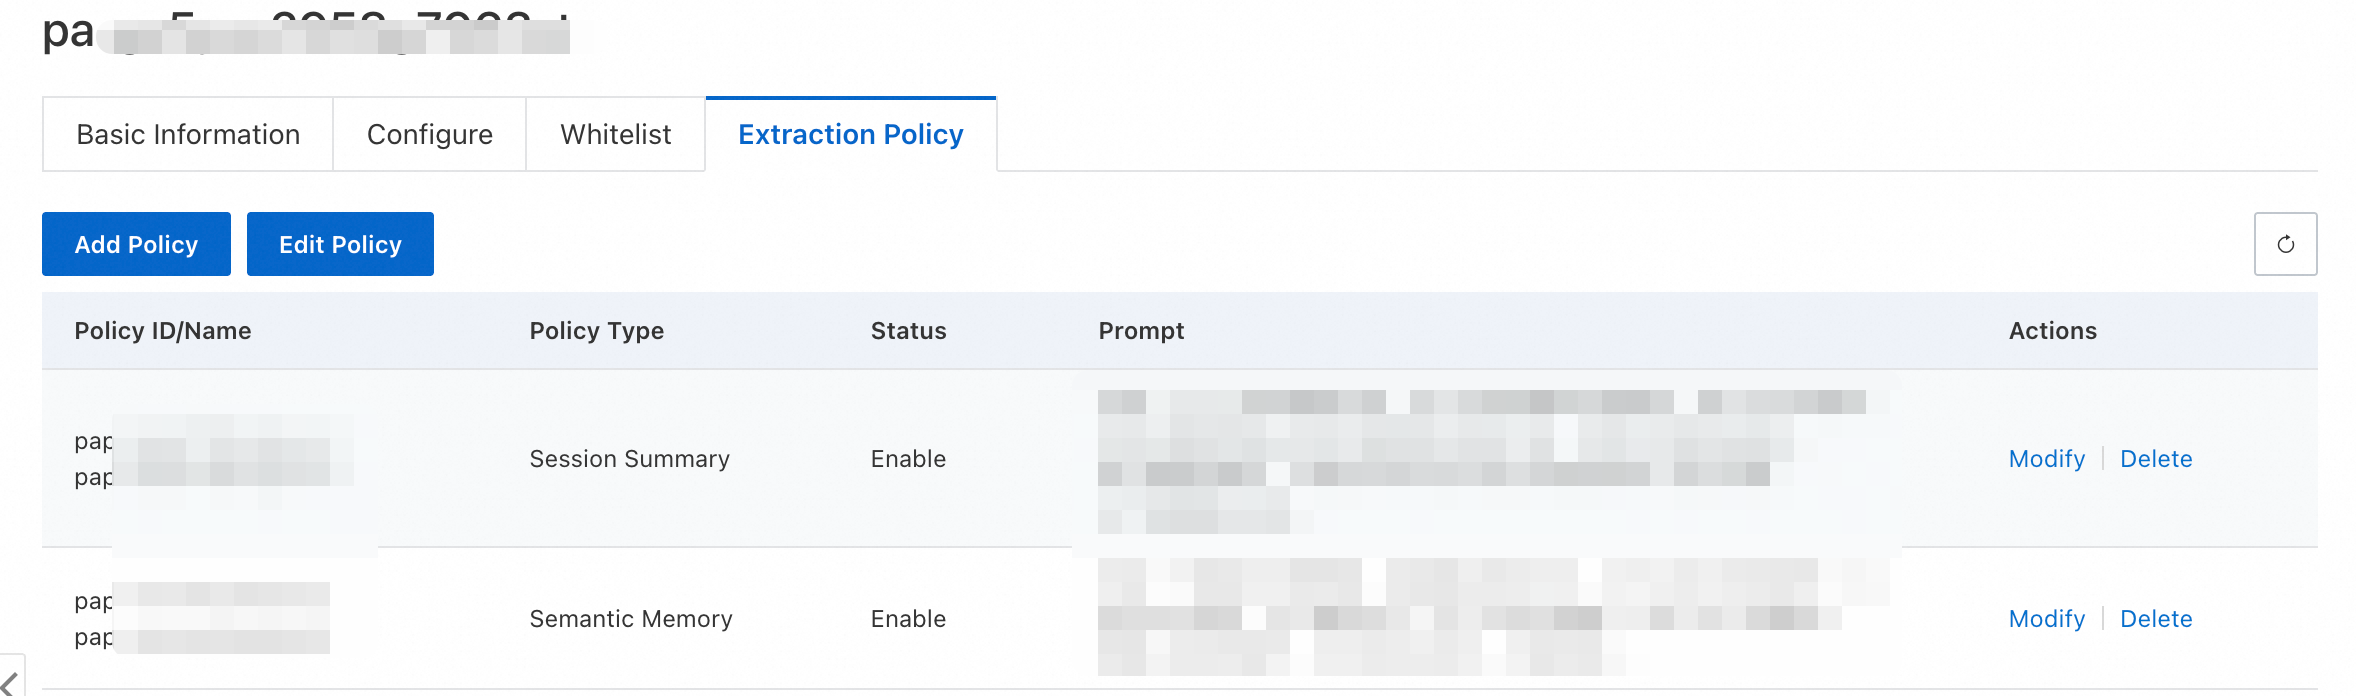
Edit an existing policy to fine-tune it, or click Add Policy. Then click the Modify Policy button to activate the new policy.

Step 5: API examples
Add memories
curl -X POST http://my-endpoint:8080/v1/memories \
  -H "Content-Type: application/json" \
  -H "Authorization: Token <your-api-key>" \
  -d '{
        "messages": [
            {
              "role": "user",
              "content": "I like spicy food, especially Sichuan cuisine."
            },
            {
              "role": "assistant",
              "content": "Got it, I've noted your taste preferences."
            }
        ],
        "user_id": "user_002",
        "agent_id": "food-assistant",
        "run_id": "user_002_run_id",
        "metadata": {
            "additionalProp1": {}
        }
    }'
Expected response:
{
    "results": [
        {
            "id": "32155c0a-xxxx-xxxx-xxxx-804e119bb965",
            "event": "ADD",
            "data": {
                "memory": "likes spicy food"
            }
        },
        {
            "id": "9188deee-xxxx-xxxx-xxxx-3073ef826b42",
            "event": "ADD",
            "data": {
                "memory": "especially likes Sichuan cuisine"
            }
        }
    ]
}
Search memories
curl -X POST http://my-endpoint:8080/v2/memories/search \
  -H "Content-Type: application/json" \
  -H "Authorization: Token <your-api-key>" \
  -d '{
        "query": "What kind of food do I like?",
        "agent_id": "food-assistant",
        "filters": {
            "user_id": "user_002",
            "run_id": "user_002_run_id",
            "additionalProp1": {}
        }
    }'
Expected response:
{
    "results": [
        {
            "id": "9188deee-xxxx-xxxx-xxxx-3073ef826b42",
            "memory": "especially likes Sichuan cuisine",
            "hash": "a826fbf3c3844024633e84d04875ee45",
            "metadata": {
                "additionalProp1": {

                }
            },
            "score": 0.681654033365126,
            "created_at": "2026-03-05T23:59:36.038217-08:00",
            "updated_at": null,
            "user_id": "user_002",
            "agent_id": "food-assistant",
            "run_id": "user_002_run_id"
        },
        {
            "id": "32155c0a-xxxx-xxxx-xxxx-804e119bb965",
            "memory": "likes spicy food",
            "hash": "b2882aaf96654a9e16f45f363022010a",
            "metadata": {
                "additionalProp1": {

                }
            },
            "score": 0.582298149788604,
            "created_at": "2026-03-05T23:59:36.023417-08:00",
            "updated_at": null,
            "user_id": "user_002",
            "agent_id": "food-assistant",
            "run_id": "user_002_run_id"
        }
    ]
}
Get memories
  curl -X POST http://my-endpoint:8080/v2/memories \
  -H "Content-Type: application/json" \
  -H "Authorization: Token <your-api-key>" \
  -d '{
        "filters": {
            "user_id": "user_002",
            "run_id": "user_002_run_id",
            "agent_id": "food-assistant"
        }
    }'
Expected response:
{
    "results": [
        {
            "id": "39b06e97-xxxx-xxx-xxxx-4223818bc04e",
            "memory": "likes spicy food",
            "hash": "b2882aaf96654a9e16f45f363022010a",
            "metadata": {
                "additionalProp1": {

                }
            },
            "created_at": "2026-03-06T00:12:45.109789-08:00",
            "updated_at": null,
            "user_id": "user_002",
            "agent_id": "food-assistant",
            "run_id": "user_002_run_id"
        },
        {
            "id": "482def46-xxxx-xxxx-xxxx-ff4886a1047c",
            "memory": "especially likes Sichuan cuisine",
            "hash": "a826fbf3c3844024633e84d04875ee45",
            "metadata": {
                "additionalProp1": {

                }
            },
            "created_at": "2026-03-06T00:12:45.121585-08:00",
            "updated_at": null,
            "user_id": "user_002",
            "agent_id": "food-assistant",
            "run_id": "user_002_run_id"
        }
    ]
}
Appendix: API reference
PolarDB memory management is a managed service based on the open-source framework mem0 (v1.0.1). You can visit http://<your-endpoint>:8080/docs to view the up-to-date API documentation.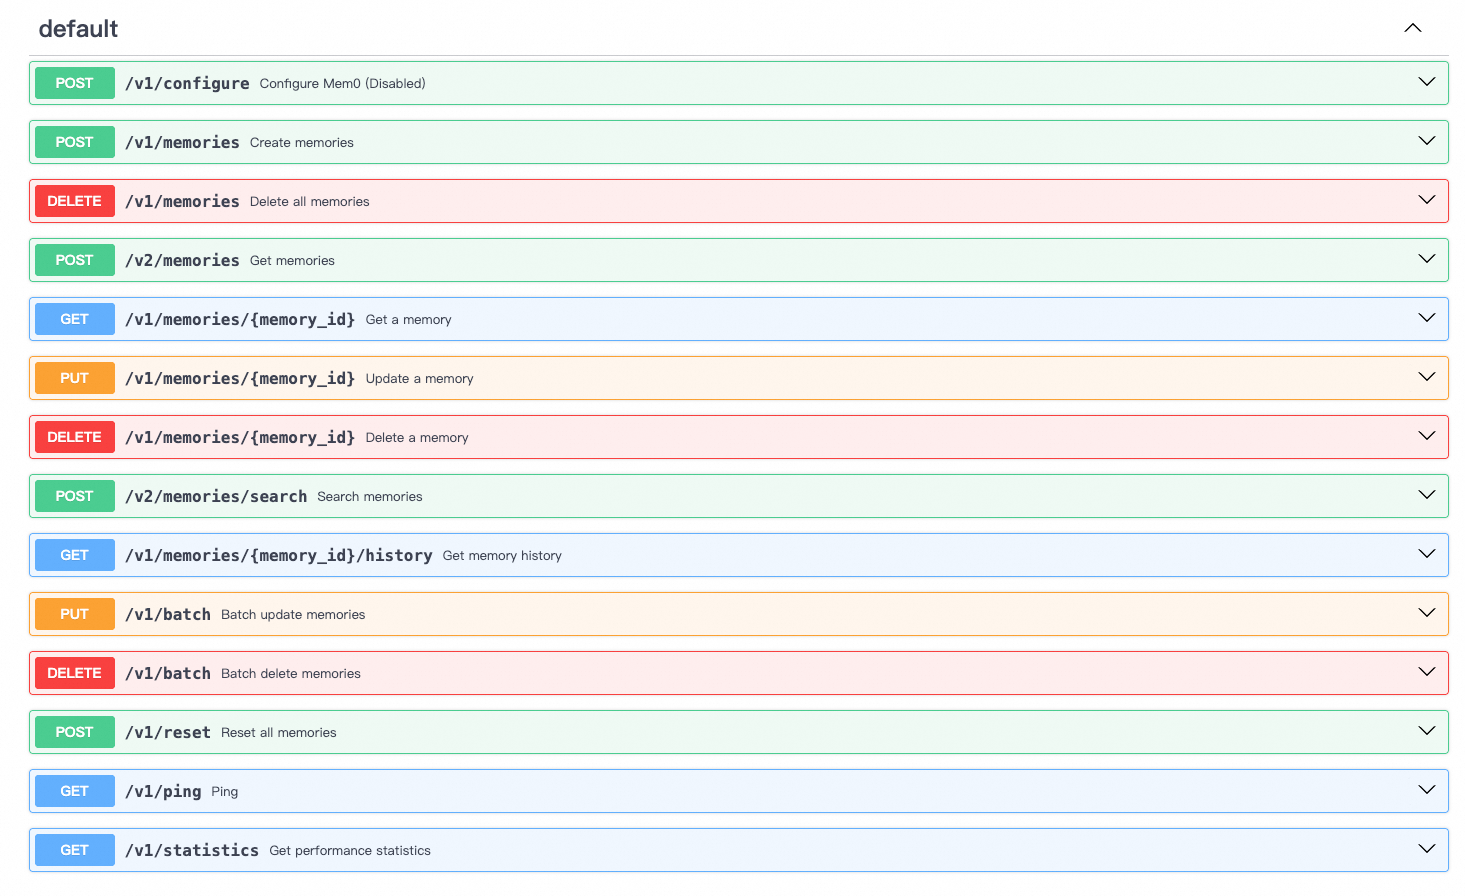
Request header
Authenticate API requests by including Authorization: Token <your-api-key> in the Request Header.
Request examples
This section provides examples for key APIs.
Create memories
Stores new memories. The service automatically analyzes the content of messages to generate conversation summaries and semantic memories.
Request URL:
POST /v1/memoriesRequest Body:
messages
array(Required)A list of conversation messages in the OpenAI Format.
curl
curl -X POST http://my-endpoint:8080/v1/memories \
  -H "Content-Type: application/json" \
  -H "Authorization: Token <your-api-key>" \
  -d '{
        "messages": [
            {
              "role": "user",
              "content": "I like spicy food, especially Sichuan cuisine."
            },
            {
              "role": "assistant",
              "content": "Got it, I have noted your taste preference."
            }
        ],
        "user_id": "user_002",
        "agent_id": "food-assistant",
        "run_id": "user_002_run_id",
        "metadata": {
            "additionalProp1": {}
        }
    }'
Python
import requests
import json

payload = {
    "messages": [
        {"role": "user", "content": "I like spicy food, especially Sichuan cuisine."},
        {"role": "assistant", "content": "Got it, I have noted your taste preference."}
    ],
    "user_id": "user-002",
    "agent_id": "food-assistant",
    "run_id": "user_002_run_id"
}

response = requests.post(
    "http://<your-endpoint>:8080/v1/memories",
    headers={"Authorization": "Token <your-api-key>", "Content-Type": "application/json"},
    data=json.dumps(payload)
)

print(response.json())
user_id
String(Required)A unique identifier for the user.
agent_id
String(Optional)A unique identifier for the Agent, used to isolate memories for different applications for the same user.
run_id
String(Optional)A unique identifier for a single run or Session.
metadata
Object(Optional)Additional metadata to store with the memory.
Search memories
Searches for the most relevant memories based on a query string.
Request URL:
POST /v2/memories/searchRequest Body:
query
String(Required)The text to search for, such as a new user question.
curl
curl -X POST http://my-endpoint:8080/v2/memories/search \
  -H "Content-Type: application/json" \
  -H "Authorization: Token <your-api-key>" \
  -d '{
        "query": "What kind of food do I like?",
        "agent_id": "food-assistant",
        "filters": {
            "user_id": "user_002",
            "run_id": "user_002_run_id",
            "additionalProp1": {}
        }
    }'
Python
import requests
import json

payload = {
    "query": "What kind of food do I like?",
    "agent_id": "food-assistant",
    "filters": {
          "user_id": "user_002",
          "run_id": "user_002_run_id"
      }
}

response = requests.post(
    "http://<your-endpoint>:8080/v2/memories/search",
    headers={"Authorization": "Token <your-api-key>", "Content-Type": "application/json"},
    data=json.dumps(payload)
)

print(json.dumps(response.json(), indent=2, ensure_ascii=False))
agent_id
String(Optional)Restricts the search to the specified Agent.
filters
Object(Required)Filters based on metadata.
Get memories
Retrieves all raw memories within a specified scope.
Request URL:
POST /v2/memoriesRequest Body:
filters
Object(Required)Filters based on metadata.
curl
  curl -X POST http://my-endpoint:8080/v2/memories \
  -H "Content-Type: application/json" \
  -H "Authorization: Token <your-api-key>" \
  -d '{
        "filters": {
            "user_id": "user_002",
            "run_id": "user_002_run_id",
            "agent_id": "food-assistant"
        }
    }'
Python
import requests
import json

payload = {
    "filters": {
          "user_id": "user_002",
          "run_id": "user_002_run_id",
          "agent_id": "food-assistant",
      }
}

response = requests.post(
    "http://<your-endpoint>:8080/v2/memories",
    headers={"Authorization": "Token <your-api-key>", "Content-Type": "application/json"},
    data=json.dumps(payload)
)

print(json.dumps(response.json(), indent=2, ensure_ascii=False))
Delete memories
Deletes all memories within a specified scope.
Request URL:
DELETE /v1/memoriesQuery String:
user_id
String(Required)A unique identifier for the user.
curl
curl -X DELETE 'http://<your-endpoint>:8080/v1/memories?user_id=user_002&agent_id=food-assistant' \
  -H 'accept: application/json' \
  -H 'Authorization: Token <your-api-key>'
Python
import requests
import json

# Define the scope for deletion
current_user_id = "user_002"
current_agent_id = "food-assistant"

# Prepare the API request URL
api_url = f"http://<your-endpoint>:8080/v1/memories?user_id={current_user_id}&agent_id={current_agent_id}"

response = requests.delete(
    api_url,
    headers={"Authorization": "Token <your-api-key>"},
)

print(json.dumps(response.json(), indent=2, ensure_ascii=False))
agent_id
String(Optional)Deletes memories only for the specified Agent.
run_id
String(Optional)Deletes memories only for the specified Session.