Create a file data source
Quick BI lets you upload local Excel and CSV files to create a file data source, supporting your evolving business analysis needs. This topic describes how to create and modify a file data source and outlines the methods for uploading files.
Use cases
Create a file data source from a local file to analyze it alongside your online data sources.
Limitations
File type | Description |
Excel |
|
CSV |
|
Usage notes
Supported data types for fields include text, numeric, and date. When you configure fields, you can select these types or allow them to be automatically identified based on the data content during the upload process. You can also modify the data type.
When you upload a CSV file, we recommend that you convert its format to UTF-8.
Quick BI accurately identifies UTF-8 encoded CSV files. Other encodings, such as GBK and GB2312, may not be recognized correctly, resulting in garbled characters after the upload.
We recommend that you use Google Chrome to upload files.
Quick BI determines a column's data type based on its first 100 rows:
If the first 100 rows all contain numbers, the system identifies the column as a numeric type.
If even one row contains a string, the system identifies the column as a string type.
Numeric fields are not compatible with string data, but string fields are compatible with numeric data.
Before you begin
Confirm the supported file types.
You can upload CSV and Excel files. Supported Excel formats are .xls and .xlsx.
For other considerations, see the Usage notes section.
Ensure that the file format and size meet the standards described in Limitations.
Entry points
Log on to the Quick BI console. You can upload a local file in one of the following ways:
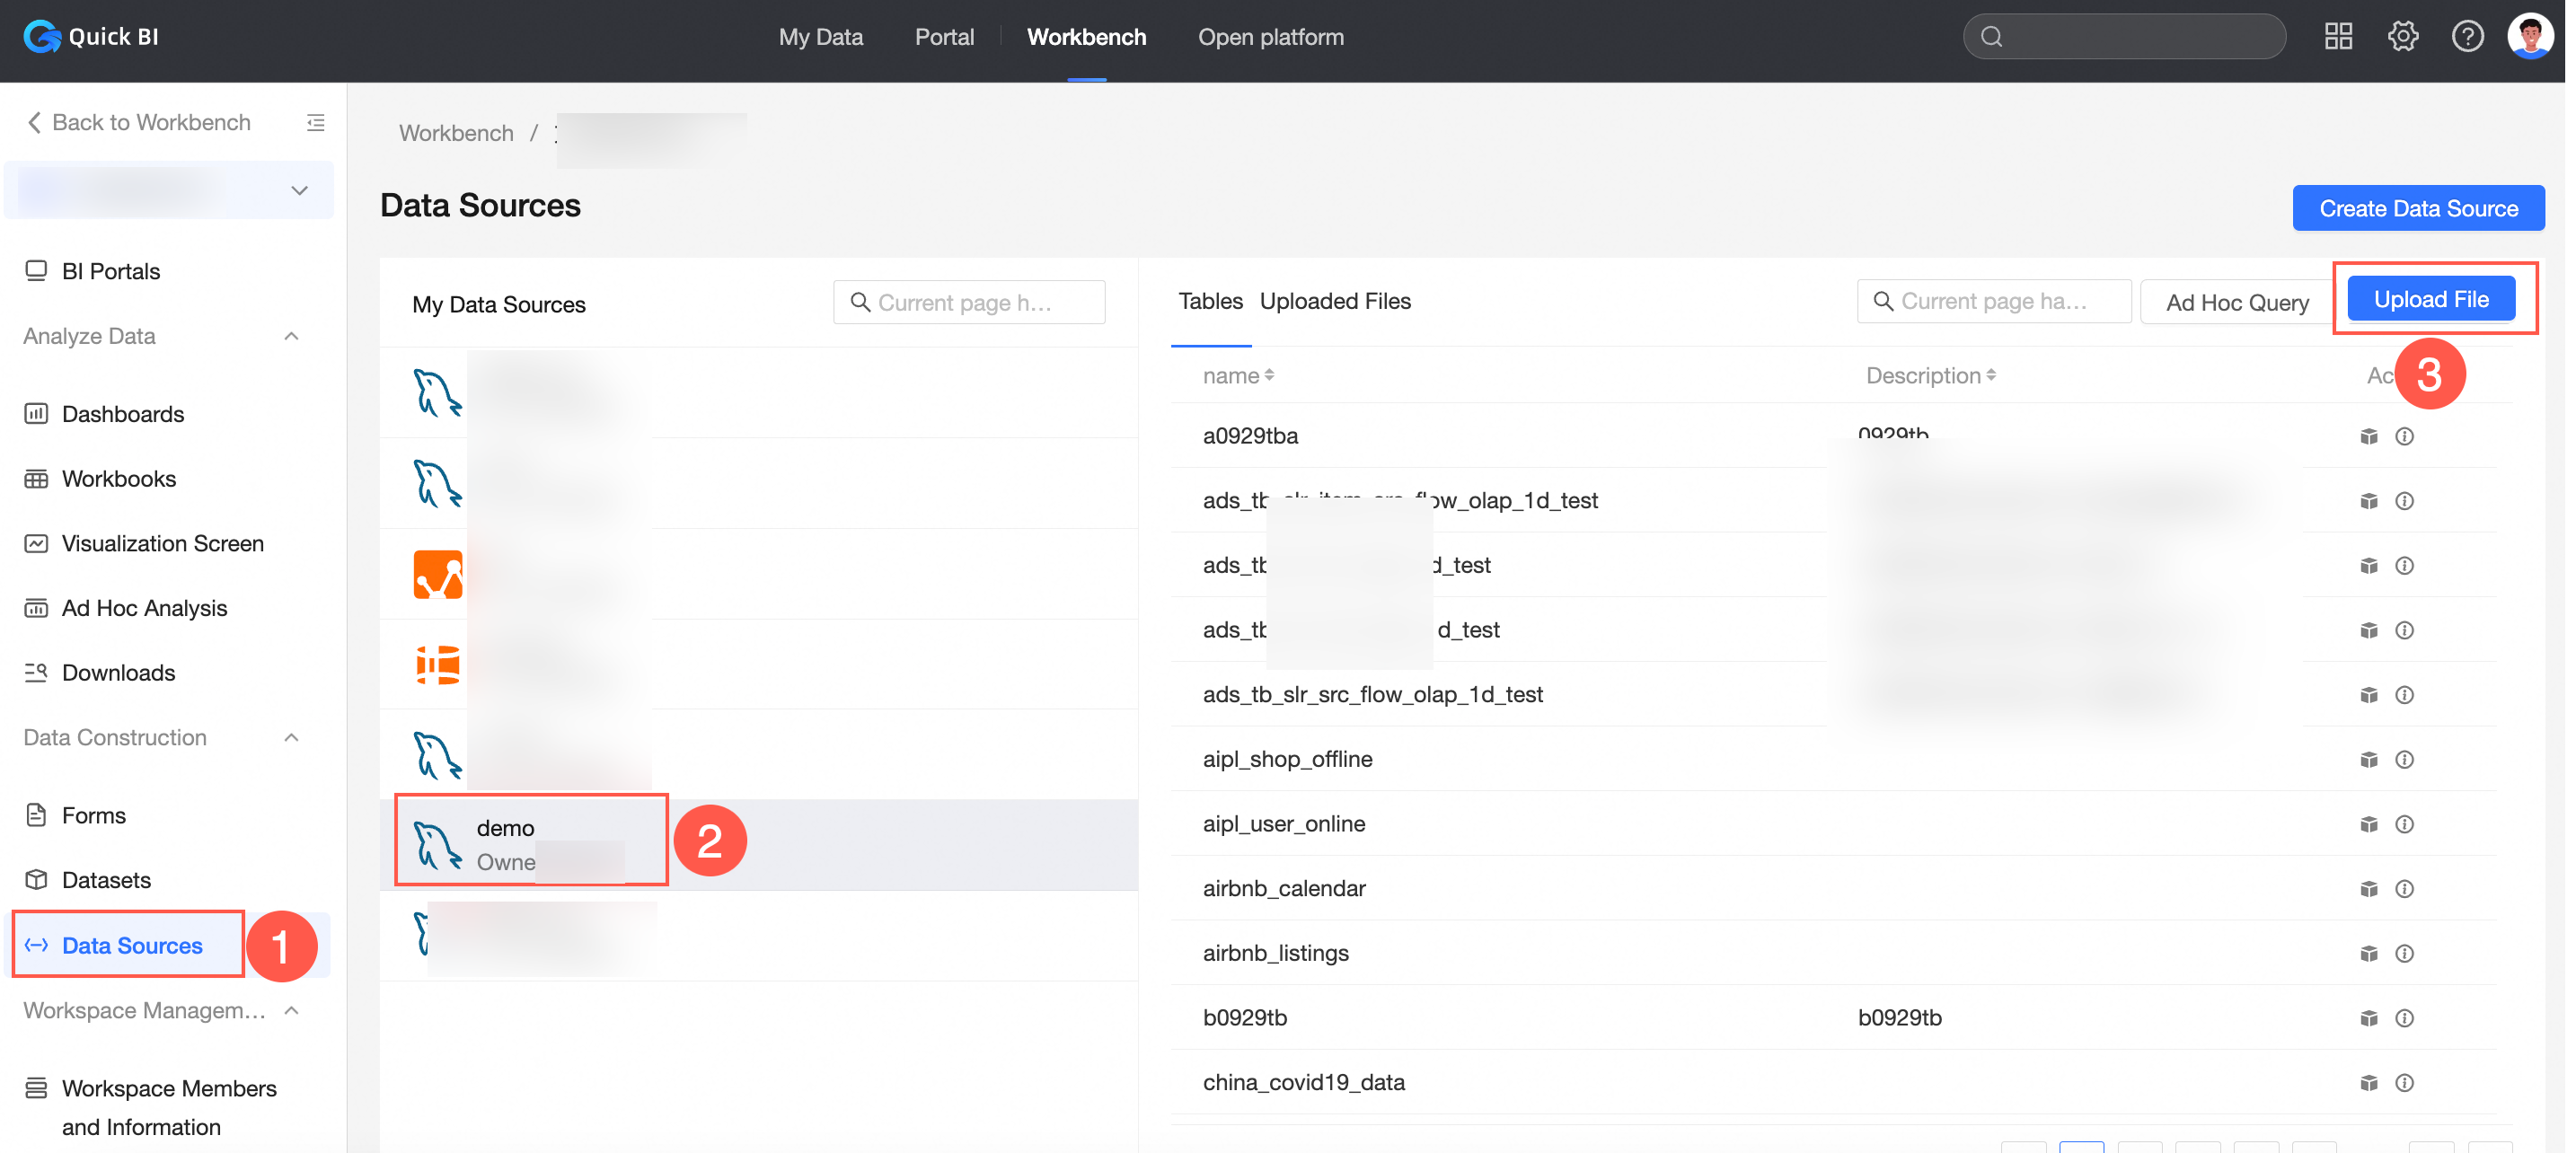
Upload a local file on the Data Sources page.
You must have read and write permissions on the target data source and use a data source that supports file uploads. To see which data sources support file uploads, see Data source feature list.
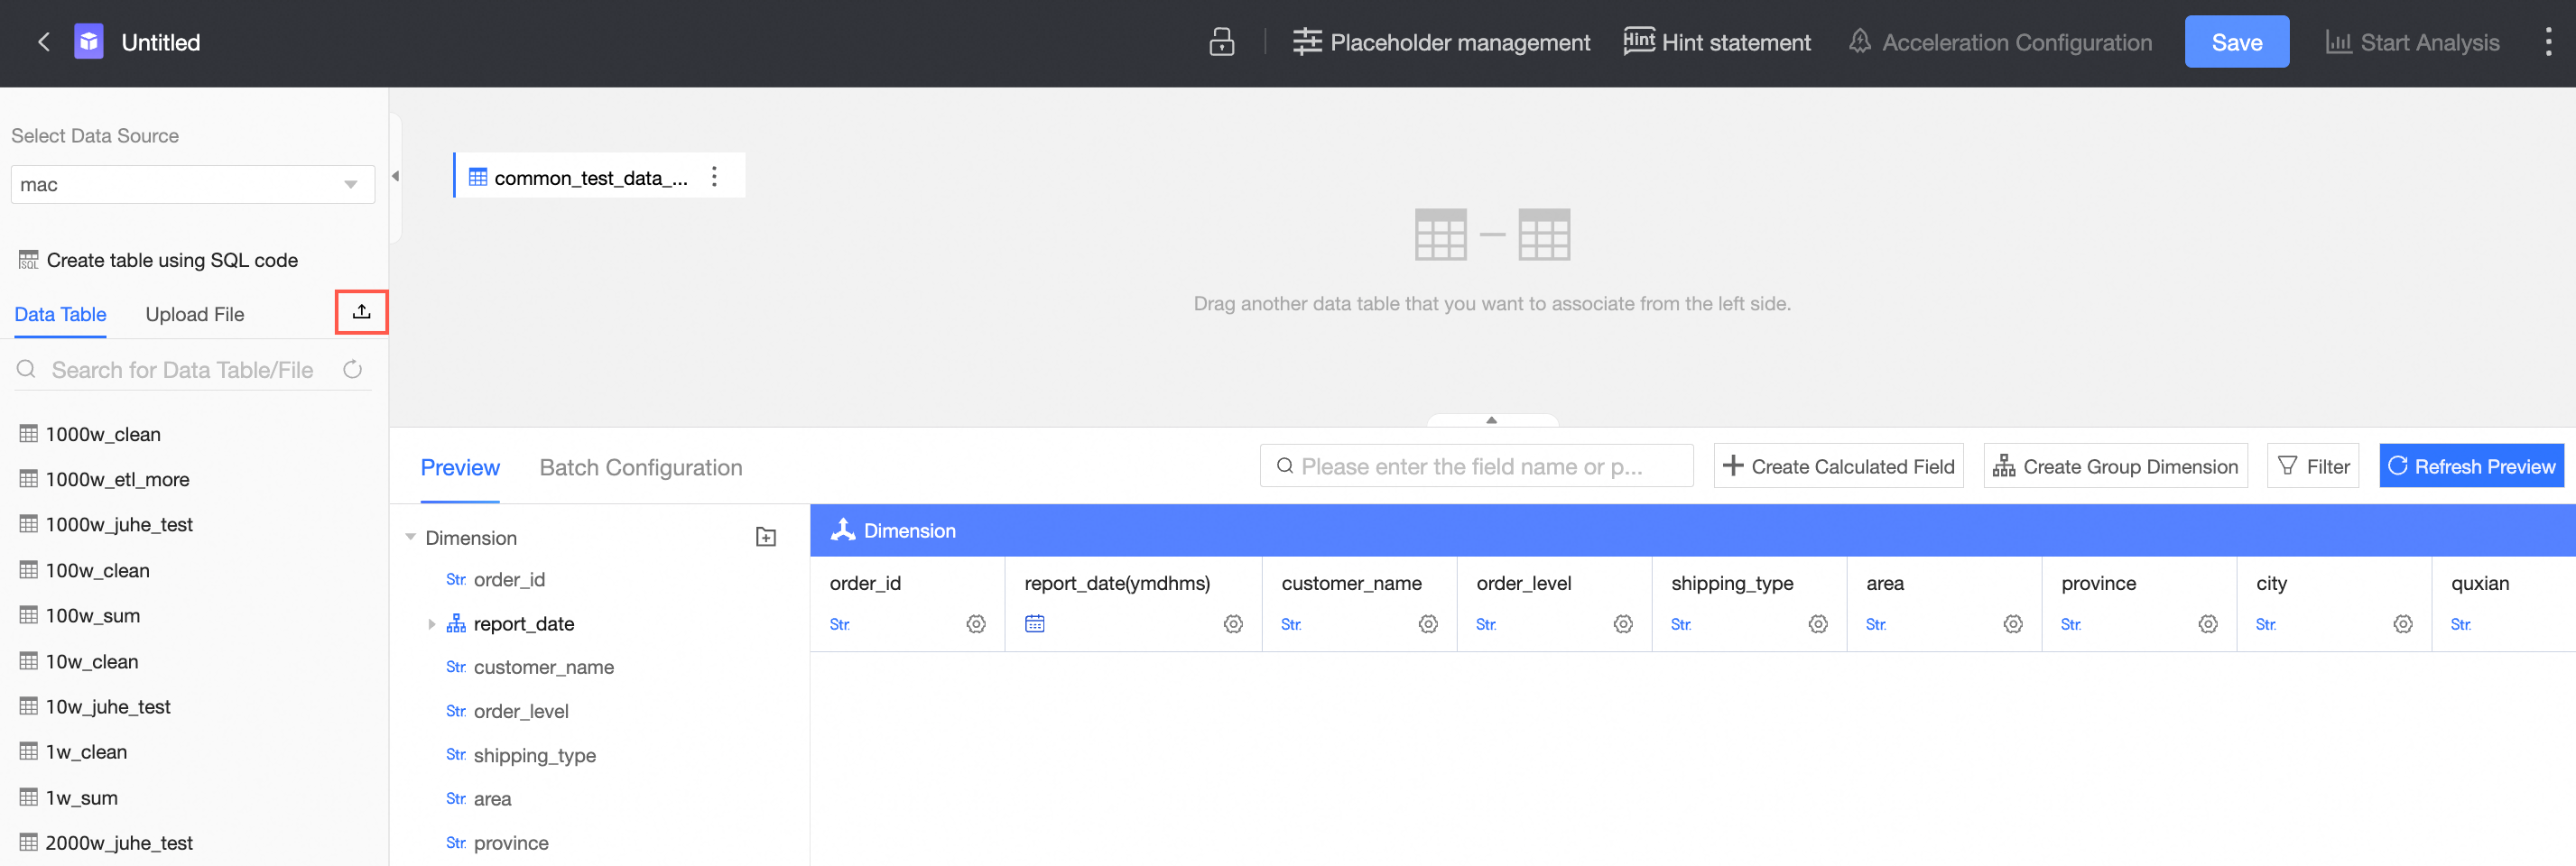
Upload a local file from the dataset editing page.
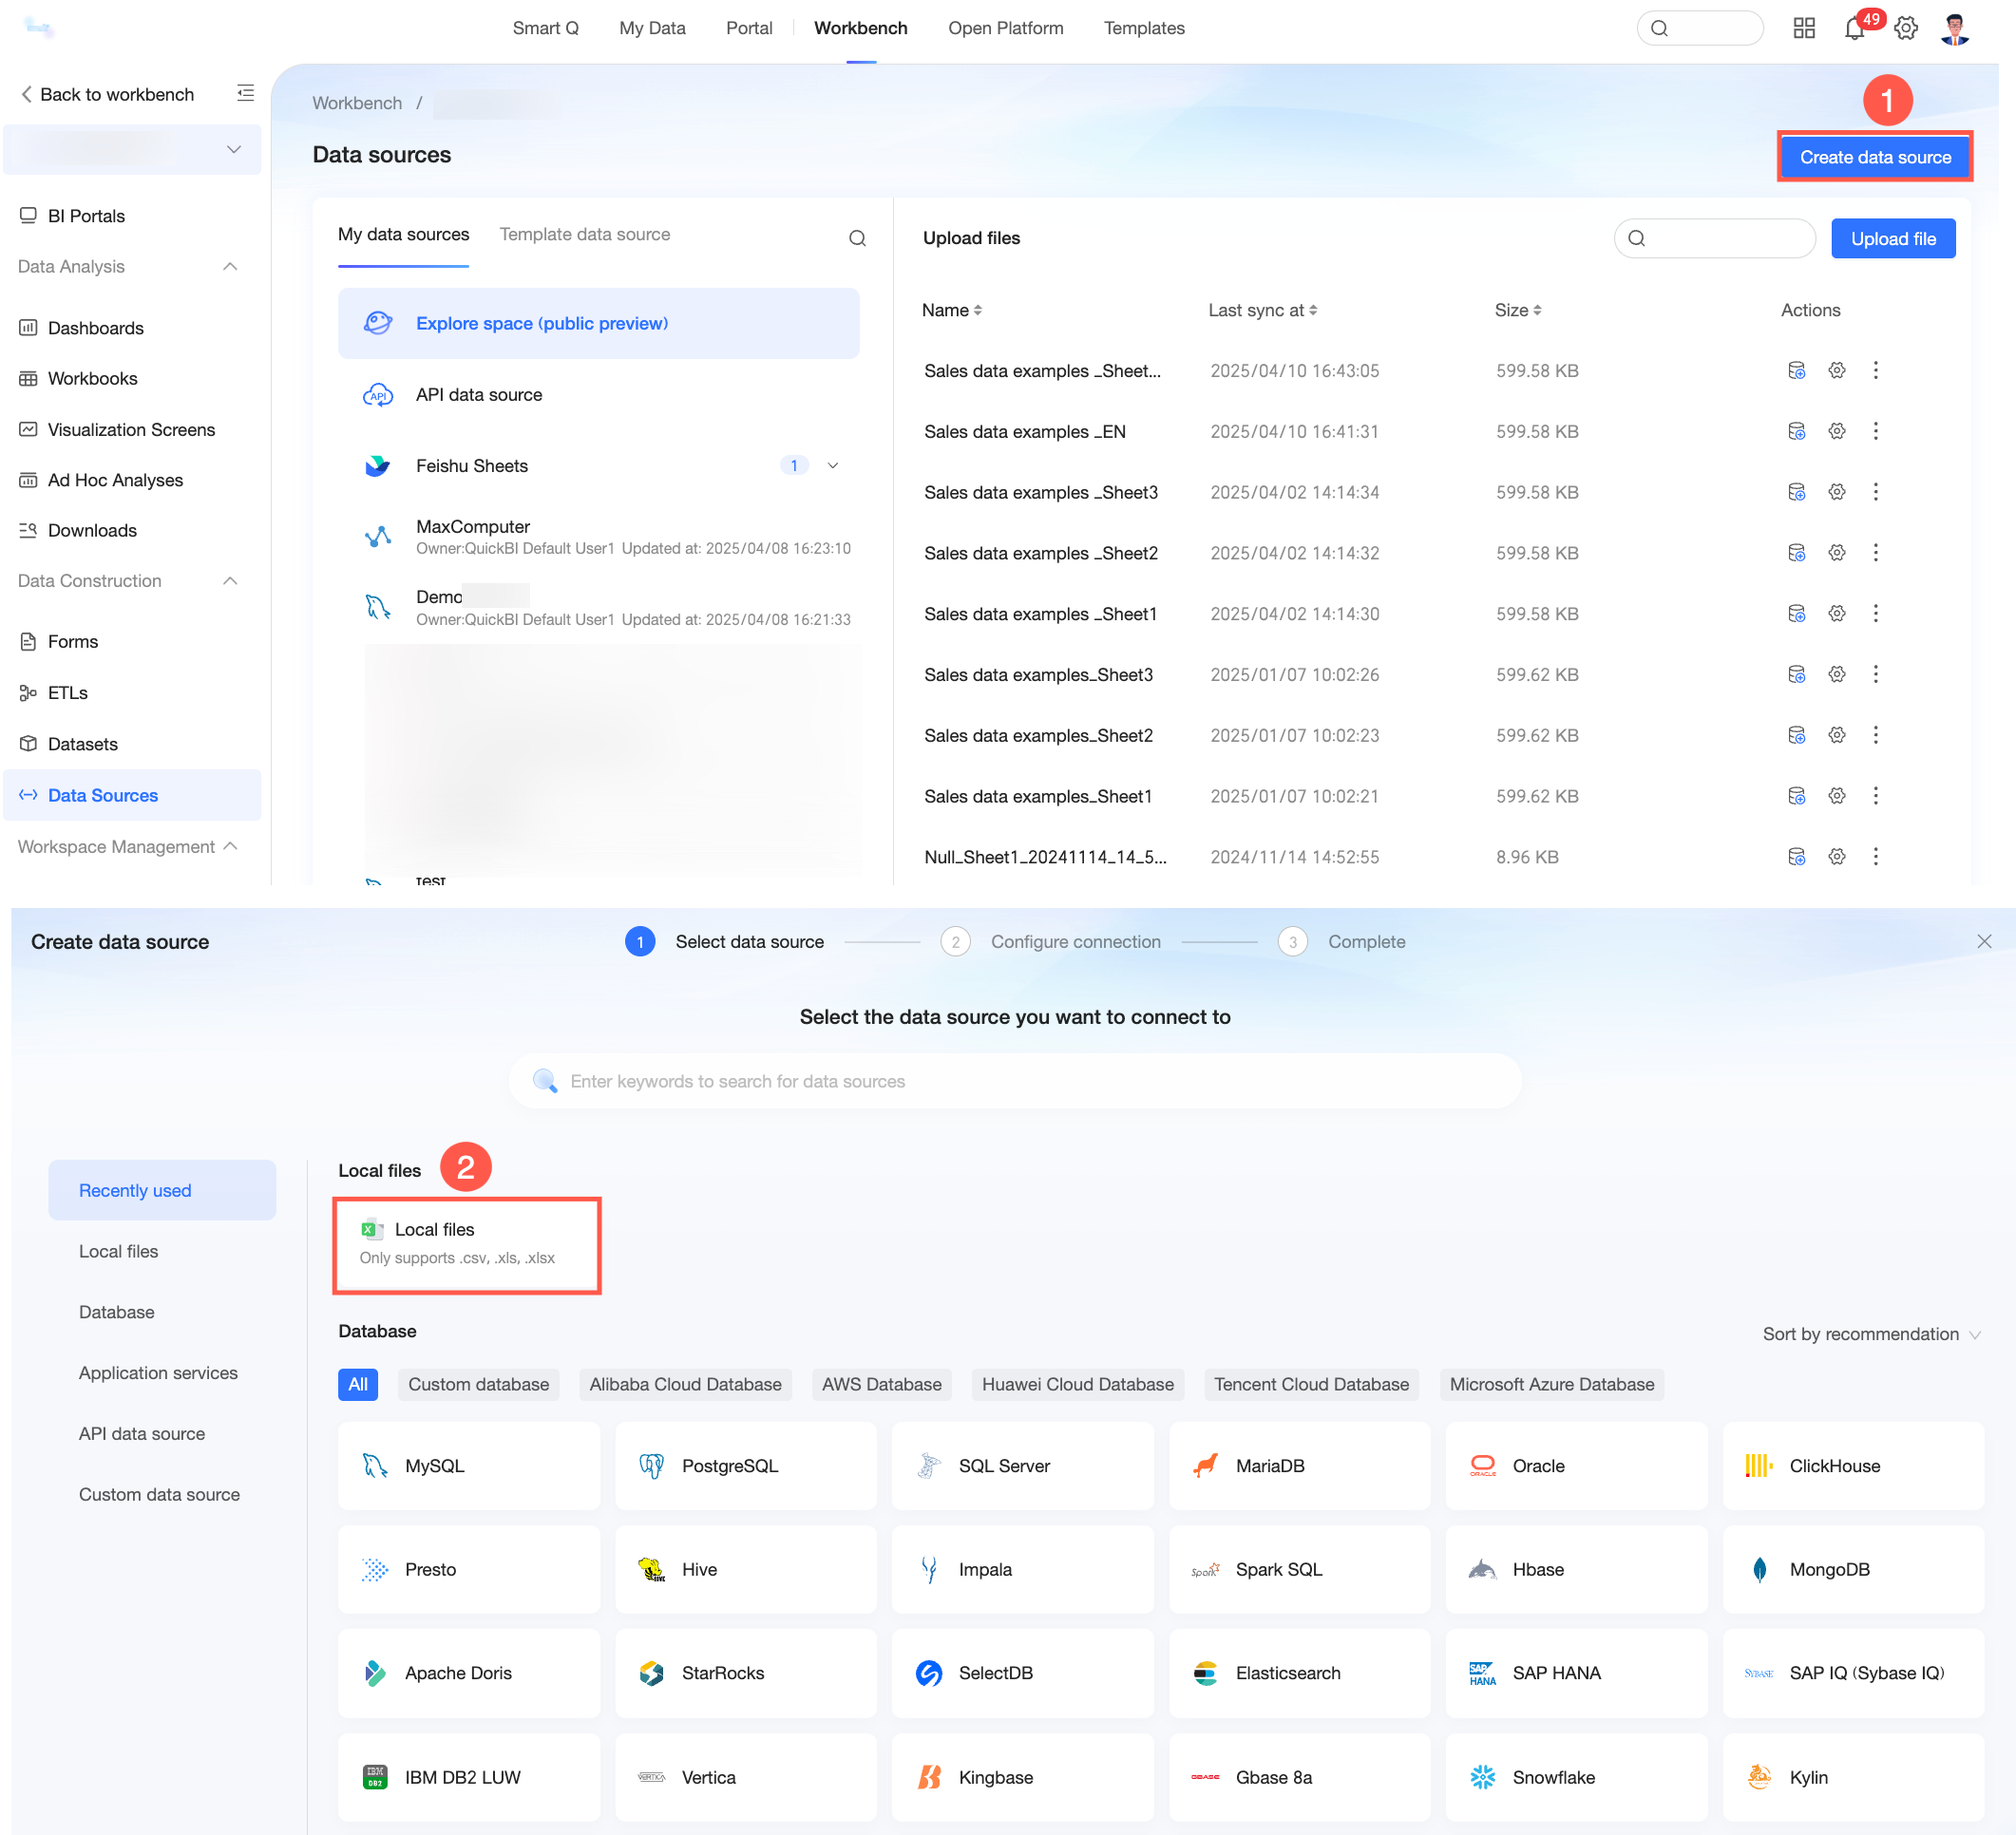
On the data source list page, click Create Data Source, select Local File to create a file data source, and store it in your user space.
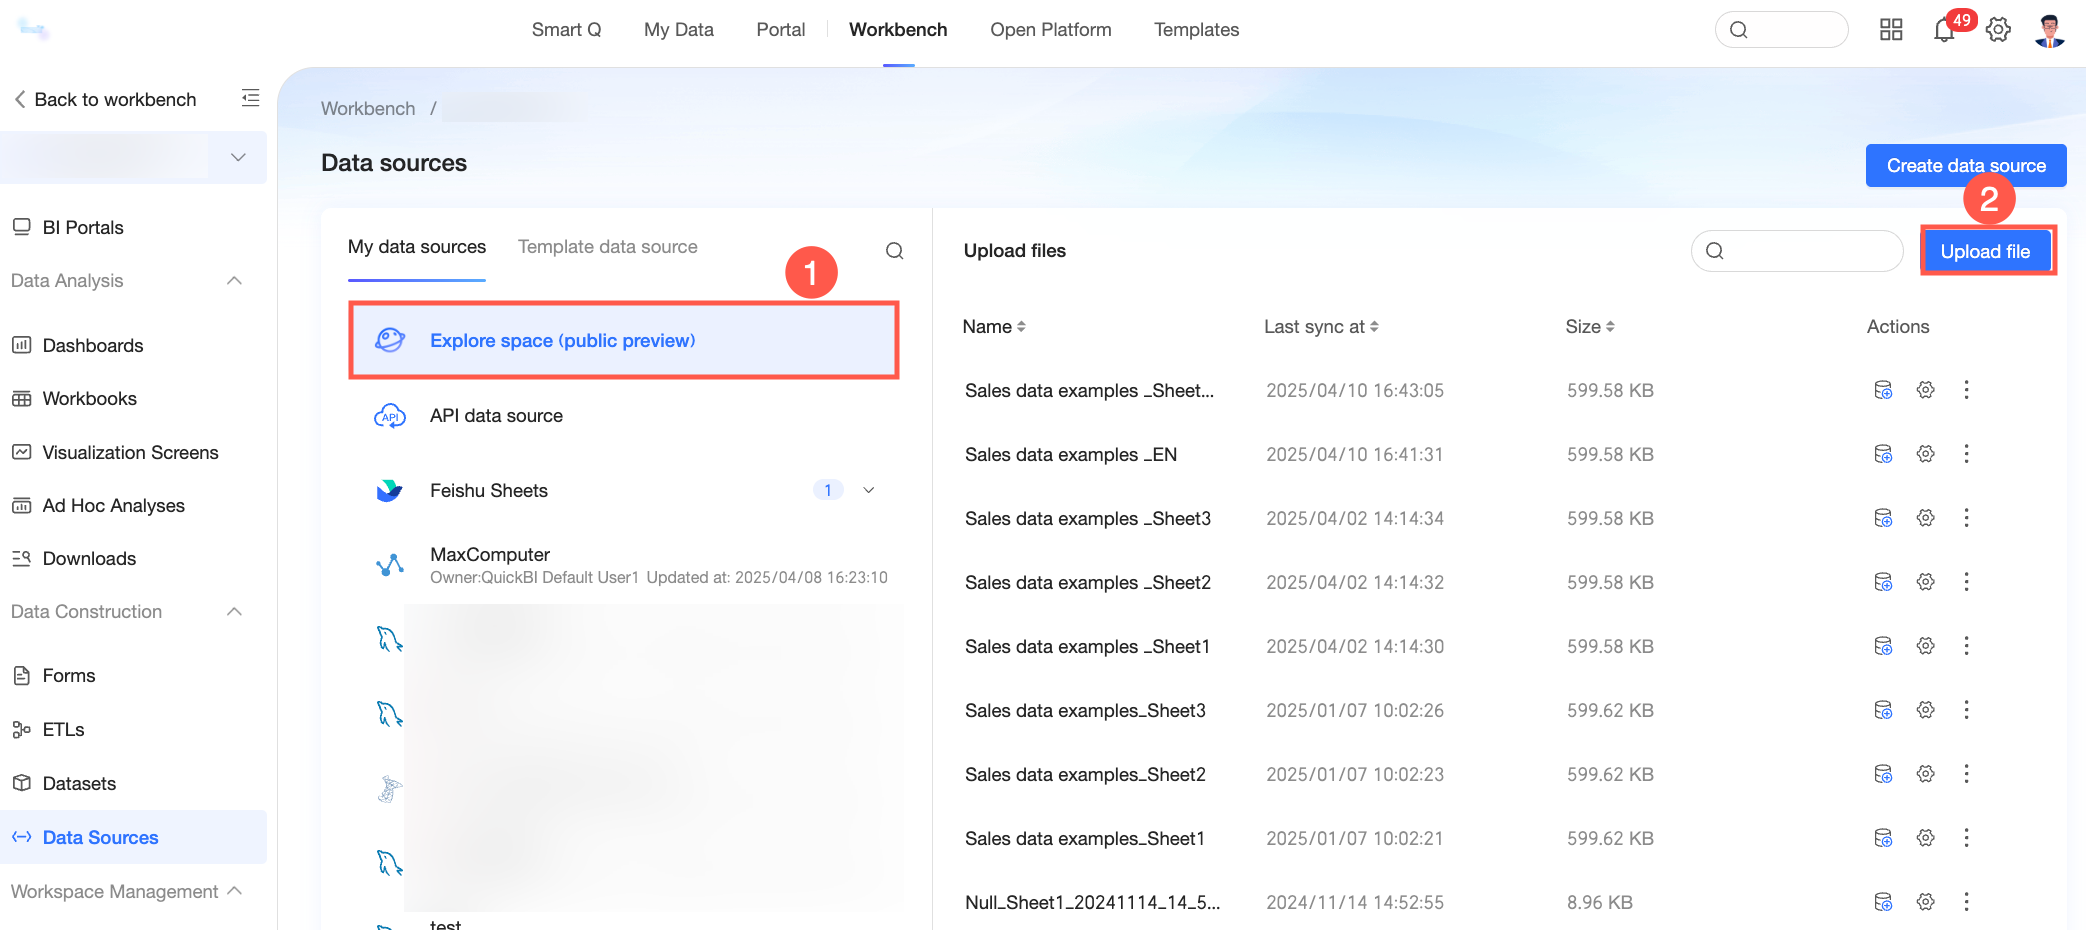
You can select your user space and click Upload File on the right to upload the file to your user space.
 Note
NoteA file data source created this way in a user space can only be edited by the administrator or developers of that workspace. Other users cannot view or edit it. For more information, see User space.
Upload a file
On the Upload File page, you can upload and configure a local file to use as a data source. Supported file types include Excel and CSV files. This section uses the sample sales data Excel file as an example.
When you upload an Excel file, you can upload content from a maximum of five sheets. If you need to upload more than five sheets, split the content into multiple Excel files.
When you upload a CSV file, we recommend that the file is in UTF-8 format.
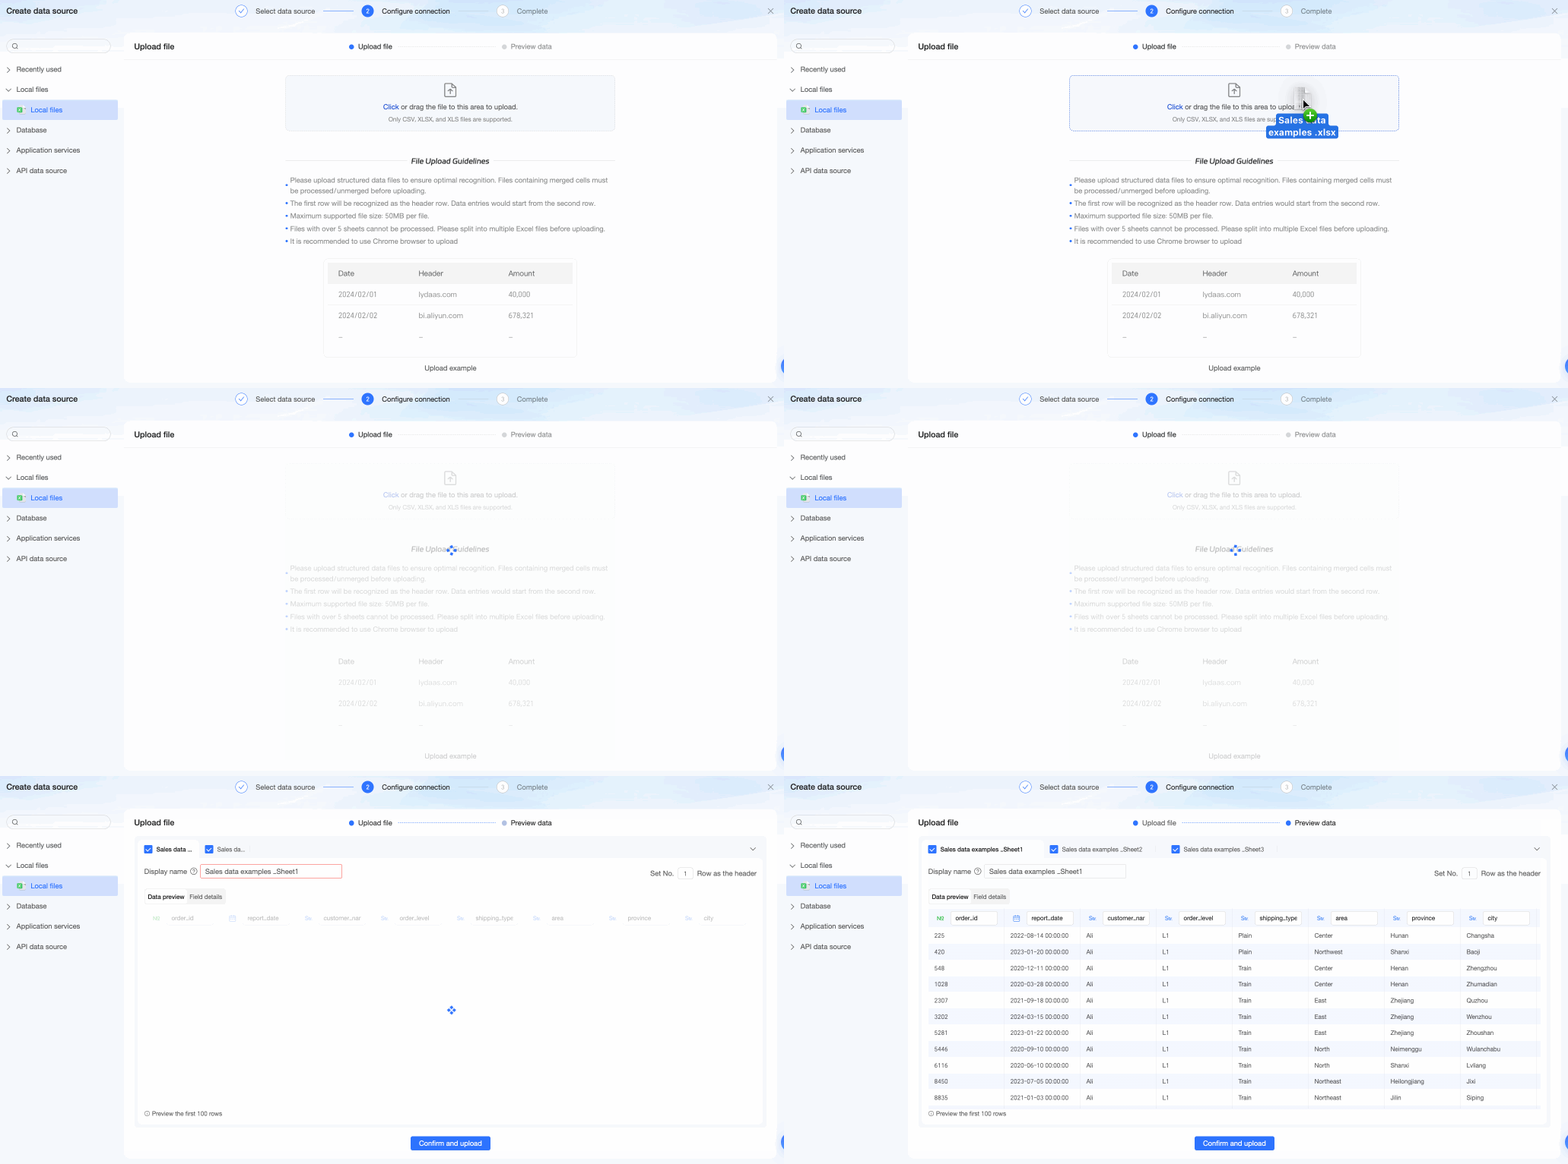
On the File Upload page, click or drag a file to the upload area. After the upload is complete, you are automatically redirected to the Data Preview page.
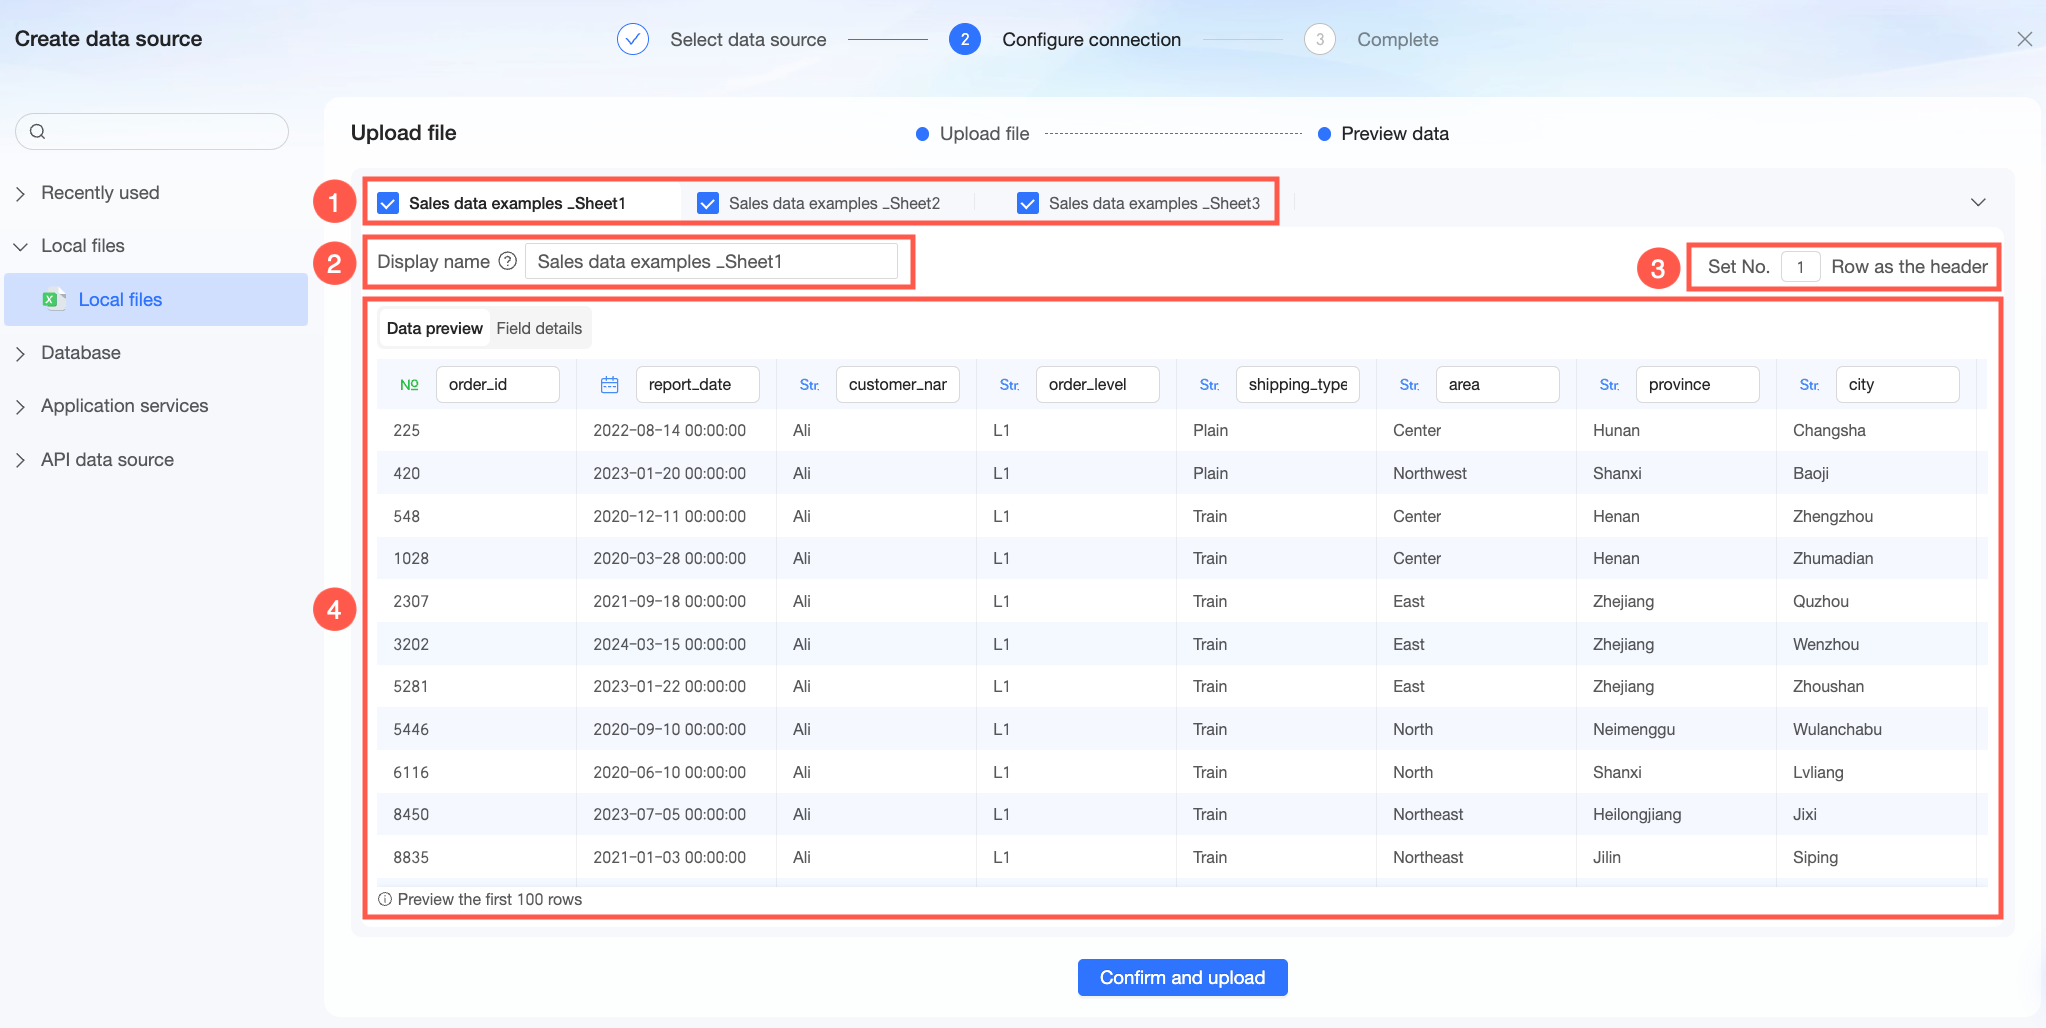
On the Data Preview page, you can preview the following information and make adjustments.

Displayed content
Configuration item
Action
Area ①
Sheet count and titles of the uploaded file
Switch sheets
Click a tab to switch sheets and preview the data within. The content in Area ④ changes accordingly.
Rename a sheet
Double-click a sheet name to rename it based on your business needs. By default, the sheet name from the local file is used.
NoteSheet names cannot contain special characters or leading or trailing spaces.
Change sheet selection
Click the
icon before a sheet name to select or deselect it. By default, all sheets are selected. If a sheet is deselected, its data is not uploaded.NoteYou must select at least one sheet to complete the file upload.
Sheet shortcut actions
Click the
icon on the right side of the tab bar to open a drop-down list of shortcut actions.Select only this sheet: Selects only the current sheet. After the file is uploaded, only the data from the current sheet is included.
Select all sheets: Selects all sheets shown in the tab bar. After the file is uploaded, data from all sheets is included.
Exclude this sheet: Deselects the current sheet. After the file is uploaded, data from the current sheet is not included.
Area ②
Names of the uploaded file in various systems
display name
The display name of the file in Quick BI. The system automatically uses the file name as the display name, but you can customize it.
NoteThe display name cannot contain special characters or leading or trailing spaces.
physical table name
The customizable name of the database table that Quick BI automatically creates for the uploaded file.
NoteThe physical table name can only contain letters, digits, and underscores (_), and can be up to 150 characters long.
You do not need to configure this field when you upload a file to a user space.
Area ③
Header row of the uploaded file
header row
You can change the header row for the current sheet here.
NoteThe number must be a positive integer.
Ensure the header row does not contain empty fields, which causes an error.
Area ④
Data content of the uploaded file
data preview
On the Data preview tab, you can preview the file's data, including field names, data types, and specific values. The system automatically detects data types and reads field names. You can modify them if the automatic detection is incorrect.
Modify field name: Click the field name text box to edit the name.
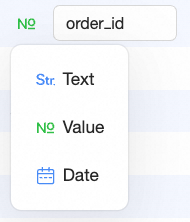
Modify data type: Click the data type icon and select the correct type from the drop-down list. Supported types are text, numeric, and date.
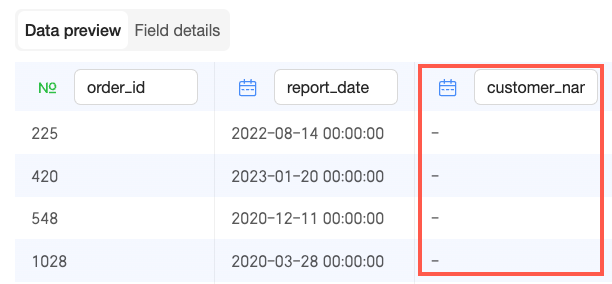
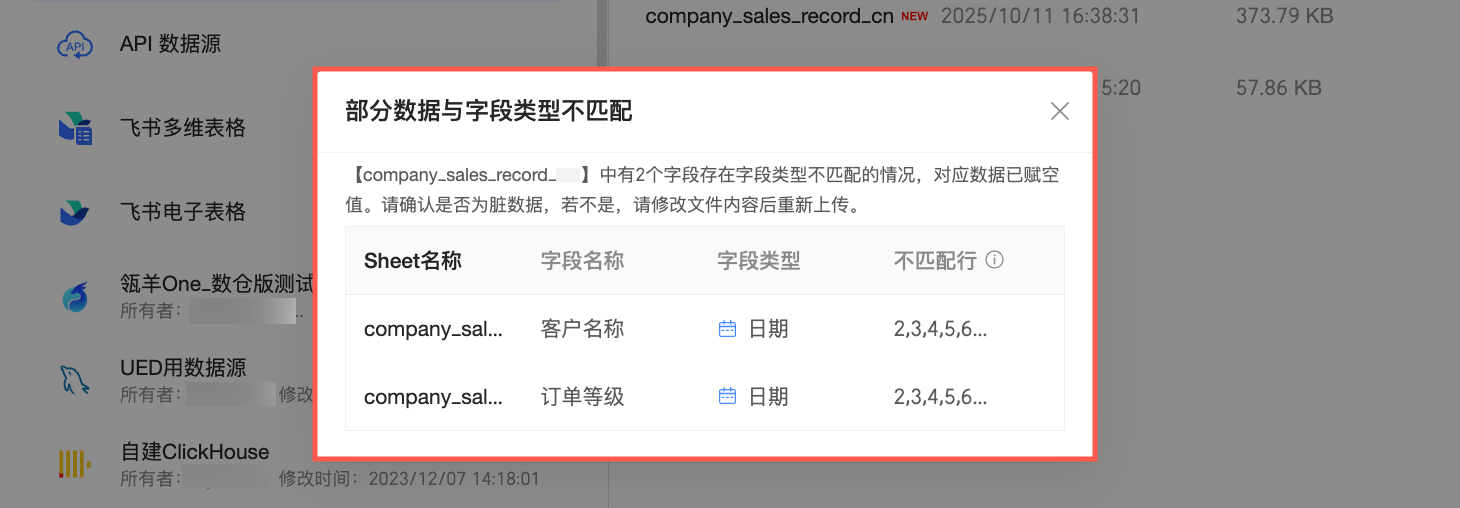
NoteIf you change a data type to one that does not match the content, for example, changing a name field to a date type, the data is displayed as "-".
During the upload, the system converts data that does not match the specified data type to null values. The system prompts you for confirmation in a dialog box.
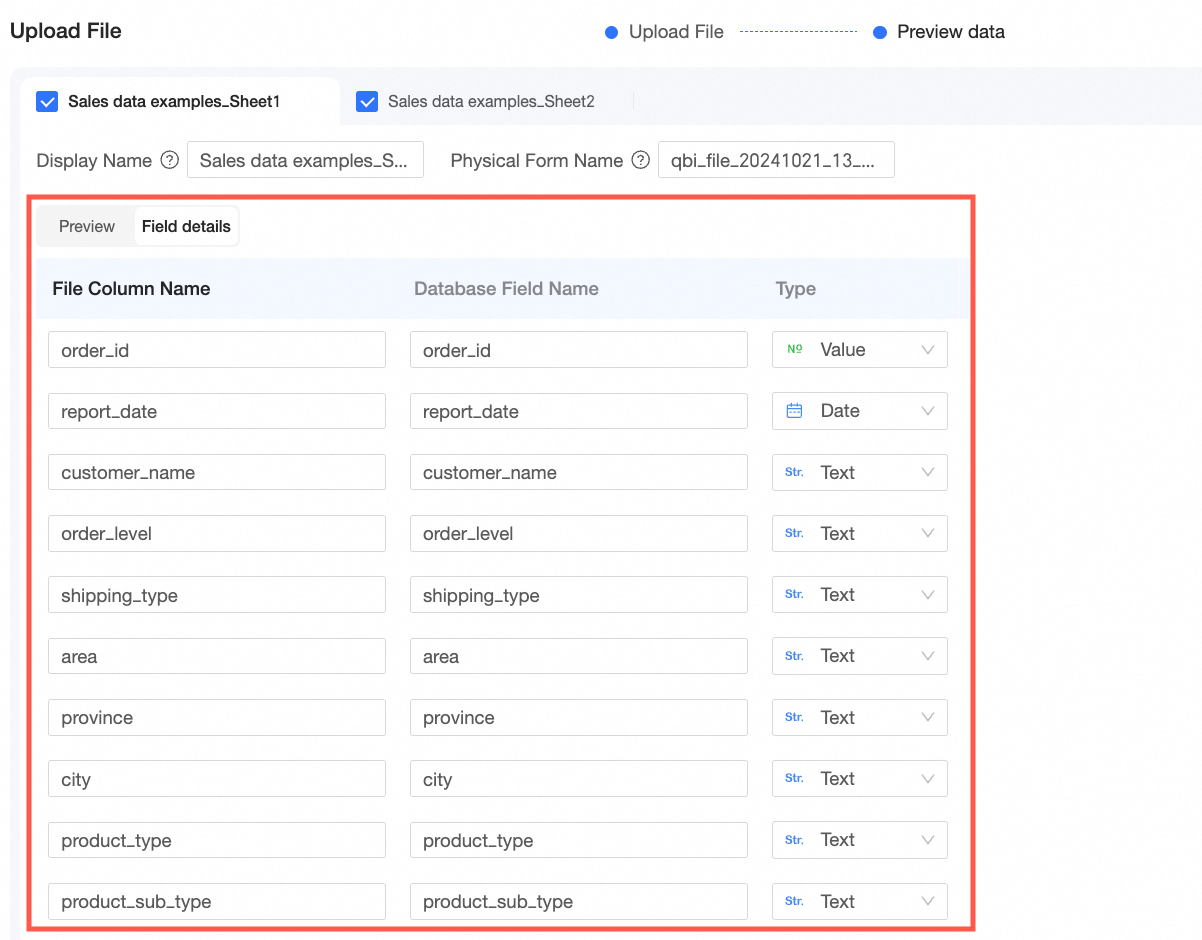
Field details
On the Field Details tab, configure the file column name, database field name, and data type.
When you upload a file, Quick BI stores it as a database table. The database field name and data type define the table's schema, and the file column name serves as the field's description in the database.
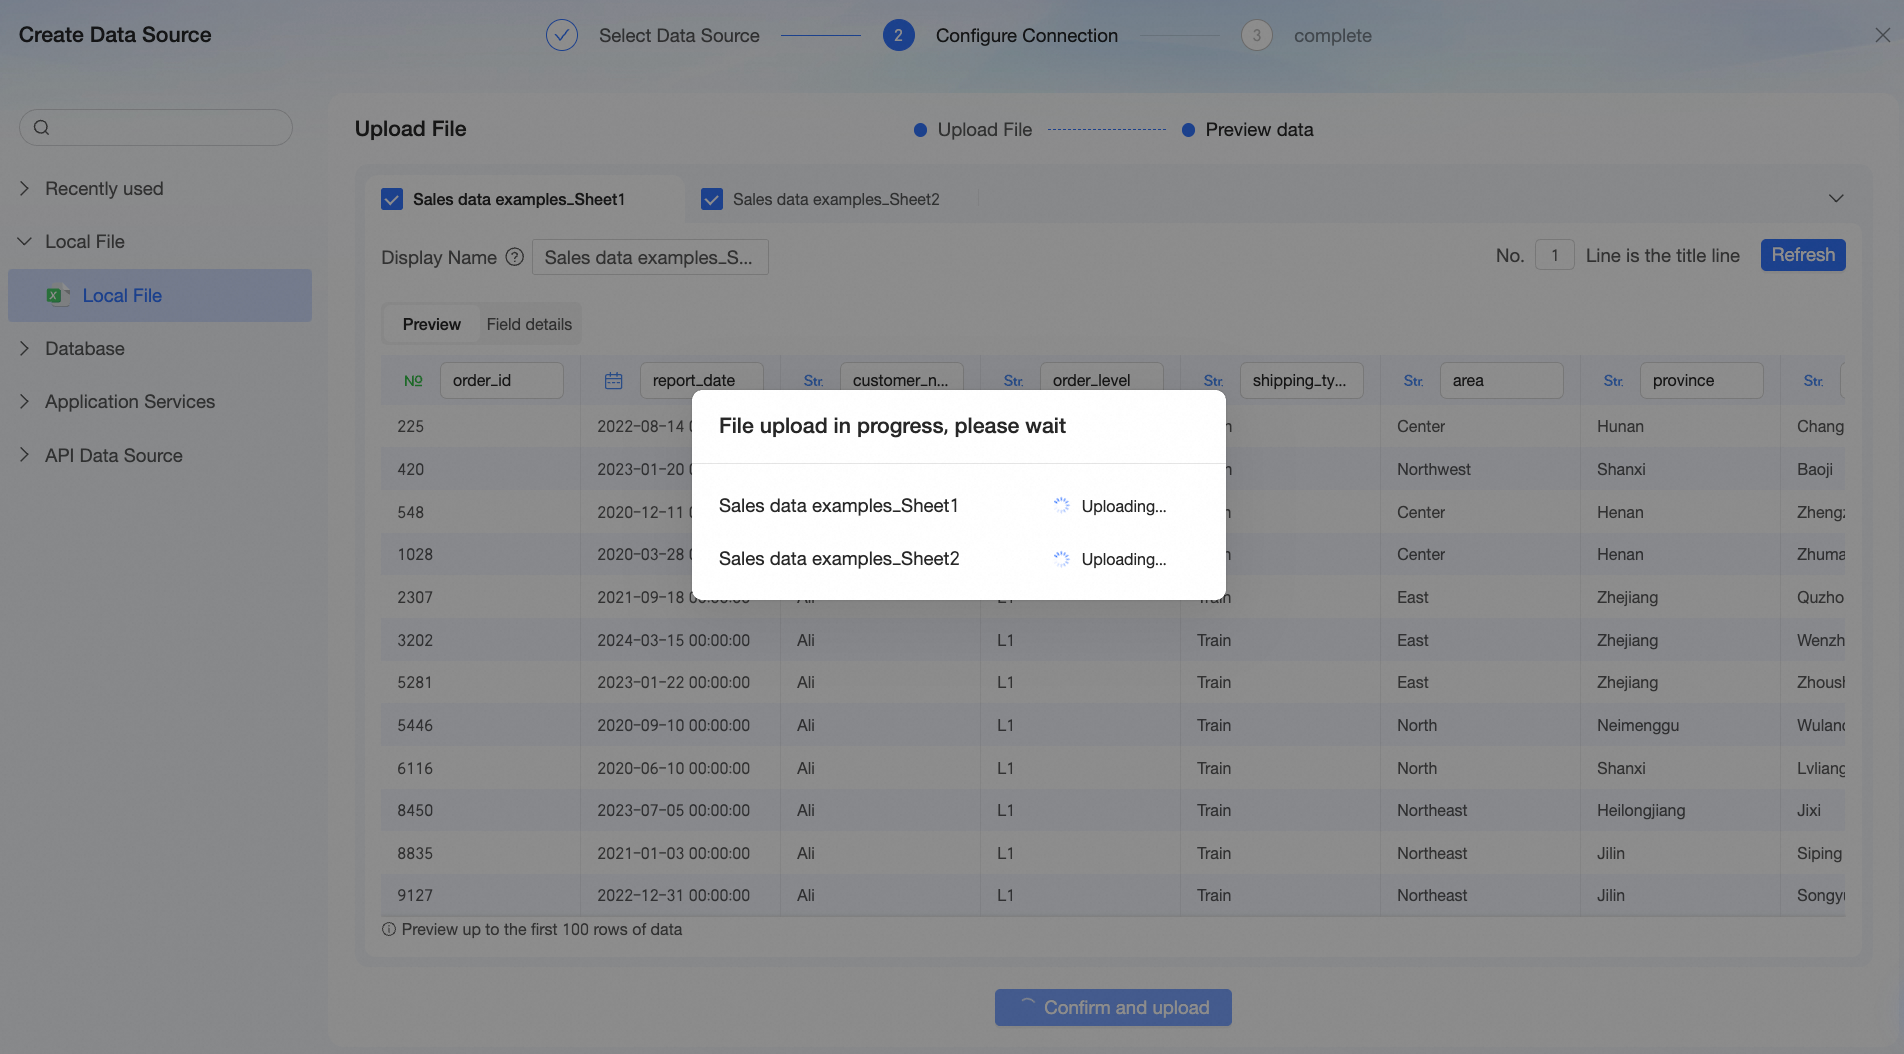
Click Confirm and Upload at the bottom of the page. In the dialog box that appears, you can view the upload progress for each sheet.
If the upload fails, click Back (①) to return to the Data Preview step and adjust settings. Alternatively, click Upload Again (②) to return to the File Upload step and select a new file. To understand the failure, click Error Message (③) to view the cause of the error and its traceId.
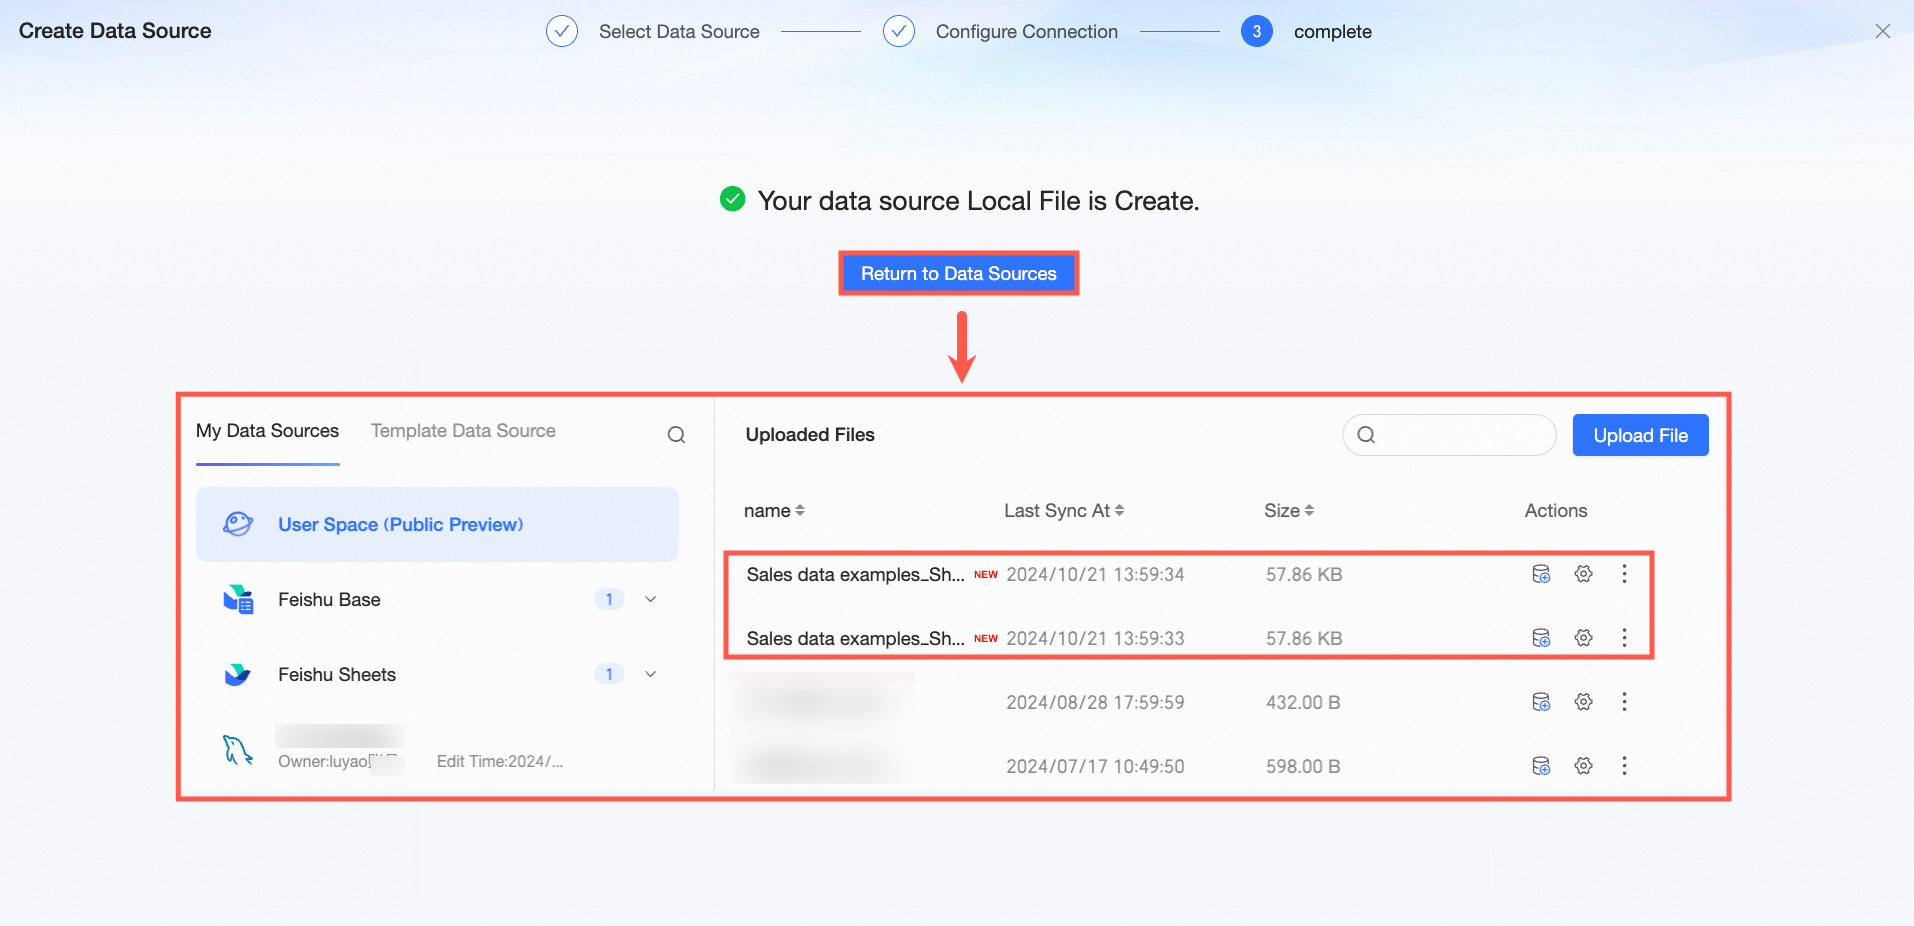
After the file is successfully uploaded, click Return to Data Source List to view the uploaded file data source.
 icon before a sheet name to select or deselect it. By default, all sheets are selected. If a sheet is deselected, its data is not uploaded.
 icon on the right side of the tab bar to open a drop-down list of shortcut actions.


Modify an uploaded file
If your business data changes after the initial upload, you can append, replace, or delete files to enable continuous, long-term tracking and analysis.
Click the  icon to the right of the target file to go to the Modify File Upload page, where you can perform the following actions.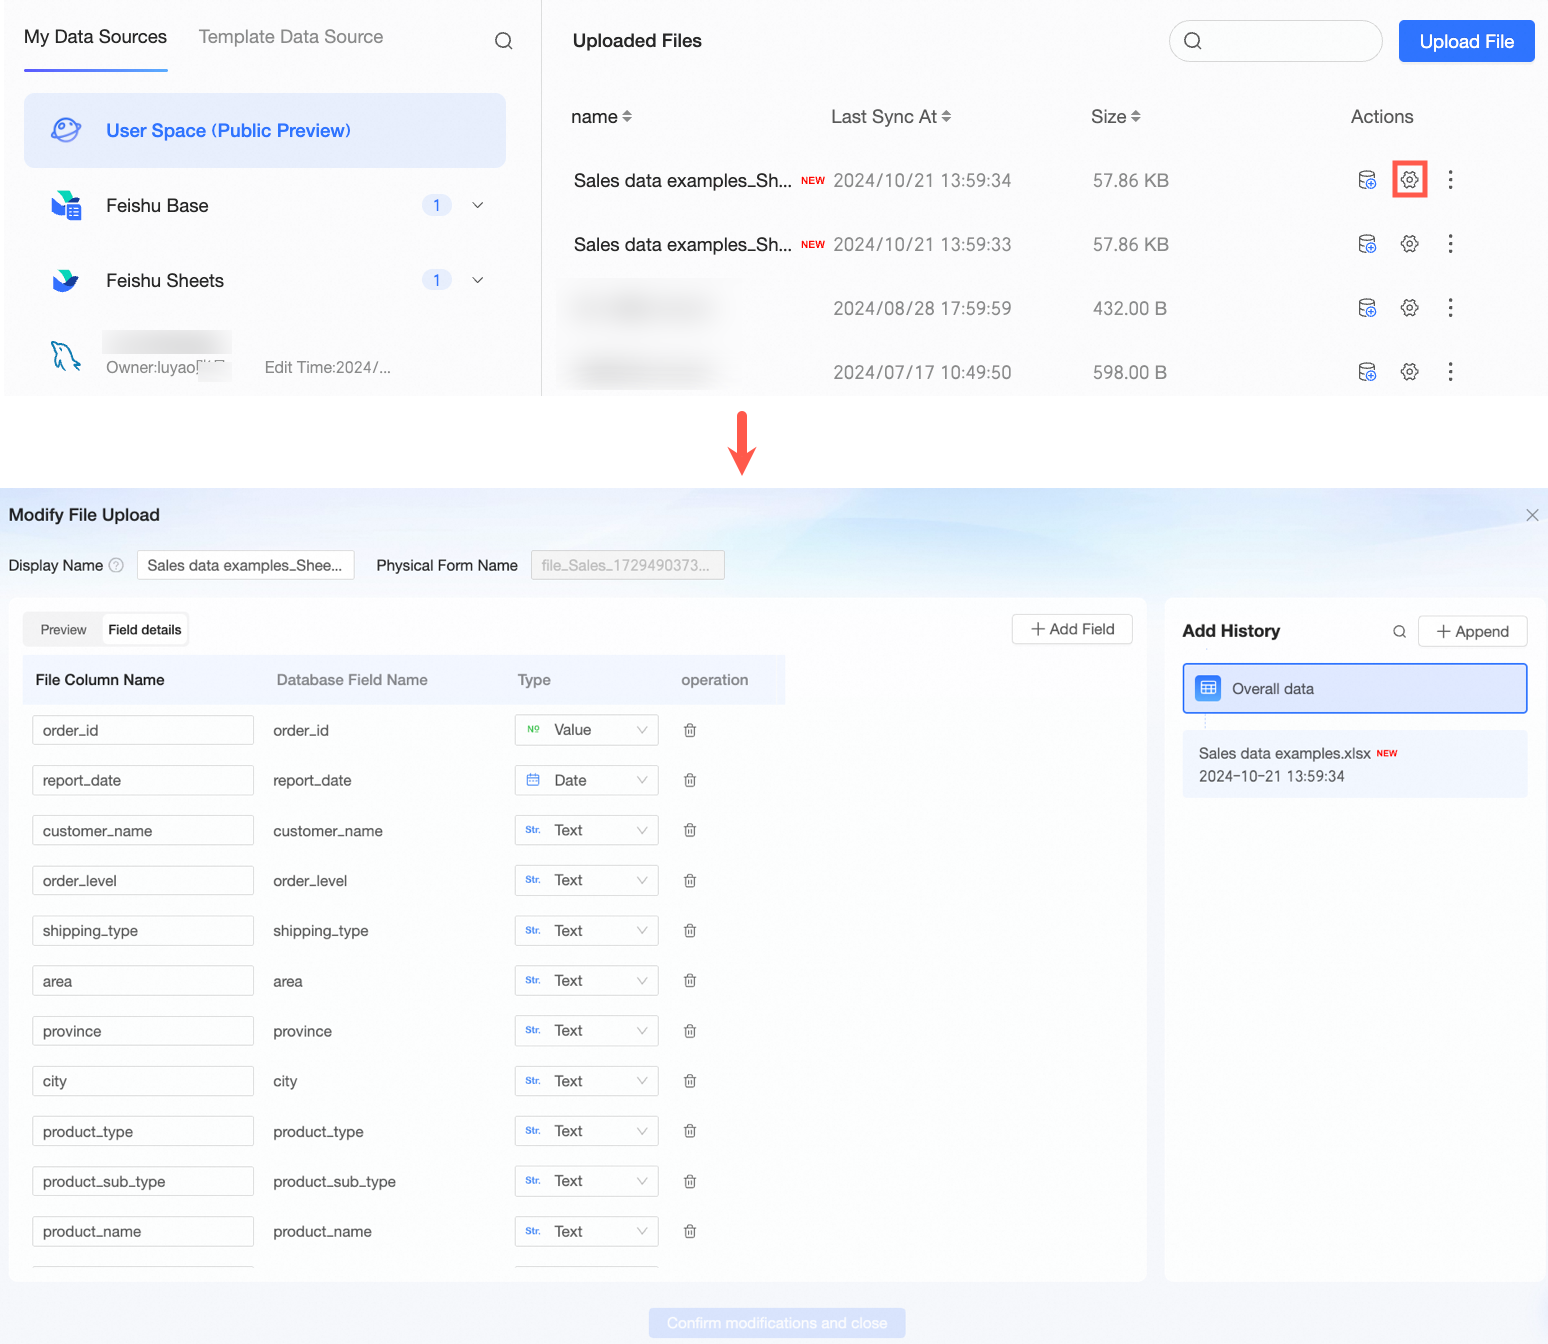
Configuration item | Action | |
display name | The display name of the file in Quick BI. You can customize it. Note The display name cannot contain special characters or leading or trailing spaces. | |
data preview | Display data | In the Append History panel, switch between files to view their content. |
Modify fields |
| |
Field details | Modify fields |
|
Add field | Click the Add Field button at the upper-right of the table. In the Add Field dialog box, enter the information for the new field and click OK. Note You can only add fields when viewing the overall data.
| |
Append history | View append history | The Append History panel lists all appended files. Click a file card to view its content. |
Append a file | If new business data is generated, you can append the new file to the table of the existing file data source. For more information, see Append a file. | |
Replace a file | If new business data needs to replace old business data, you can replace the old file. For more information, see Replace a file. | |
Delete a file | If an appended business data file contains dirty data, you can delete it. For more information, see Delete a file. | |
 icon in the Actions column for the target field to delete it.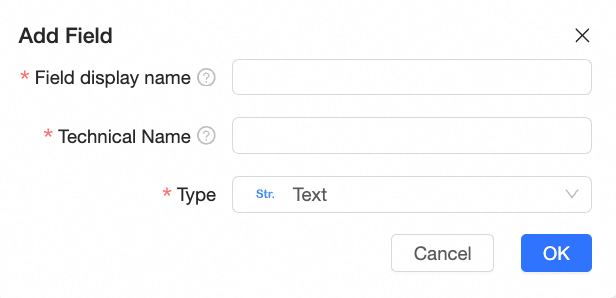
Append a file
When new business data is generated that builds on existing file content, you can append a new file to ensure your data is current and complete. Follow these steps:
Log on to the Workbench, go to the Data Sources page, find the target file in the Uploaded Files list, and click its name (③) or the
icon (④) in the Actions column.On the Modify File Upload page that appears, click the Append button on the right.
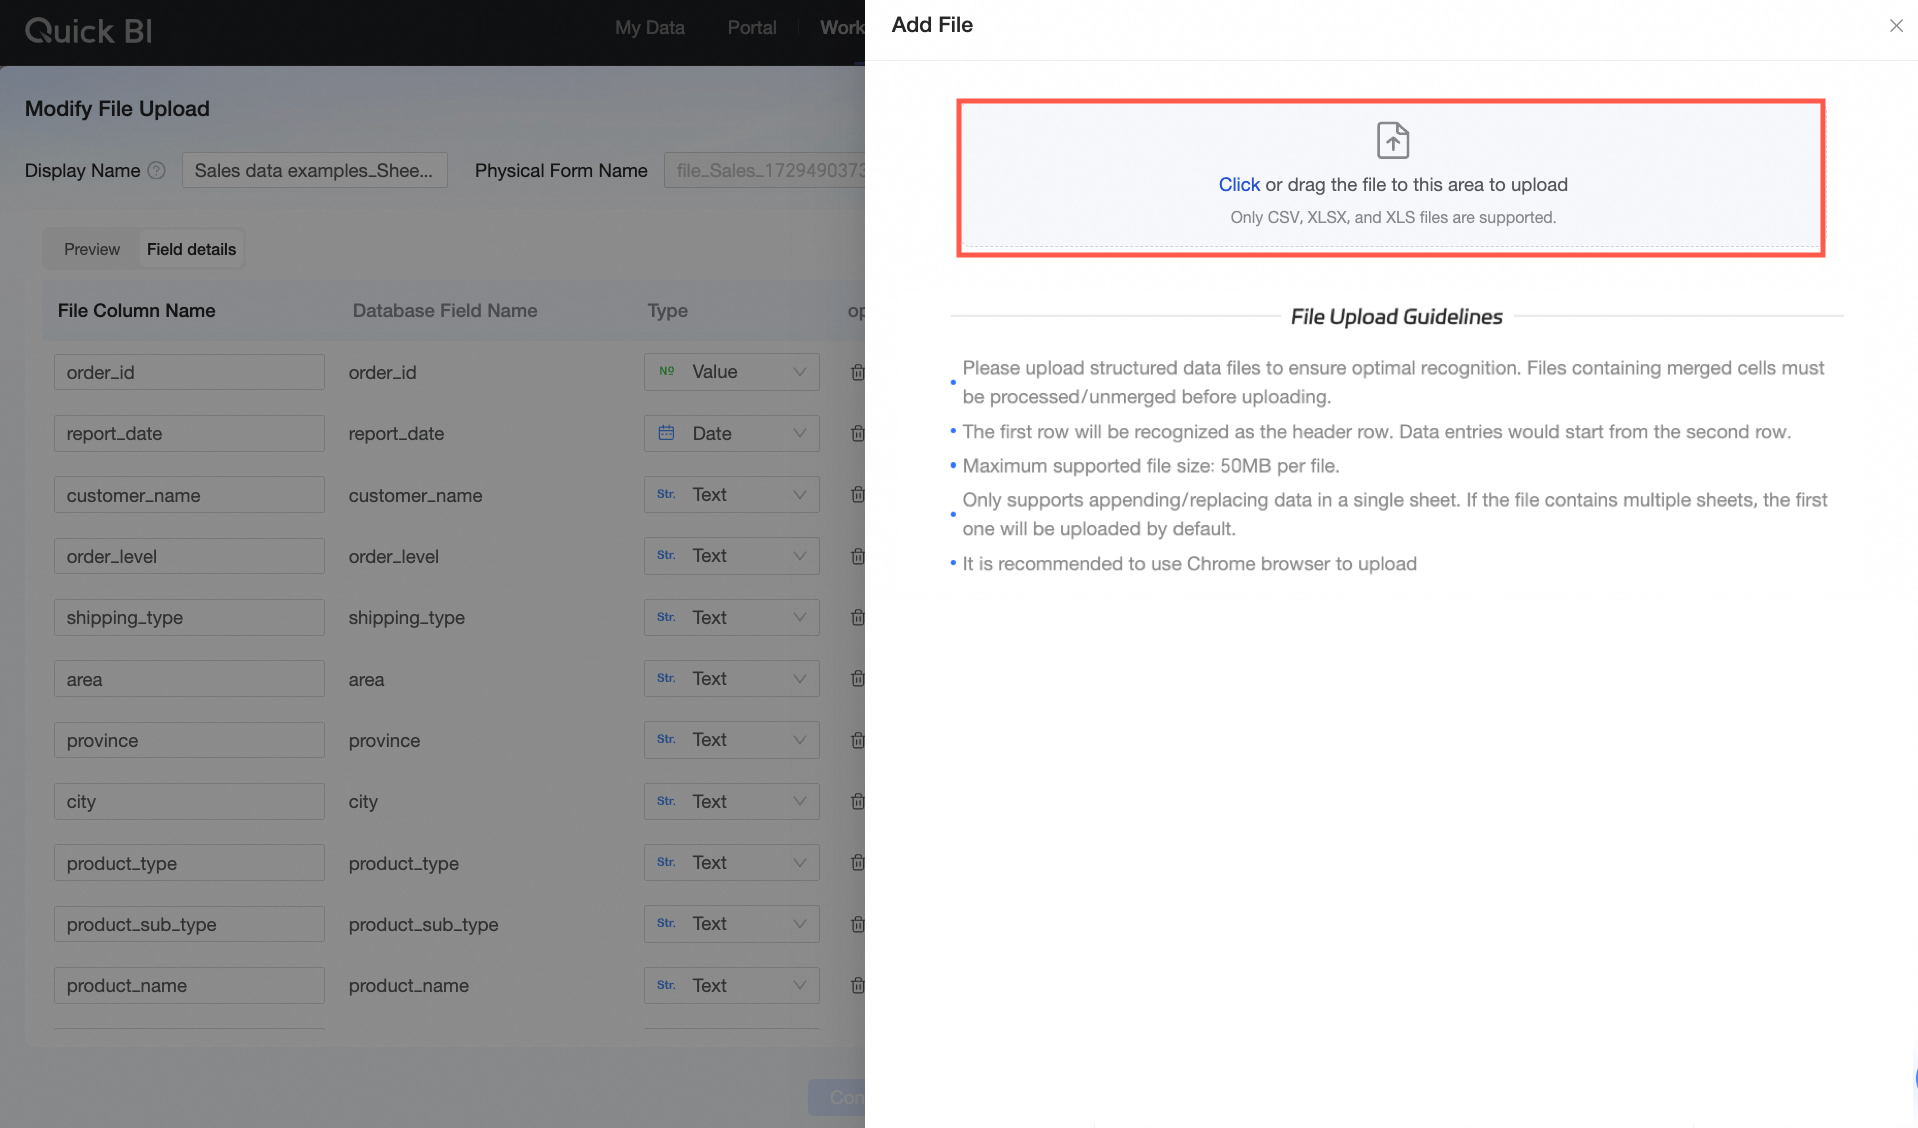
In the Append File panel, click or drag the file you want to append to the upload area.
NoteYou can only append data from one sheet at a time. If your file has multiple sheets, select the desired sheet on the preview page before uploading.
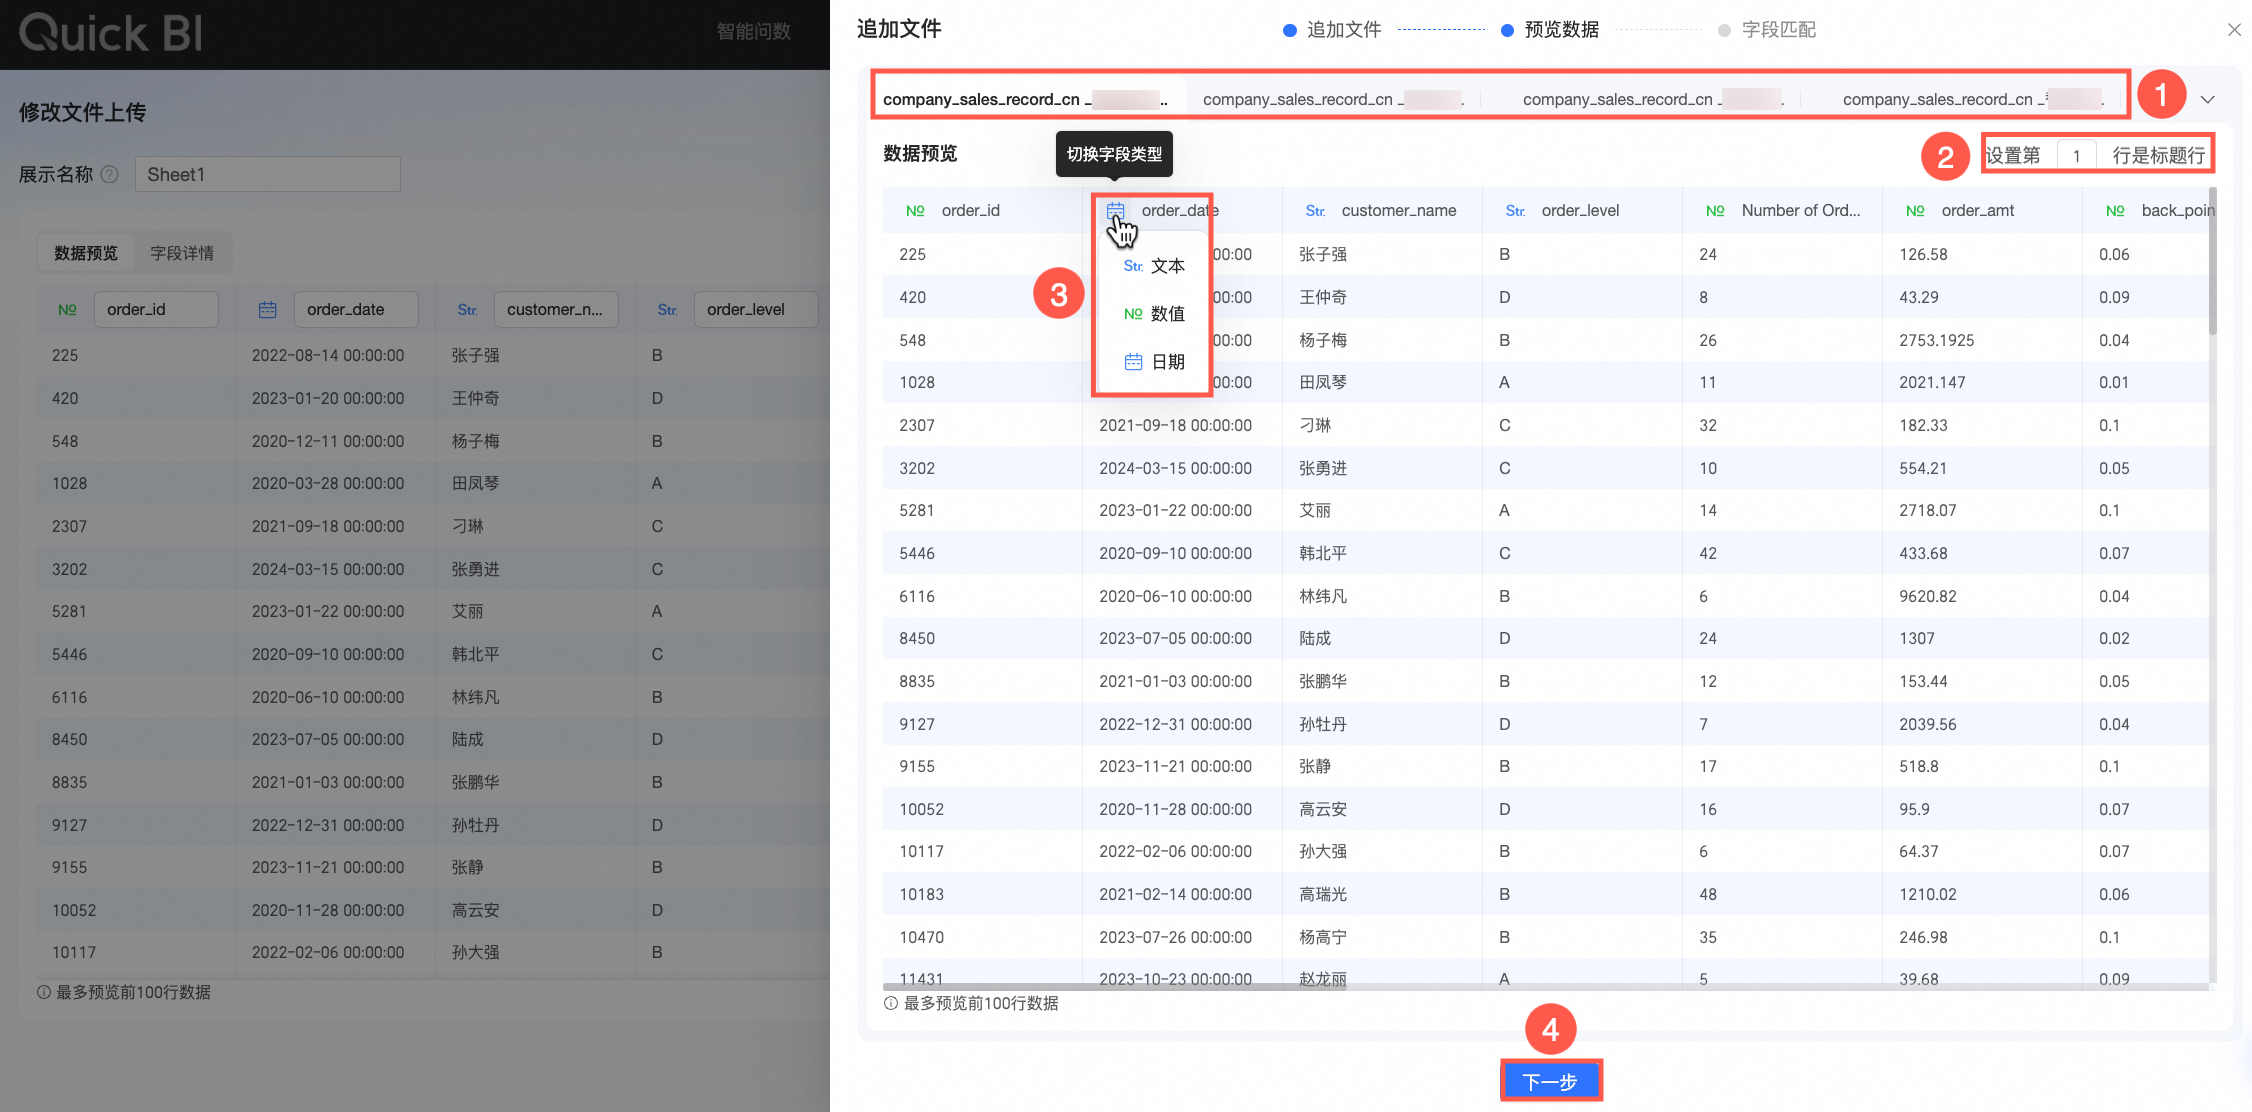
On the Data Preview page, switch to the sheet tab (①) you want to append to the original file. You can modify the header row (②) and data type (③) as needed. When you are finished, click Next (④).
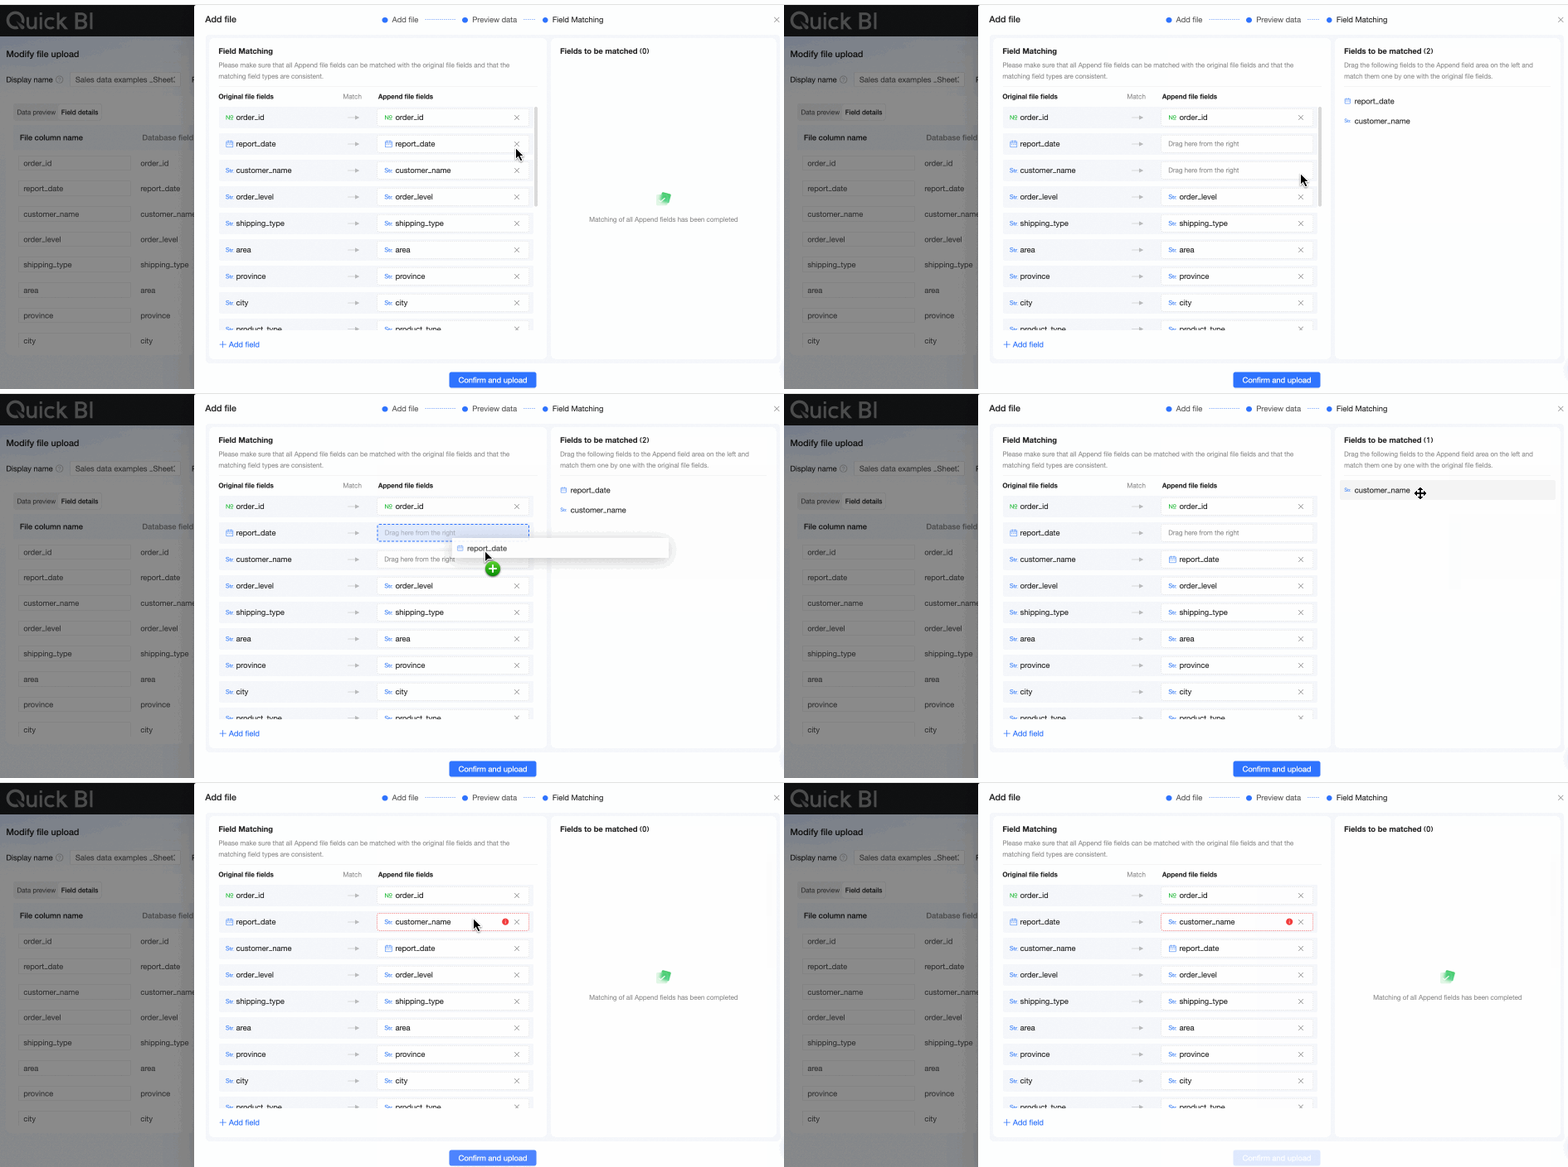
In the Field Mapping step, map the fields from the appended file to the original file. The system automatically maps fields with the same name. You can manually change the mappings. For fields with different names, you can drag them from the Unmapped Fields area to the Field Mapping area to create a mapping.
NoteEnsure that the data types of the original and appended fields match. Otherwise, an error occurs. The matching rules are as follows:
A Text field can be mapped to a field of any data type.
A Numeric field can only be mapped to a Numeric field.
A Date field can only be mapped to a Date field.
If the appended file has more fields than the original file, you can click Add Field to create corresponding fields in the original file for mapping. If the extra fields are not needed, you can proceed to the next step without mapping them.
If the appended file has fewer fields than the original file, the extra fields in the original file can remain unmapped. You can proceed to the next step.
If the appended file contains duplicate field names, the system attempts to map them sequentially to fields with the same name. In this case, you must manually adjust the mappings in the Field Mapping step to ensure each original field is mapped to only one corresponding field from the appended file. You can choose which of the duplicate fields to use based on your business requirements.
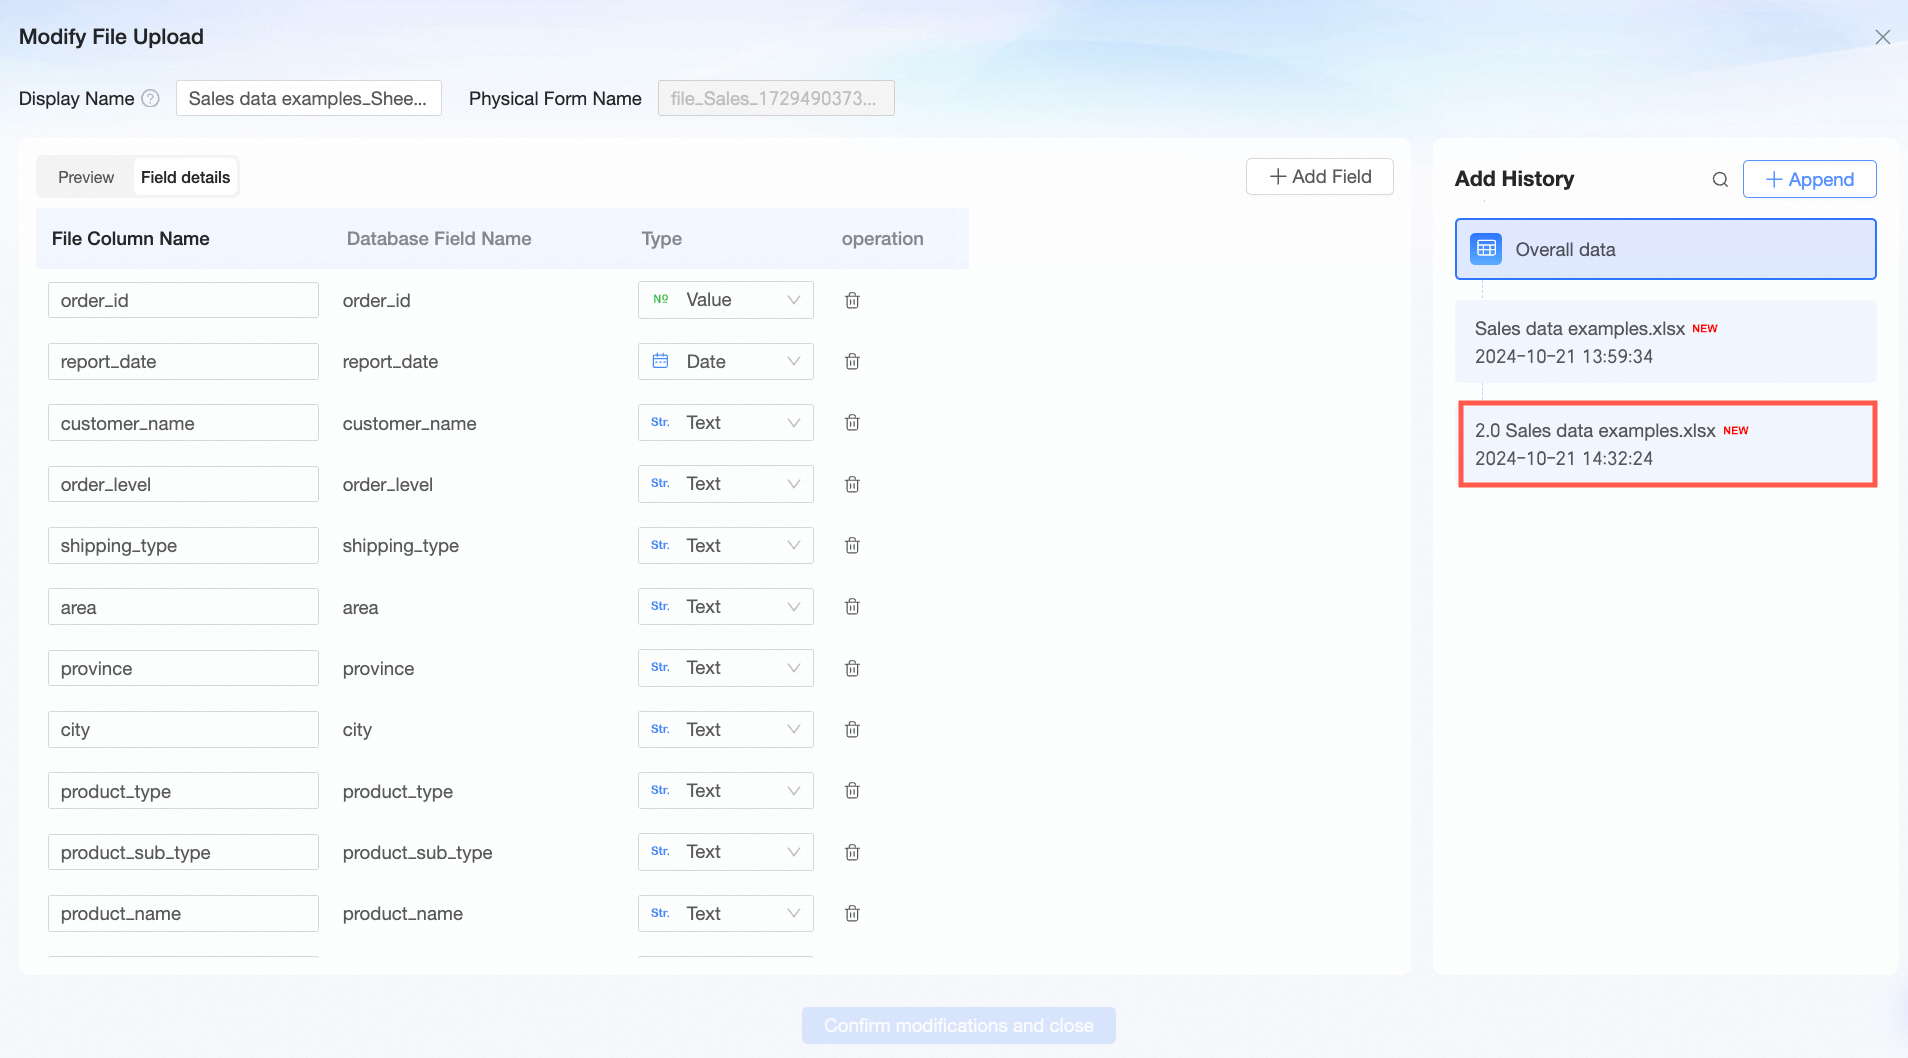
Click Confirm and Upload. After the upload is successful, the appended file appears in the append history panel.
(Optional) If you need to replace a file that has already been appended, click the
icon next to the file in the Append History panel to go to the Replace File page.
 icon (④) in the Actions column.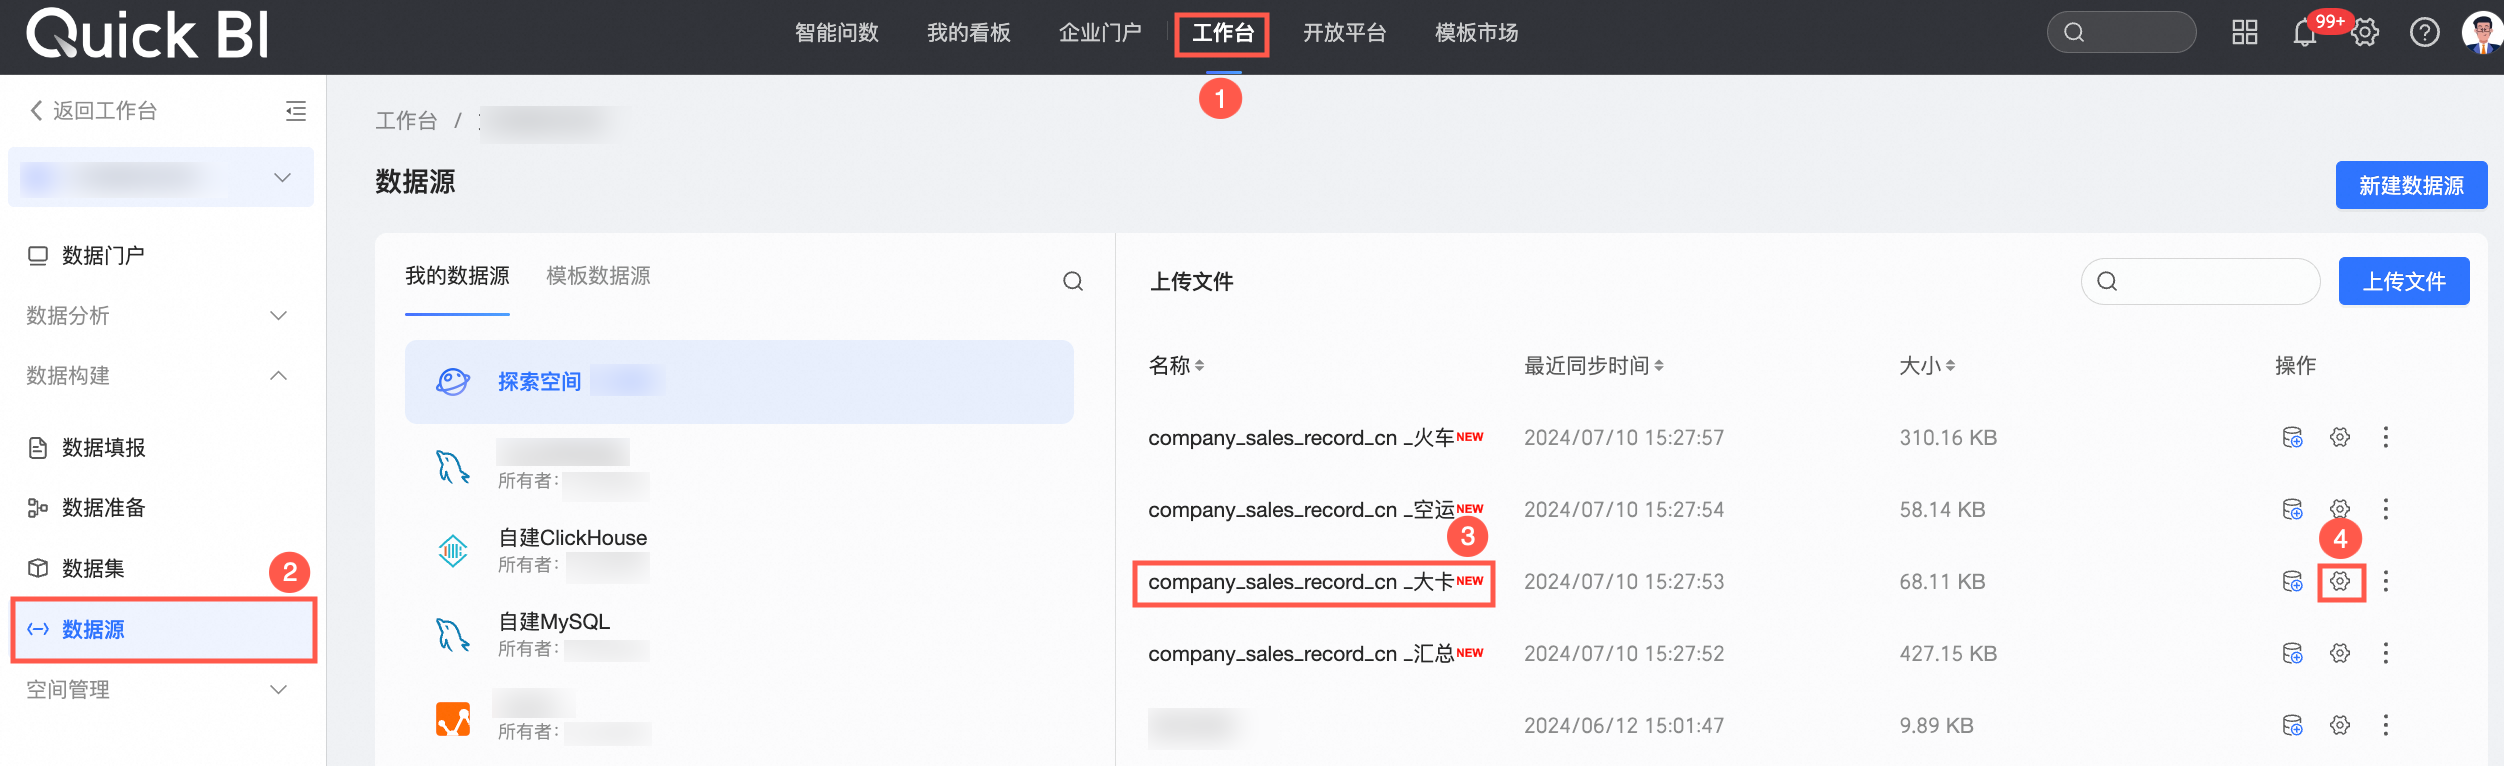
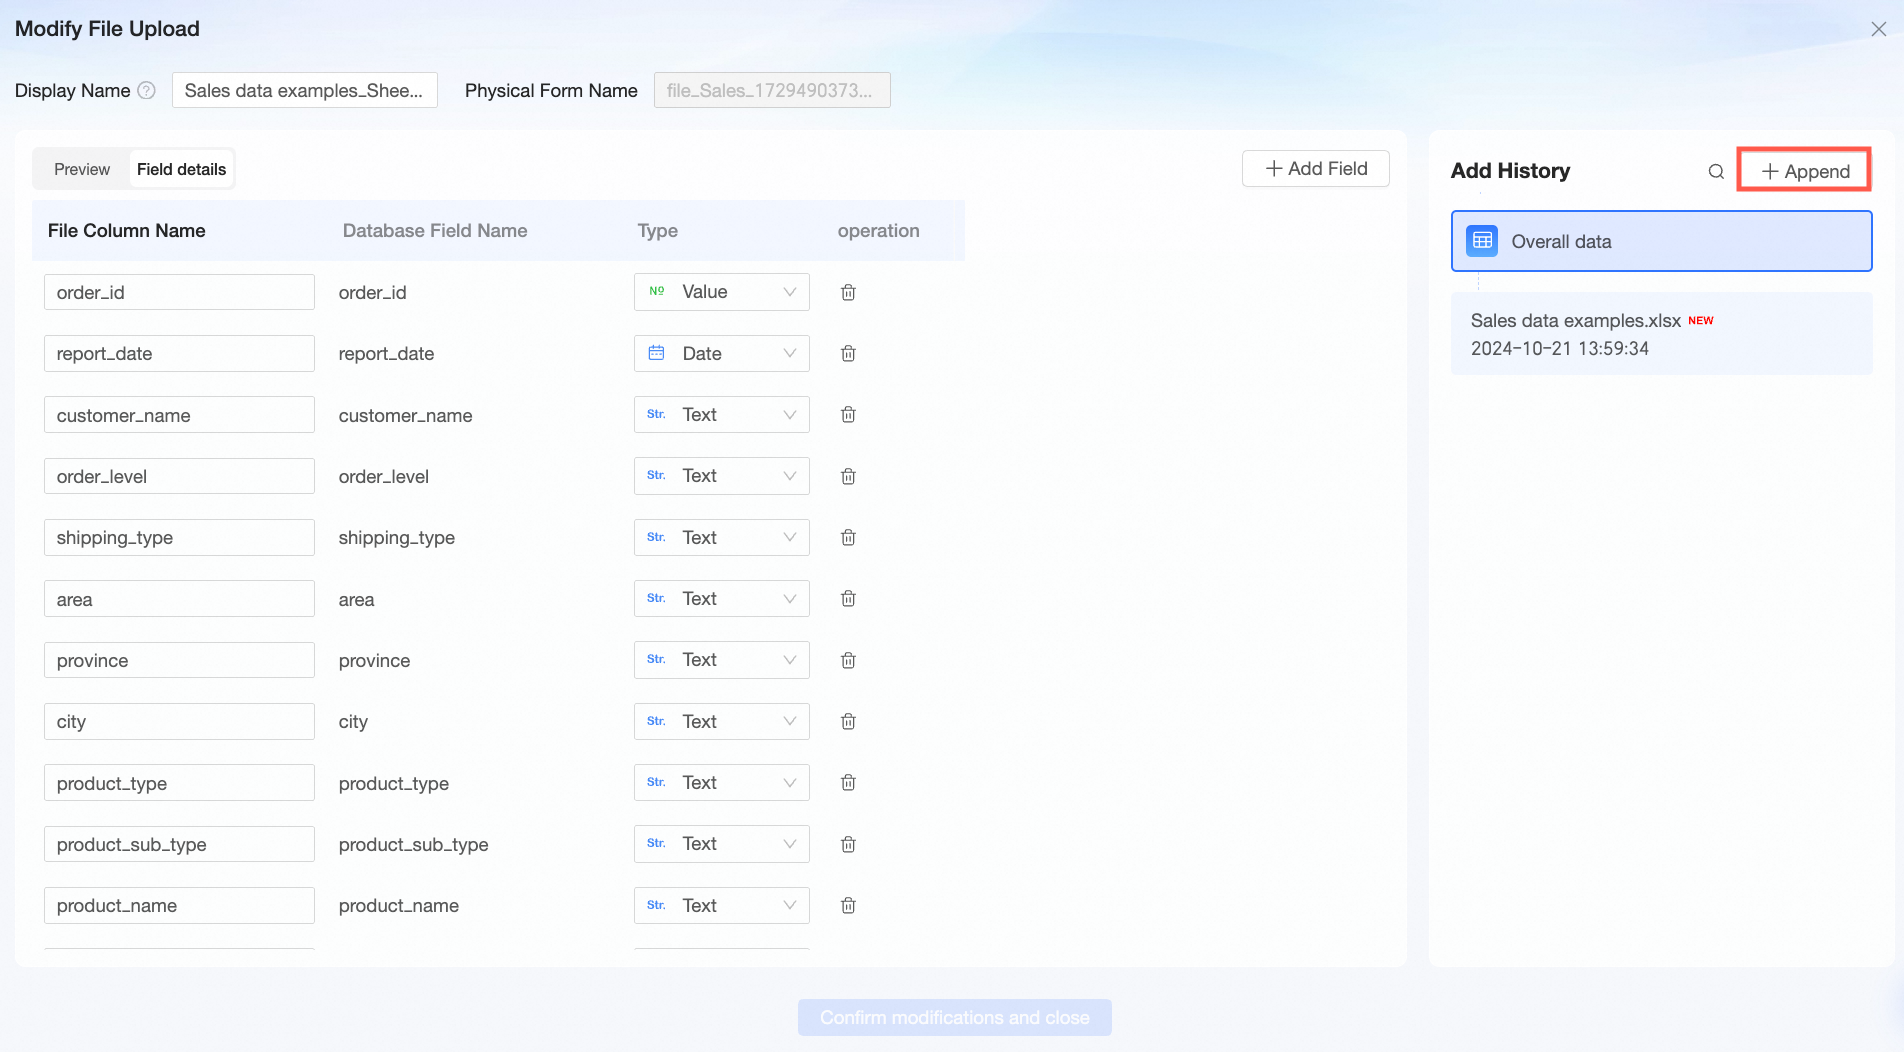


 icon next to the file in the Append History panel to go to the Replace File page.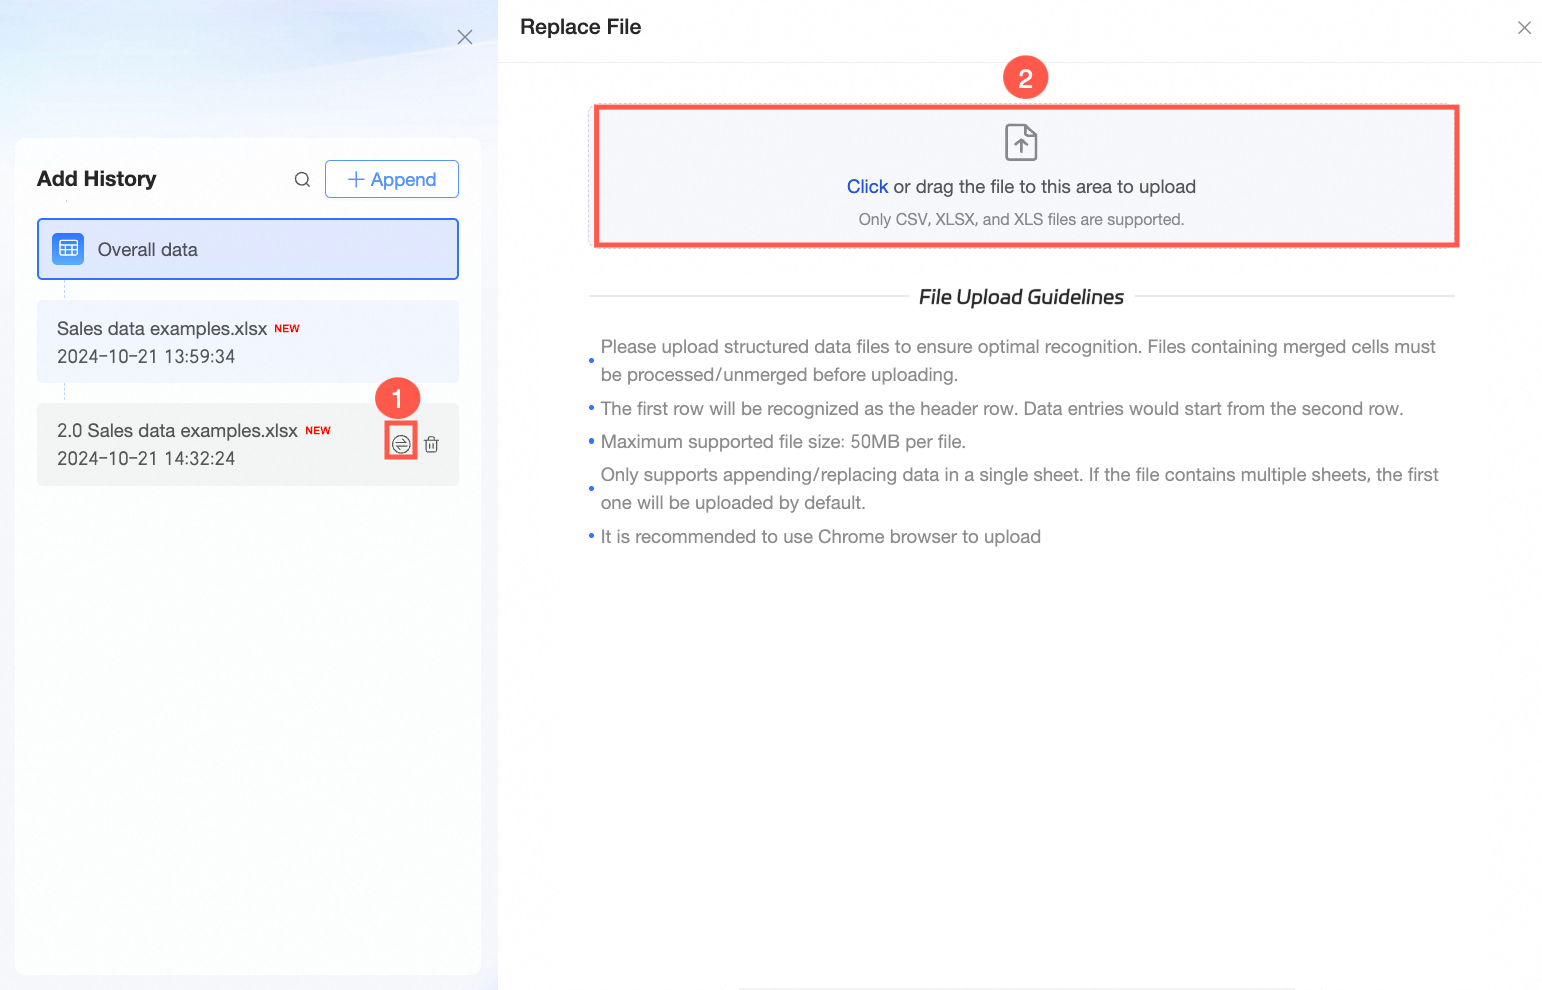
Replace a file
If you need to update data from a previous file upload, you can replace that data to maintain accuracy. Follow these steps:
On the Modify File Upload page, in the Append History panel, select the file you want to replace. Click the
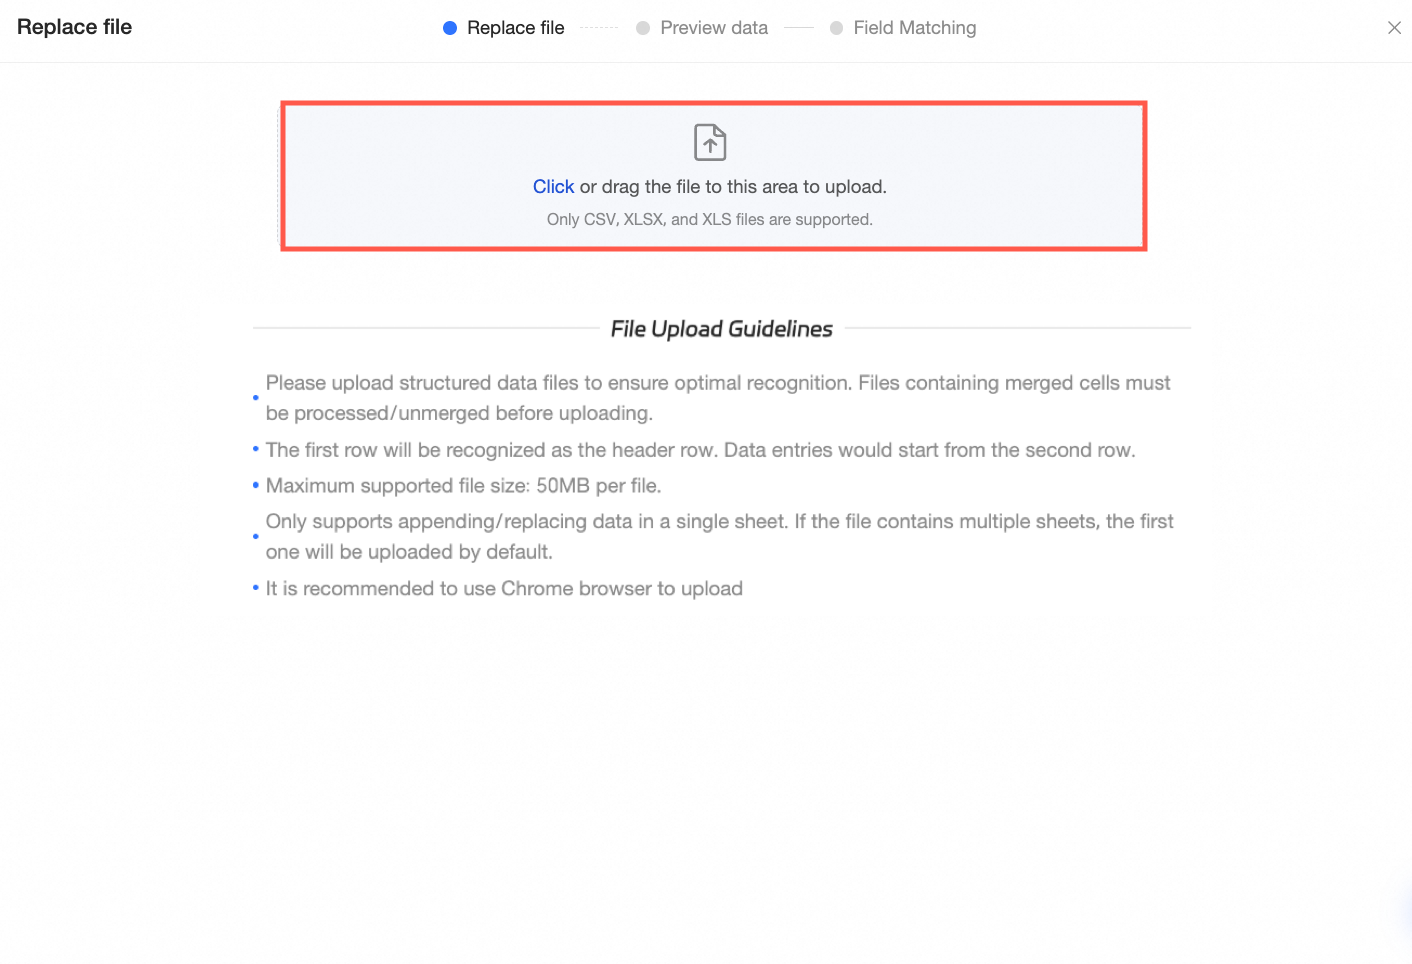
icon in the file card, or click the Replace Data button at the upper-right of the data table.On the Replace File page, click or drag the new file to the upload area.
NoteYou can only replace data from one sheet at a time. If your file has multiple sheets, select the desired sheet on the preview page before uploading.
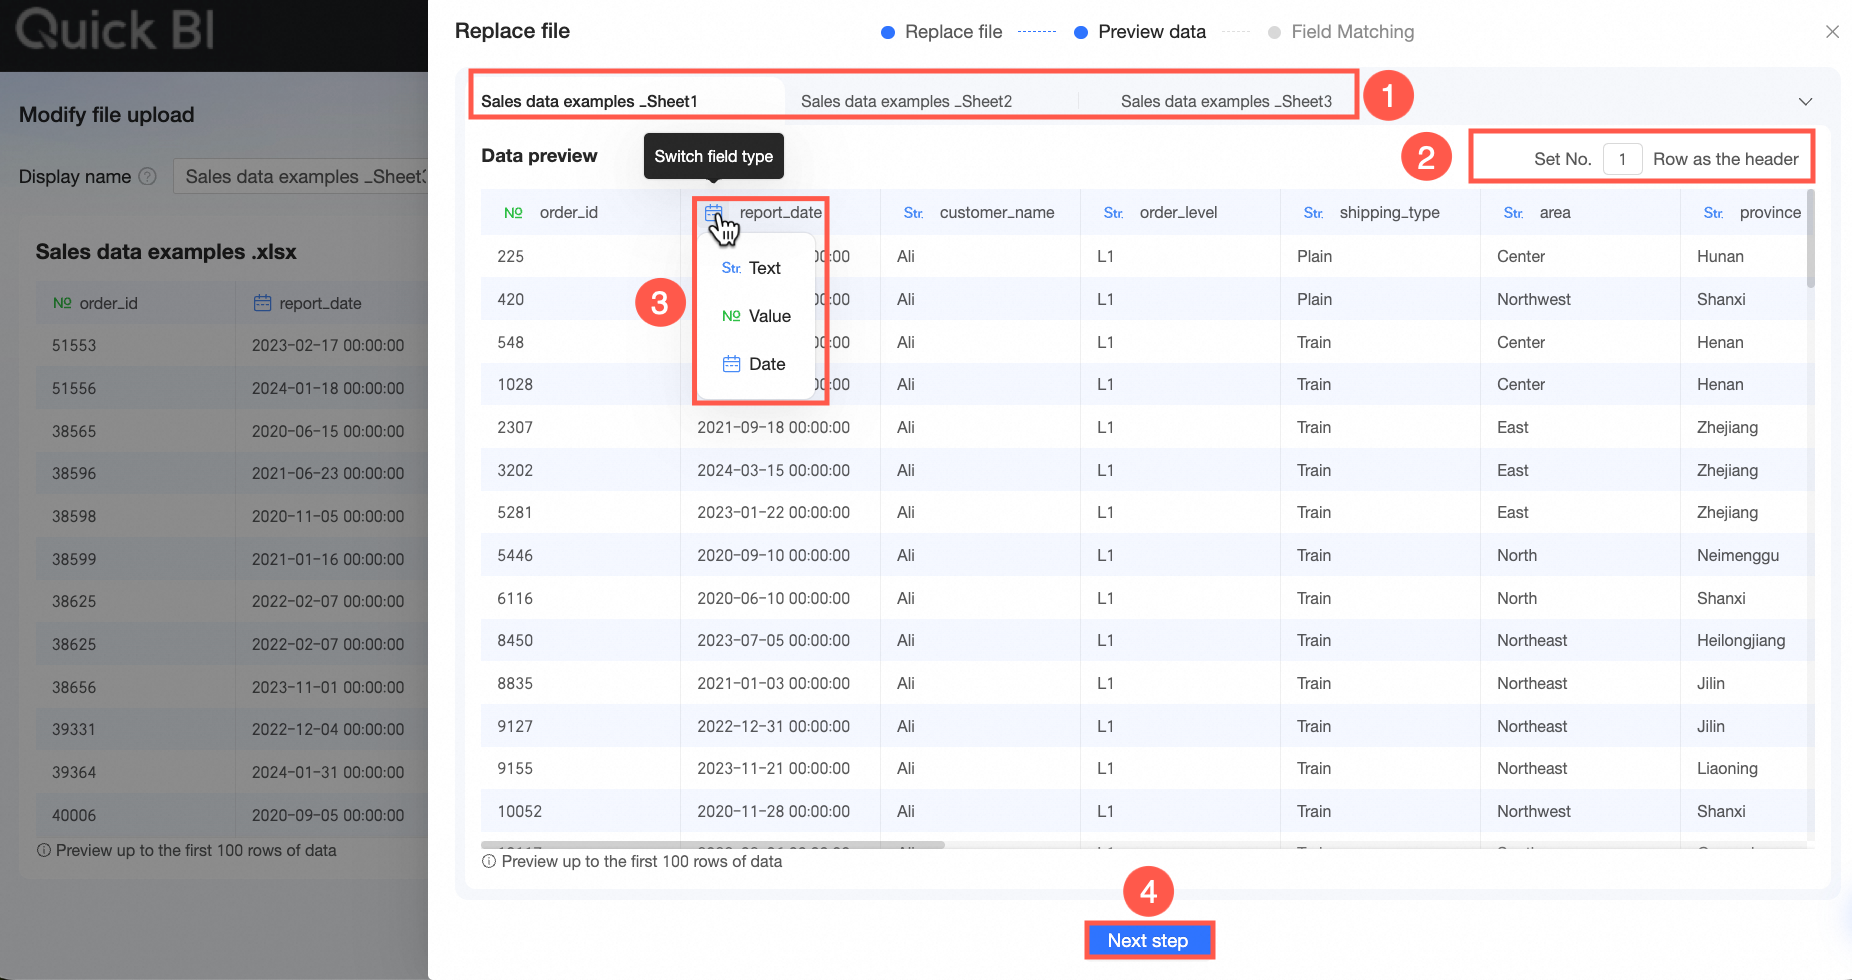
On the Data Preview page, switch to the sheet tab (①) that you want to use for replacement. You can modify the header row (②) and data type (③) as needed. When you are finished, click Next (④).
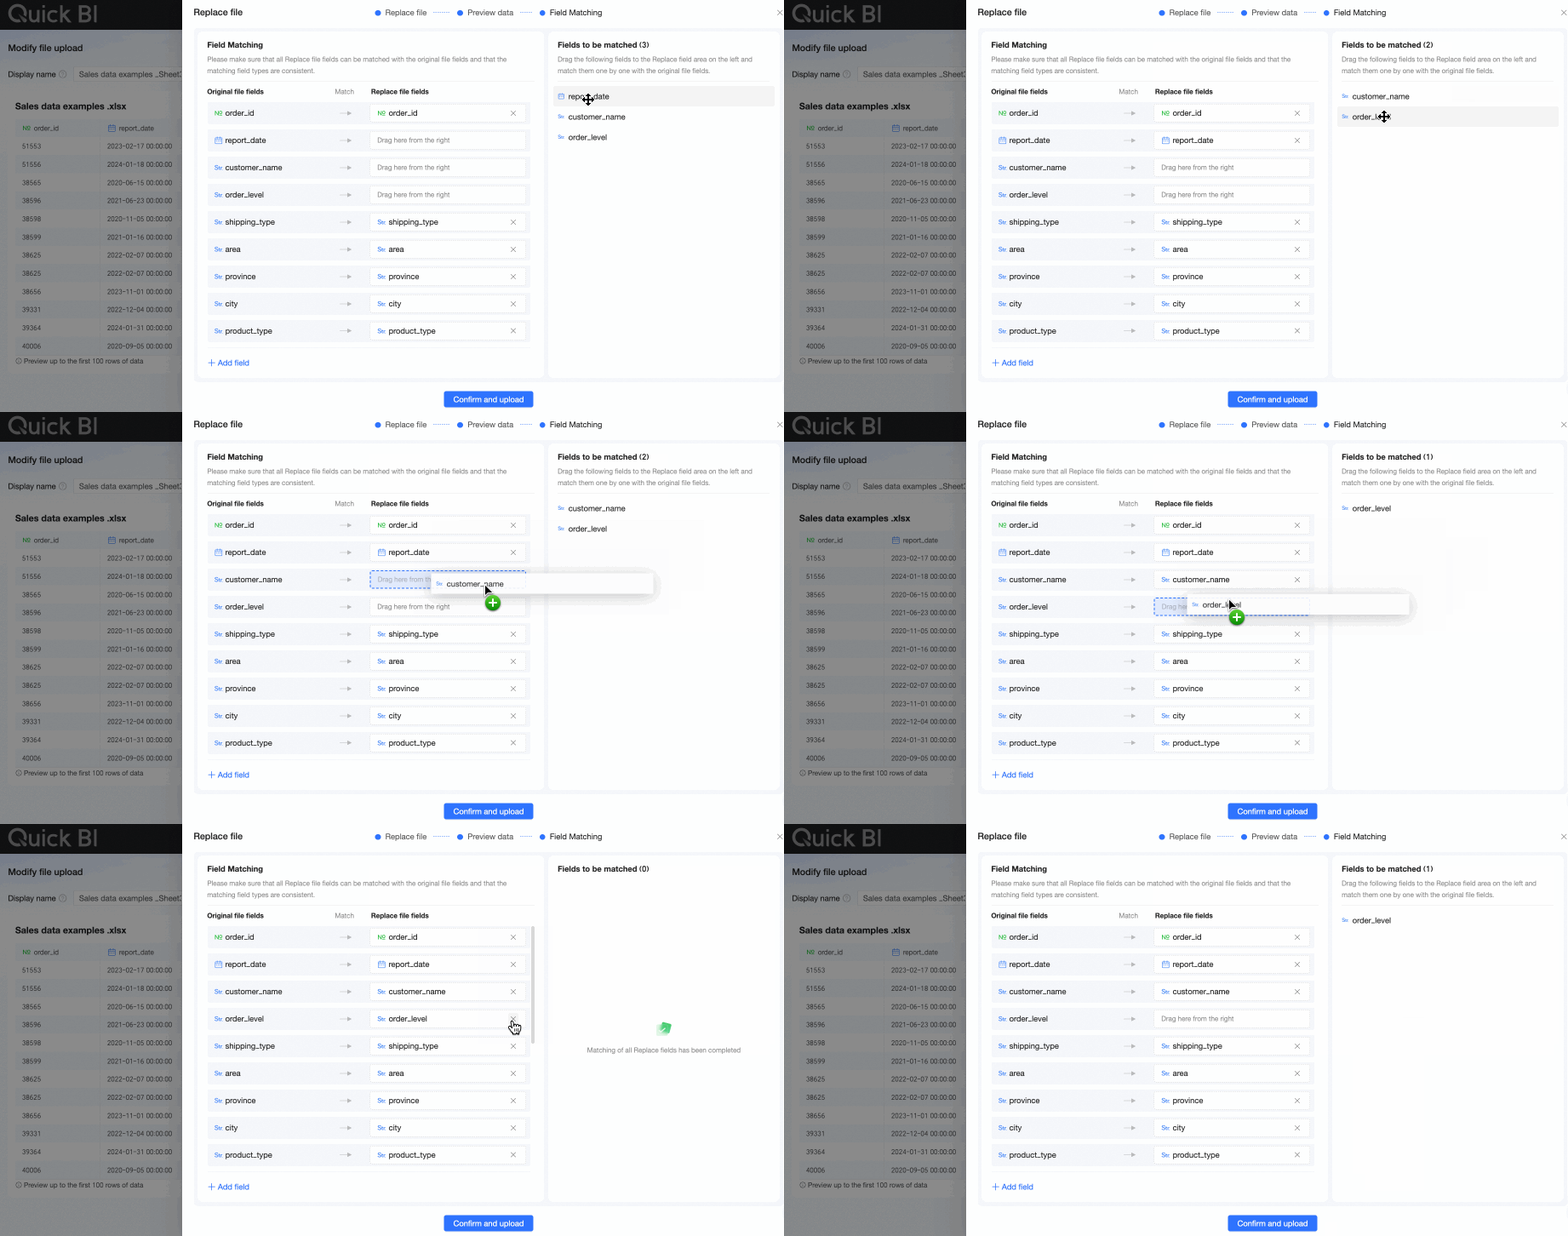
In the Field Mapping step, map the fields from the replacement file to the original file. The system automatically maps fields with the same name. You can manually change the mappings. For fields with different names, you can drag them from the Unmapped Fields area to the Field Mapping area to create a mapping.
NoteEnsure that the data types of the original and replacement fields match. Otherwise, an error occurs. The matching rules are as follows:
A Text field can be mapped to a field of any data type.
A Numeric field can only be mapped to a Numeric field.
A Date field can only be mapped to a Date field.
If the replacement file has more fields than the original file, you can click Add Field to create corresponding fields in the original file for mapping. If the extra fields are not needed, you can proceed to the next step without mapping them.
If the replacement file has fewer fields than the original file, the extra fields in the original file can remain unmapped. After the replacement, these extra fields are still retained in the overall data. You can view them on the Field Details tab for the overall data.
If the replacement file contains duplicate field names, the system attempts to map them sequentially to fields with the same name. In this case, you must manually adjust the mappings in the Field Mapping step to ensure each original field is mapped to only one corresponding field from the replacement file. You can choose which of the duplicate fields to use based on your business requirements.
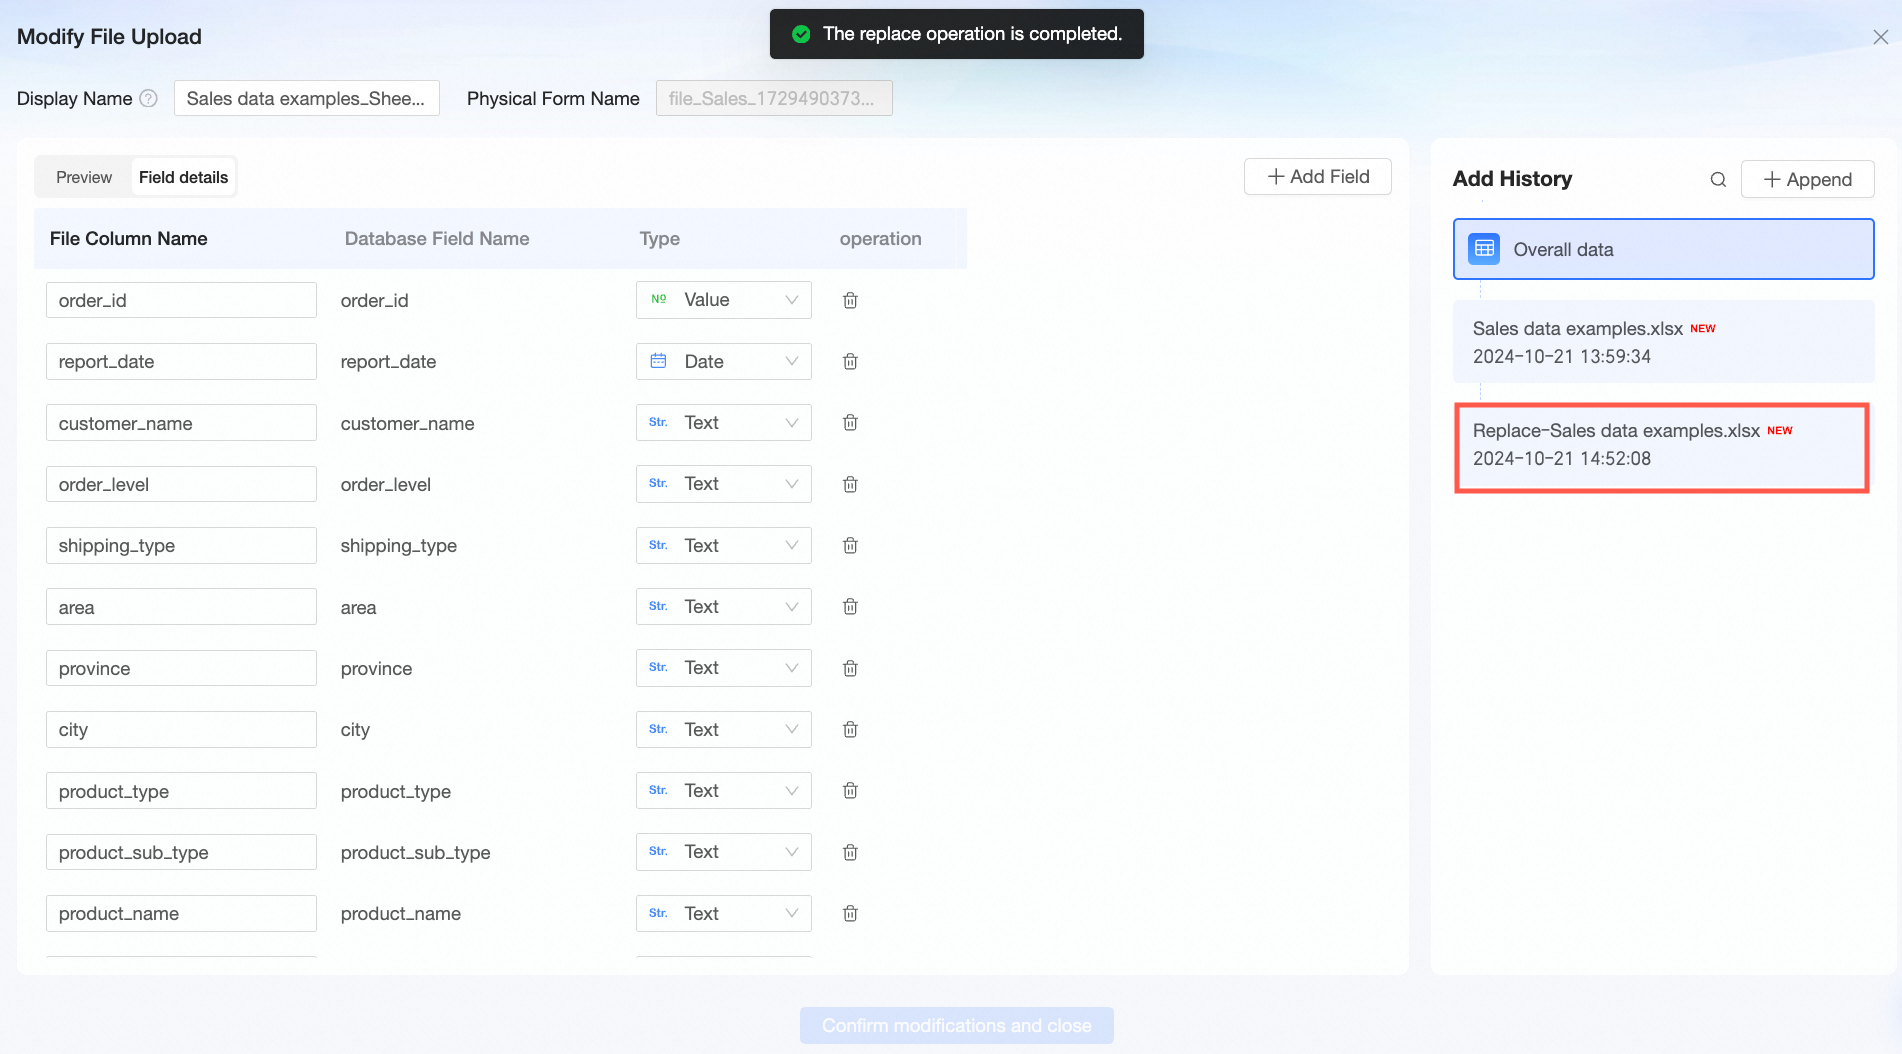
Click Confirm and Upload. After the upload is successful, the replaced file appears in the append history panel.
 icon in the file card, or click the Replace Data button at the upper-right of the data table.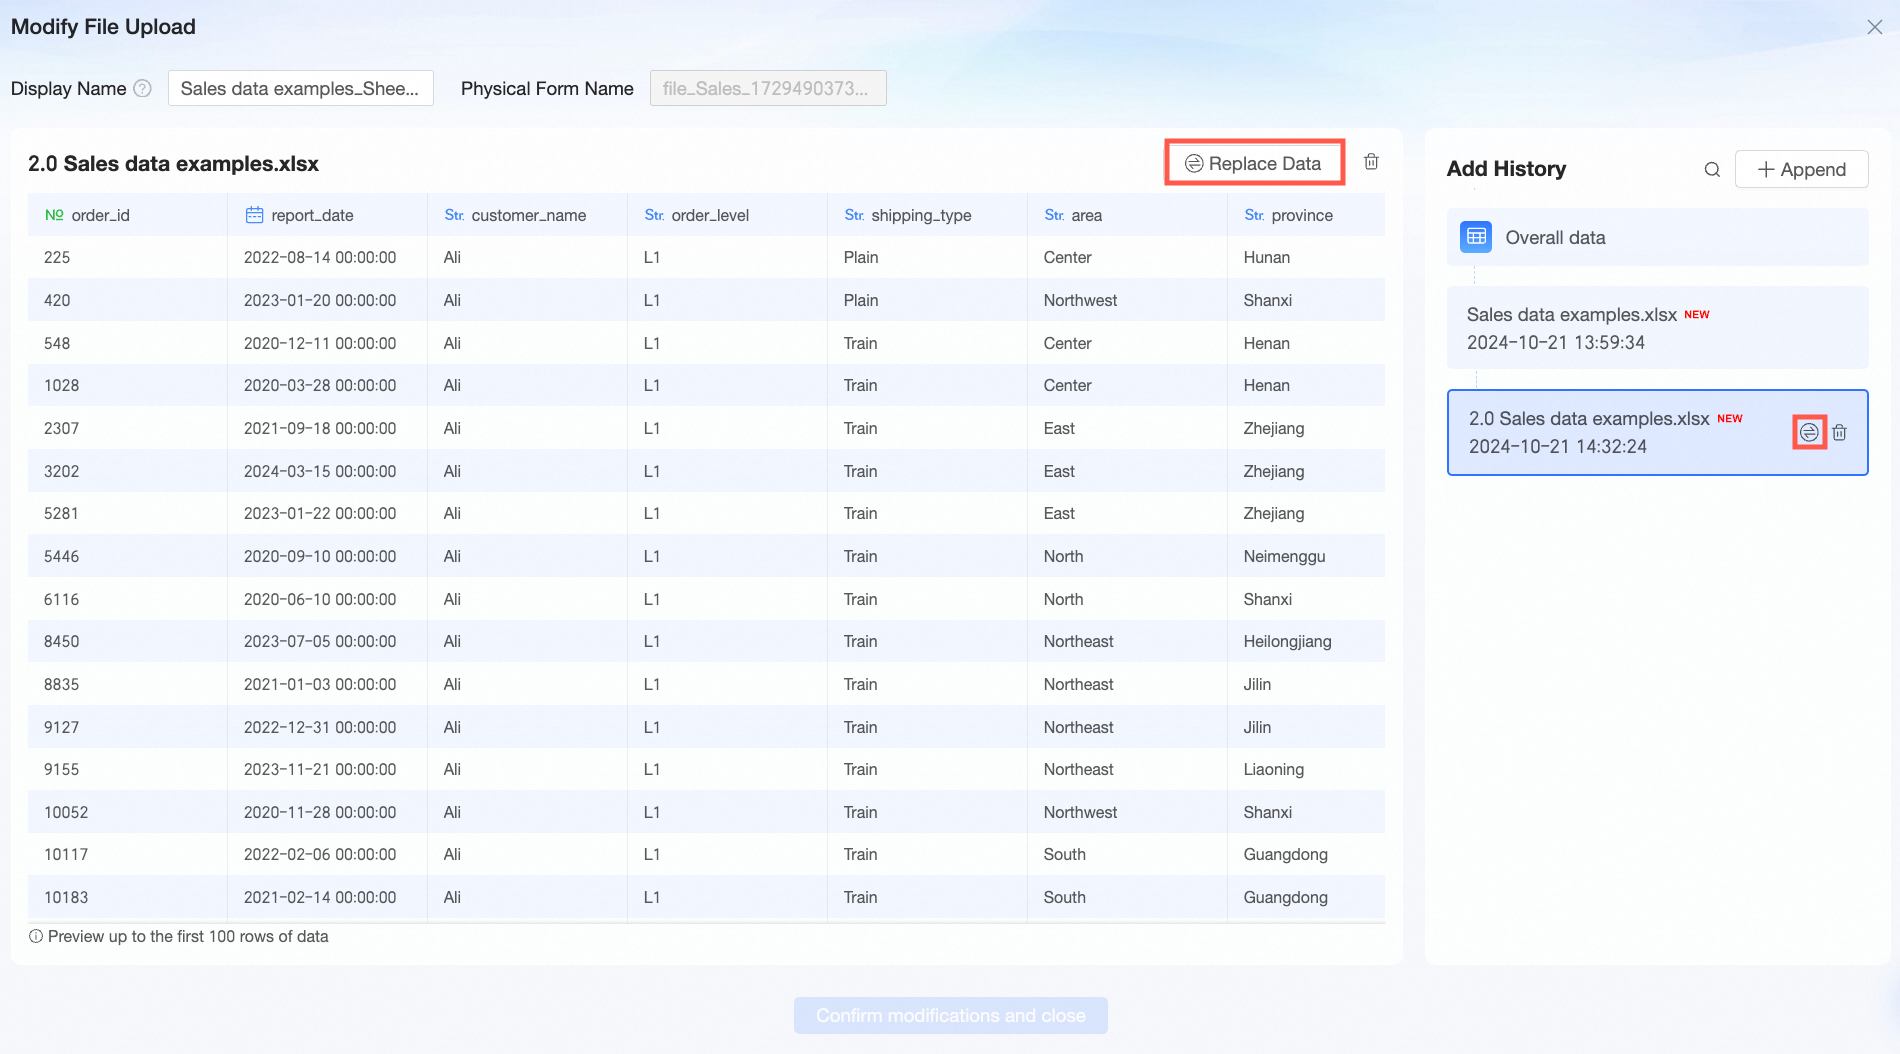


Delete a file
If you no longer need a business data file, or if it contains dirty data, you can select and delete the corresponding file from the Modify File Upload page in the Append History panel.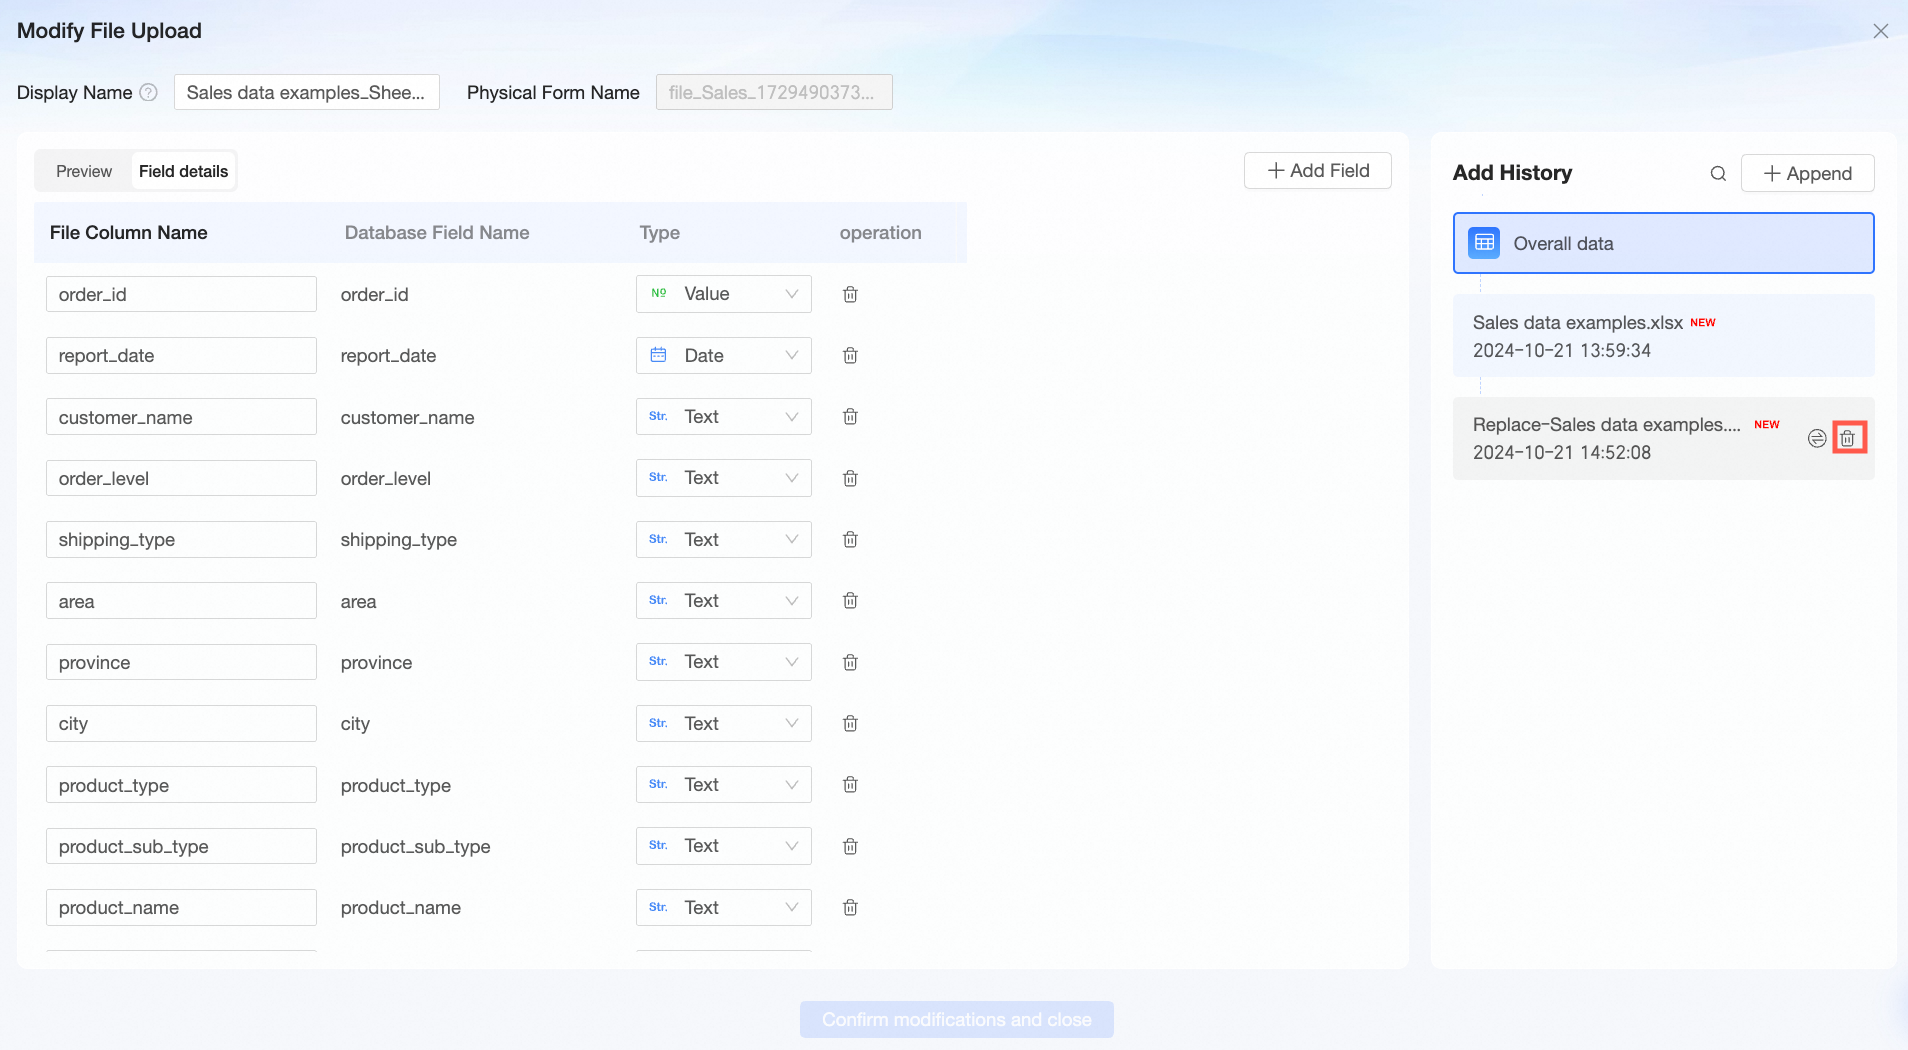
Local file data source example
You can download the following sample CSV file to practice: Sample Sales Data.
You can download the following sample Excel file to practice: Sample Sales Data.
The structure of the sales data is shown in the following table.
Field name | Type | Description |
order_id | varchar | Order ID |
report_date | datetime | Order date |
customer_name | varchar | Customer name |
order_level | varchar | Order level |
order_number | double | Order quantity |
order_amt | double | Order amount |
back_point | double | Discount point |
shipping_type | varchar | Shipping method |
profit_amt | double | Profit amount |
price | double | Unit price |
shipping_cost | double | Shipping cost |
area | varchar | Area |
province | varchar | Province |
city | varchar | City |
product_type | varchar | Product type |
product_sub_type | varchar | Product subtype |
product_name | varchar | Product name |
product_box | varchar | Product packaging |
shipping_date | datetime | Shipping date |
Next steps
After you successfully create a file data source, you can create a dataset to analyze the data.
Create a dataset based on the current file data source. For more information, see data modeling.
NoteAs of version 6.0.1, when you create a dataset from a file data source, you can add calculated fields by using built-in system functions.
Visualize and analyze the data by using dashboards, spreadsheets, or data screens. For more information, see Data Analysis.
Design a data portal for your reports and set up subscriptions, metric monitoring, and more to apply your data insights. For more information, see Data Application.
FAQ
1. Garbled characters in uploaded CSV files
Quick BI accurately identifies UTF-8 encoded CSV files. Other encodings, such as GBK and GB2312, may not be recognized correctly, which can result in garbled characters after the upload. You must convert these files to the UTF-8 format.
Use an application like Notepad to open the CSV file.
Choose Save As.
Click the drop-down arrow next to Encoding.
From the Encoding list, select UTF-8.

2. "Data type mismatch" error when appending a file
Reason 1: There is a clear data type mismatch between the source table and the appended table. You need to manually change the data type in one of the tables or remap the fields.
Reason 2: If a column in the appended Excel file is entirely empty, Quick BI defaults its data type to text. If the corresponding field in the original table is numeric, a data type mismatch error occurs. To resolve this, add a numeric value to any cell in the empty column of the appended Excel file before uploading.
3. "Excel file parsing failed" error or inaccurate data after upload
Reason: The format or content of the uploaded file does not meet the requirements.
Solution:
Check 1: Verify that the file type is either CSV or Excel (.xls, .xlsx) and that the content complies with the Usage notes.
Check 2: Ensure that the file format and size meet the standards described in Limitations.
4. Missing or disabled upload button
Reason 1: You need permission to create a file data source. You must be a developer with workspace developer permissions or higher, or you must be granted usage or edit permissions for the data source through collaboration.
Reason 2: You lack read and write permissions for the target data source. The database account used in Quick BI must have read and write permissions on the database. If not, the upload fails. Contact your database administrator to grant the necessary permissions.
5. New field not appearing in dataset
Reason: The original table did not contain this field. After a new field is added, it is not automatically included in the dataset. You must manually select it on the model configuration page of the dataset editor to make it visible.

6. CSV file not visible in the file selection dialog
Reason: In a Windows environment, the file selection dialog defaults to showing only .xlsx files. You need to change the file type filter to "All files" to see and select your CSV file.