Embedding management
Quick BI AIPro provides an embedding feature to integrate the native AIPro analysis dialog into your portals or business systems. This allows users in your organization to use AIPro's intelligent analysis capabilities from their internal systems without logging in to Quick BI. This document explains how to configure this feature.
Limitations
Subscription: Ensure that your organization has purchased the Quick BI AIPro edition. Otherwise, the embedding feature is unavailable.
Permissions: Only users with AIPro centralized management permission can access the management center to create embedding configurations. For more information about permission settings, see User Permissions.
Feature limitations: The embedded analysis dialog does not support extended operations such as adding enterprise data, skills, or MCPs. Saving analysis artifacts and sharing conversations are also not supported.
Credit usage: Credits consumed by embedded access are charged to the user bound to the ticket.
Feature entry
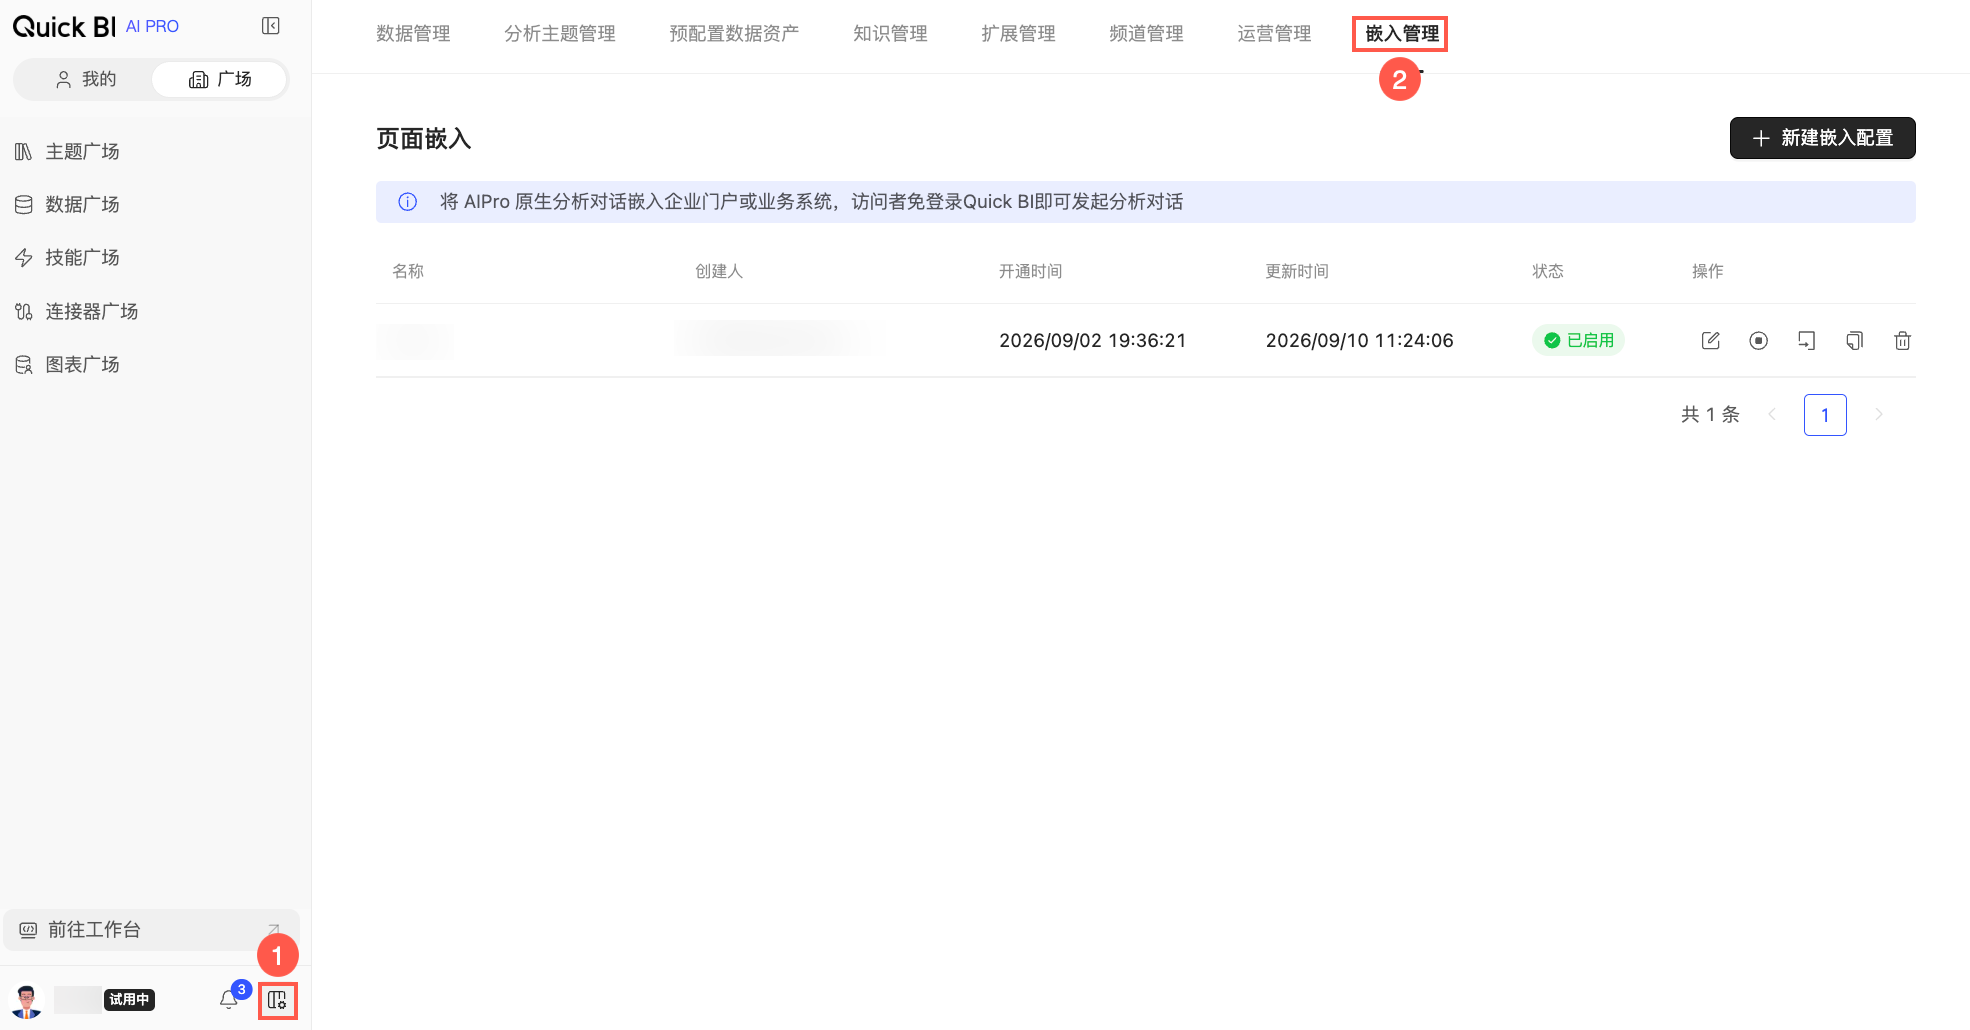
Go to the Quick BI AIPro management center and click embedding management in the top navigation bar.
Procedure
The process to generate an embedded AIPro page is as follows: Create Embedding Configuration > Edit Embedding Configuration > Debug Embed Code > Get Ticket > Assemble login-free URL. The following sections describe each step in detail.
Step 1: Create an embedding configuration
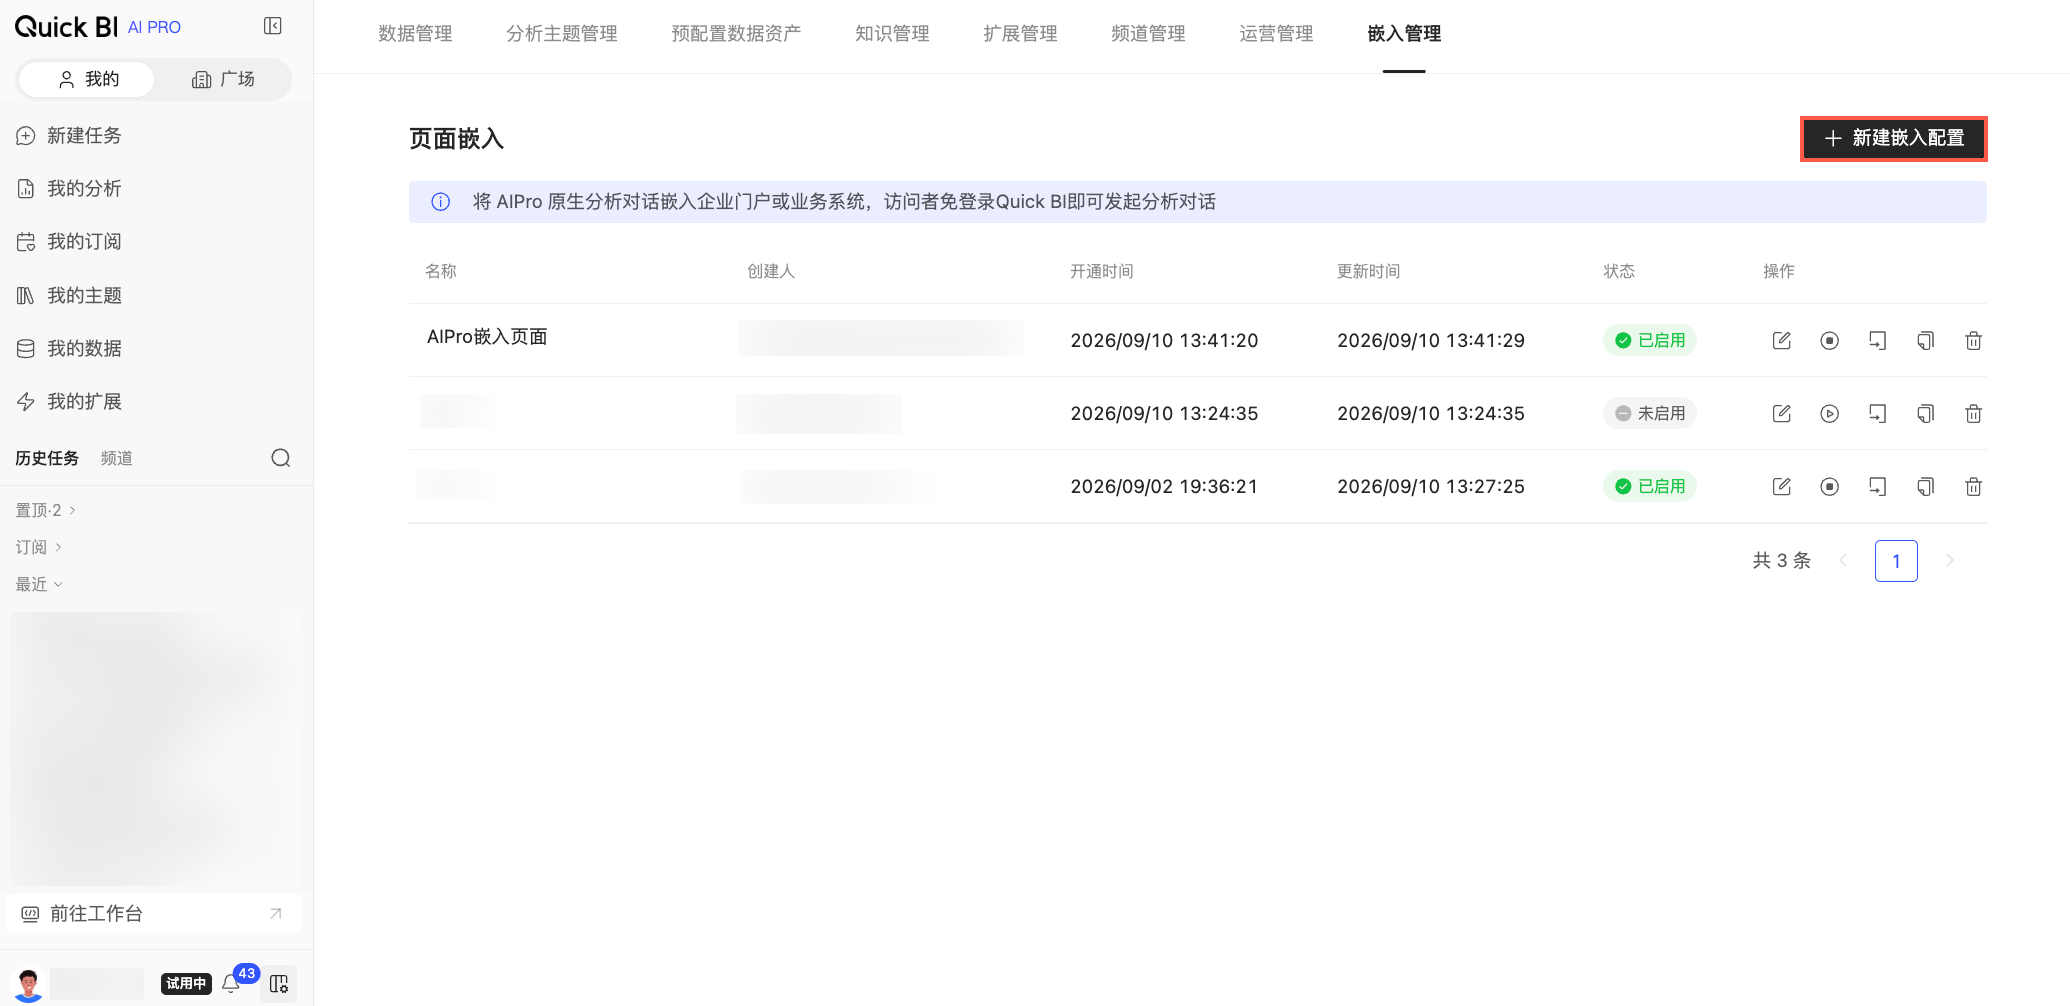
On the embedding management page, click Create Embedding Configuration in the upper-right corner.
In the Create Embedding Configuration dialog box, enter a name for the embedded page. You can name it based on its business purpose or core function. This name serves as the unique identifier for the embedding configuration and cannot be changed after creation.
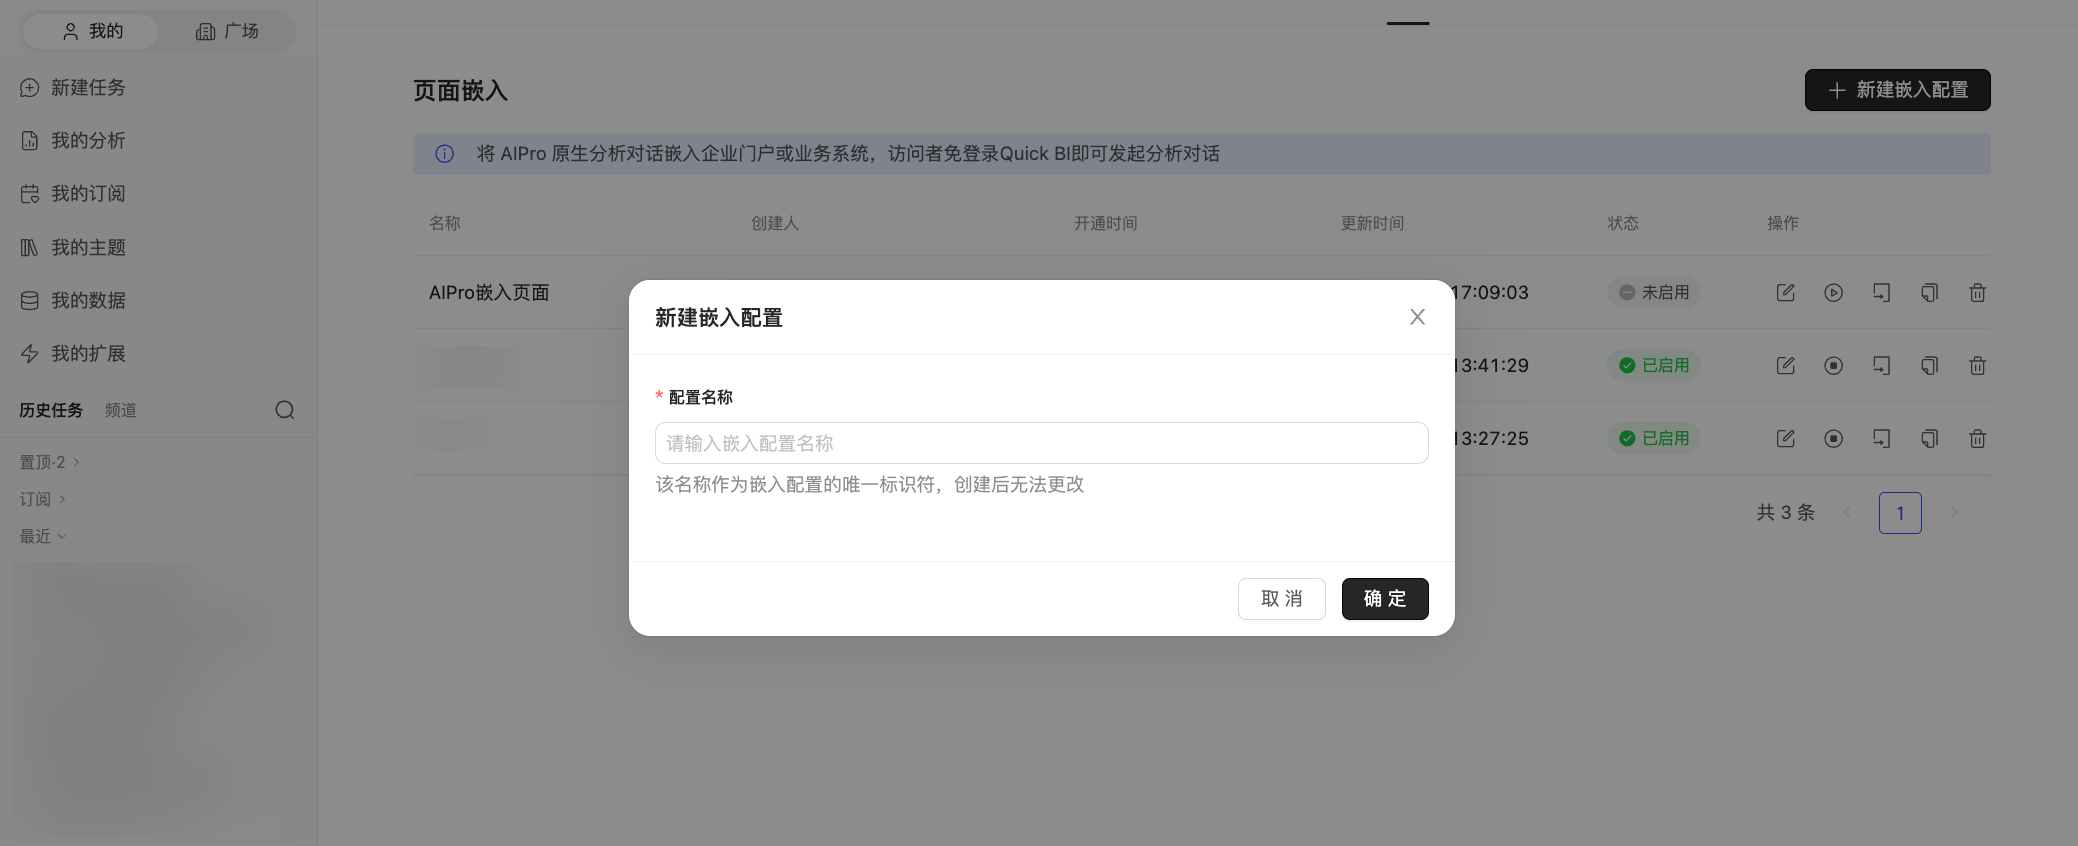
After you finish the configuration, click OK.
Step 2: Edit the embedding configuration
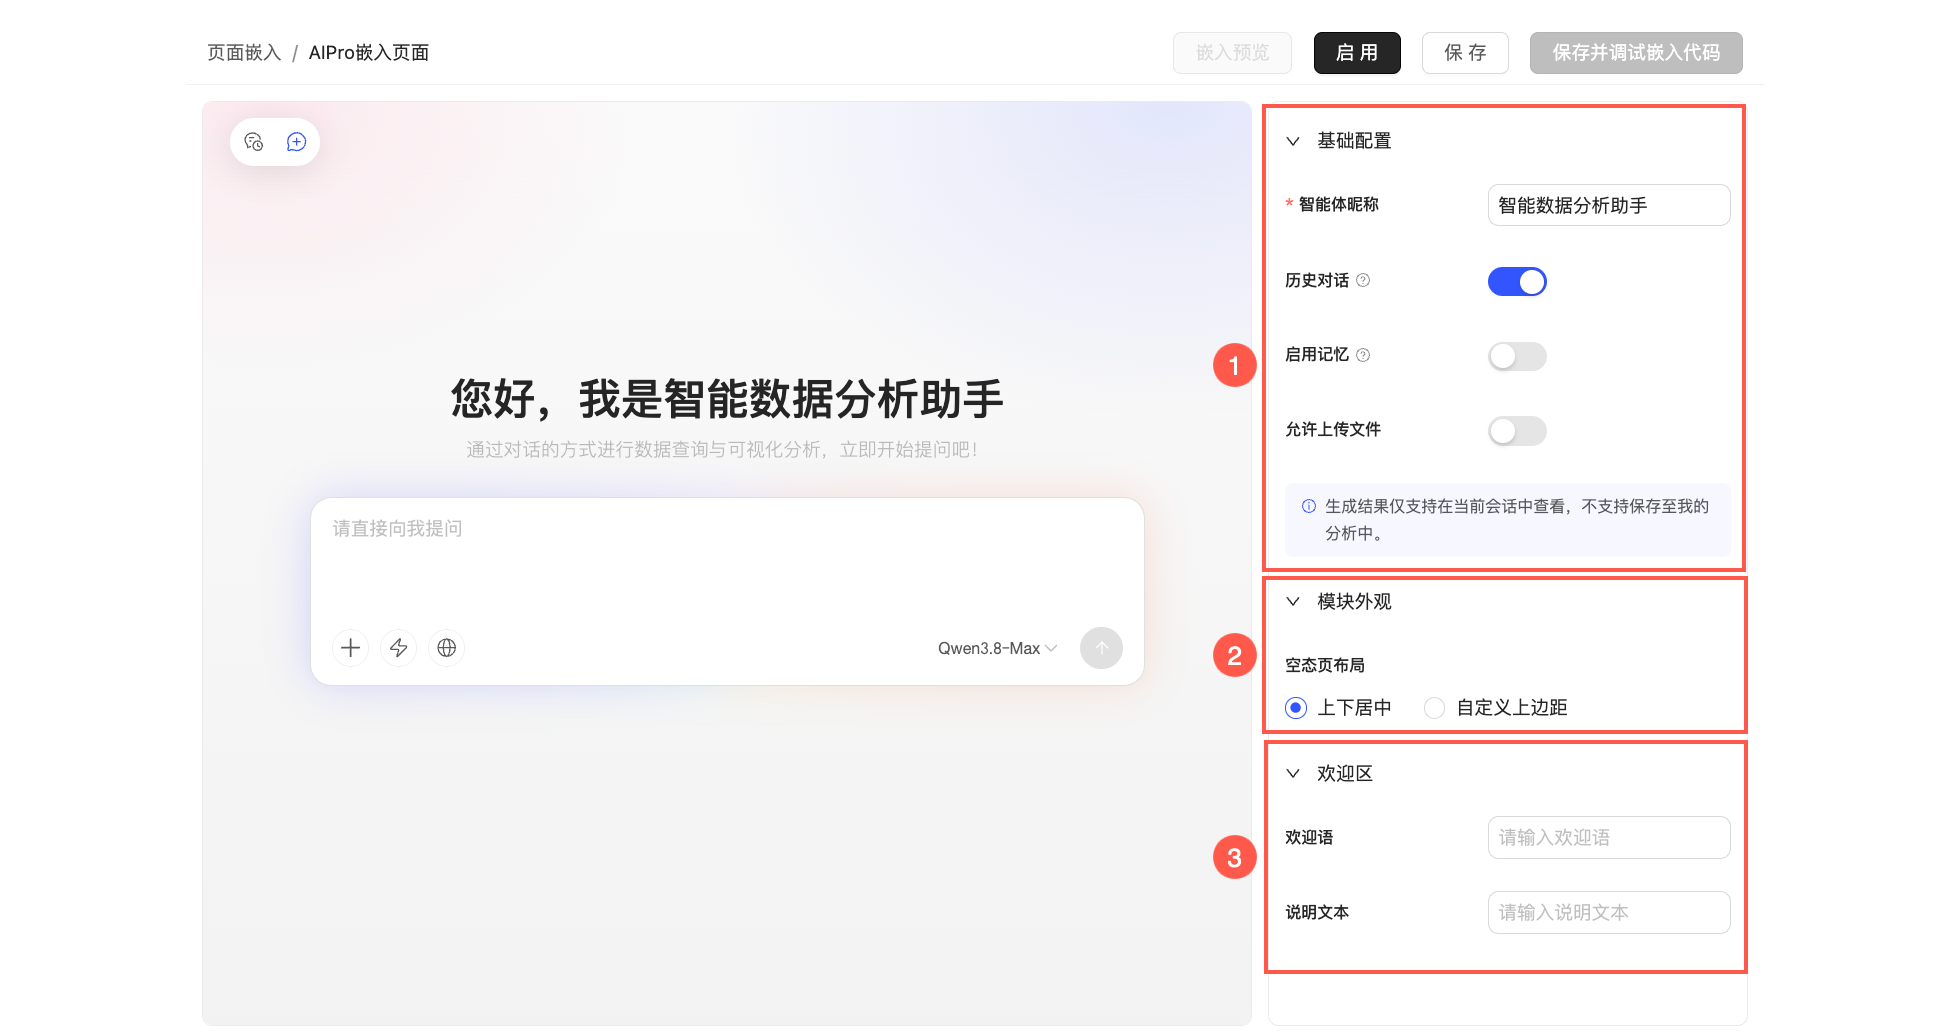
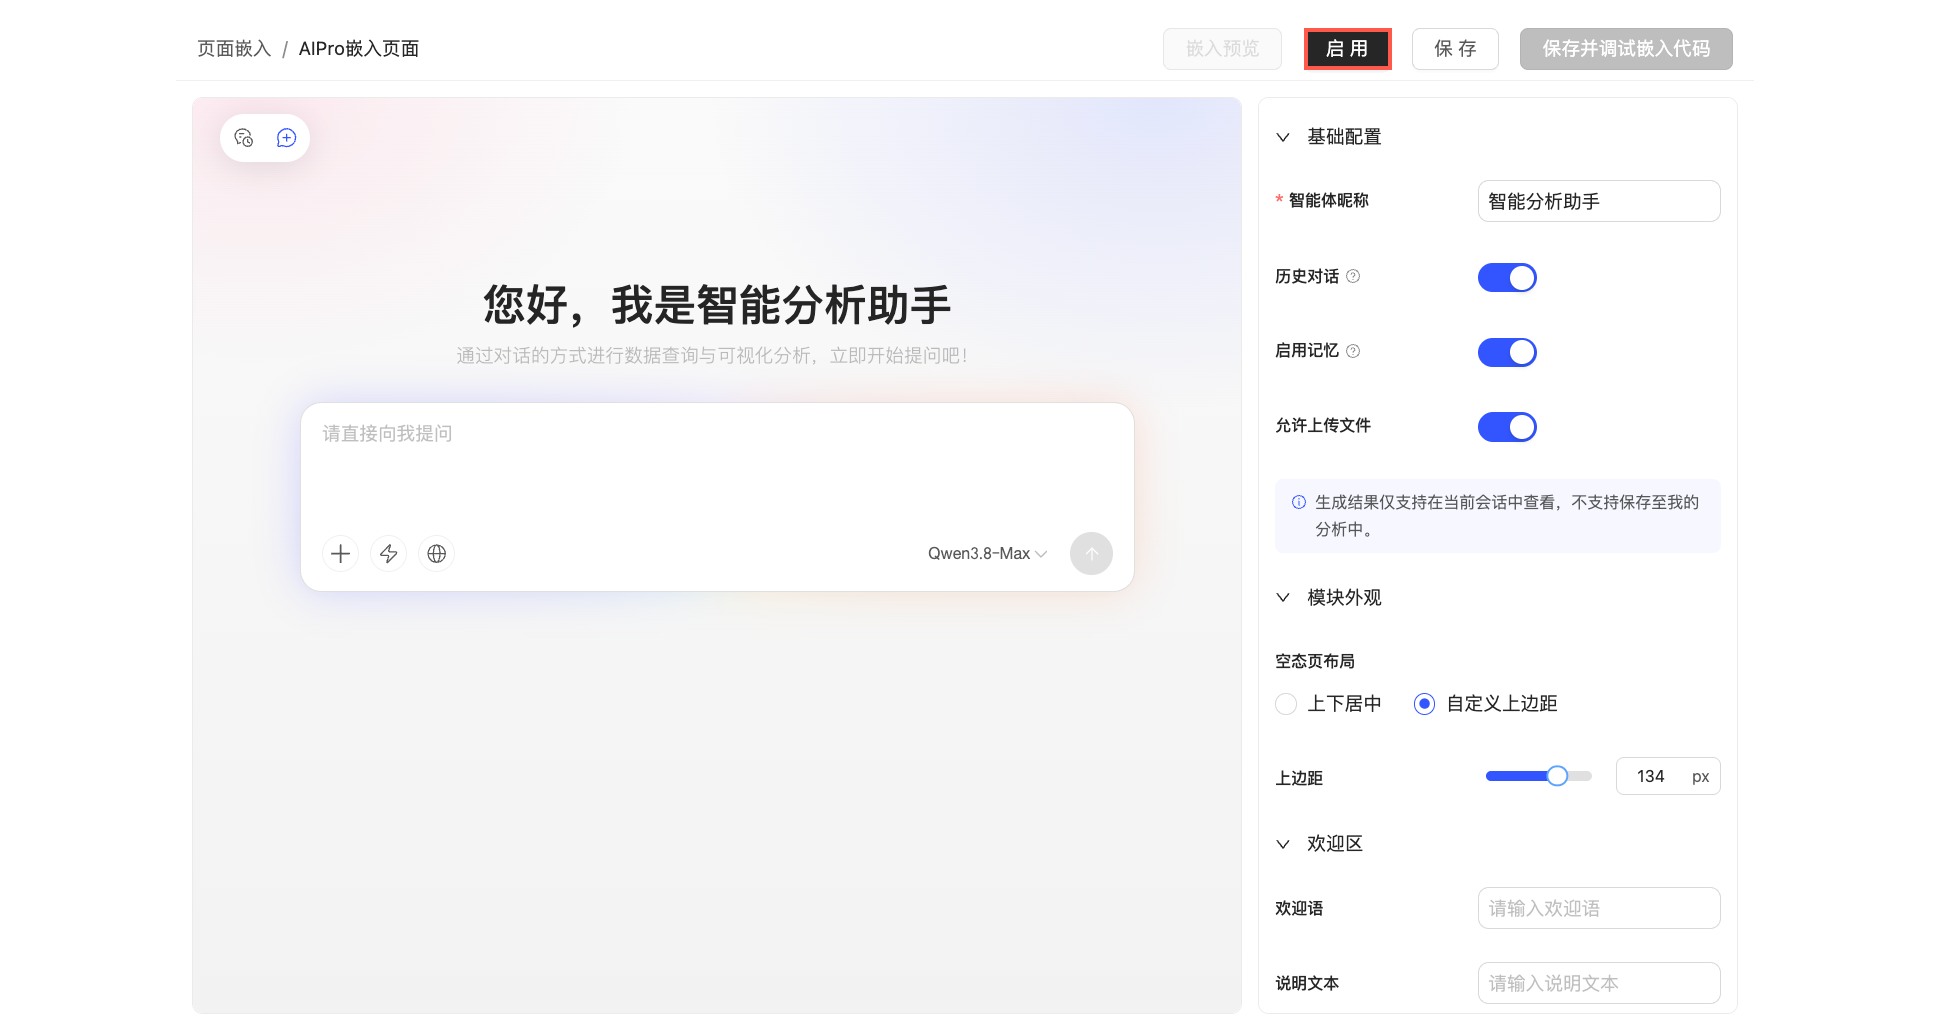
After the embedding configuration is created, the editing page opens automatically. Configure the following settings for the embedded page:
Parameter
Description
① Basic configuration
Agent nickname
The default is "Intelligent Data Analysis Assistant". You can set a custom nickname for the intelligent agent that aligns with your business scenario or brand identity.
Conversation history
Select whether to enable the conversation history feature.
If enabled, multiple visitors using the same ticket can view the entire conversation history. If disabled, the entry point for conversation history is hidden.
Enable memory
Select whether to enable the memory feature.
If enabled, AIPro reads and updates the memory of the ticket's bound user. When multiple visitors use the same ticket, they share and influence the memory context of that bound user.
Allow file upload
Select whether to allow users to upload local files for analysis.
② Module appearance
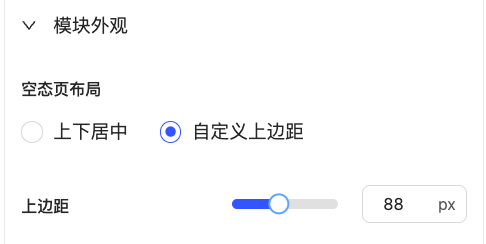
Empty state layout
Set the layout position of the dialog box on the page. Options include Vertically Centered and Custom Top Margin.
If you select Custom Top Margin, you can set a value from 0 to 200px. The preview area on the left shows your changes in real time.
③ Welcome area
Welcome message
Set the welcome message for the intelligent agent. You can customize the content based on your business scenario or to provide guidance, such as a company slogan, a friendly greeting, or introductory text.
The welcome message can be up to 50 characters long. If left empty, the default message "Hello, I am [Agent Nickname]" is displayed.
Description text
Set the description text for the intelligent agent. You can enter information such as core features, usage instructions, or important notes to help users understand the agent's capabilities and usage.
The description text can be up to 100 characters long. If left empty, the default text "Perform data queries and visual analysis through conversation. Start asking questions now!" is displayed.
After you finish the configuration, click Save.
Step 3: Debug the embed code
Click the Enable button to enable debugging for the embedding configuration.

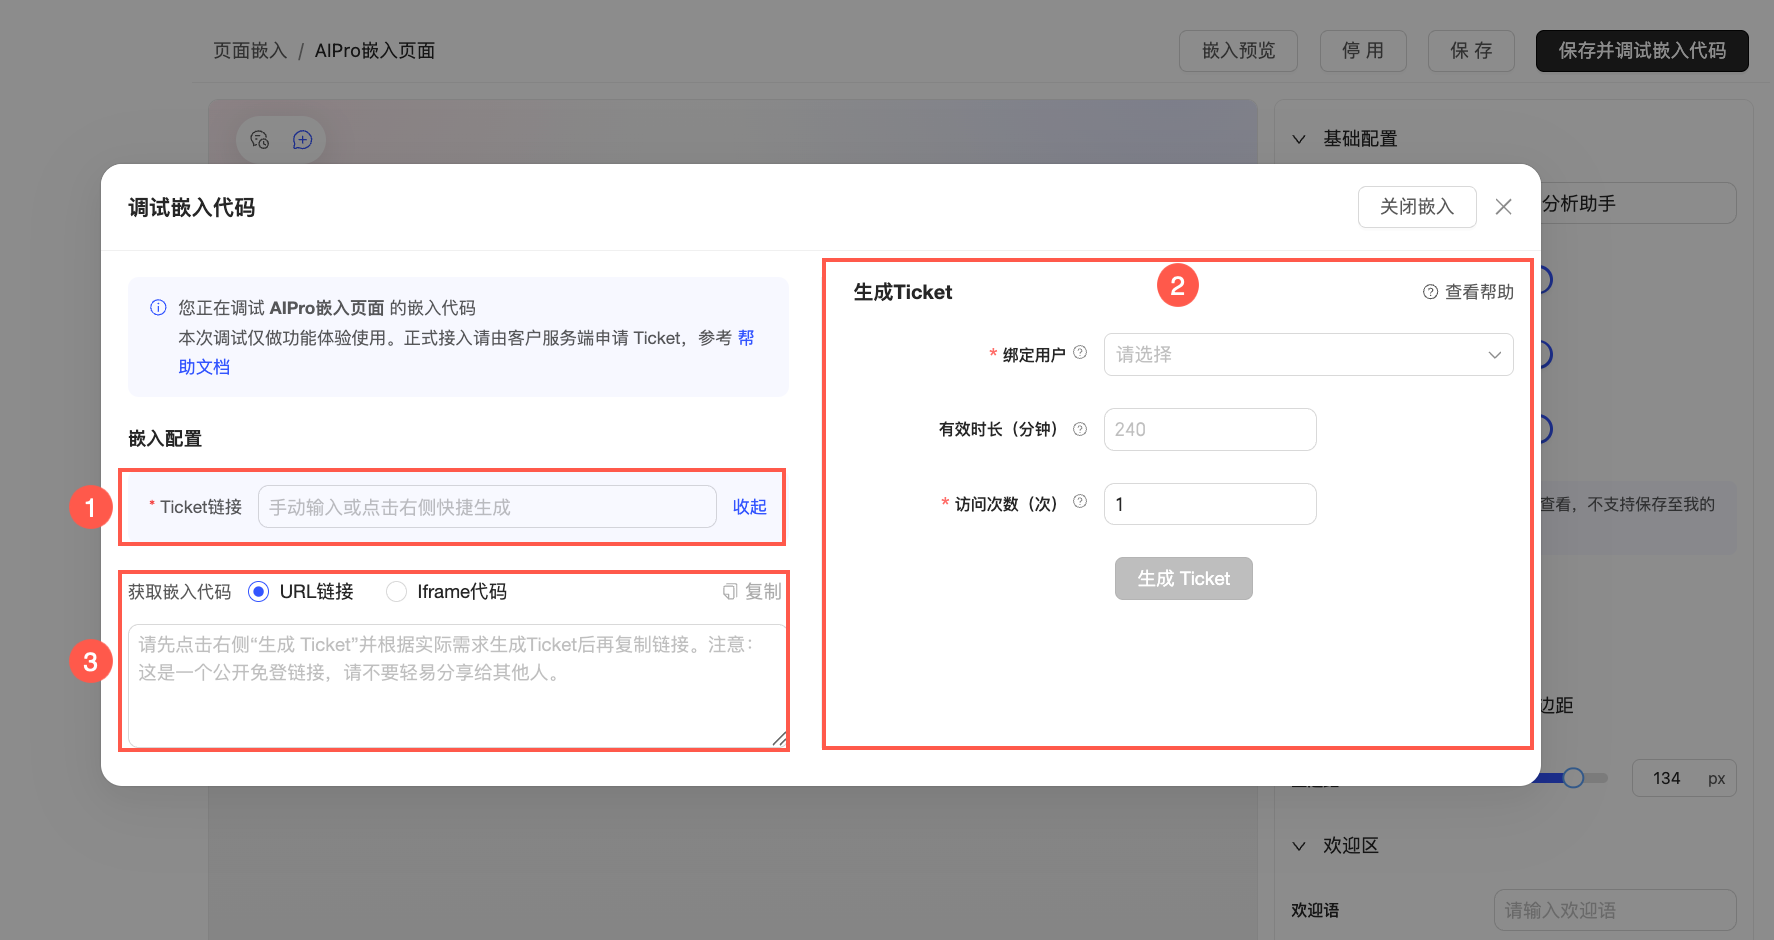
Click Save and Debug Embedding Code. In the Debug Embedding Code dialog box, complete the following steps.
NoteThis debugging step is only for previewing the embedding effect. For production use, you must also complete Step 4: Get a ticket and Step 5: Assemble the login-free URL.
Actions
Description
① Ticket link
Enter the temporary authorization ticket used to access the embedded page.
You can either manually enter an existing ticket or quickly generate one for a specific user in the Generate ticket area to preview the embedding effect with that user's permissions.
② Generate ticket
Configure the following information in this area to quickly generate a ticket for a specific user.
Bound user: Click the field and select a specific authorized user from the drop-down list. Access permissions for data assets and other settings are based on this user's identity.
Expiration time (minutes): Set the validity duration for the generated ticket.
Access count: Set the number of times the ticket can be used to access the embedded page. This helps prevent link misuse or leakage.
Click the Generate Ticket button. The system generates a ticket link and automatically populates it in the Ticket link field.
ImportantThe ticket link provides public, login-free access. Keep it secure.
③ Get embed code
Click Copy to get the code for the embedded page. Both URL Link and Iframe Code formats are available.
URL Link: A direct web address. Paste it into your browser to view the result.
Iframe Code: An HTML code snippet with an
<iframe>tag. Copy this code into your web page to view the result.
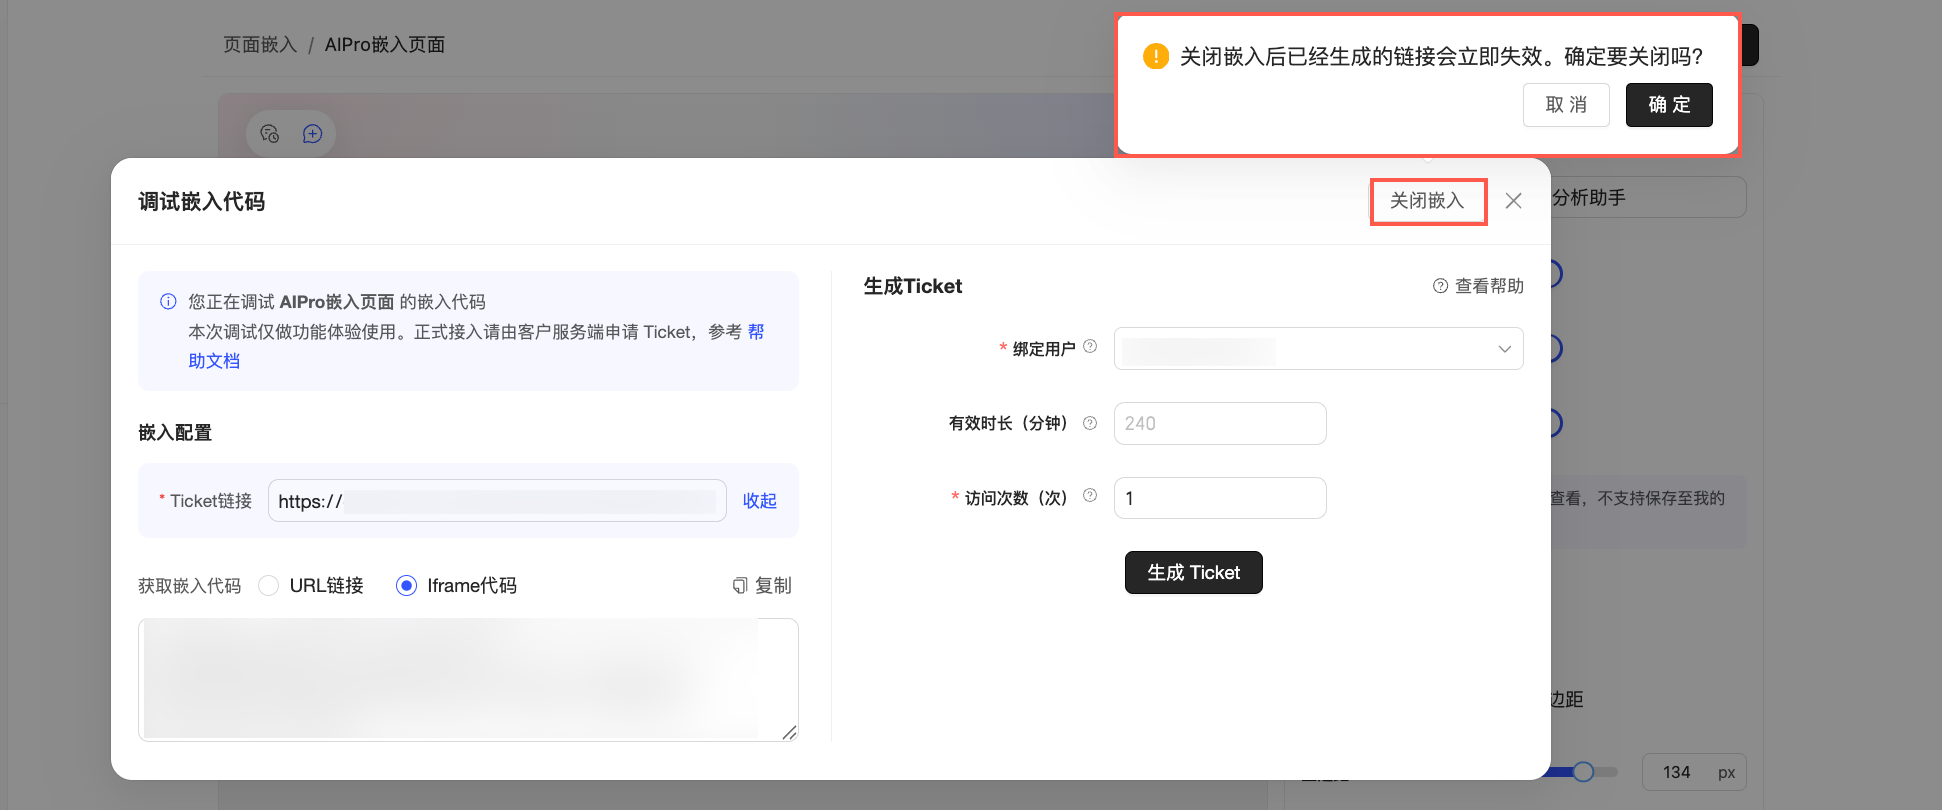
(Optional) Click the Disable Embedding button to stop the debugging session, block access through the temporary link, or reconfigure embedding parameters. Disabling the configuration immediately invalidates any previously generated links.
Step 4: Get a ticket
After debugging the embedded page, integrate it into your system for production use. Call the Quick BI CreateTicket4AiPro API to get an access ticket. The following sections describe the parameters for this API.
In a production environment, you must first authenticate the user in your own business system and map their identity to a valid AIPro user within your Quick BI organization. Then, call the CreateTicket4AiPro API to generate an access ticket for that user.
If multiple visitors use the same ticket, you cannot identify the individual users from your business system. Therefore, to ensure each user has an isolated, personalized analysis experience with the correct data permissions, you must call the API to generate a unique ticket for each access request.
CreateTicket4AiPro: Generate AIPro embedding ticket
API description: Issues a login-free ticket for an enabled AIPro embedding configuration. The issued ticket type is fixed as
AI_PRO_TICKET(31).Note: Only organization administrators or accounts with AIPro centralized management permission can call this API.
Input parameter
Parameter | Type | Required | Description |
aiProId | String | Yes | The ID of the AIPro embedding configuration. The configuration must exist, belong to the current organization, and be enabled. |
ticketNum | Int | No | The number of times the ticket can be used. Default value: 1. Value range: 1 to 99,999. |
userId | String | Conditionally required | The Quick BI You must provide either this parameter or a combination of Note The |
accountName | String | Conditionally required | The account name of the user to be bound. This parameter is used with |
accountType | Int | Conditionally required | The account type. The value must map to a Quick BI |
expireTime | Int | No | The ticket's validity period. Unit: minutes. The default value is 240. The value must be greater than 0. |
systemUid | String | No | A custom system identifier. The length must be less than 150 characters. |
customParam | String | No | Custom pass-through parameters. If not empty, this must be a valid JSON string. |
Output parameter
Parameter | Type | Description |
Request ID | string | The request ID. |
Success | boolean | Indicates whether the request was successful. |
Result | string | The generated ticket. |
Example
Request example
POST /openapi/v2/pop/ticket/createTicket4AiPro
Content-Type: application/x-www-form-urlencoded

aiProId=a1&ticketNum=1&expireTime=240
Response example
{
  "RequestId": "req-1",
  "Success": true,
  "Result": "generated-ticket"
}
Common errors
Error code | Description |
AE0566662010 | The configuration does not exist or does not belong to the current organization. |
AE0566662011 | The embedding configuration is disabled. |
AE0530010025 | The value of ticketNum is out of the allowed range. |
AE0510000038 | Invalid parameter. |
AE0591000014 | Failed to resolve the bound user. |
Step 5: Assemble the login-free URL
After obtaining the ticket, assemble the login-free URL using the following format. Then, embed this URL into your business system's front-end page to complete the integration.
https://{QuickBI-access-domain}/token3rd/ai/chat?accessTicket={accessTicket}&aiProId={aiProId}Parameter | Description |
Quick BI access domain | The server address where your Quick BI service is located. For example, the domain for the Quick BI site in China (Hong Kong) is |
accessTicket | The ticket obtained in Step 4: Get a ticket. |
aiProId | The ID of the AIPro embedding configuration. |
Related operations
The embedding configuration list page displays the Name, creator, creation time, and update time for all configurations in the current organization. From the operations column for a configuration, you can perform the following actions:
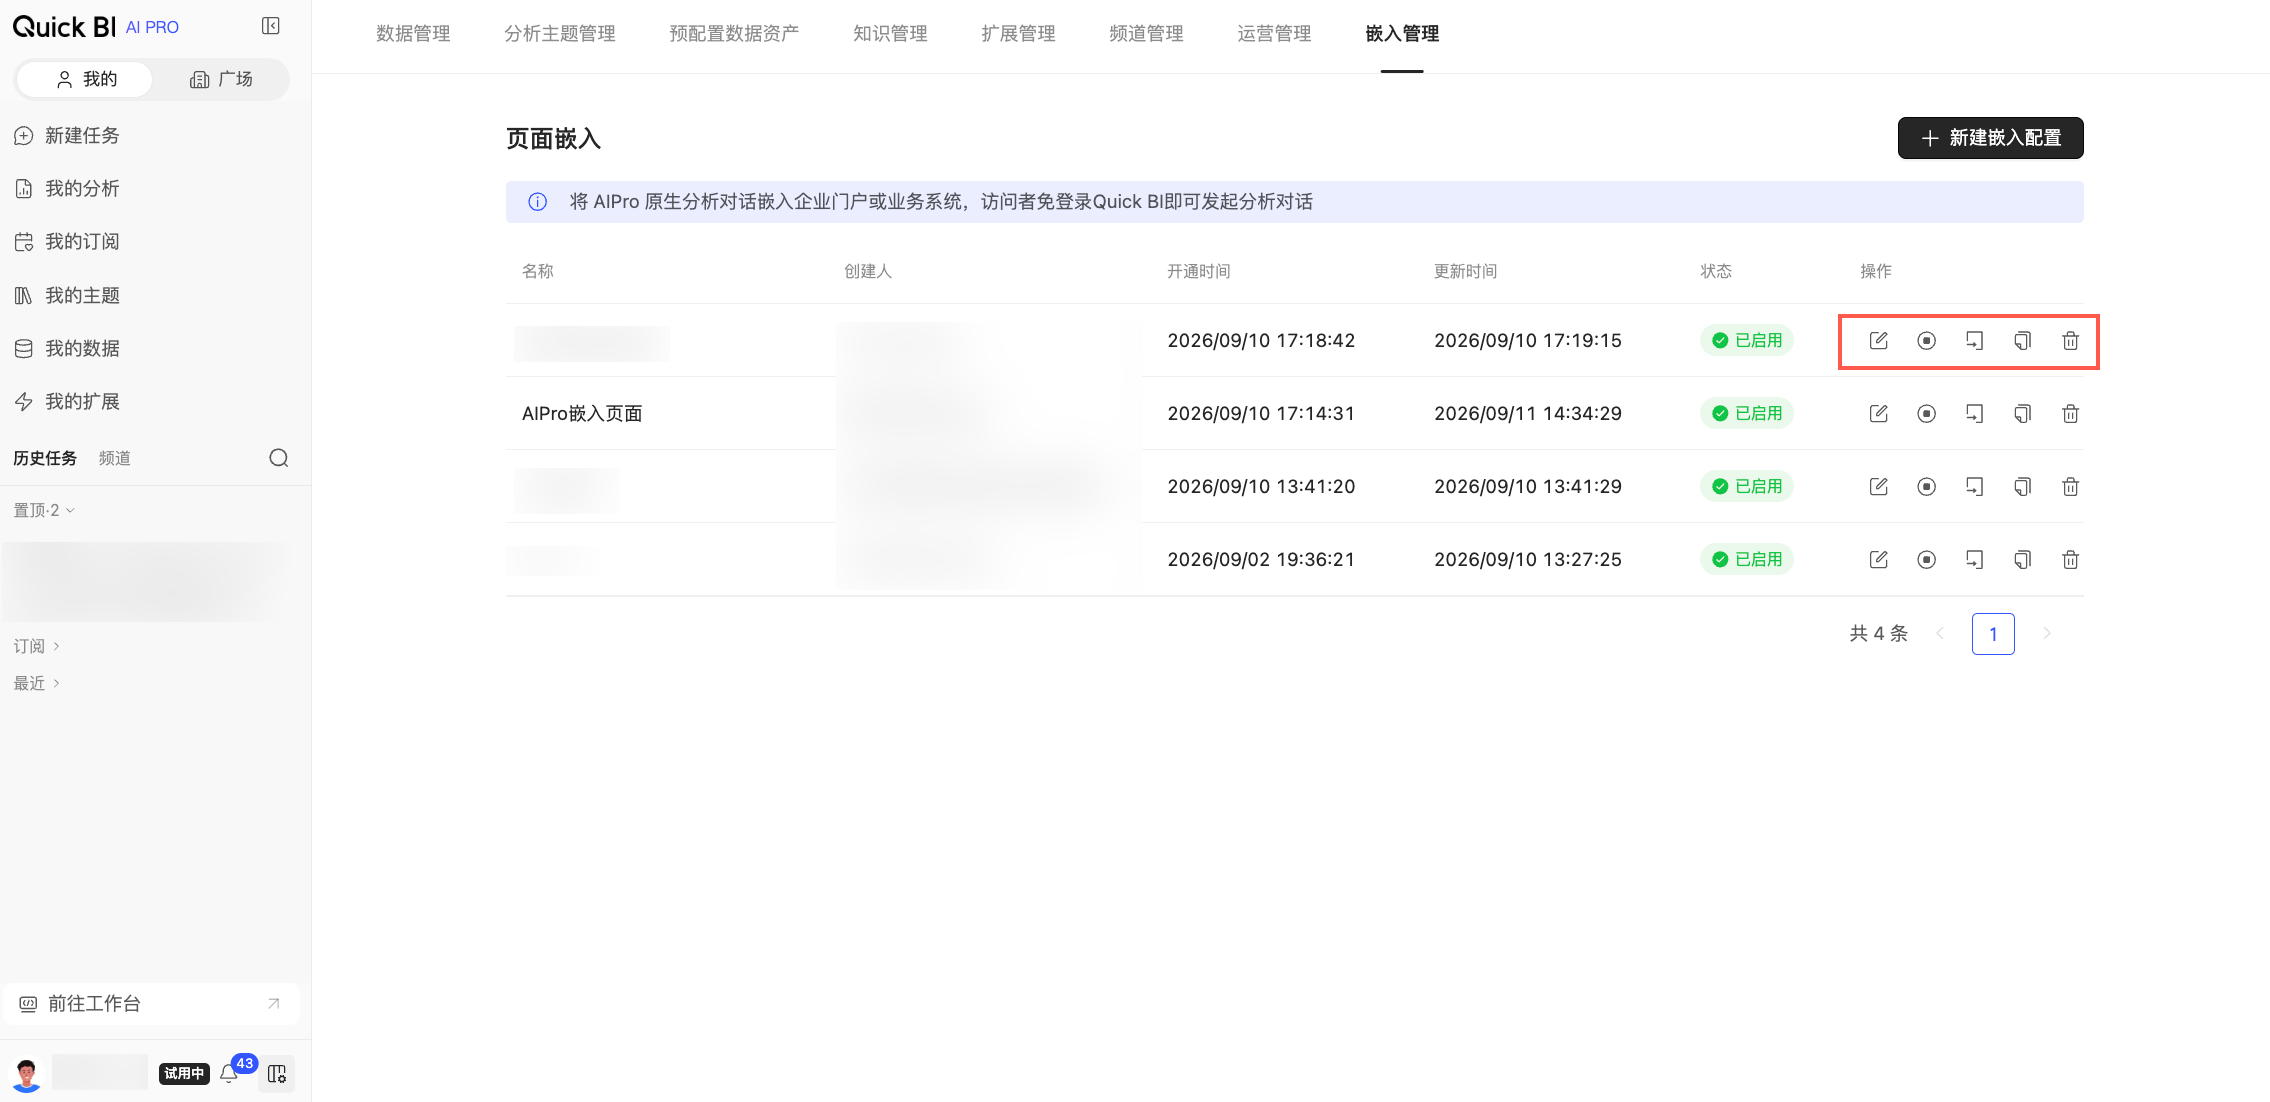
Edit: Click the
icon to open the editing page and modify the embedding configuration.Change Status: Click the
icon to toggle the running status of the embedding configuration.Create a Copy: Click the
icon to create a copy of the selected embedding configuration.Debug Embed Code: Click the
icon to open the Debug embed code dialog box, generate a temporary ticket, and get the embed code for debugging.Delete: Click the
icon to delete a configuration. Deleting a configuration permanently disables any deployed pages that use it, and this action cannot be undone.
 icon to open the editing page and modify the embedding configuration.
 icon to toggle the running status of the embedding configuration.
 icon to create a copy of the selected embedding configuration.
 icon to open the Debug embed code dialog box, generate a temporary ticket, and get the embed code for debugging.
 icon to delete a configuration. Deleting a configuration permanently disables any deployed pages that use it, and this action cannot be undone.