Role management
Quick BI offers a custom role and permission system for secure, flexible organizational management. This system lets you manage users, resources, and role permissions to meet complex security and compliance requirements. You can assign permissions based on job roles, grant multiple roles to a user, and assign users to specific roles in batches. This enables centralized management and clarifies functional boundaries. You can customize permission controls for each functional module, from organization-level to workspace-level roles. This ensures that users perform duties only within their designated scope. This topic describes how to customize organization roles and workspace roles, and add users to custom roles.
Limitations
Custom roles are available only in Quick BI Professional.
Only an organization administrator can configure custom roles.
Role-related open API capabilities currently support only predefined roles. Support for custom roles will be gradually expanded.
Features
Predefined user roles: Quick BI provides several default roles. You can delete these default roles and replace them with custom ones.
At the organization level, three predefined organization roles are provided: organization administrator, permission administrator, and general user.
At the workspace level, four predefined workspace roles are provided: workspace administrator, workspace developer, workspace analyst, and workspace viewer.
Custom roles: Create custom organization and workspace roles based on your business needs and assign multiple roles to a user.
Functional permissions: Define the functional permissions for each role.
Resource permissions: Centrally authorize access to resources at the organization and workspace levels.
Access the feature
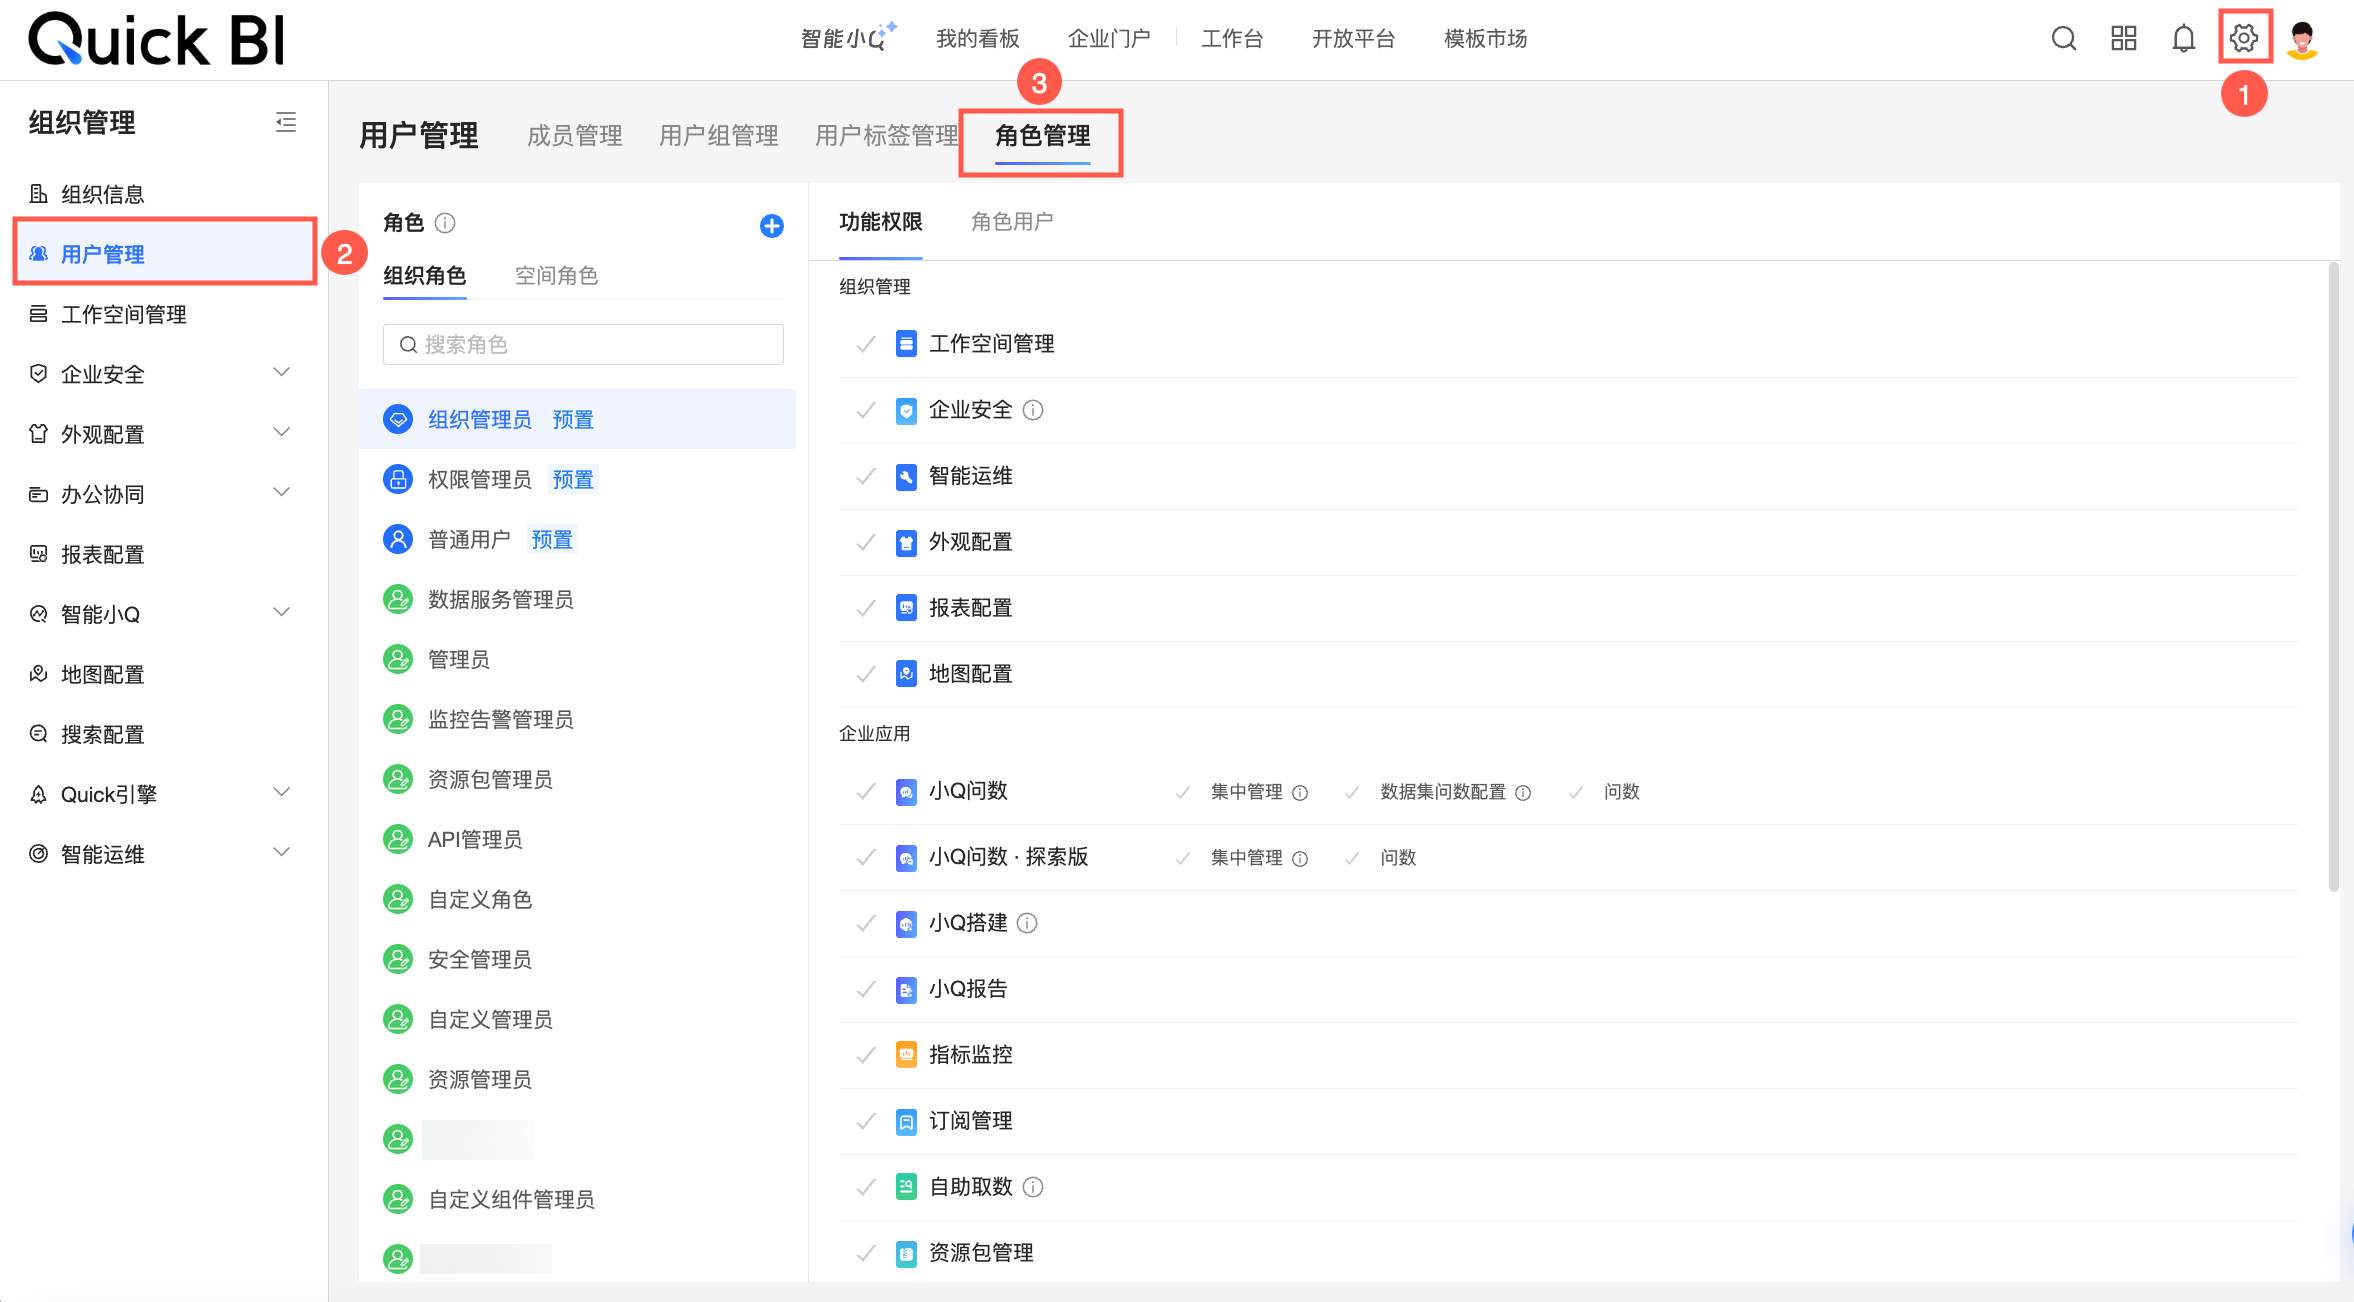
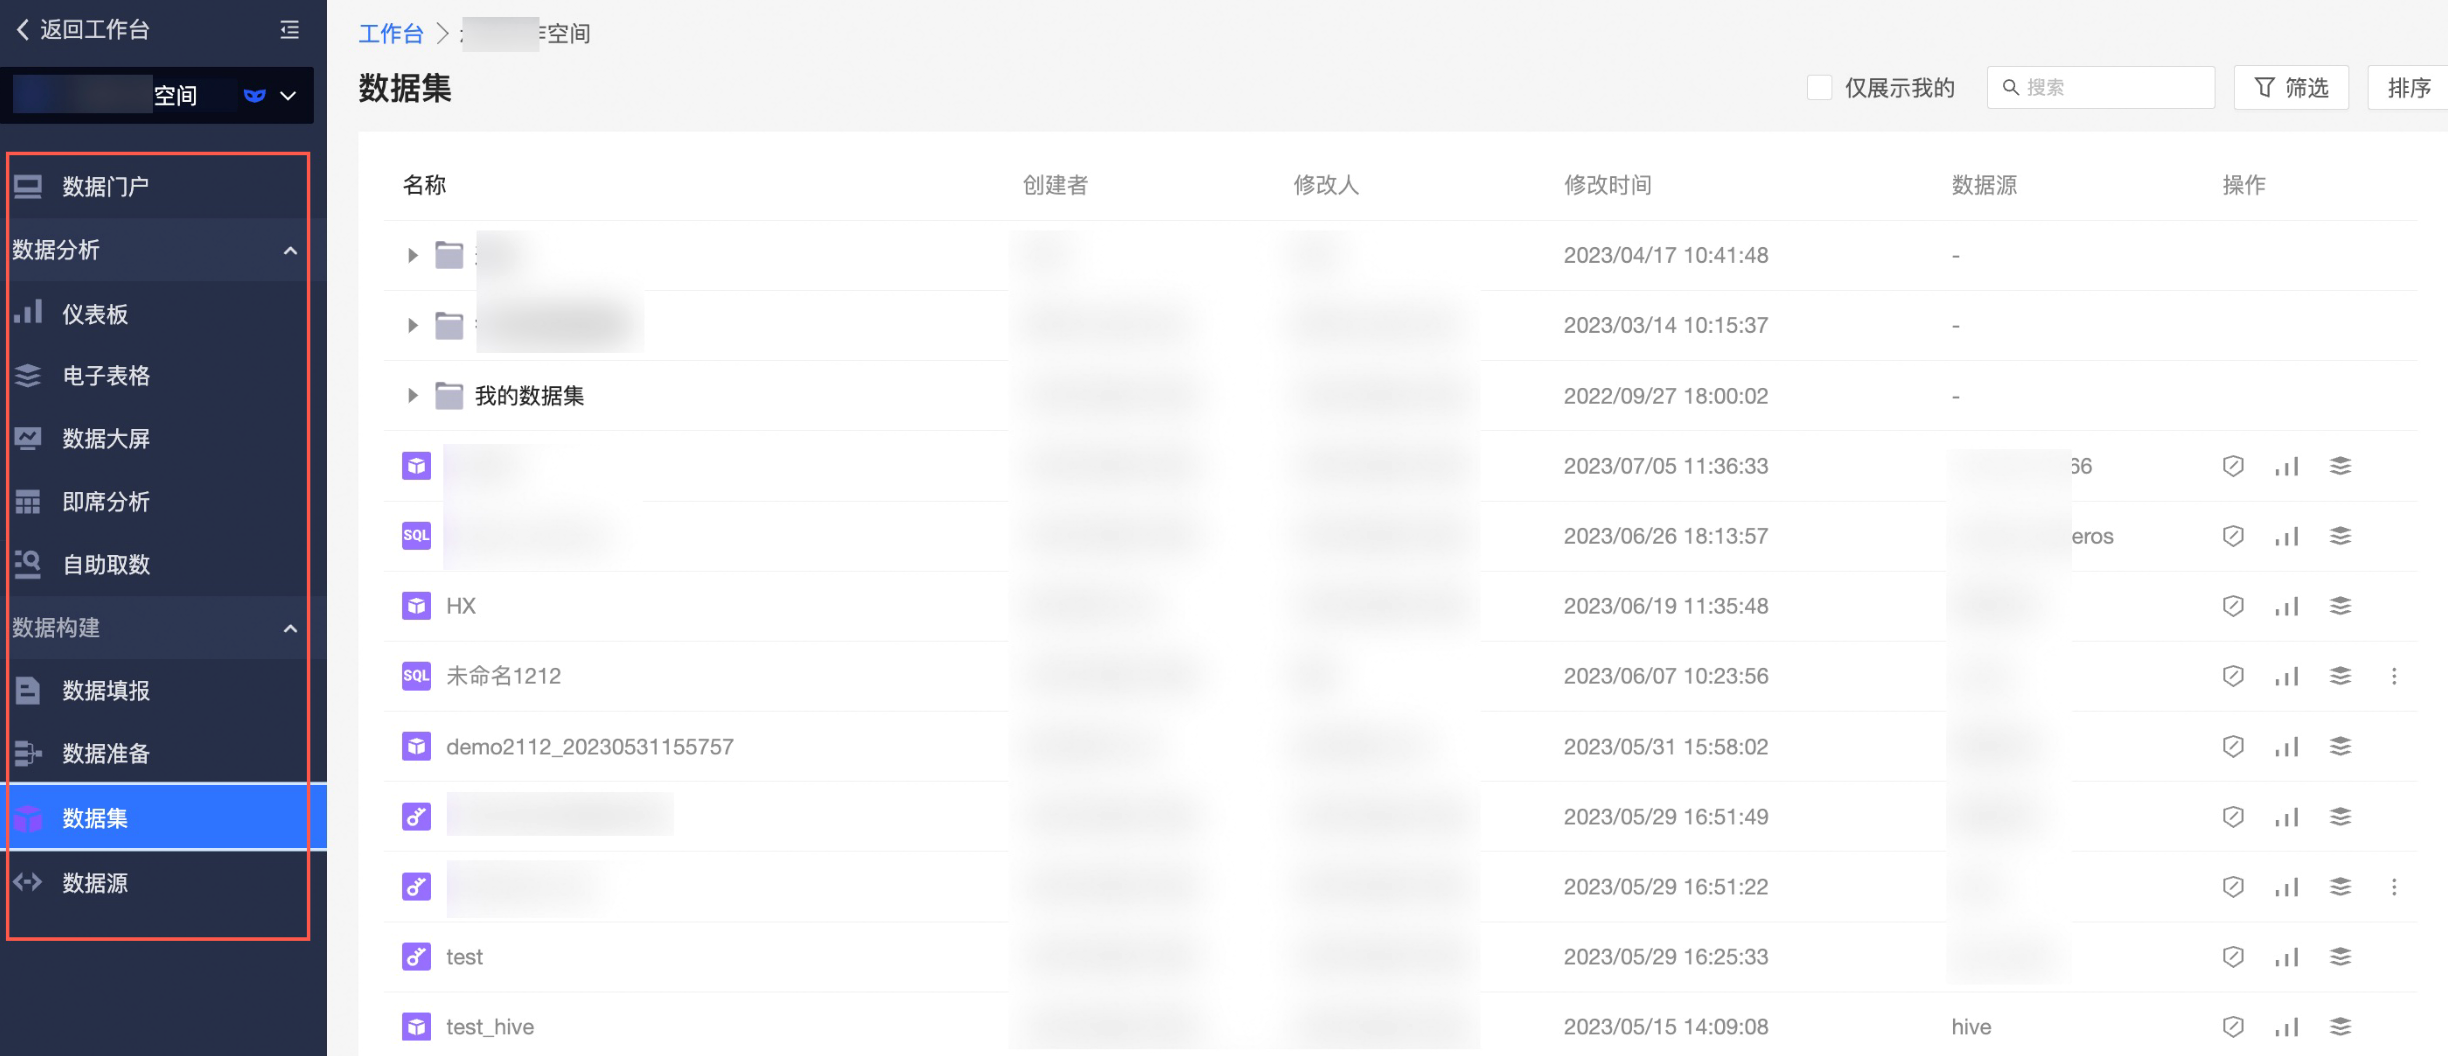
On the Quick BI homepage, follow the steps in the figure to access the Role management page.
Organization roles
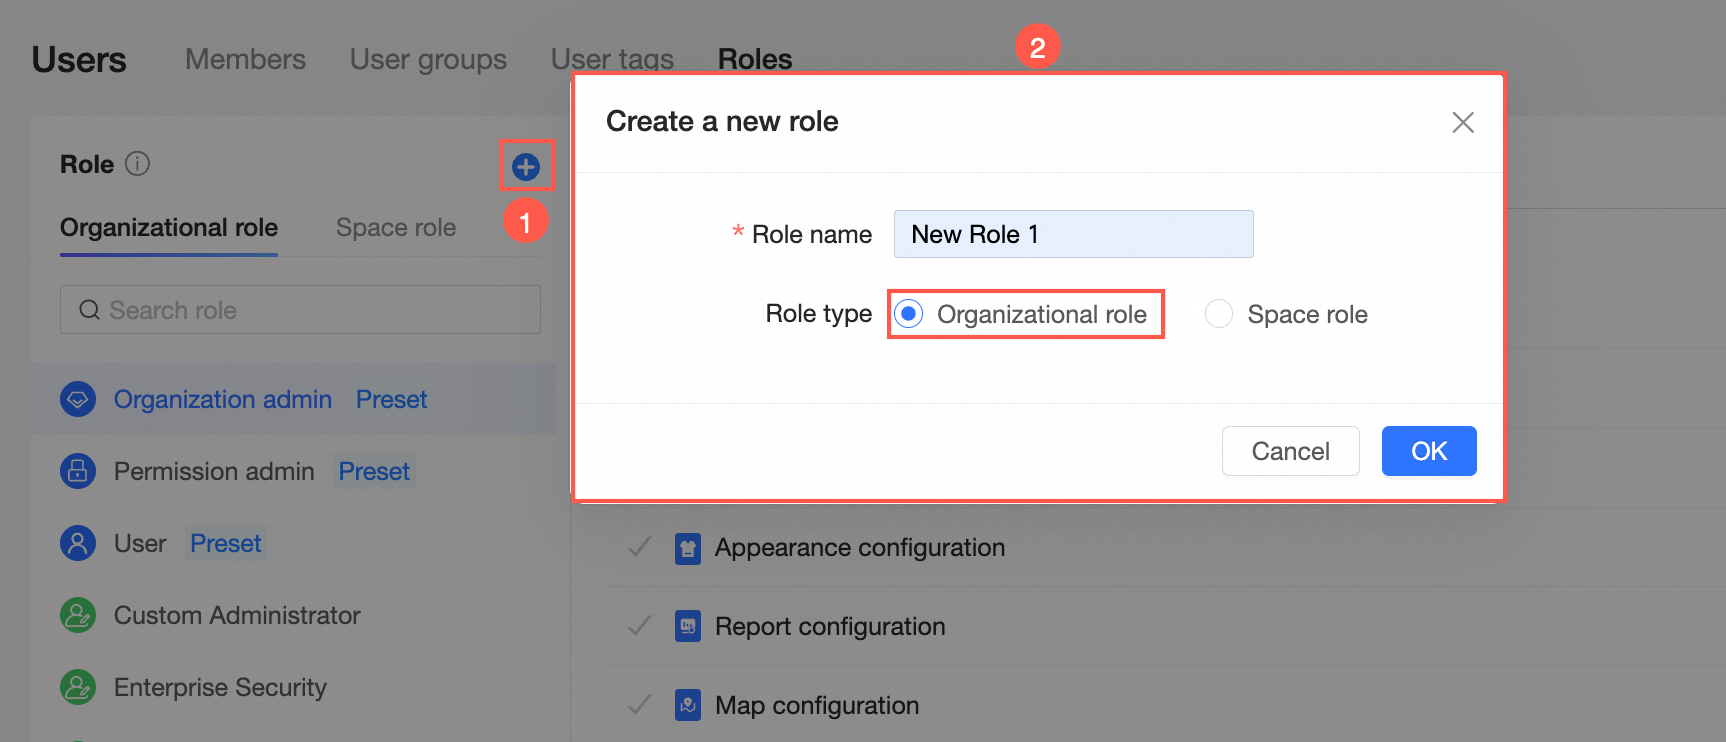
Create an organization role.
On the Role management page, create an organization role as shown in the figure.
Configure functional permissions.
On the Role management page, configure the functional permissions for the role as shown in the figure.
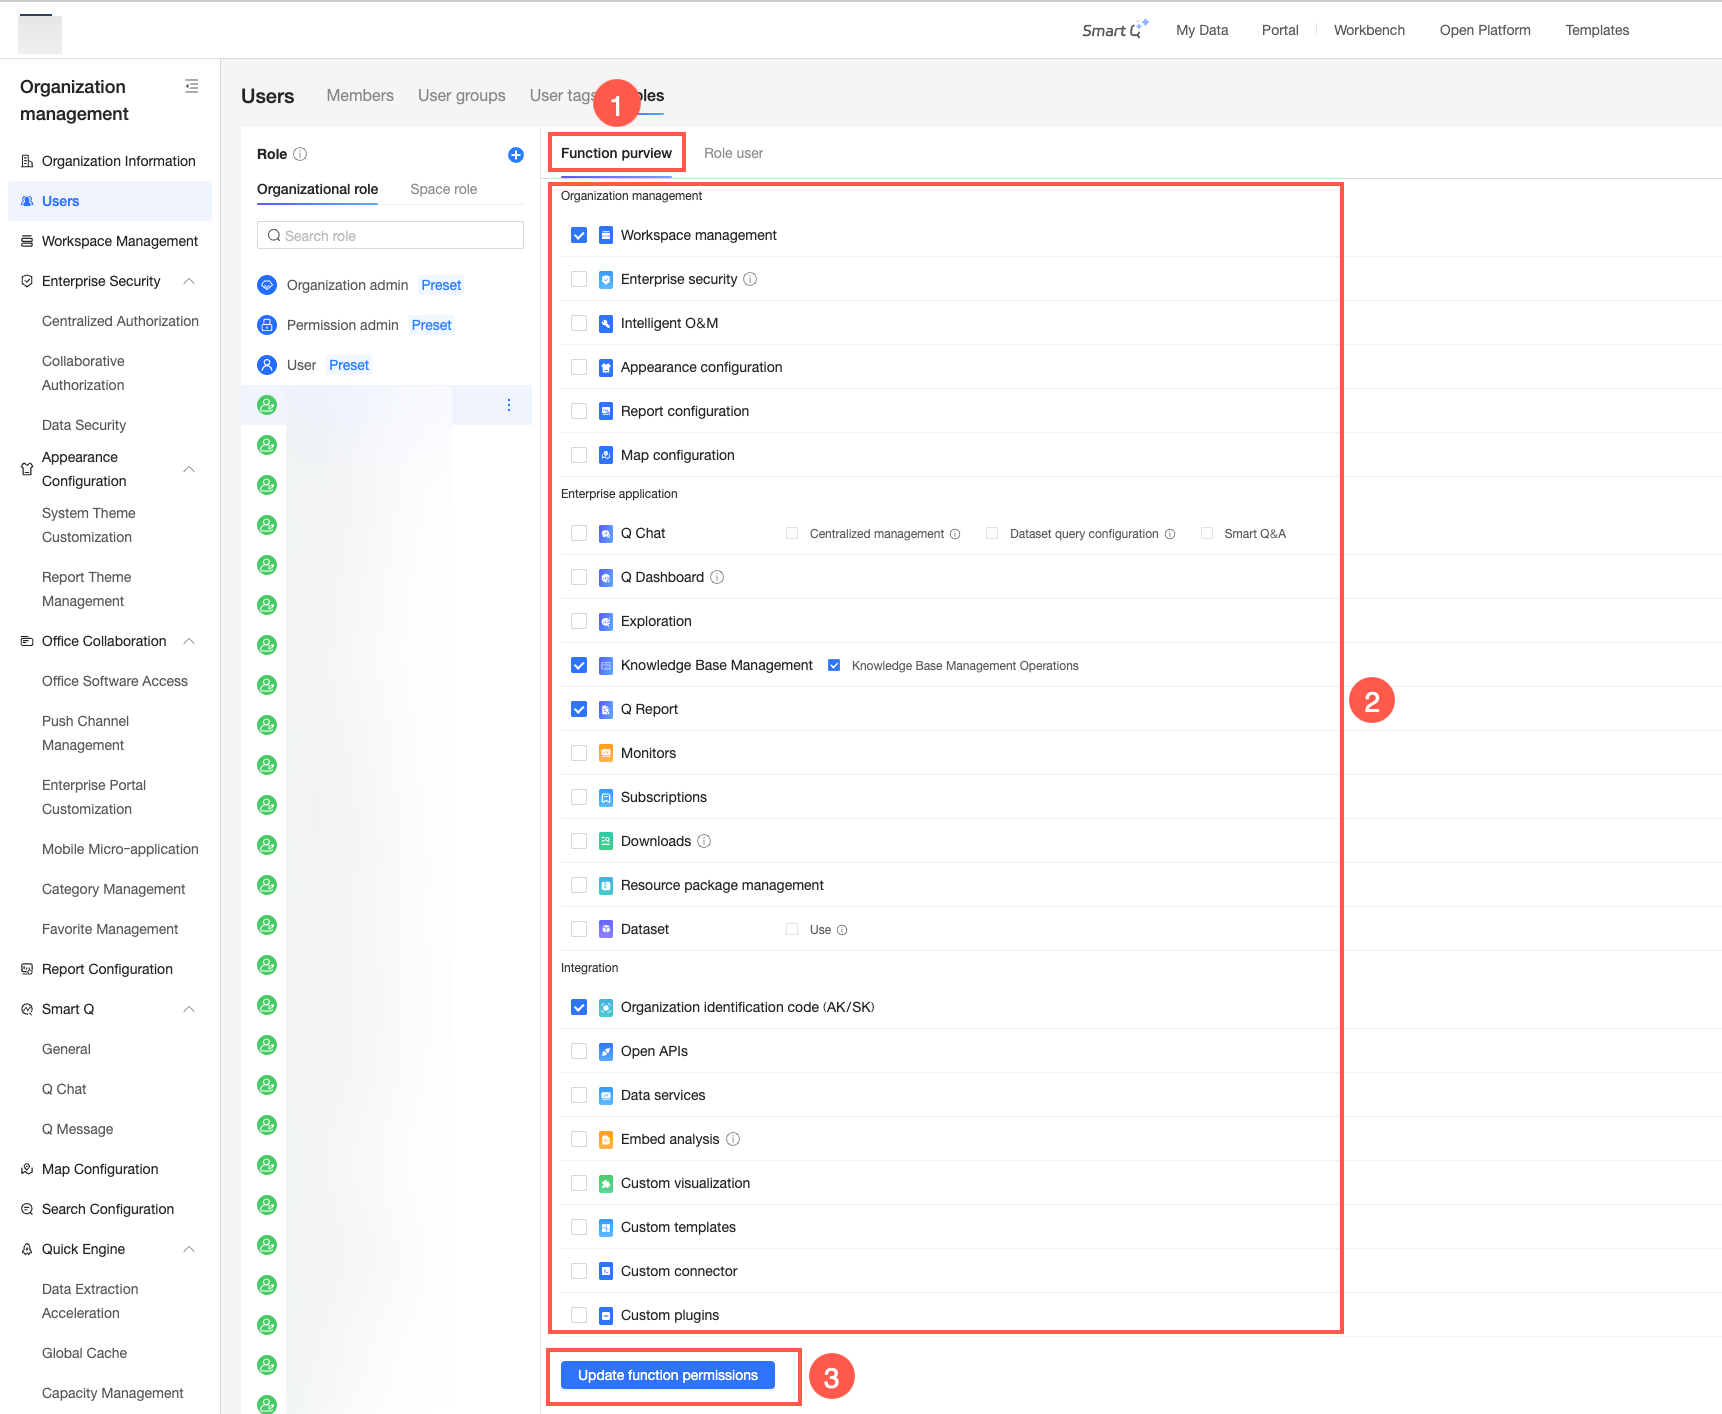 Organization Management: Workspace Management, Enterprise Security (including Centralized Authorization, Collaborative Authorization Configuration, and Data Security), intelligent O&M, Appearance Configuration, Report Configuration, and Map Configuration.
Enterprise Applications: Q-Robot (including Centralized Management, Dataset Q&A Configuration, and Q&A), Q-Robot - Exploration Edition (including Centralized Management and Q&A), Q-Builder (including the intelligent Q feature in dashboards), Exploratory Analytics, Knowledge Base Management (knowledge base operations), Q-Report, Metric Monitoring, Subscription Management, Ad Hoc Query, Resource Package Management, and Dataset (Use).
NoteThe dataset "Use" permission applies to both organization and workspace roles. You only need to grant the permission in one role.
Open Integration: Organization ID (AK/SK), open API, data service, embedded analysis, Custom Component Visualization, and Custom Template.
NoteBy default, newly created organization roles have functional permissions selected for the following modules: Q-Robot (includes Q&A; excludes Centralized Management and Dataset Q&A Configuration), Q-Robot - Exploration Edition (includes Q&A; excludes Centralized Management), Q-Builder, Exploratory Analytics, Q-Report, Metric Monitoring, Subscription Management, Ad Hoc Query, open API, data service, and embedded analysis. You can select or clear the check boxes for other modules.
You cannot modify the functional permissions of a predefined organization role. However, an organization administrator can modify the Dataset (Use) permission for the general user role as needed. The change takes effect only within the current organization.
The organization administrator is the role with the highest level of permissions in an organization and can manage all features. This includes permissions for Workspace Management, Enterprise Security (including Centralized Authorization, Collaborative Authorization Configuration, and Data Security), intelligent O&M, Appearance Configuration, Report Configuration, Map Configuration, Q-Robot (including Centralized Management, Dataset Q&A Configuration, and Q&A), Q-Robot - Exploration Edition (including Centralized Management and Q&A), Q-Builder (including the intelligent Q feature in dashboards), Exploratory Analytics, Knowledge Base Management (knowledge base operations), Q-Report, Metric Monitoring, Subscription Management, Ad Hoc Query, Resource Package Management, Dataset (Use), Organization ID (AK/SK), open API, data service, embedded analysis, Custom Visualization, and Custom Template.
The permission administrator role has permissions for Enterprise Security, Q-Robot (includes Q&A; excludes Centralized Management and Dataset Q&A Configuration), Q-Robot - Exploration Edition (including Centralized Management and Q&A), Q-Builder, Exploratory Analytics, Metric Monitoring, Subscription Management, Ad Hoc Query, Dataset (Use), open API, data service, and embedded analysis.
An organization administrator can modify only the Dataset (Use) permission for the general user role. In the permission settings for the general user role, this permission is optional, as shown in the following figure.

Add users to a role.
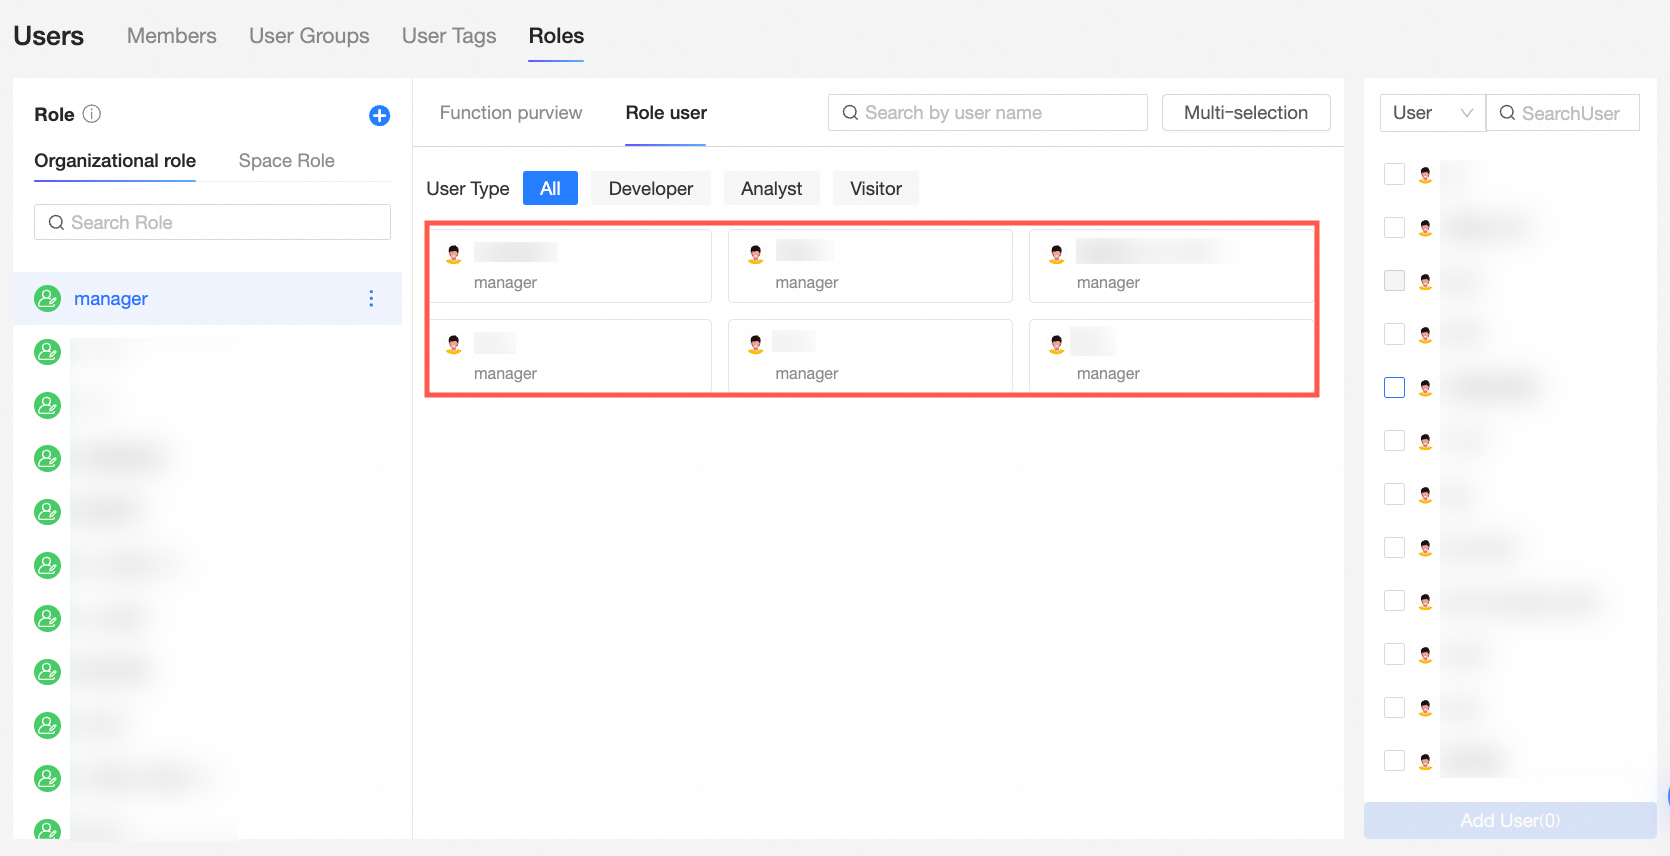
On the Role management page, add users to the role as shown in the figure.
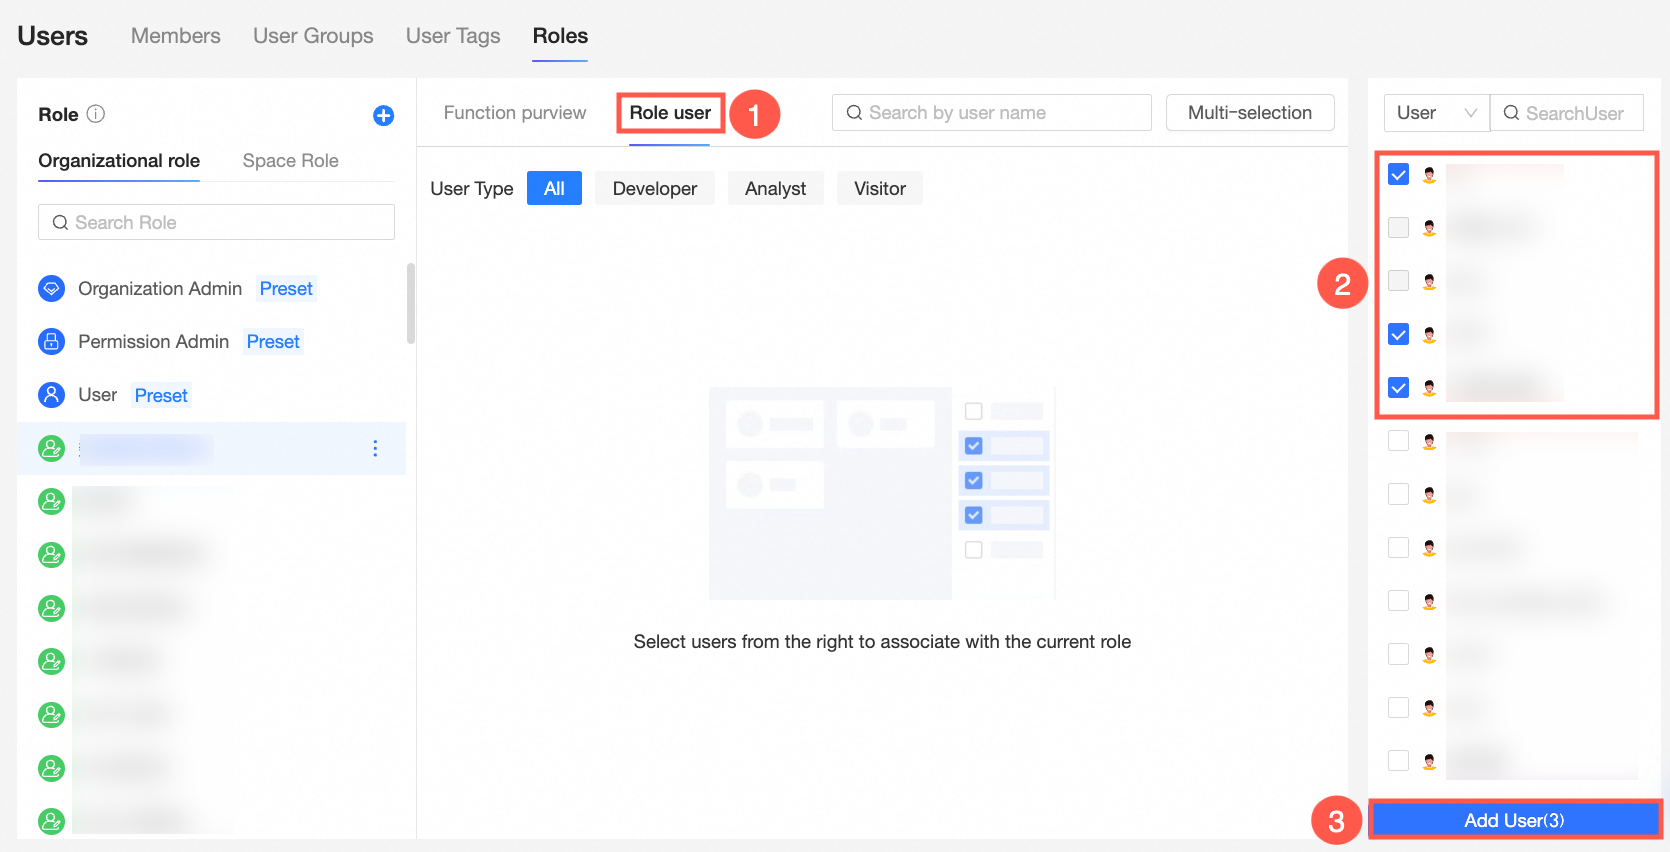
After you click Add User, the selected users appear in the Role Users list. You can click the User Type filter to quickly view all users of a specific type or continue to select users from the user list on the right.

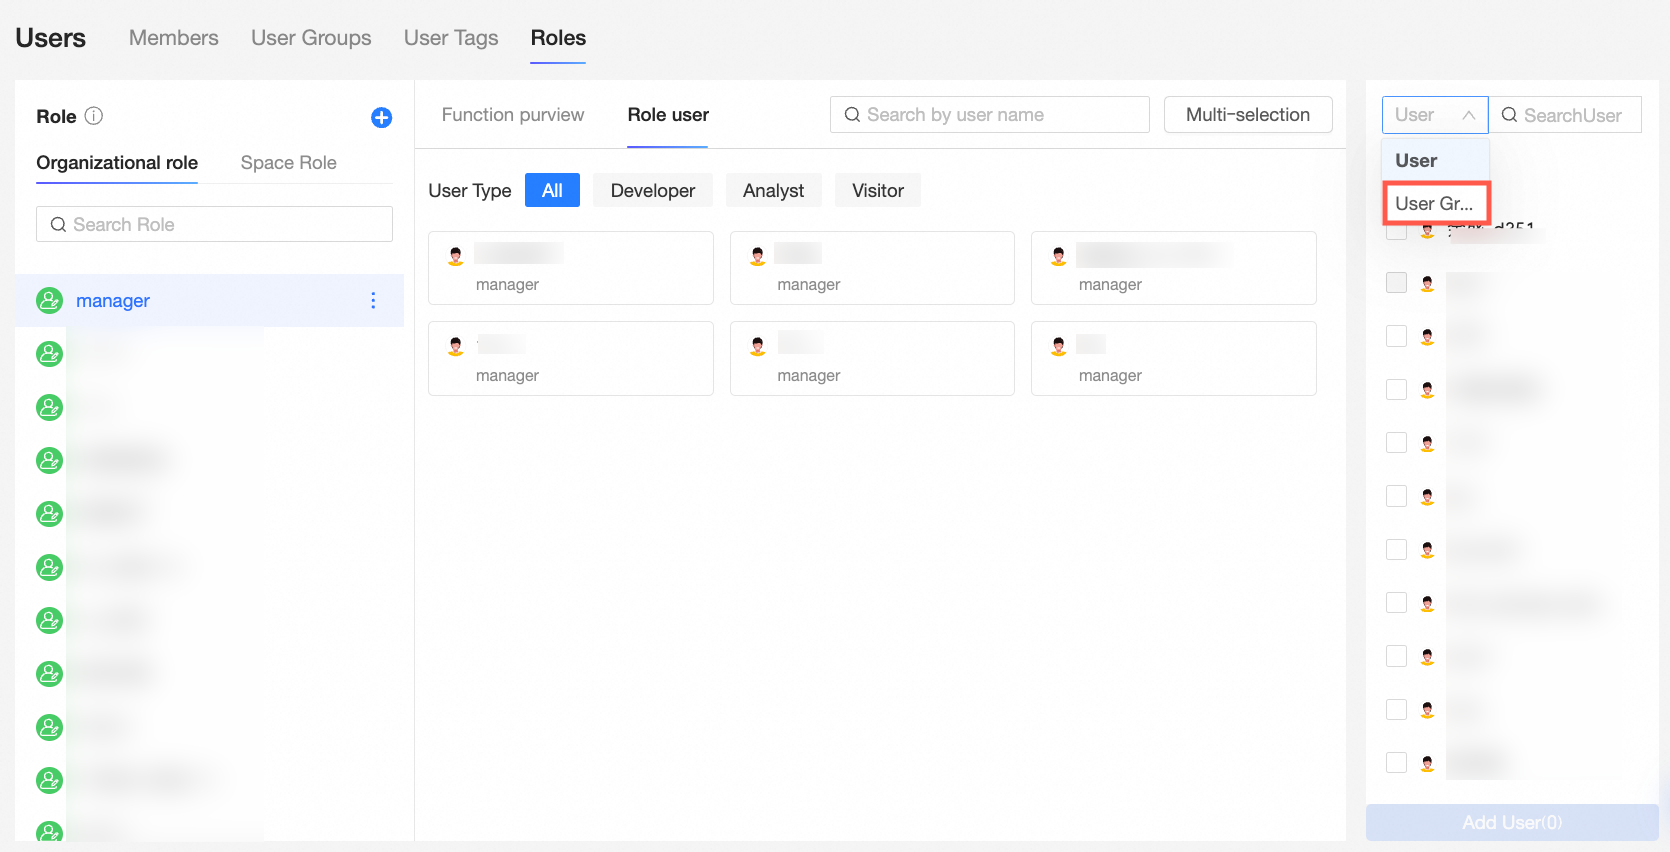
You can switch to the User Group tab and select members from multiple groups in batches to add them.
You can expand a user group (①), select all users in the current group (②), or select specific users in the current group (③).
After you click Add User, the selected users appear in the Role Users list.
Remove users from a role.
In the Role Users list, hover over a user, click the
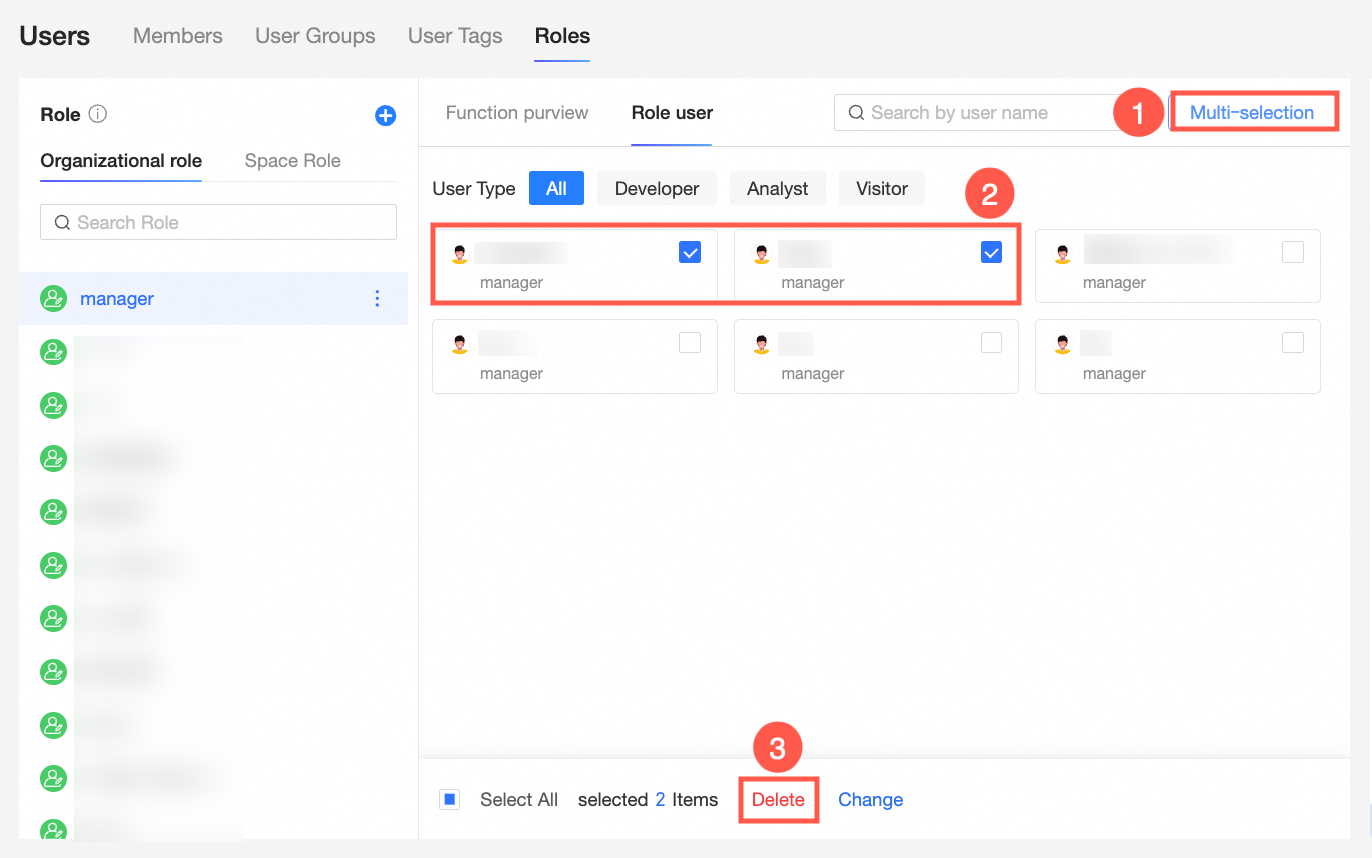
icon in the upper-right corner, and click OK in the Unassign Organization Role dialog box.You can remove users in batches as shown in the figure.
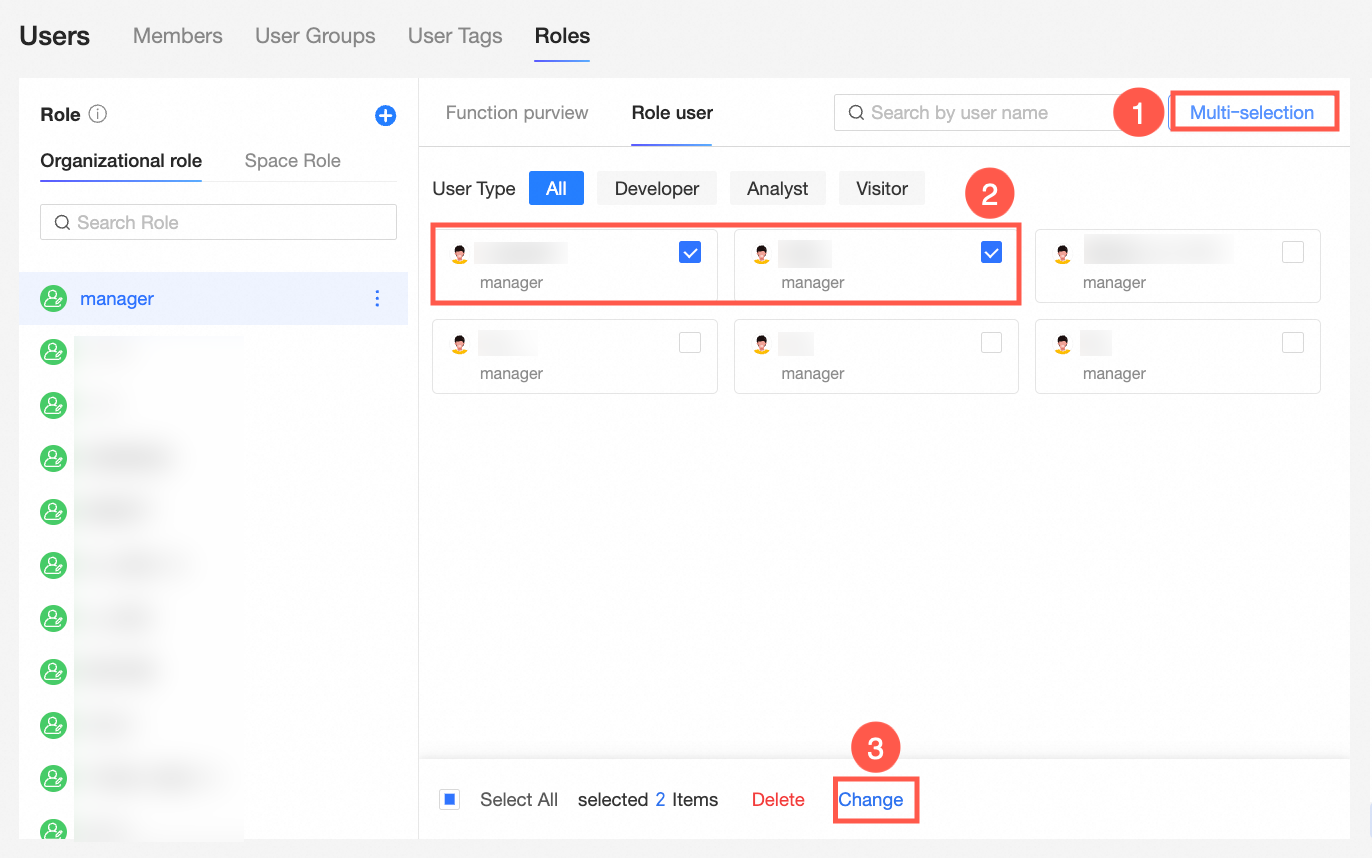
Change roles for users in batches.
In the Role Users list, follow the steps in the figure to open the Batch Change Role panel.
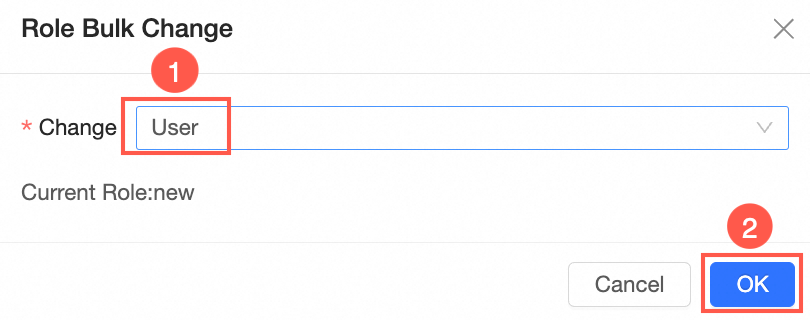
In the Batch Change Role panel, select a role under Change to and click OK.

 icon in the upper-right corner, and click OK in the Unassign Organization Role dialog box.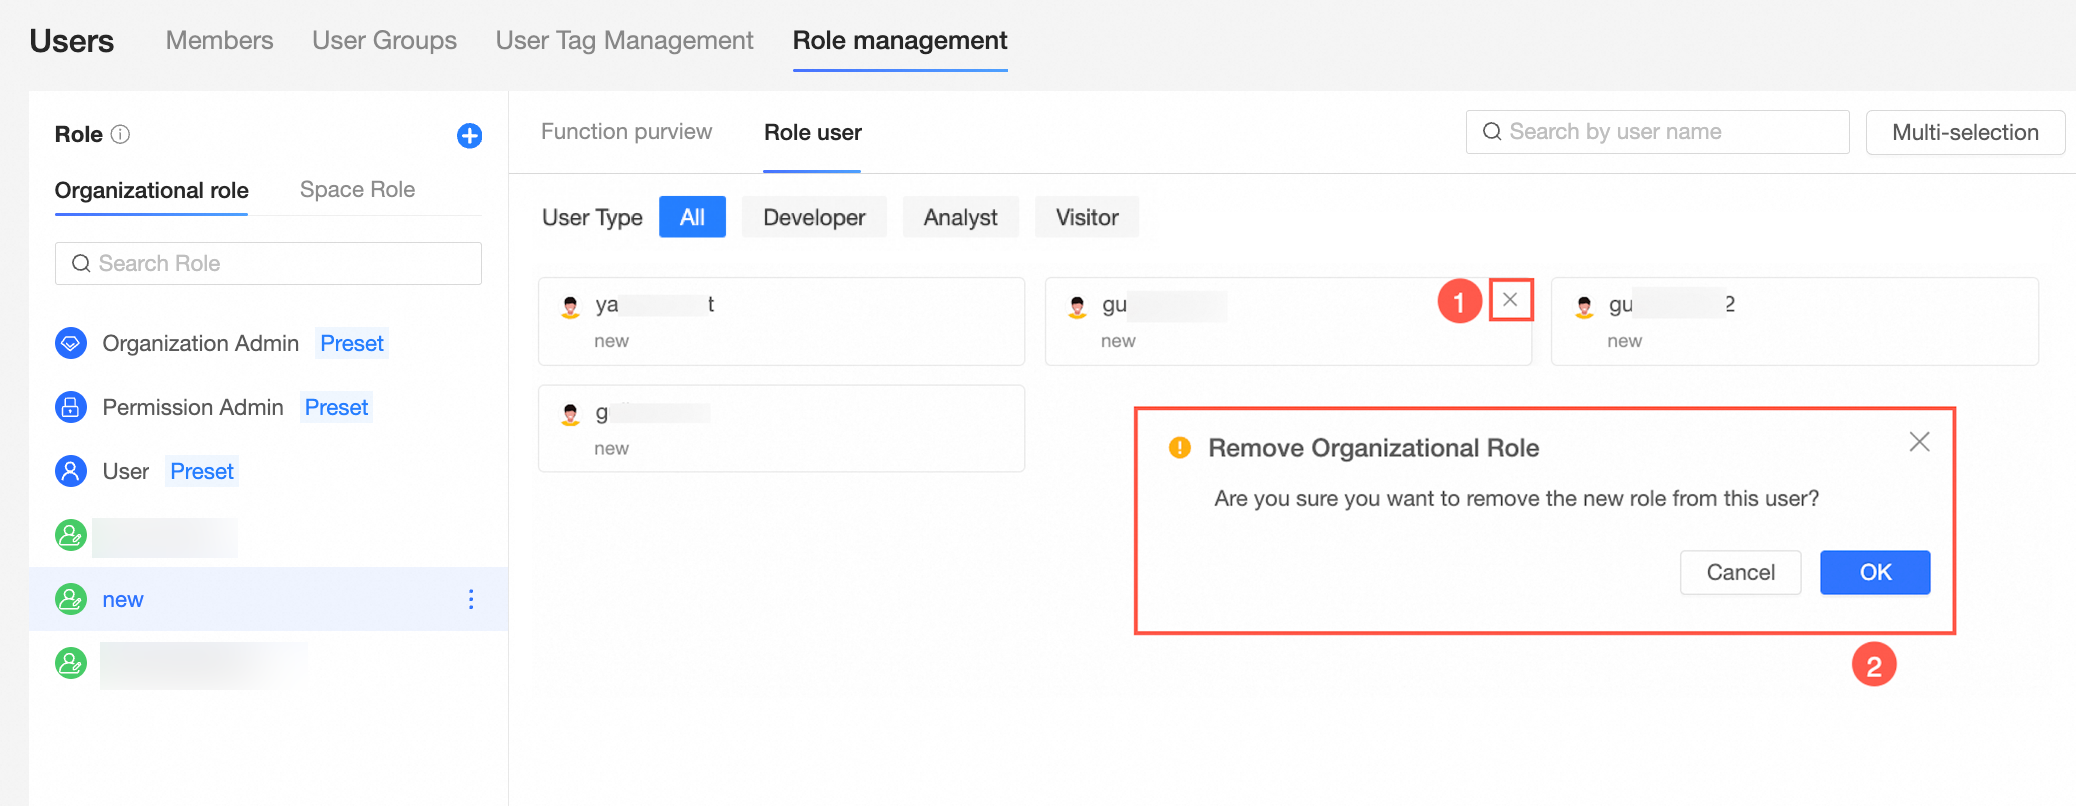
Workspace roles
Create a workspace role.
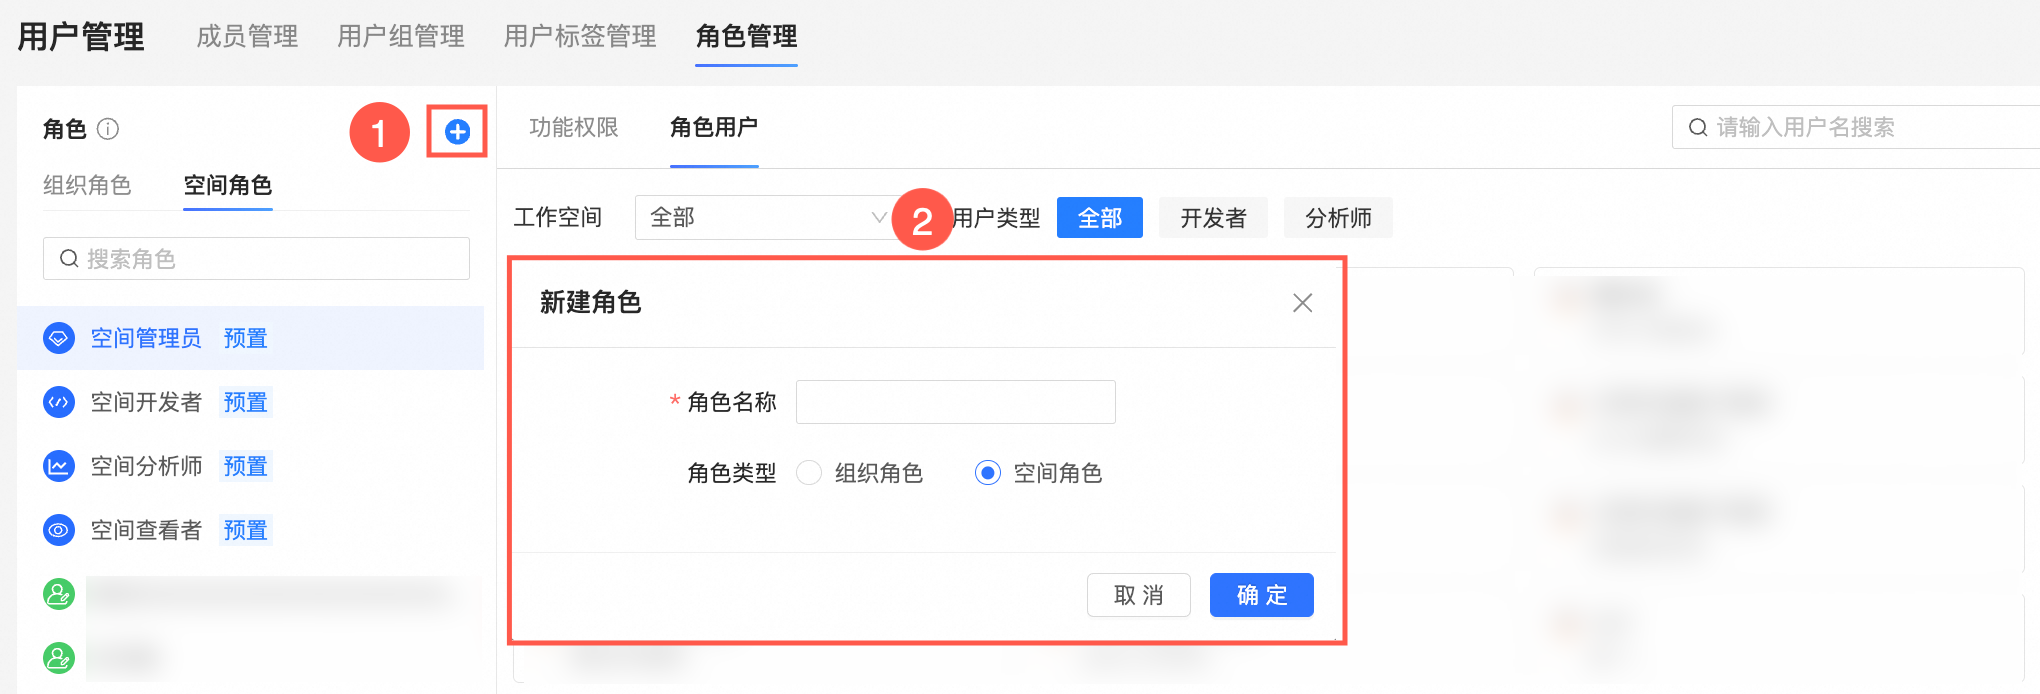
On the Role management page, create a workspace role as shown in the figure.
Configure functional permissions.
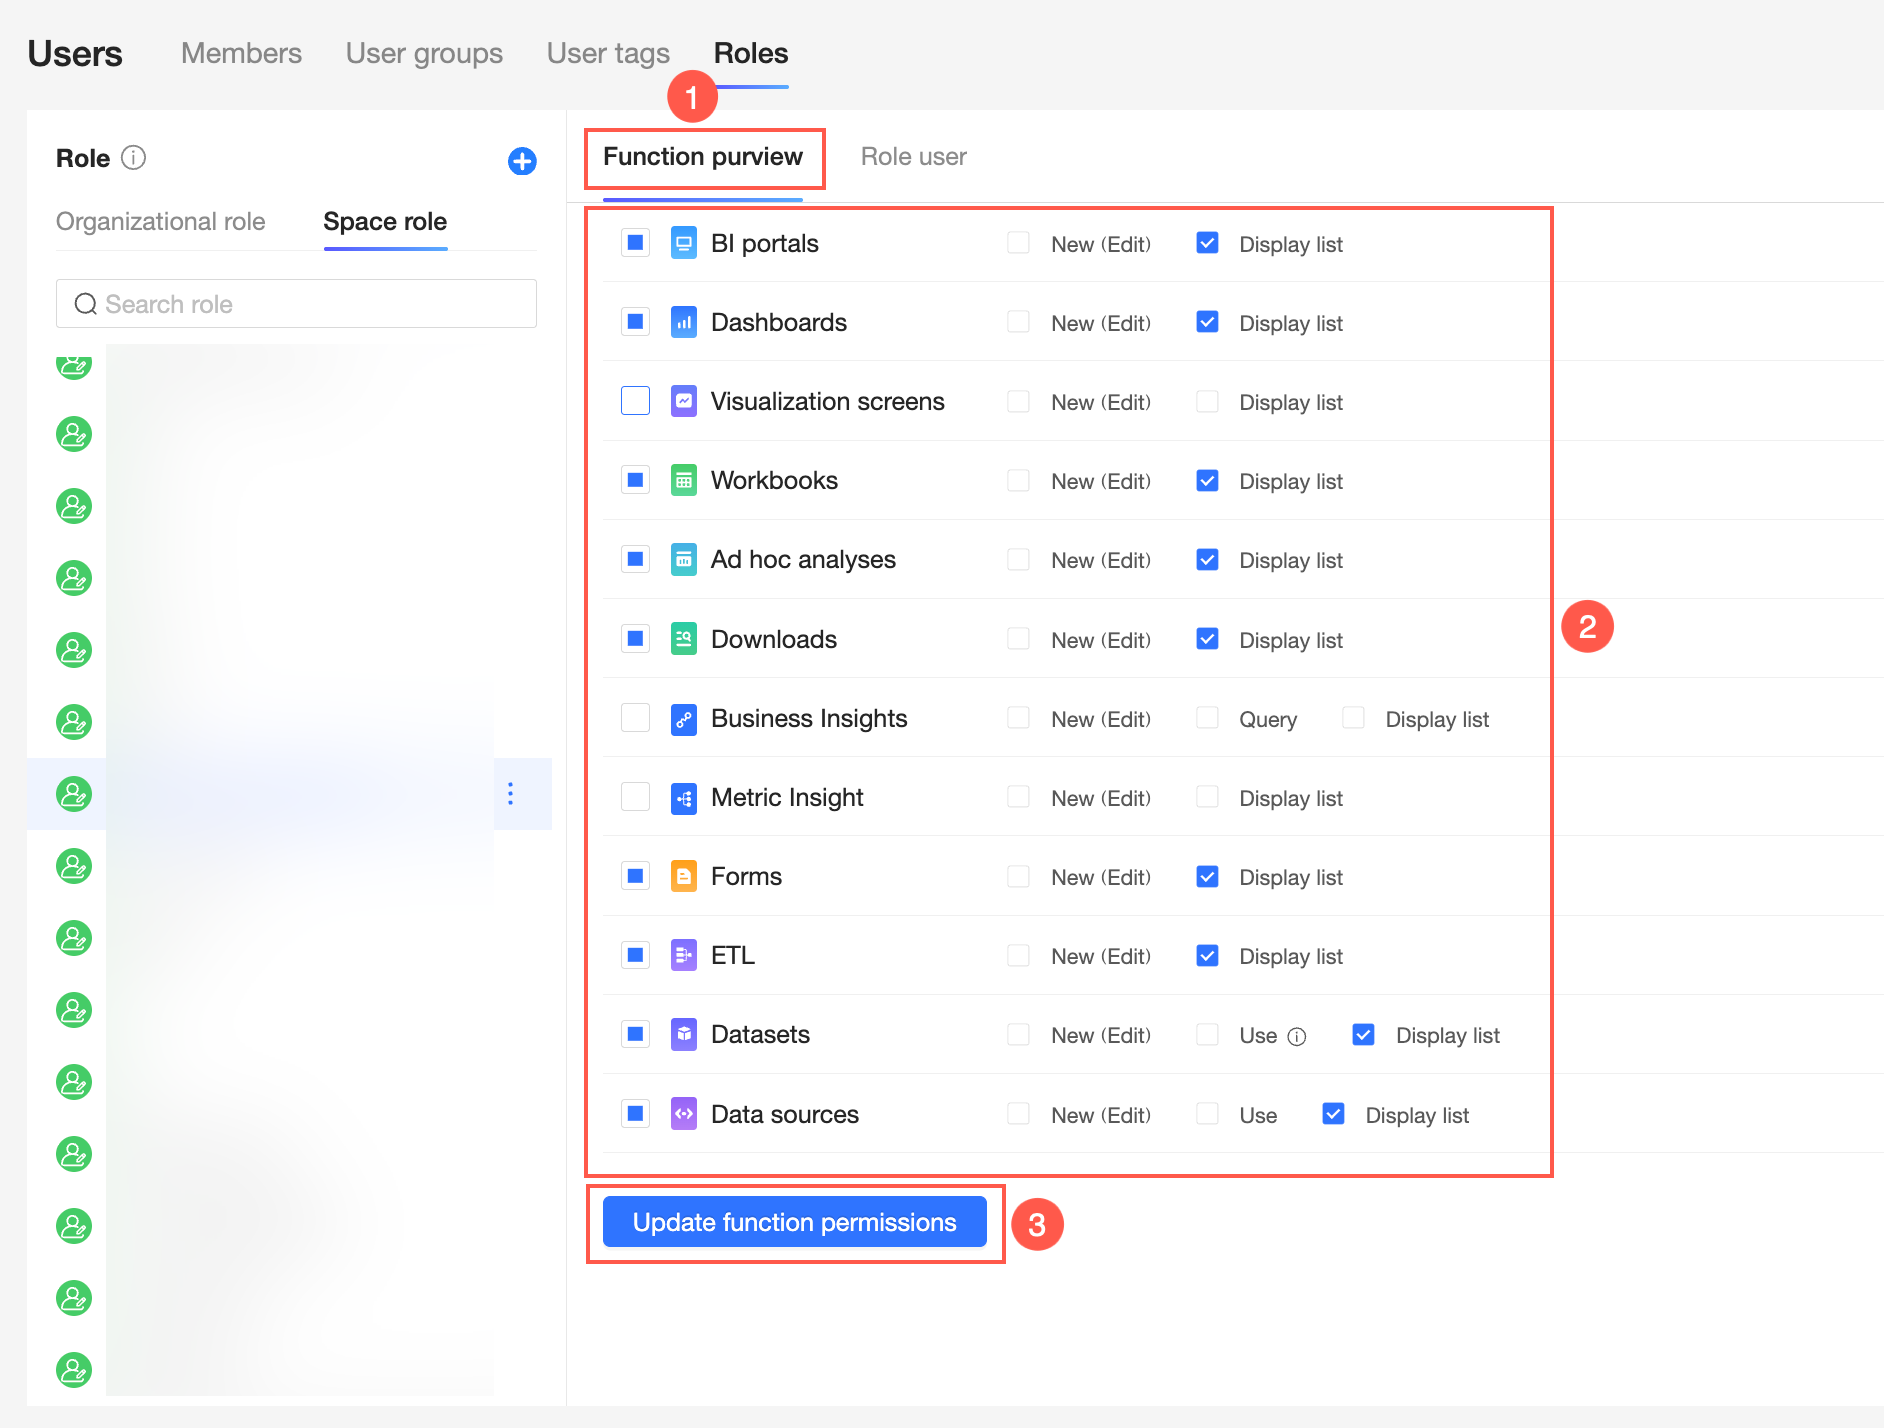
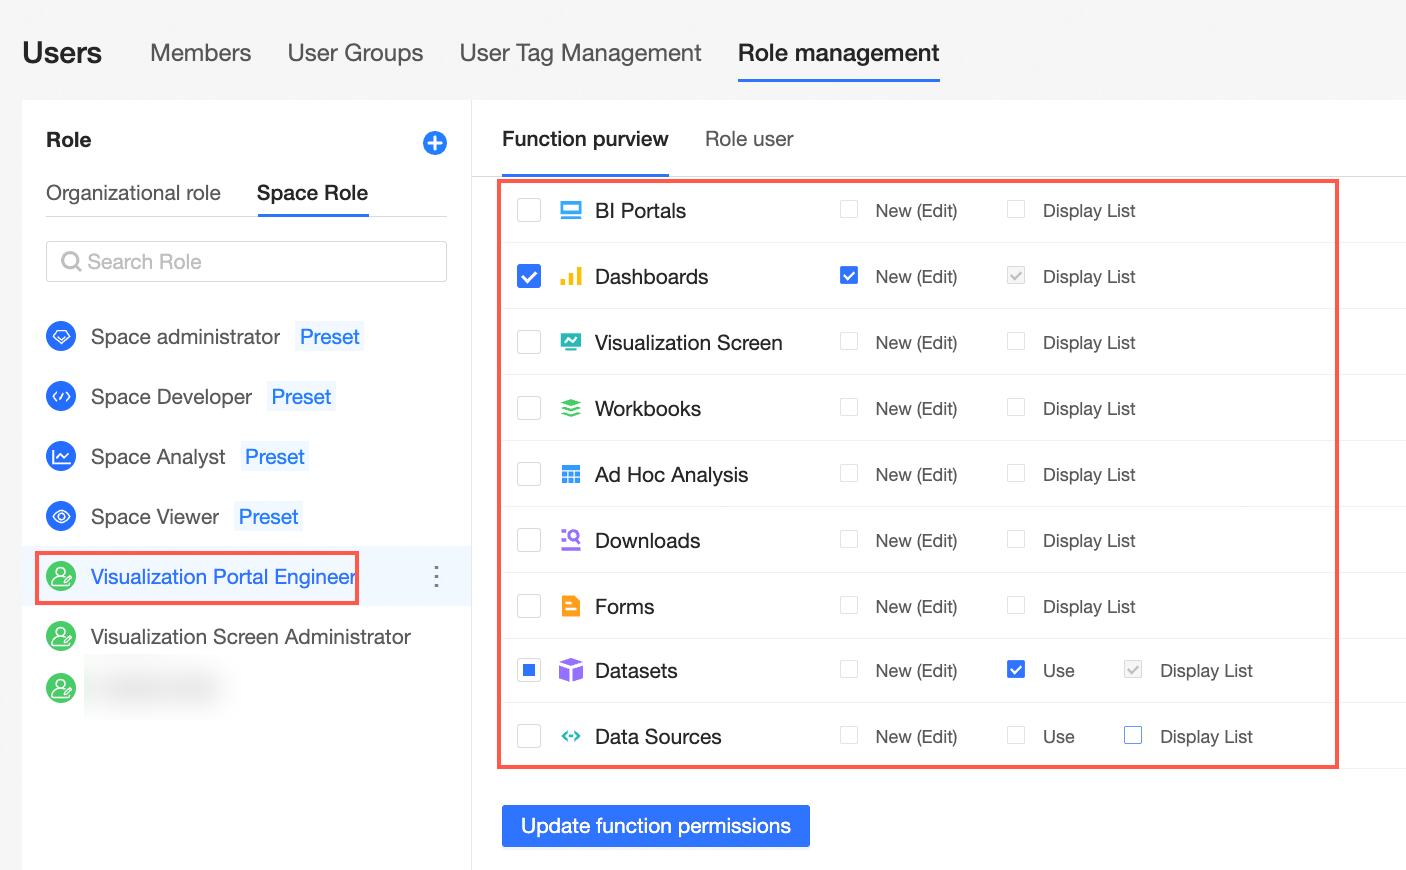
On the Role management page, configure the functional permissions for the role as shown in the figure.
NoteWhen you create a workspace role, view permissions for all modules are selected by default. You can then customize the role by granting create (edit) permissions for specific modules and use permissions for datasets and data sources.
You cannot modify the functional permissions of a predefined workspace role.
A workspace administrator has the highest level of permissions in a workspace. This role includes create (edit), use, and view permissions for all modules, as well as the ability to manage the permissions and assets of other members.
A workspace developer has create (edit), use, and view permissions for all modules.
A workspace analyst has create (edit) and view permissions for Data Portal, Dashboard, data dashboard, spreadsheet, Ad Hoc Analysis, Ad Hoc Query, data preparation, Business Insights, and Metric Insights. This role also has view permissions for Data Entry and data sources, and use and view permissions for datasets.
A workspace viewer has view permissions for all modules.
A user with create (edit) permissions for a module can also create, rename, and delete folders in that module. A user with only view permissions, such as a workspace viewer, cannot manage folders.
Add users to a role.
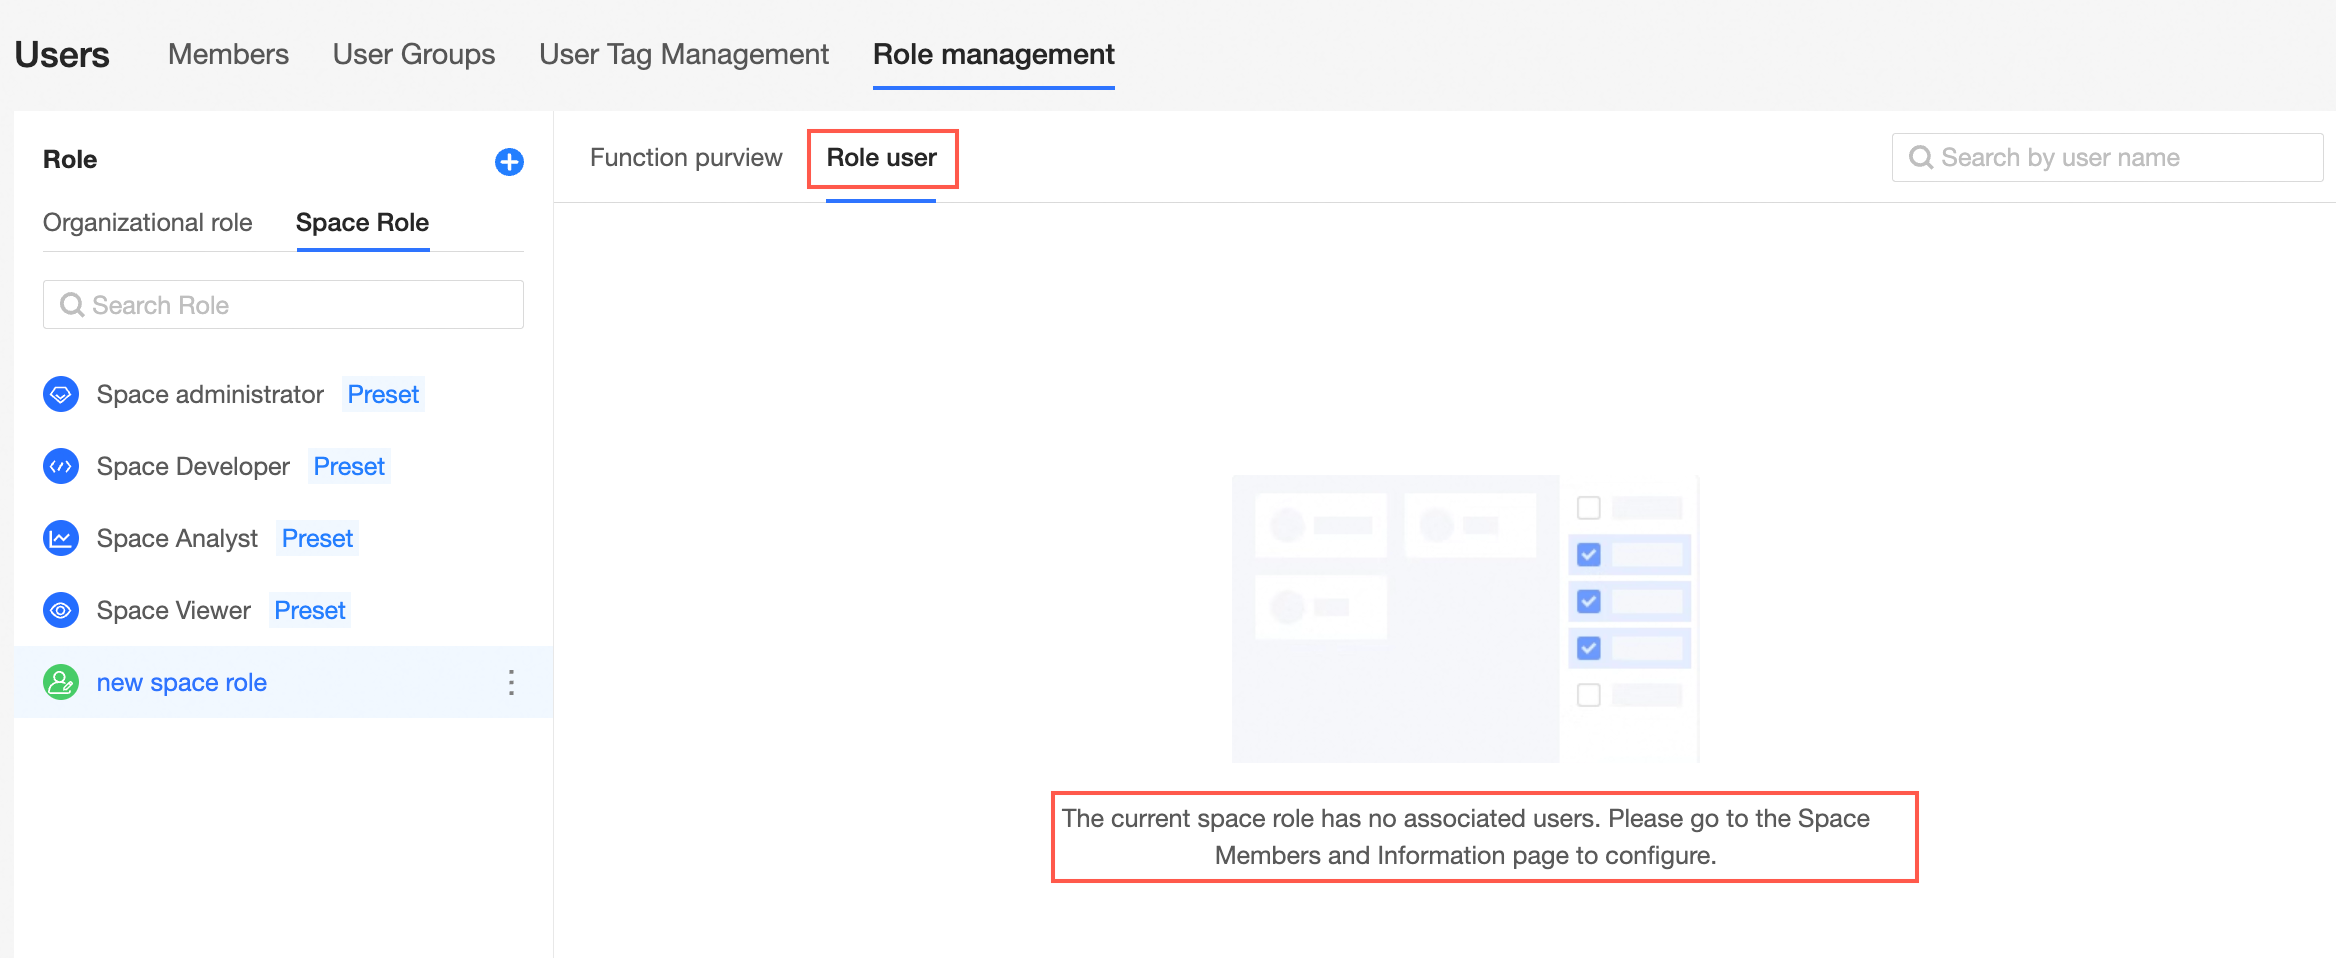
On the Role management page, the user list for a new role is empty. You must add users from the Workspace Members and Information page.
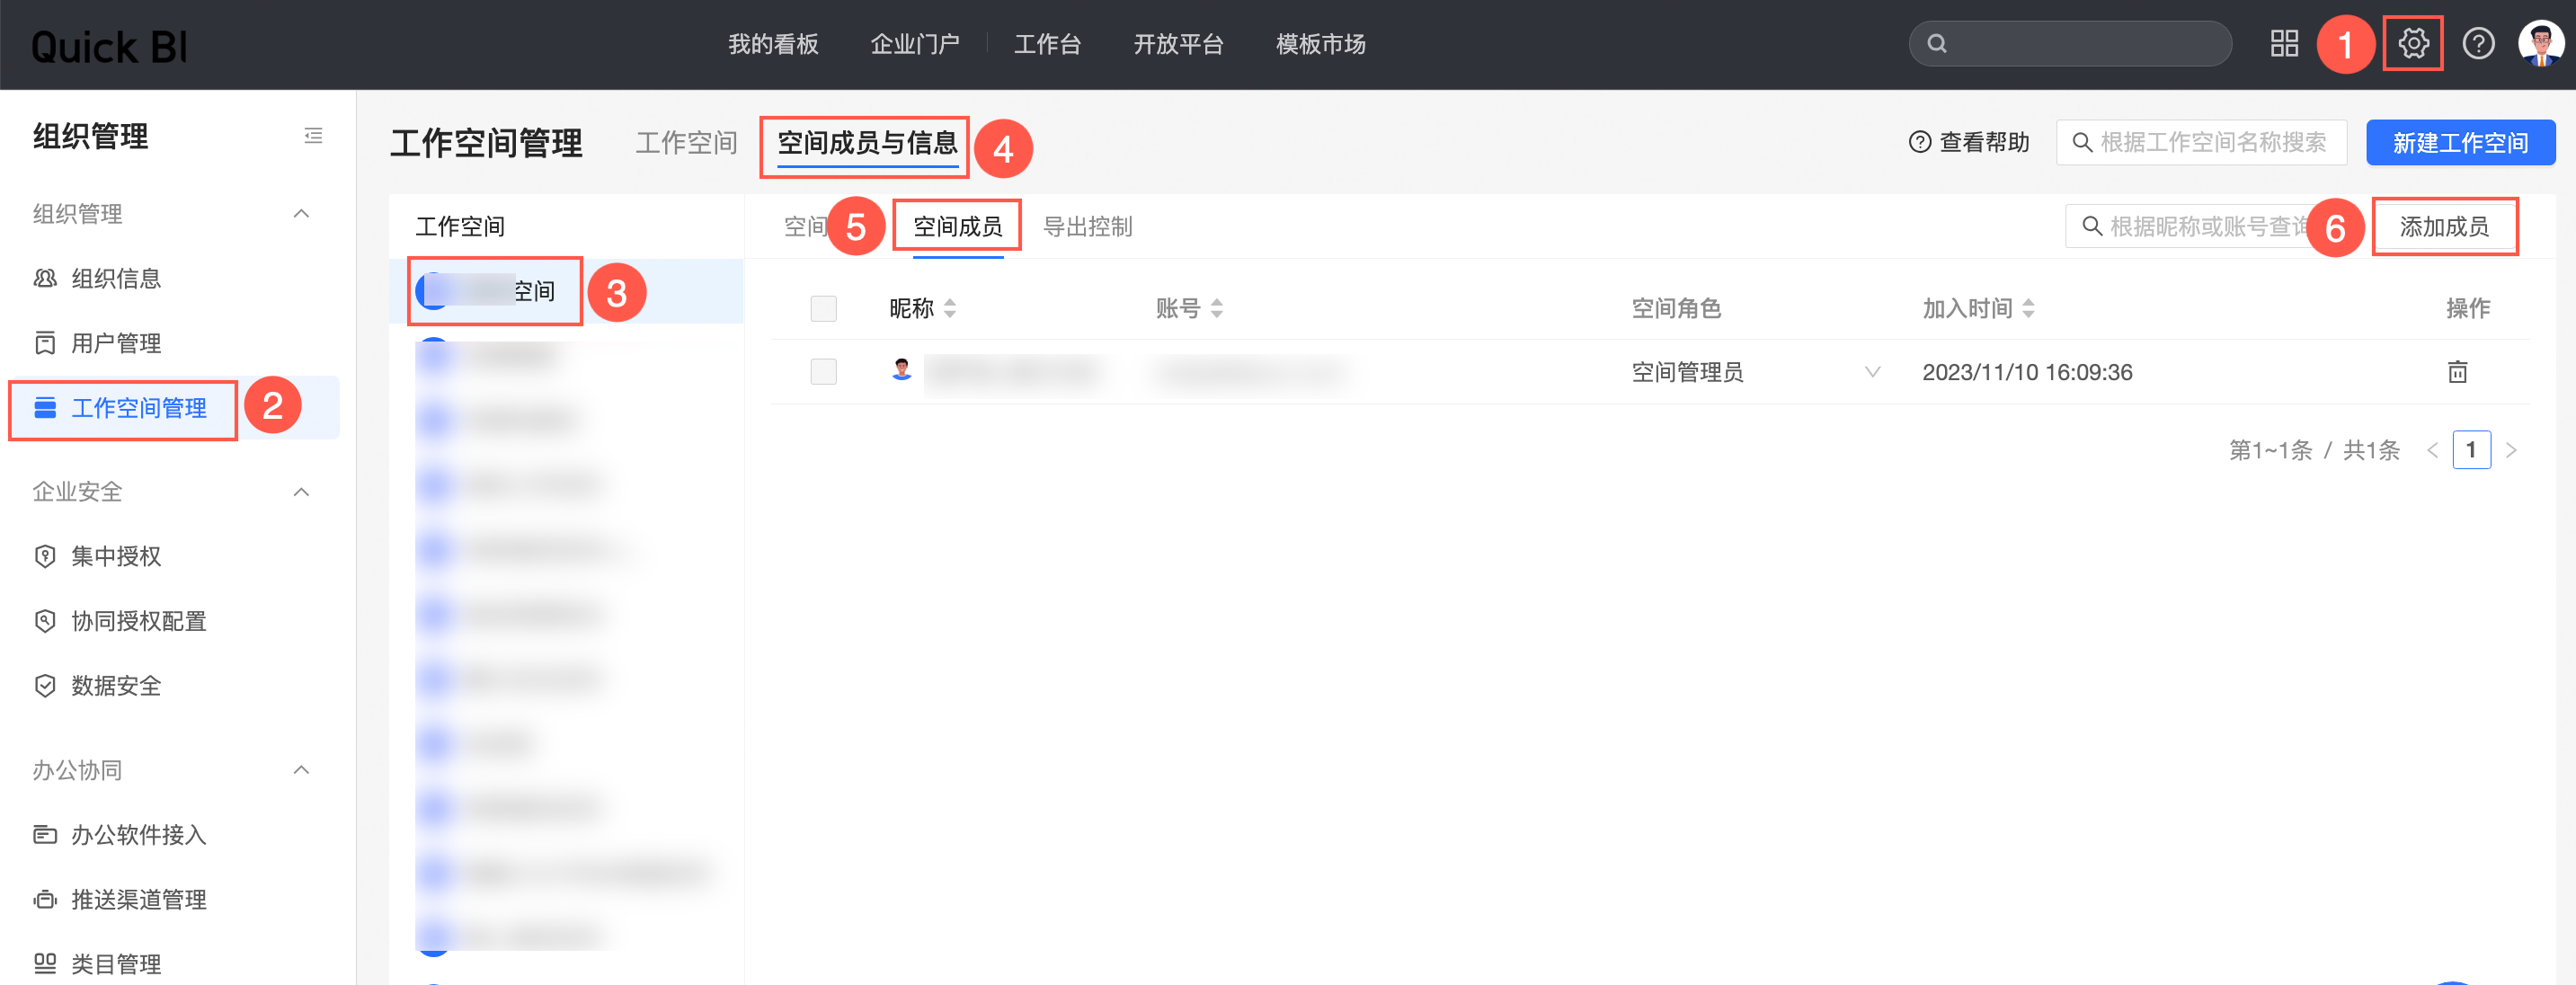
Follow the steps in the figure to go to the Workspace Members and Information page and add users to the role.
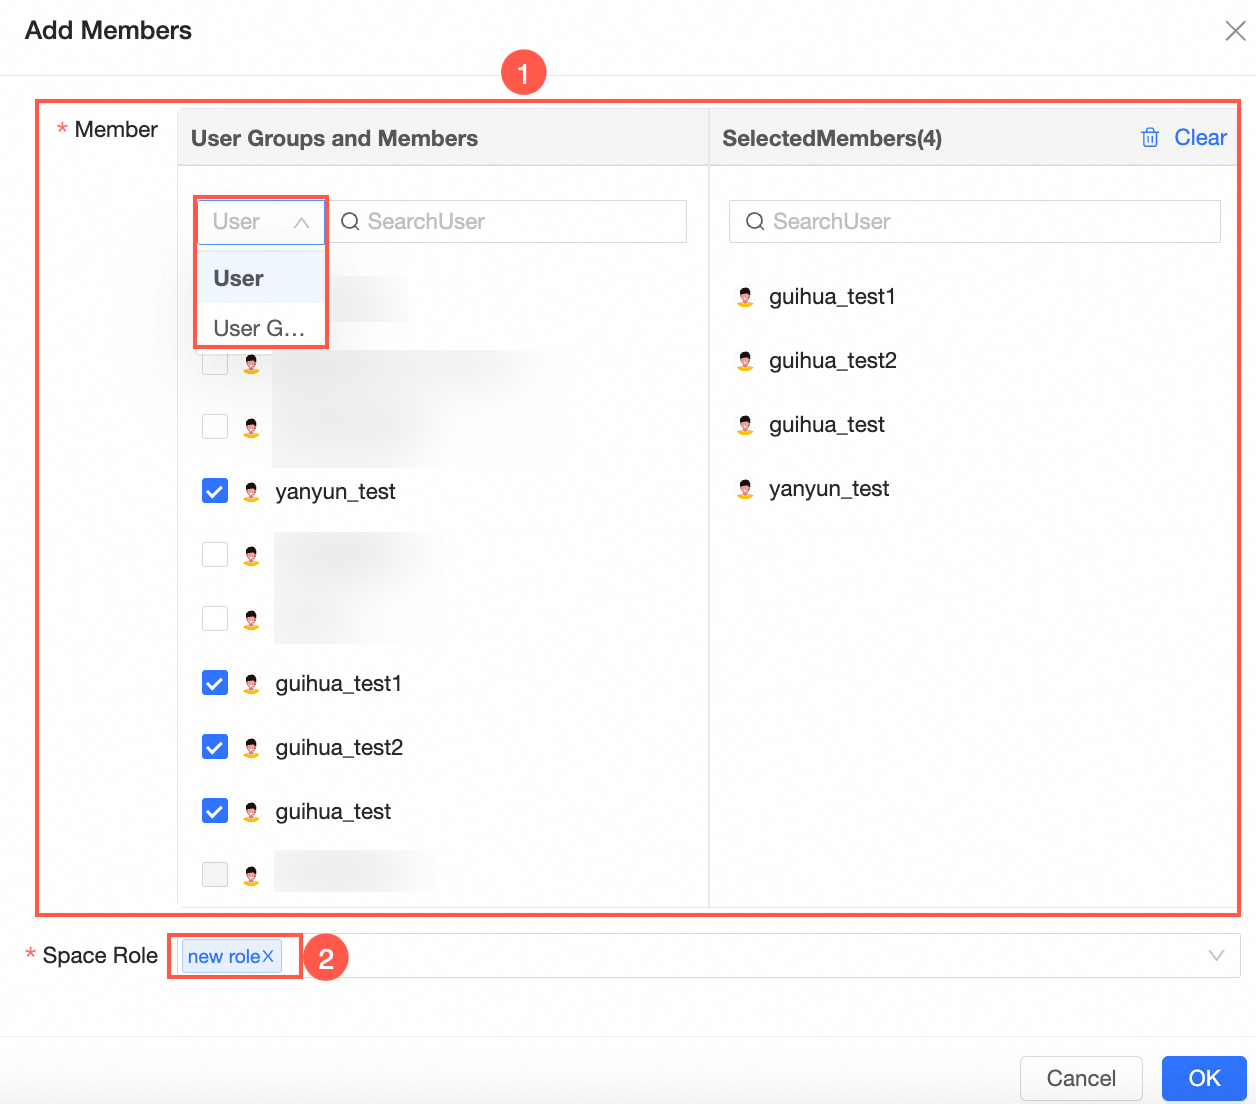
In the Add Workspace Member panel, select the Member and workspace role.
You can select User and User Group members.
For more information, see Add a workspace member.
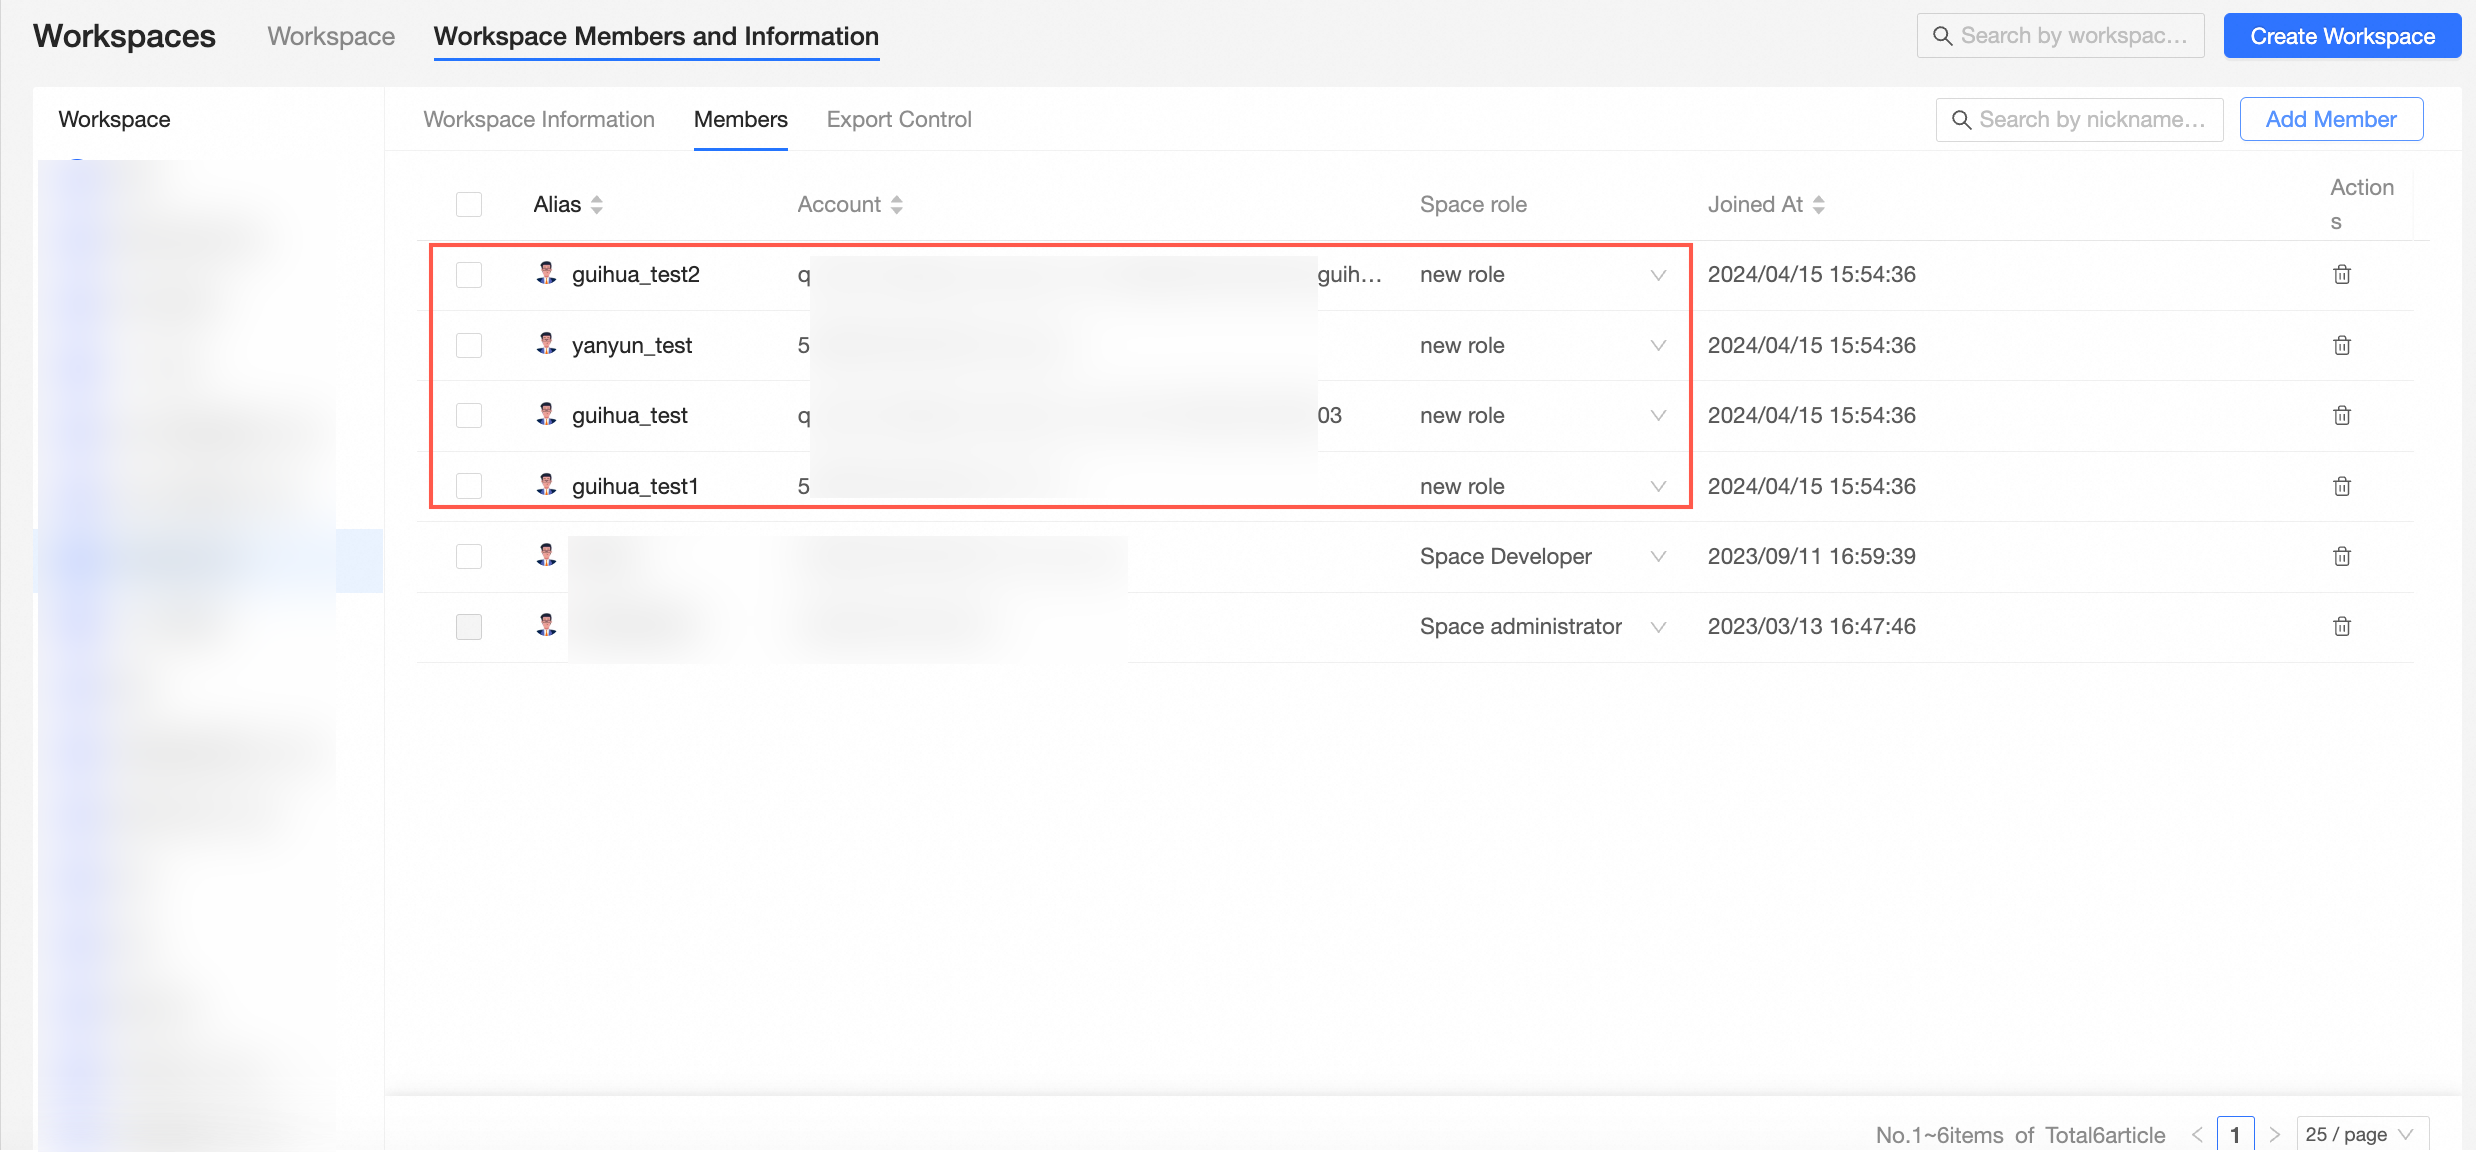
After you click OK, the users are added to the workspace.
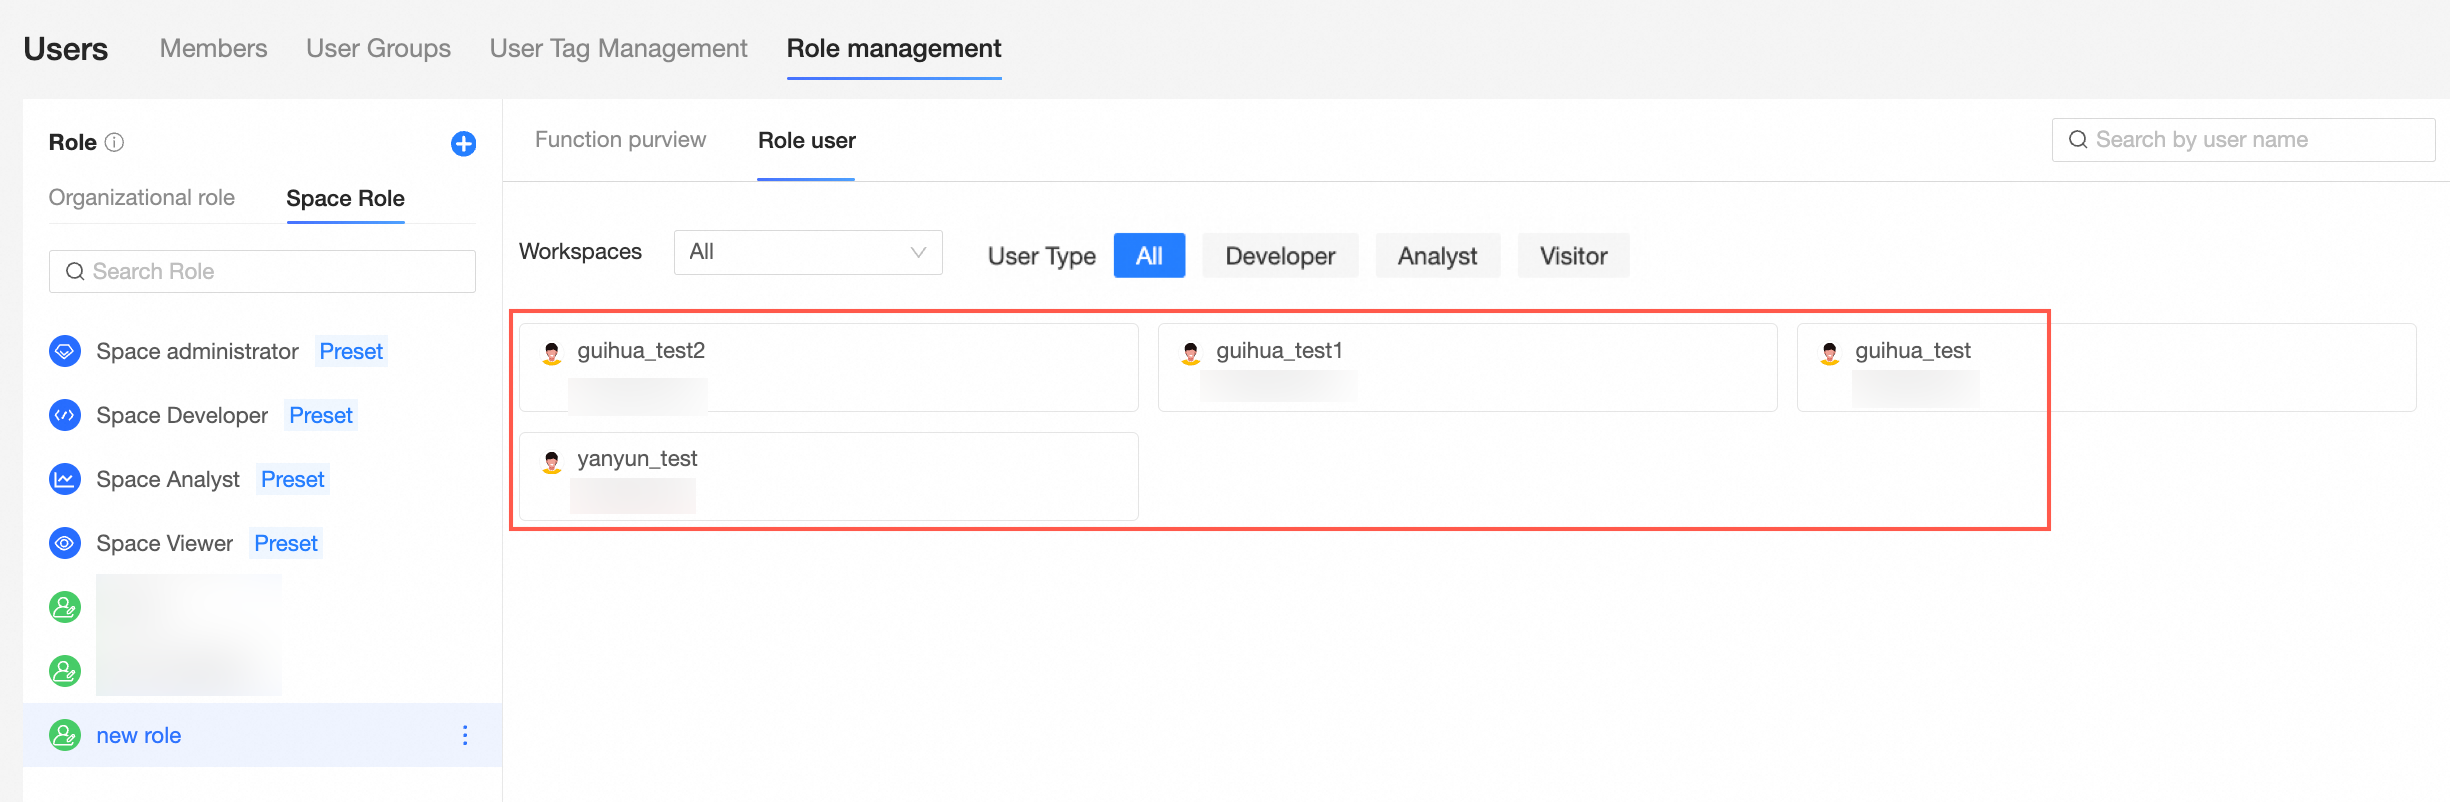
On the Role management page for the corresponding workspace role, the users now appear in the Role Users list. You can click the User Type filter to quickly view all users of a specific type.
Remove users from a role.
On the Workspace Management > Workspace Members and Information > Member Management page, click the
icon to the right of the target user to remove them.For more information, see Delete a workspace member.
 icon to the right of the target user to remove them.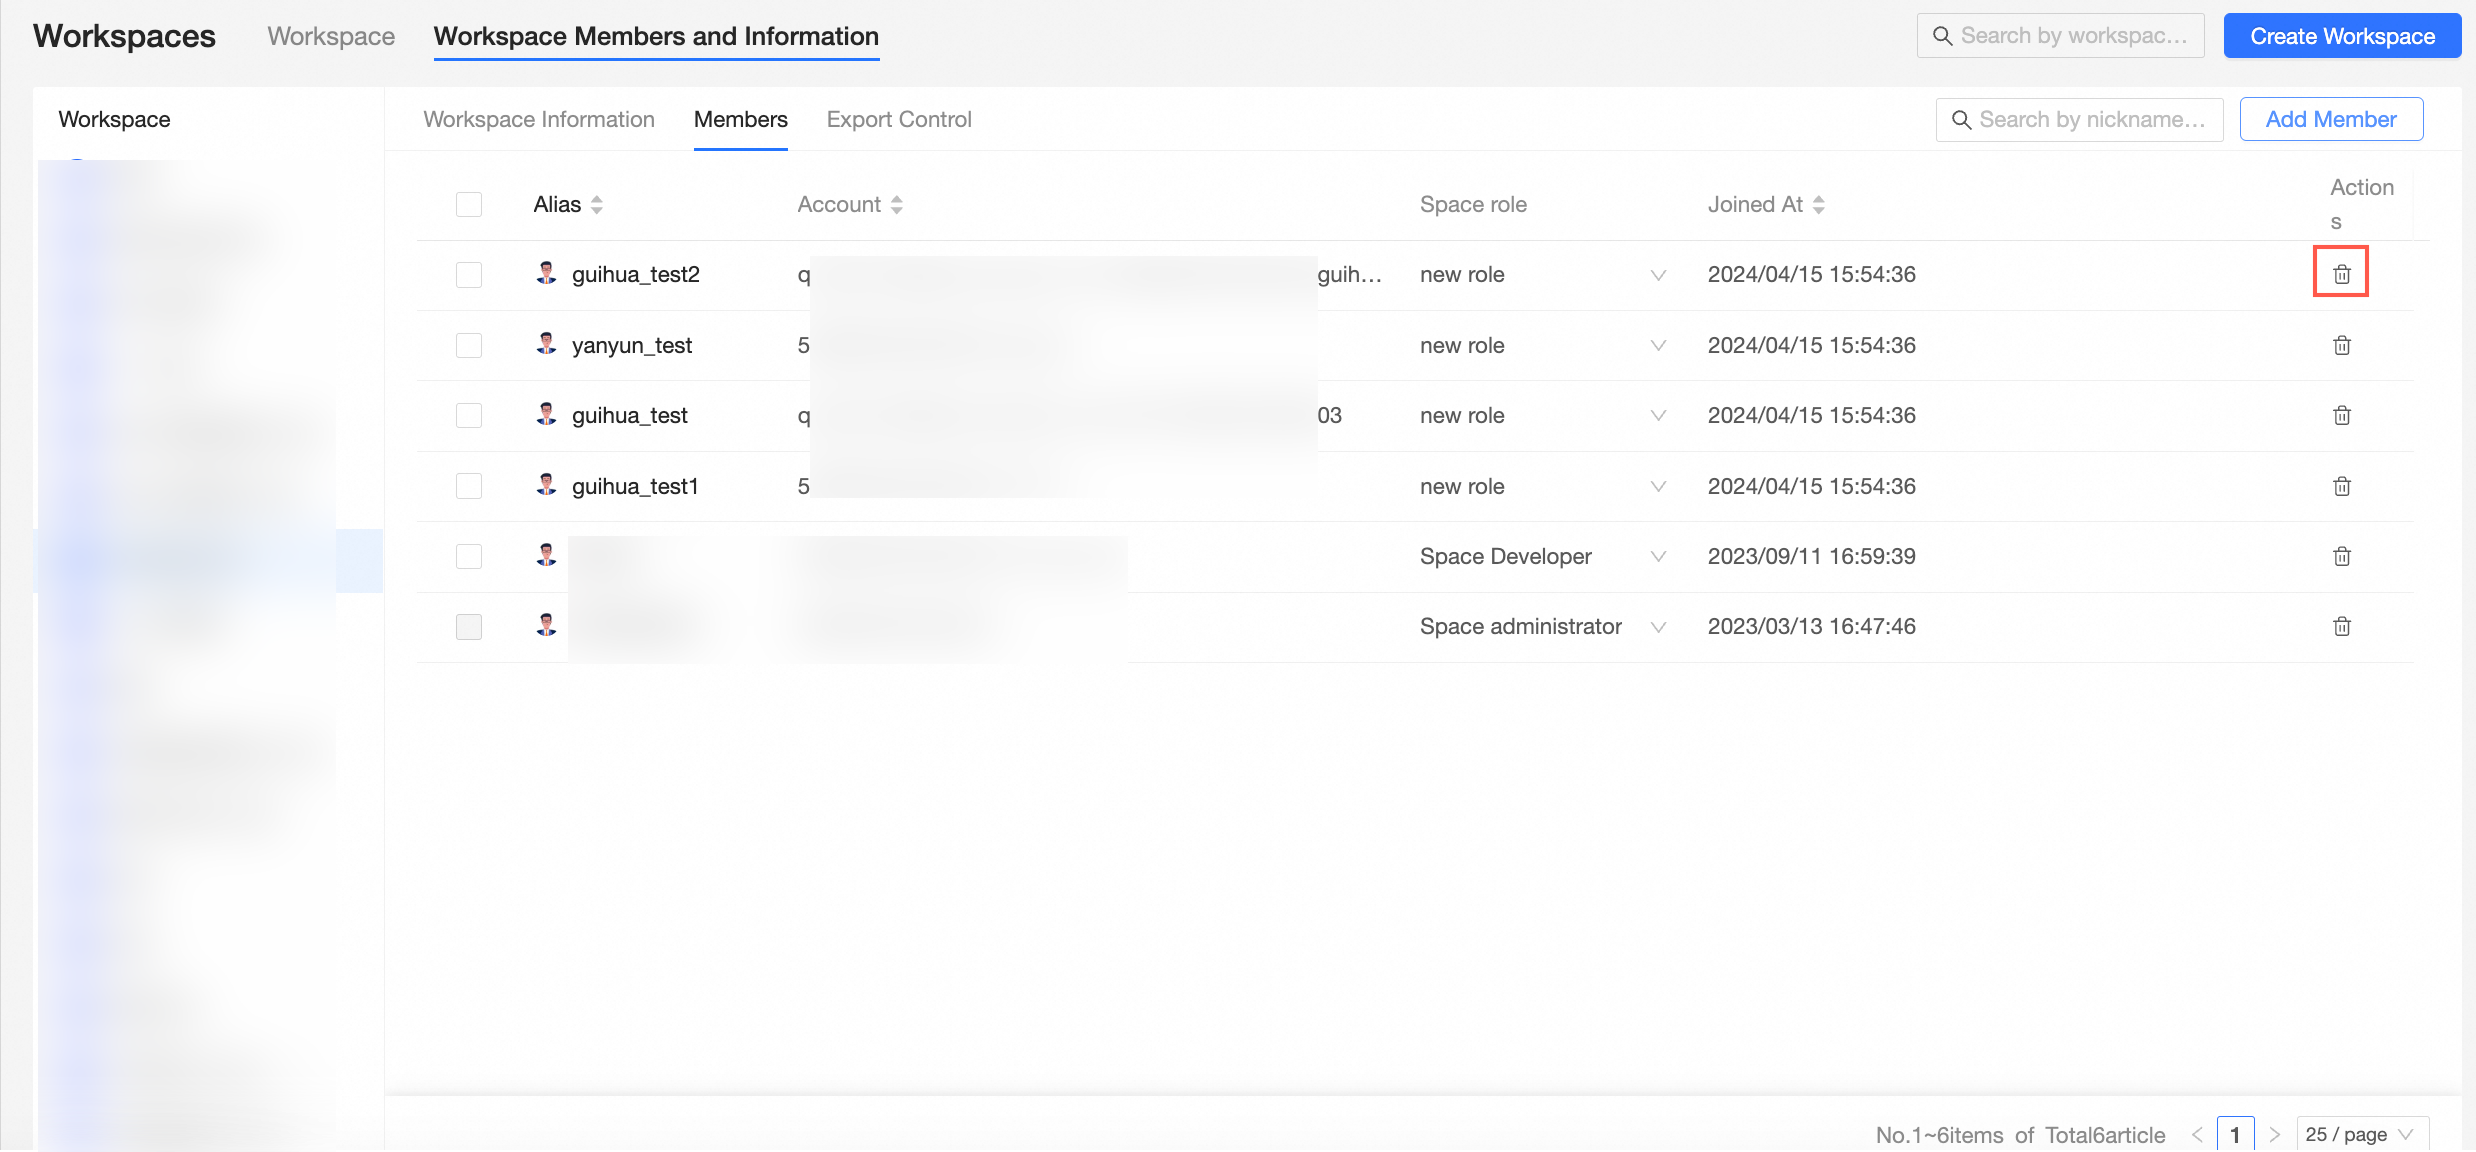
Use case 1: Custom data dashboard administrator
This section describes how to use a custom role to grant specific permissions to an employee, allowing them to use BI features within their scope of responsibility.
Background
Your company has an employee, Xiaoming, who works in the marketing department's publicity team. You want to grant him permissions to use only data dashboards for external presentations.
Procedure
If you are a new customer, follow these steps to assign the appropriate role to Xiaoming:
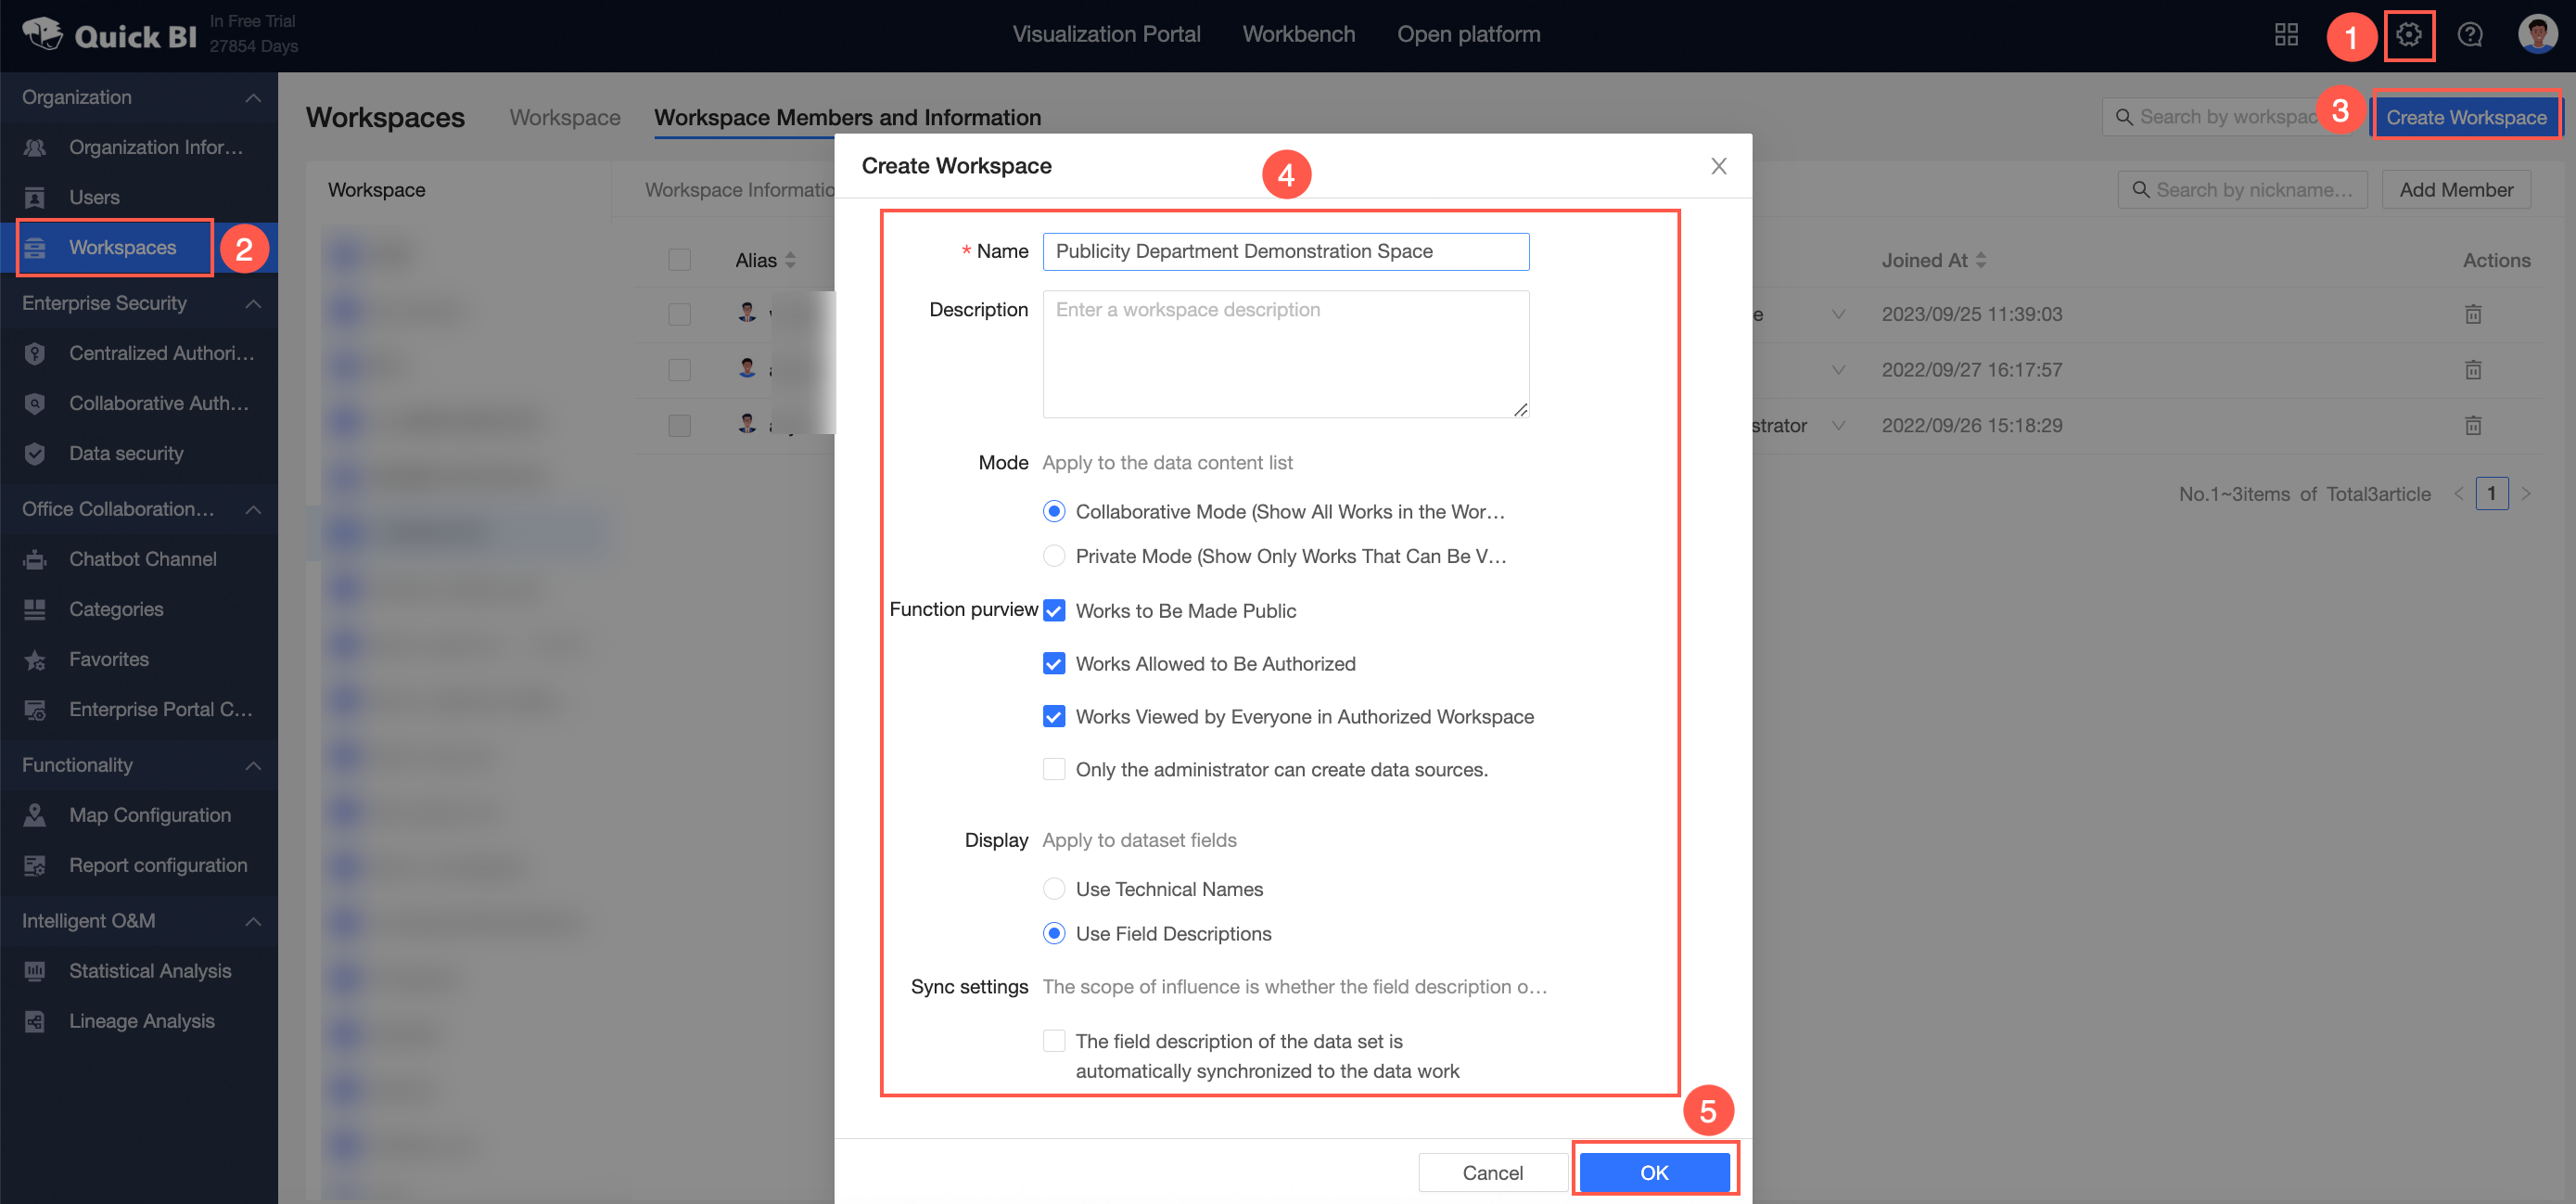
Create a workspace as shown in the figure. In this example, the workspace is named "Publicity Demo Space".
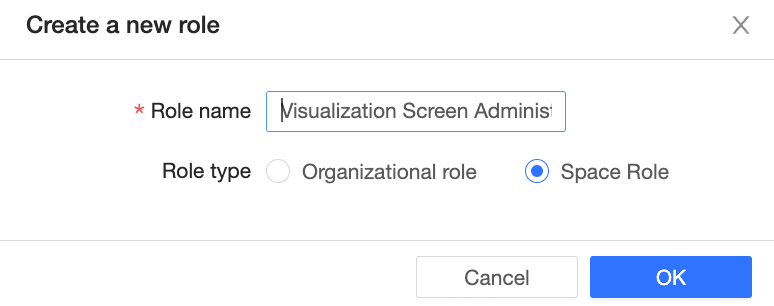
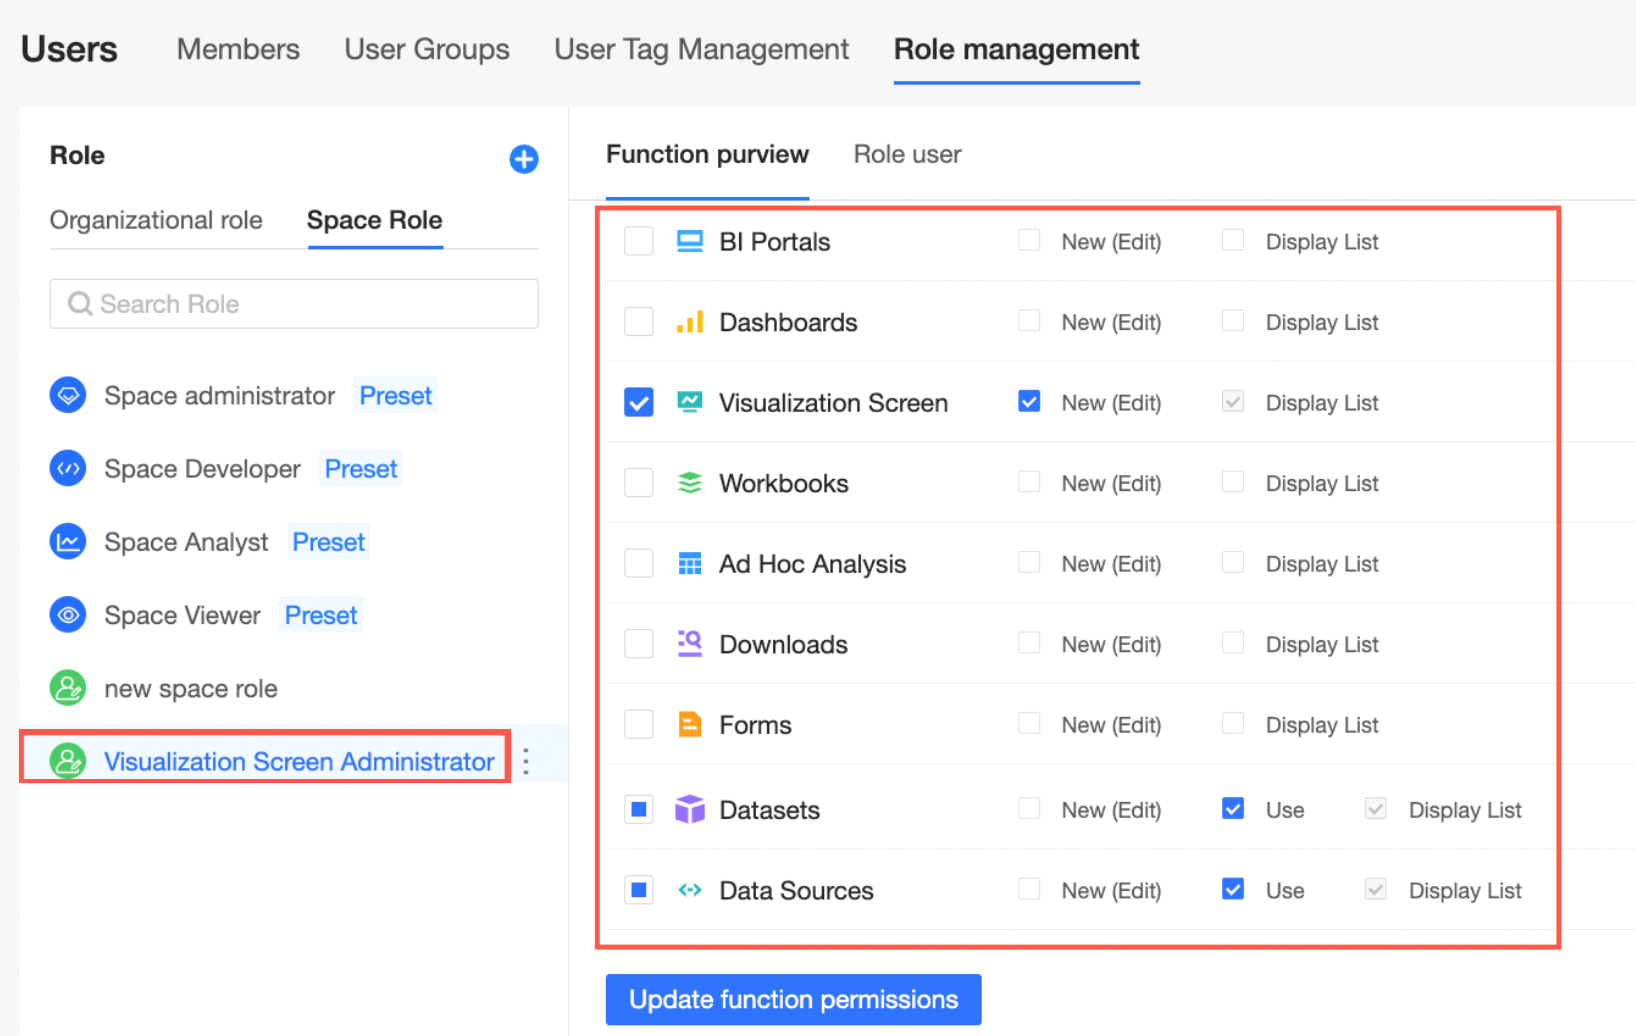
Create a new workspace role named "Data Dashboard Administrator".
Then, configure this custom role with create (edit) permissions for data dashboards and use permissions for datasets and data sources.
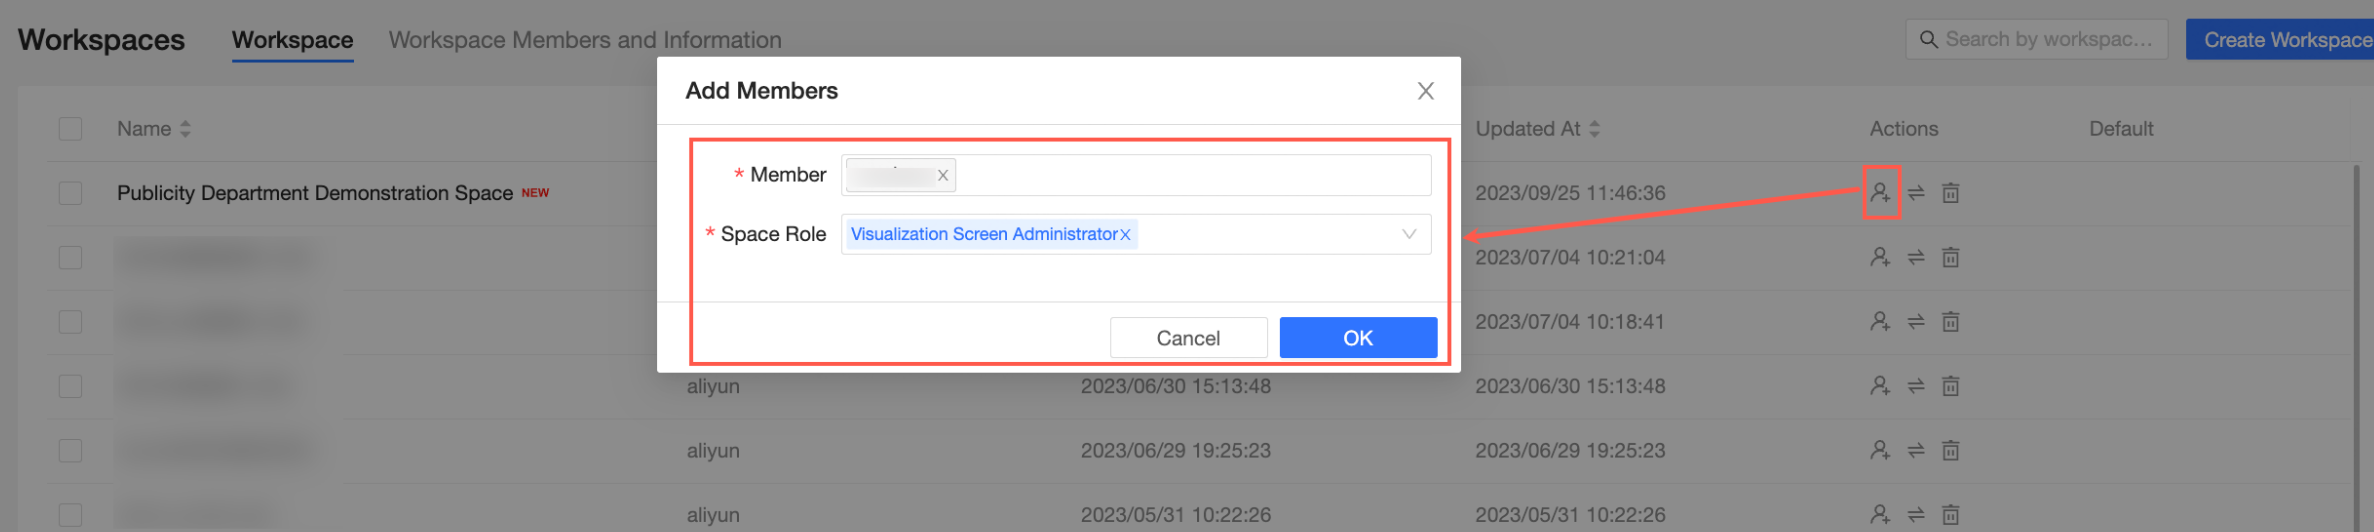
On the Workspace Management page, add Xiaoming to the "Publicity Demo Space" as a "Data Dashboard Administrator".
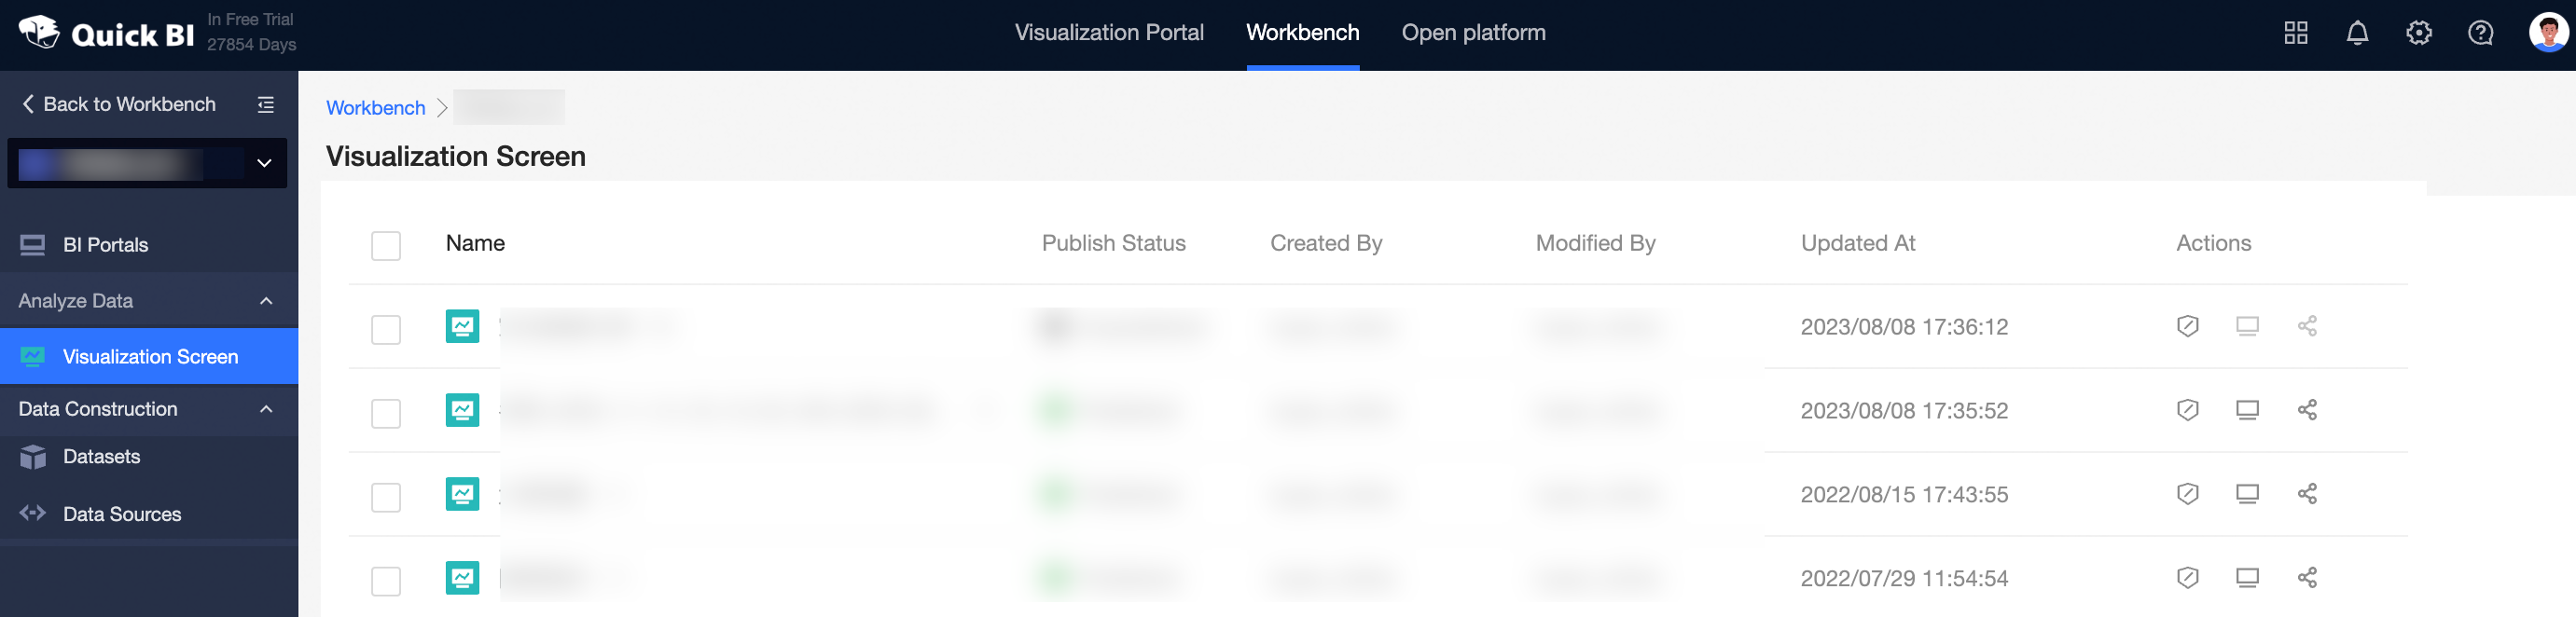
Now, Xiaoming can only see and use the data dashboard module, ensuring he uses BI features only within his scope of responsibility.
If you are an existing customer:
Xiaoming is in a workspace with the organization-level general user role and the workspace-level workspace developer role. He can see all functional module directories in the workspace and can create and edit all features.
Follow these steps to assign the appropriate role to Xiaoming:
Create a new workspace role named "Data Dashboard Administrator".
Then, configure this custom role with create (edit) permissions for data dashboards and use permissions for datasets and data sources.
On the Workspace Members and Information page, change Xiaoming's existing workspace developer role to the "Data Dashboard Administrator" role.
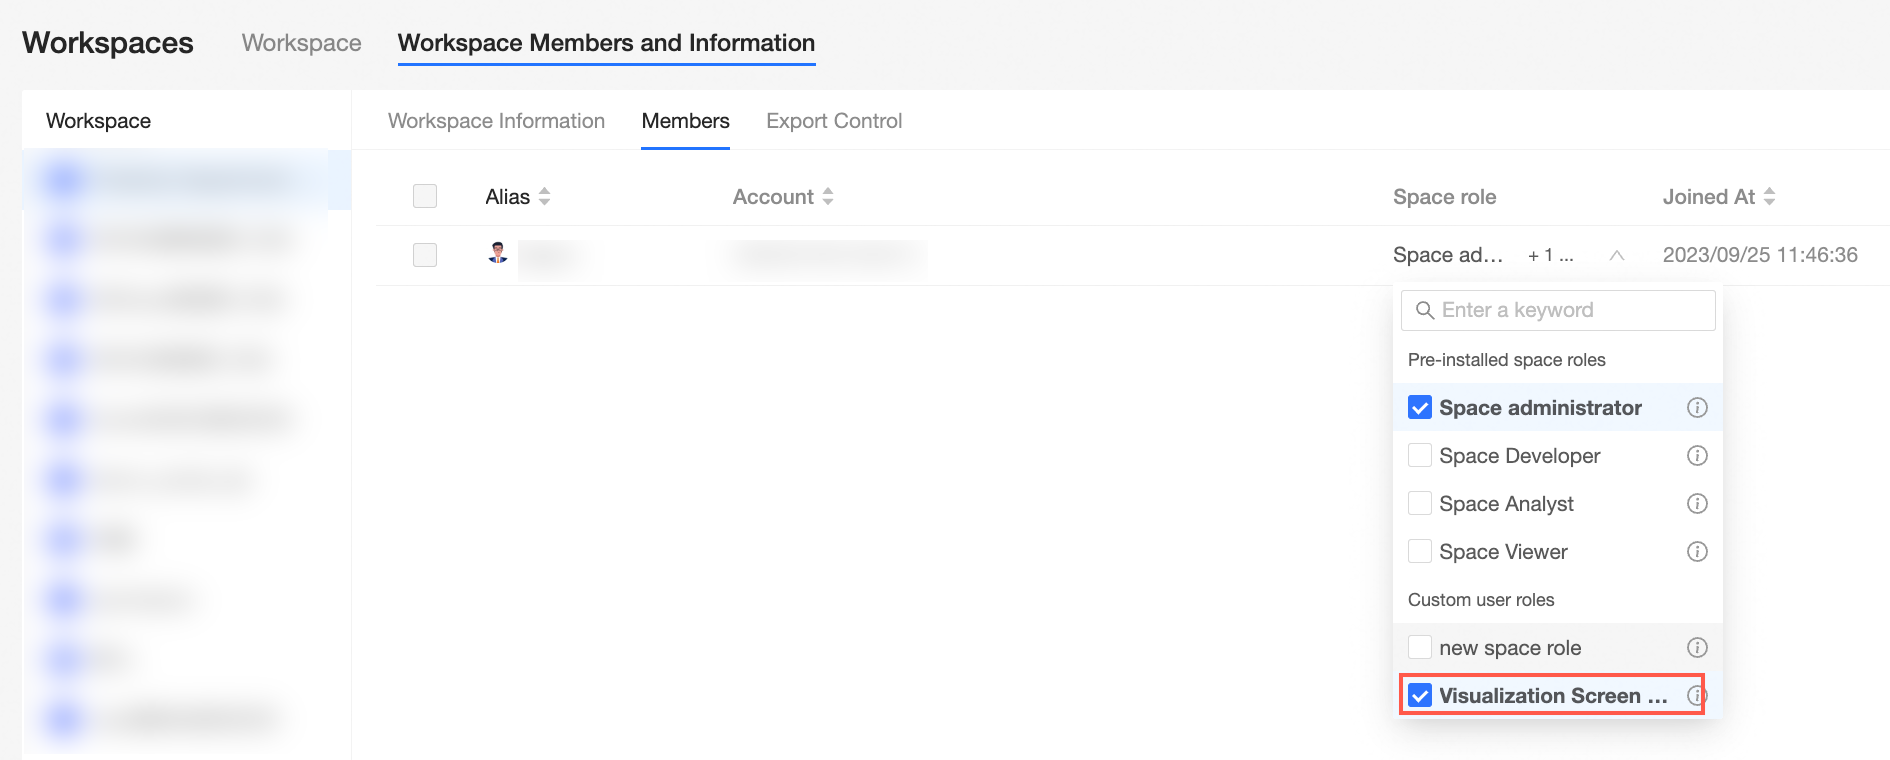
Now, Xiaoming can only see and use the data dashboard module, ensuring he uses BI features only within his scope of responsibility.
Use case 2: Custom ETL and resource administrators
This section describes a complex, multi-faceted permission scenario.
Background
Sam works for an automotive company and has the following two job responsibilities:
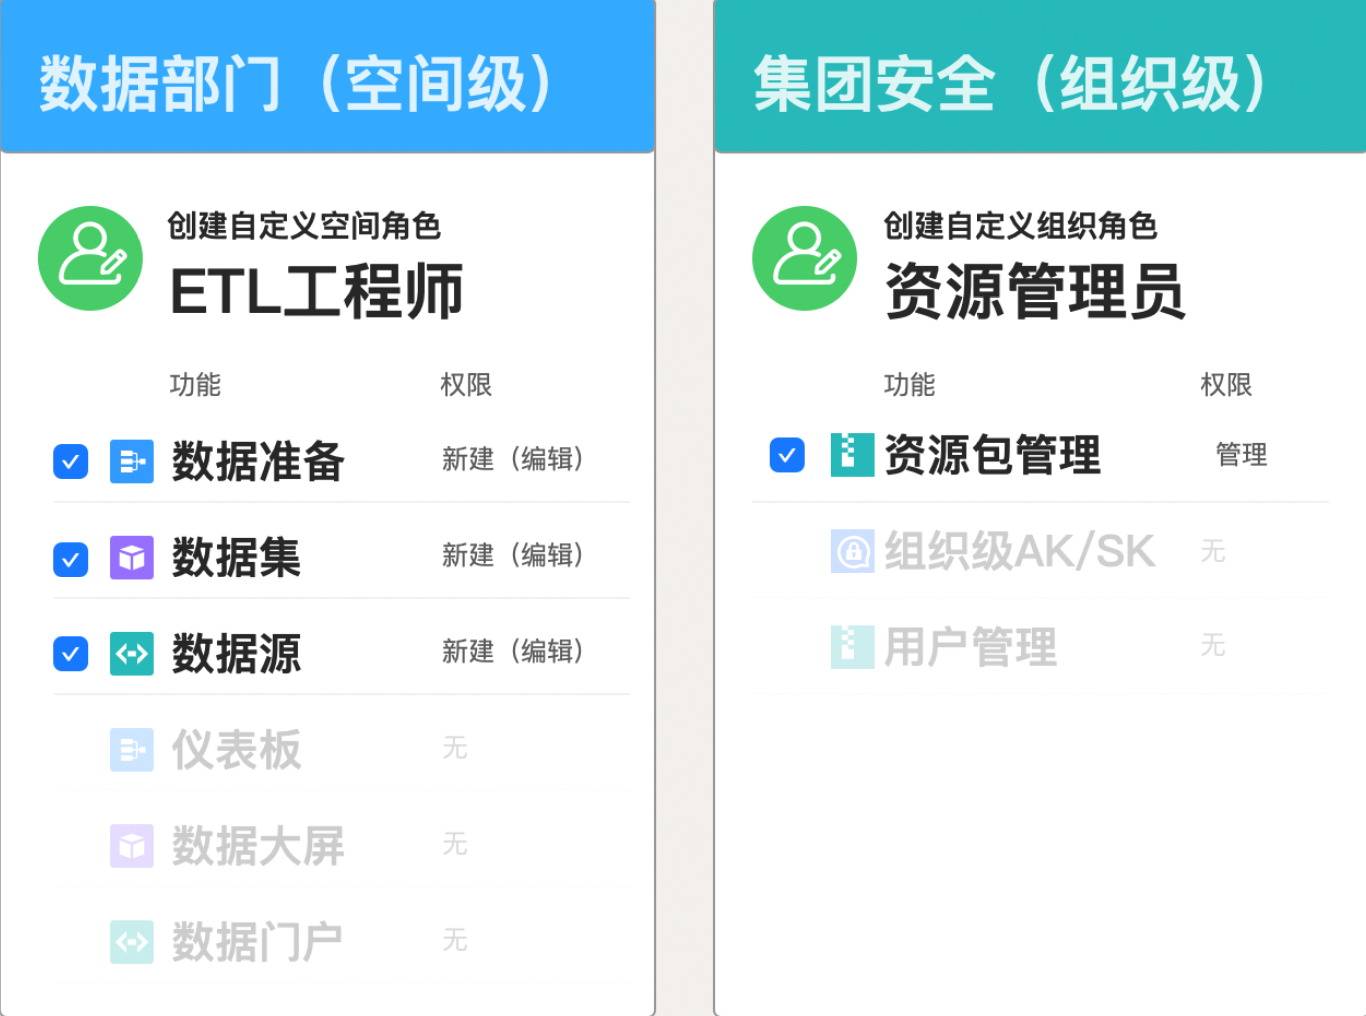
ETL engineer in the data department: Sam should only be able to develop data by performing operations like data cleansing and processing. However, he currently has the workspace developer role in the data department's workspace, which grants him unnecessary permissions to create and edit data portals, dashboards, and data dashboards. This does not match his job role.
Resource administrator: Sam should only be able to manage and publish resource packages for production deployment. However, he currently has the organization administrator role, which gives him all permissions within the organization and exceeds the scope of his responsibilities.
The custom role feature allows an administrator to resolve these issues by assigning Sam fine-grained permissions that precisely match his ETL engineer and resource administrator responsibilities.
Procedure
Create a custom workspace role and a custom organization role.
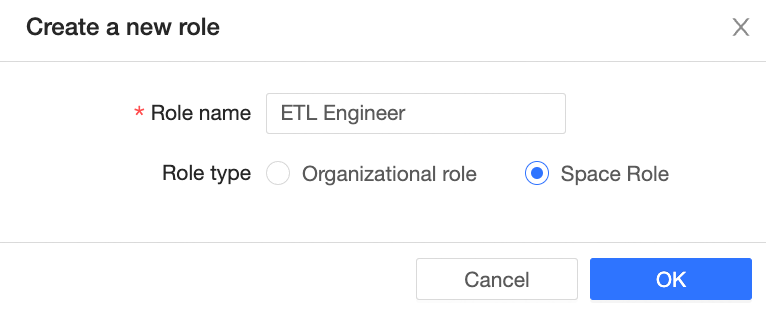
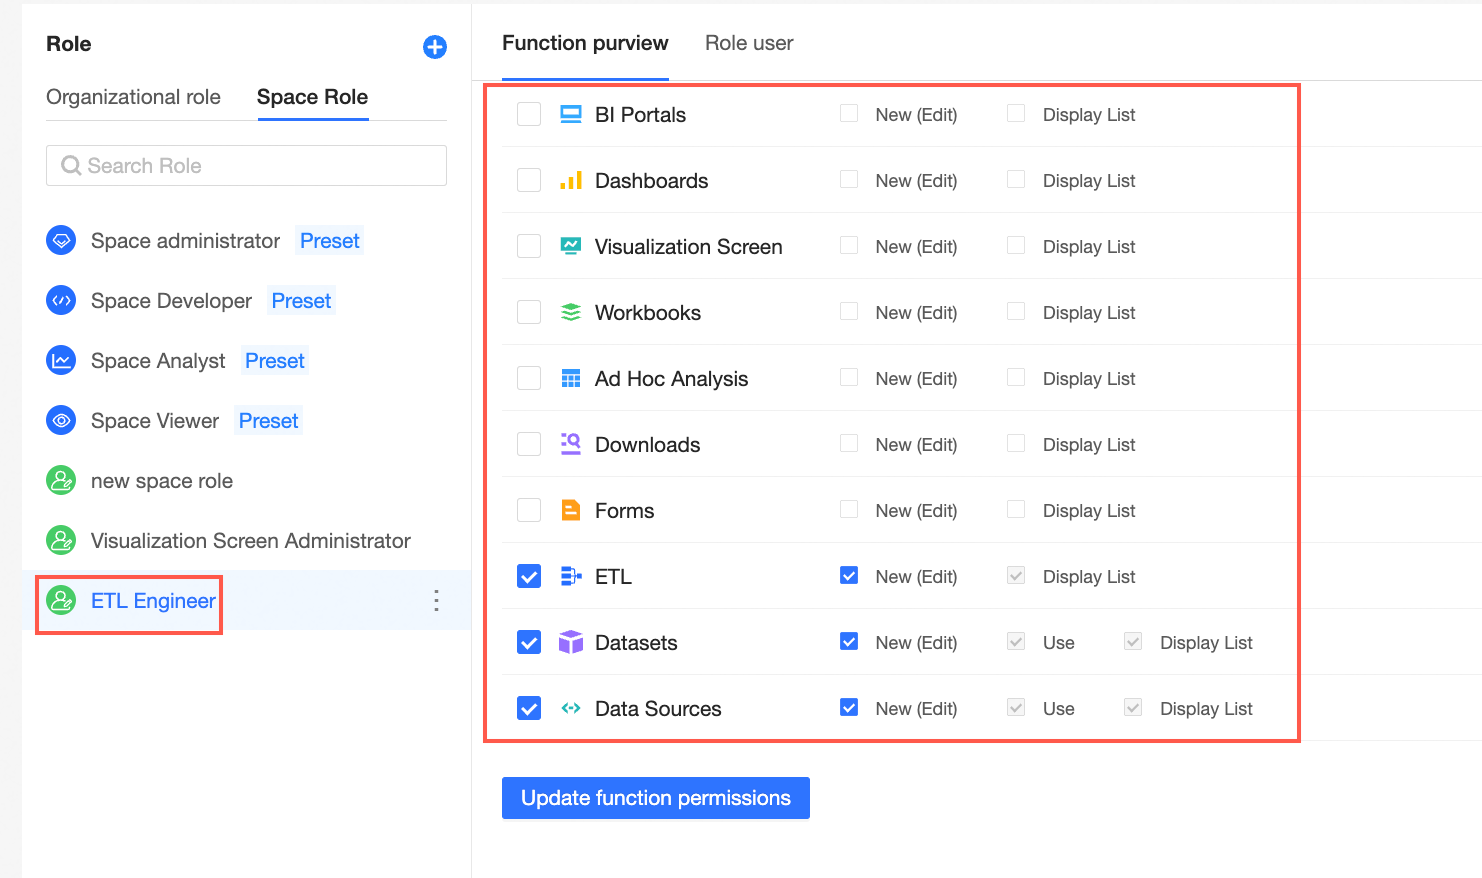
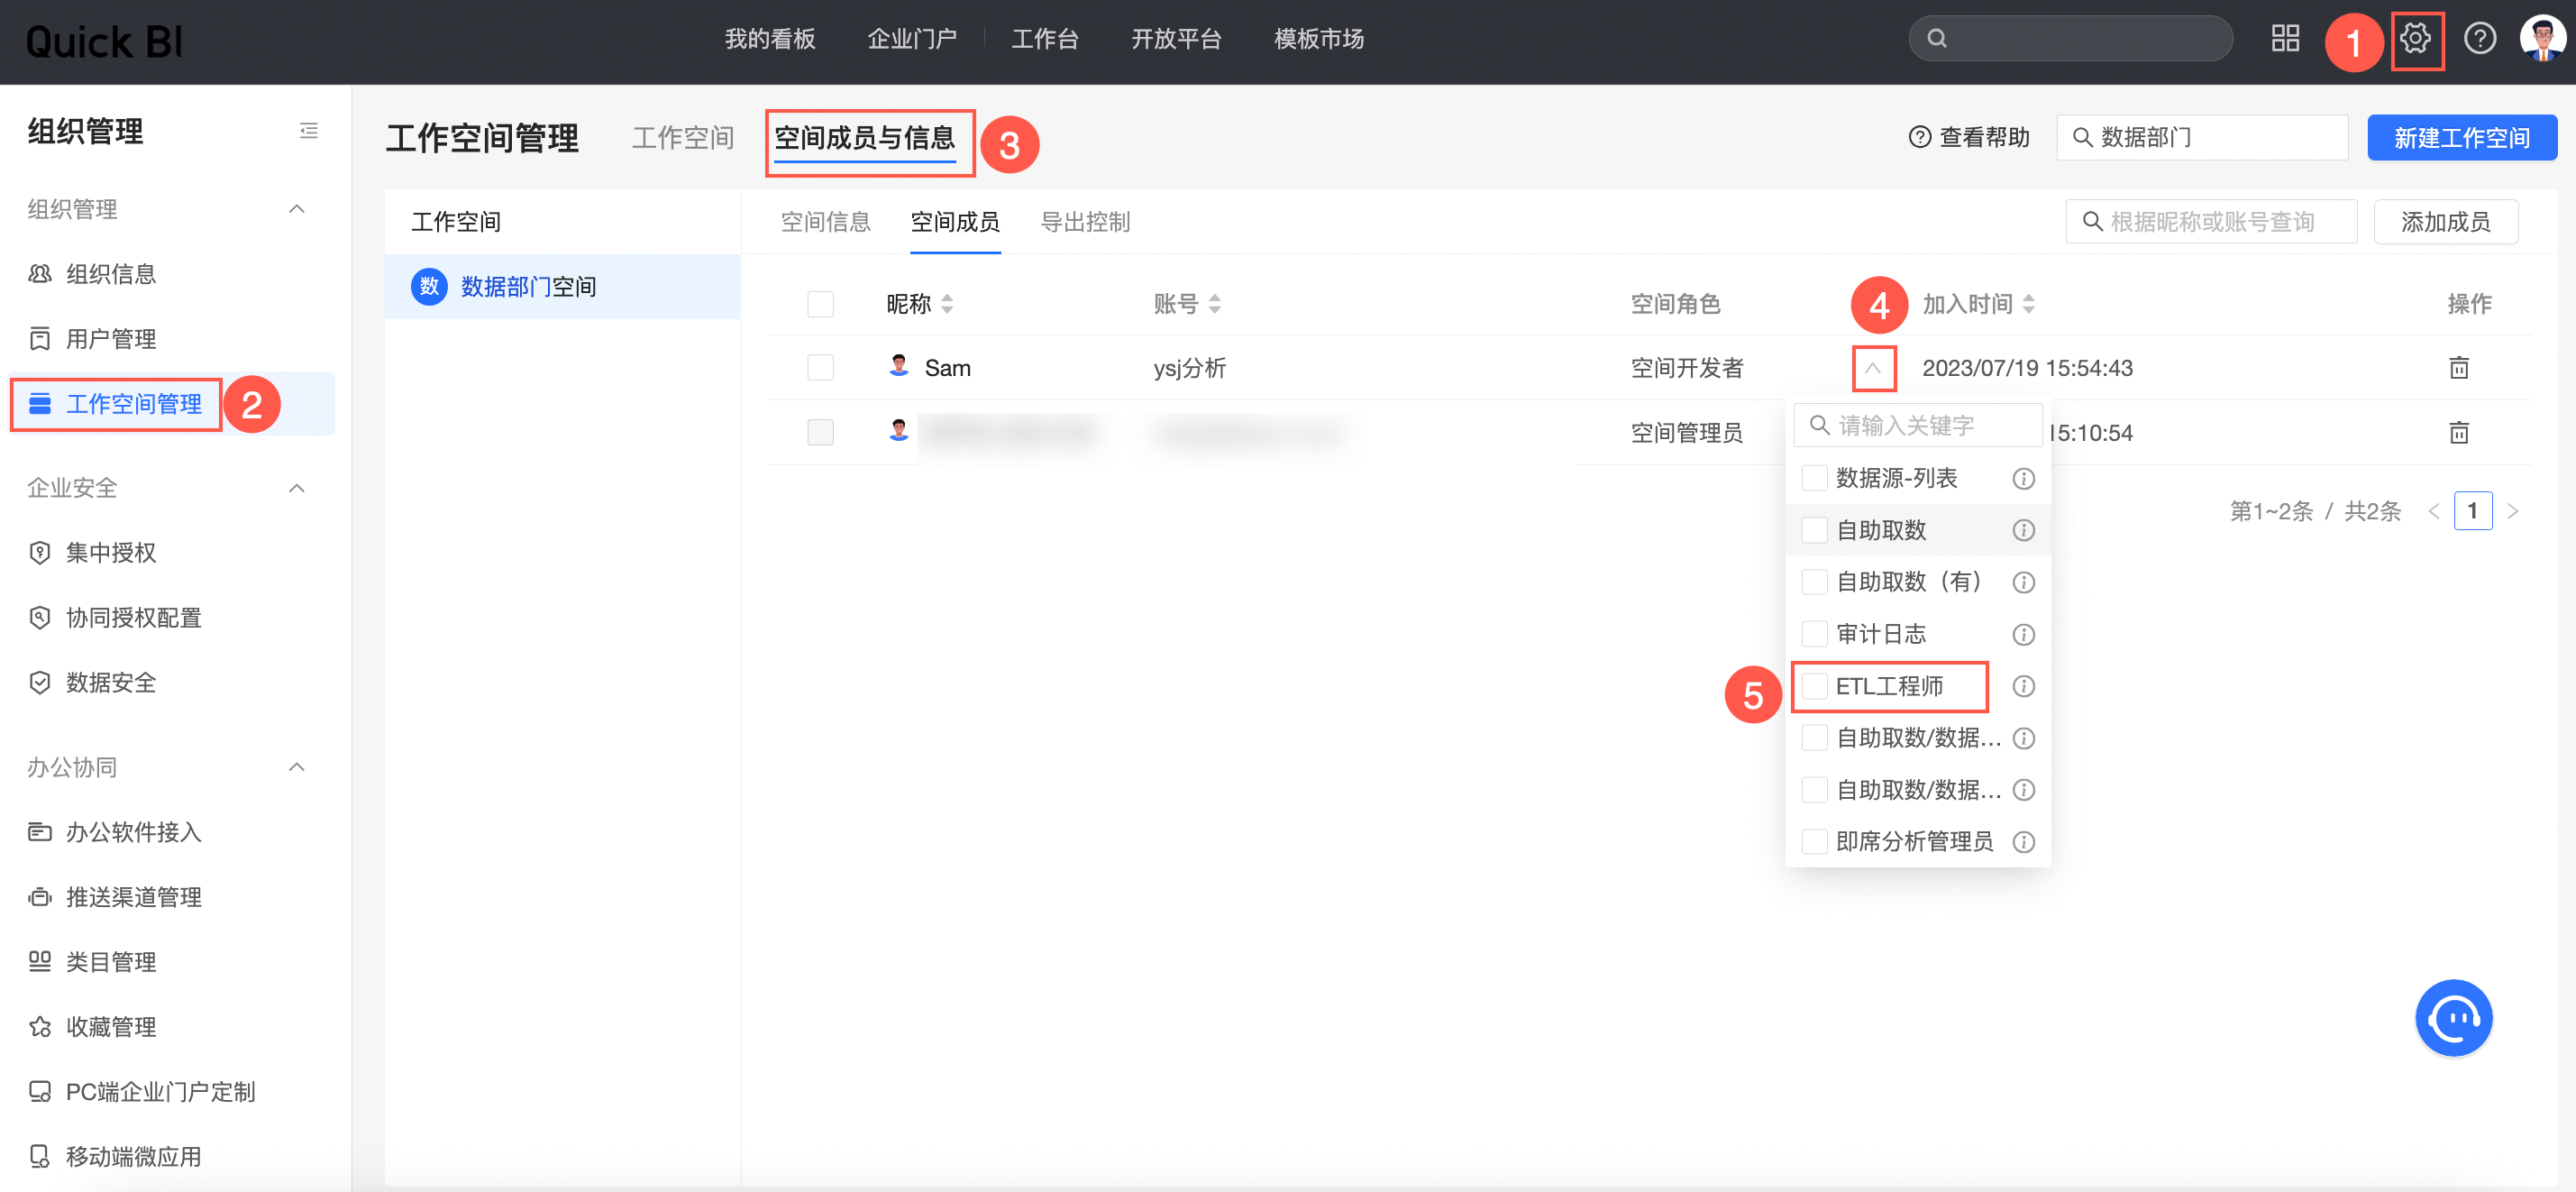
Create a custom workspace role named ETL engineer.
Grant this custom role create (edit) permissions for data preparation, datasets, and data sources.
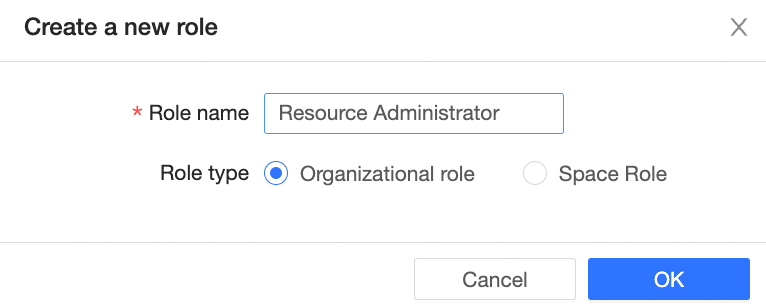
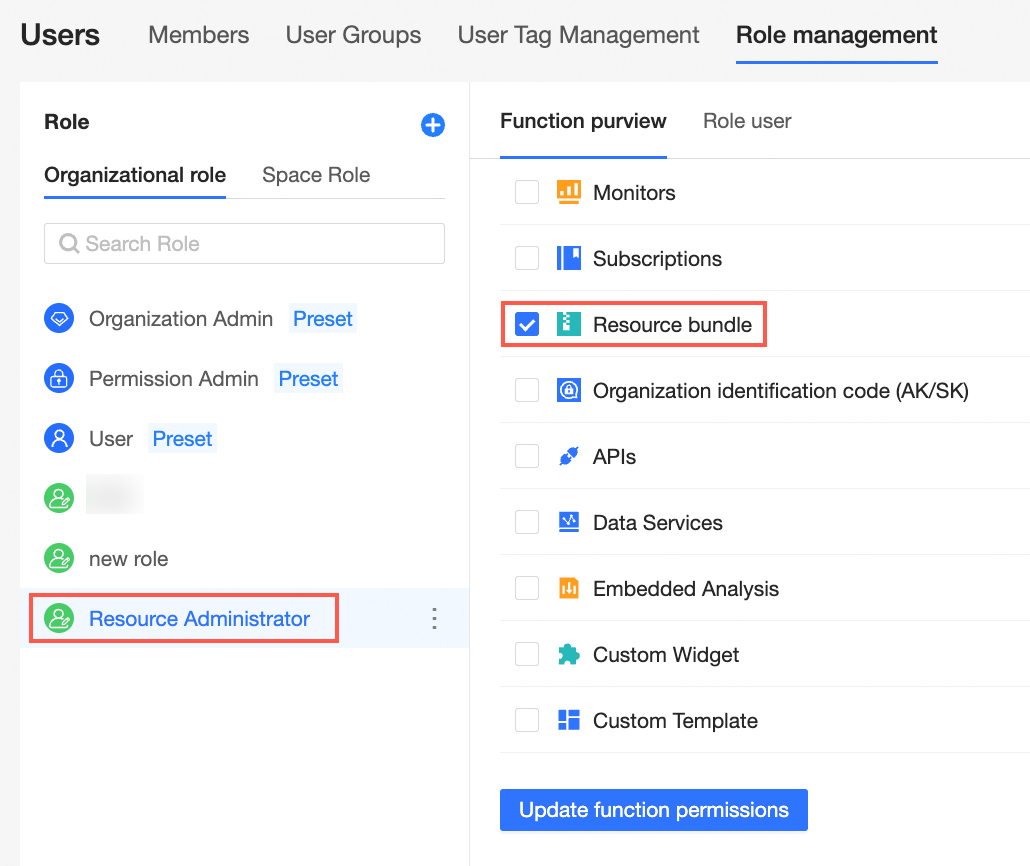
Create a custom organization role named resource administrator.
Grant this custom role the Resource Package Management permission.
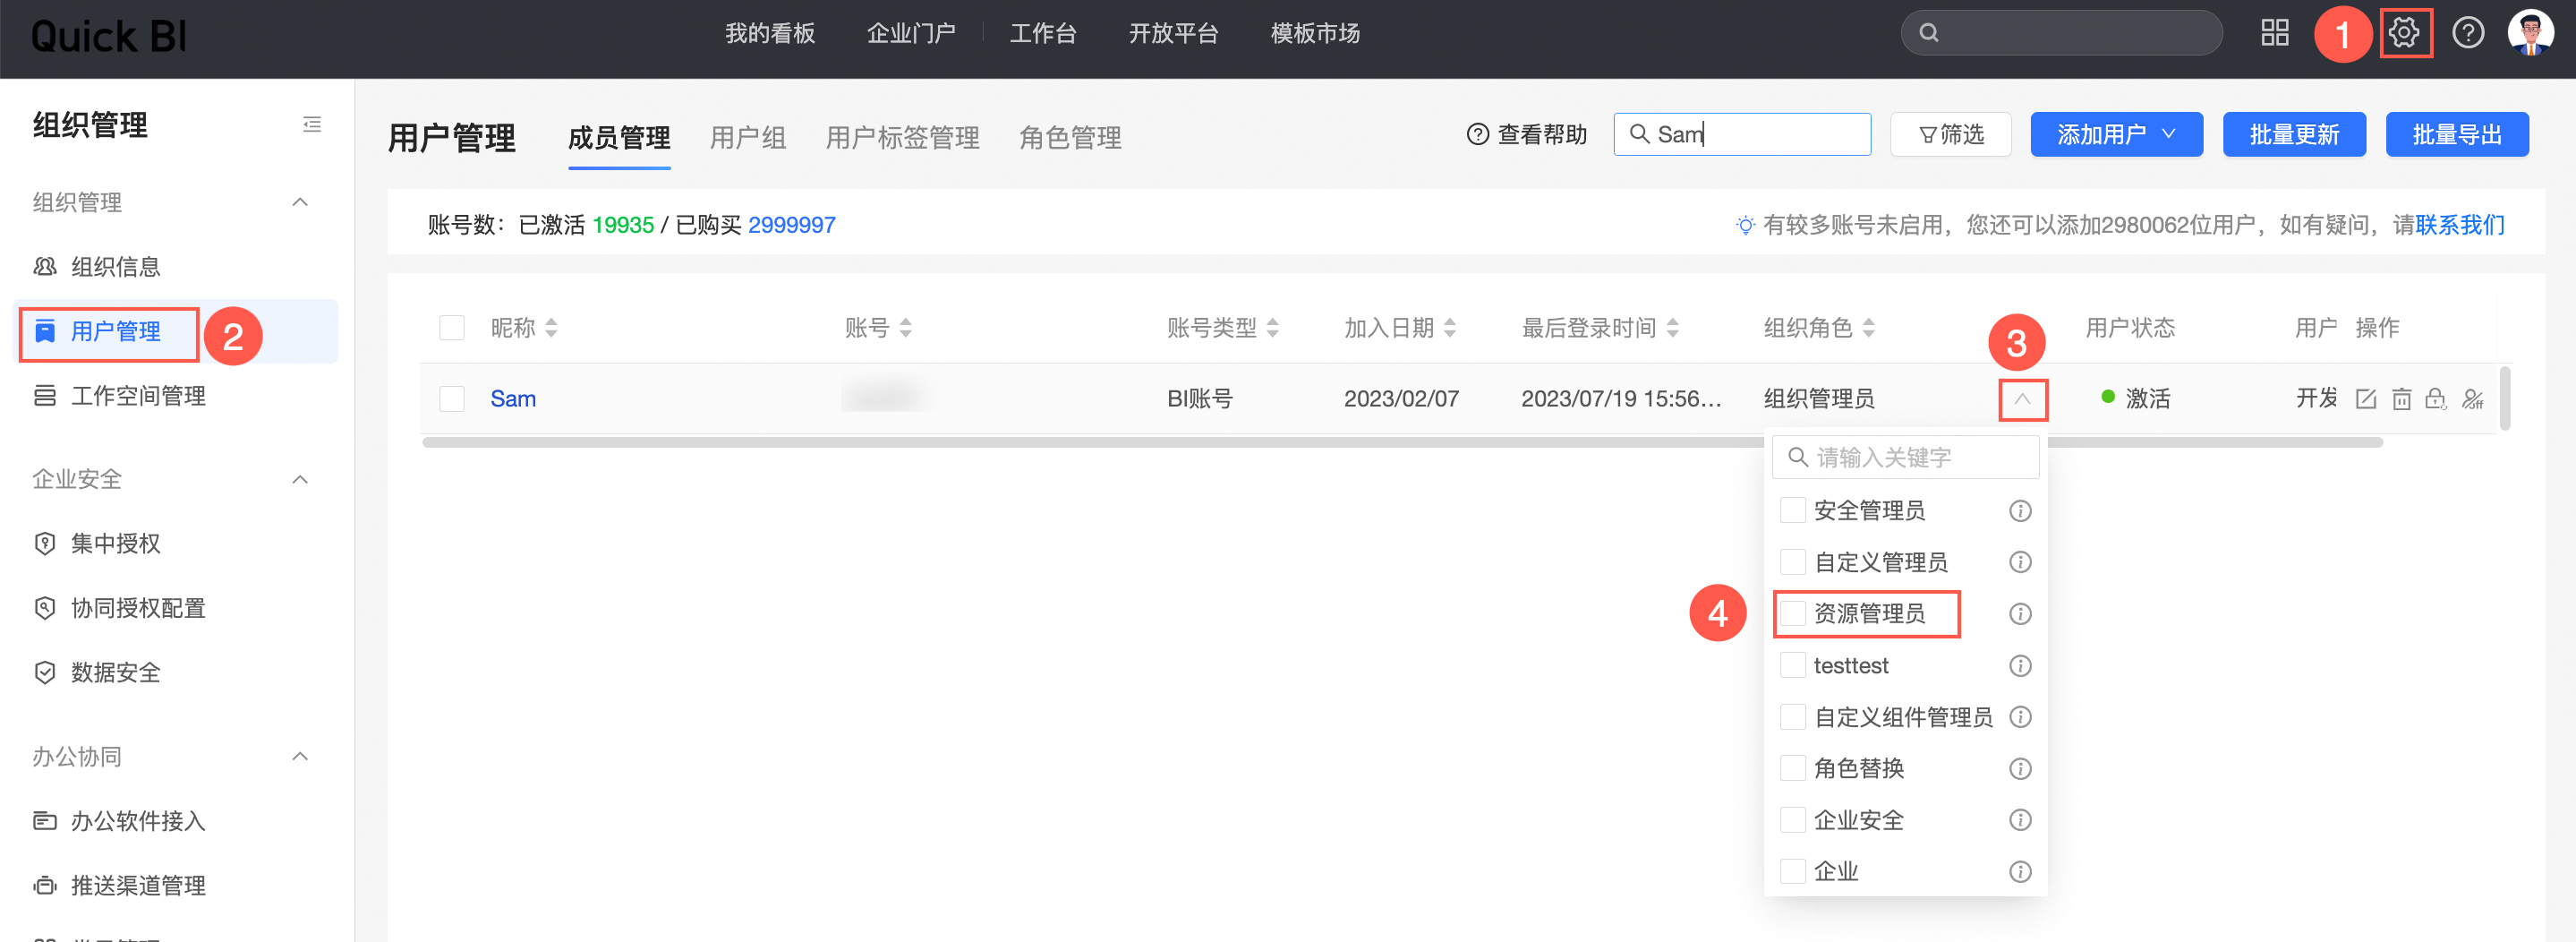
Assign the ETL engineer and resource administrator roles to Sam.
On the Workspace Management > Workspace Members and Information page, change Sam's current workspace developer role to the ETL engineer role.
On the User Management page, change Sam's current organization administrator role to the resource administrator role.
Now, at the organization level, Sam can only manage and publish resource packages for production deployment. At the workspace level, he can only perform data development tasks, such as data cleansing and processing, within the corresponding workspace.
Use case 3: Custom intelligent O&M engineer
This section describes how to use a custom role to grant an employee the permissions of an intelligent O&M engineer, ensuring they use BI O&M and analysis features only within their scope of responsibility.
Background
An employee, Xiaoqiang, is responsible for system O&M and monitoring. He needs to regularly perform monitoring checks and analyze performance logs for the BI system. However, he does not need access to business data. You can create a custom role for him that only includes intelligent O&M permissions.
Procedure
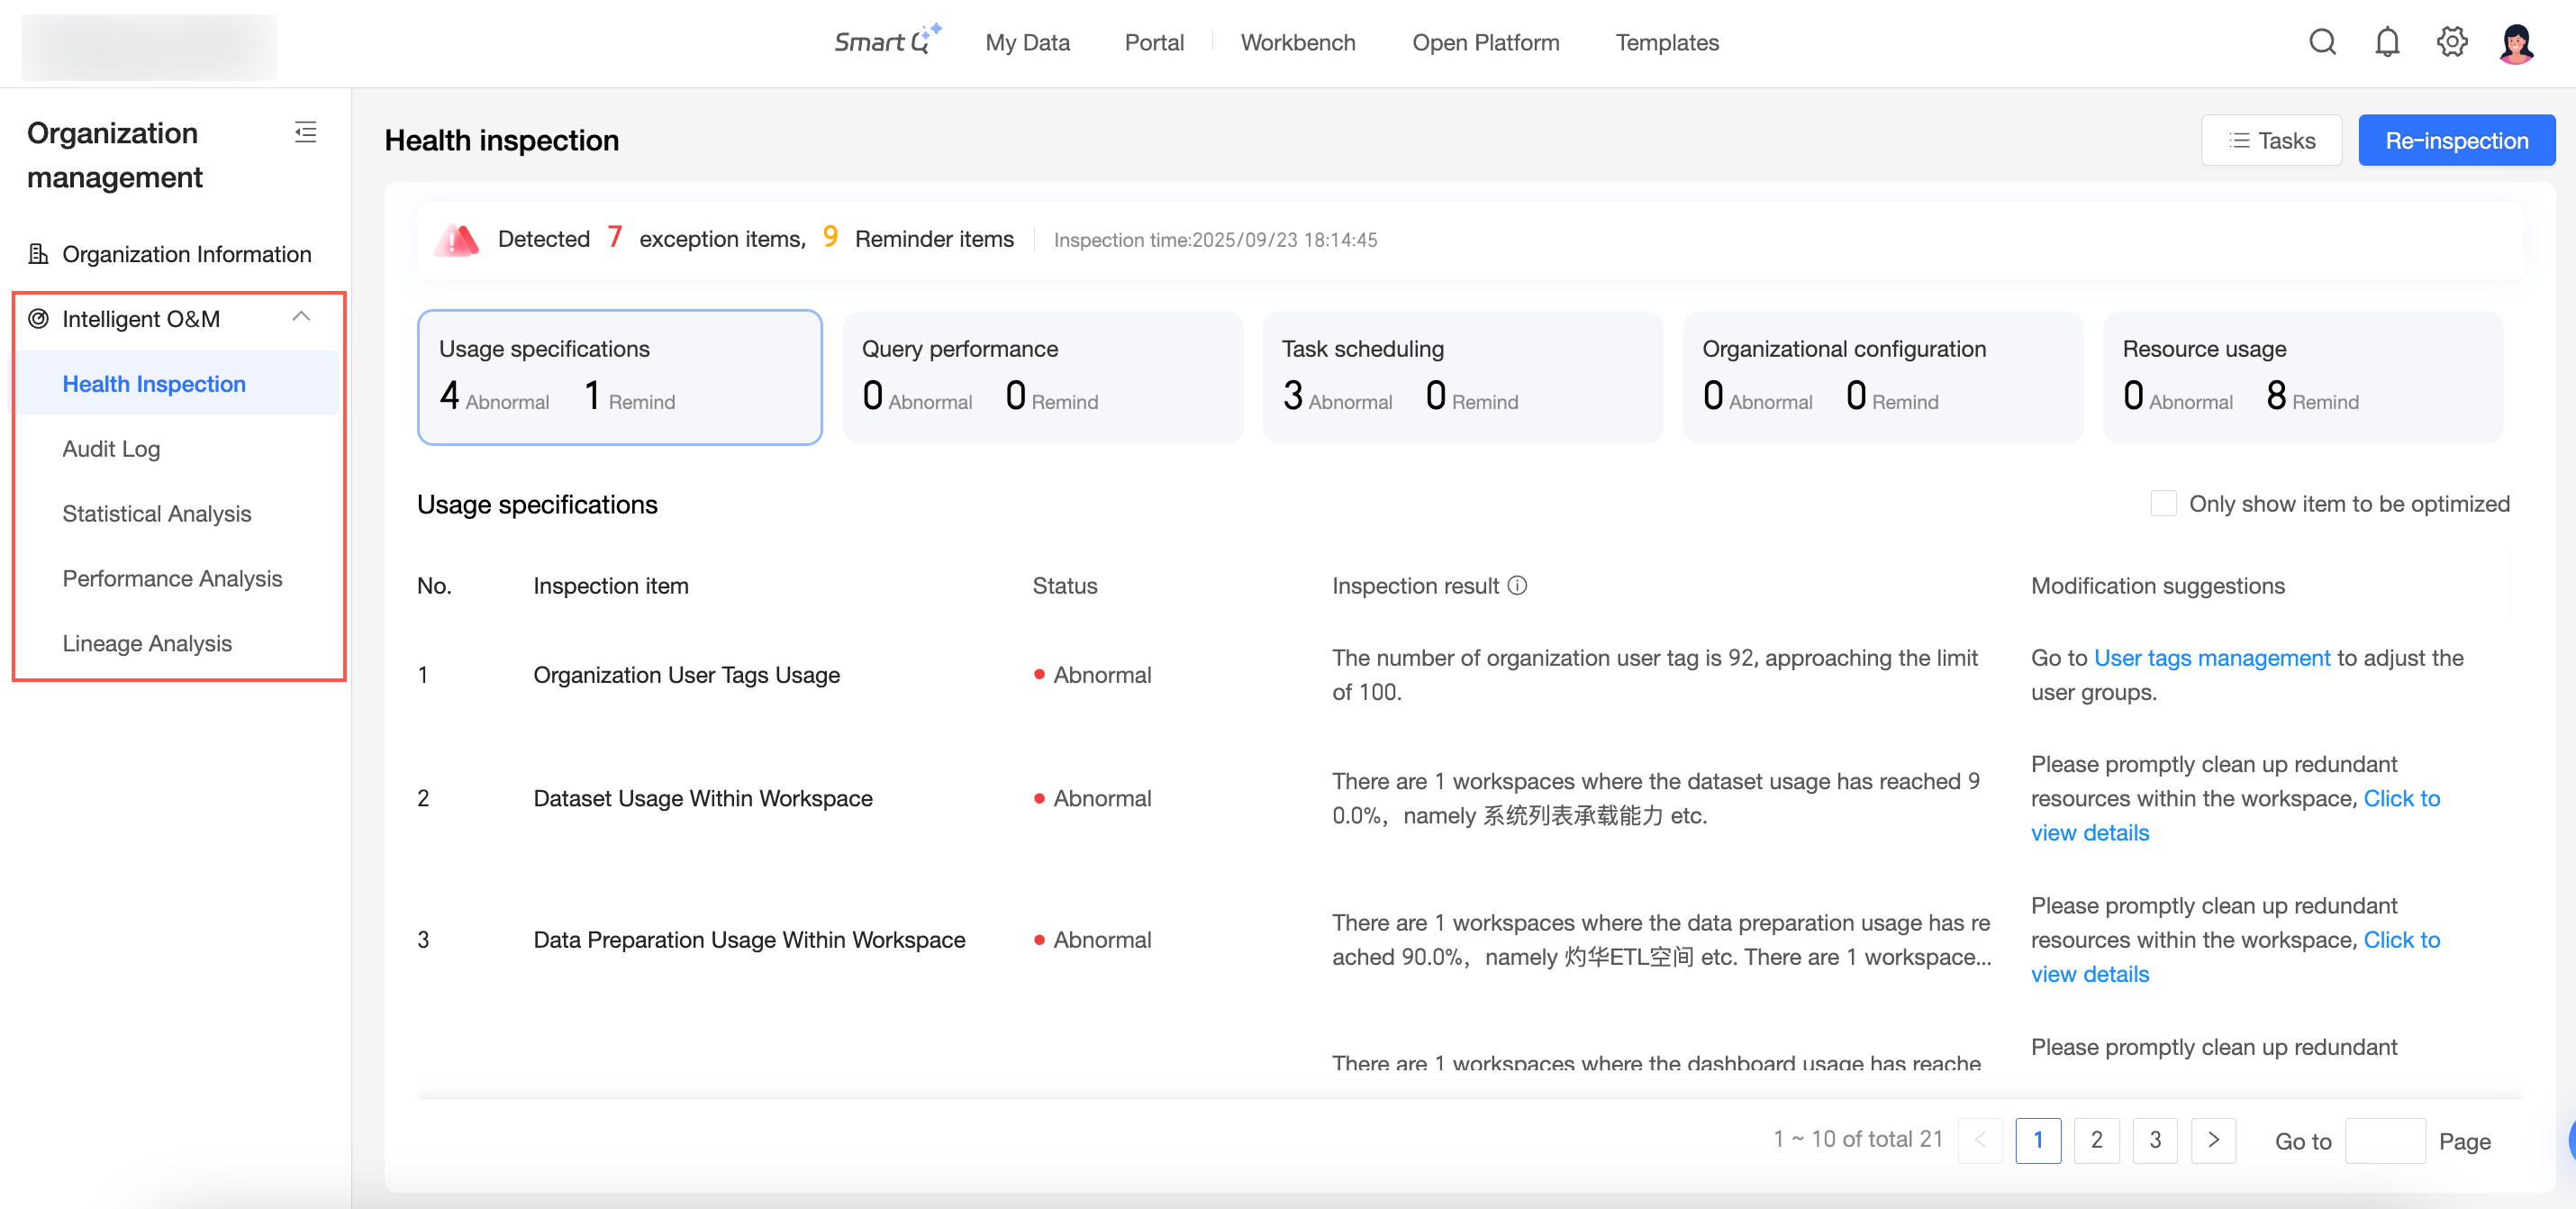
Navigate to Organization Management > User Management > Role Management, and click the
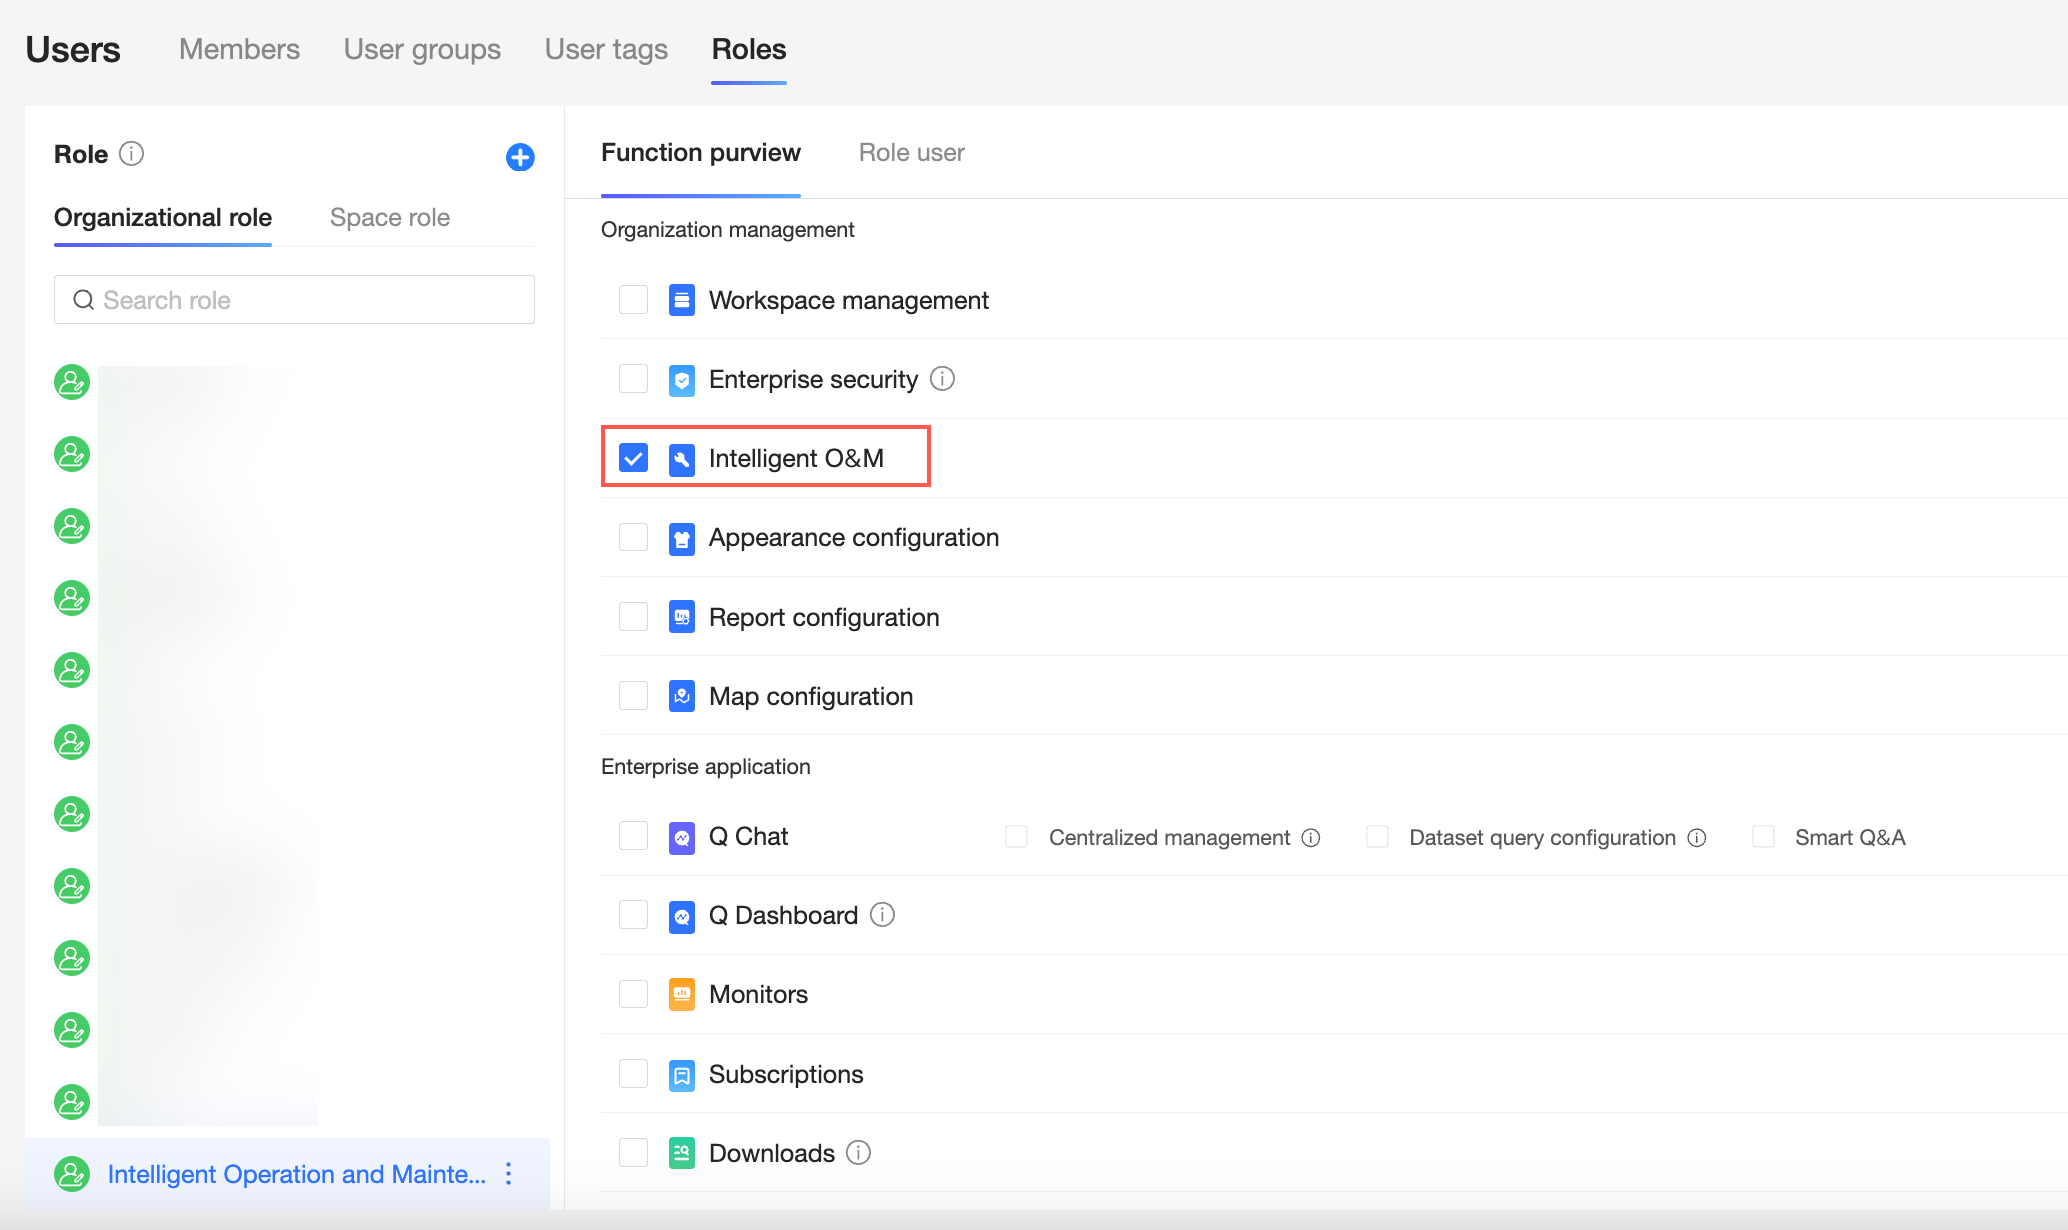
icon to create a custom organization role. Set a custom role name, such as "intelligent O&M engineer".In the organization roles list, select the newly created intelligent O&M engineer role. In the functional permissions list on the right, select the intelligent O&M permission. After this permission is selected, users associated with this role can view all data in the entire organization, including audit data and lineage analysis.
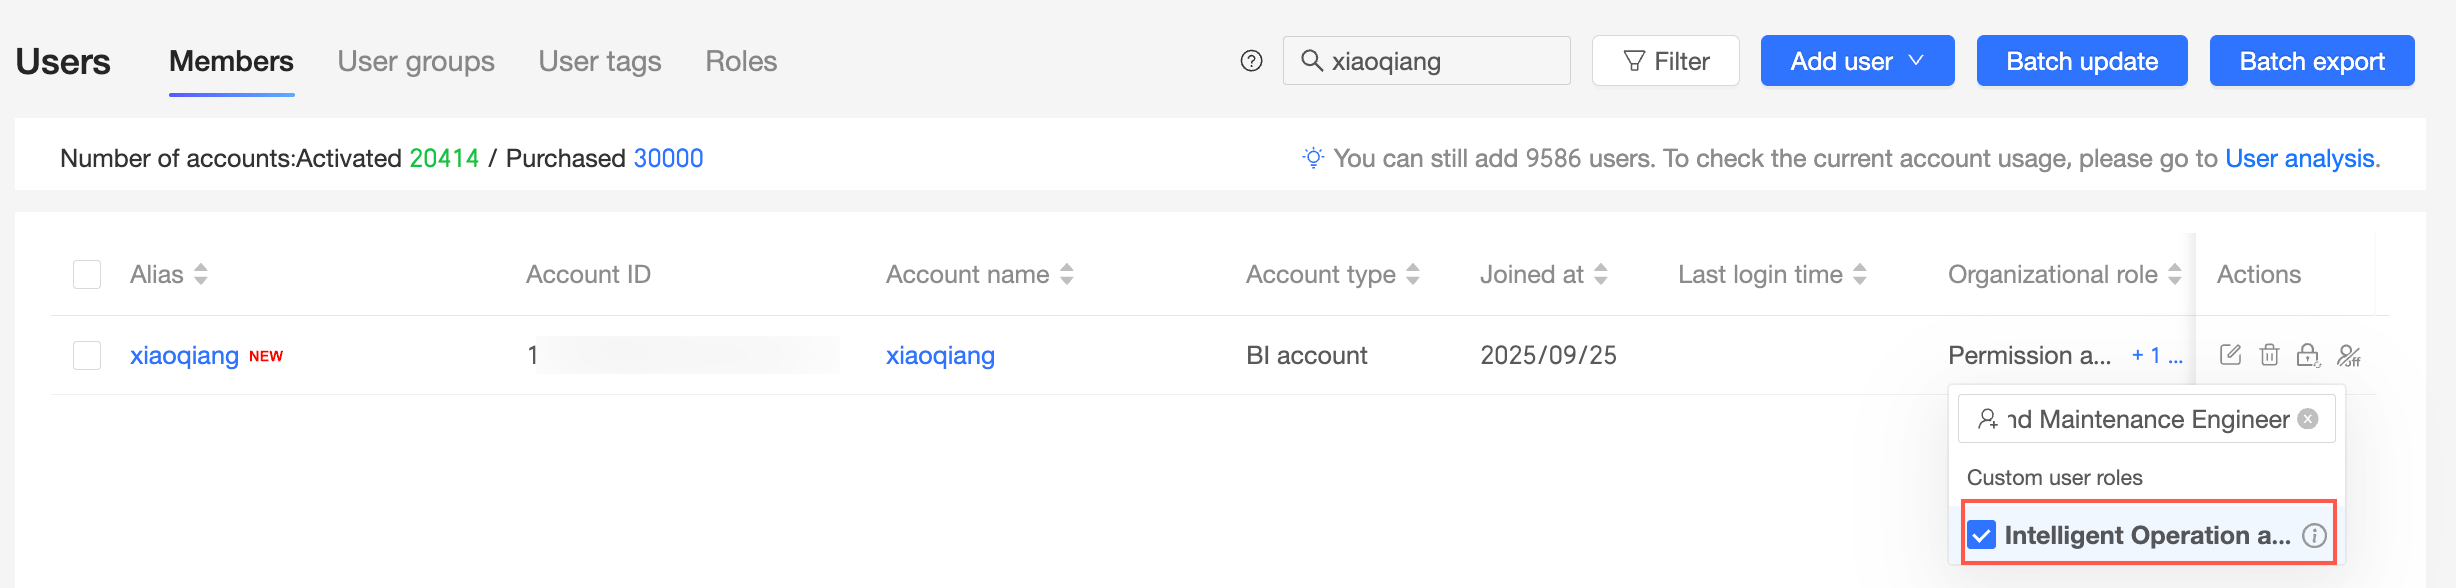
In User Management, find the user Xiaoqiang and assign the intelligent O&M engineer role to him.
Log in to the Quick BI system with Xiaoqiang's account. In Organization Management, you can see the intelligent O&M features, including Monitoring, Audit Logs, Statistical Analysis, Performance Analysis, and Lineage Analysis.
 icon to create a custom organization role.
 Set a custom role name, such as "intelligent O&M engineer".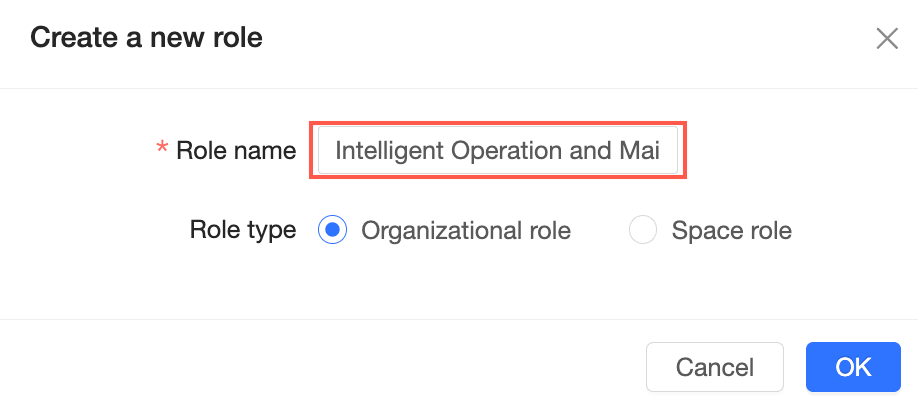
Permission priority
This section explains the logic of permission priority with two use cases.
Permission priority
From a functional perspective, functional permissions take precedence over resource use permissions in a workspace.
From a resource perspective, functional permissions are constrained by resource permissions in a workspace.
Scenario 1:
User's current permissions: Xiaoming is in workspace A. He has the organization-level general user role and the workspace-level workspace developer role. Xiaoming can see all functional module directories in the workspace A workbench and can create or edit all modules, such as dashboards, spreadsheets, data dashboards, data sources, and datasets.
User permission change
The organization administrator goes to the role management center and creates a new workspace role named Dashboard - No Permissions. This role has no create (edit) or view permissions for the dashboard module, as shown in the following figure.
On the Workspace Members and Information page, change Xiaoming's existing workspace developer role to the Dashboard - No Permissions role.
Now, Xiaoming cannot see the dashboard entry in workspace A and cannot perform any dashboard operations. As a result, his permissions to use existing dashboard resources in the workspace are revoked.
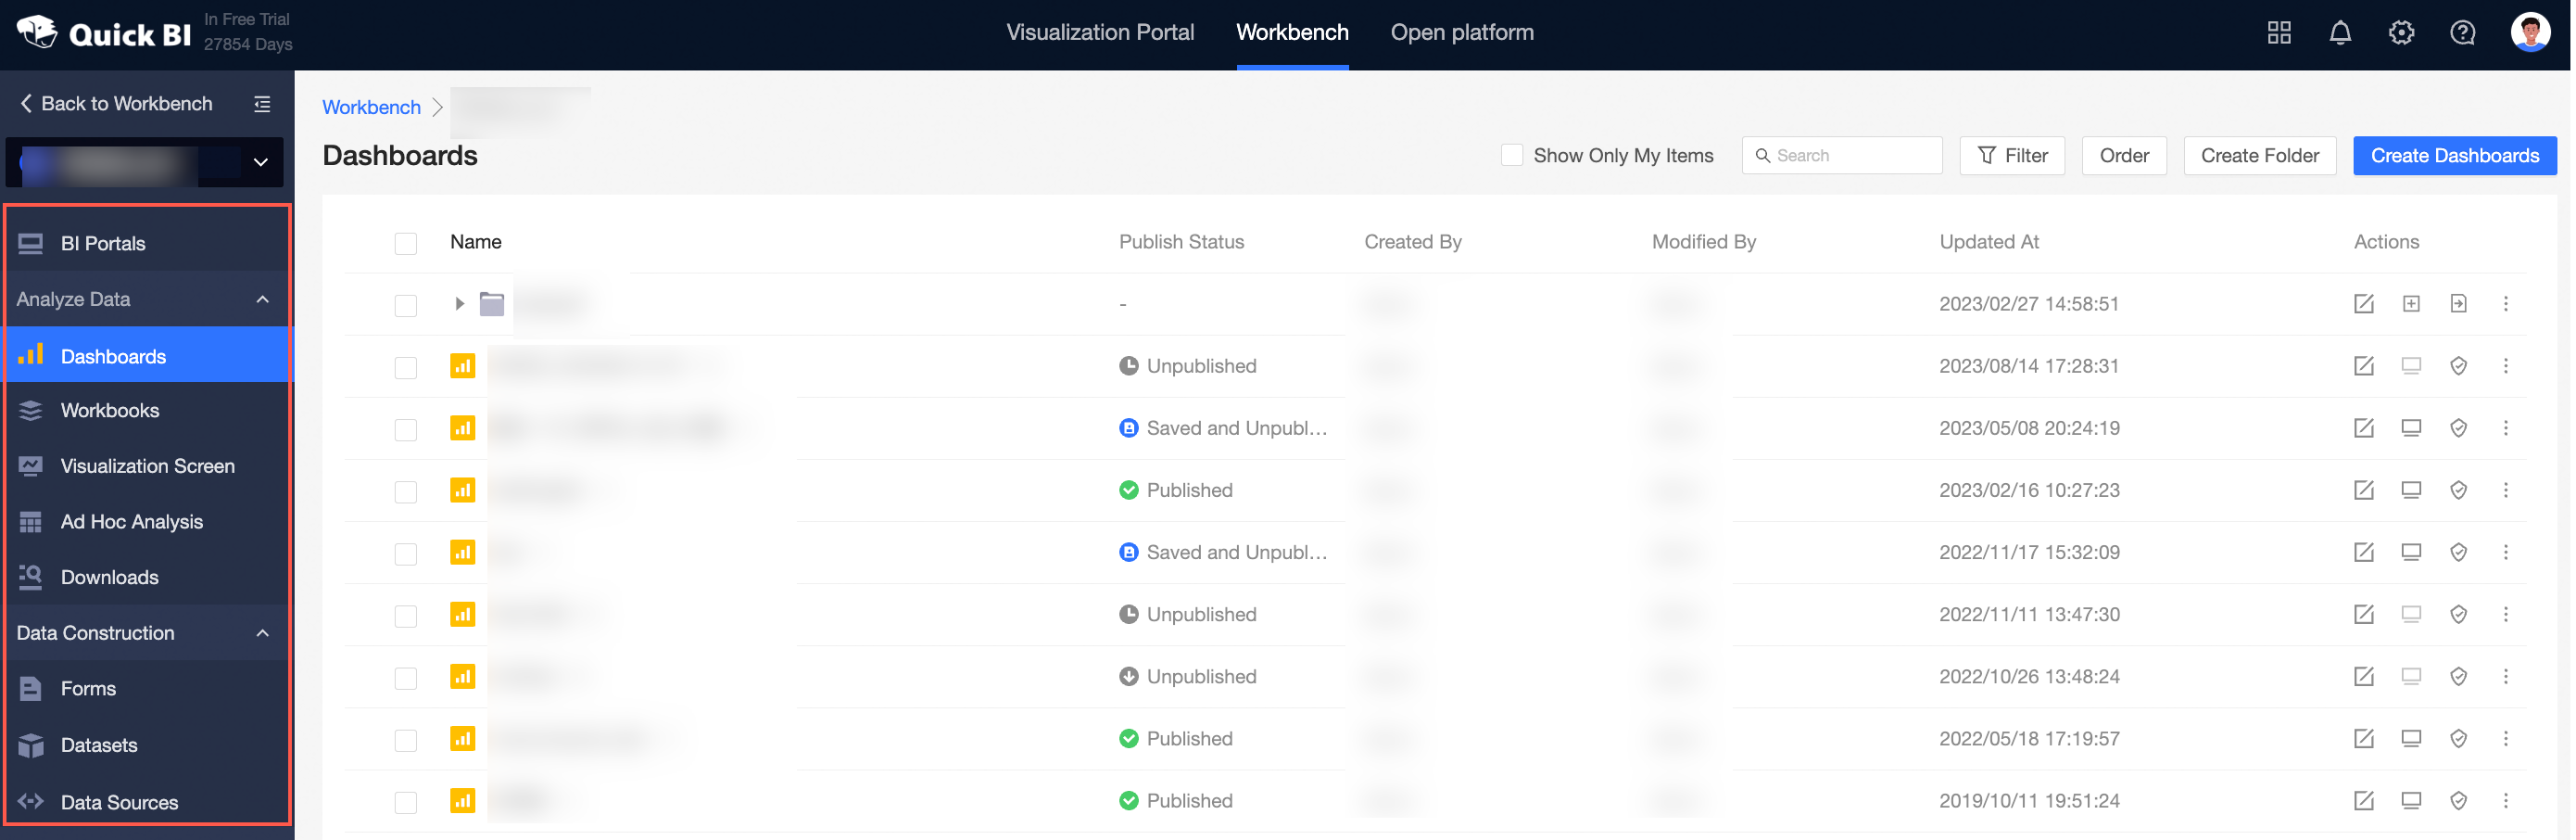
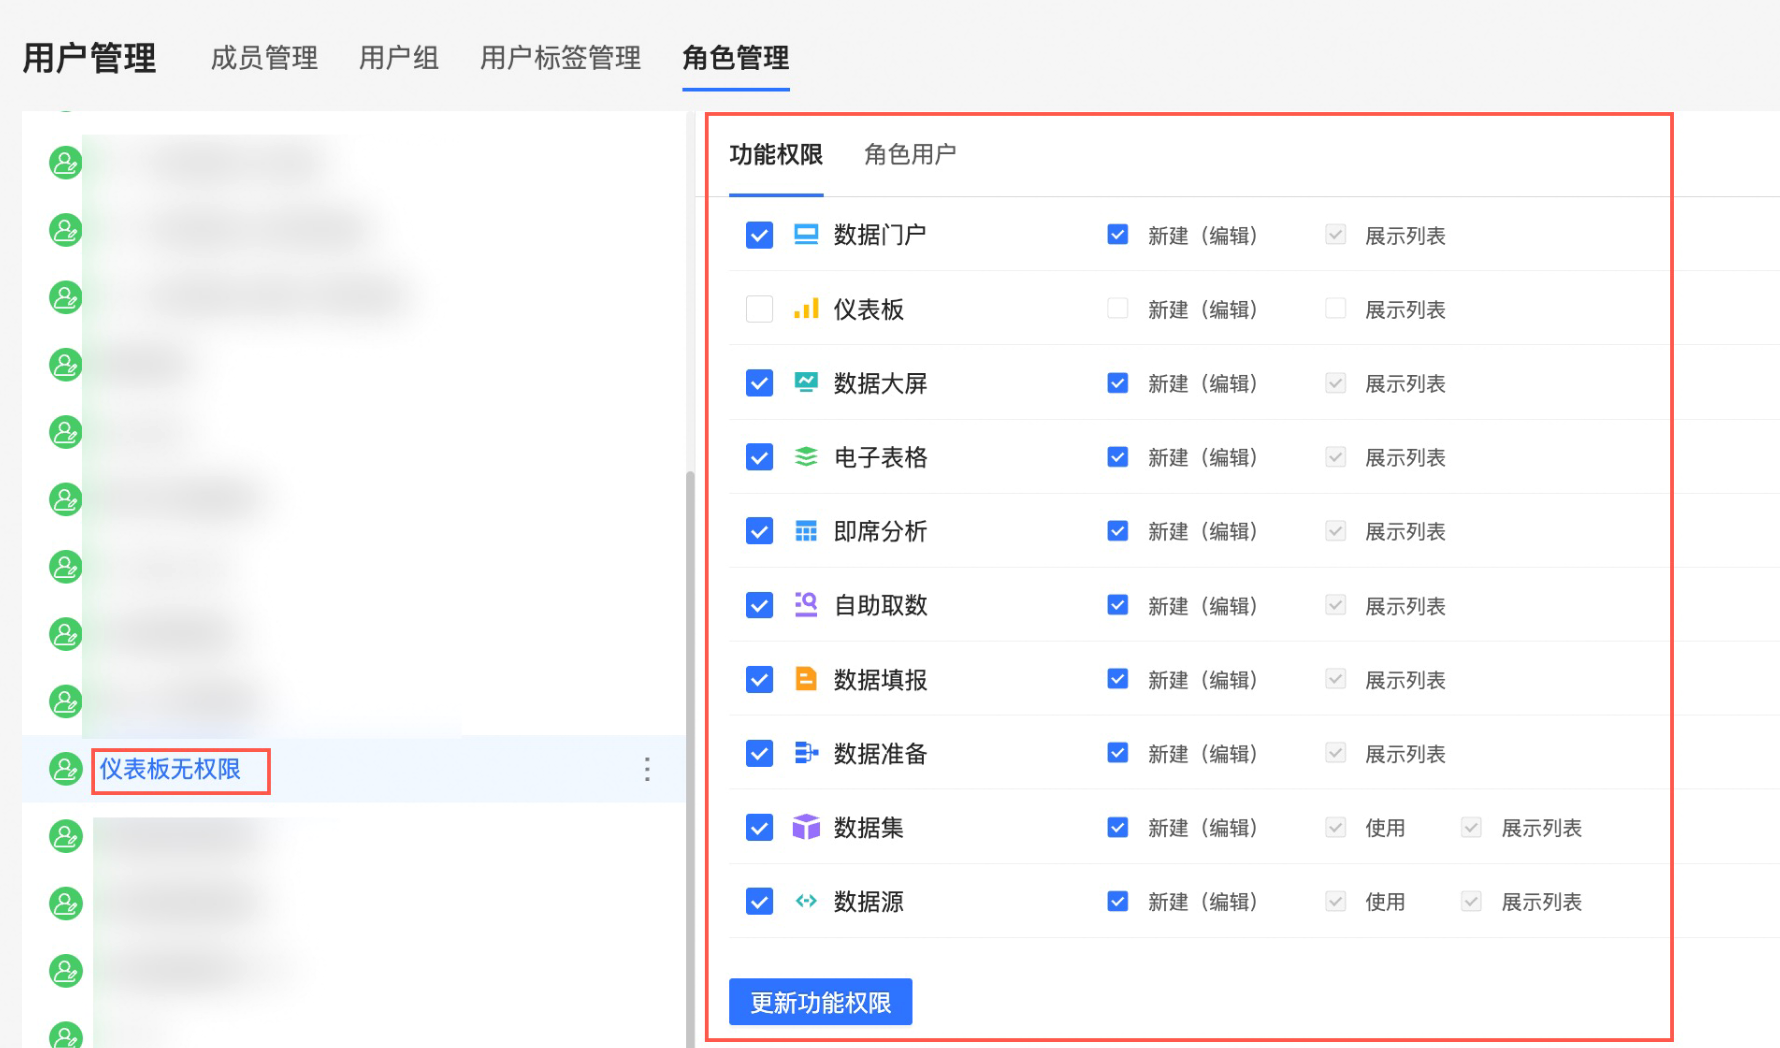
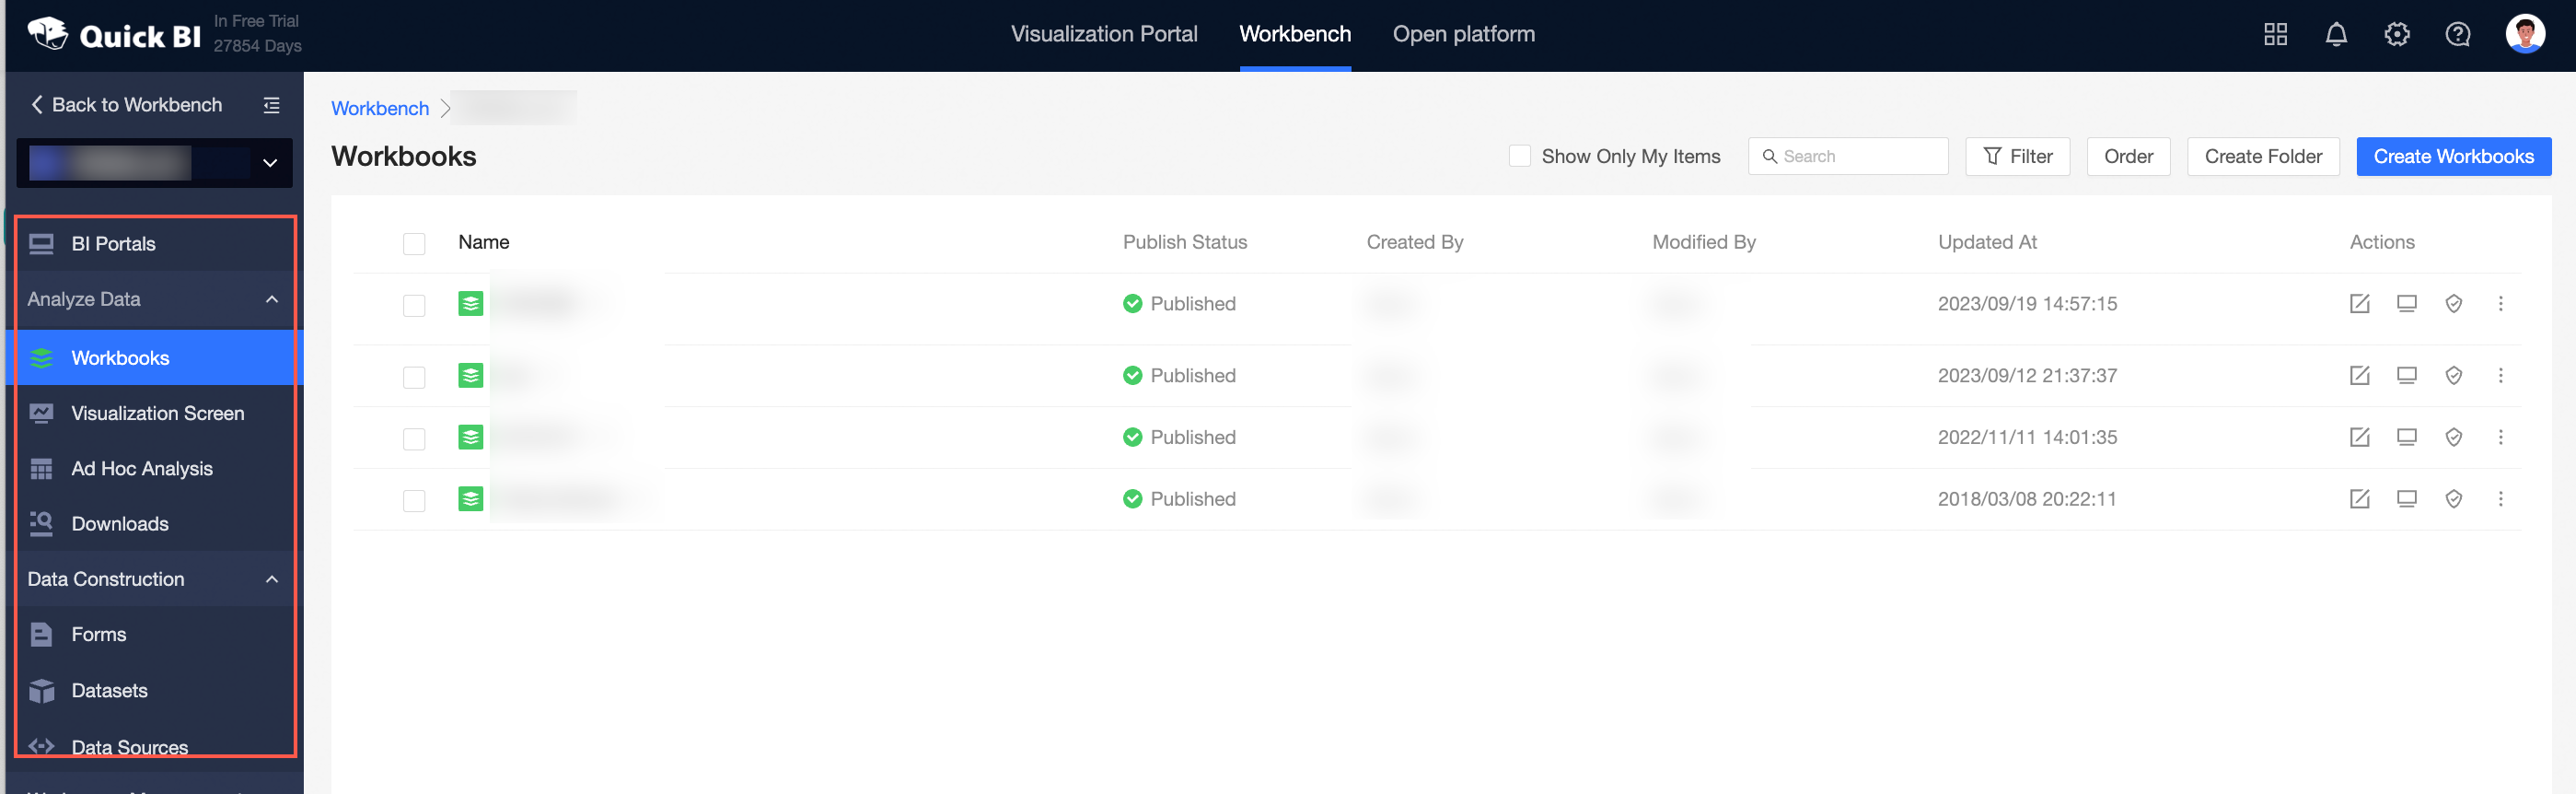
Therefore, functional permissions take precedence over workspace resource use permissions.
Scenario 2:
User's current permissions
Xiaoming is in workspace A. He has the organization-level general user role and the workspace-level workspace analyst role.
Xiaoming can see all directories in the workspace A workbench but cannot manage data sources or datasets. He can only manage the reports he created.
Additionally, Xiaoming has been granted edit permissions for three reports created by another user, Xiaozhang, in workspace A.
User permission change
On the Workspace Members and Information page, change Xiaoming's existing workspace analyst role to Dashboard Administrator.
The functional permissions for the Dashboard Administrator role are shown in the following figure.
Now, Xiaoming can only see the dashboard module in workspace A. He can manage his own reports and the three reports for which Xiaozhang granted him permissions.

Therefore, functional permissions are also constrained by workspace resource permissions.