Deploy and use SVN on an ECS instance
Deploy Subversion (SVN) on an ECS instance with HTTP or svnserve access to manage code through checkout, update, and commit.
Prerequisites
Create an ECS instance. See Create an instance using the custom launch tab.
The instance must meet these requirements:
-
The instance has a static public IP address or an Elastic IP Address (EIP). See Enable public bandwidth.
-
Operating system: Alibaba Cloud Linux 3, Alibaba Cloud Linux 2, or CentOS 7.x.
-
Instance type: At least 4 vCPUs and 4 GiB of memory. The exact specifications depend on your project size and team size.
-
An inbound security group rule allows traffic on ports 22, 80, and 443. See Add a security group rule.
NoteIf you use the svnserve mode, you must also allow traffic on port 3690.
This tutorial supports one-click SVN deployment. Run with one click
Deploy SVN
SVN supports two access modes: HTTP and svnserve.
|
Feature |
HTTP mode |
svnserve mode |
|
Protocol |
HTTP |
Custom SVN protocol |
|
Access method |
Web browser or SVN client |
SVN client only |
|
Port |
80 |
3690 |
|
Security |
HTTPS encryption |
Plaintext by default; encryption optional |
|
Configuration |
Web server configuration |
SVN server configuration |
|
Feature support |
More features, such as permission management and log viewing |
Fewer features |
Deploy SVN using HTTP
Step 1: Install SVN
-
Connect to the Linux instance.
-
Install SVN.
sudo yum install -y subversion -
Check the SVN version.
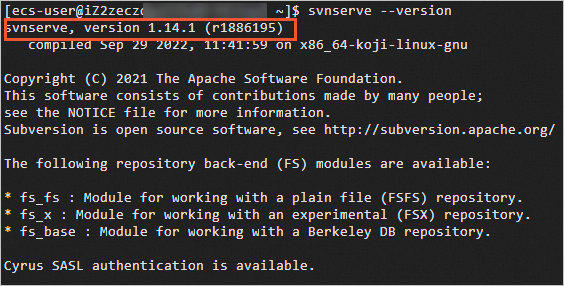
svnserve --versionOutput similar to the following indicates SVN is installed.
Step 2: Install Apache
-
Install httpd.
sudo yum install httpd -y -
Check the httpd version.
httpd -versionOutput similar to the following indicates httpd is installed.

Step 3: Install mod_dav_svn
mod_dav_svn is an Apache module that provides web access to SVN repositories.
Install mod_dav_svn.
sudo yum install mod_dav_svn -yStep 4: Configure SVN
-
Create an SVN repository.
sudo mkdir /var/svn cd /var/svn sudo svnadmin create /var/svn/svnrepos -
Change the user group of the SVN repository to apache.
sudo chown -R apache:apache /var/svn/svnrepos -
View the automatically generated repository files.
cd svnrepos
ls
The following table describes the directories in Subversion.
Contents
Description
db
Stores all version control data files.
hooks
Stores hook script files.
locks
Tracks clients that access the repository.
format
A text file containing an integer that indicates the repository configuration version.
conf
The SVN repository configuration file, containing access accounts and permissions.
-
Run a command to add a user and password for the SVN repository.
By default, SVN uses plaintext passwords, but HTTP requires hashed passwords. Generate a separate passwd file. In this example, a user named
userTestwith passwordpassWDTestis added. Run one of the following commands:-
To add the first user, use the
-cparameter to create the file.sudo htpasswd -c /var/svn/svnrepos/conf/passwd userTest -
To add more users after the first, omit
-c.sudo htpasswd /var/svn/svnrepos/conf/passwd userTest
Set the password as prompted.
-
-
Go to the conf directory.
cd /var/svn/svnrepos/conf/ -
Set read and write permissions for the account.
-
Open the access control file.
sudo vim authz -
Press
ito enter edit mode. -
Add the following code at the end of the file.
userTestis the account,ris read permission, andwis write permission.[/] userTest=rw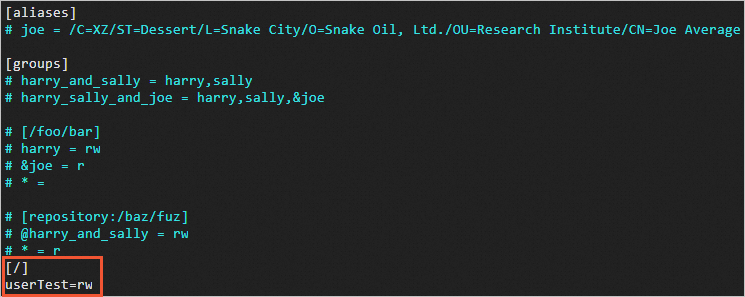
-
Press
Esc, enter:wq, and press Enter to save and exit.
-
-
Modify the SVN service configuration.
-
Open the SVN service configuration file.
sudo vim svnserve.conf -
Press
ito enter edit mode. -
Find the following lines and remove the comment symbol (#) and leading space.
NoteEach line must not start with a space, and a space must exist on both sides of the equal sign (=).
anon-access = read
auth-access = write
password-db = passwd
authz-db = authz
realm = /var/svn/svnrepos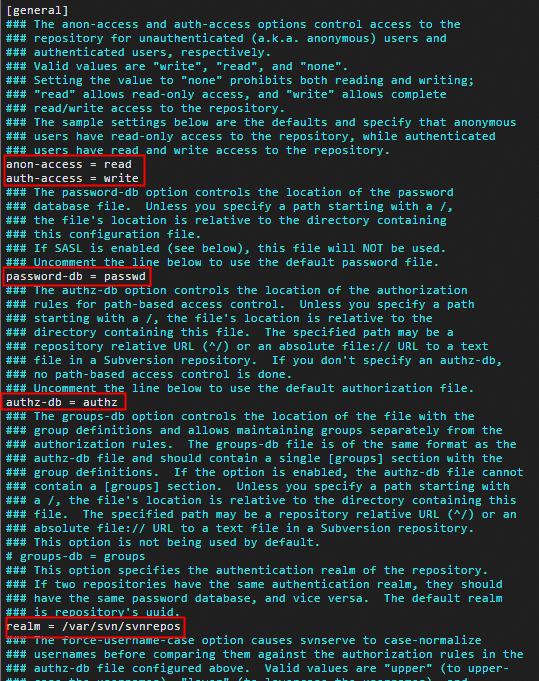
-
Press
Esc, enter:wq, and press Enter to save and exit.
-
-
Start the SVN repository.
This command directly specifies the repository.
sudo svnserve -d -r /var/svn/svnrepos/NoteTo stop the SVN service, run the
killall svnservecommand. -
Check whether the SVN service is started.
ps -ef |grep svnOutput similar to the following indicates the SVN service is running.


Step 5: Configure Apache
-
Create and edit the httpd configuration file.
sudo vim /etc/httpd/conf.d/subversion.conf -
Press
ito enter edit mode. -
Enter the following configuration in the
subversion.conffile.<Location /svn> DAV svn SVNParentPath /var/svn AuthType Basic AuthName "Authorization SVN" AuthzSVNAccessFile /var/svn/svnrepos/conf/authz AuthUserFile /var/svn/svnrepos/conf/passwd Require valid-user </Location> -
Press
Esc, enter:wq, and press Enter to save and exit. -
Start the Apache service.
sudo systemctl start httpd.service
Deploy SVN using svnserve
Step 1: Install SVN
-
Connect to the Linux instance.
-
Install SVN.
sudo yum install -y subversion -
Check the SVN version.
svnserve --versionOutput similar to the following indicates SVN is installed.
Step 2: Configure SVN
-
Create an SVN repository.
sudo mkdir /var/svn cd /var/svn sudo svnadmin create /var/svn/svnrepos -
View the automatically generated repository files.
cd svnrepos
ls
The following table describes the directories in Subversion.
Contents
Description
db
Stores all version control data files.
hooks
Stores hook script files.
locks
Tracks clients that access the repository.
format
A text file containing an integer that indicates the repository configuration version.
conf
The SVN repository configuration file, containing access accounts and permissions.
-
Set a username and password for the SVN repository.
-
Open the user configuration file.
cd conf/ sudo vim passwd -
Press
ito enter edit mode. -
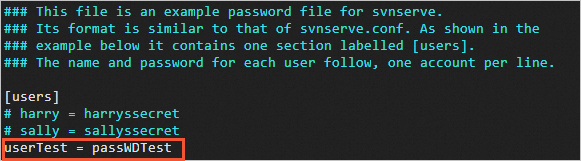
Go to the
[users]section and add a username and password.NoteFormat:
username = password. For example,userTest = passWDTest, as shown below. A space must exist on both sides of the equal sign (=). -
Press
Esc, enter:wq, and press Enter to save and exit.
-
-
Set read and write permissions for the account.
-
Open the access control file.
sudo vim authz -
Press
ito enter edit mode. -
Add the following code at the end of the file.
userTestis the account,ris read permission, andwis write permission.[/] userTest=rw -
Press
Esc, enter:wq, and press Enter to save and exit.
-
-
Modify the SVN service configuration.
-
Open the SVN service configuration file.
sudo vim svnserve.conf -
Press
ito enter edit mode. -
Find the following lines and remove the comment symbol (#) and leading space.
NoteEach line must not start with a space, and a space must exist on both sides of the equal sign (=).
anon-access = read auth-access = write password-db = passwd authz-db = authz realm = /var/svn/svnrepos -
Press
Esc, enter:wq, and press Enter to save and exit.
-
-
Start the SVN repository.
This command directly specifies the repository.
sudo svnserve -d -r /var/svn/svnrepos/NoteTo stop the SVN service, run the
killall svnservecommand. -
Check whether the SVN service is started.
ps -ef |grep svnOutput similar to the following indicates the SVN service is running.
Use SVN
The typical SVN code management workflow:
-
Checkout: Check out source code to your local computer.
-
Other users modify and commit source code to the repository.
-
Update: Get the latest code.
-
You modify and debug the source code.
-
Commit: Commit modified code to the repository. Other programmers can then see your changes.
Check out source code to a local directory (Checkout)
-
Download and install the TortoiseSVN client on your local Windows computer.
-
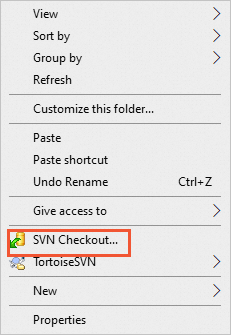
Right-click a blank area in the local project folder.
In this example, the folder is
C:\Test. -
In the pop-up menu, select SVN Checkout....
-
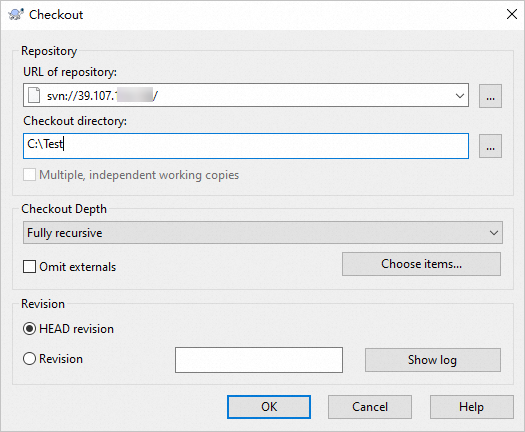
Enter the following information and click OK:
-
URL of repository: The URL where the source code is stored.
-
HTTP access mode: The URL is in the format of
http://<Public IP address of the ECS instance>/svn/<SVN repository name>. -
svnserve access mode: The URL is in the format of
svn://<Public IP address of the instance>/<SVN repository name>.NoteIf the SVN service was started in the parent directory of the repository, append the repository name to the SVN checkout URL.
-
-
Checkout directory: The local directory for the source code. In this example,
C:\Test.
NoteOn first login, enter the username and password set in the passwd file.
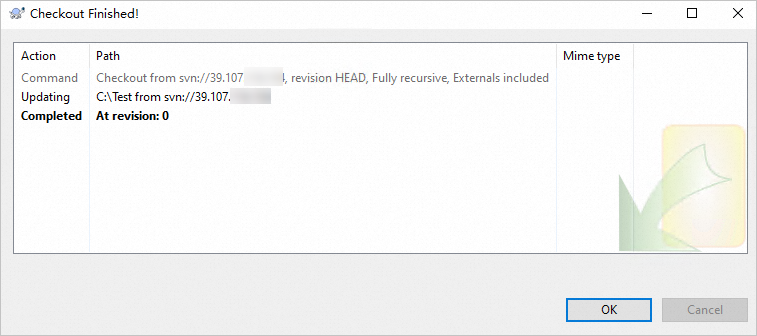
The following shows a successful checkout.
-
Obtain updates (Update)
After the server-side repository is updated, right-click a blank area in the local project folder and select SVN Update to download the latest version.
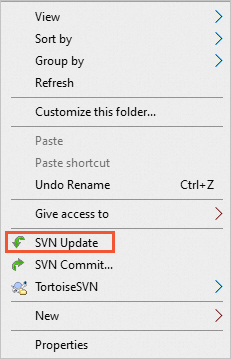
SVN Update overwrites existing content in the project folder. Back up your project before updating.
Commit modifications (Commit)
Commit local modifications to the server-side repository:
-
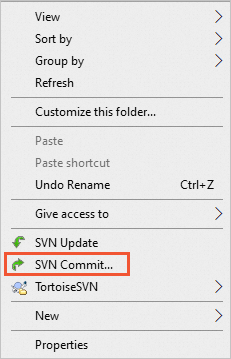
Right-click a blank area in the project file and select SVN Commit....
-
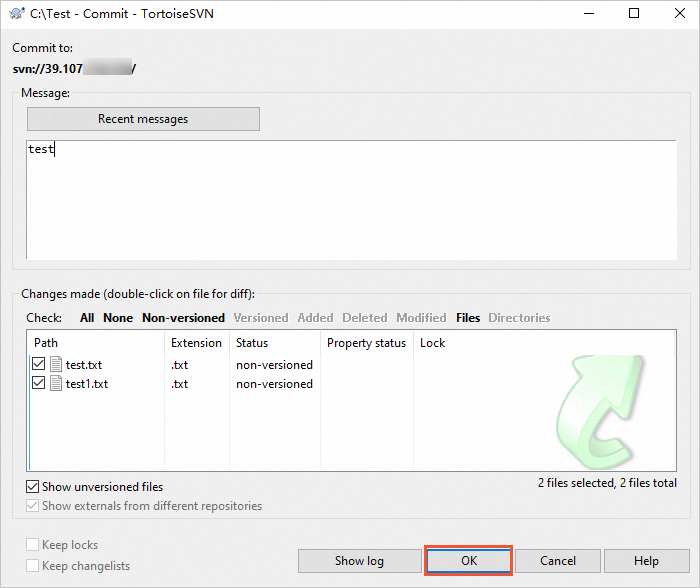
Enter a version update comment, select the content to commit, and click OK.
The local project overwrites the repository project.
Note-
If two users commit modifications, the later commit fails because the version is outdated. Back up your project, download the latest version from the server, overwrite the local folder with your changes, and then click SVN Commit.
-
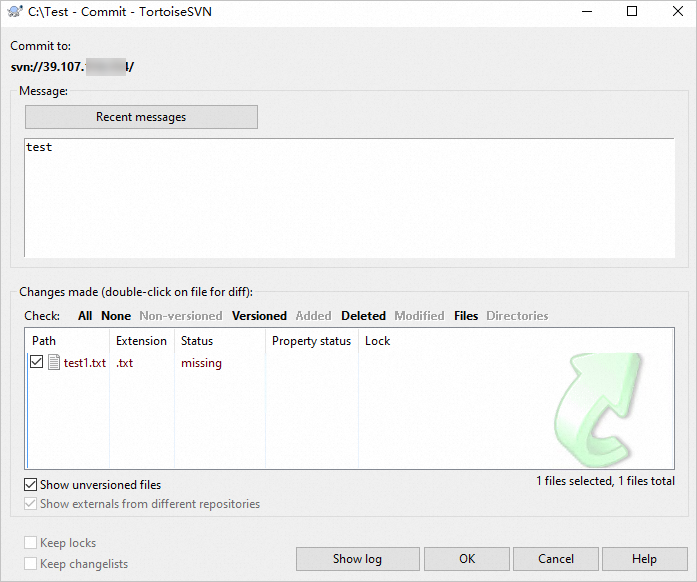
If you delete a file in the committed project, a message similar to the following is displayed.
-
Revert a file
Revert a deleted file in SVN:
-
Open the local project folder, right-click, and select SVN Checkout... to check out data.
-
Delete one of the files.
-
Choose the appropriate operation based on whether you have committed the modification:
-
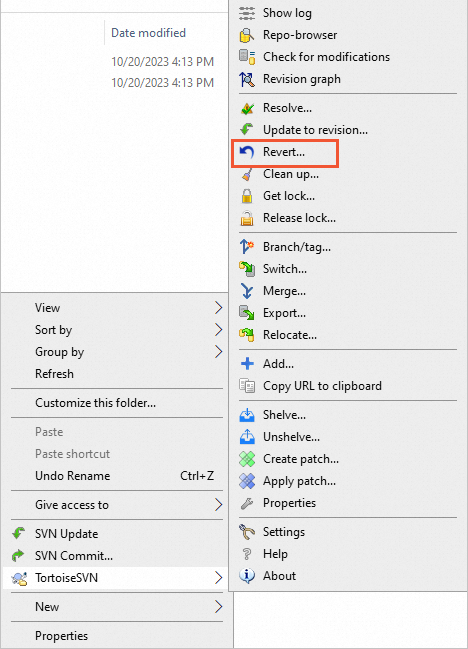
If not yet committed, right-click a blank area and select .
-
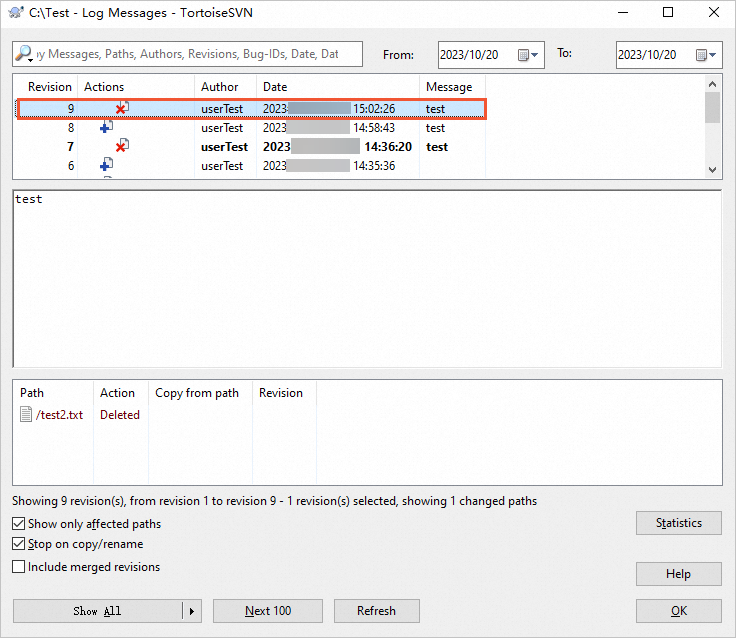
If already committed, the server-side repository is synchronized and the file is deleted there too. Revert with the following steps:
-
Right-click a blank area and select .
-
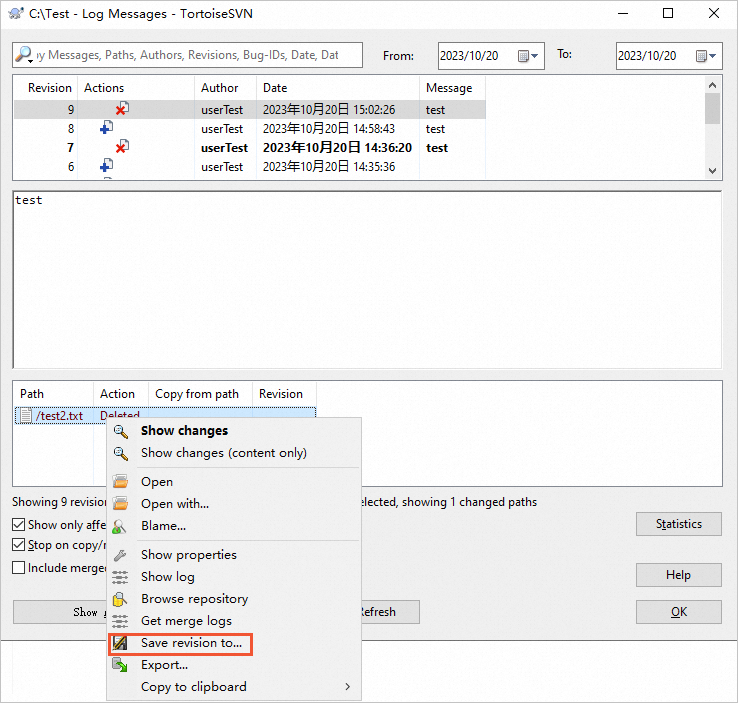
Click the log entry for the deletion. The deleted data appears below.
-
Right-click the deleted data and click Save revision to....
-
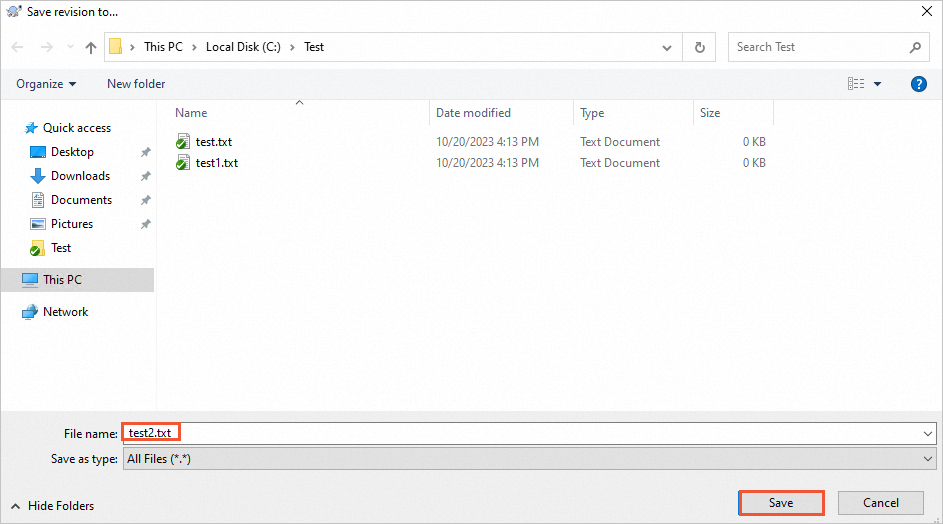
Set the file name and click Save to restore the file to its original location.
-
-
-
Open the original folder and click SVN Commit... to synchronize with the repository.
FAQ
Why am I prompted with "The host did not respond" when I use TortoiseSVN to access the SVN server?
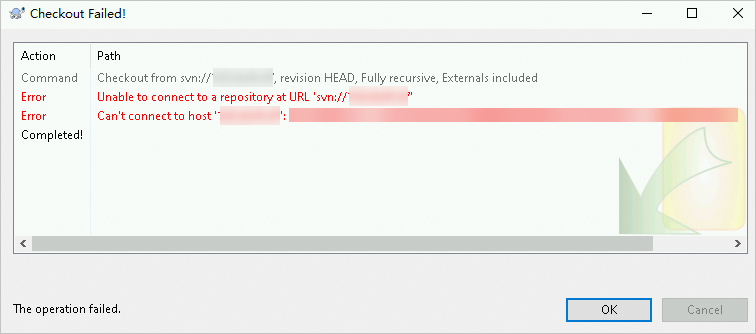
Possible causes:
-
The SVN server is not started.
-
The required ports are not opened in the security group.
-
The firewalld firewall is enabled but the required ports are not allowed.
Troubleshoot as follows:
-
Check the SVN service status.
ps -ef |grep svnOutput similar to the following indicates the SVN service is running. If not, run
sudo svnserve -d -r /var/svn/svnrepos/to start it. -
Check whether the security group rules meet the SVN server requirements.
-
HTTP mode: ports 22, 80, and 443.
-
svnserve mode: ports 22, 80, 443, and 3690.
-
-
Check the firewalld firewall.
-
Check the firewalld status.
sudo firewall-cmd --state-
If
not runningis returned, the firewall is disabled and does not affect SVN. -
If
runningis returned, the firewall is enabled. Proceed to the next step.
-
-
Allow traffic on the required SVN port, such as port 3690.
sudo firewall-cmd --add-port=3690/tcp --permanent -
Reload the
firewalldconfiguration.sudo systemct
-
