Financial units
Financial units aggregate cloud resource costs into custom cost categories, enabling cost allocation by dimensions such as organization, project, or environment within your enterprise.
What are financial units
Financial units are a configurable rule system. By combining multiple dimensions such as resource tags, resource groups, resource names, product types, regions, and accounts, the system automatically executes allocations and reaggregates raw consumption data to generate cost views that align with your organizational structure or business model.
Core capabilities of financial units:
Multi-condition rule combination — Supports AND/OR logic to flexibly combine tags, products, regions, accounts, resource instances, and other dimensions.
Hierarchical tree management — Supports creating multi-level tree structures that map to your actual organizational hierarchy, enabling cost aggregation analysis at each level.
Shared resource cost allocation — For resources shared across multiple business units (such as network traffic and storage), allocates shared costs by specified proportions.
Budget management integration — You can set individual budgets for each financial unit and trigger alert notifications when spending exceeds the threshold.
Visual cost analysis — Integrates with cost analysis to view spending and cost trends for each financial unit.
Financial units can meet the following cost allocation scenarios:
Allocate costs by department or cost center — Create a financial unit for each department. Define rules based on accounts or specific department tags (such as
department:rd) to automatically aggregate all resource costs belonging to that department.Allocate costs by project or product line — Create a financial unit for a specific project that contains multiple microservices. Set the rule to
all resources with the tag project:e-commerceto calculate independent ROI for each product line.Allocate costs by environment (production, testing) — Create two financial units: "Production Environment" and "Test Environment". Set rules to
tag env:prodandtag env:testrespectively. Set a lower budget and alert for the "Test Environment" to effectively control non-production spending.Fine-grained allocation of shared resources — Aggregate shared infrastructure such as Kubernetes clusters or database clusters into a "Shared Resource Pool" financial unit. Use the shared cost allocation feature to automatically distribute the total cost proportionally based on each project's CPU/memory usage or call counts.
Considerations
Before you configure financial units, note the following constraints:
Hierarchy depth — Financial units support a maximum of 4 levels.
Maximum units — By default, a single account supports a maximum of 200 financial units.
Directory order — You can drag to adjust the order of financial units in the directory tree. Rule priority decreases from top to bottom.
Rule priority — Manual assignment > Follow-allocation > Automatic allocation.
Multiple rule matches — When a resource instance matches multiple automatic allocation rules, the rules are executed in the order of the financial unit directory tree. Once a rule takes effect, subsequent rules no longer apply.
Primary and sub-account conflicts — If the same resource matches rules from both the primary account and sub-accounts, the resource is assigned to the primary account's financial unit.
Inactive resources — Resource instances that have not generated bills in the last 3 months and have not been assigned to any financial unit are automatically removed from the financial unit unallocated resource list and cannot be reassigned.
Data update delay — After reassigning resources or modifying automatic allocation rules, updates are delayed by 48 hours from the time of the change. For split-type cloud products (such as OSS, snapshots, and Cloud Communication), the specific costs of each split item are delayed by 72 hours.
Prerequisites
(Optional) To batch create financial units based on an account tree, activate Enterprise Account Center.
(Optional) To use tags for allocation rules, configure Cost Tags.
(Optional) To use resource groups for allocation rules, create and configure the necessary resource groups.
Operation guide
The new version of financial units is being progressively rolled out, with new capabilities including allocation effect preview, batch creation of financial units, and historical rule viewing. The operation guide annotates differences where applicable.
Identify your version
You can determine which version you are using based on the financial units homepage. Users on the legacy version should wait for the system upgrade.
New version homepage:
Legacy version homepage:
If you have never used financial units, the new version displays the financial unit rule editing page by default. If you have used financial units before, you are directed to the overview page.
Create financial units
Financial units support two creation methods: manual creation and batch creation (new version feature).
Manual creation — Customize the arrangement based on your organizational structure, business classification, or other scenarios.
Batch creation — Quickly build financial units based on an existing account tree or resource groups.
Manually create financial units
Log on to the Expenses and Costs console.
In the left-side navigation pane, choose > Cost Center.
Go to the Cost Centers page.
Complete the remaining steps based on your version:
New version
Click Edit Rule on the right side to go to the Cost Center Rule Management page.

Click the
 button next to Cost Center to add a financial unit.
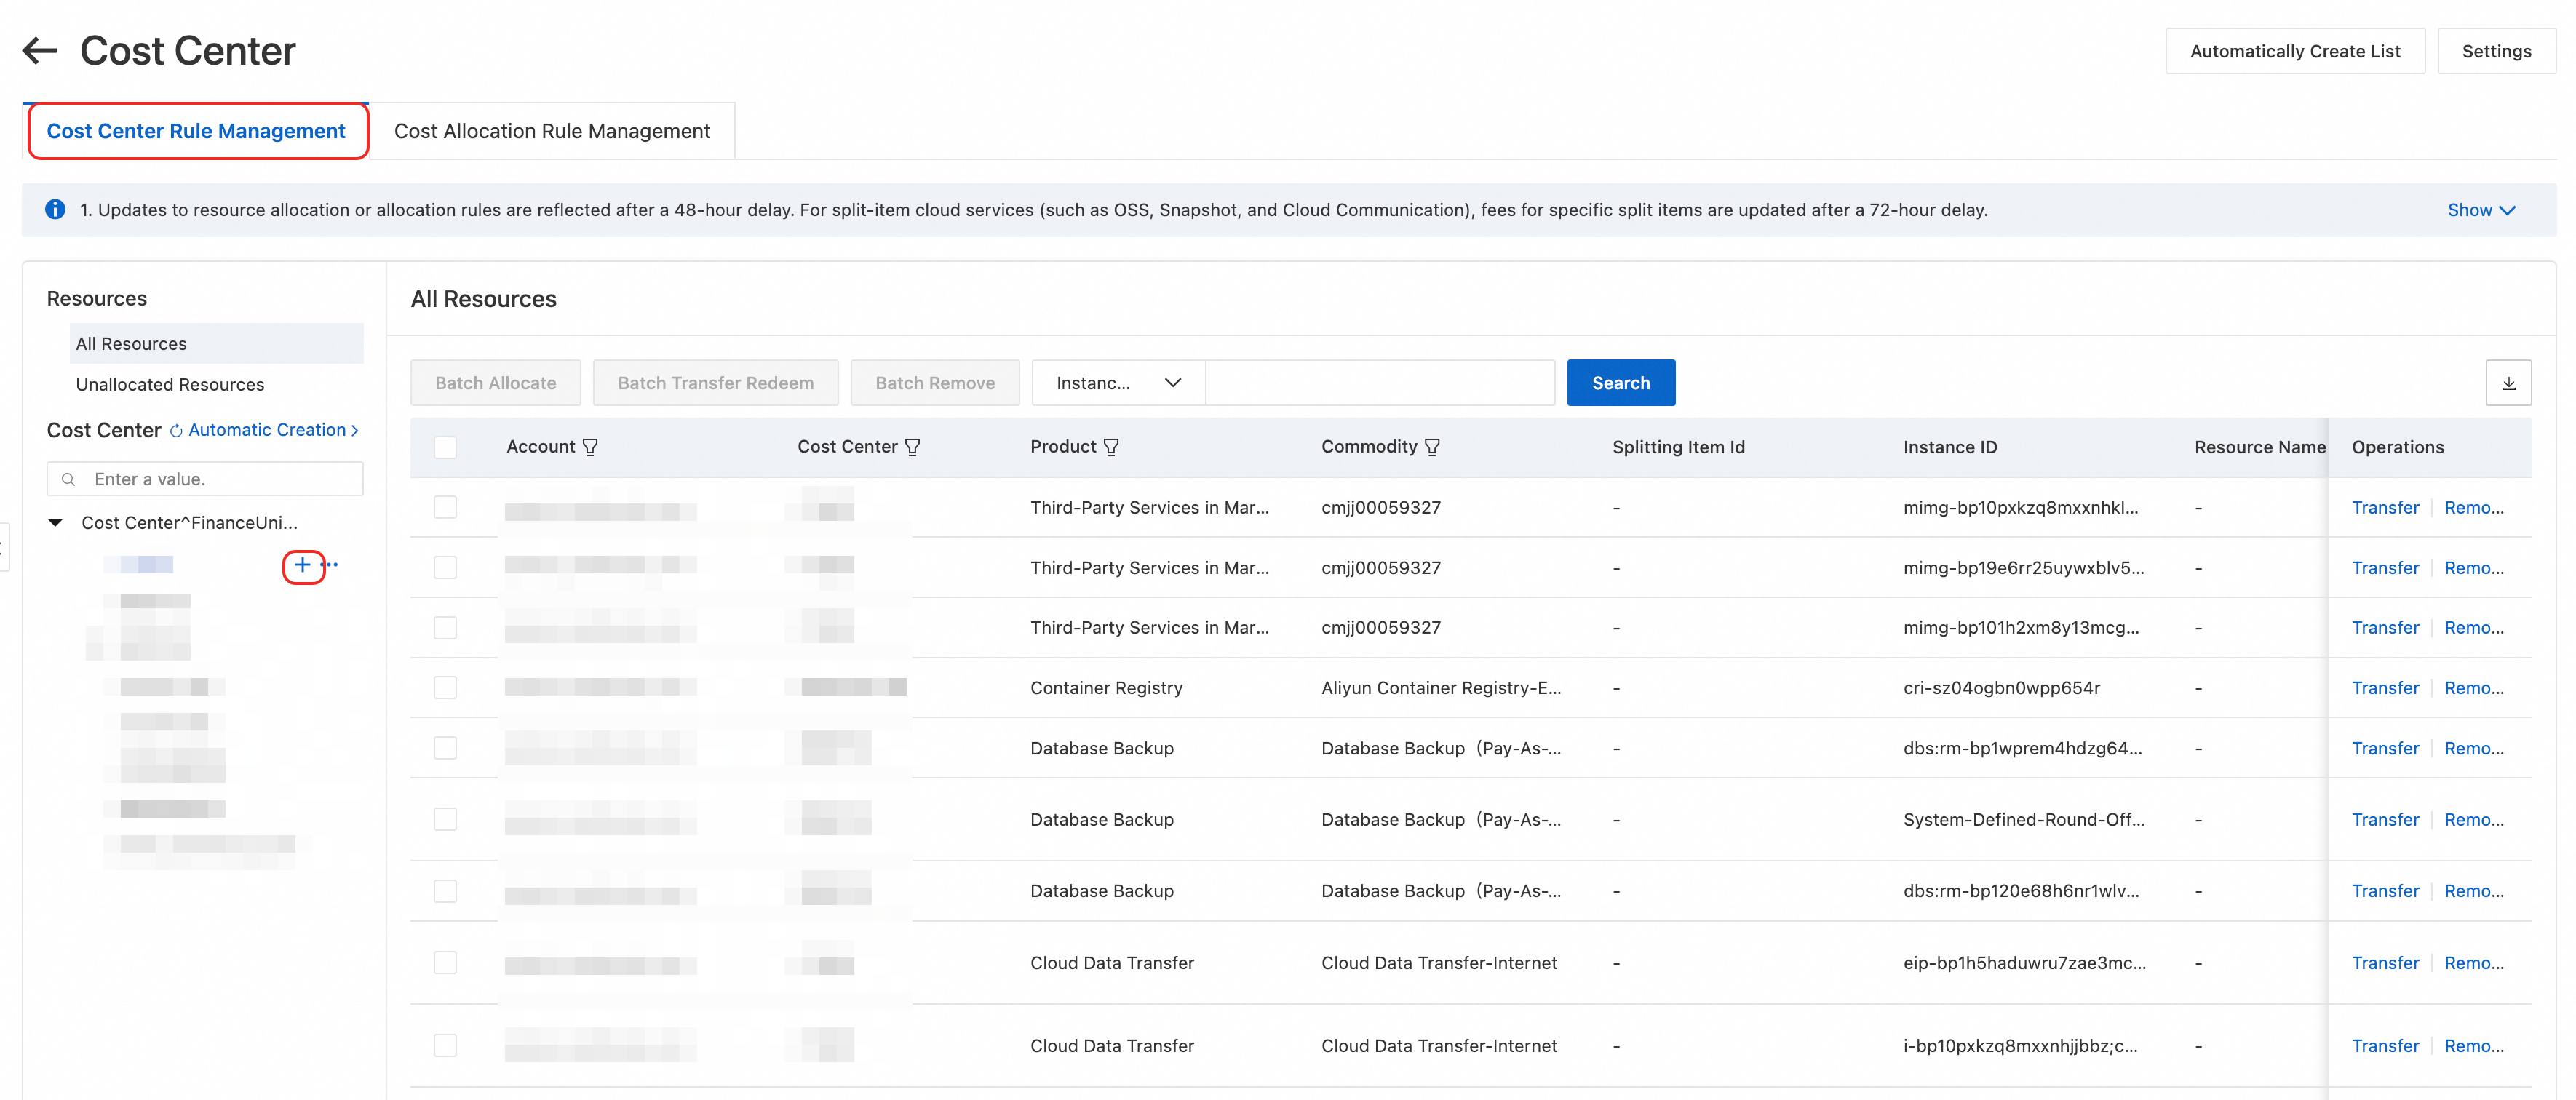
The new financial unit appears in the directory tree.
Legacy version
Click the
 button next to Cost Center to add a financial unit.

For existing financial units, click the buttons on the right to rename, copy, or delete them.

Batch create financial units (new version)
Log on to the Expenses and Costs console.
In the left-side navigation pane, choose > Cost Center, and go to the Cost Centers page.
Click Edit Rule on the right side to go to the Cost Center Rule Management page.
Click Bulk Create, and in the dialog box, Select Information to Sync.
Enterprise/Organization/Account — If you have activated Enterprise Account Center, you can synchronize the account list and name information from Account Center to use as the financial unit directory tree.
Resource Group — Suitable for scenarios where resource groups are used for cost allocation.
After making your selection, click Create. The system creates financial units in batches. You can view the creation details in Bulk Creation List. After the creation is complete, click the
button to refresh the directory tree.

 button to refresh the directory tree.
The new financial units appear in the directory tree after you refresh it.
Assign resources to financial units
After creating financial units, you need to associate them with corresponding resources. Two methods are supported: Create Allocation Rules and Manual Assignment.
Create allocation rules
Create allocation rules to automatically assign resource instances that meet specified conditions to designated financial units.
New version
Go to the Cost Center Rule Management page and select an existing financial unit.
In the Allocation Rule area on the right, click Edit.
In the area below, edit rules by dimensions such as Resource Owner Account, Product Name, Commodity Name, Region, Instance ID, and Resource Tag. Multi-condition combinations are supported.
Rule Configuration Supported Configuration Types Resource owner account, product name, commodity name, resource group, region Supports equal to and not equal to. Supports multiple selections. Resource name, tag, instance ID (billing granularity) Supports equal to and not equal to for input. Separate multiple values with commas. Supports contains, does not contain, starts with, and ends with. After setting the conditions, click Preview to preview the allocation effect based on the previous billing period's consumption data on the right side. Preview data is for debugging reference only and may not be consistent with the split bill details and other billing pages.
After confirmation, click Save to complete the automatic allocation rule configuration.
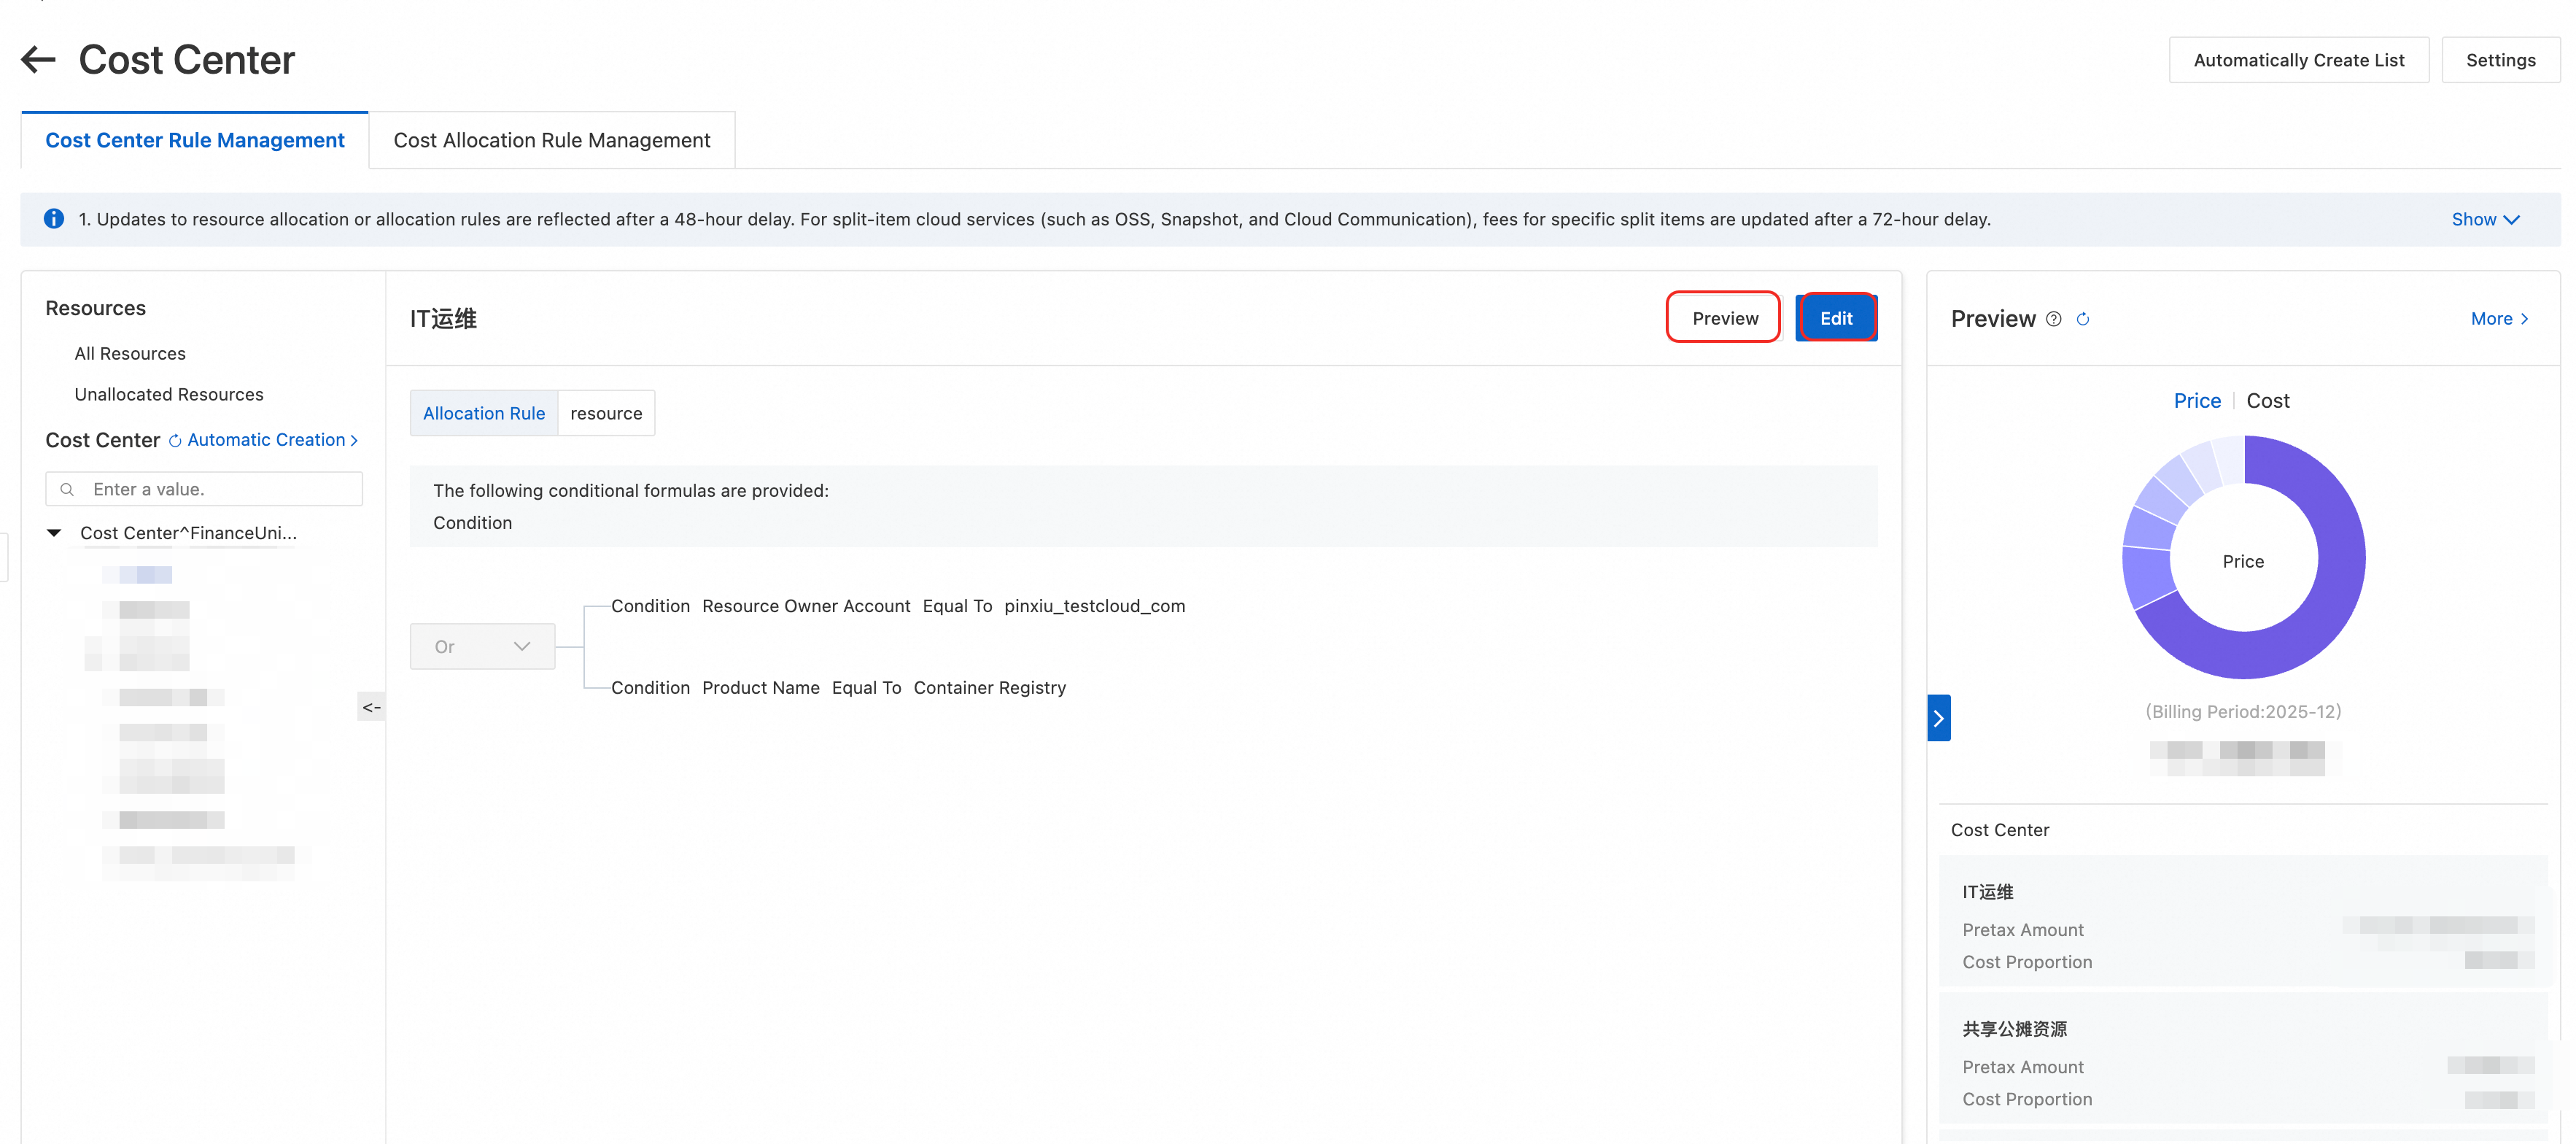
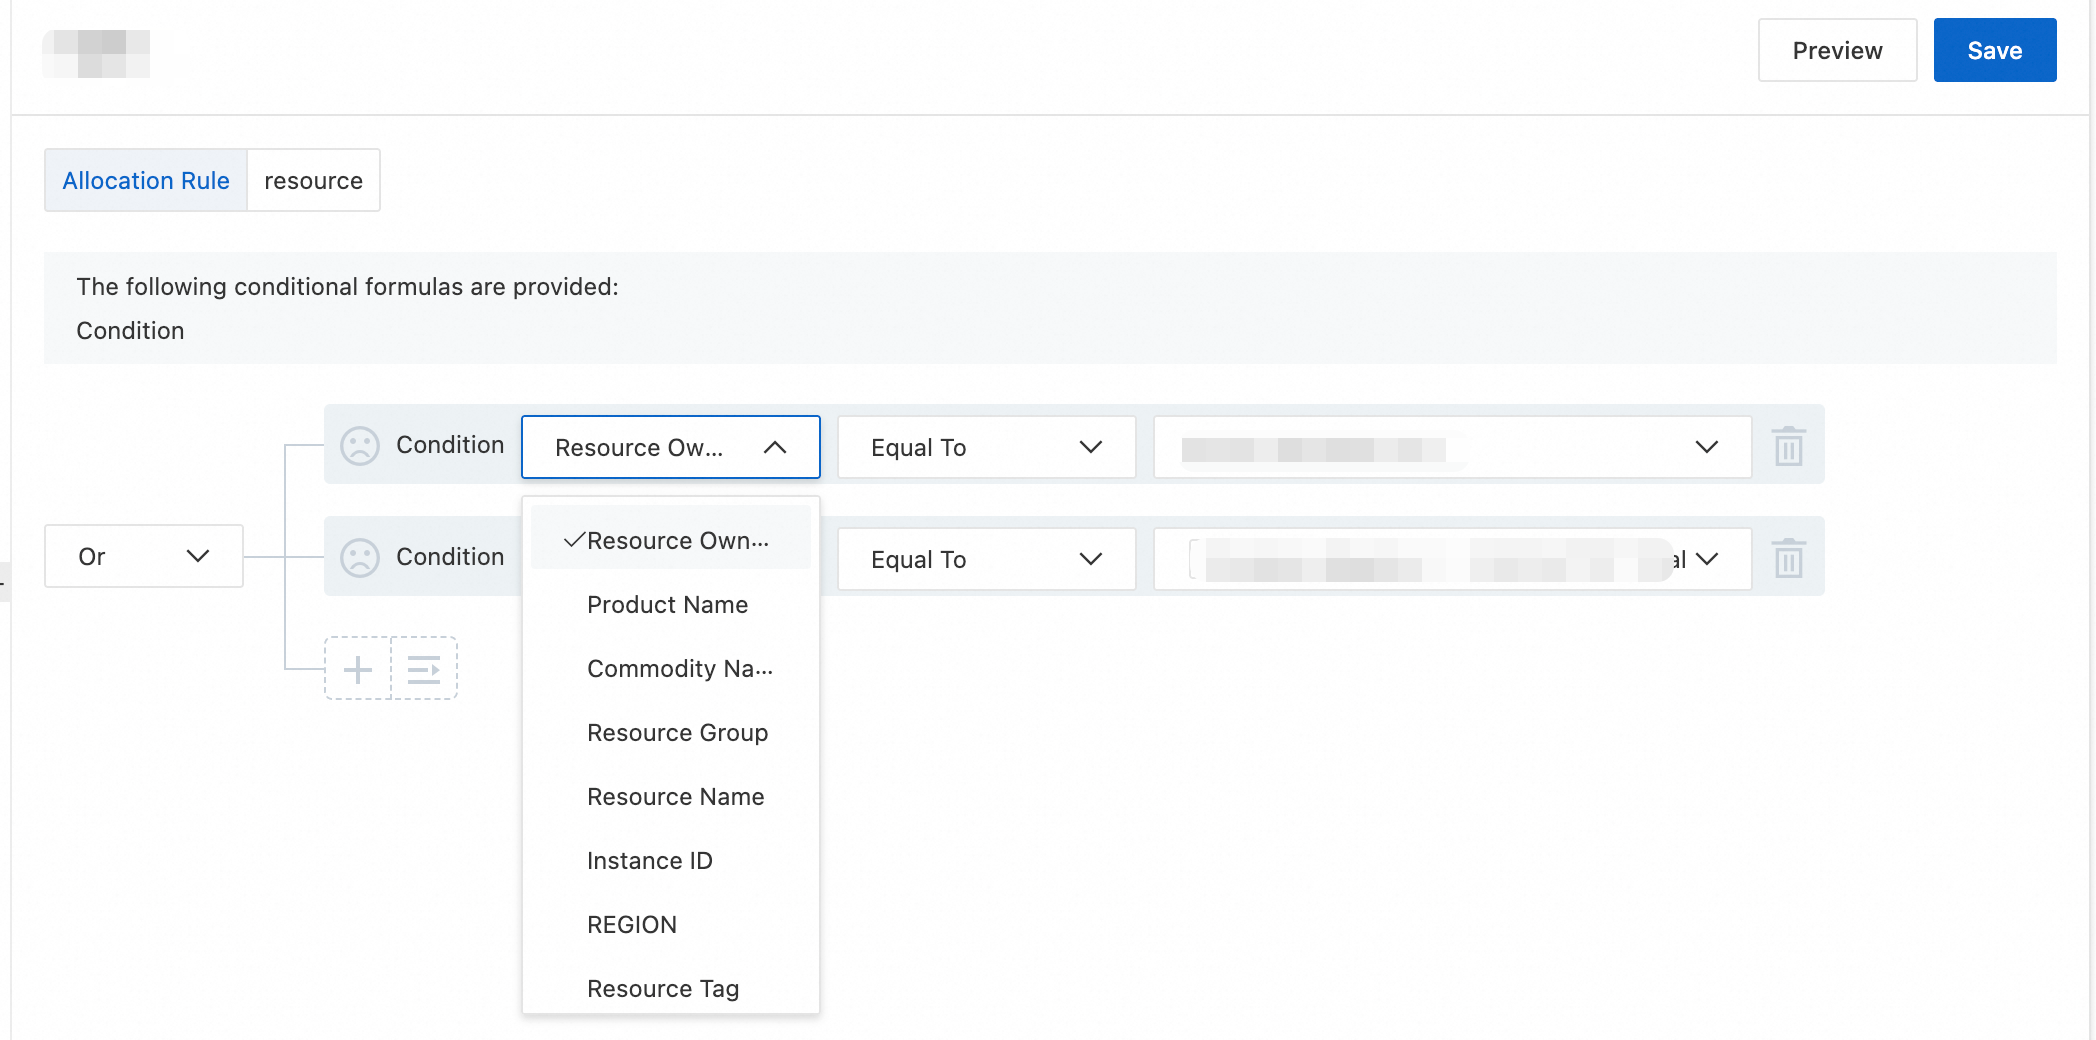
Use the Preview feature to verify that resources are allocated as expected. Allocation data is updated within 24–48 hours.
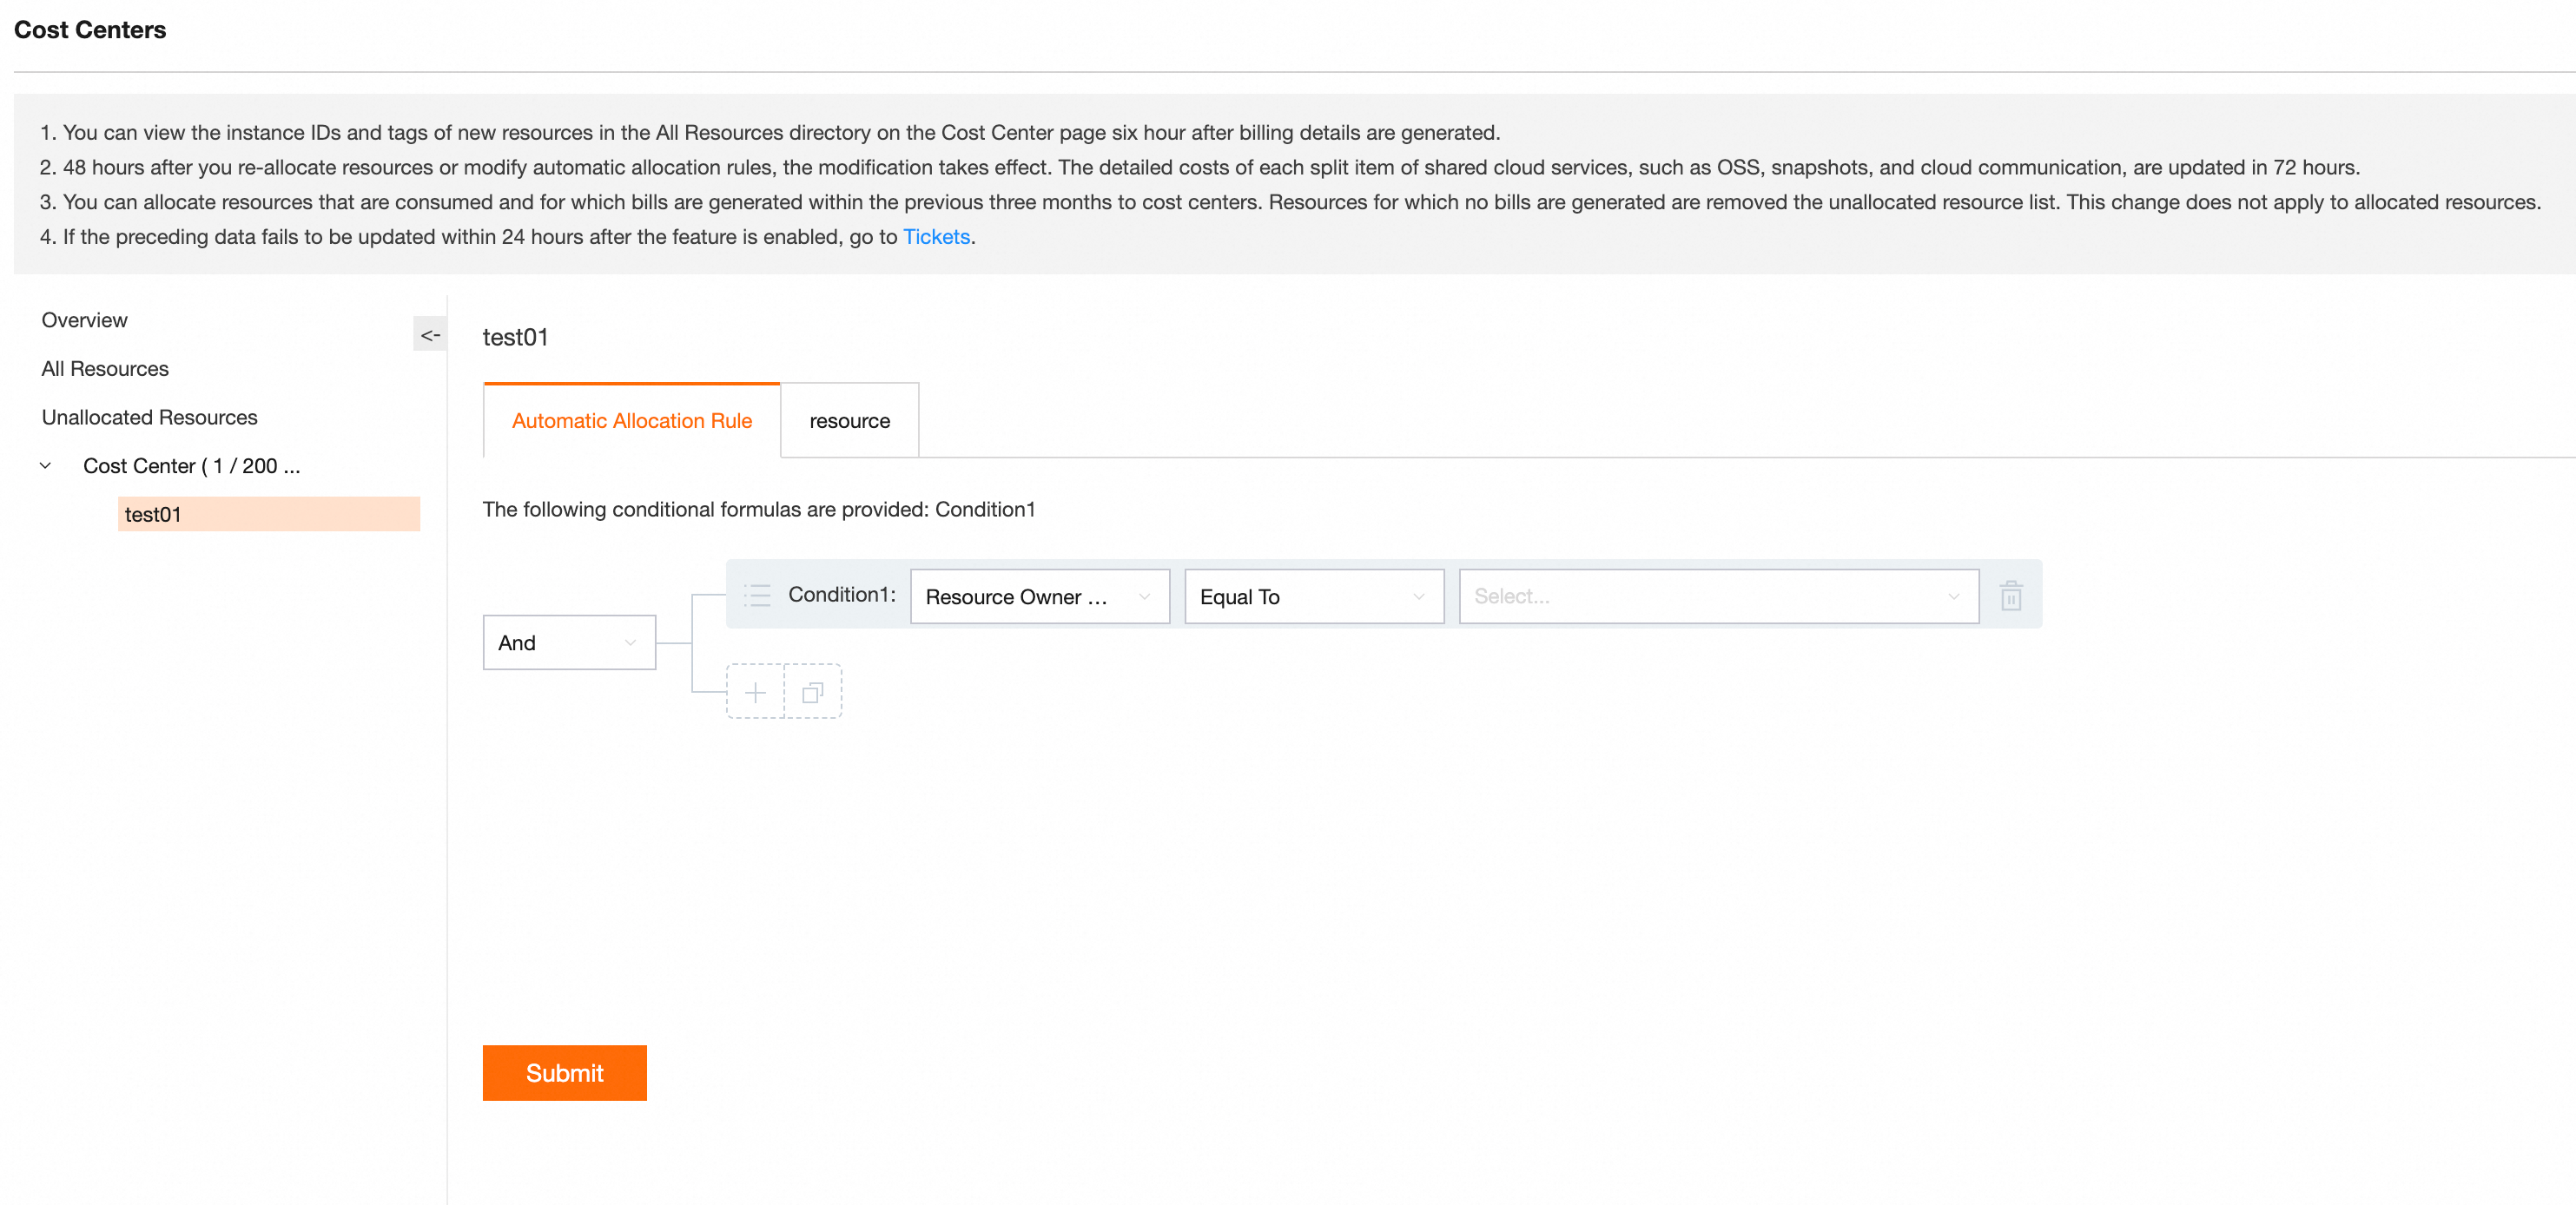
Legacy version
Select a financial unit. On the Automatic Allocation Rule tab, click Edit.
Add conditions or condition groups. In the condition drop-down list, define custom rules based on resource owner account, product name, product details, tags, resource groups, and resource instance names.
Click Submit.


Manually assign resources
Manual assignment means manually assigning resources to financial units. Manual assignments have higher priority than automatic assignments.
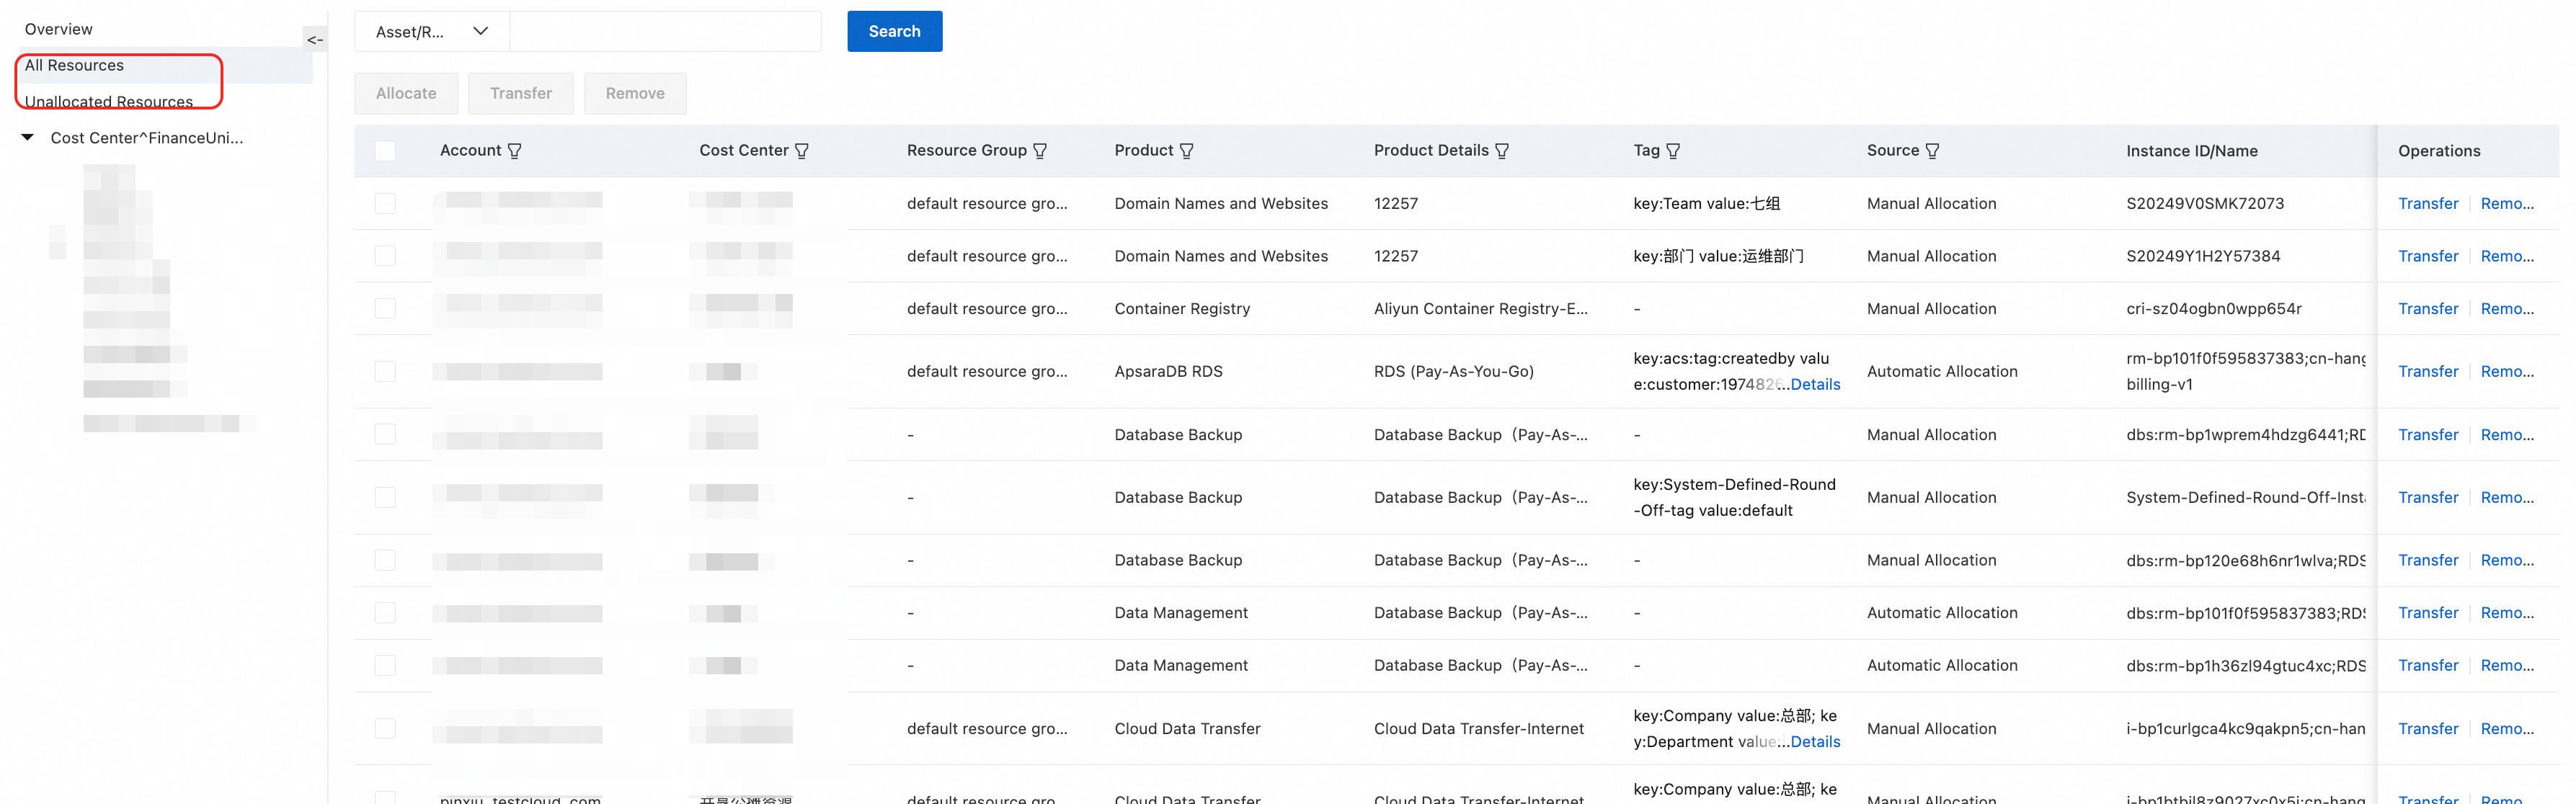
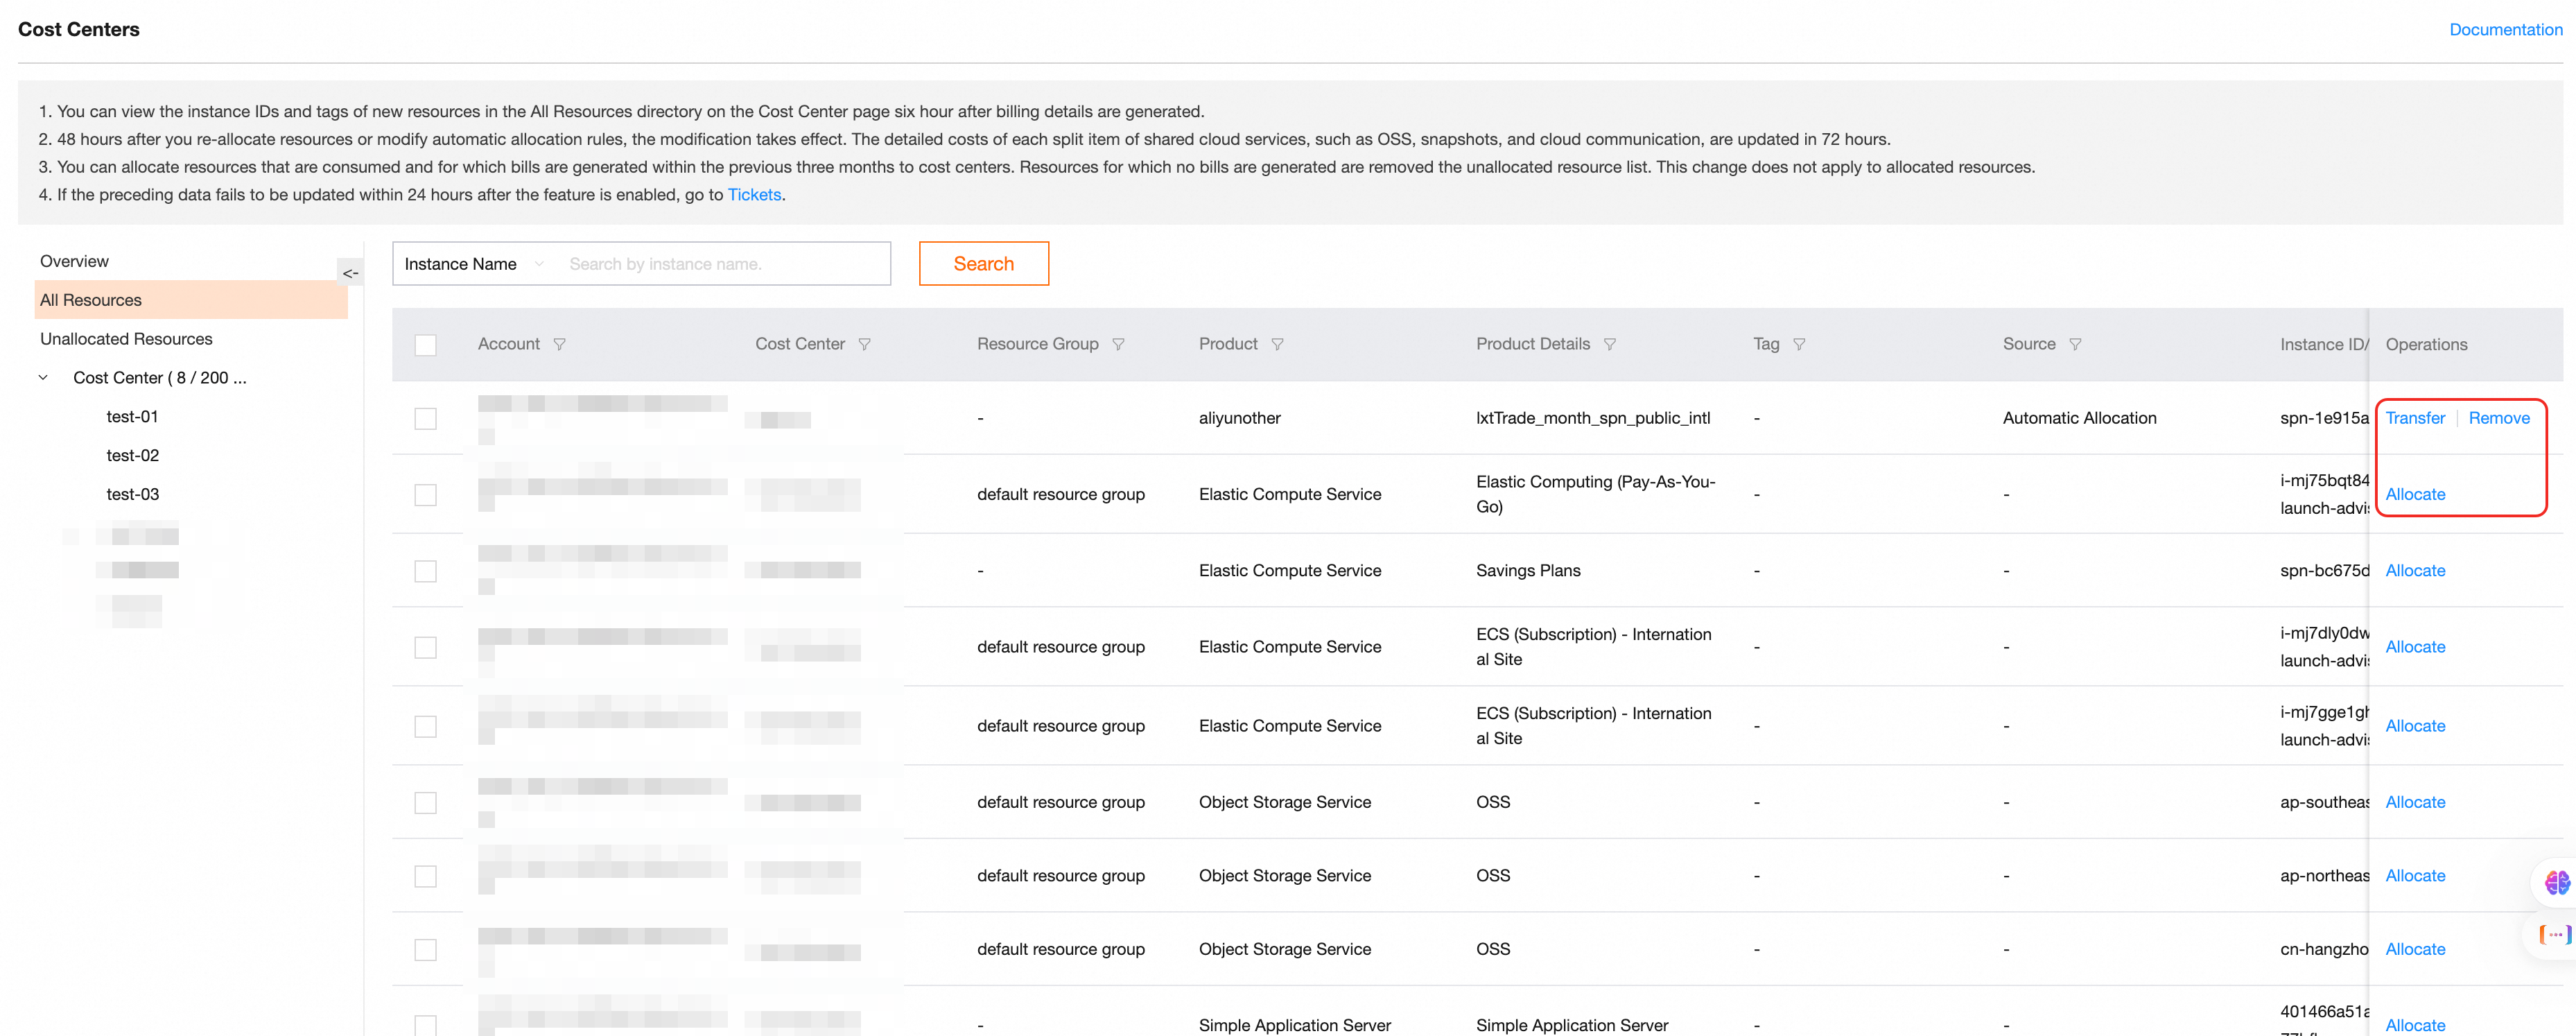
In the financial unit All Resources (or All Resources in the legacy version) or Unallocated Resources list, view the current resource allocation status for financial units.
Find the resource you want to adjust and perform allocation, transfer, or removal operations. You can select multiple resources for batch operations.
Allocate: For Unallocated Resources that have not been assigned, click Allocate to manually assign the resource.
Transfer: For resources that need to be reassigned to a different financial unit, click Transfer and select the target financial unit in the dialog box.
Remove: For resources that no longer need to be assigned, click Remove to remove them from the current financial unit.
Configure shared expense rules
Use this feature to split the costs of a specified financial unit across other financial units, enabling shared resource cost allocation.
New version
Log on to the Expenses and Costs console. In the left-side navigation pane, choose > Cost Center.
Go to the Cost Center page. Click Edit Rule on the right side to go to the Cost Center Rule Management page.
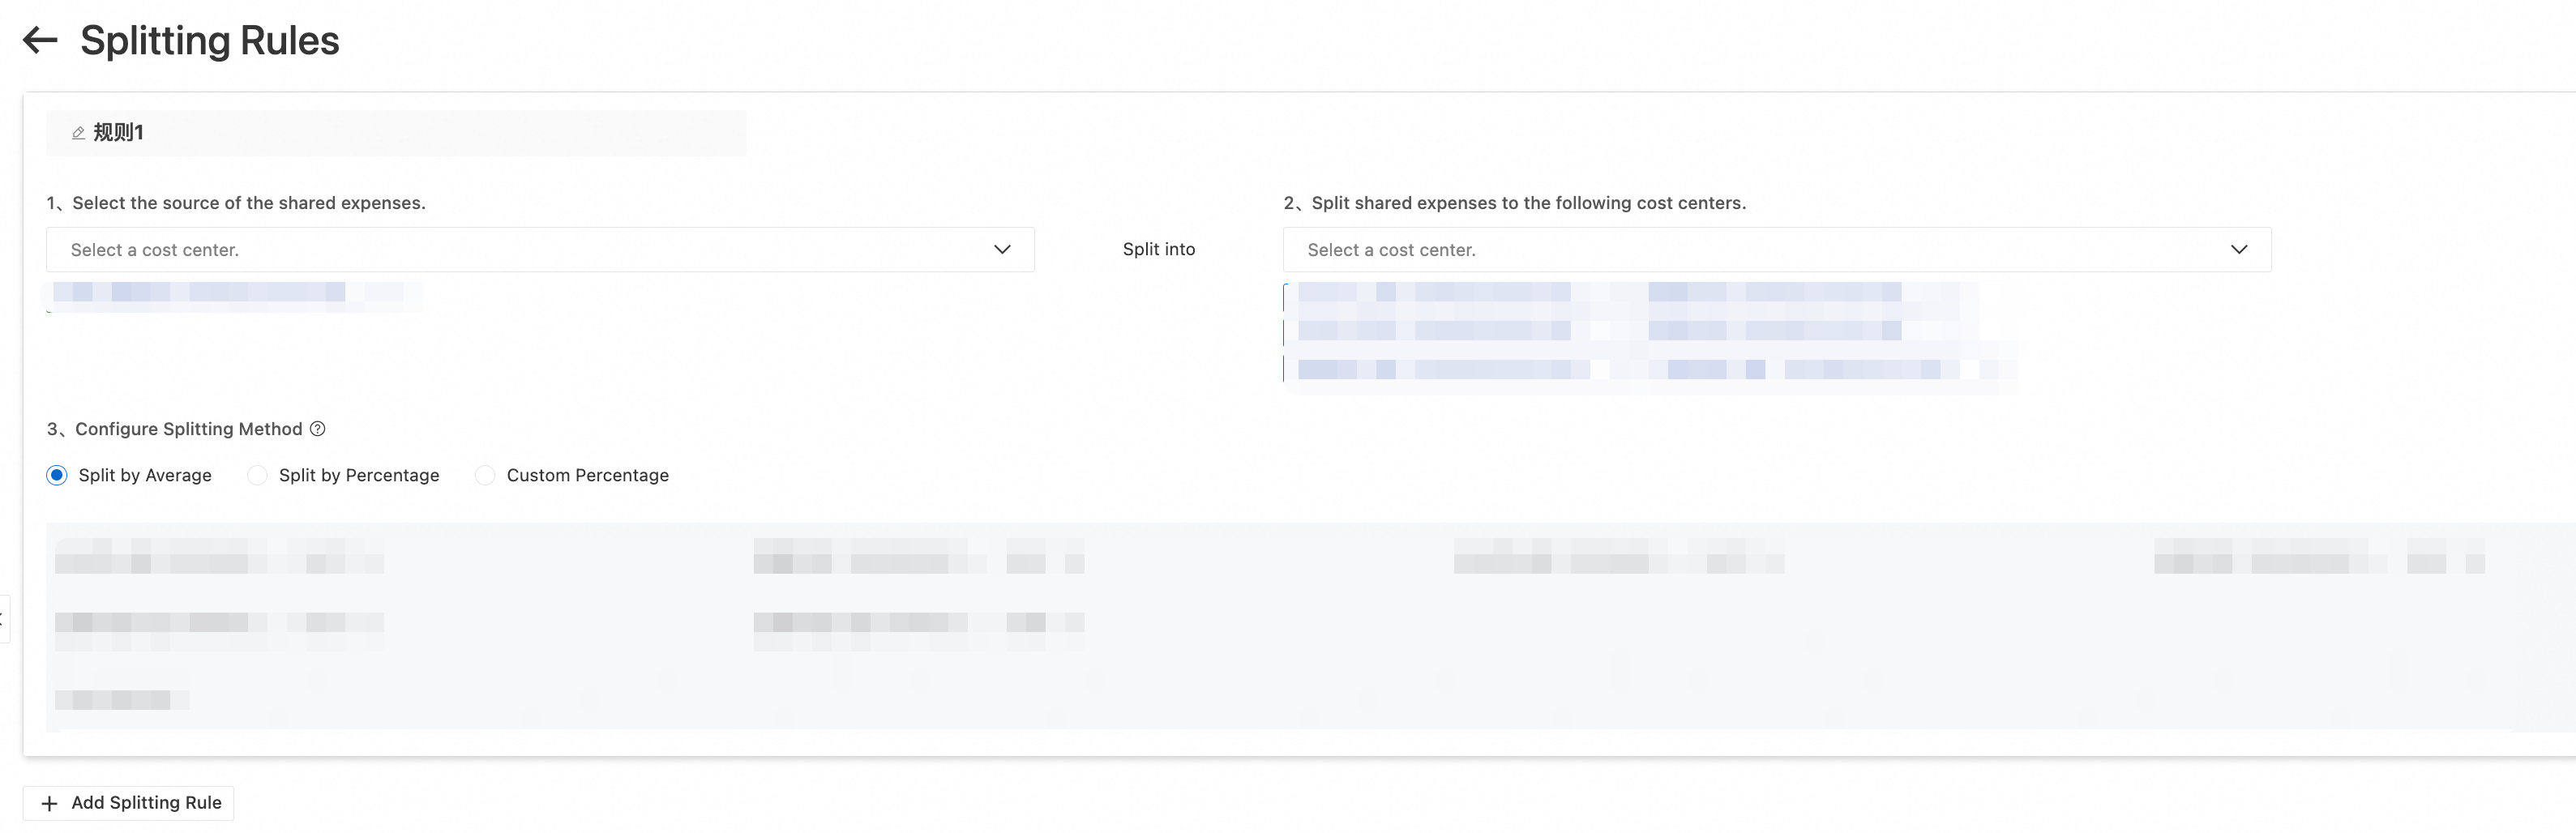
Switch to the Shared Cost Rule Management tab and click Add Split Rule to add the first shared expense split rule.
Confirm the source of shared costs, the financial units to which shared costs will be allocated, and the split method.
Click Preview to preview the shared cost rule results.
Click More next to Preview. By default, you can view the full resource allocation results for the account and sub-accounts. You can switch between accounts and billing periods (current and previous month) for the preview.
After confirmation, click Save.
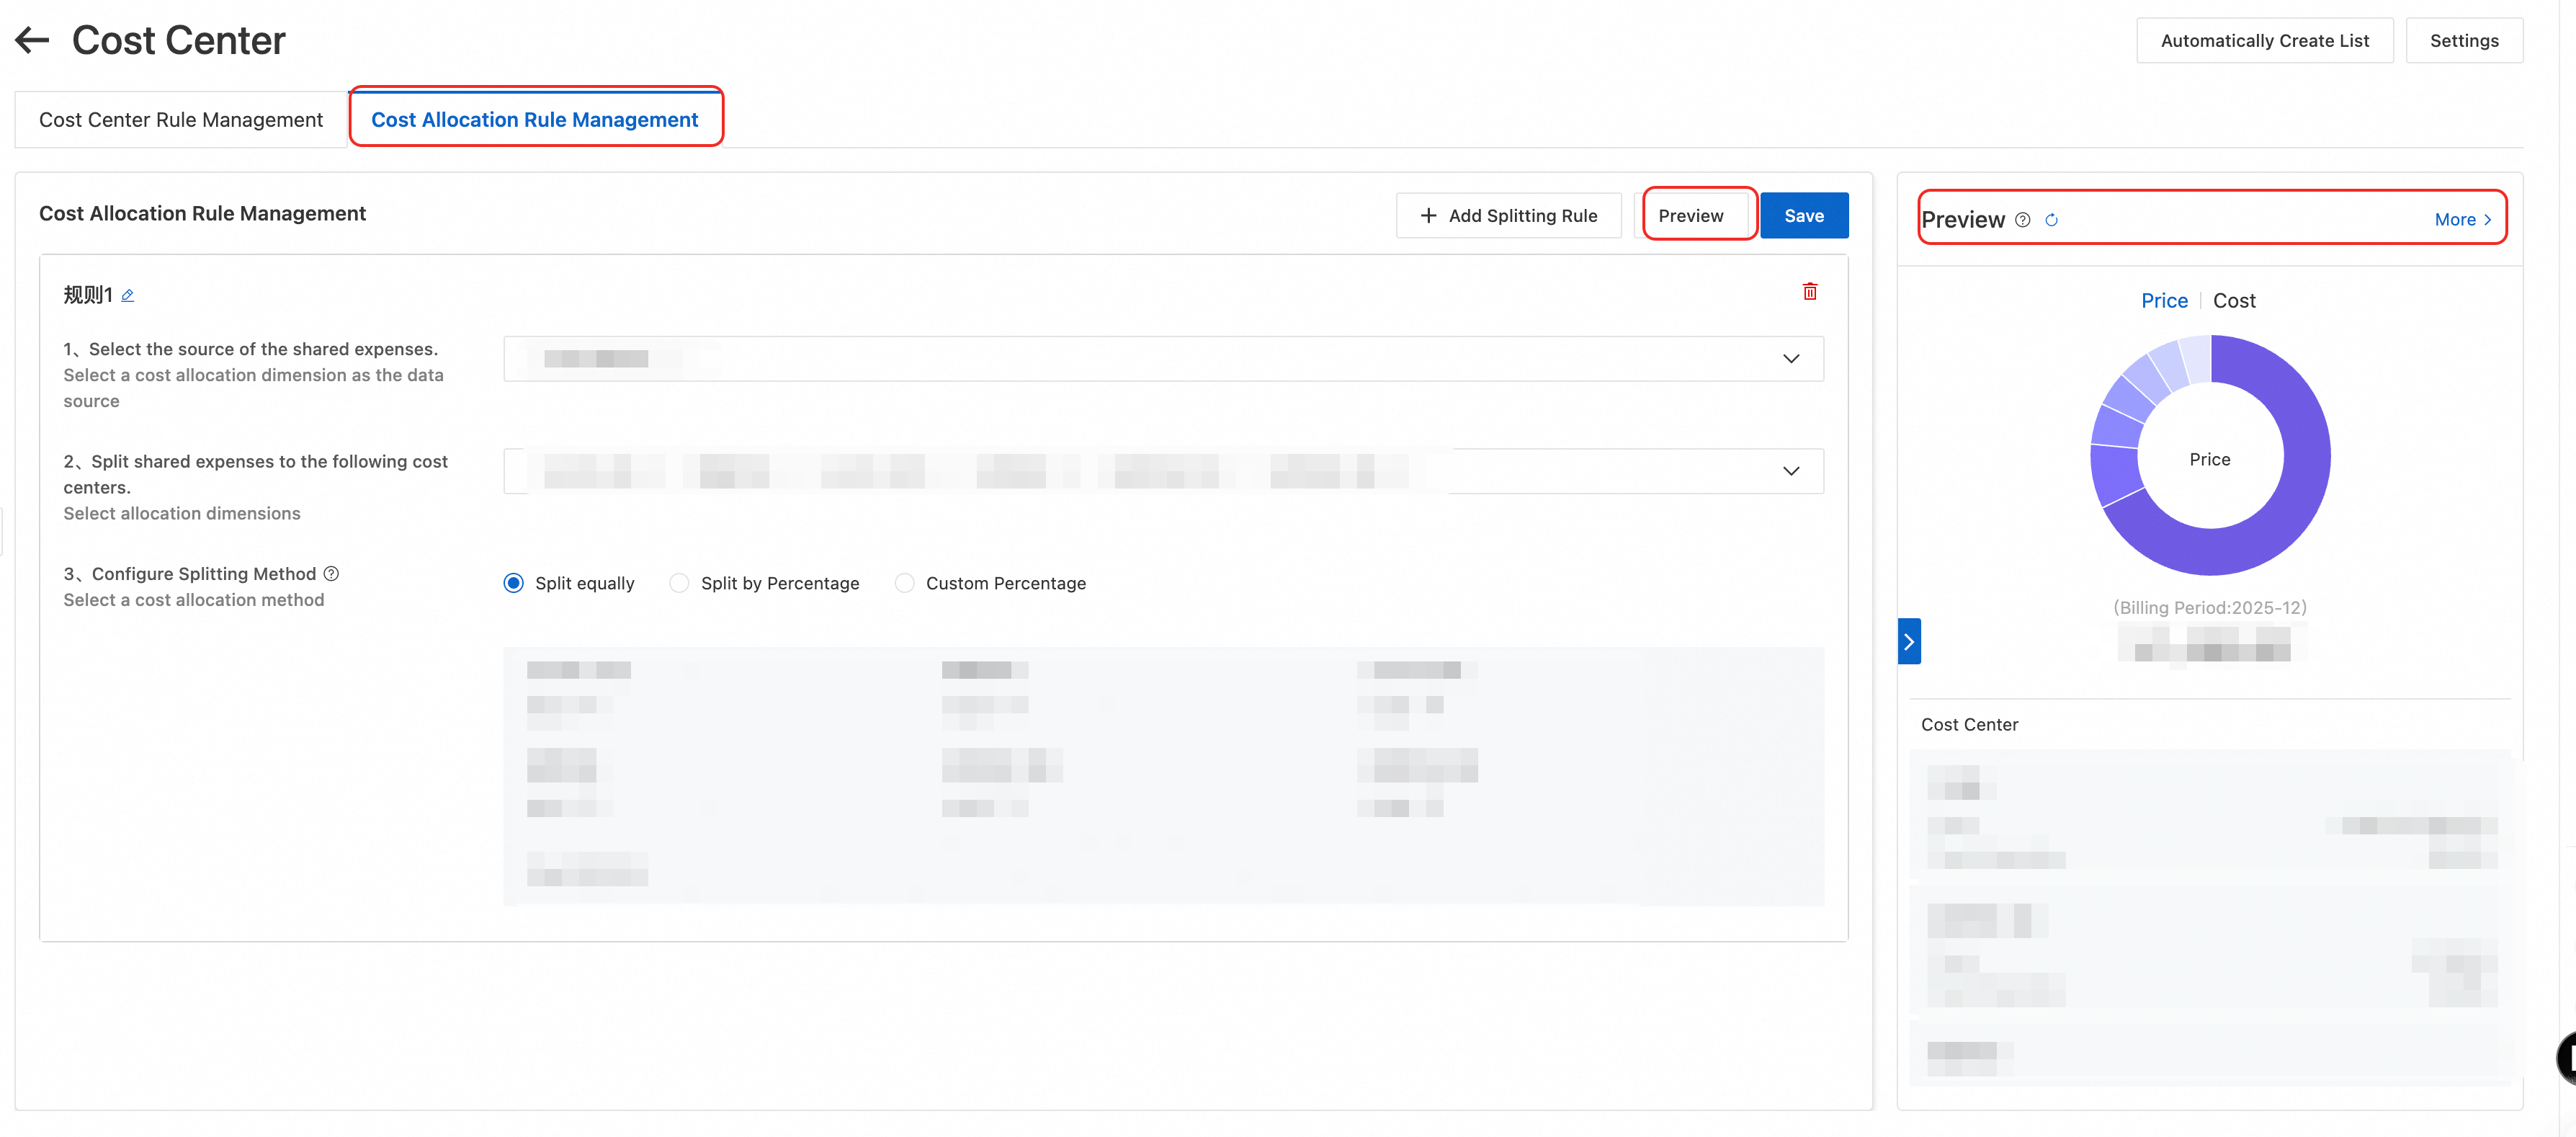
Use the Preview feature to verify that shared costs are distributed as expected before saving.
Legacy version
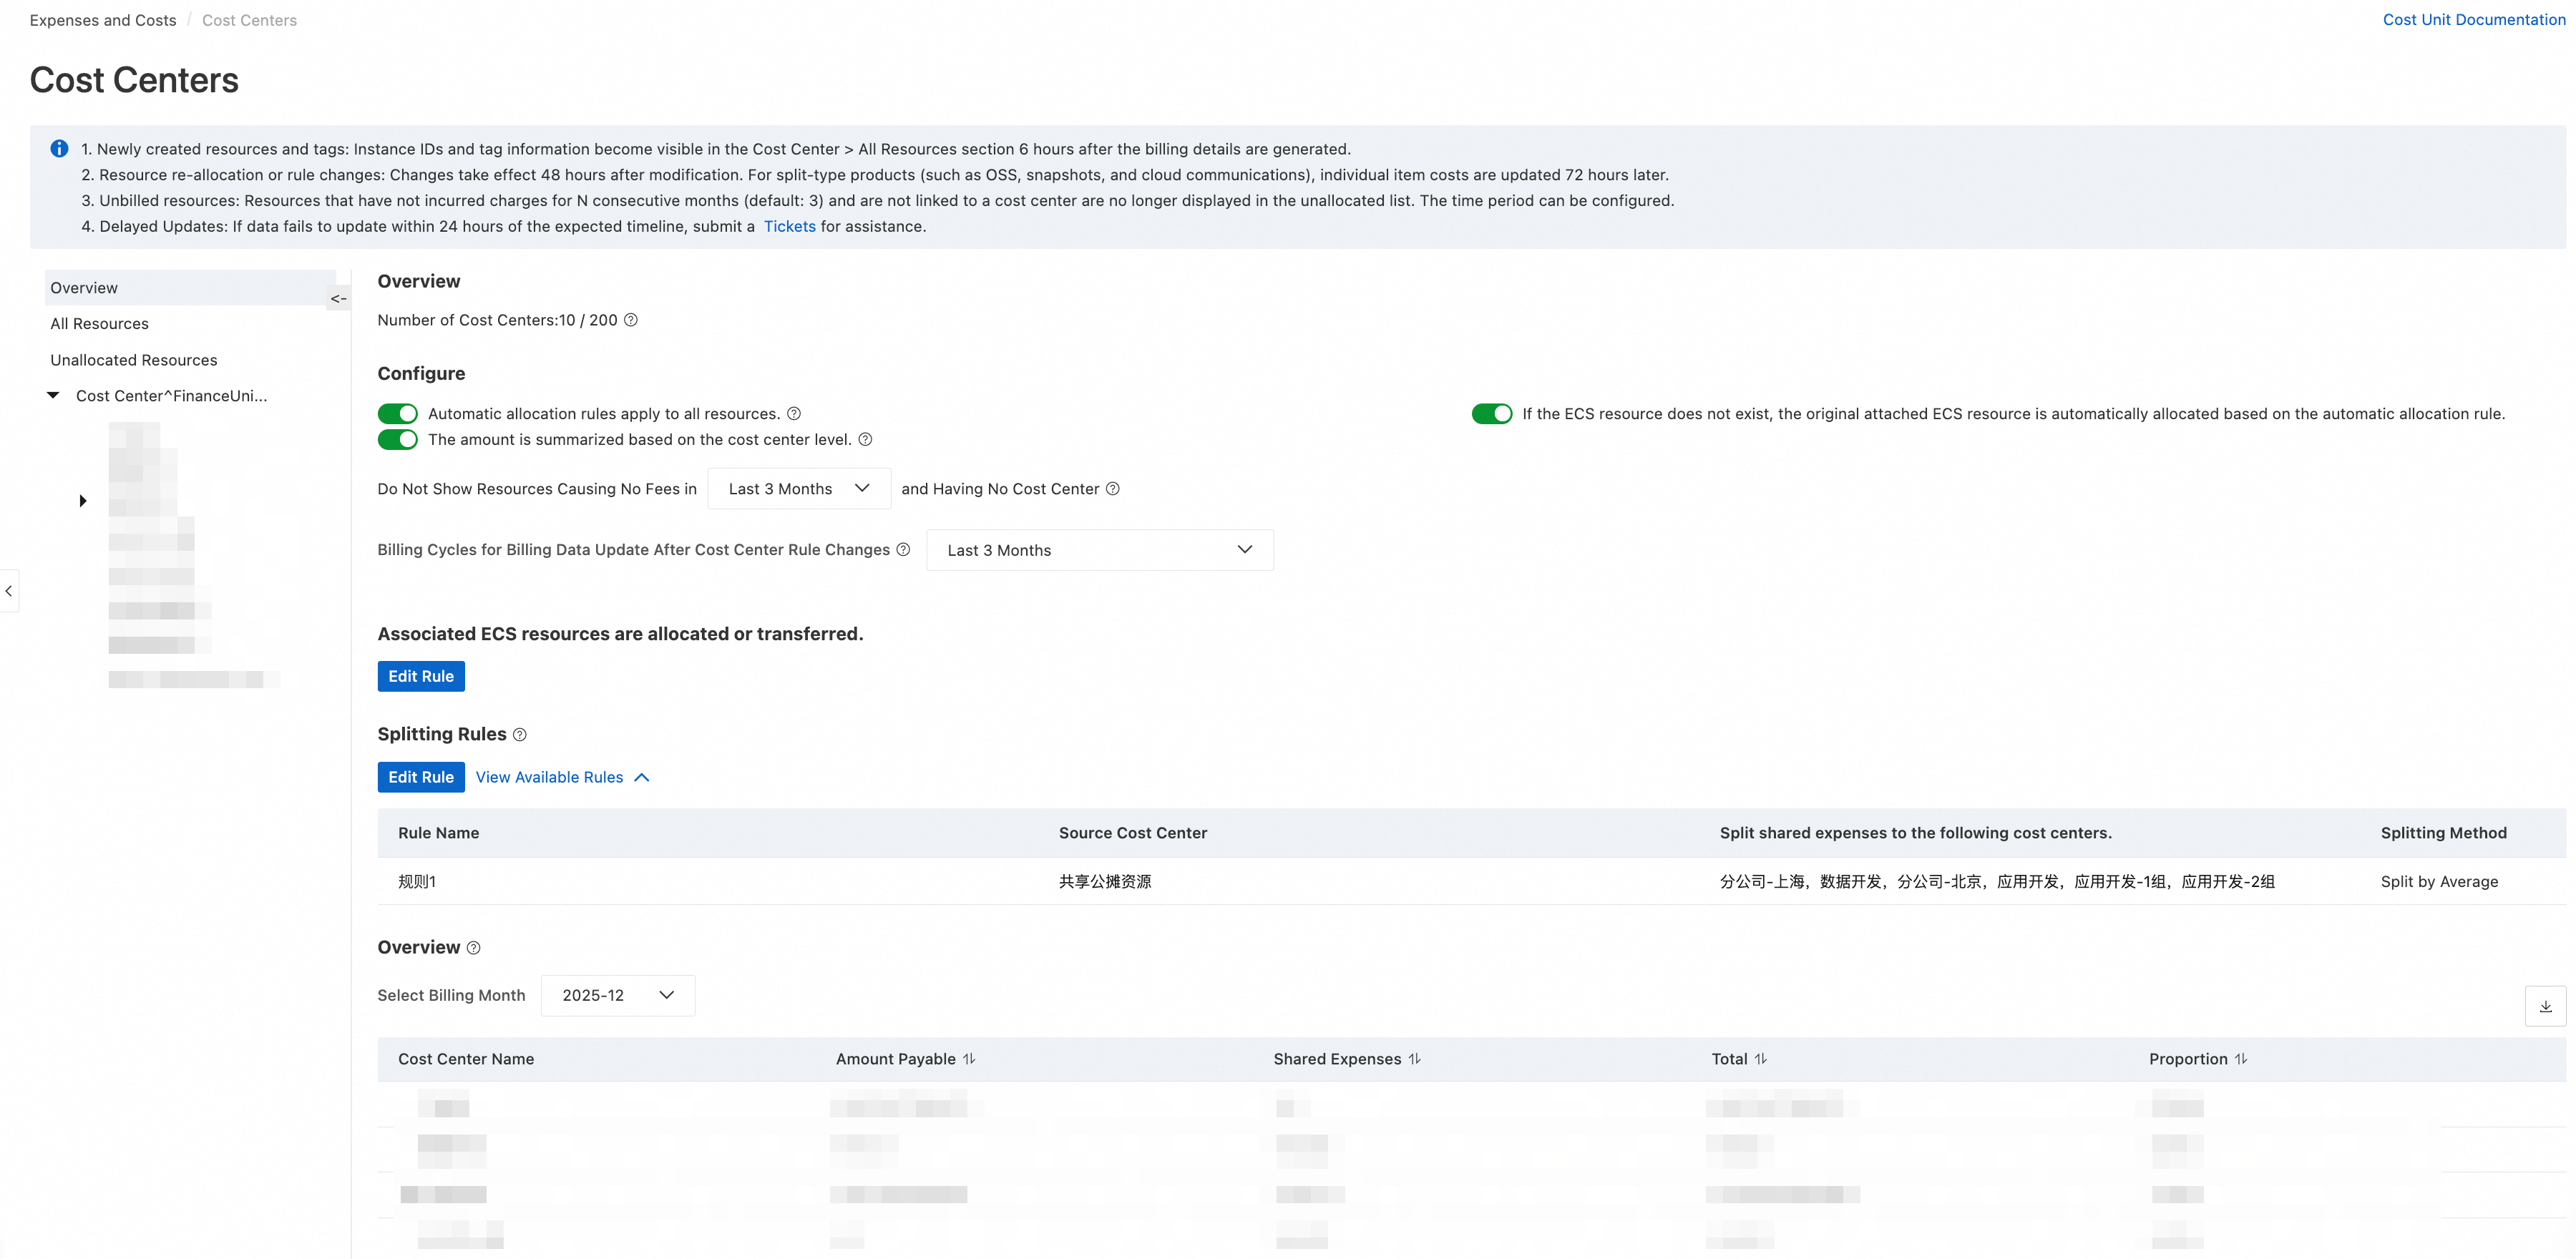
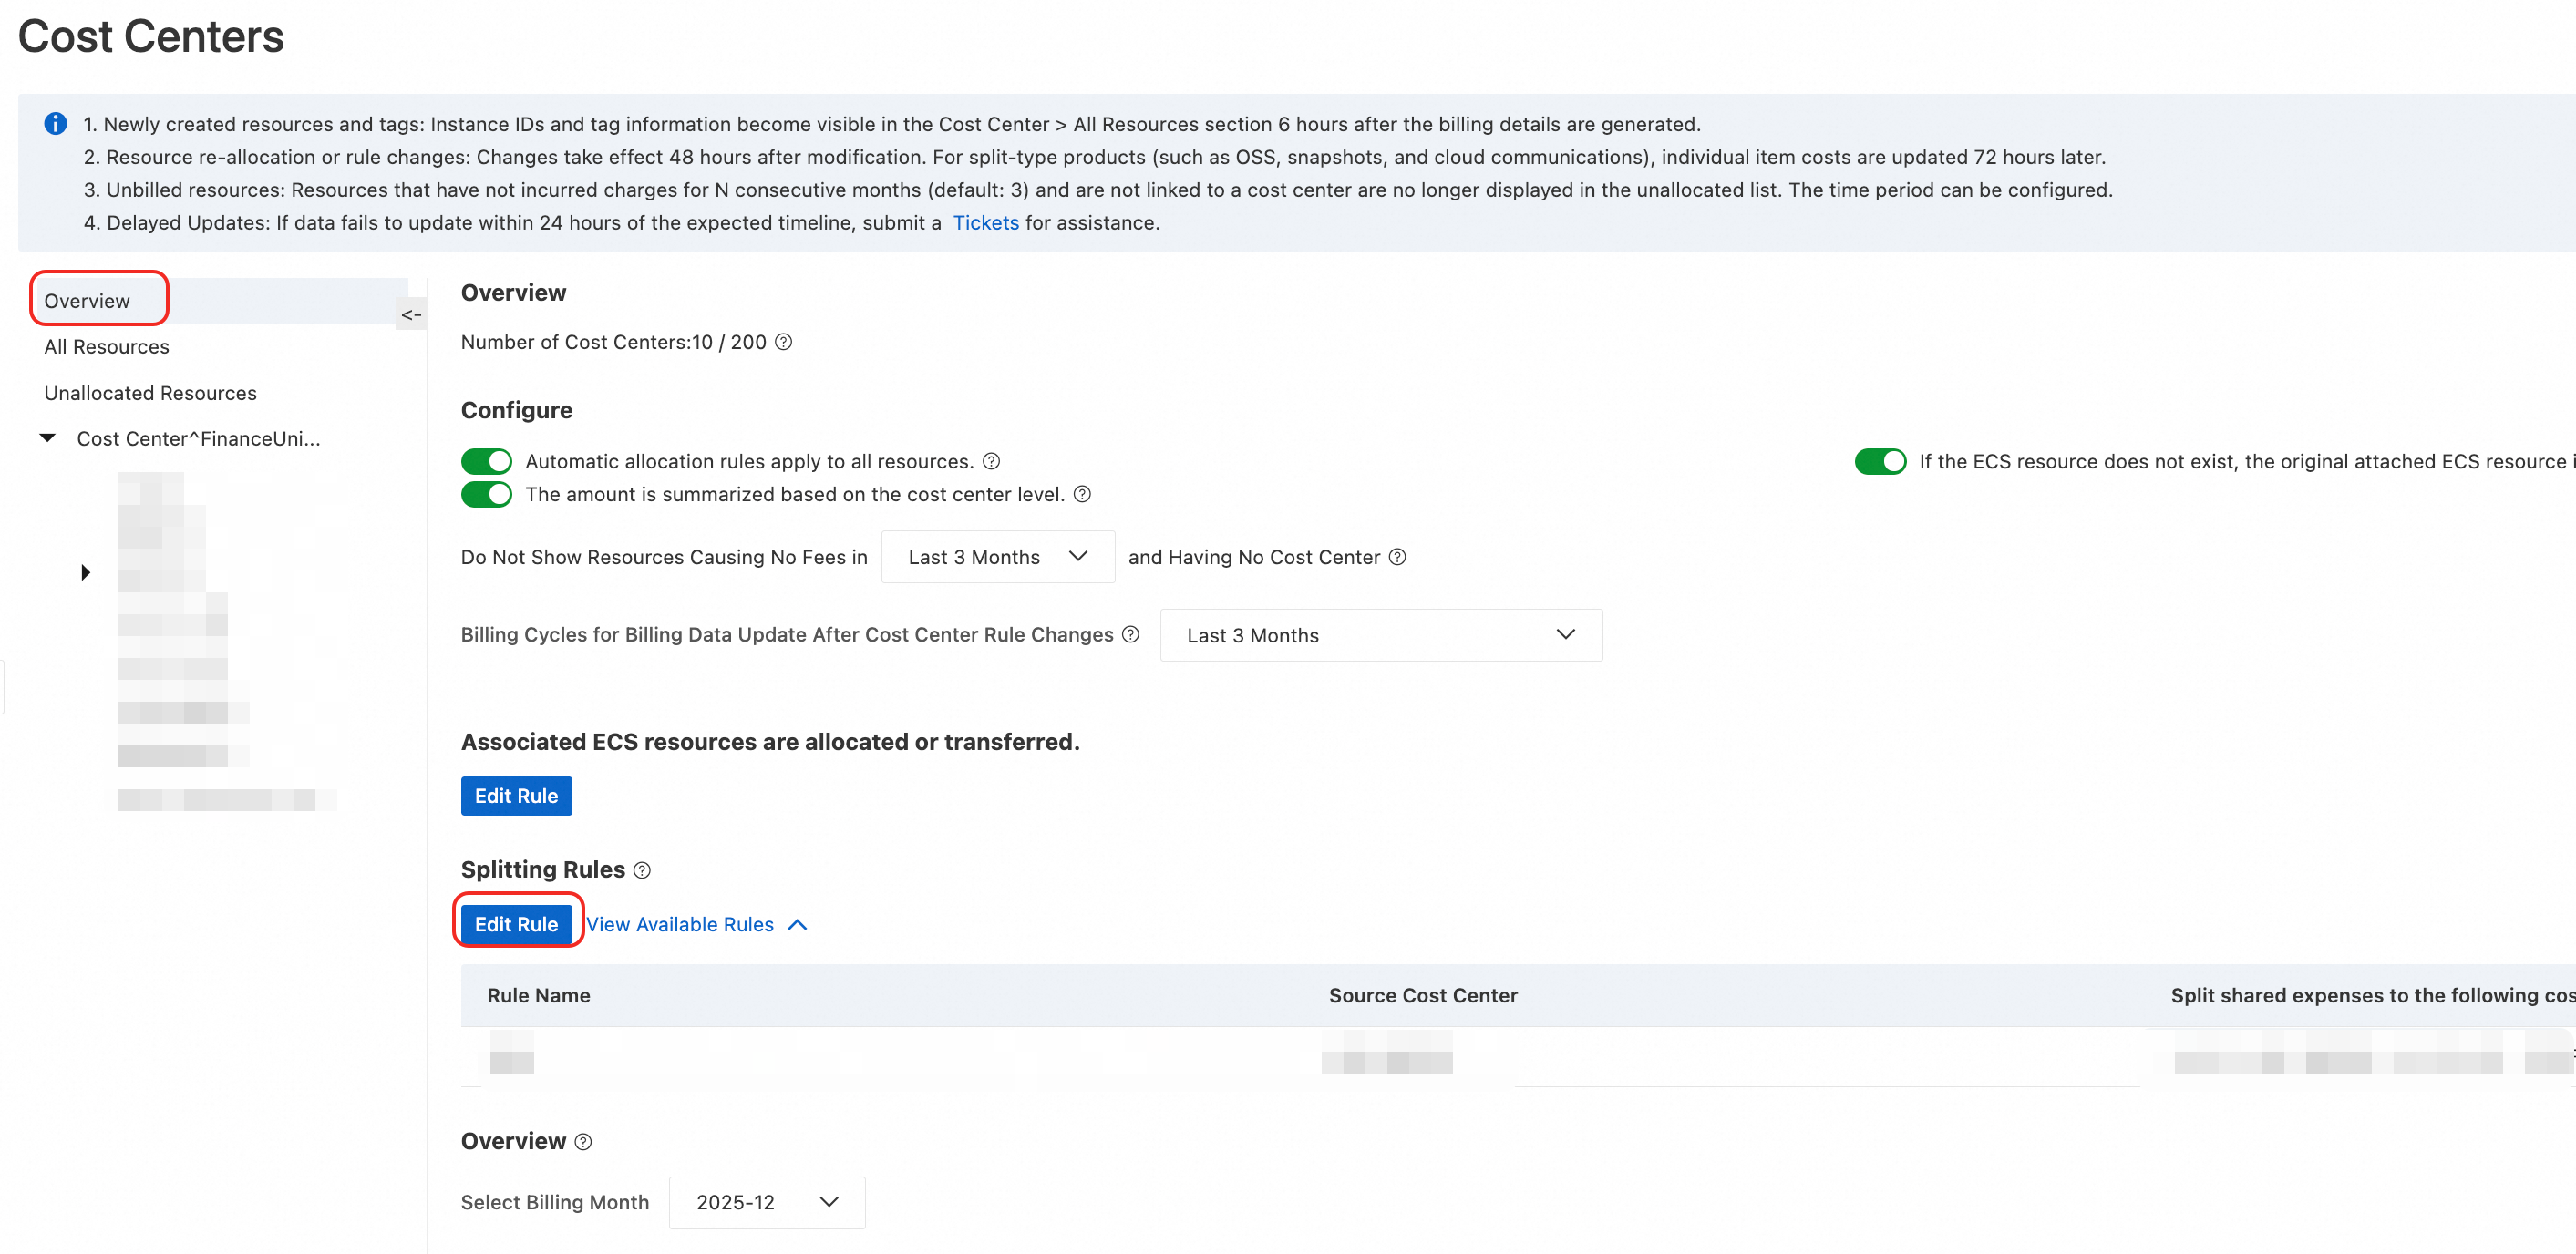
Log on to the Expenses and Costs console. In the left-side navigation pane, choose > Cost Center.
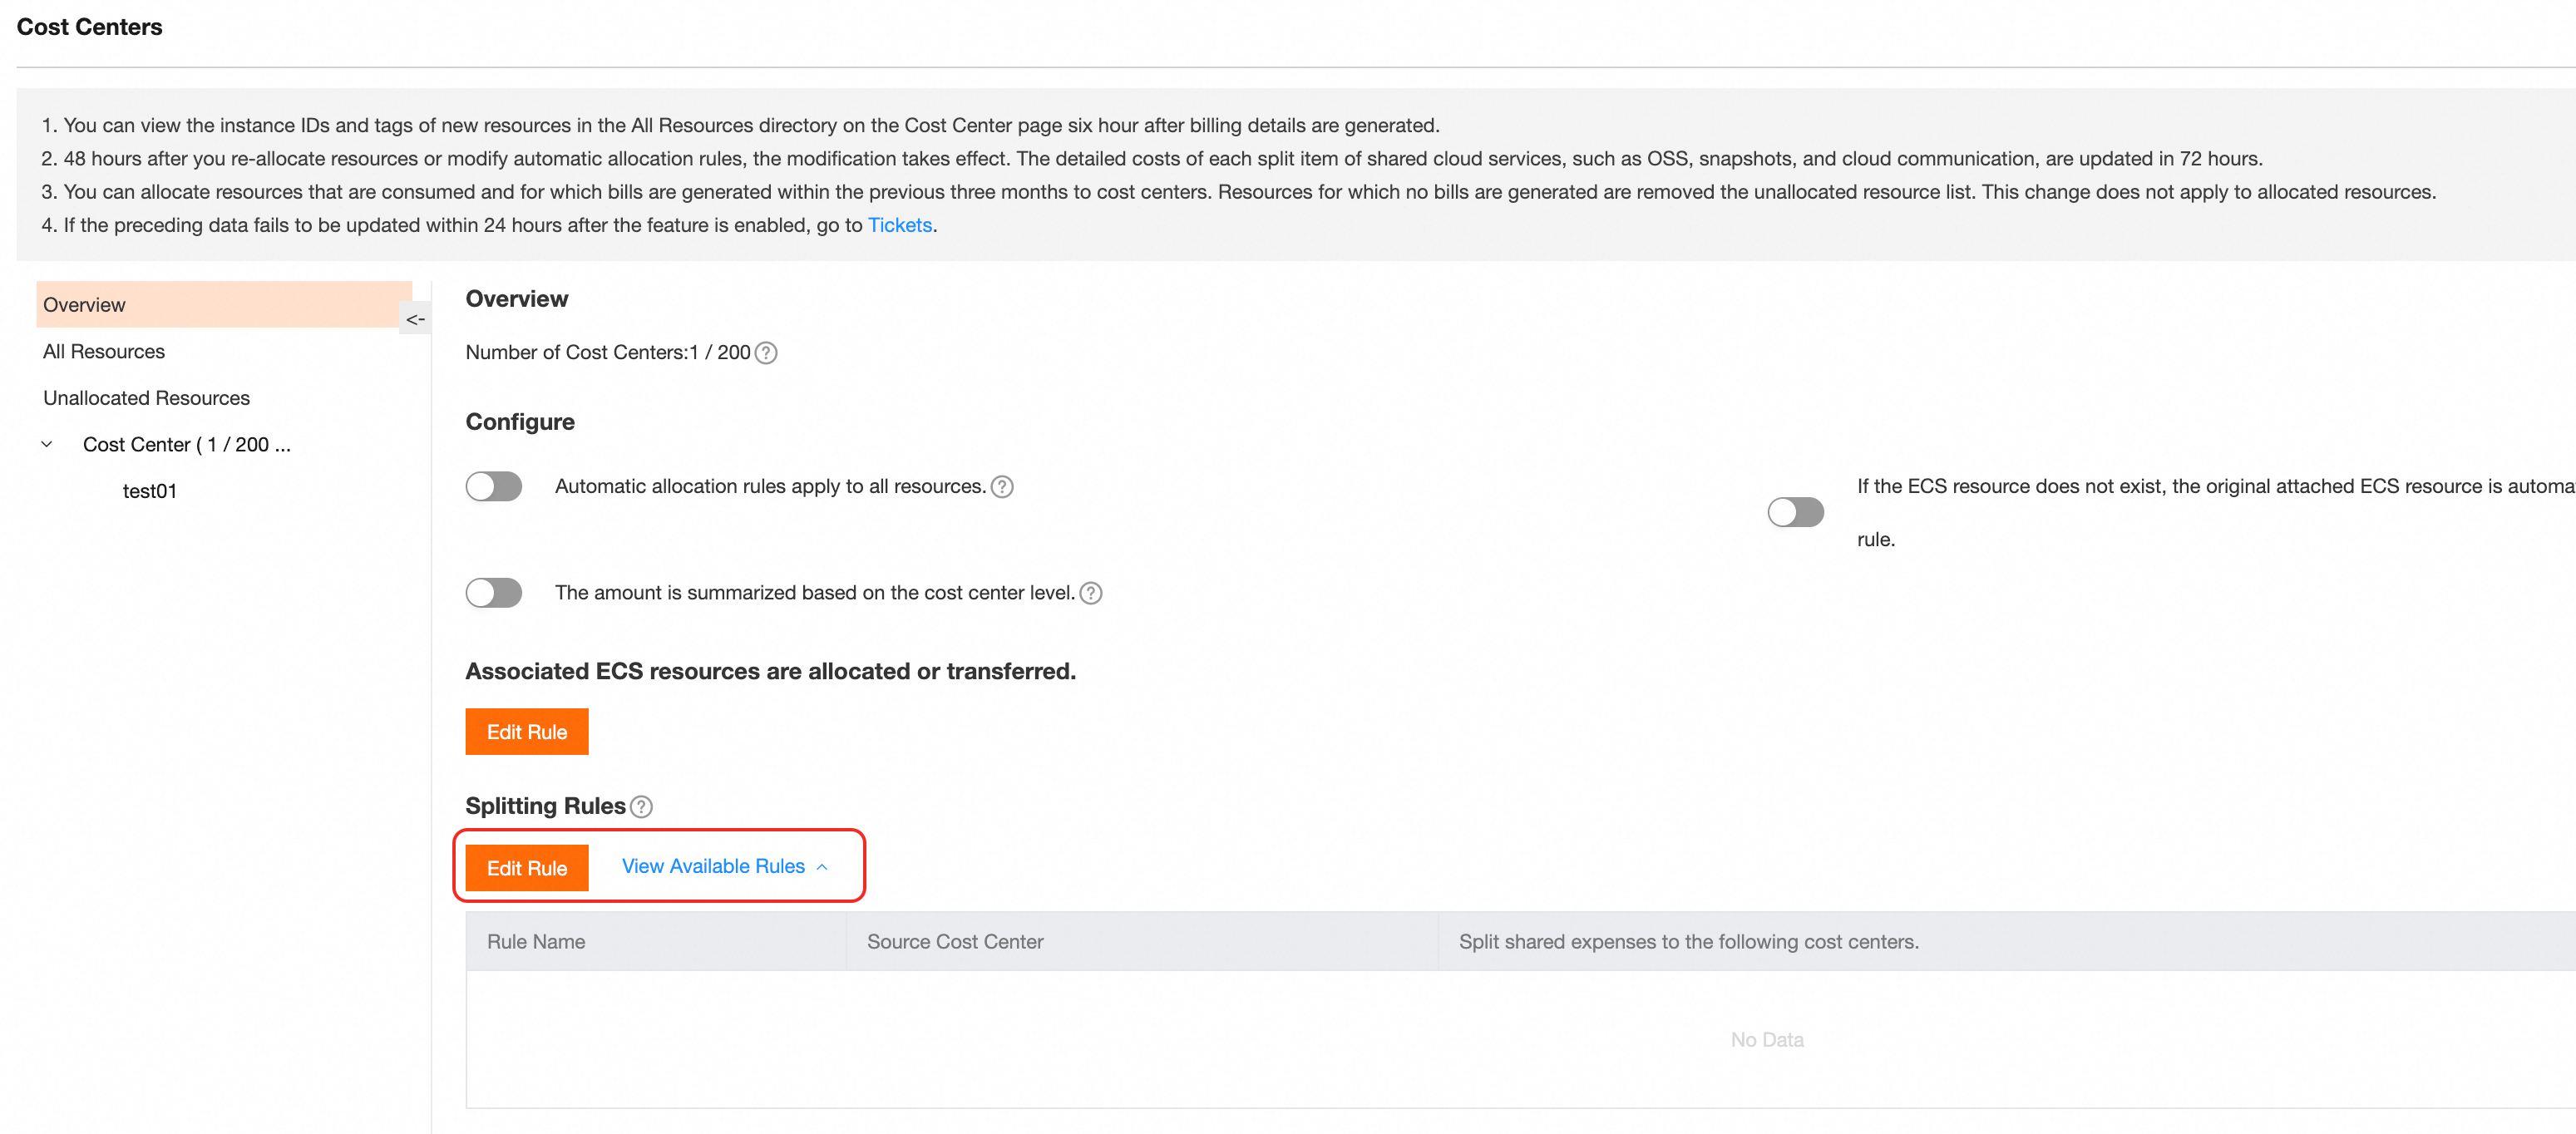
On the Cost Center page, click Overview, find Splitting Rules, and select Edit Rule.
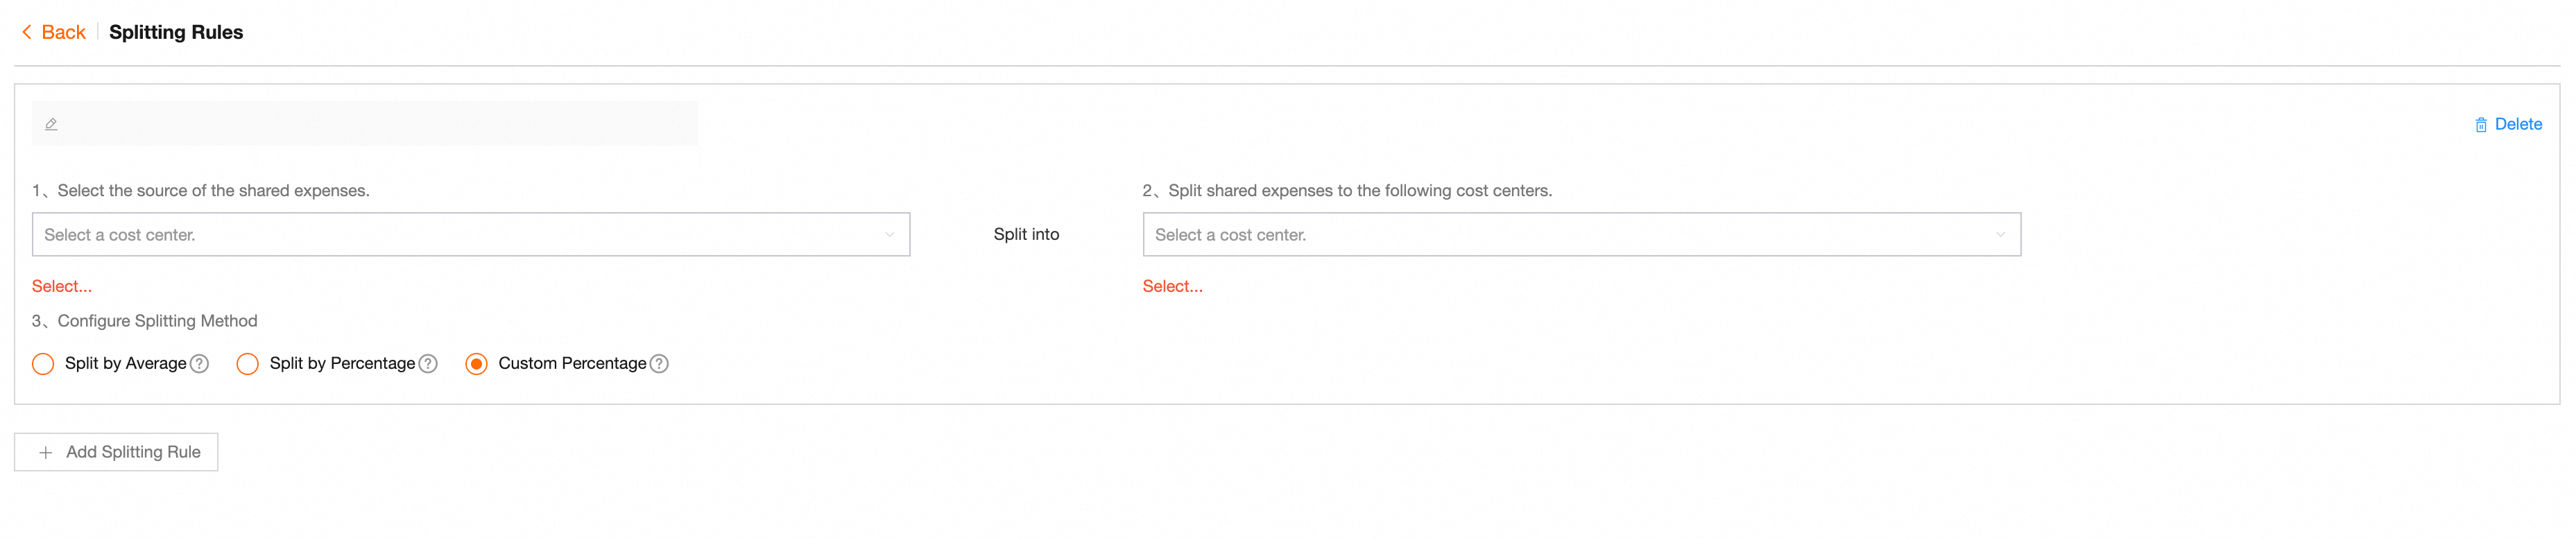
On the Splitting Rules page, click Add Split Rule to add the first shared expense split rule.
Confirm the source of shared costs, the financial units to which shared costs will be allocated, and the split method. Click Save.
You can add multiple split rules at once. Return to the overview page to View Available Rules.
Configure global rules
Global rules enable automatic allocation for all products, follow-allocation for ECS-associated resources, and other features to reduce missed or incorrect allocations.
New version
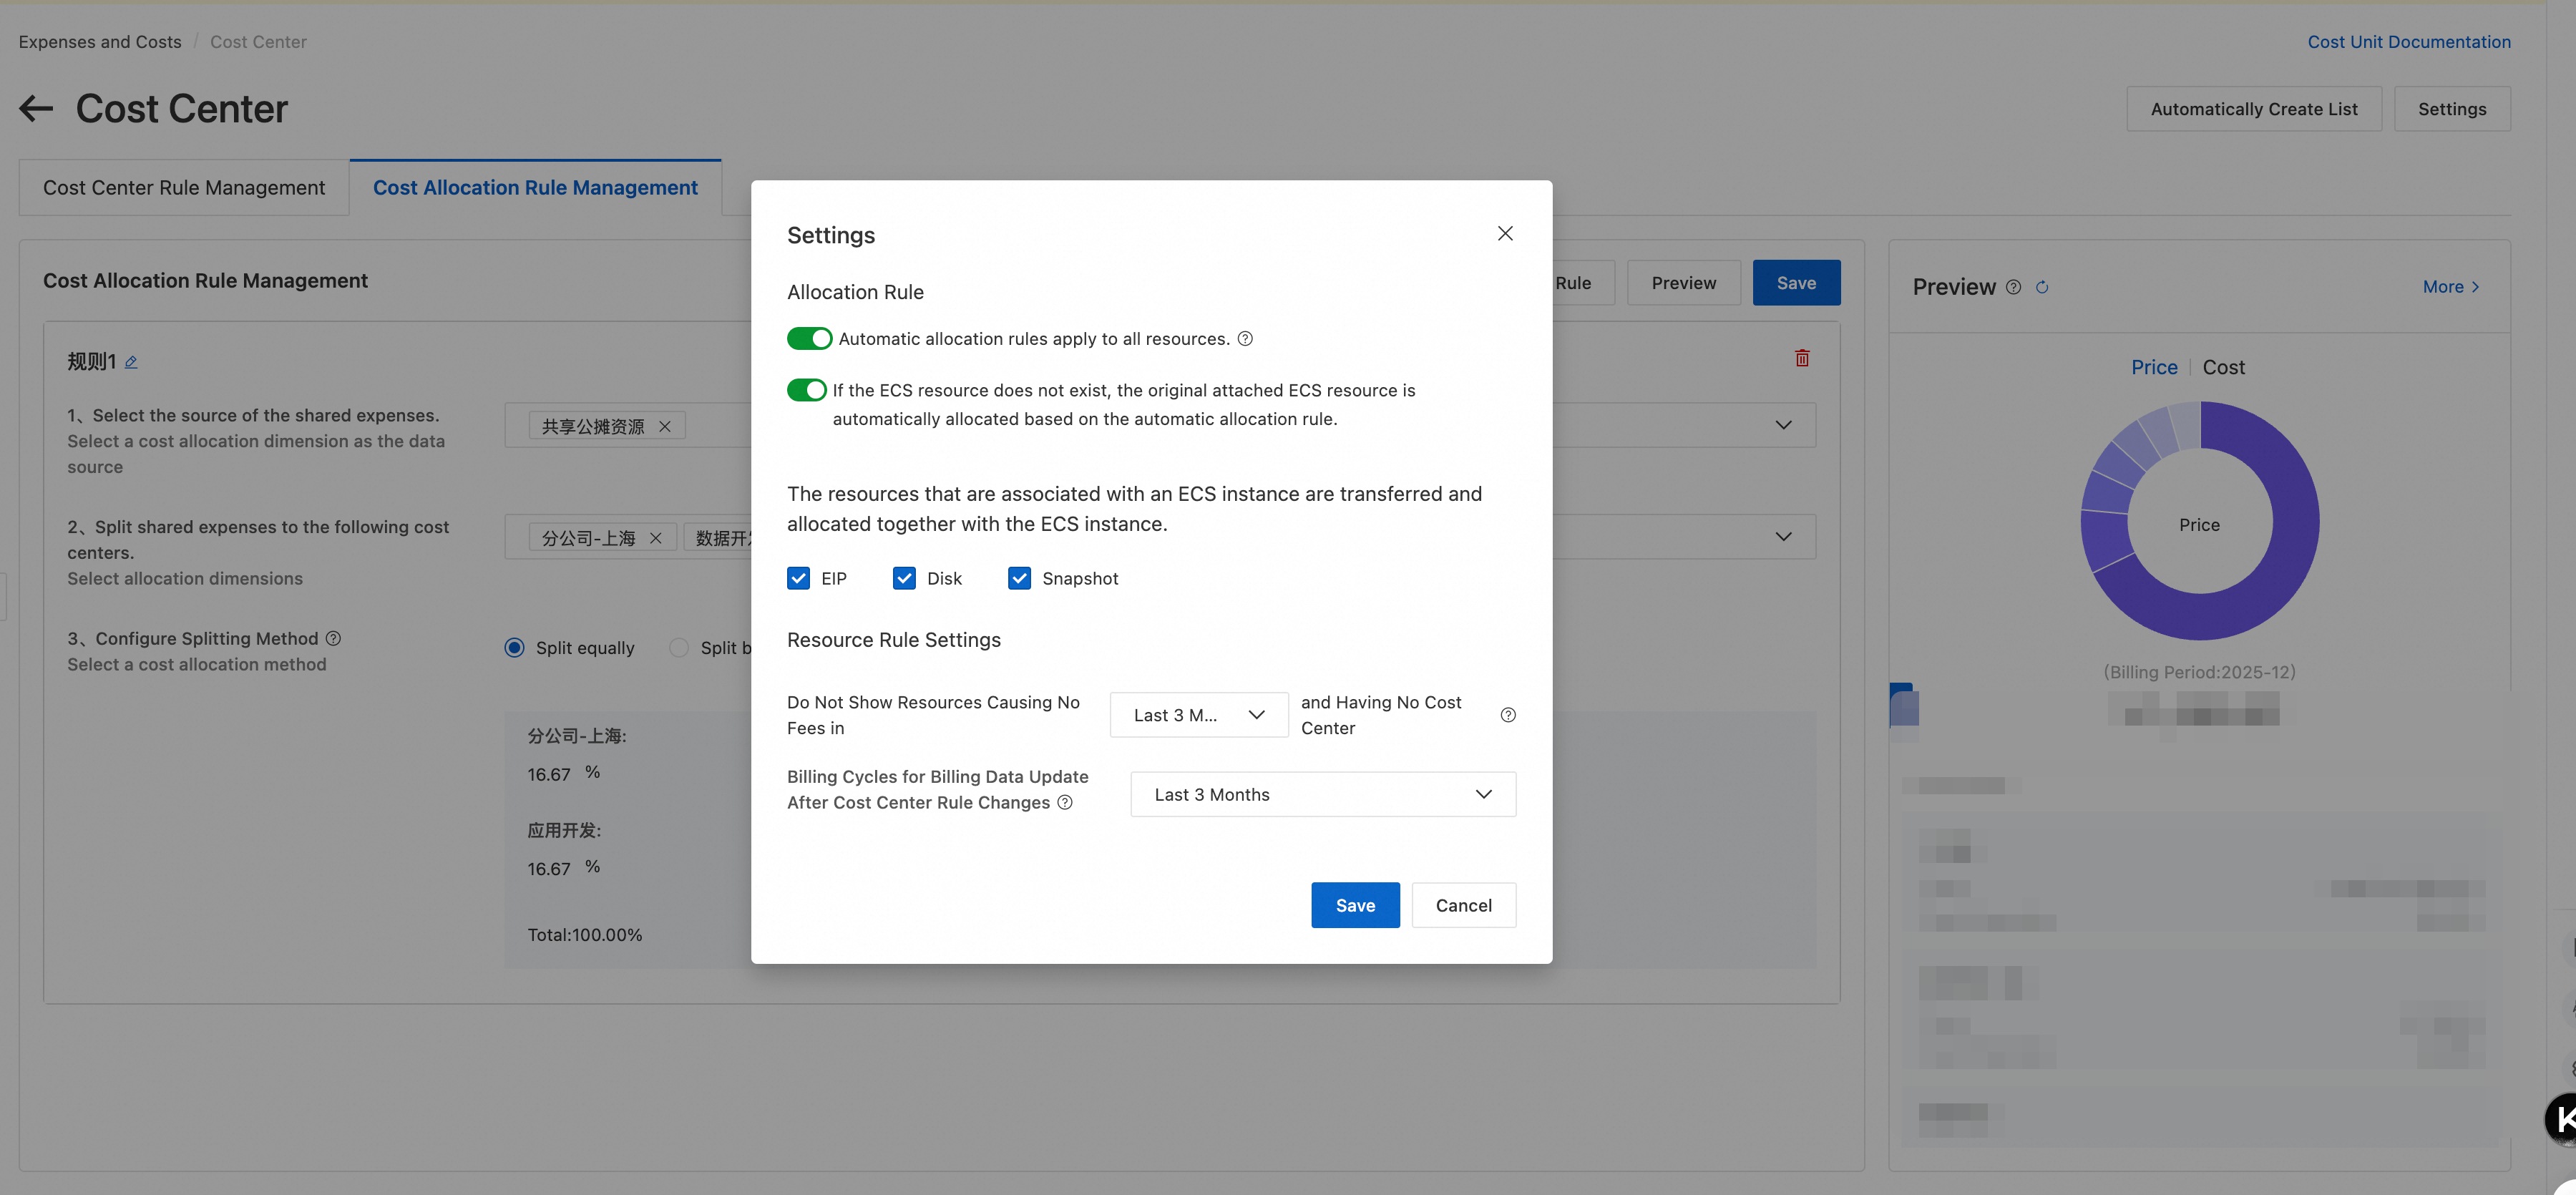
Go to the Cost Center page. Click Edit Rule on the right side to go to the Cost Center Rule Management page.
Click Configure in the upper-right corner to configure global rules in the dialog box.
Legacy version
On the Cost Center page, click Overview to configure the following rules:
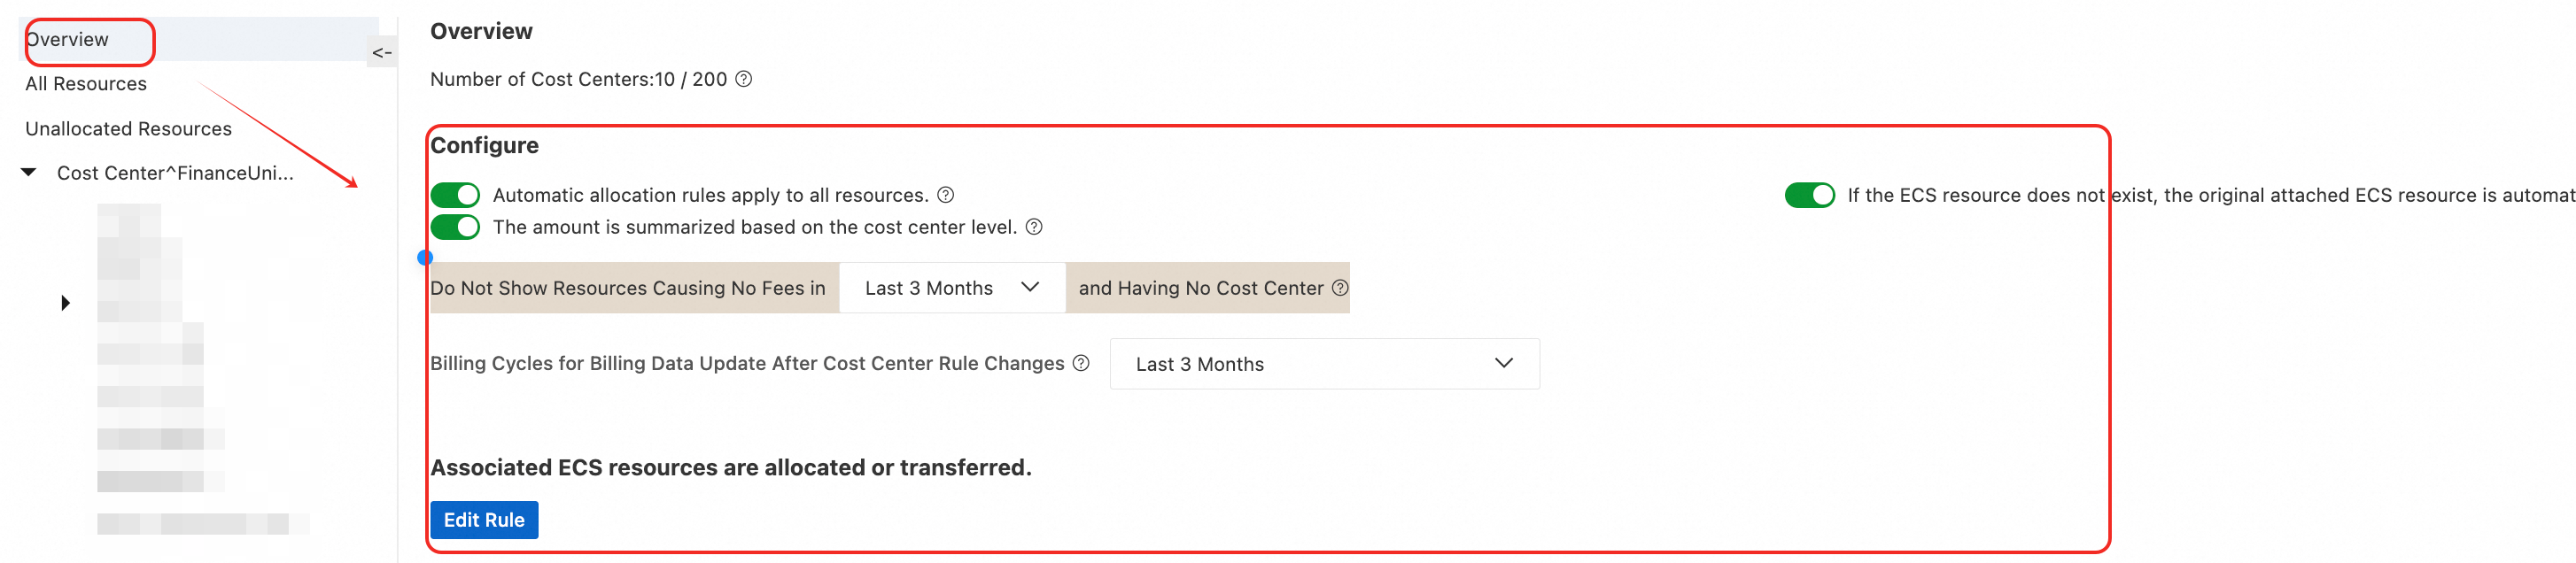
The specific rule settings are as follows:
Automatic allocation rules apply to all resources.
When enabled, if automatic allocation rules are adjusted, the new rules take effect for all non-manually assigned cloud product resource instances.
When disabled, if automatic allocation rules are adjusted, the new rules take effect only for unallocated cloud product resource instances.
The amount is summarized based on the cost center level.
When enabled, on the Cost Center>Overview>Overview page, the cost report aggregates the cost allocation data (you can choose between payable amount, discounted amount, cost amount, and cost excluding vouchers) for each financial unit by the financial unit directory tree.
When disabled, the cost overview report is displayed in a flat view without hierarchical aggregation by the financial unit directory tree.
Do Not Show Resources Causing No Fees in {select} and Having No Cost Center
Supports custom configuration (last 1 month, last 2 months, last 3 months). Default is last 3 months.
For example, if set to last 2 months: if a resource has not generated any bills in the last 2 months (current month and previous month) and has never been associated with a financial unit, it will be automatically filtered out from the All Resources and Unallocated Resources pages and will not be displayed.
Billing Cycles for Billing Data Update After Cost Center Rule Changes
After financial unit rules are changed, billing data for the last N months is refreshed based on the latest rules.
Billing data for historical billing periods is not refreshed.
Associated ECS resources are allocated or transferred.
Use this rule to configure whether EIP, Disk, Snapshot follow ECS resource instances for cost allocation. If selected, Elastic IP addresses and cloud disks follow the associated ECS instances and are allocated to the corresponding financial units. Otherwise, they are not follow-allocated.
If the ECS resource does not exist, the original attached ECS resource is automatically allocated based on the automatic allocation rule.
When enabled, associated resource instances set to follow ECS instance allocation can be allocated by other custom allocation rules when the ECS resource instance does not exist.
When disabled, associated resource instances set to follow ECS instance allocation cannot be allocated by other custom allocation rules when the ECS resource instance does not exist.
View financial unit information
New version
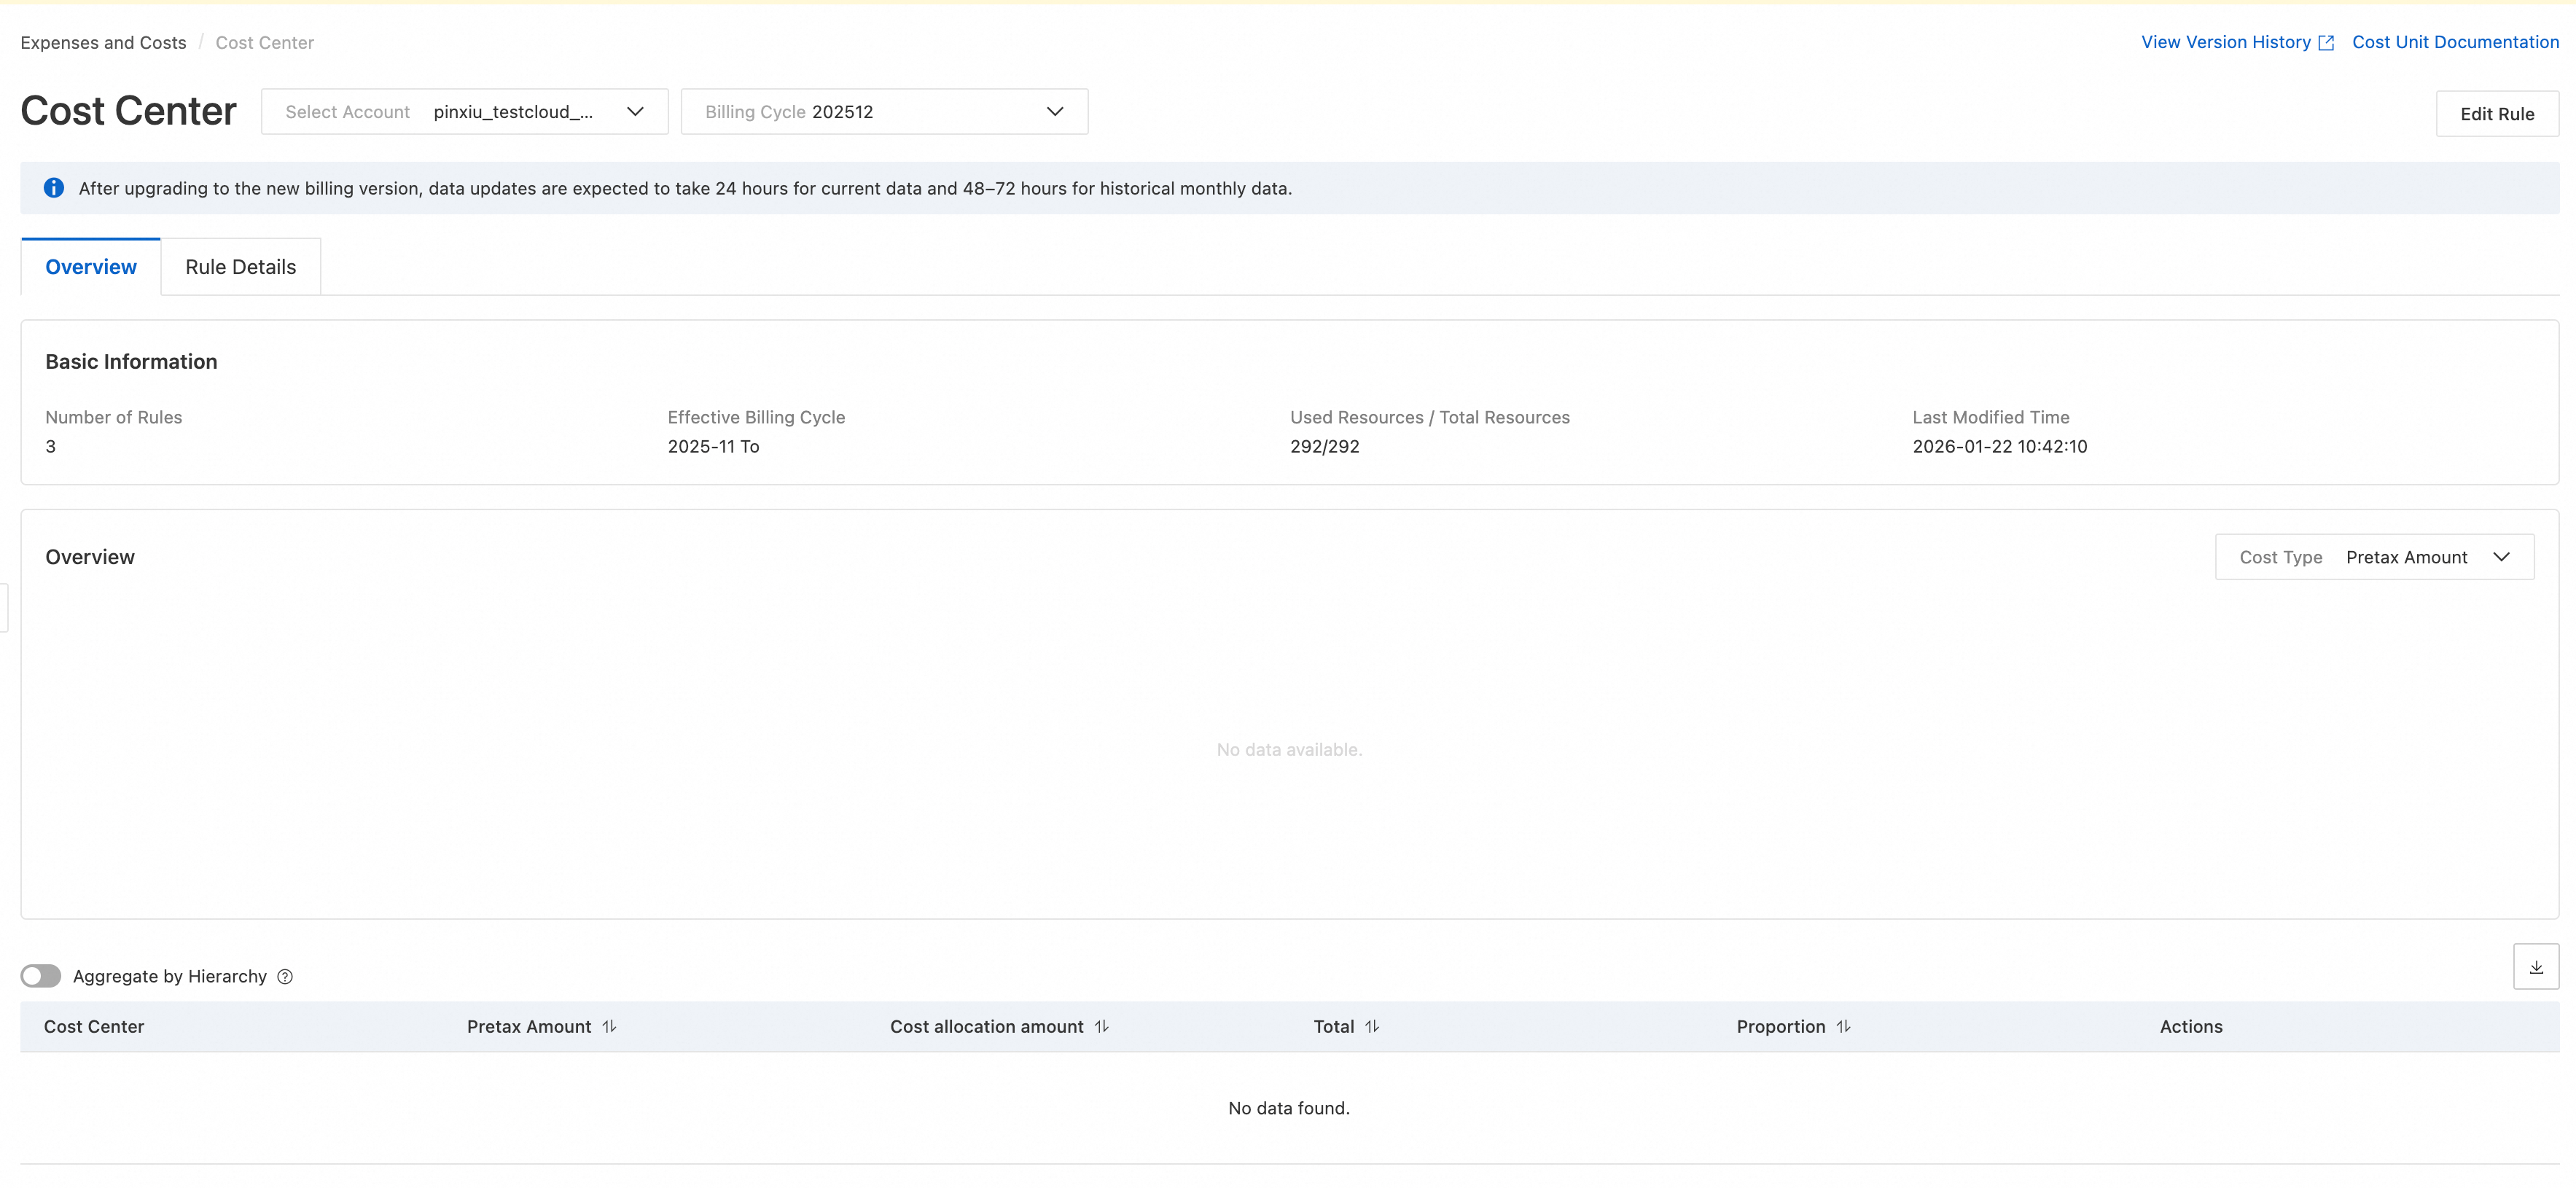
View overview
Log on to the Expenses and Costs console. In the left-side navigation pane, choose > Cost Center.
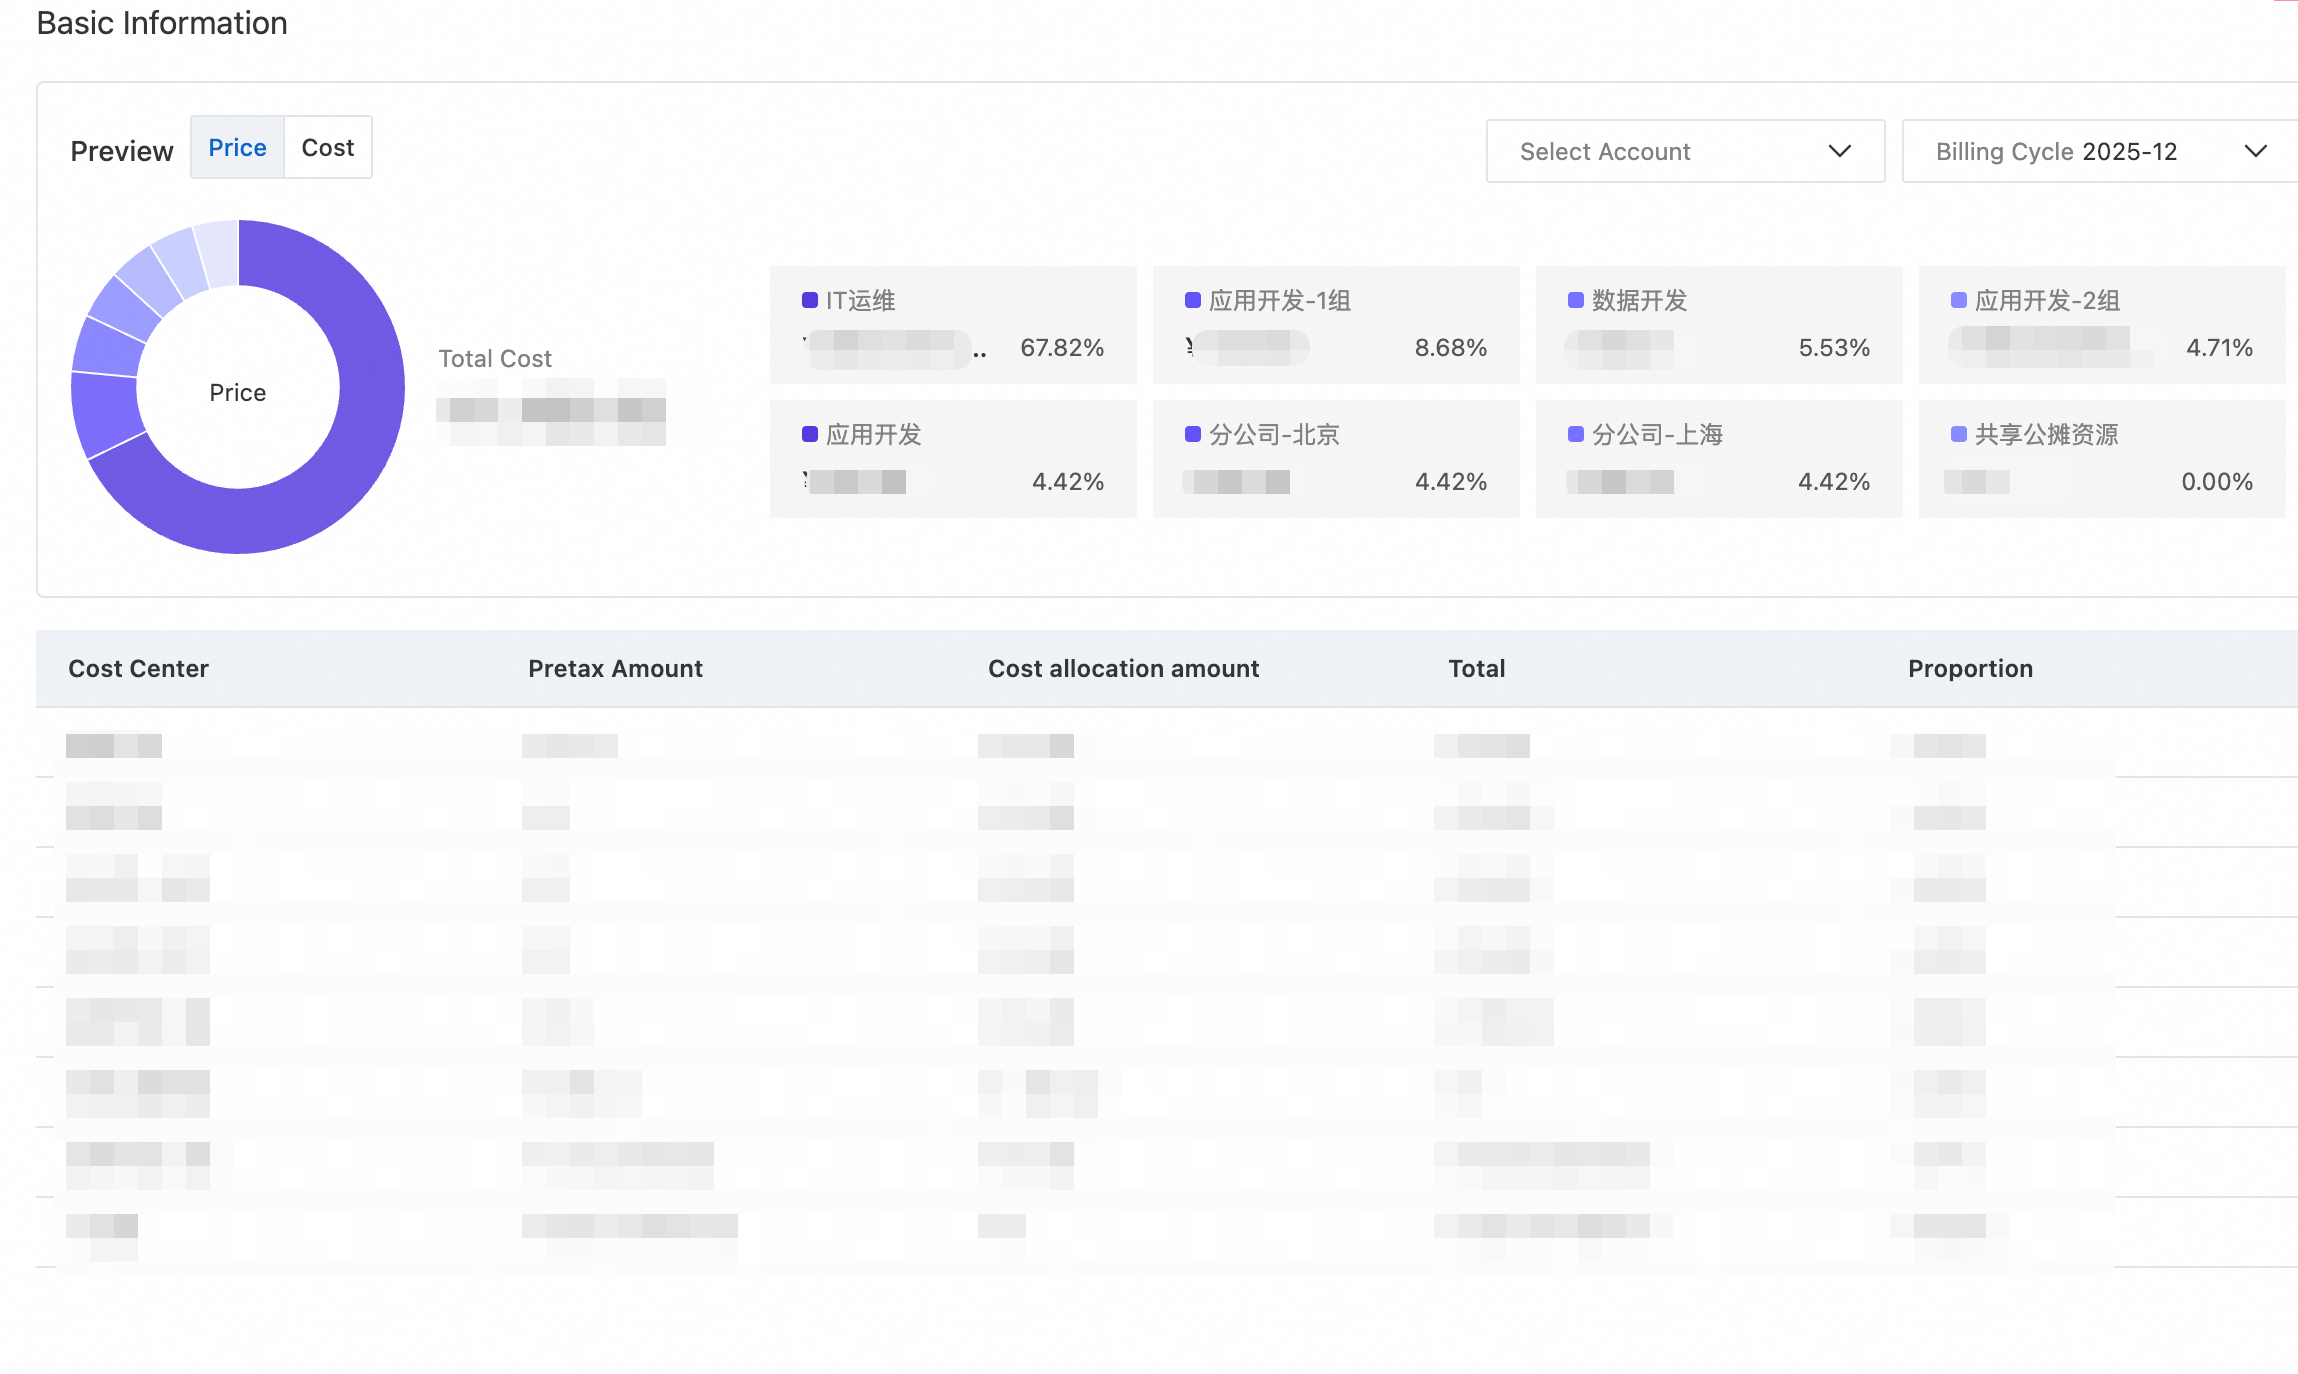
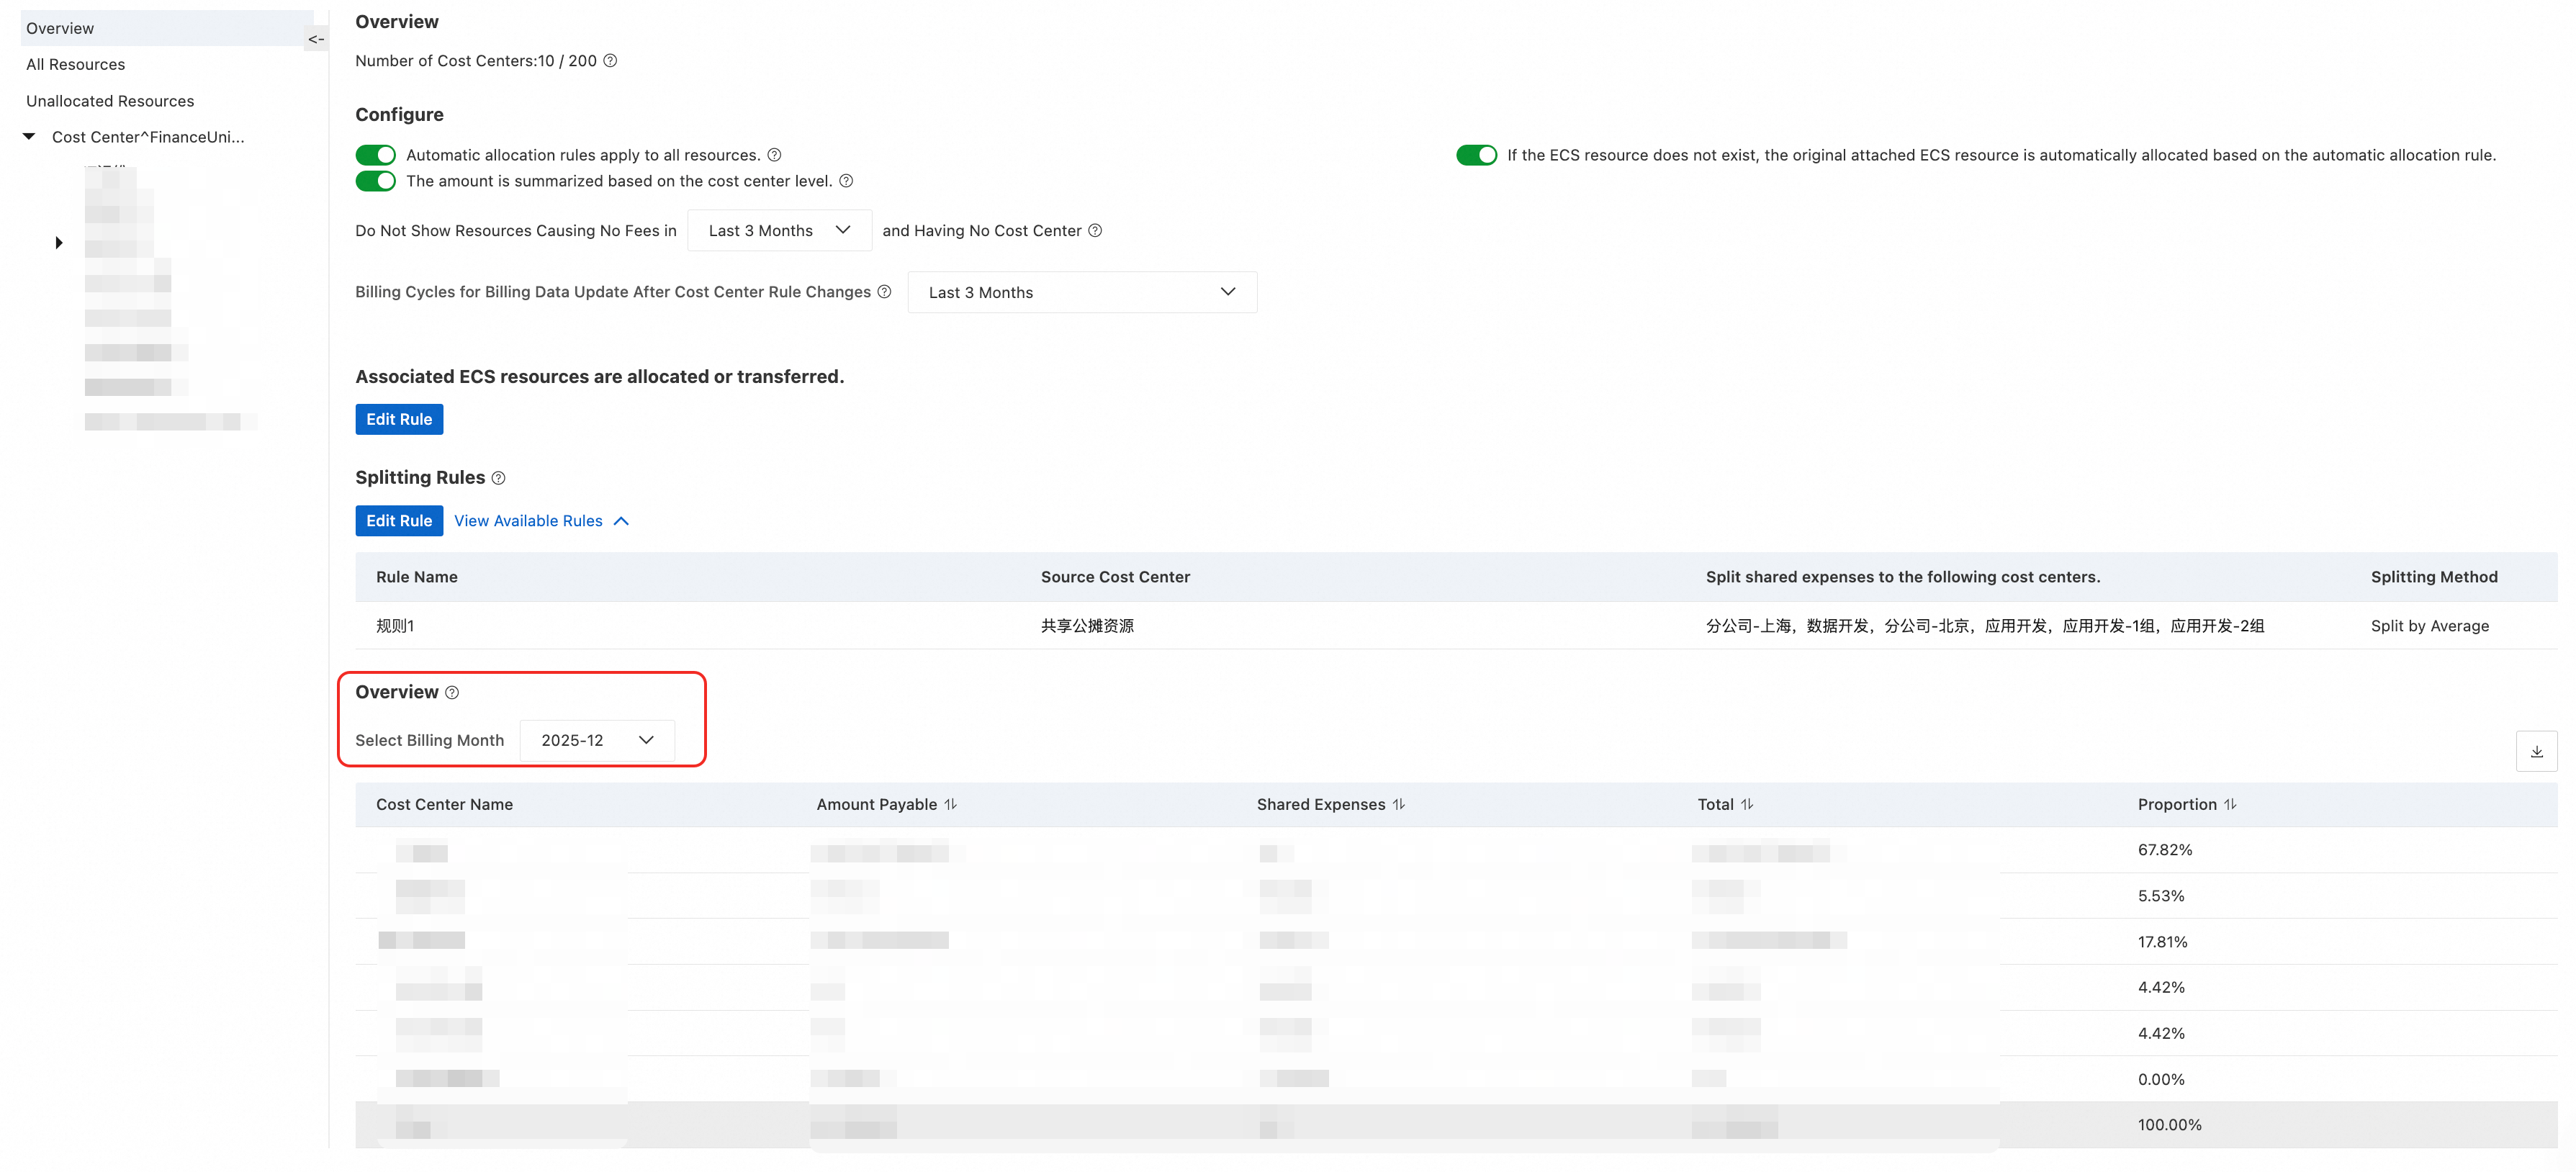
Go to the Cost Center overview page to view the following information:
Basic Information: Displays the number of financial unit rules, the billing periods covered by the rules, the number of allocated resources, the total number of resources, and the last modified time.
Cost Overview:
Supports cost analysis by payable amount, discounted amount, cost amount, and cost including vouchers.
A ring chart displays the top 8 financial units with their corresponding amounts and percentages.
A table displays the amount, shared cost amount, total (sum of amount and shared cost), and percentage (total proportion) for each financial unit. You can also click to navigate to the Cost Analysis page or the Rule Details page.
Aggregate by Hierarchy: Disabled by default. When enabled, amounts are aggregated by the financial unit tree hierarchy, where the parent financial unit amount equals the sum of its own financial unit amount and all child financial unit resource amounts.
For enterprise multi-account users, selecting all accounts includes all costs generated by sub-accounts for the corresponding billing period. Financial units also display financial unit information for resources across all accounts.
View historical rule details
Switch to the Rule Details tab to view information about automatic rules and shared cost rules:
On the automatic rules page, you can view Rule Details, Rule Type, and other information in the order of the financial unit directory tree. Automatic rules are sorted by priority, with 1 being the highest.
Click View Version History to navigate to the historical rules page and view the change history for the selected financial unit.
On the shared cost rules page, you can view detailed information about shared expense rules.
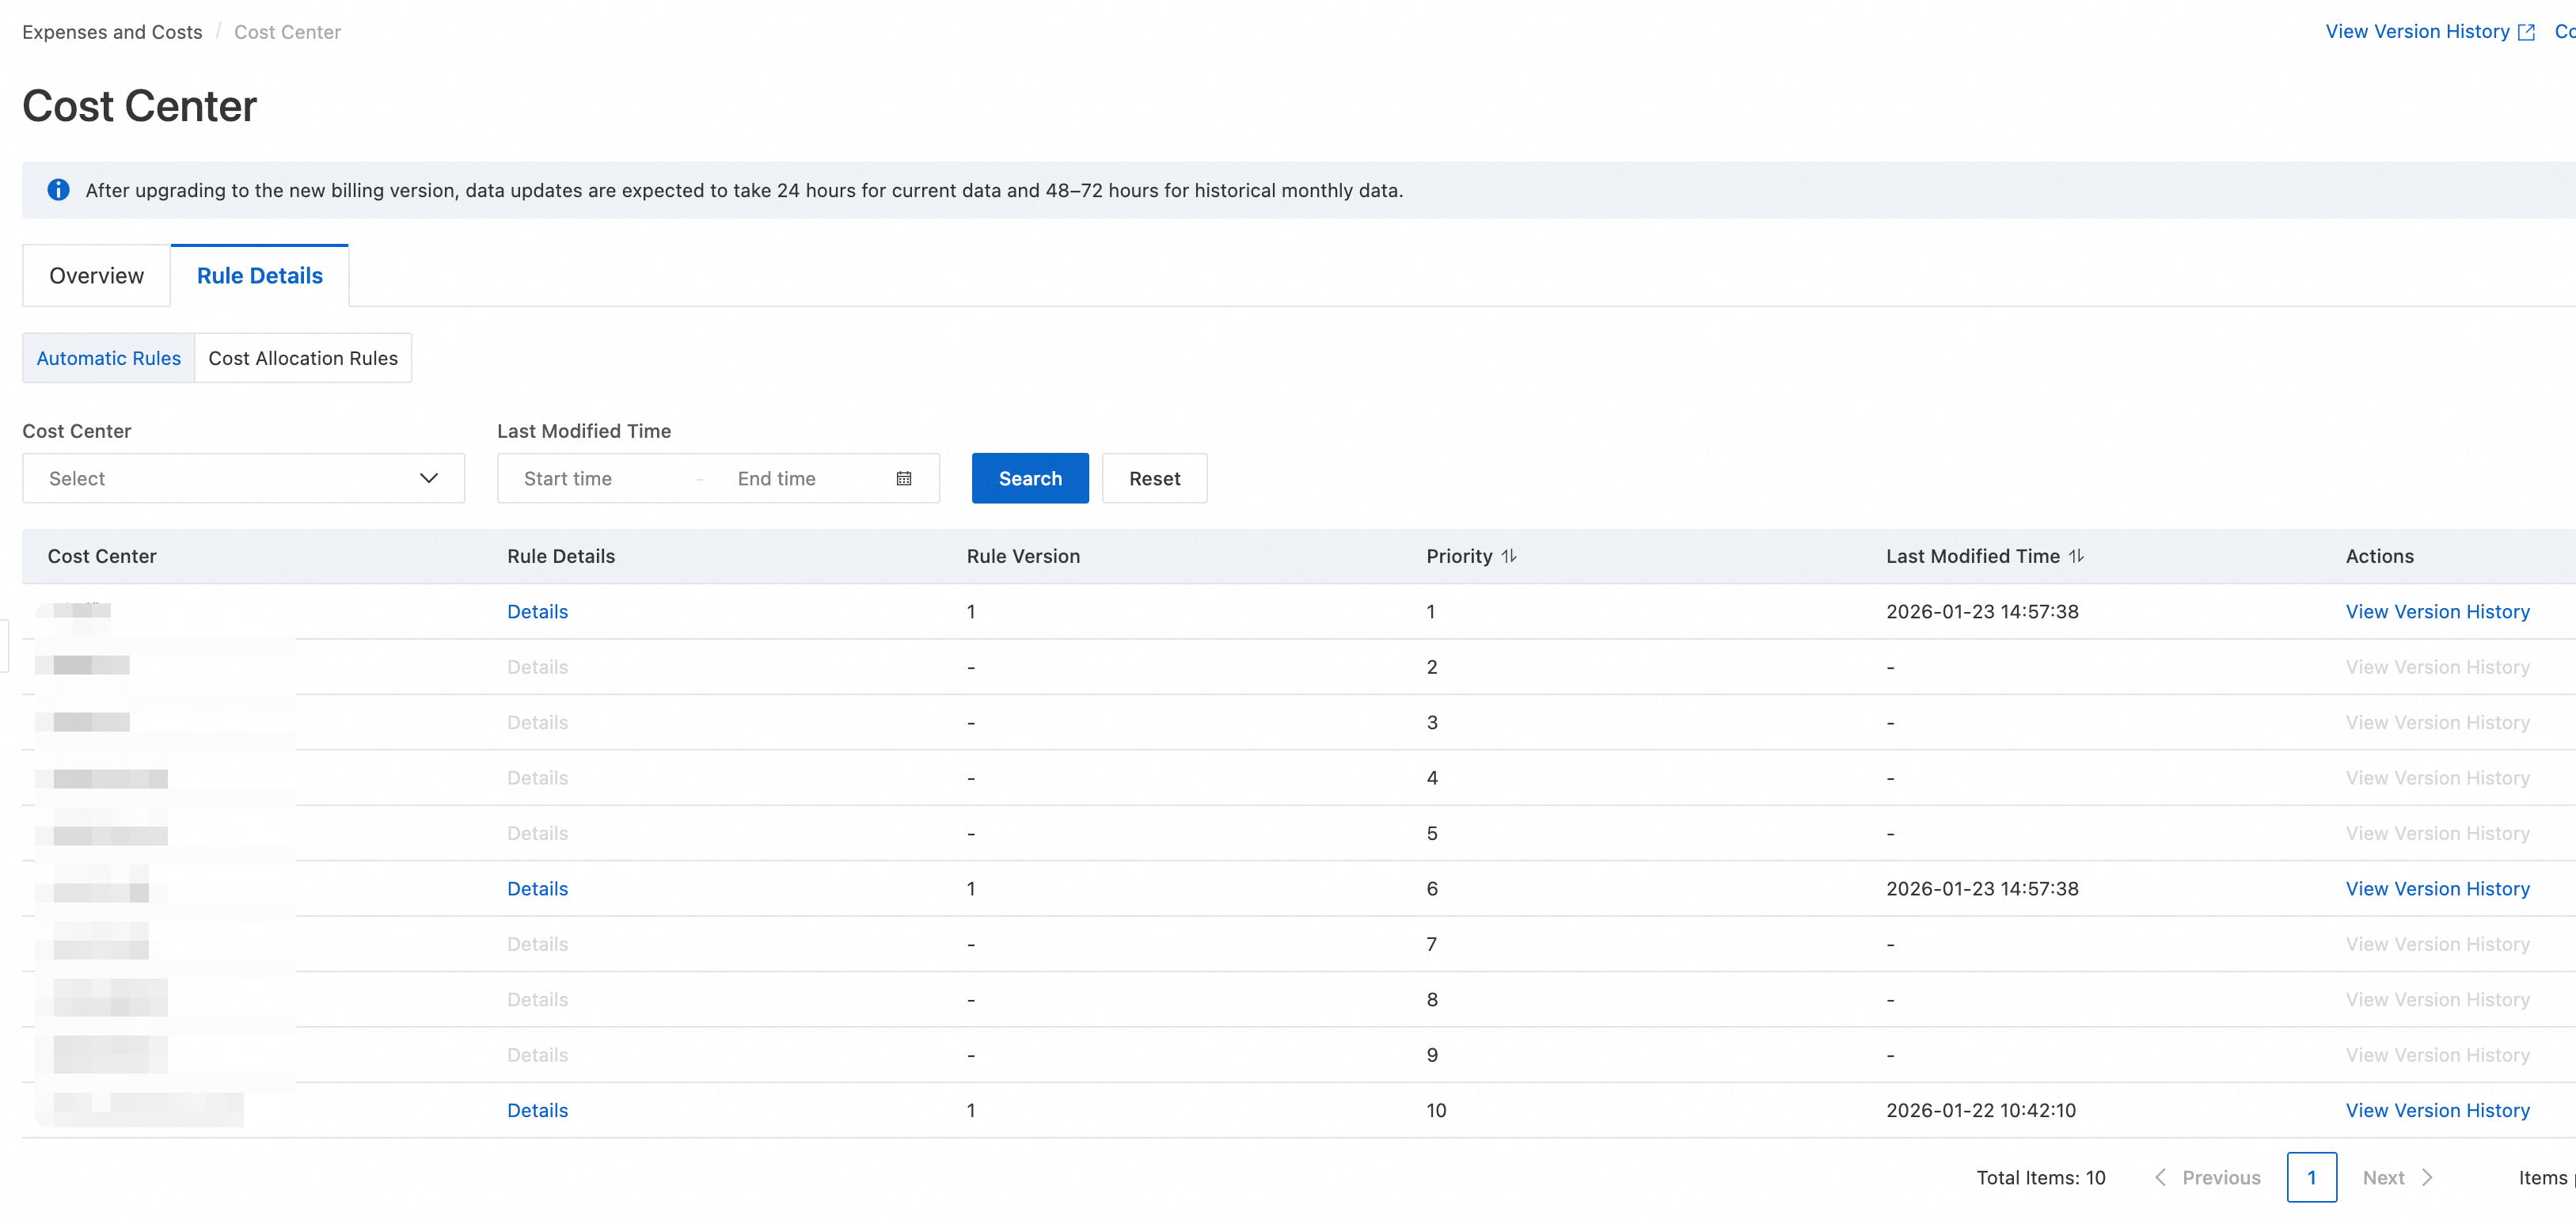
Financial units created before upgrading to the new version do not support rule viewing and similar operations.
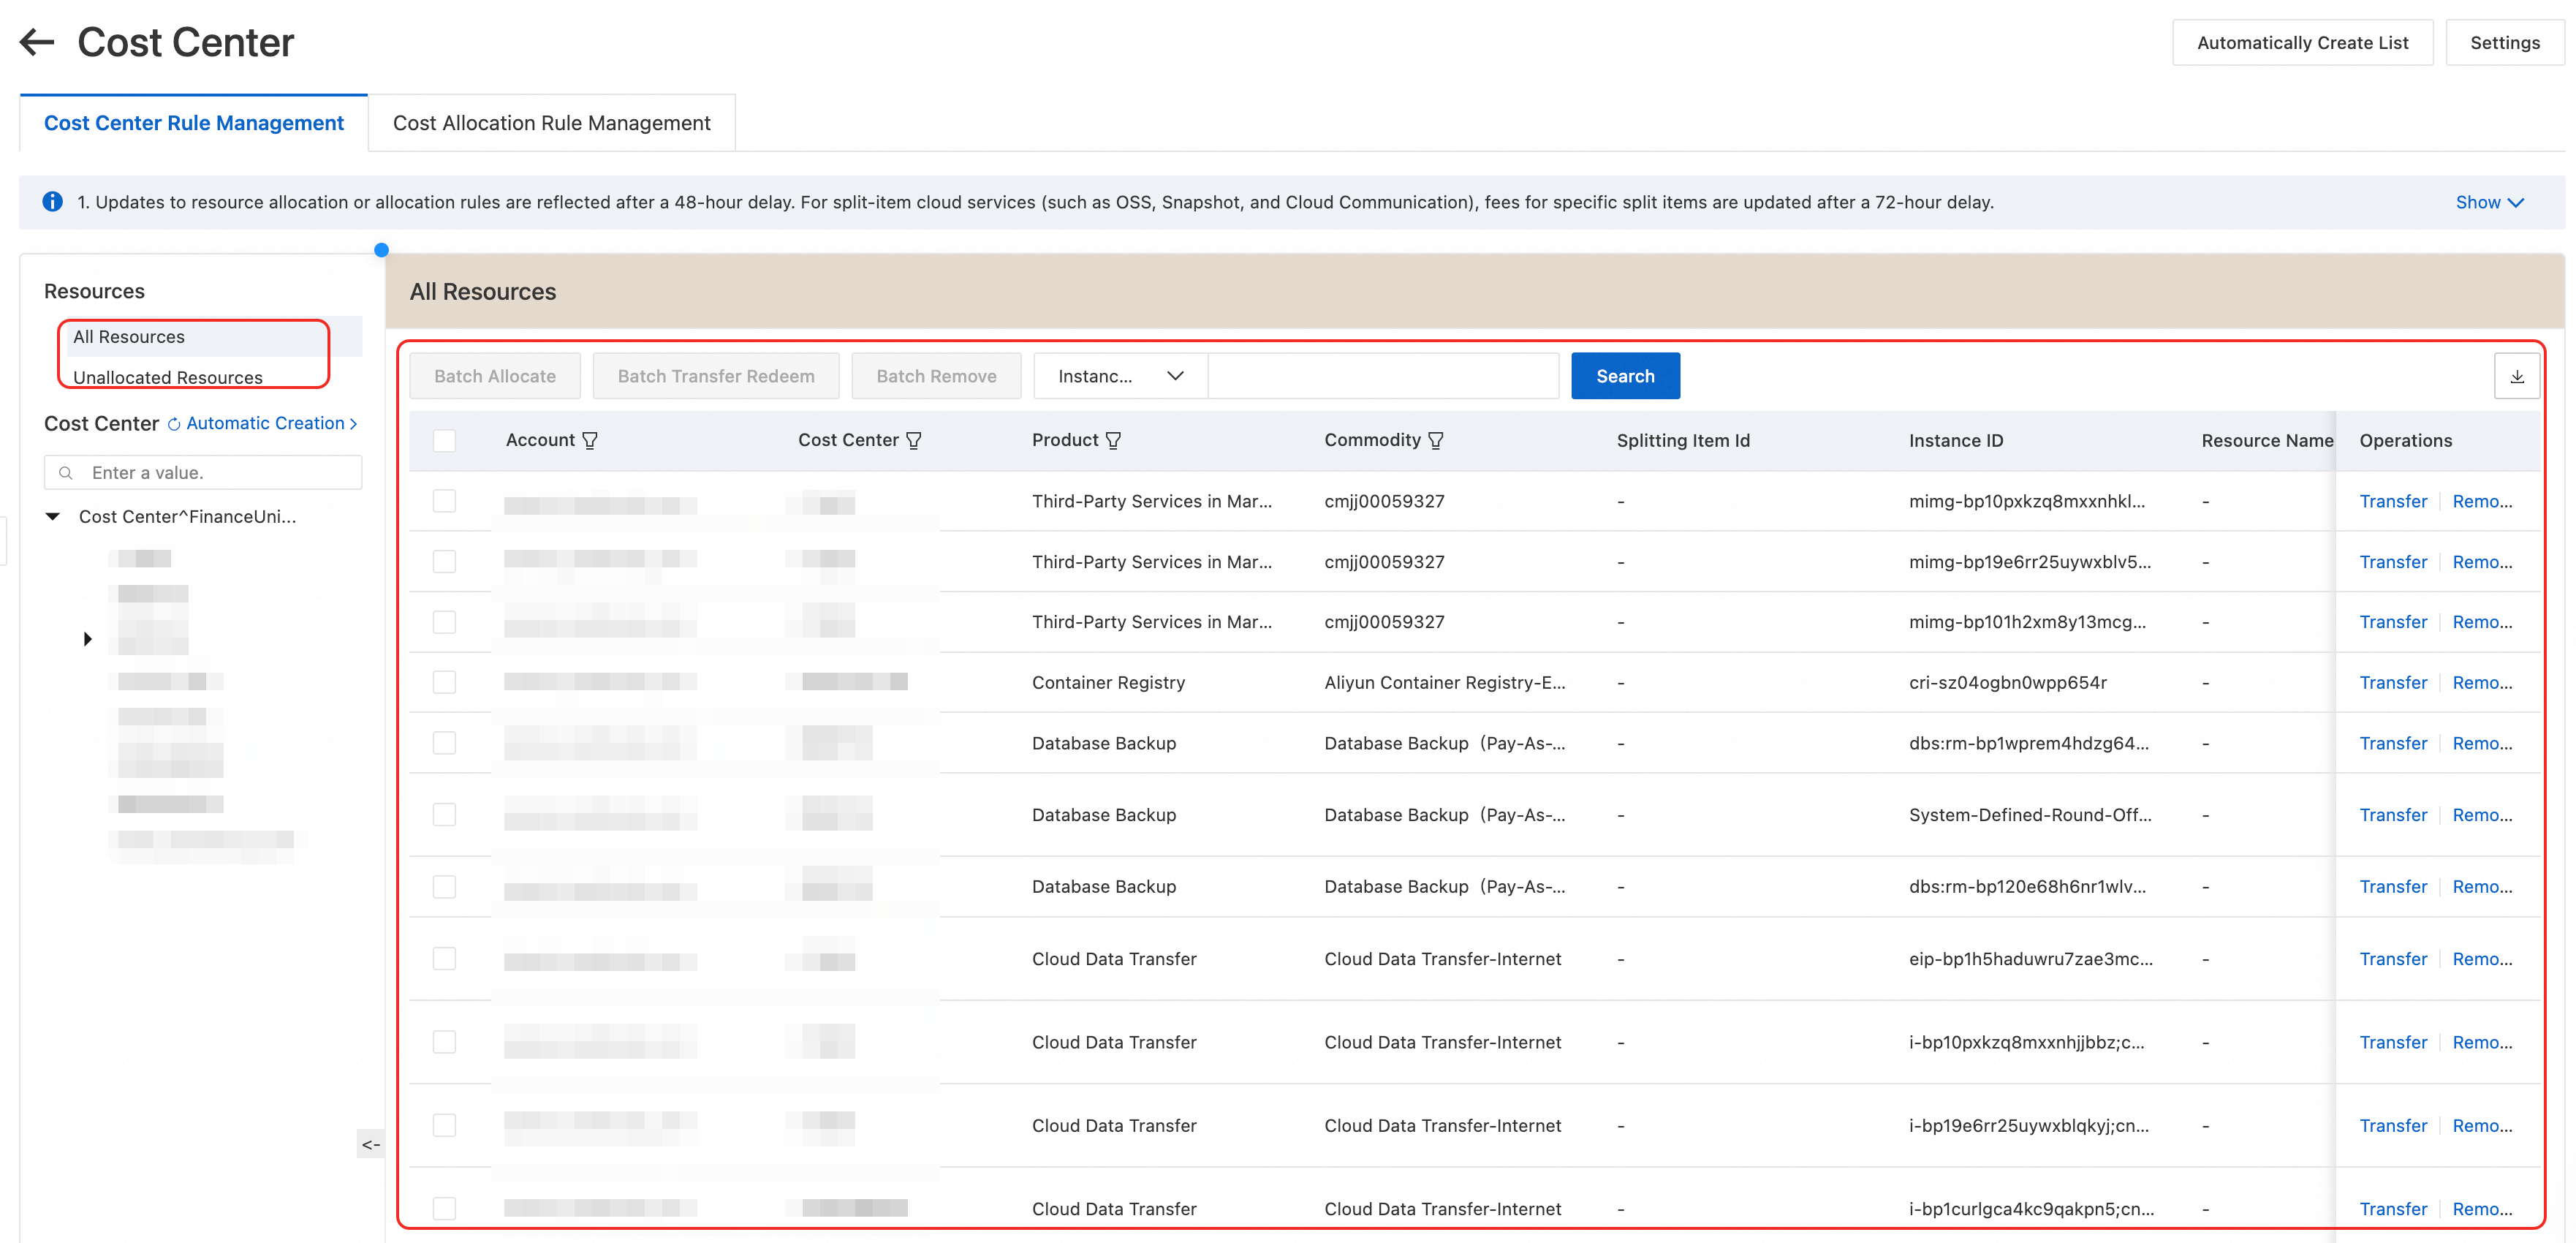
View resource list
Go to the Cost Center homepage. Click Edit Rule in the upper-right corner to go to the Cost Center Rule Management page.
In the resource list menu, you can query and manage all resources and unallocated resources.
When querying, you can search for resources by Instance ID, Resource Name, and Follow-Allocation Instance ID.
Supports full resource queries for the primary account and sub-accounts. The displayed fields include: Account, Cost Center, Product, Commodity, Splitting Item Id, Instance ID, Resource Name, Resource Group, Resource Tag, Region, Resource Last Billed Period, Rule Source, Rule Version, Rule Refresh Billing Period Count, Follow-Allocation Instance ID, Operations.
View split bills
You can use Split Bill to view detailed cost allocation information. For more information, see .
Legacy version
After the rules are configured, you can view the financial unit details, resource allocation information, and cost information for each financial unit.
Log on to the Expenses and Costs console. In the left-side navigation pane, choose > Cost Center.
Go to the Cost Center page to view the monthly cost overview.
Overview data is updated with a 48-hour delay relative to actual costs. For split-type cloud products (such as OSS, snapshots, and Cloud Communication), the specific costs of each split item are updated with a 72-hour delay.
The cost overview supports viewing data for the last 12 months.
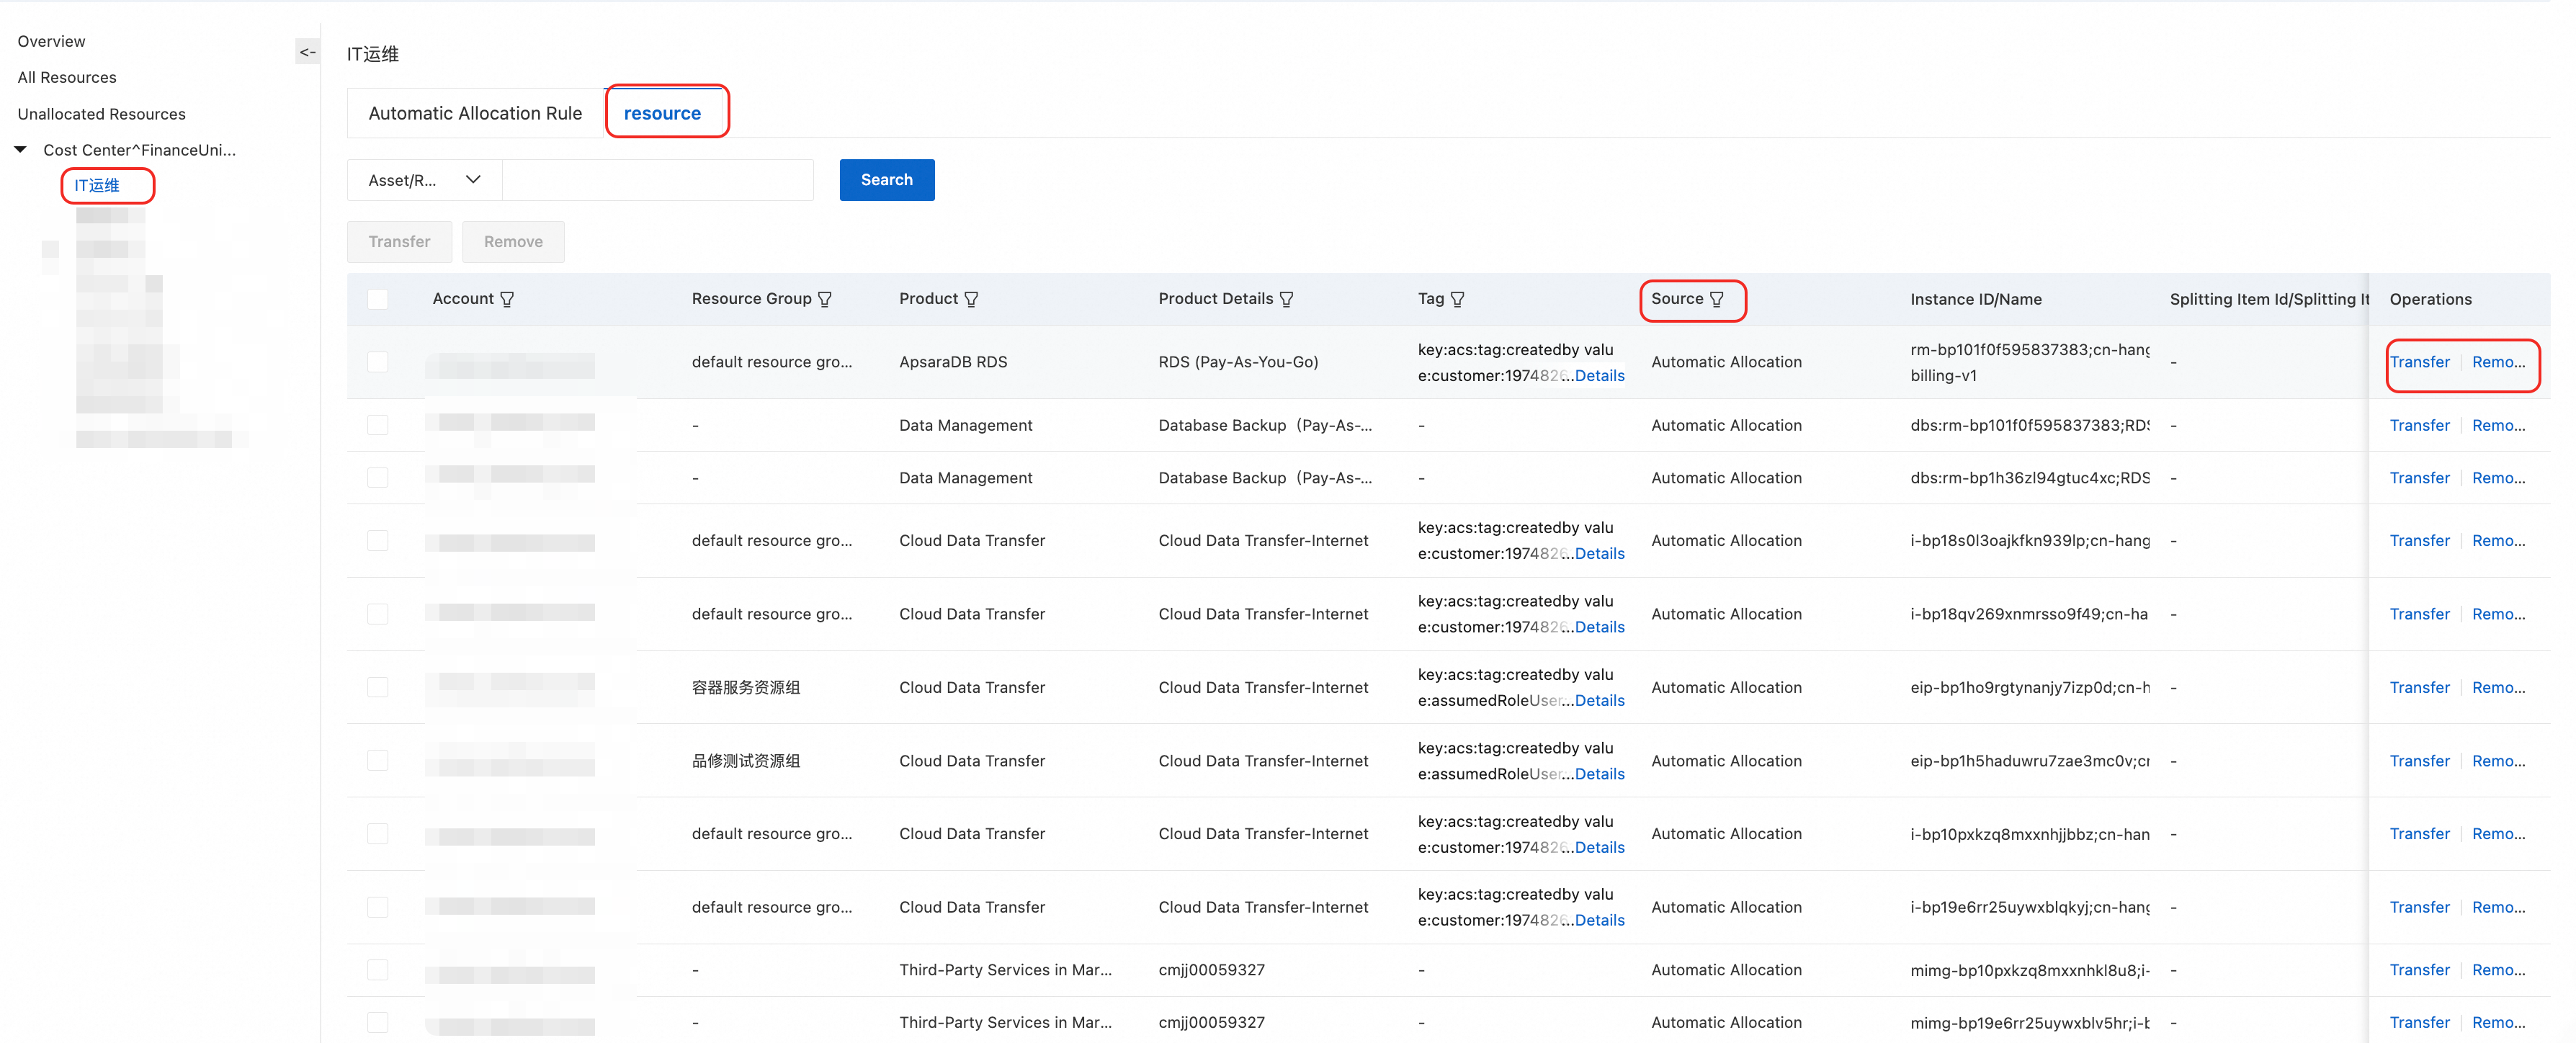
Click a specific financial unit to view and modify the Automatic Allocation Rule and the currently allocated resources. On the resource tab, use the Source field to determine whether the allocation is automatic or manual. You can transfer or remove resources.
After reassigning resources or modifying automatic allocation rules, updates are delayed by 48 hours from the time of the change. For split-type cloud products (such as OSS, snapshots, and Cloud Communication), the specific costs of each split item are delayed by 72 hours.
You can also use Split Bill to view detailed cost allocation information. For more information, see .
Assign resources to financial units (legacy console)
Establish the matching relationship between cloud product resource instances and financial units through Automatic Allocation Rules and Manual Assignment to automatically attribute the cost bills generated by cloud resources to designated financial units for cost allocation purposes.
Create automatic allocation rules
Define rules to establish the matching relationship between cloud product resource instances and financial units, so that the cost bills generated by cloud product resource instances are automatically attributed to the designated financial units for automatic cost allocation.
Find the financial unit you want to edit. On the right-side automatic allocation rules tab, click Add.
Configure rules based on account, product, tag, resource group, instance name, and other criteria. Both AND and OR logic are supported.
Click Submit to complete the financial unit configuration.
Manually assign resources (legacy console)
Manual resource assignment establishes a manual mapping between cloud product resource instances and financial units.
Log on to the Expenses and Costs console. In the left-side navigation pane, choose Manage Split >Cost Center.
On the Financial Units page, click All Resources or Unallocated Resources on the left side of the page. Find the resource instance you want to adjust and perform allocation, transfer, or removal operations.
Allocate: For Unallocated Resources that have not been assigned, click Allocate to manually assign the resource.
Transfer: For resources that need to be reassigned to a different financial unit, click Transfer and select the target financial unit in the dialog box.
Remove: For resources that no longer need to be assigned, click Remove to remove them from the current financial unit. Removed resources are classified as "unallocated".
Configure shared expense rules (legacy console)
Use this feature to split the costs of a specified financial unit across other financial units, enabling shared resource cost allocation.
Log on to the Expenses and Costs console. In the left-side navigation pane, choose Manage Split >Cost Center.
On the Cost Center page, click Overview, find Splitting Rules, and select Edit Rules.
On the Splitting Rules page, click Add Split Rule to add the first shared expense split rule.
Confirm the source of shared costs, the financial units to which shared costs will be allocated, and the split method. Click Save.
Rule priority: Manual assignment > Follow-allocation > Automatic allocation.
When a resource instance matches multiple automatic allocation rules, the rules are executed in the order of the financial unit directory tree. Once a rule takes effect, subsequent rules no longer apply.
Resource instances that have not generated bills in the last 3 months and have not been assigned to any financial unit are automatically removed from the financial unit unallocated resource list and cannot be reassigned.
If the same resource matches rules from both the primary account and sub-accounts, the resource is assigned to the primary account's financial unit.
Configure global rules (legacy console)
Global rules enable automatic allocation for all products, follow-allocation for ECS-associated resources, and other features to reduce missed or incorrect allocations.
On the Cost Center page, click Overview to configure the following rules:

Automatic allocation rules apply to all resources.
When enabled, if automatic allocation rules are adjusted, the new rules take effect for all non-manually assigned cloud product resource instances.
When disabled, if automatic allocation rules are adjusted, the new rules take effect only for unallocated cloud product resource instances.
Aggregate Amounts by Financial Unit Hierarchy
When enabled, on the Cost Center>Overview>Overview page, the cost report aggregates the payable amounts for each financial unit by the financial unit directory tree.
When disabled, the cost overview report is displayed in a flat view without hierarchical aggregation by the financial unit directory tree.
ECS-Associated Resource Follow-Allocation Settings
Use this rule to configure whether EIP and Disk follow ECS resource instances for cost allocation. If selected, Elastic IP addresses and cloud disks follow the associated ECS instances and are allocated to the corresponding financial units. Otherwise, they are not follow-allocated.
If ECS Resource Does Not Exist, Associated Resources with Follow-Allocation Can Be Allocated by Automatic Rules
When enabled, associated resource instances set to follow ECS instance allocation can be allocated by other automatic allocation rules when the ECS resource instance does not exist.
When disabled, associated resource instances set to follow ECS instance allocation cannot be allocated by other automatic allocation rules when the ECS resource instance does not exist.
View financial unit information (legacy console)
After the rules are configured, you can view the financial unit details, resource allocation information, and cost information for each financial unit.
Go to the Cost Center page. Click Overview to view the monthly cost overview.
Overview data is updated with a 48-hour delay relative to actual costs. For split-type cloud products (such as OSS, snapshots, and Cloud Communication), the specific costs of each split item are updated with a 72-hour delay.
The cost overview supports viewing data for the last 12 months.
Click a specific financial unit to view and modify the Automatic Allocation Rule and the currently allocated resources. On the resource tab, use the Source field to determine whether the allocation is automatic or manual. You can transfer or remove resources.
After reassigning resources or modifying automatic allocation rules, updates are delayed by 48 hours from the time of the change. For split-type cloud products (such as OSS, snapshots, and Cloud Communication), the specific costs of each split item are delayed by 72 hours.
You can also use Split Bill to view detailed cost allocation information. For more information, see .


API reference
You can use the following APIs to create and modify financial units.
| API | Description |
| CreateCostUnit | Creates financial units. Supports batch creation. |
| ModifyCostUnit | Modifies financial units. Supports batch modification. |
| QueryCostUnit | Queries financial unit node information. |
| DeleteCostUnit | Deletes a financial unit. |
FAQ
After setting automatic allocation rules for financial units, why has resource allocation not taken effect?
After setting automatic allocation rules, resource allocation may not take effect for the following reasons:
Tag issues — Check whether the tags are set correctly and whether the tag names and values contain spaces. Spaces in tags can cause allocation issues. You need to delete the tags with spaces in Cost Tags and re-add them.
Allocation rule issues — Make sure your automatic allocation rules are correctly configured. On the corresponding financial unit's allocation rule tab, check and adjust the automatic allocation rules.
Timing issues — For the following data, if the update status has not taken effect after exceeding 24 hours beyond the times listed below, provide the specific financial unit name and unallocated instance ID and submit a ticket for assistance.
Automatic allocation rules for unallocated resources typically take effect within 24 hours.
After reassigning resources or modifying automatic allocation rules, updates are delayed by 48 hours from the time of the change. For split-type cloud products (such as OSS, snapshots, and Cloud Communication), the specific costs of each split item are delayed by 72 hours.
Modified financial unit rules not taking effect; newly added financial units not allocated successfully —
Cause: The "Apply automatic allocation rules to all resources" option is not enabled. After modifying financial unit rules, already allocated resources are not automatically reassigned.
Resolution: Manually reassign the resources, or enable Apply automatic allocation rules to all resources and re-verify in the split bill details after 48 hours.
If resource A is both in a resource group and tagged with a cost tag, how is the financial unit allocation rule matched?
If a single financial unit allocation rule includes both resource group and tag conditions, Resource A only needs to meet one of the conditions to be matched to that financial unit. Within the same financial unit, there is no priority difference between conditions.
After configuring financial unit rules, why hasn't the cost overview data been refreshed?
After reassigning resources or modifying automatic allocation rules, data refresh is delayed: typically updated within 48 hours. For split-type cloud products (such as OSS, snapshots, and Cloud Communication), the specific costs of each split item may be delayed by 72 hours.
How should unallocated costs be allocated?
If shared costs or costs that cannot be directly attributed exist, you can configure Shared Expense Split Rules. Currently supported split methods include even distribution, proportional distribution, and custom split ratios.
Why can't I select sub-accounts, resource groups, or tags when configuring financial unit rules?
Financial unit rule configuration typically filters based on the resource dimension of bills. If an account has not generated any bill data recently, the corresponding sub-account, resource group, or tag may not appear in the drop-down options. Confirm that the corresponding account has generated bill data before configuring.
The split bill details are incomplete, missing data from some sub-accounts?
Split bill details need to be activated to use. If the primary account has been activated but sub-accounts have not, the split bill detail results may be incomplete.
Financial units show no unallocated resources, but the bill shows unallocated items?
Check whether the rules have a specified effective billing period or rule application billing period. Also verify whether the unallocated bill's corresponding account and instance ID can be found in the financial unit resource list (All Resources or Unallocated Resources).