ApsaraVideo VOD is an all-in-one platform for audio and video management, processing, and delivery. This topic describes how to get started with ApsaraVideo VOD to build a secure, cost-effective, and production-ready video playback solution.
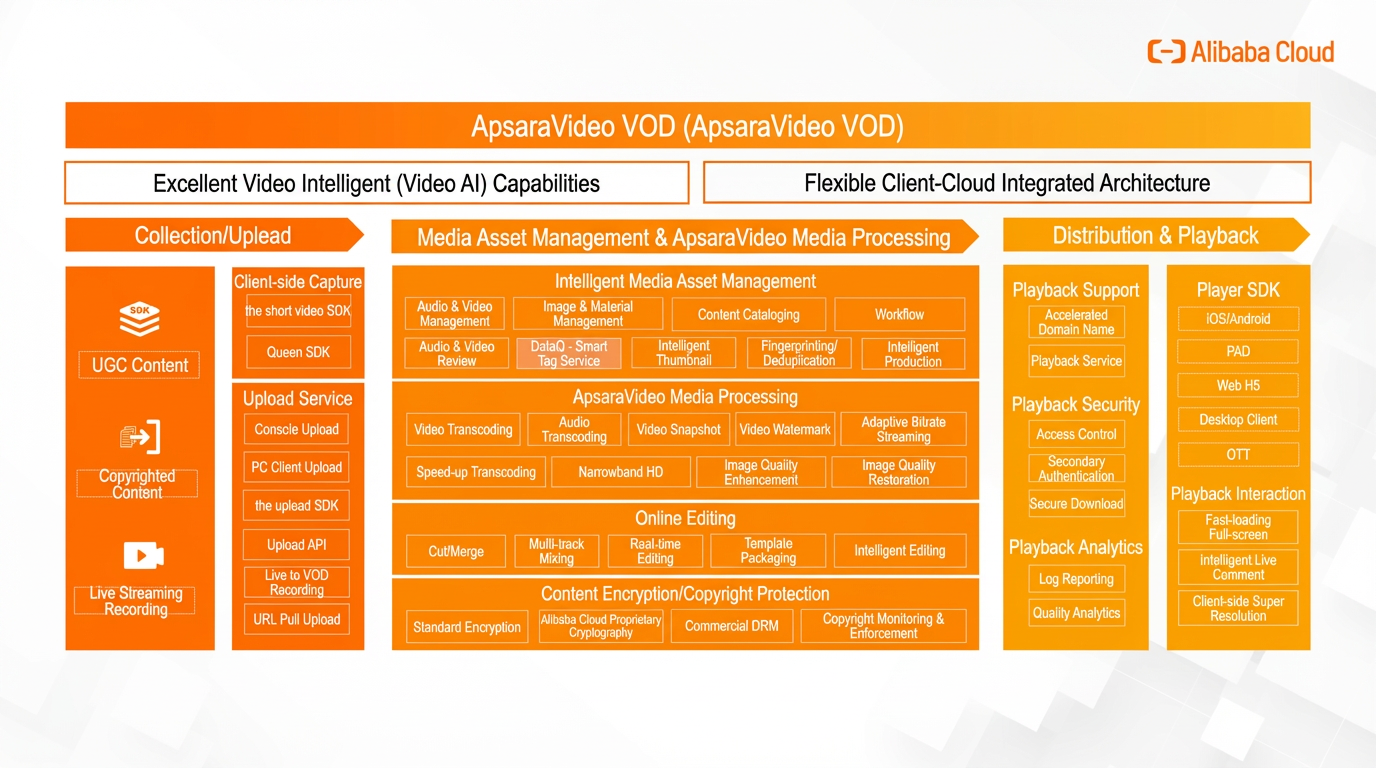
Product architecture
Prerequisites
-
Sign in to the ApsaraVideo VOD console and enable the service. You can select pay-as-you-go (postpaid) or a resource plan (prepaid) as the billing method. For more information, see Billing overview.
ApsaraVideo VOD offers a free trial for new users to explore the service.
Region selection
ApsaraVideo VOD services are isolated by region. Selecting a region close to your users reduces network latency and improves data transfer efficiency. In addition, feature availability varies across different regions. For more information, see Regions.
Solution setup
Step 1: Configure storage
-
In the ApsaraVideo VOD console, go to Storage Management. In the top navigation bar, select your target region.
-
Click Enable VOD System Bucket and select a storage redundancy type. If your business requires higher availability, we recommend Zone-Redundant Storage (ZRS).
-
Standard storage - Zone-Redundant Storage (ZRS)
ZRS uses a data redundancy mechanism across multiple availability zones (AZs). It stores redundant copies of your data across multiple AZs within the same region. If one availability zone becomes unavailable, your data remains accessible. In the Enable VOD System Bucket dialog box, set Storage Redundancy Type to Zone-Redundant Storage (Recommended). After you select ZRS, you cannot convert it to LRS. Click Enable.
-
Standard storage - Locally Redundant Storage (LRS)
LRS uses a data redundancy mechanism within a single availability zone (AZ). It stores redundant copies of your data on multiple devices across multiple facilities within a single AZ to ensure data durability and availability in the event of hardware failure. In the Enable VOD System Bucket dialog box, click Enable. Note: If you select LRS and the AZ becomes unavailable, your data will be inaccessible. For higher availability, we recommend that you select Zone-Redundant Storage.
Enabling the storage location may take some time. Wait until the storage location status changes to Normal before using it.
-
Step 2: Upload audio and video
Configure a transcoding template group before you upload files. This ensures that videos are automatically transcoded into multiple output qualities after they are uploaded. This improves the playback experience and reduces bandwidth usage.
-
(Optional) In the ApsaraVideo VOD console, go to transcoding template group, click Add transcoding template group, configure the group, and then save the settings. For more information, see Audio and video transcoding.
-
Select an upload method.
-
Upload by using an SDK (recommended for production environments)
Your backend service calls the SDK to obtain an upload credential. The client (web or app) then uses this credential to upload the file directly to ApsaraVideo VOD. This is the most secure and efficient method.
NoteFor detailed code examples, see Overview of media upload.
python# Python example: Obtain an upload credential and address from the backend service. from aliyunsdkvod.request.v20170321 import CreateUploadVideoRequest from aliyunsdkcore.client import AcsClient import json # 1. Initialize the client. # Replace the placeholders with your AccessKey ID, AccessKey secret, and region ID. client = AcsClient('your-access-key-id', 'your-access-key-secret', 'cn-shanghai') # 2. Create an API request and set its parameters. request = CreateUploadVideoRequest.CreateUploadVideoRequest() request.set_Title('My Test Video') request.set_FileName('video_test.mp4') # request.set_TemplateGroupId('your-transcode-template-group-id') # Optional. Specify a transcoding template. # 3. Initiate the request and obtain a response. response = client.do_action_with_exception(request) response_data = json.loads(response) # 4. Return the UploadAddress and UploadAuth values to the client. upload_address = response_data['UploadAddress'] upload_auth = response_data['UploadAuth'] video_id = response_data['VideoId'] # After the client obtains the credential, it uses the upload SDK to complete the file upload. -
Upload from the console (suitable for uploading or testing a small number of small files)
In the ApsaraVideo VOD console, go to media library, choose Audio/Video, and then click Upload Audio/Video. On the Upload Audio/Video page, select Local Upload and add files.
-
import online videos (suitable for migrating sites when your files are hosted online). For more information, see import online videos.
-
Windows client (suitable for uploading multiple large files in batches). For more information, see Upload files by using the Windows client.
-
Step 3: Configure CDN domain name (Optional)
If you play videos by using a direct playback URL, you are charged for storage outbound traffic. If you configure a CDN domain name, you can benefit from a price discount of 50% to 70% on CDN service fees compared with storage outbound traffic fees. For more information, see Add a CDN domain name.
Step 4: Integrate player
-
Obtain a playback credential (recommended for production environments)
-
Call the backend API
Your backend service calls an API to dynamically generate a time-limited playback credential (PlayAuth) for each playback request.
python# Python example: Obtain a playback credential. from aliyunsdkvod.request.v20170321 import GetVideoPlayAuthRequest # The client was initialized in the upload step. request = GetVideoPlayAuthRequest.GetVideoPlayAuthRequest() request.set_VideoId('your-video-id') # Replace the placeholder with the actual video ID. request.set_AuthInfoTimeout(3000) # The validity period of the credential in seconds. In this example, the period is 50 minutes. response = client.do_action_with_exception(request) play_auth = json.loads(response)['PlayAuth'] # Return the obtained play_auth and video_id values to the frontend. -
Integrate the frontend player
The frontend player uses the
vidandplayAuthobtained from the backend to initialize playback.Web
<!-- Web player example -->
<div id="player-container"></div>
<script src="https://g.alicdn.com/de/prismplayer/2.15.2/aliplayer-min.js"></script>
<script>
  var player = new Aliplayer({
    id: 'player-container',
    width: '100%',
    height: '500px',
    vid: 'your-video-id',      // Obtained from the backend
    playauth: 'your-play-auth', // Obtained from the backend
    cover: 'https://your-domain.com/cover.jpg' // The URL of the cover image
  }, function (player) {
    console.log('The player is created.');
  });
</script>
Android
1. Create a player.
AliPlayer player = AliPlayerFactory.createAliPlayer(context);
// 2. Configure the playback source.
VidAuth vidAuth = new VidAuth();
vidAuth.setVid("your-video-id");
vidAuth.setPlayAuth("your-play-auth");
vidAuth.setRegion("cn-shanghai"); // Set the region.
// 3. Prepare for playback.
player.setDataSource(vidAuth);
player.prepare();
iOS
1. Create a player.
let player = AliPlayer()
// 2. Configure the playback source.
let vidAuth = AVPVidAuthSource()
vidAuth.vid = "your-video-id"
vidAuth.playAuth = "your-play-auth"
vidAuth.region = "cn-shanghai" // Set the region.
// 3. Prepare for playback.
player.setSource(vidAuth)
player.prepare()
-
-
Use URL signing
URL signing appends signature information directly to the URL. This method is less secure than using a playback credential and is suitable for scenarios where you cannot modify the player. For more information, see URL signing.
-
Use the Web Player Demo
When you test or experiment with audio and video uploads, you can also use the Web Player Demo.
-
In the ApsaraVideo VOD console, go to media library, choose Audio/Video, and then click Manage in the Actions column for the video.
-
Click the Video URL tab. In the Actions column for a specific definition, click Copy.
-
Paste the playback URL into the web player to start playback.
-
Next steps
-
Set up a transcoding template (Audio and video transcoding) to automatically transcode uploaded videos into multiple definitions.
-
Set up a workflow to automatically process uploaded videos with tasks like transcoding, snapshotting, and watermarking.
-
Use video editing (Video editing) to professionally edit videos online or through an API or SDK.
-
Configure a CDN domain name (Add a CDN domain name) to accelerate video uploads and downloads and reduce traffic costs.
FAQ
Batch upload
You can use the PC client, import online videos, or use an upload SDK to upload audio and video files in batches. For more information, see Overview of media upload.
Migrate from OSS to ApsaraVideo VOD
-
You can add your Object Storage Service (OSS) bucket to ApsaraVideo VOD if the following requirements are met:
-
You must have an OSS bucket that uses the Standard storage class in the target region.
-
Authorize ApsaraVideo VOD to access your OSS resources on the Cloud Resource Access Authorization page.
-
-
You can also use an upload tool to migrate the files after you prepare the source file URLs. For more information, see Overview of media upload.