Hybrid cloud access is an Alibaba Cloud solution that protects web applications and manages traffic for services deployed outside of Alibaba Cloud. If your services run on a third-party public cloud, a private cloud, or an on-premises data center, you can use hybrid cloud access with Web Application Firewall (WAF) to centrally manage and protect your services. This topic describes what hybrid cloud access is and how to deploy it.
Hybrid cloud access
Hybrid cloud access extends cloud-based protection components to other cloud platforms or on-premises data centers. It provides an integrated web application security solution by combining on-premises and cloud capabilities.
Use cases
Protecting on-premises web services when business requirements prevent traffic from being routed to the public cloud.
Unifying web service protection for services deployed across Alibaba Cloud, other public clouds, private clouds, on-premises data centers, and VPC intranets.
Providing unified protection for latency-sensitive and high-reliability services that require active-active disaster recovery across multiple network environments.
Benefits
Enables unified management of on-premises and cloud-based assets and mitigation policies.
Protects your services locally through on-premises deployment.
Synchronizes cloud-based mitigation rules and threat intelligence in real time.
Protects both internet-facing and intranet services.
Enables traffic diversion and out-of-band inspection at a unified access layer, supporting manual and automatic bypass to ensure failover if a WAF cluster fails.
Connection types
Connection type | Principle | Use cases |
Reverse proxy connection | In reverse proxy connection mode, add the domain name or IP address to WAF and point the DNS record to the WAF protection cluster endpoint. The Hybrid Cloud WAF cluster performs security checks on all proxied access requests. | This mode is suitable for scenarios where the network architecture can be modified and service traffic is not excessive. Examples include the Internet, retail, government, finance, and media industries. |
SDK integration | In SDK integration mode, you deploy an SDK plug-in on the unified access gateway. The SDK plug-in copies the service traffic from the gateway to the WAF protection cluster. In this mode, the Hybrid Cloud WAF protection cluster does not participate in traffic forwarding, thereby separating service forwarding from detection. | This mode is suitable for users with a unified access layer gateway (such as Nginx or APISIX) and O&M capabilities who handle large traffic volumes with strict requirements for latency and stability. Examples include leading Internet customers and customers with special requirements for forwarding features. |
Choose a hybrid cloud connection type based on your network architecture and requirements. The following scenarios explain how to select the appropriate connection type:
Enterprise public service portal
Background: This portal offers online services and information queries. Because it handles sensitive data, the portal requires robust security. The portal has stable service traffic, and the network architecture can tolerate minor adjustments.
Recommended connection type: reverse proxy mode
Rationale:
Simplified deployment: The reverse proxy mode is simple to deploy. You just need to redirect service traffic to WAF through DNS configuration. This approach does not require complex changes to the existing internal network structure or deploying a plug-in at each access point, making it ideal for rapid implementation by teams with basic O&M skills.
Minimal architectural changes: Due to stable service traffic, you can adjust DNS settings to redirect traffic to WAF without impacting the user experience.
Centralized management: The reverse proxy mode lets you centrally manage security policy on the WAF platform. This simplifies policy enforcement.
Large-scale social e-commerce
Background: This platform handles large-scale, high-concurrency services and requires high performance, stability, and security. The goal is to enhance application security without altering the network architecture or impacting the user experience. Due to a widely distributed user base and complex traffic patterns, the platform needs a solution that can effectively detect and mitigate potential threats.
Recommended connection type: SDK integration
Rationale:
As a platform that prioritizes user experience, it requires very low access latency and high system stability. The SDK integration mode reduces overall access latency by eliminating extra redirects and traffic passing through additional proxy nodes.
The SDK integration mode separates service traffic forwarding from security detection, which offers several advantages for a social platform:
Enhanced system stability: Even if the WAF protection cluster fails, service traffic and system availability are not affected.
Independent scaling: You can scale the WAF protection cluster independently of your application as your business grows. This ensures security capacity keeps pace with service demand.
The platform already uses a unified access layer gateway, such as Nginx or APISIX, to manage and distribute traffic. The SDK integration mode is ideal for this network architecture:
Seamless integration: By deploying the WAF SDK plug-in on your existing access layer gateway, you can add security protection with minimal changes to your network architecture.
Flexible configuration: You can configure WAF security policy to meet evolving requirements.
Limitations
Web tamper-proofing is not supported for hybrid cloud access.
Prerequisites
You must have an active subscription Enterprise or Ultimate instance. For purchase instructions, see Purchase a subscription WAF 3.0 instance.
NoteSubscription Basic or Pro instances and pay-as-you-go instances do not support hybrid cloud access.
Prepare the required cluster resources. See Prepare cluster resources for recommendations.
NoteA hybrid cloud cluster consists of management, storage, and protection components. To ensure high cluster stability, deploy different components separately. If a component contains multiple nodes, deploy a load balancing device in front of the nodes.
Step 1: Install the WAF client
WAF client
A hybrid cloud cluster uses your local servers as WAF protection nodes. Before deploying a cluster, you must install the WAF client (vagent) on these servers.
vagent is used to:
Communicate with the Alibaba Cloud WAF server to pull Hybrid Cloud WAF installation and upgrade images.
Monitor and report the running status of hybrid cloud components to ensure WAF service availability.
Synchronize cloud-based configuration information in real time, including forwarding configurations, mitigation rules, and threat intelligence, to ensure the real-time effectiveness of Hybrid Cloud WAF protection.
vagent can be installed only on Linux servers by using an RPM package. The following 64-bit Linux operating systems are supported: AliOS 3.2104, Tencent OS 3.1, CentOS 7, Red Hat 7, and Kylin V10 (x86). The kernel version must be 4.10 or later.
CentOS 7 is no longer maintained, and Alibaba Cloud is discontinuing support for this operating system. While existing CentOS 7 installations will continue to function, Alibaba Cloud will no longer provide image updates for it.
Procedure
Log on to your local server.
Obtain the latest version of vagent and download it to your local server.
Method: Submit a ticket to contact a product technical expert.
Install vagent.
Run the following command to install vagent.
sudo rpm -ivh t-yundun-vagent-xxxxxxx.xxxxx.rpmNoteReplace
xxxxxxx.xxxxxwith the version number of your downloaded vagent package.After the installation is complete, run the following command to verify the installed vagent version.
rpm -qa|grep vagent
Modify the vagent connection configuration.
After installing vagent, you must configure it to communicate with the Alibaba Cloud server. Follow these steps to modify the connection settings based on your connection type:
Run the following command to open the vagent configuration file in edit mode.
sudo vi /home/admin/vagent/conf/vagent.tomlPress the i key to enter edit mode, and then modify or add the following content:
domain="wafopenapi.cn-hangzhou.aliyuncs.com" // The endpoint for the Hybrid Cloud WAF service. See the table below for the correct value.
access_key_id=***************** // Your Alibaba Cloud account AccessKey ID.
access_key_secret=***************** // Your Alibaba Cloud account AccessKey secret.
Table 1. Domain value
WAF service region
Connection type
Domain value
The Chinese mainland
Internet access (The hybrid cloud cluster connects to the WAF console over the internet)
wafopenapi.cn-hangzhou.aliyuncs.comPrivate connection over Express Connect (The hybrid cloud cluster connects to the private WAF console over an Express Connect circuit. This mode requires a pre-configured Express Connect circuit)
NoteCurrently, VPC instances in the China (Hangzhou), China (Shanghai), and China (Beijing) regions are supported. For other regions in the Chinese mainland, submit a ticket to contact a product expert.
wafopenapi.vpc-proxy.aliyuncs.comOutside the Chinese mainland
Internet access (The hybrid cloud cluster connects to the WAF console over the internet)
wafopenapi.ap-southeast-1.aliyuncs.comPrivate connection over Express Connect (The hybrid cloud cluster connects to the private WAF console over an Express Connect circuit. This mode requires a pre-configured Express Connect circuit)
NoteFor regions outside the Chinese mainland, submit a ticket to contact a product expert.
wafopenapi-intl.vpc-proxy.aliyuncs.comPress the Esc key to exit edit mode.
Enter :wq and press the Enter key to save the changes and exit.
Start vagent.
Run the following command to start vagent.
sudo systemctl start vagentRun the following command to enable vagent to start automatically on system startup.
sudo systemctl enable vagentAfter you enable automatic startup, the following success message appears:
Created symlink from /etc/systemd/system/multi-user.target.wants/vagent.service
to /usr/lib/systemd/system/vagent.service.
If the startup fails, use the following methods to check the vagent logs:
Query the systemd journal. Run the following command:
sudo journalctl -u vagentQuery the vagent log file. Run the following command:
tail /home/admin/vagent/logs/vagent.log
You can also run the following commands to stop or check the status of vagent:
Verify the installation.
Run the following command to verify the installation.
ps aux | grep AliYunDunWafIf the output contains the
AliYunDunWafprocess, it confirms that vagent is installed and running. You can then add the server as a local WAF protection node by deploying a cluster configuration.If the output does not contain the
AliYunDunWafprocess, review the installation steps and try again. If the issue persists, submit a ticket to contact a product expert for help.
Step 2: Deploy a hybrid cloud cluster
Go to the WAF purchase page and subscribe to Additional Hybrid Cloud Protection Nodes.
NoteOnly subscription Enterprise and Ultimate instances support hybrid cloud access. Subscription Basic, Pro, or pay-as-you-go instances do not support this connection type.
A single hybrid cloud cluster requires at least two protection nodes. The QPS supported by each protection node depends on the cluster type. For example, in reverse proxy mode, a node supports up to 5,000 QPS for HTTP traffic or 3,000 QPS for HTTPS traffic. You can determine the number of nodes based on your service QPS and scale out by adding more protection nodes.
-
Log on to the Web Application Firewall 3.0 console. From the top menu bar, select the resource group and region (Chinese Mainland or Outside Chinese Mainland) for the WAF instance.
-
In the navigation pane on the left, click Hybrid Clouds.
On the Hybrid Clouds page, click Add Cluster.
In the Basic Information Configuration step of the wizard, configure the following parameters and click Next.
Parameter
Description
Cluster Name
Specify a name for the hybrid cloud cluster.
Cluster Type
Select the cluster type. Valid values:
Reverse Proxy Mode: If you select this mode, WAF serves as a reverse proxy cluster for service forwarding and protection.
SDK Integration Mode: If you select this mode, you must deploy an SDK plug-in on your unified access gateway. The SDK plug-in copies traffic to the WAF protection cluster. In this mode, the WAF protection cluster does not participate in traffic forwarding.
If the WAF cluster malfunctions, you can enable manual bypass. After you enable manual bypass, the WAF protection cluster immediately enters the bypass state. The cluster's SDK no longer forwards traffic to the WAF cluster, and your services bypass WAF protection.
ImportantAfter you select a Cluster Type, you cannot change it. We recommend that you plan your cluster deployment before you configure it.
Protection Nodes
Select the number of protection nodes for the hybrid cloud cluster.
NoteThe total number of nodes that you add to all custom hybrid cloud clusters cannot exceed the number of Additional Protection Nodes you have purchased.
Server Port
Specify the service ports for the hybrid cloud cluster. These ports must include all ports used by the web services you intend to protect. When adding a web service to the cluster, you can only assign it ports from this list.
By default, ports 80, 8080, 443, and 8443 are enabled for the hybrid cloud cluster. If you have no special requirements, you do not need to modify the settings.
To add other ports, manually enter them. Press the Enter key after you enter each port.
ImportantThe hybrid cloud cluster does not support ports 22, 53, 9100, 4431, 4646, 8301, 6060, 8600, 56688, 15001, 4985, 4986, or 4987. You can click View the range of ports that are not supported. to view the list of unsupported ports.
We recommend that you add only necessary protection ports. Do not add ports that are irrelevant to your services to avoid security risks.
Cluster Access Mode
Specify the network access mode for the hybrid cloud cluster. Valid values:
Internet: The hybrid cloud cluster connects to the WAF console over the internet.
Internal Network: The hybrid cloud cluster connects to the WAF console over a private network.
ImportantYou can use the Internal Network mode only after you set up an Express Connect circuit. For more information, see Express Connect.
Remarks
Add remarks for the hybrid cloud cluster.
In the Node Group Configuration step of the wizard, click Add Node Group to add node groups in the specified order, and then click Next.
NoteYou must first add multiple node groups to the hybrid cloud cluster and then add nodes to the node groups. Each node group requires a load balancer to ensure load balancing and disaster recovery. If you do not have a load balancer, submit a ticket to consult with product and technical experts.
Parameter
Description
Node Group Name
Specify a name for the node group.
Server IP Address for Load Balancing
Enter the public IP address of the node group's load balancer.
Node Group Type
Select the type of the node group. Valid values:
Protection: Hosts the protection component. You can add multiple node groups of this type to a cluster for disaster recovery.
Management: Hosts the management component. You can add multiple node groups of this type to a cluster for disaster recovery.
Storage: Hosts the storage component. You can add only one node group of this type to a cluster.
Management and Storage: Hosts the management and storage components. You can add only one node group of this type to a cluster.
You must add the node groups in the following order:
Option 1: Add at least three node groups
First, add one Storage node group. Then, add at least one Management node group. Finally, add at least one Protection node group.
Option 2: Add at least two node groups
First, add one Management and Storage node group. Then, add at least one Protection node group.
Region
If you set Node Group Type to Protection, you must select a Region for the node group. You do not need to set this parameter for other types of node groups.
Remarks
Add remarks for the node group.
In the Initial Node Configuration step of the wizard, click Add Node, configure the following parameters, and then click Save.
Parameter
Description
Server IP Address
Specify the public IP address of the on-premises server.
Node Name
Specify a name for the node.
Region
Select the region where the node is located.
Server Configuration
Displays the server's configuration information.
Protection Node Group
Select the protection node group to which you want to add the node.
The number of nodes that you add to the current cluster cannot exceed the protection node count specified for the cluster.
We recommend that you add at least two nodes to the Protection node group to ensure active-active disaster recovery.
After the cluster is created, you can click Switch Cluster, select the cluster that you want to manage, and then perform the following operations:
In the Basic Information section, view the basic information about the cluster. You can also click Edit to modify the cluster name, number of protection nodes, service ports, or remarks.
Click Node Group Configuration to add or modify a node group. For more information, see Step 6.
Click Add Node to add a node. For more information, see Step 7.
Check the running status of the nodes.
Node Status indicates whether the server is running as expected. Normal indicates that the server is running. Stopped indicates that the server is shut down.
If a server is shut down, the corresponding node cannot provide WAF protection. Check the cause of the server shutdown and fix the issue as soon as possible.
Application Status indicates whether the WAF client application, vagent, is running as expected on the node. Normal indicates that the application is running. Stopped indicates that vagent has stopped running.
If vagent stops running, the node may not provide WAF protection as expected. We recommend that you log on to the on-premises server, check the installation and running status of vagent, and fix the issue as soon as possible. For more information, see Step 1: Install the WAF client.
ImportantTo prevent node health checks from failing, do not delete the RAM user used for deployment or its associated permissions. If you accidentally delete the RAM user, submit a ticket to consult with product and technical experts.
Prepare cluster resources
You can select a cluster deployment solution based on your protection scenario. Different solutions require different numbers of cluster resources.
Reverse proxy
Protection scenario | Service QPS range | Recommended configuration | Deployment |
Production protection for high-stability services (disaster recovery and high availability) | Up to 500 QPS for HTTP traffic, or up to 300 QPS for HTTPS traffic. | 3 servers (8-core, 16 GB RAM) + 1 load balancer. |
|
500 to 2,000 QPS for HTTP traffic, or 300 to 1,000 QPS for HTTPS traffic. | 2 servers (8-core, 16 GB RAM) + 1 server (16-core, 32 GB RAM) + 1 load balancer. | ||
2,000 to 5,000 QPS for HTTP traffic, or 1,000 to 3,000 QPS for HTTPS traffic. | 3 servers (16-core, 32 GB RAM) + 1 load balancer. | ||
Up to 10,000 QPS for HTTP traffic, or up to 6,000 QPS for HTTPS traffic. | 3 servers (32-core, 64 GB RAM) + 1 load balancer. | ||
Beyond the ranges above. | Scale out protection nodes as needed. A single protection node supports up to 5,000 QPS for HTTP traffic or 3,000 QPS for HTTPS traffic. | ||
PoC testing (minimal validation) | Up to 500 QPS for HTTP traffic, or up to 300 QPS for HTTPS traffic. | 2 servers (8-core, 16 GB RAM). |
|
SDK integration
Protection scenario | Service QPS range | Recommended configuration | Deployment |
Production protection for high-stability services (disaster recovery and high availability) | Up to 15,000 QPS. | 3 servers (32-core, 64 GB RAM). |
|
More than 15,000 QPS. | Scale out protection nodes as needed. A single protection node supports up to 15,000 QPS. | ||
PoC testing (minimal validation) | Up to 5,000 QPS. | 2 servers (16-core, 32 GB RAM). |
|
Step 3: Add services to WAF
The process for adding services to Web Application Firewall (WAF) differs for the reverse proxy and SDK integration modes. Follow the procedure that matches the cluster type you selected when you deployed your hybrid cloud cluster.
Reverse proxy mode
-
Log on to the Web Application Firewall 3.0 console. From the top menu bar, select the resource group and region (Chinese Mainland or Outside Chinese Mainland) for the WAF instance.
-
In the left navigation pane, click Onboarding.
On the Hybrid Cloud Access tab, click Reverse Proxy, and then click Add.
In the Configure Listener wizard, configure the following and click Next.
Parameter
Description
Domain Name/IP Address
Enter the domain name or IP address that you want to protect. Note the following:
You can enter an exact domain name (for example,
www.aliyundoc.com) or a wildcard domain name (for example,*.aliyundoc.com).NoteA wildcard domain name does not match the root domain. For example,
*.aliyundoc.comdoes not matchaliyundoc.com.A wildcard domain name does not match subdomains at different levels. For example,
*.aliyundoc.comdoes not matchwww.example.aliyundoc.com.A wildcard domain name matches all subdomains at the same level. For example,
*.aliyundoc.commatcheswww.aliyundoc.comandexample.aliyundoc.com.If a protected object is associated with both an exact domain name and a matching wildcard domain name, the protection rules for the exact domain name take precedence.
You can enter an IP address, such as 192.168.XX.XX.
Protocol Type
The protocol and port that your website uses.
Select HTTP or HTTPS and enter the corresponding port number. Press the Enter key after you enter each port.
NoteThe port you enter must be within the range of listener ports configured for the hybrid cloud cluster. If a port required by your domain name or IP address is outside this range, you must first add a new listener port to the hybrid cloud cluster. For more information, see Step 2: Deploy a hybrid cloud cluster.
If you select HTTP, no further configuration is required.
If you select HTTPS, you must upload the associated SSL certificate to allow WAF to listen for and protect your website's HTTPS traffic.
-
-
Purchase Certificate
Click Apply to open the SSL certificate application page and apply for a certificate.
After configuring the certificate as prompted, it is automatically uploaded to WAF.
NoteThe quick application option is for paid Domain Validated (DV) certificates only. To apply for other types of certificates, you must purchase them through the Certificate Management Service. For more information, see Purchase a commercial certificate.
-
After selecting HTTPS and configuring a certificate, you can also configure the following:
HTTP/2
If your website supports the HTTP/2 protocol, you can select HTTP/2 to enable protection for HTTP/2 traffic.
NoteThe HTTP/2 protocol uses the same port as the HTTPS protocol.
Advanced Settings
Is a Layer 7 proxy such as Anti-DDoS Proxy or CDN deployed in front of WAF
Resource Group
From the resource group list, select the resource group for the domain name. If you do not select a resource group, the domain name is added to the Default Resource Group.
NoteYou can use Resource Management to create resource groups and manage cloud resources by dimensions such as business department or project. For more information, see Create a resource group.
In the Configure Forwarding Rule wizard, configure the following and click Submit.
Parameter
Description
Node Settings
Select a Protection Node Group and add the origin server address to the protection node group. This address is the IP address of your website's origin server, which receives normal service requests (origin fetch requests) forwarded by WAF. Multiple protection node groups provide disaster recovery for each other. For example, if the origin server for node group A is unreachable, traffic is automatically routed to the origin server for node group B. Options:
IP
You can enter multiple IP addresses. Press the Enter key after you enter each IP address. You can add up to 20 origin IP addresses.
NoteIf you specify multiple origin IP addresses, WAF automatically performs load balancing among them.
You can configure both IPv4 and IPv6 addresses, only IPv4 addresses, or only IPv6 addresses.
If you configure both IPv4 and IPv6 addresses, requests from IPv6 clients are forwarded to the IPv6 origin server, and requests from IPv4 clients are forwarded to the IPv4 origin server.
If you configure only IPv4 addresses, both IPv4 and IPv6 requests are routed to the origin server over IPv4. WAF forwards requests to the IPv4 origin server address that you specify.
If you configure only IPv6 addresses, both IPv4 and IPv6 requests are routed to the origin server over IPv6. WAF forwards requests to the IPv6 origin server address that you specify.
Domain Name (Such as CNAME)
If you specify an origin domain name, only IPv4 origin fetch is supported (IPv6 origin fetch is not supported). WAF forwards client requests only to the IPv4 address resolved from the origin domain name.
Standby Link Back-to-origin
After enabling origin failover, if all origin server addresses in the primary link become unreachable, the WAF cluster automatically forwards traffic to the standby link's origin IP address to ensure high availability. When an origin server in the primary link recovers, the WAF cluster automatically routes traffic back to the primary link.
You can configure origin failover only if origin fetch retry is enabled.
If your website is deployed on multiple protection nodes, you can click Add Protection Node to add multiple protection nodes to WAF at the same time.
Public Cloud Disaster Recovery
After enabling this feature, you can fail over services to the public cloud link for disaster recovery. If the hybrid cloud link fails, you can point your domain's DNS record to the CNAME address assigned by the public cloud disaster recovery link. Traffic is protected by the public cloud cluster and then forwarded to the origin server address. You must add the origin server address for disaster recovery. The configuration requirements are the same as those for the origin server address in Node Settings. For more information, see origin server address configuration requirements.
Load Balancing Algorithm
If you have multiple origin server addresses, select a load balancing algorithm for WAF to use when forwarding origin fetch requests. Options:
IP hash
Forwards requests from the same client to the same origin server. This method is suitable for scenarios that require session persistence but may result in an unbalanced load.
Round-robin
Distributes client requests sequentially to each server in the origin server address list. This method is suitable for scenarios with multiple origin servers that require even load distribution.
Advanced HTTPS Settings
Enable HTTP Back-to-Origin: Allows WAF to use the HTTP protocol to fetch requests from the origin server when the origin server does not support HTTPS. If your origin server is not configured with an SSL certificate, you must enable this feature. Otherwise, your website will be inaccessible. The default origin port is 80, which can be customized.
Origin SNI: You must enable this feature if your origin server hosts multiple HTTPS domains on the same IP address to ensure correct request routing. After selecting Origin SNI, you can specify the value of the Server Name Indication (SNI) extension field. Options:
Match request host
The origin SNI value is the same as the value of the Host field in the HTTP request header. For example, if the domain name added to WAF is
*.aliyundoc.comand the client request Host iswww.aliyundoc.com, the origin SNI iswww.aliyundoc.com.Custom
Specify a fixed SNI value, which can be different from the Host field. Use this option only if the origin server has special configuration requirements, such as needing to direct requests from multiple domains to a specific backend service.
Other Advanced Settings
Change the DNS record of the domain name.
ImportantBefore you change the DNS record, perform a local verification to ensure that the forwarding configuration has taken effect. If you change the DNS record before the WAF forwarding configuration takes effect, your service may be interrupted. For more information, see Local verification.
You only need to change the DNS record when you add a domain name to WAF. You can skip this step when you add an IP address.
Change the DNS A record of your domain name to point to the IP address of the protection node group.
If you enabled Public Cloud Disaster Recovery in Step 5, change the DNS CNAME record of your domain name to point to the public cloud CNAME before you switch to the disaster recovery link.
NoteIf you use Alibaba Cloud DNS, you can log on to the Alibaba Cloud DNS console to change the A and CNAME records of the domain name. For more information, see Change DNS settings.
After adding the service, WAF automatically generates a protected object and enables the core web protection rules for that object by default. You can go to the page to view the automatically added protected object and configure protection rules for it. For more information, see Protection configuration overview.
SDK integration mode
In hybrid cloud SDK integration mode, you deploy an SDK on your unified access gateway to copy service traffic to a bypass WAF cluster for detection. This method separates traffic forwarding from detection. To add services to WAF in SDK integration mode, contact our product technical experts by submitting a ticket.
After deploying the SDK and the hybrid cloud WAF cluster, you can perform the following:
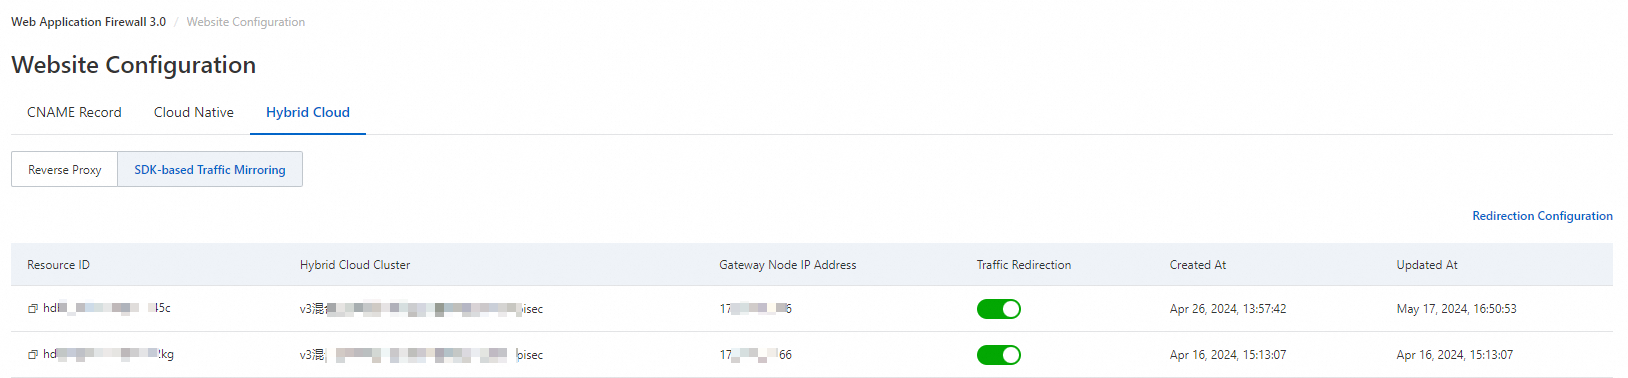
View the mappings between the forwarding node IP address, the hybrid cloud cluster, and the protection node group, and check the status of the forwarding node.
Log on to the Web Application Firewall 3.0 console.
In the left-side navigation pane, click Onboarding.
On the Hybrid Cloud Access tab, click SDK Integration.
You can view the mapping and status of the forwarding node IP address in the onboarding list.
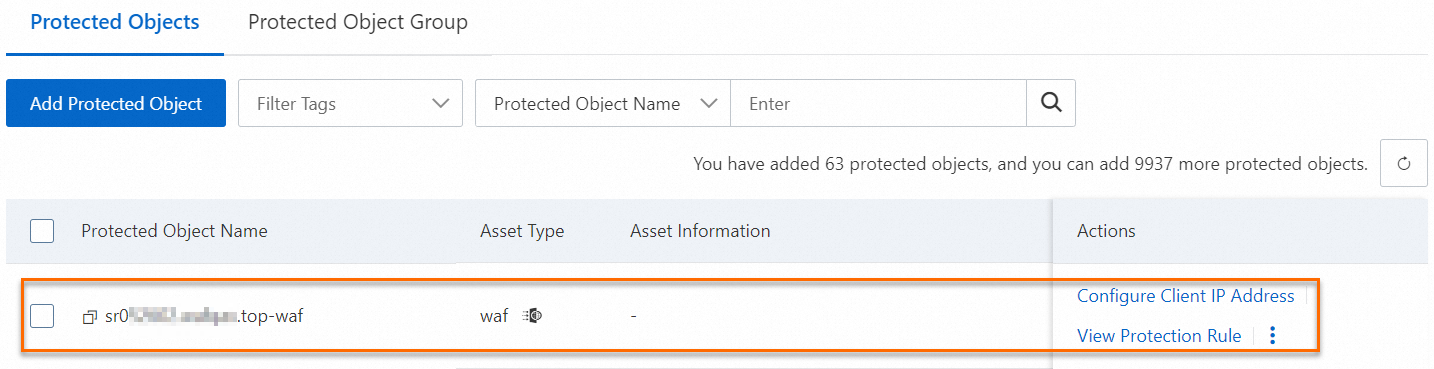
Add a protected object.
After adding the service, WAF does not automatically add the website domain name as a protected object. You must manually add the domain name or URL as a protected object on the Protected objects page in the WAF console. For more information, see Configure protected objects and protected object groups.
Configure protection rules for the protected object.
After adding the protected object, you must configure protection rules for that object. For more information, see Protection configuration overview.