Configure devices for ADB debugging
To use ADB debugging devices on a cloud computer, an administrator must configure the peripheral policy as described in this topic.
Prerequisites
If you use a hardware terminal, you must enable network ADB for your ADB devices first. Hardware terminals do not support USB-based ADB connections and only support network connections.
Hardware terminals
When you connect to a cloud computer through a hardware terminal (such as Alibaba Cloud Workspace Terminal, Alibaba Cloud Workspace Terminal Pro, or 23.8-inch Alibaba Cloud Workspace All-In-One Terminal), both the administrator and the end user must complete the following configuration steps.
Configure peripheral policies (administrator)
Peripheral management policies are part of the cloud computer policy, and must be created and maintained by an administrator in the console.
The following examples use the EDS Enterprise Edition console. For the Business Edition procedure, see Manage policies.
General procedure for creating or modifying peripheral policies
Create a custom policy and associate it with a cloud computer
Modify a custom policy already associated with a cloud computer
Peripheral policy settings
Hardware terminals do not support USB-based ADB connections and only support network connections. An administrator must configure network redirection to establish connectivity between the cloud computer and the phone.
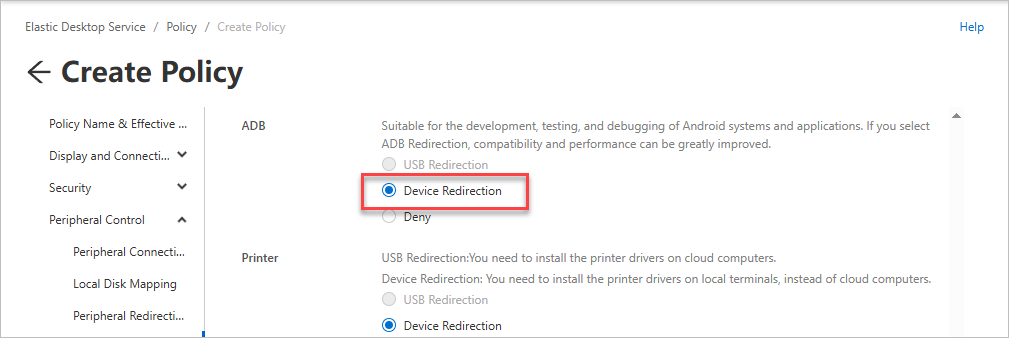
Enable device redirection for ADB devices
Configuration path: .
Configuration requirements: Set the redirection mode for ADB devices to Device Redirection.
Client-side configuration
Make sure the hardware terminal and the ADB device are on the same network. Using a phone as an example, open Settings, enable Developer options, and then enable Wireless debugging.
-
Verify that the hardware terminal and the phone (under Wireless debugging) are on the same subnet.
-
On the hardware terminal, go to Settings > Network, select the network > Network Properties, and find the IPv4 address.
-
On the phone, go to Settings > Developer options > Wireless debugging, select the network, and note the IP address and port.
-
-
On the phone, open Wireless debugging and tap Pair device with pairing code.
The Pair device dialog box appears on the phone, showing the WLAN pairing code and IP address and port. Record this information for subsequent pairing on the computer.
-
After configuring the ADB environment on the cloud computer (see the Windows or Linux cloud computer tabs below), run the pairing command.
adb pair <phone_IP>:<pairing_port> # Example: adb pair 10.1.30.130:37659 # Use the IP and port shown on the phone under "Pair device with pairing code" -
After pairing succeeds, connect to the device. Use the IP and port displayed on the phone's Wireless debugging page under "IP address & Port".
adb connect <phone_IP>:<connection_port> # Example: adb connect 10.1.30.130:35287 # Use the IP and port shown under "IP address & Port" -
Verify the connection.
adb devices
Windows client/macOS client
When you connect to a cloud computer by using the Windows client/macOS client, both the administrator and the end user must complete the following configuration steps.
Configure peripheral policies (administrator)
Peripheral management policies are part of the cloud computer policy, and must be created and maintained by an administrator in the console.
The following examples use the EDS Enterprise Edition console. For the Business Edition procedure, see Manage policies.
General procedure for creating or modifying peripheral policies
Create a custom policy and associate it with a cloud computer
Modify a custom policy already associated with a cloud computer
Peripheral policy settings
Enable device redirection for ADB devices
Configuration path: .
Configuration requirements: Set the redirection mode for ADB devices to Device Redirection.
Client-side configuration
Configure ADB environment variables on both the local device (client) and the cloud computer so that ADB commands are available. Choose the appropriate tab based on the operating system of the device.
Windows (client)
-
In the Start menu, search for
environment variablesand click Edit the system environment variables. -
Add the
ANDROID_HOMEvariable.-
In the System Properties dialog box, click the Advanced tab, and then click Environment Variables.
-
Under System variables, click New.
-
In the New System Variable dialog box, set the variable name to
ANDROID_HOMEand the variable value to the directory path of adb.exe (for example,D:\platform-tools), and then click OK.
-
-
Edit the
Pathvariable.-
Under System variables, select the variable named
Pathand click Edit. -
In the Edit environment variable dialog box, click New, enter
%ANDROID_HOME%, and then click OK.
-
-
Verify the configuration. Open Command Prompt and run
adb. If the output includes an ADB version number, the environment variables are configured correctly.
macOS (client)
First, determine your shell type. Open Terminal and run echo $0. Based on the output (-zsh or -bash), choose the corresponding configuration file.
-
zsh (default shell): configuration file is
~/.zshrcor/etc/zshrc -
bash: configuration file is
~/.bashrcor/etc/profile
-
Open the corresponding configuration file.
-
Add the following environment variables. Replace the path with the actual directory where the ADB tools are located.
# Android ADB configuration export ANDROID_HOME=/Users/xxxx/Downloads/platform-tools export PATH=$PATH:$ANDROID_HOME -
Run the following command to apply the changes.
# For zsh users source ~/.zshrc # For bash users source ~/.bashrc -
Verify the configuration. Open Terminal and run
adb. If the output includes an ADB version number, the environment variables are configured correctly.
Windows (cloud computer)
-
In the Start menu, search for
environment variablesand click Edit the system environment variables. -
Add the
ANDROID_HOMEvariable.-
In the System Properties dialog box, click the Advanced tab, and then click Environment Variables.
-
Under System variables, click New.
-
In the New System Variable dialog box, set the variable name to
ANDROID_HOMEand the variable value to the directory path of adb.exe (for example,D:\platform-tools), and then click OK.
-
-
Edit the
Pathvariable.-
Under System variables, select the variable named
Pathand click Edit. -
In the Edit environment variable dialog box, click New, enter
%ANDROID_HOME%, and then click OK.
-
-
Verify the configuration. Open Command Prompt and run
adb. If the output includes an ADB version number, the environment variables are configured correctly.
Linux (cloud computer)
-
Open the shell configuration file (for example,
~/.bashrcor/etc/profile). -
Add the following environment variables. Replace the path with the actual directory where the ADB tools are located.
# Android ADB environment variables export ANDROID_HOME=/opt/platform-tools export PATH=$PATH:$ANDROID_HOME -
Run
source ~/.bashrcto apply the changes. -
Verify the configuration. Open a terminal and run
adb. If the output includes an ADB version number, the environment variables are configured correctly.
The local device detects the ADB device, but the cloud computer does not
Symptom: The local device running the cloud computer session detects the ADB device, but the cloud computer cannot detect it.
Possible causes:
-
ADB environment variables are not configured on the client or the cloud computer.
-
ADB device redirection is not enabled in the console.
Solutions:
-
Configure ADB environment variables on both the client and the cloud computer. See Client-side configuration above.
-
Verify that the peripheral policy has ADB device redirection enabled. See Configure peripheral policies (administrator) above.
Troubleshooting
For common questions about cloud computer policies, see Policy FAQ.
For common questions about peripherals, see Peripheral FAQ.
For troubleshooting methods for common issues, see Self-help Guide for Peripheral Issues.