Configure drawing tablets
By default, drawing tablets work on cloud computers without any configuration. If you encounter issues, the administrator can configure custom peripheral rules in the console to resolve them.
Obtain peripheral information
For USB peripherals, you need the VID (Vendor ID) and PID (Product ID), which are required when you configure peripheral policies. Both VID and PID are hexadecimal values, such as 0xa12c, where the 0x prefix is typically optional. You can look up the VID and PID of a connected USB peripheral in several ways.
The availability of peripheral devices on a cloud computer depends on multiple factors, including the type and version of the Alibaba Cloud Workspace terminal, the cloud computer image type and version, the type and version of the local device running the Alibaba Cloud Workspace client, and the brand and model of the peripheral device. You can visit the peripheral compatibility page to check whether a specific peripheral is compatible with a cloud computer. The data on this page was obtained under laboratory conditions and may differ from actual results.
From the Alibaba Cloud Workspace terminal
Open and log on to the Alibaba Cloud Workspace client.
In the upper-right corner of the client, click the icon, and then select Settings.
In the left-side navigation pane of the Settings window, click Peripherals, and then view the VID and PID of the USB peripheral on the Local USB Peripherals panel.
From the computer's device manager
You can find the VID and PID of a peripheral in the device management information on your computer.
Windows
In the Start menu, search for and open Device Manager.
In the Device Manager window, navigate to , and then double-click the USB device you want to look up.
On the Details tab of the properties dialog box, select Hardware Ids from the Property drop-down list. The VID and PID are displayed in the text box below.
macOS
In the system menu bar, choose , and then click More Info in the dialog box.
At the bottom of the About This Mac panel, click System Report.
In the left-side navigation pane of the new window, choose Hardware > USB, select the USB device you want to look up in the right-side panel, and then view the VID and PID below.
From the floating menu
Click the floating menu and select Peripherals & Printers.
On the Advanced Management tab, view the VID and PID of the USB peripheral in the device list.
Use a third-party tool
You can use the USB Device Tree Viewer tool to view peripheral information. This tool supports only Windows.
Download the tool: https://www.uwe-sieber.de/usbtreeview_e.html#download.
Extract the downloaded package, and then double-click
UsbTreeView.exeto open it.In the left-side directory of the tool, select the USB device you want to look up, and then view the VID and PID in the Device ID section of the right-side panel.
Administrator: Configure peripheral policies
Peripheral management policies are part of the cloud computer policy, and must be created and maintained by an administrator in the console.
The following examples use the EDS Enterprise Edition console. For the Business Edition procedure, see Manage policies.
General procedure for creating or modifying peripheral policies
Create a custom policy and associate it with a cloud computer
Modify a custom policy already associated with a cloud computer
Peripheral policy settings
Configure a custom peripheral rule (optional)
End user: Configure and use the peripheral
Device redirection for drawing tablets
Connect the peripheral
You must connect peripherals to the WUYING Terminal oron-premises computer running the Alibaba Cloud Workspace client before you can connect the peripherals to a cloud computer.
When you connect a cloud computer to a peripheral for the first time, a connection configuration dialog box appears in the lower-right corner of the cloud computer desktop. In the dialog box, you can select the device type, specify whether to turn on auto-connect, and specify whether to remember the current configurations.
Disable USB redirection on the client side
For this type of peripheral, you must also disable USB redirection on the client side (turn off the switch shown in the following figure) to use it normally on the cloud computer.
Configuration path:
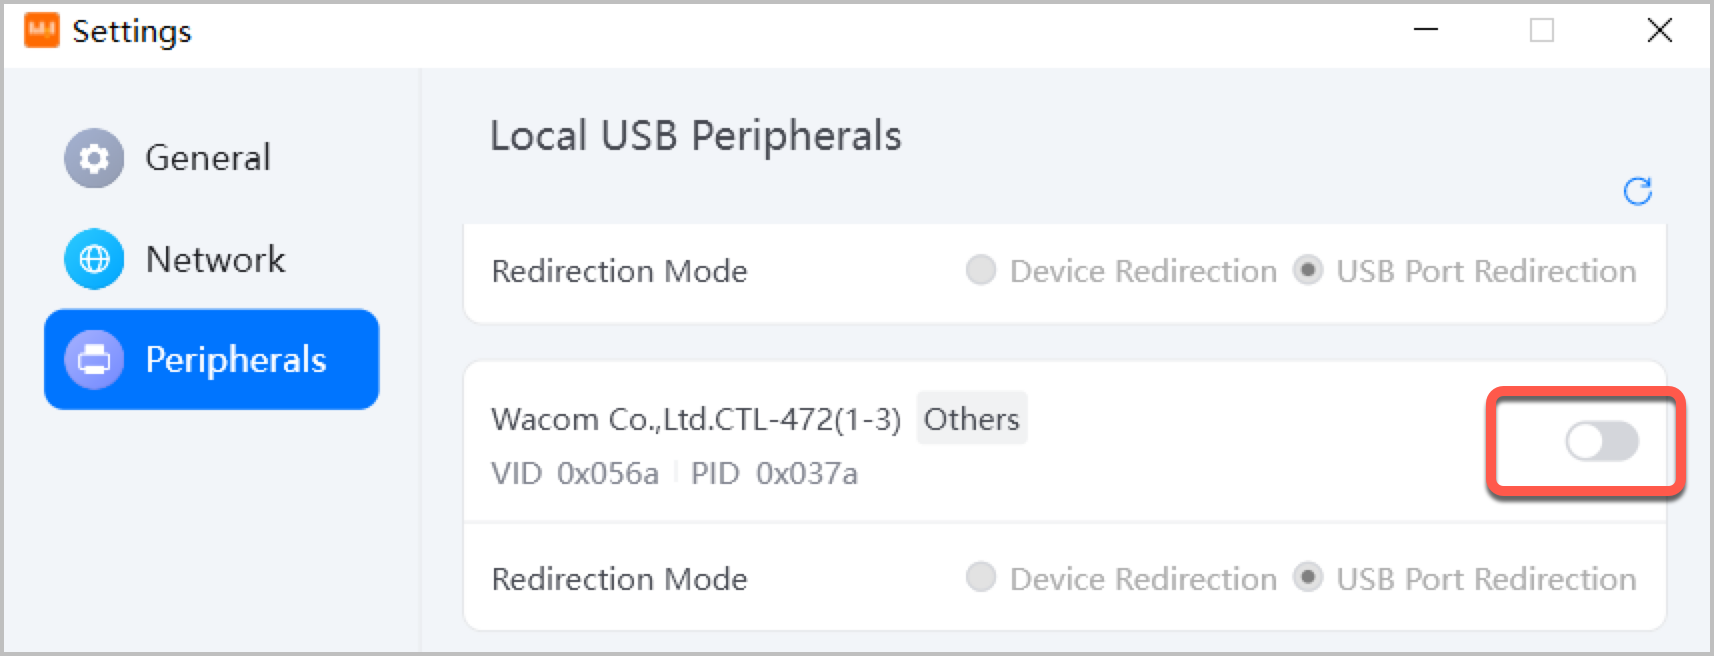
USB port redirection for drawing tablets
With USB port redirection configured for a drawing tablet, you can use advanced features on the cloud computer, such as customizing the pen barrel buttons.
Connect the peripheral
You must connect peripherals to the WUYING Terminal oron-premises computer running the Alibaba Cloud Workspace client before you can connect the peripherals to a cloud computer.
When you connect a cloud computer to a peripheral for the first time, a connection configuration dialog box appears in the lower-right corner of the cloud computer desktop. In the dialog box, you can select the device type, specify whether to turn on auto-connect, and specify whether to remember the current configurations.
Configure USB redirection on the client
You must enable USB redirection on the client and set it to USB port redirection for the drawing tablet to work properly on the cloud computer.
Path: Alibaba Cloud Workspace client > > Settings > Peripherals.
For a better experience, click Edit next to Connection optimization and enter 1:0.
Configure cursor capture
To synchronize the mouse cursor with the stylus cursor and its trajectory, you can configure cursor capture. This feature is currently supported on the Windows client and WUYING Cube Ultra AX01.
On the client, go to Floating menu > Management > Preferences > Control > Mouse configuration > Capture cursor.
Turn on the Capture cursor toggle, set Select an adaptive scenario type to Support drawing tablets, and then turn on the Double-click ESC to release cursor toggle.
Troubleshooting
For common questions about cloud computer policies, see Policy FAQ.
For common questions about peripherals, see Peripheral FAQ.
For troubleshooting methods for common issues, see Self-help Guide for Peripheral Issues.