Canary release with Istio and Alibaba Cloud DevOps AppStack
This topic describes how to implement a canary release using Istio and Alibaba Cloud DevOps AppStack.
Background
To control online releases, you can adjust the traffic split by managing the number of instances for each version. For example, you can pause a deployment when the ratio of new to old instances is 1:4. This directs 20% of the traffic to the new version for canary validation.
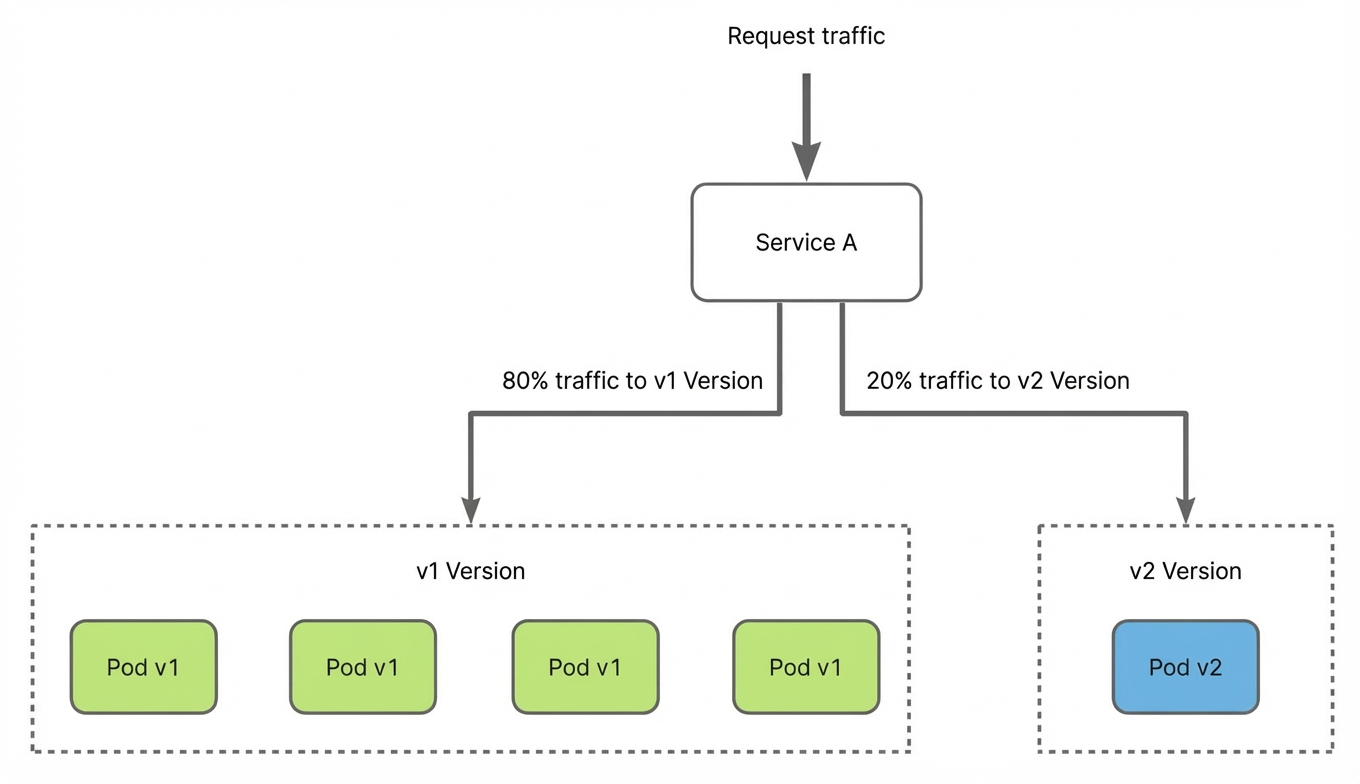
However, this ratio-based approach to canary releases has two main limitations:
-
You cannot precisely control the scope of the canary release. For example, you cannot direct requests from specific users to the new version.
-
You lack fine-grained control over the traffic ratio. For example, a minimum canary ratio of 20% is often impractical for many applications.
By routing requests to different service versions based on request parameters across the entire call chain, you can achieve a full-link canary release. For example, Alibaba Cloud MSE supports canary releases for HTTP/HTTPS and RocketMQ traffic. For more information, see Implement a Full-link Canary Release for Application Services with MSE and Alibaba Cloud DevOps AppStack.
This topic explains the principles of implementing a full-link canary release with the open-source tool Istio and demonstrates how to configure it in Alibaba Cloud DevOps AppStack. This method supports canary release scenarios for HTTP, gRPC, and WebSocket traffic.
How it works
Prerequisites
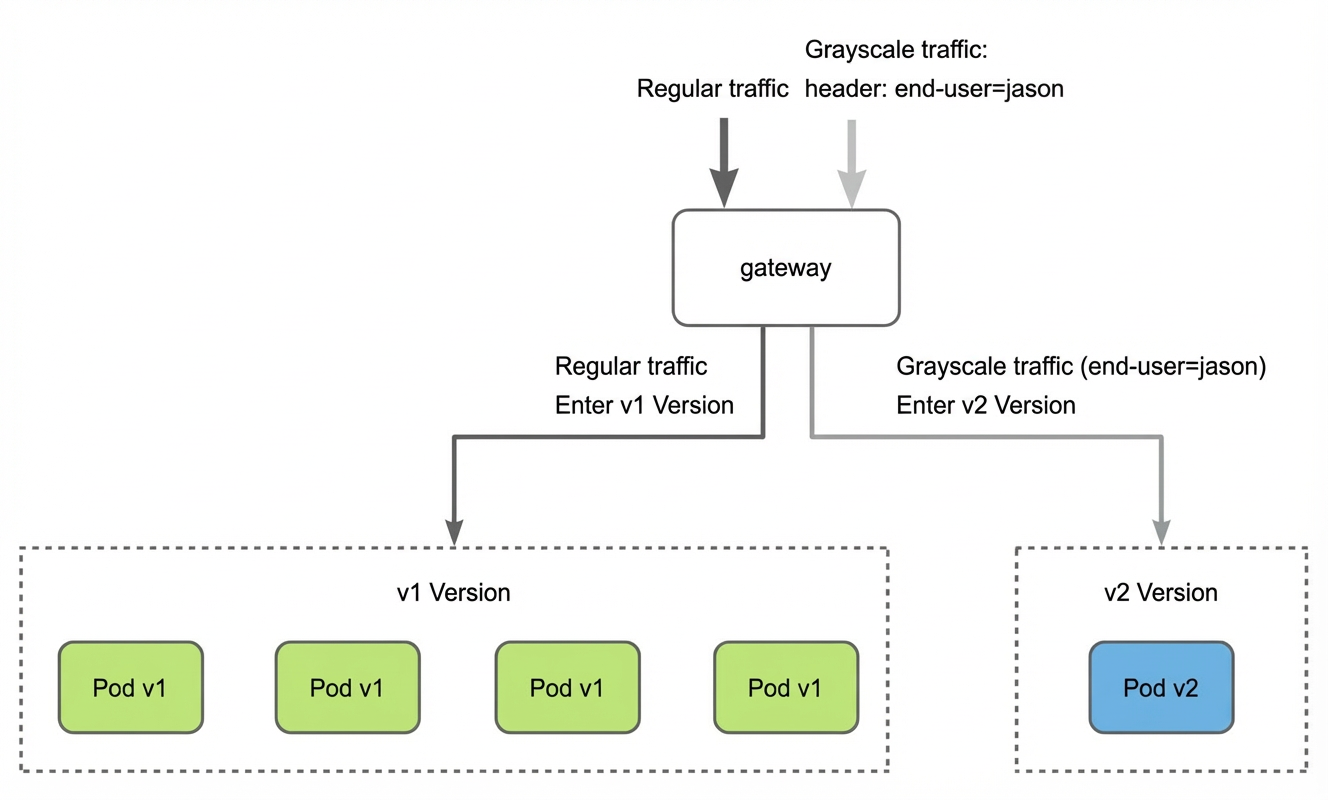
In Istio, to route traffic based on a specific header, complete the following steps:
-
Install Istio.
-
Add a label to the namespace to automatically inject the Envoy sidecar proxy when you deploy an application:
kubectl label namespace default istio-injection=enabled -
Configure a DestinationRule and a VirtualService based on your routing rules. For example:
apiVersion: networking.istio.io/v1alpha3
kind: DestinationRule
metadata:
  name: service-a
spec:
  host: service-a
  subsets:
  - name: v1
    labels:
      version: v1
  - name: v2
    labels:
      version: v2
---
apiVersion: networking.istio.io/v1alpha3
kind: VirtualService
metadata:
  name: service-a
spec:
  hosts:
    - service-a
  http:
  - match:
    - headers:
        end-user:
          exact: jason
    route:
    - destination:
        host: service-a
        subset: v2
  - route:
    - destination:
        host: service-a
        subset: v1
After you apply these rules, requests with the header end-user: jason are routed to version v2 of service-a. All other requests are routed to version v1.
Procedure
In Alibaba Cloud DevOps AppStack, we recommend embedding release specifications into your development workflow, enabling development teams to perform self-service releases. This guide uses the official Bookinfo microservice example to demonstrate the configuration process in Alibaba Cloud DevOps AppStack.
Step 1: Application configuration
-
Create four applications, one for each microservice. In the Alibaba Cloud DevOps AppStack console, navigate to the Applications page and create the following applications: productpage, reviews, ratings, and details.
-
Configure the application orchestration, which defines the application's deployment architecture (the k8s manifest in Kubernetes). A complete example is available in the sample repository. For the deployment order, we recommend placing non-workloads in one stage and workloads in a separate stage.
In the example, Stage 1 (non-workload) contains a service (type: Service) and a service-account (type: ServiceAccount). Stage 2 (workload) contains a deployment (type: Deployment). The two stages are connected by a sequential arrow to ensure that non-workloads are deployed before workloads.
-
Create a production environment named
prodfor each of the four applications. For thereviewsapplication, also create a canary environment namedgray. Then, associate them with k8s cluster resources. To do this, go to the application details page, click the Environments tab, and click Create Environment. Enter the environment name (prodfor the production environment andgrayfor the canary environment), select the target k8s cluster and namespace, and click OK. -
Perform the initial deployment for the production environment of each of the four applications. After the deployment, you can view the resource list on the environment details page. To deploy, navigate to the production environment page for each application and click Deploy in the upper-right corner.
-
In the pipeline for the
reviewsapplication, add a task to deploy to the canary environment, followed by a manual review before releasing to the production environment. On the Pipeline Settings tab, configure the canary release pipeline with the following stages: Pipeline Source → AppStack Canary Deployment (deployment stage) → Manual Review (verification stage) → AppStack Production Deployment (deployment stage). For the Pipeline Source stage, add the application's code repository under Application Settings - Associate Code and Artifacts.
Step 2: Run and verify
Follow the official example to create a gateway so that the application is accessible from outside the cluster.
After the pipeline's AppStack Canary Deployment stage is complete, it enters the Verification stage and waits at the Manual Review step. The pipeline status changes to Pending and waits for approval.
After the pipeline deploys the canary environment, access the BookInfo service:
-
Log in as the user
jasonto access the canary environment.After you log in, the top-right corner of the page shows the current user as jason. The bottom of the page displays Reviews served by: reviews-gray-78595b5bc-tssvh. This indicates that a pod from the canary version serves the reviews service, confirming the traffic routing configuration is in effect.
-
Log in anonymously or as any other user to access the production environment.
When you access the production environment, the Bookinfo sample application page displays as expected. The bottom of the page shows
Reviews served by: reviews-prod-666cdc7bd9-gr249, indicating that the reviews service is served by a pod from the production version.
Step 3: Canary environment cleanup
-
At the end of the development process, add the AppStack environment cleanup component and select Clean up only resources and retain environment metadata. In the pipeline, add a new stage and an AppStack environment cleanup task. For Build Cluster, select Alibaba Cloud DevOps Beijing Build Cluster. For Build Environment, select Default Environment. For Download Pipeline Source, select Download all pipeline sources. In the task steps, for Application, select reviews, for Environment, select canary environment-gray, and for Cleanup Type, select Clean up only resources and retain environment metadata.
-
Rerun the pipeline. After the AppStack environment cleanup step completes, go to the k8s cluster and verify that the canary environment resources have been deleted. When you access the BookInfo service, all users are now directed to the new version in the production environment.
After logging in as the user jason, the bottom of the page displays
Reviews served by: reviews-prod-666cdc7bd9-gr249. This indicates that the reviews service is served by a production environment pod, and the reviews section shows black star ratings.