
本文介绍如何在微服务场景下实现DevOps流程富化,通过建立从代码仓库、容器镜像、Kubernetes资源到APM服务的完整实体关联链路,实现端到端的可观测性。
适用范围
云服务开通要求
阿里云云效(DevOps):已开通并创建组织。
阿里云容器镜像服务(ACR):已开通个人版或企业版。
阿里云容器服务Kubernetes版(ACK):已创建集群。
权限要求
需要创建具有如下权限的RAM用户或角色:
基础数据准备
数据类型 | 要求 |
DevOps数据 |
|
容器镜像数据 |
|
Kubernetes数据 |
|
应用可观测数据 | 确保应用已接入ARMS Agent:
|
部署实施步骤
实施步骤中的完整代码包为umodel_and_codes.zip。
步骤一:接入 DevOps 流程富化 UModel 数据
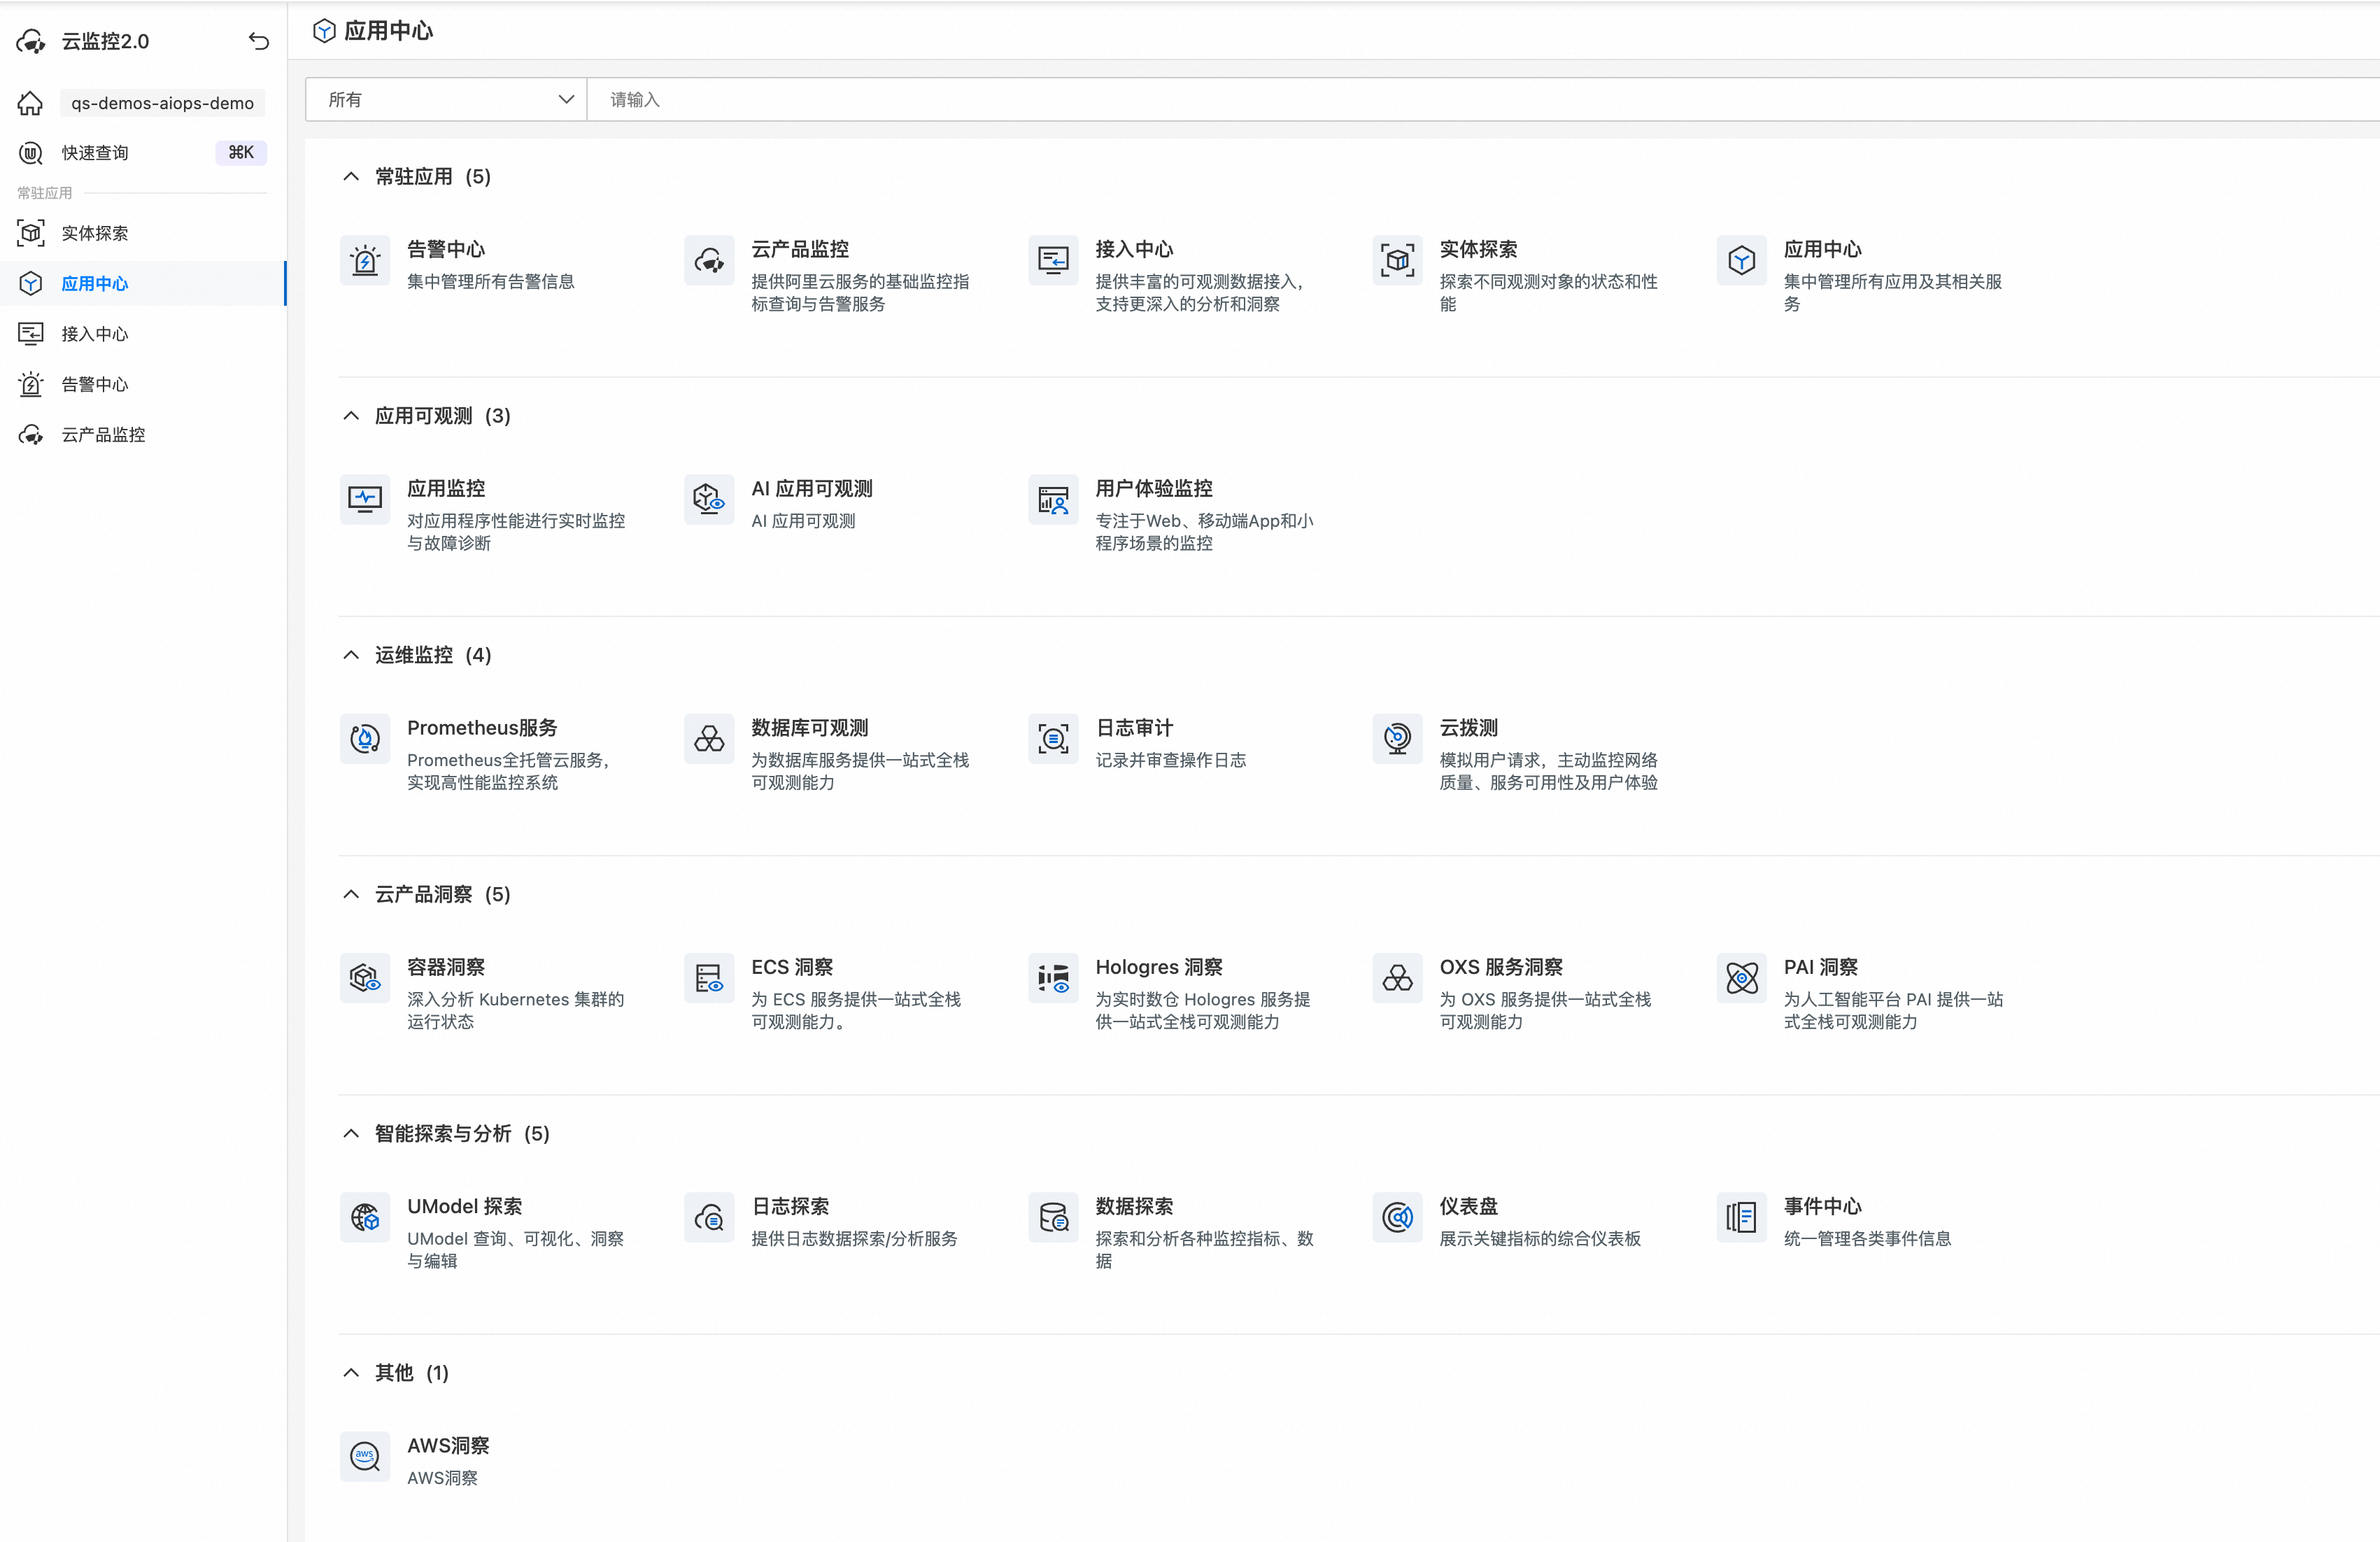
进入云监控2.0工作区,点击 应用中心, 选择 UModel 探索,可以看到现在已接入的 UModel 数据。
替换参数后执行如下命令,上传代码包中 Devops 相关的 UModel 定义以及数据。
export ALIBABA_CLOUD_ACCESS_KEY_ID="your-access-key-id" export ALIBABA_CLOUD_ACCESS_KEY_SECRET="your-access-key-secret" python umodel_batch_uploader.py ../umodel --endpoint metrics.<REGION>.aliyuncs.com --workspace <YOUR_WORKSPACE>进入云监控2.0 工作区,点击 应用中心, 选择 UModel 探索,查看上传的UModel数据。
可通过节点类型筛选、域筛选,查看特定类型的 UModel 数据。下图筛选只查看
devops域数据。
同时也能查看 DevOps UModel 数据域其他域的 UModel 打通关联,详细使用方式可参考UModel 探索使用文档。
步骤二:DevOps 实体/关系数据生成
进入devops_data_generator数据生成器目录。
编辑配置文件。
# 应用程序配置文件

# 阿里云访问配置
aliyun:
  region: "cn-hongkong"
  access_key_id: "<YOUR_ACCESS_KEY_ID>"
  access_key_secret: "<YOUR_ACCESS_KEY_SECRET>"

# DevOps配置
devops:
  organization_id: "<YOUR_ORGANIZATION_ID>"  # 替换为您的组织ID
  access_key_id: "<YOUR_ACCESS_KEY_ID>"
  access_key_secret: "<YOUR_ACCESS_KEY_SECRET>"

# ACR容器镜像服务配置
acr:
  instance_id: "<YOUR_ACR_INSTANCE_ID>"  # 替换为您的ACR实例ID
  region: "cn-hangzhou"
  access_key_id: "<YOUR_ACCESS_KEY_ID>"
  access_key_secret: "<YOUR_ACCESS_KEY_SECRET>"

# CMS配置(用于获取 k8s.pod 数据)
cms:
  endpoint: "<YOUR_CMS_ENDPOINT>"
  workspace: "<YOUR_CMS_WORKSPACE>"
  namespace_filter: "<YOUR_NAMESPACE_FILTER>"
  access_key_id: "<YOUR_ACCESS_KEY_ID>"
  access_key_secret: "<YOUR_ACCESS_KEY_SECRET>"

# SLS配置
sls:
  endpoint: "cn-hongkong.log.aliyuncs.com"
  access_key_id: "<YOUR_ACCESS_KEY_ID>"
  access_key_secret: "<YOUR_ACCESS_KEY_SECRET>"
  project: "<YOUR_SLS_PROJECT>"

  # LogStore映射配置
  logstore_mapping:
    entities:
      developer: "<WORKSPACE_NAME>__entity"
      code_repository: "<WORKSPACE_NAME>__entity"
      code_release: "<WORKSPACE_NAME>__entity"
      image_registry: "<WORKSPACE_NAME>__entity"
      image: "<WORKSPACE_NAME>__entity"
    relationships:
      developer_manages_code_repository: "<WORKSPACE_NAME>__topo"
      code_release_sourced_from_code_repository: "<WORKSPACE_NAME>__topo"
      image_sourced_from_image_registry: "<WORKSPACE_NAME>__topo"
      image_sourced_from_code_release: "<WORKSPACE_NAME>__topo"
      image_registry_contains_image: "<WORKSPACE_NAME>__topo"
      pod_uses_image: "<WORKSPACE_NAME>__topo"
      # 静态Topo关系
      static_topo: "<WORKSPACE_NAME>__topo"
配置参数说明:
配置段
参数名
描述
示例值
是否必须
aliyun
region
阿里云地域标识
cn-hangzhou
是
access_key_id
阿里云访问密钥ID
LTAI5t***
是
access_key_secret
阿里云访问密钥Secret
nP0foq***
是
devops
organization_id
DevOps组织ID,在DevOps控制台获取
62d8f3a0de***
是
access_key_id
DevOps API访问密钥ID
LTAI5t***
是
access_key_secret
DevOps API访问密钥Secret
nP0foq***
是
acr
instance_id
容器镜像服务实例ID
cri-67u5tdtph***
是
region
ACR服务地域
cn-hangzhou
是
access_key_id
ACR API访问密钥ID
LTAI5t***
是
access_key_secret
ACR API访问密钥Secret
nP0foq***
是
cms
endpoint
云监控 2.0 API端点
metrics.cn-hangzhou.aliyuncs.com
是
workspace
云监控 2.0 工作空间名称
o11y-aiops-demo***
是
access_key_id
CMS API访问密钥ID
LTAI5t***
是
access_key_secret
CMS API访问密钥Secret
nP0foq***
是
sls
endpoint
日志服务API端点
cn-hangzhou.log.aliyuncs.com
是
access_key_id
SLS API访问密钥ID
LTAI5t***
是
access_key_secret
SLS API访问密钥Secret
nP0foq***
是
project
云监控 2.0 工作区归属的 Project 名称.
可在工作区中查询
cms-qs-demos-aiops-demo-***
是
logstore_mapping.entities
实体数据LogStore,
格式:${workspace_name}__entity,
其中 workspace 为云监控 2.0 工作区名称qs-demos-aiops-demo__entity
是
logstore_mapping.relationships
关系数据LogStore,
格式:${workspace_name}__topo,
其中 workspace 为云监控 2.0 工作区名称qs-demos-aiops-demo__topo
是
在
devops_data_generator根目录执行以下命令,生成相关实体数据。pip install -r requirements.txt # 单次执行 python main.py --mode single部署devops_data_generator,此处提供三种方式,对比如下,根据实际基础设施选择合适的方案。
特性
Kubernetes CronJob
函数计算
Docker Compose
部署复杂度
中等
低
低
运维成本
中
低(按量付费)
中
适用场景
已有K8s集群
Serverless场景
独立服务器
Kubernetes CronJob部署(推荐)
1. 准备配置和镜像
# 创建命名空间和ConfigMap
kubectl create namespace devops-data-generator
kubectl create configmap devops-generator-config \
  --from-file=config/ \
  -n devops-data-generator

# 构建并推送镜像
docker build -t your-registry.com/devops-data-generator:v1.0 .
docker push your-registry.com/devops-data-generator:v1.0
2. 创建CronJob资源(k8s/cronjob.yaml)
apiVersion: batch/v1
kind: CronJob
metadata:
  name: devops-data-generator
  namespace: devops-data-generator
spec:
  schedule: "*/15 * * * *"  # 每15分钟执行。执行频率示例:*/5 * * * *(每5分钟)、0 * * * *(每小时)、0 2 * * *(每天凌晨2点)
  concurrencyPolicy: Forbid
  jobTemplate:
    spec:
      template:
        spec:
          restartPolicy: OnFailure
          containers:
          - name: generator
            image: your-registry.com/devops-data-generator:v1.0
            command: ["python", "main.py", "--mode", "single"]
            volumeMounts:
            - name: config
              mountPath: /app/config
            resources:
              limits:
                memory: "512Mi"
                cpu: "500m"
          volumes:
          - name: config
            configMap:
              name: devops-generator-config
3. 部署和验证
# 部署CronJob
kubectl apply -f k8s/cronjob.yaml
# 手动测试
kubectl create job --from=cronjob/devops-data-generator test-job -n devops-data-generator
# 查看日志
kubectl logs -n devops-data-generator -l app=devops-data-generator --tail=50
阿里云函数计算部署(容器镜像)
使用函数计算的自定义容器镜像功能,直接复用Docker镜像部署。
1. 构建并推送镜像到ACR
# 登录ACR
docker login --username=${ACR_USERNAME} registry.cn-hangzhou.aliyuncs.com
# 构建镜像(添加FC适配)
docker build -t registry.cn-hangzhou.aliyuncs.com/your-namespace/devops-data-generator:v1.0 .
# 推送镜像
docker push registry.cn-hangzhou.aliyuncs.com/your-namespace/devops-data-generator:v1.0
2. 创建s.yaml配置文件
edition: 1.0.0
name: devops-data-generator-fc

services:
  devops-generator:
    component: fc
    props:
      region: cn-hangzhou
      service:
        name: devops-data-generator-service
        internetAccess: true

      function:
        name: data-generator
        description: DevOps数据采集生成器
        # 使用自定义容器镜像
        runtime: custom-container
        customContainerConfig:
          image: registry.cn-hangzhou.aliyuncs.com/your-namespace/devops-data-generator:v1.0
          command: ["python", "main.py", "--mode", "single"]
          accelerationType: Default
        timeout: 600
        memorySize: 512
        instanceConcurrency: 1

      triggers:
        - name: timer-trigger
          type: timer
          config:
            enable: true
            cronExpression: '0 */15 * * * *'  # 每15分钟执行
            payload: '{}'
3. 部署和测试
# 安装Serverless Devs
npm install -g @serverless-devs/s
s config add  # 配置阿里云账号
# 部署函数
s deploy

# 手动触发测试
s invoke

# 查看日志
s logs -t
4. 部署
s deploy              # 部署函数
s invoke --event '{}'  # 测试执行
s logs -t             # 查看日志
Docker Compose部署
1. 创建docker-compose.yml
version: '3.8'
services:
  devops-data-generator:
    build: .
    container_name: devops-data-generator
    restart: unless-stopped
    command: python app.py --host 0.0.0.0 --port 5000
    ports:
      - "5000:5000"
    volumes:
      - ./config:/app/config:ro
      - ./logs:/app/logs
    healthcheck:
      test: ["CMD", "curl", "-f", "http://localhost:5000/health"]
      interval: 30s
2. 启动服务并配置定时触发
# 启动服务
docker-compose up -d

# 配置crontab定时触发
crontab -e
# 添加:每15分钟执行
*/15 * * * * curl -X POST http://localhost:5000/invoke -H "Content-Type: application/json" -d '{"mode":"single"}'
3. 监控和运维
curl http://localhost:5000/status # 查看状态 docker-compose logs -f # 查看日志 docker-compose restart # 重启服务验证数据是否正确上传到EntityStore。
DevOps实体互联互通效果展示
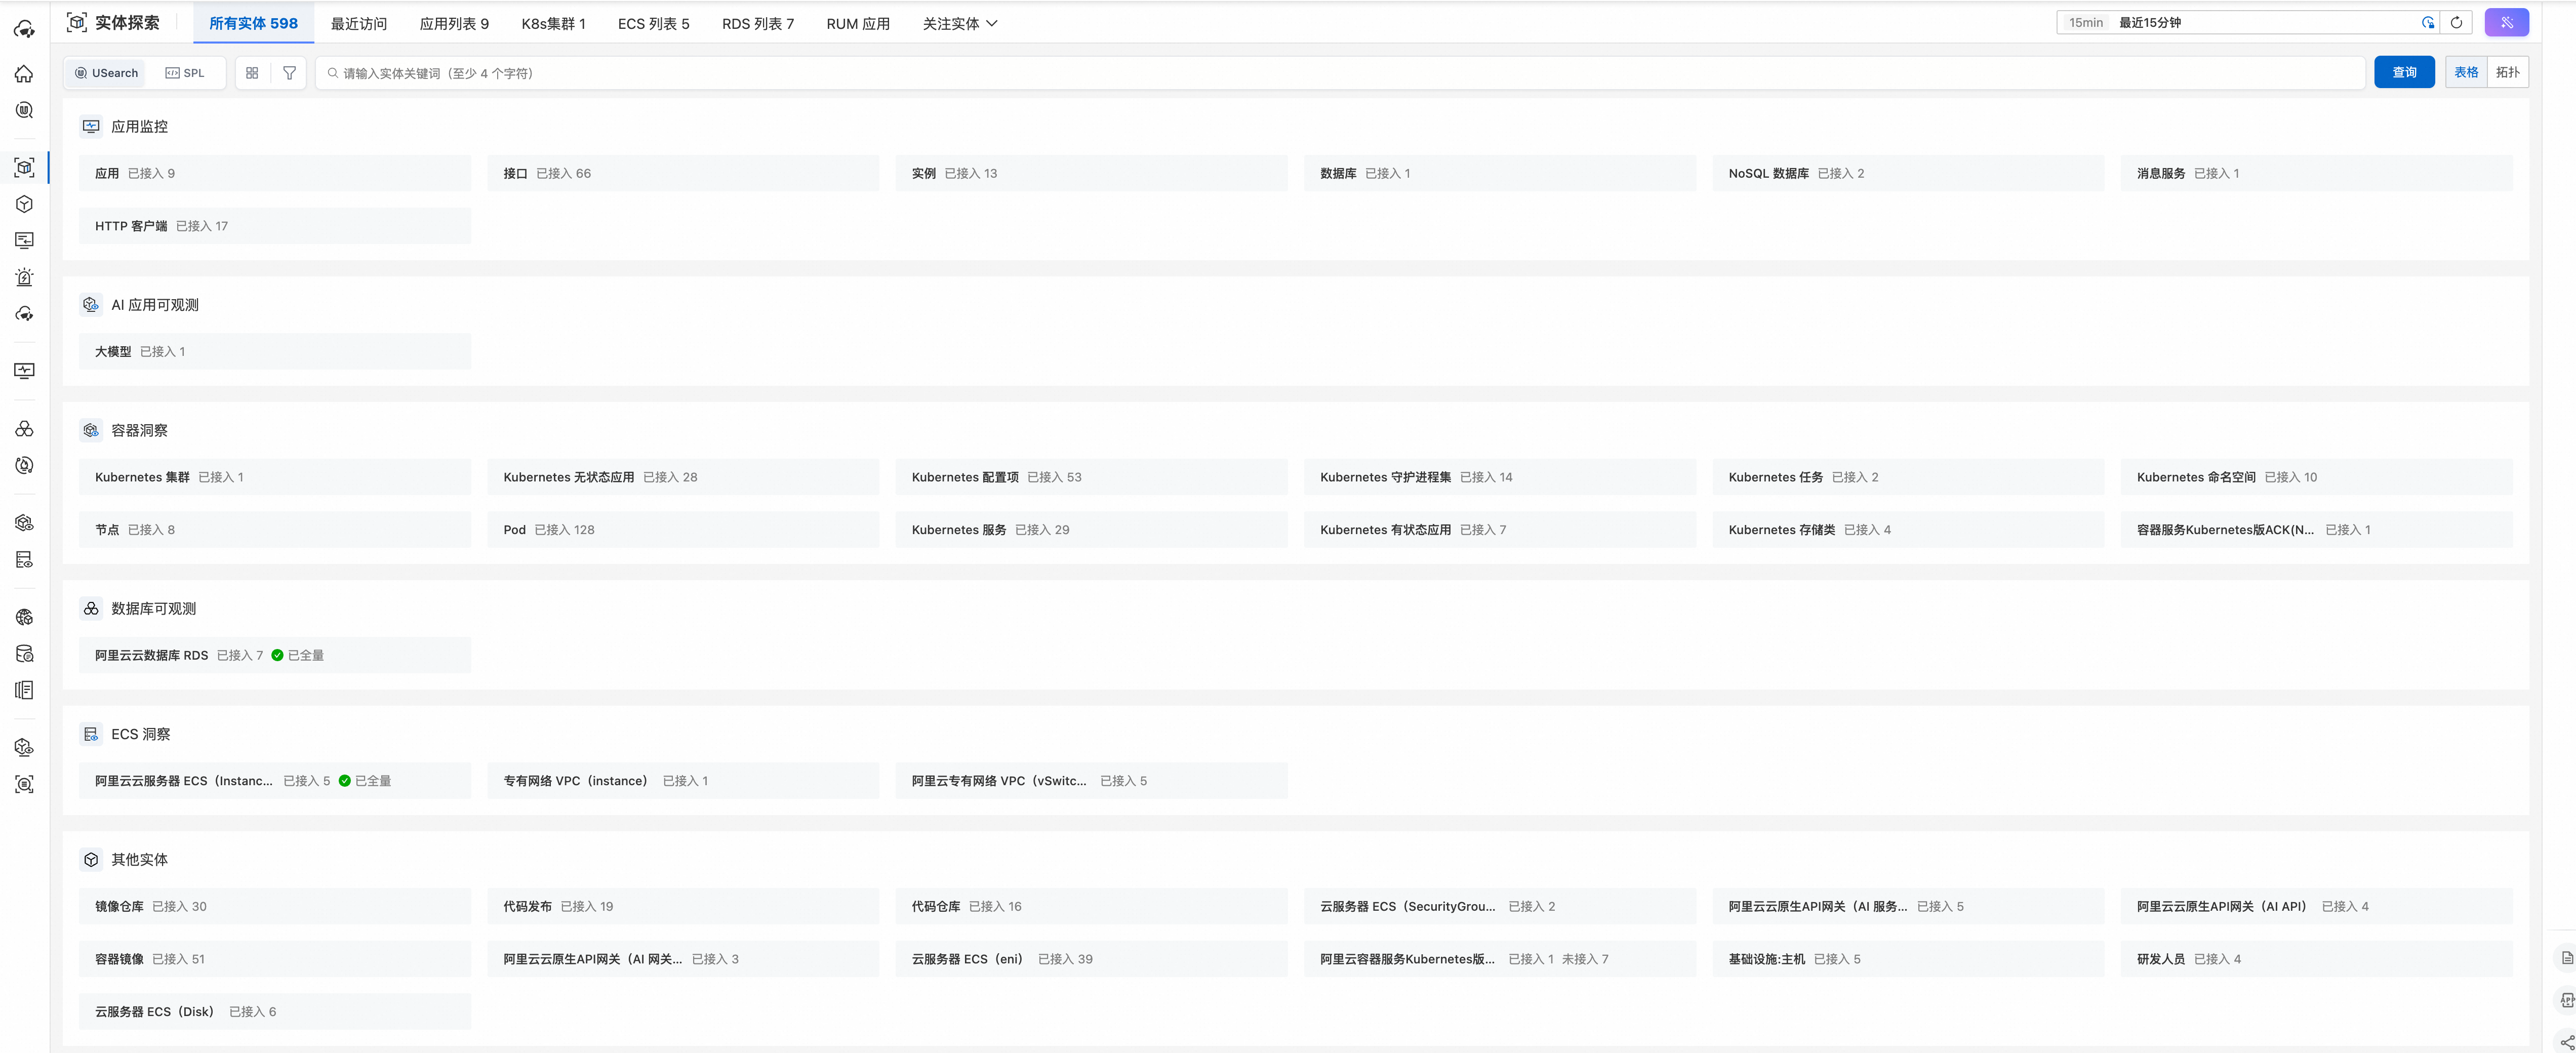
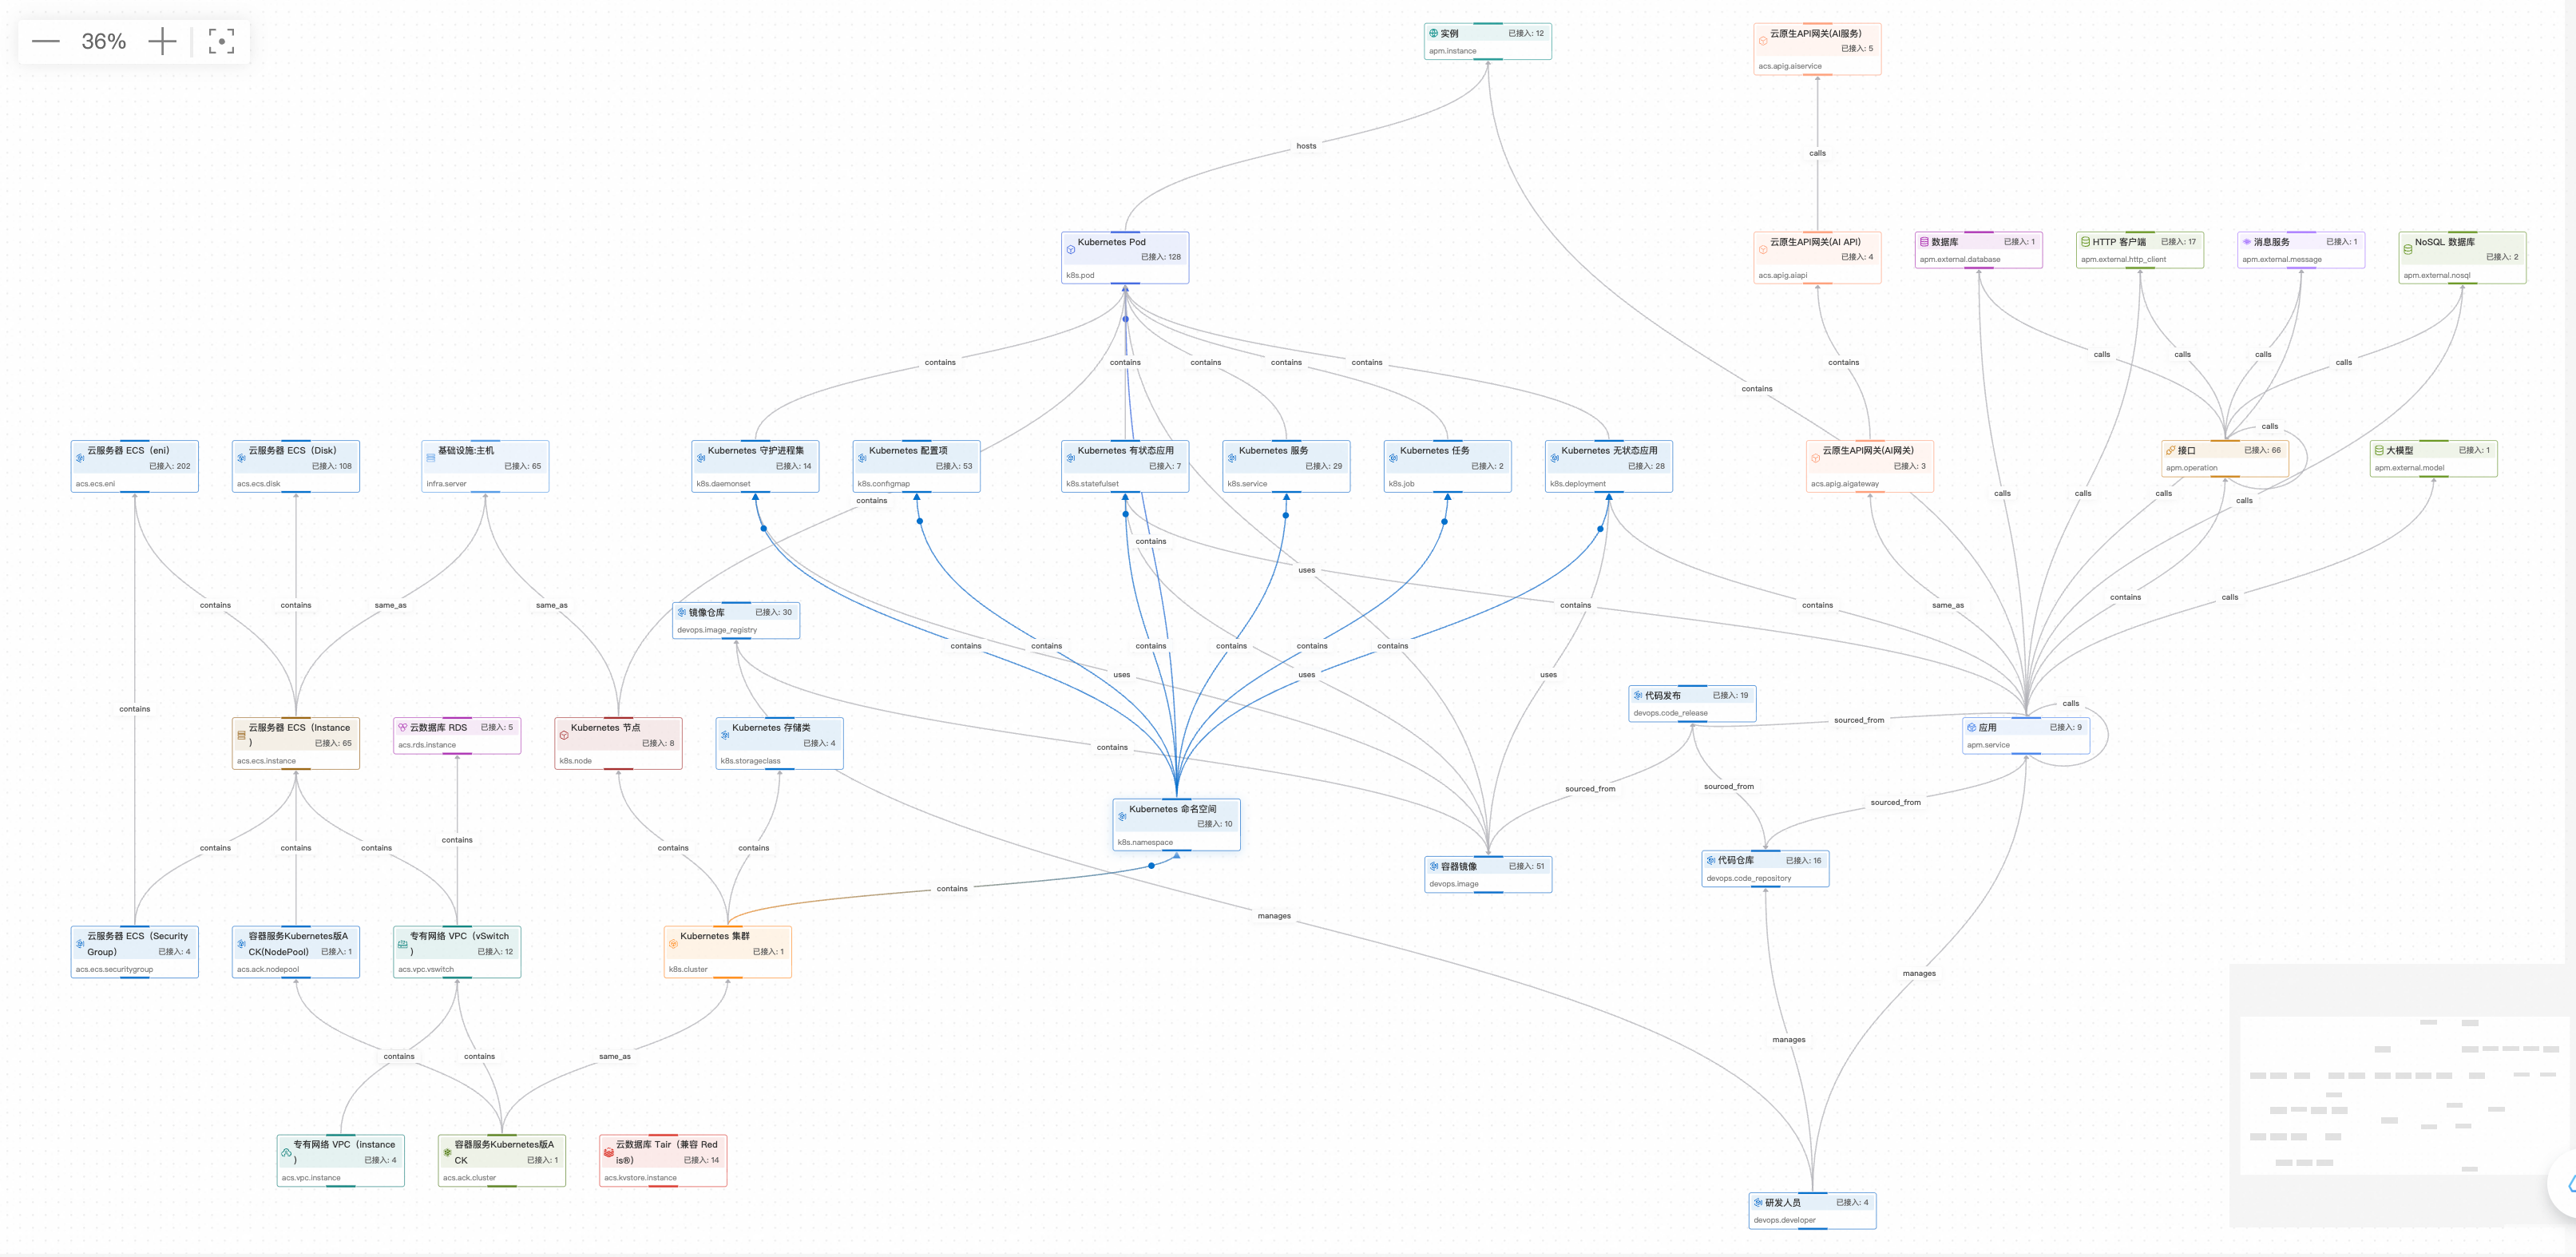
执行完上述步骤后,即可完成 DevOps 定义的实体数据打通,登录到云监控 2.0 控制台,可看到如下内容:
全景实体数据概览:展示完整的DevOps实体数据,涵盖代码仓库、开发人员、代码发布、容器镜像、Kubernetes Pod、APM服务监控等全链路实体。
全链路拓扑关系图谱:实体拓扑视图将DevOps全链路的实体和关系统一呈现在拓扑图中,提供"上帝视角",支持分层布局、关系流向展示、异常标识和交互探索。
分类实体列表管理:CMS提供结构化的实体列表视图,支持按实体类型分组显示、多维度筛选搜索、状态监控,与拓扑图形成互补的可视化体验。

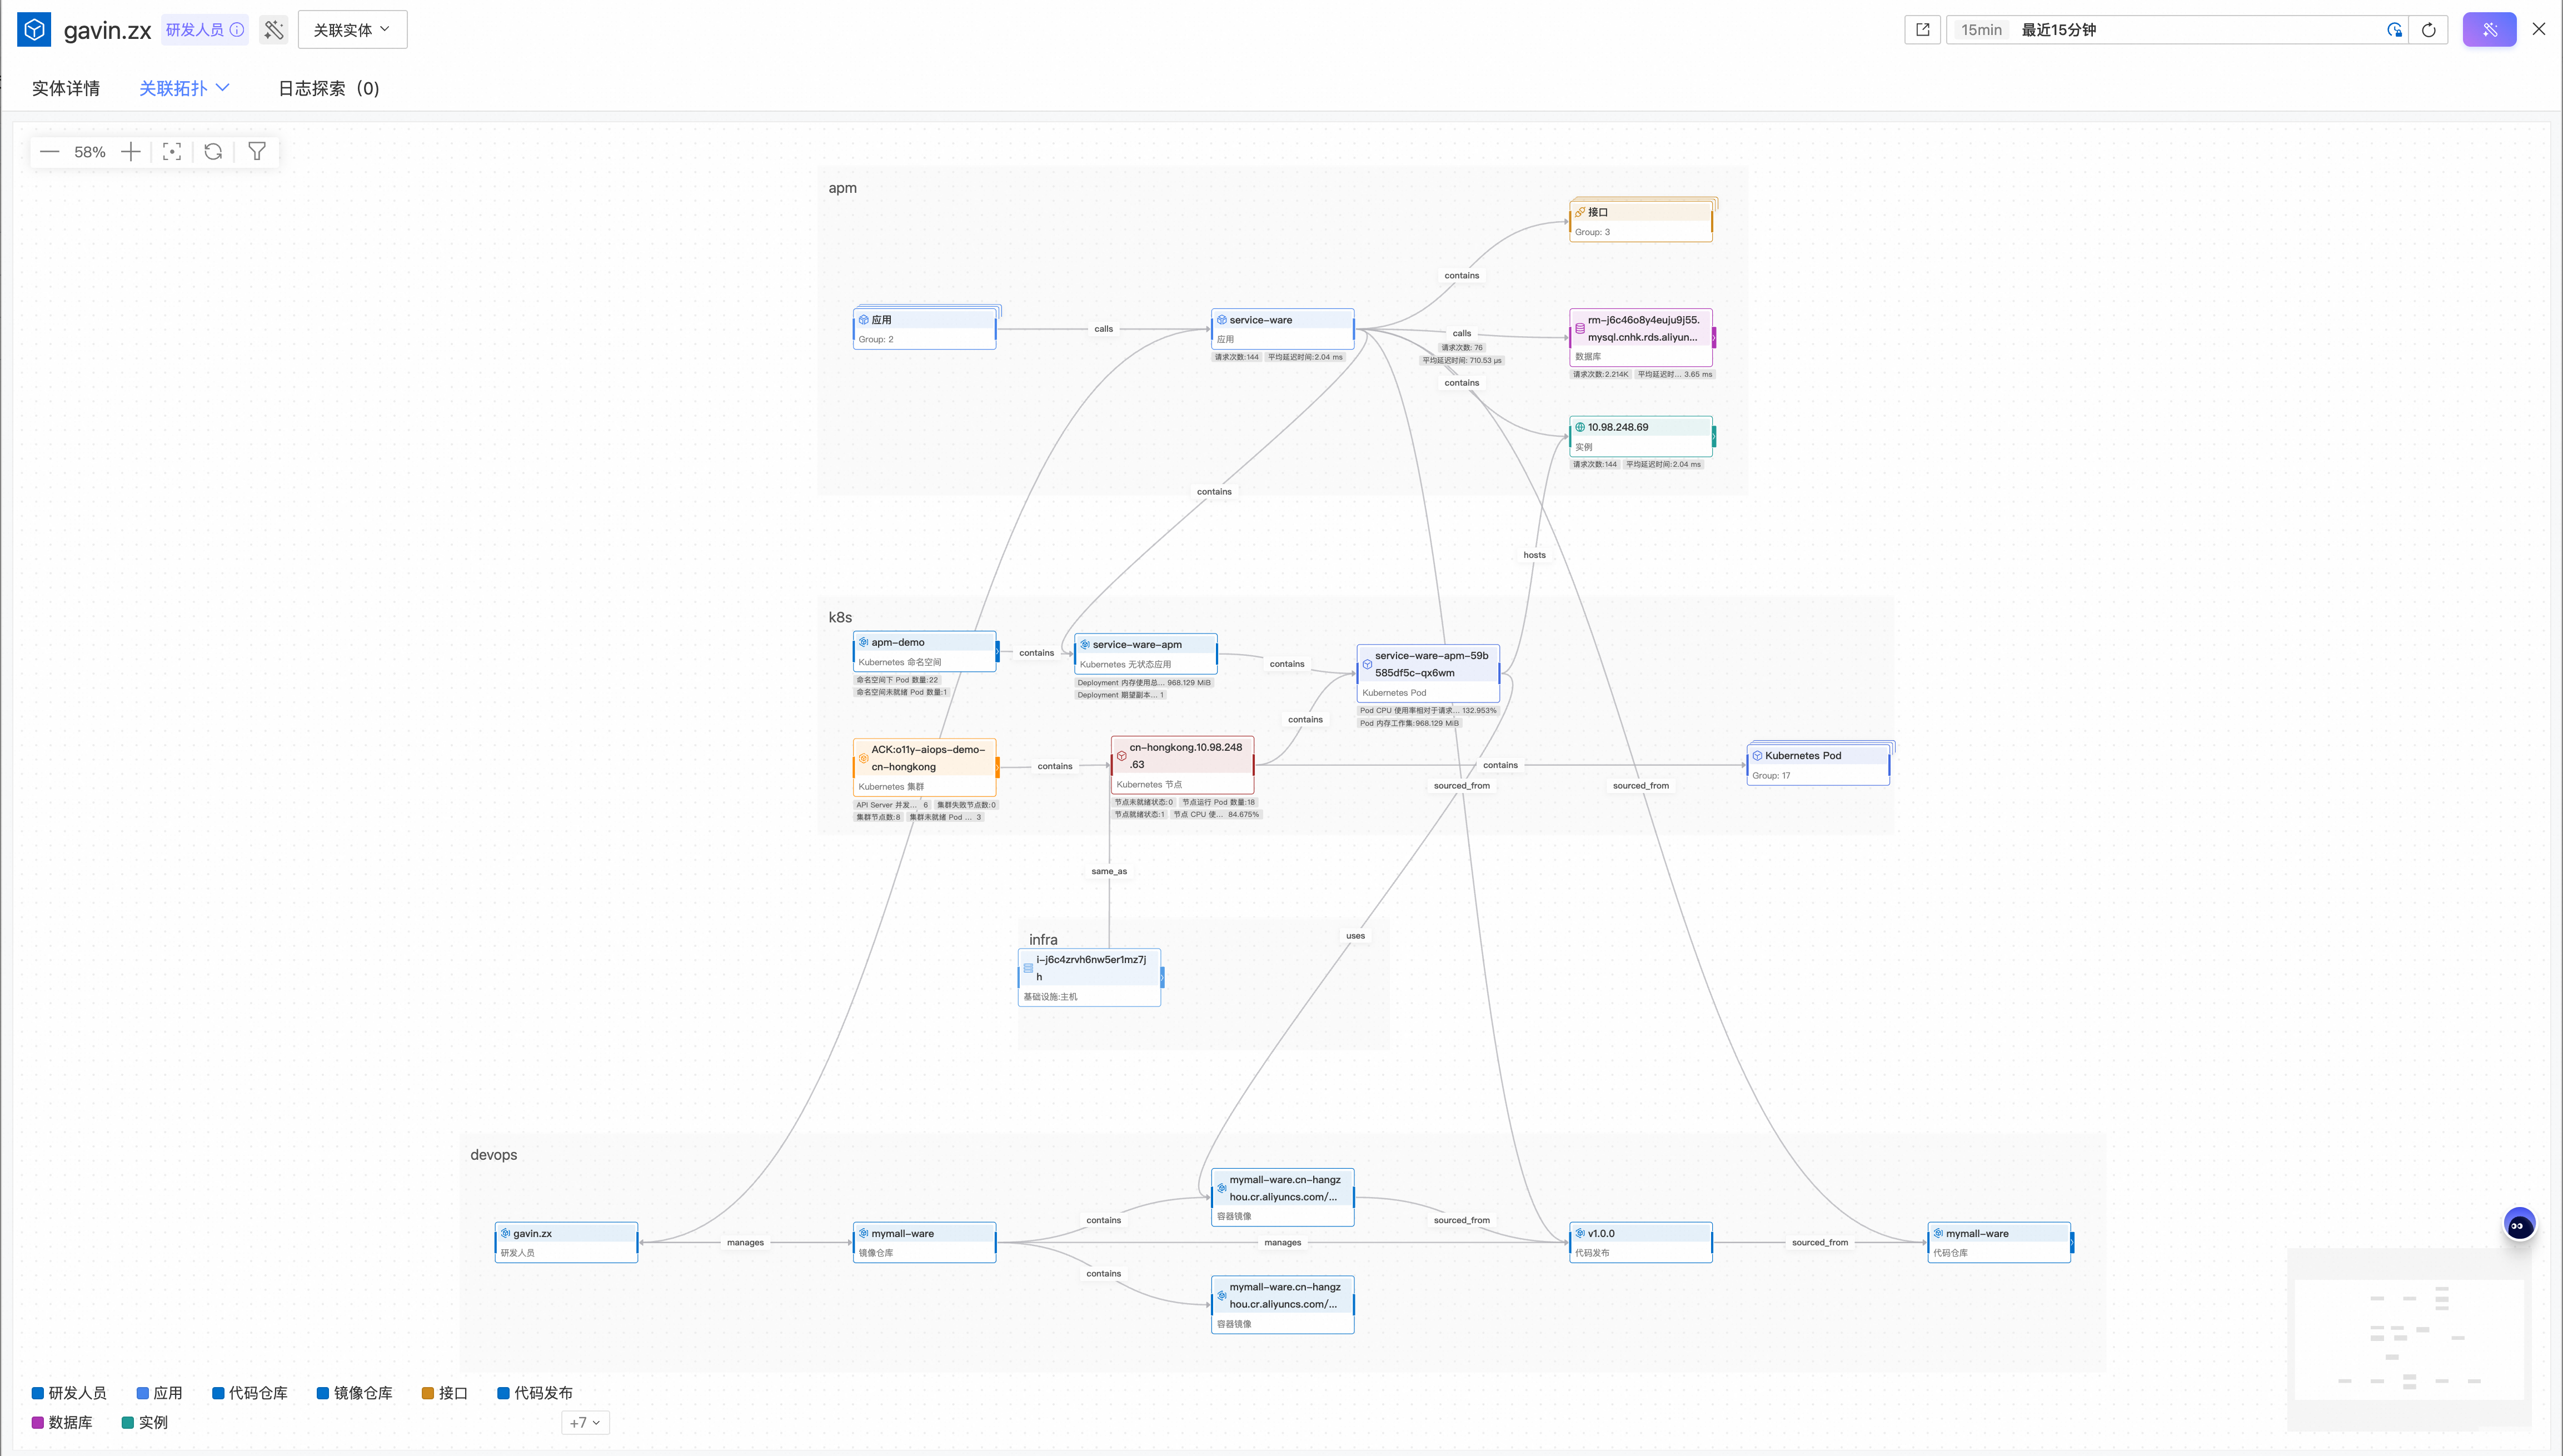
单实体深度分析:单实体拓扑视图聚焦特定实体进行局部关系分析,支持上下游追踪、影响范围分析,适用于故障影响分析、变更风险评估、性能瓶颈定位等场景。
常见问题
问题排查思路
当数据已上传但在EntityStore中查不到时,参考以下内容排查:
排查内容 | 使用工具 |
确认数据已写入Logstore | SLS控制台查询 |
检查必要字段是否完整 | SLS控制台查询字段完整性 |
检查KeepAlive是否过期 | SLS控制台查询过期状态 |
验证EntityStore可见性 | UModel Explorer执行SQL查询 |
检查关系悬挂问题 | UModel Explorer执行JOIN查询 |
确认数据已写入Logstore
在实体数据(
**${workspace}__entity**)Logstore中执行查询语句。* | select count(*) as total_count where __entity_type__ = 'devops.developer'在关系数据(
**${workspace}__topo**)Logstore中执行查询语句。* | select count(*) as total_count where __relation_type__ = 'manages'说明如果count为0:数据未成功上传,检查上传代码和日志。
检查必要字段是否完整
在实体数据(
**${workspace}__entity**)Logstore中执行查询语句。确认上传的数据包含所有必要字段。* | extend validation_status= case when __domain__ is null or __domain__ = '' then 'domain缺失' when __entity_type__ is null or __entity_type__ = '' then 'entity_type缺失' when __entity_id__ is null or __entity_id__ = '' then 'entity_id缺失' when work_no is null or work_no = '' then '主键work_no缺失' when name is null or name = '' then 'name字段缺失' else '正常' end | where __entity_type__ = 'devops.developer' and validation_status != '正常' | project validation_status在关系数据(
**${workspace}__topo**)Logstore中执行查询语句。确认上传的数据包含所有必要字段。* | extend validation_status = case when __src_entity_id__ is null or __src_entity_id__ = '' then 'src_entity_id缺失' when __src_entity_type__ is null or __src_entity_type__ = '' then 'src_entity_type缺失' when __src_domain__ is null or __src_domain__ = '' then 'src_domain缺失' when __dest_entity_id__ is null or __dest_entity_id__ = '' then 'dest_entity_id缺失' when __dest_entity_type__ is null or __dest_entity_type__ = '' then 'dest_entity_type缺失' when __dest_domain__ is null or __dest_domain__ = '' then 'dest_domain缺失' when __relation_type__ is null or __relation_type__ = '' then 'relation_type缺失' else '正常' end | where __relation_type__ = 'manages' and validation_status != '正常'说明如果有缺失字段:检查数据转换代码,确保所有必要字段都有值。
所有字段值必须为字符串类型。
检查KeepAlive是否过期
即使写入Logstore,若KeepAlive已过期,EntityStore也查询不到。
在实体数据(
**${workspace}__entity**)Logstore中执行查询语句。* | select __entity_id__, from_unixtime(__last_observed_time__) as last_observed, __keep_alive_seconds__ as keep_alive, from_unixtime(__last_observed_time__ + cast(__keep_alive_seconds__ as bigint)) as expire_time, case when to_unixtime(now()) > __last_observed_time__ + cast(__keep_alive_seconds__ as bigint) then '已过期' else '未过期' end as status where __entity_type__ = 'devops.developer' order by __last_observed_time__ desc limit 20在关系数据(
**${workspace}__topo**)Logstore中执行查询语句。* | select __src_entity_id__, __dest_entity_id__, __relation_type__, from_unixtime(__last_observed_time__) as last_observed, __keep_alive_seconds__ as keep_alive, case when to_unixtime(now()) > __last_observed_time__ + cast(__keep_alive_seconds__ as bigint) then '已过期' else '未过期' end as status where __relation_type__ = 'manages' order by __last_observed_time__ desc limit 20说明status = ‘已过期’:实体已过期,EntityStore中查询不到。
status = ‘未过期’:实体应该可查询,如果查不到,检查其他情况。
解决方案:
增加KeepAlive时长:如果经常过期,适当增加
__keep_alive_seconds__值。提高上传频率:缩短定时任务间隔,确保
__last_observed_time__及时更新。KeepAlive配置原则:
定时全量:KeepAlive = 2 × 全量周期。
定时增量:KeepAlive = 2 × 增量周期。
数据更新不及时
实体字段值已变更但查询到的还是旧值或者新增的实体或关系延迟很久才能查到。
检查最近更新时间:若
delay_minutes> 60,即数据更新延迟超过1小时,需要优化上传策略。* | select __entity_type__, from_unixtime(max(__last_observed_time__)) as last_update, date_diff('minute', from_unixtime(max(__last_observed_time__)), now()) as delay_minutes group by __entity_type__
优化策略:
当前策略 | 数据延迟 | 优化方案 |
定时全量(24小时) | 最长24小时 | 改为定时全量(6小时)+ 定时增量(30分钟) |
定时增量(1小时) | 最长1小时 | 添加Webhook事件驱动,实时更新 |
推荐配置:
静态实体(如开发人员):全量(6小时)+ KeepAlive(12小时)
半静态实体(如代码仓库):全量(6小时)+ 增量(30分钟)+ 事件 + KeepAlive(12小时)
动态实体(如镜像):增量(15分钟)+ 事件 + KeepAlive(30分钟)