CCM提供Kubernetes与阿里云基础产品(例如CLB、VPC等)对接的能力,支持在同一个CLB后端挂载集群内节点和集群外服务器,可以解决迁移过程中流量中断的难题,同时还支持将业务流量转发至多个Kubernetes集群,实现备份、容灾等需求,从而保障业务的高可用。本文介绍如何在自建的Kubernetes集群中部署CCM。
前提条件
自建Kubernetes集群中已部署VNode。
如果您的Kubernetes集群部署在线下IDC,请确保已打通IDC与阿里云的网络。
背景信息
CCM(Cloud Controller Manager)是阿里云提供的一个用于Kubernetes与阿里云基础产品进行对接的组件,目前包括以下功能:
管理负载均衡
当Service的类型设置为LoadBalancer时,CCM组件会为该Service创建并配置阿里云负载均衡CLB,包括CLB实例、监听、后端服务器组等资源。当Service对应的后端Endpoint或者集群节点发生变化时,CCM会自动更新CLB的后端服务器组。
实现跨节点通信
当集群网络组件为Flannel时,CCM组件负责打通容器与节点间网络,将节点的Pod网段信息写入VPC的路由表中,从而实现容器的跨节点通信。该功能无需配置,安装即可使用。
更多信息,请参见Cloud Controller Manager。
CCM已经开源,具体项目信息请参见cloud-provider-alibaba-cloud。
准备工作
如果您自建的Kubernetes集群中没有使用阿里云ECS作为节点,可跳过准备工作。如果使用了ECS作为集群节点,需要参考以下步骤配置ECS节点的providerID,使得CCM可以管理这些节点的路由。
部署OpenKurise以便使用BroadcastJob。
命令参考如下:
helm repo add openkruise https://openkruise.github.io/charts/ helm repo update helm install kruise openkruise/kruise --version 1.3.0更多信息,请参见OpenKruise文档。
通过BroadcastJob为ECS节点配置providerID。
将以下内容保存为provider.yaml。
apiVersion: rbac.authorization.k8s.io/v1 kind: ClusterRole metadata: name: ecs-node-initor rules: - apiGroups: - "" resources: - nodes verbs: - get - patch --- apiVersion: v1 kind: ServiceAccount metadata: name: ecs-node-initor --- kind: ClusterRoleBinding apiVersion: rbac.authorization.k8s.io/v1 metadata: name: ecs-node-initor subjects: - kind: ServiceAccount name: ecs-node-initor namespace: default roleRef: kind: ClusterRole name: ecs-node-initor apiGroup: rbac.authorization.k8s.io --- apiVersion: apps.kruise.io/v1alpha1 kind: BroadcastJob metadata: name: create-ecs-node-provider-id spec: template: spec: serviceAccount: ecs-node-initor restartPolicy: OnFailure affinity: nodeAffinity: requiredDuringSchedulingIgnoredDuringExecution: nodeSelectorTerms: - matchExpressions: - key: type operator: NotIn values: - virtual-kubelet tolerations: - operator: Exists containers: - name: create-ecs-node-provider-id image: registry.cn-beijing.aliyuncs.com/eci-release/provider-initor:v1 command: [ "/usr/bin/init" ] env: - name: NODE_NAME valueFrom: fieldRef: fieldPath: spec.nodeName completionPolicy: type: Never failurePolicy: type: FailFast restartLimit: 3部署BroadcastJob。
kubectl apply -f provider.yaml
查看BroadcastJob执行结果。
kubectl get pods -o wide如果create-ecs-node-provider-id相关的Pod均达到Completed状态,则表示相应ECS节点的ProviderID已经配置成功。返回示例如下:

(可选)清理BroadcastJob。
kubectl delete -f provider.yaml
操作步骤
创建ConfigMap。
将您的阿里云账号对应的AccessKey保存到环境变量。
export ACCESS_KEY_ID=LTAI******************** export ACCESS_KEY_SECRET=HAeS**************************关于如何获取AccessKey ID和AccessKey Secret,请参见获取AccessKey。
执行以下脚本创建ConfigMap。
将以下内容保存为configmap-ccm.sh,并根据实际替换代码中的region值,然后执行脚本。
#!/bin/bash

## create ConfigMap kube-system/cloud-config for CCM.
accessKeyIDBase64=`echo -n "$ACCESS_KEY_ID" |base64 -w 0`
accessKeySecretBase64=`echo -n "$ACCESS_KEY_SECRET"|base64 -w 0`

cat <<EOF >cloud-config.yaml
apiVersion: v1
kind: ConfigMap
metadata:
  name: cloud-config
  namespace: kube-system
data:
  cloud-config.conf: |-
    {
        "Global": {
            "accessKeyID": "$accessKeyIDBase64",
            "accessKeySecret": "$accessKeySecretBase64",
            "region": "cn-hangzhou"
        }
    }
EOF

kubectl create -f cloud-config.yaml
bash configmap-ccm.sh执行脚本后,系统将在Kube-system下创建一个名为cloud-config的ConfigMap。
部署CCM。
修改
${ImageVersion}和{$ClusterCIDR},然后将以下内容保存为ccm.yaml。您可以根据CCM的变更记录获取
ImageVersion。具体请参见Cloud Controller Manager。您可以通过
kubectl cluster-info dump | grep -m1 cluster-cidr命令查看ClusterCIDR。
apiVersion: rbac.authorization.k8s.io/v1 kind: ClusterRole metadata: name: system:cloud-controller-manager rules: - apiGroups: - coordination.k8s.io resources: - leases verbs: - get - list - update - create - apiGroups: - "" resources: - persistentvolumes - services - secrets - endpoints - serviceaccounts verbs: - get - list - watch - create - update - patch - apiGroups: - "" resources: - nodes verbs: - get - list - watch - delete - patch - update - apiGroups: - "" resources: - services/status verbs: - update - patch - apiGroups: - "" resources: - nodes/status verbs: - patch - update - apiGroups: - "" resources: - events - endpoints verbs: - create - patch - update --- apiVersion: v1 kind: ServiceAccount metadata: name: cloud-controller-manager namespace: kube-system --- kind: ClusterRoleBinding apiVersion: rbac.authorization.k8s.io/v1 metadata: name: system:cloud-controller-manager roleRef: apiGroup: rbac.authorization.k8s.io kind: ClusterRole name: system:cloud-controller-manager subjects: - kind: ServiceAccount name: cloud-controller-manager namespace: kube-system --- kind: ClusterRoleBinding apiVersion: rbac.authorization.k8s.io/v1 metadata: name: system:shared-informers roleRef: apiGroup: rbac.authorization.k8s.io kind: ClusterRole name: system:cloud-controller-manager subjects: - kind: ServiceAccount name: shared-informers namespace: kube-system --- kind: ClusterRoleBinding apiVersion: rbac.authorization.k8s.io/v1 metadata: name: system:cloud-node-controller roleRef: apiGroup: rbac.authorization.k8s.io kind: ClusterRole name: system:cloud-controller-manager subjects: - kind: ServiceAccount name: cloud-node-controller namespace: kube-system --- kind: ClusterRoleBinding apiVersion: rbac.authorization.k8s.io/v1 metadata: name: system:pvl-controller roleRef: apiGroup: rbac.authorization.k8s.io kind: ClusterRole name: system:cloud-controller-manager subjects: - kind: ServiceAccount name: pvl-controller namespace: kube-system --- kind: ClusterRoleBinding apiVersion: rbac.authorization.k8s.io/v1 metadata: name: system:route-controller roleRef: apiGroup: rbac.authorization.k8s.io kind: ClusterRole name: system:cloud-controller-manager subjects: - kind: ServiceAccount name: route-controller namespace: kube-system --- apiVersion: apps/v1 kind: DaemonSet metadata: labels: app: cloud-controller-manager tier: control-plane name: cloud-controller-manager namespace: kube-system spec: selector: matchLabels: app: cloud-controller-manager tier: control-plane template: metadata: labels: app: cloud-controller-manager tier: control-plane annotations: scheduler.alpha.kubernetes.io/critical-pod: '' spec: serviceAccountName: cloud-controller-manager tolerations: - effect: NoSchedule operator: Exists key: node-role.kubernetes.io/master - effect: NoSchedule operator: Exists key: node.cloudprovider.kubernetes.io/uninitialized nodeSelector: node-role.kubernetes.io/master: "" containers: - command: - /cloud-controller-manager - --leader-elect=true - --cloud-provider=alicloud - --use-service-account-credentials=true - --cloud-config=/etc/kubernetes/config/cloud-config.conf - --configure-cloud-routes=true - --route-reconciliation-period=3m - --leader-elect-resource-lock=endpoints # replace ${cluster-cidr} with your own cluster cidr # example: 172.16.0.0/16 - --cluster-cidr=${ClusterCIDR} # replace ${ImageVersion} with the latest release version # example: v2.1.0 image: registry.cn-hangzhou.aliyuncs.com/acs/cloud-controller-manager-amd64:${ImageVersion} livenessProbe: failureThreshold: 8 httpGet: host: 127.0.0.1 path: /healthz port: 10258 scheme: HTTP initialDelaySeconds: 15 timeoutSeconds: 15 name: cloud-controller-manager resources: requests: cpu: 200m volumeMounts: - mountPath: /etc/kubernetes/ name: k8s - mountPath: /etc/ssl/certs name: certs - mountPath: /etc/pki name: pki - mountPath: /etc/kubernetes/config name: cloud-config hostNetwork: true volumes: - hostPath: path: /etc/kubernetes name: k8s - hostPath: path: /etc/ssl/certs name: certs - hostPath: path: /etc/pki name: pki - configMap: defaultMode: 420 items: - key: cloud-config.conf path: cloud-config.conf name: cloud-config name: cloud-config执行以下命令部署CCM。
kubectl create -f ccm.yaml
结果验证
创建LoadBalancer类型的Service和一组后端Endpoint。
将以下内容保存为ccm-test.yaml。
image地址请替换为VNode所在地域的地址,以免镜像下载失败。
apiVersion: v1 kind: Service metadata: name: nginx namespace: default annotations: service.beta.kubernetes.io/alibaba-cloud-loadbalancer-address-type: "intranet" spec: ports: - port: 80 protocol: TCP targetPort: 80 selector: app: nginx type: LoadBalancer --- apiVersion: apps/v1 kind: Deployment metadata: name: test-nginx spec: replicas: 2 selector: matchLabels: app: nginx template: metadata: labels: app: nginx spec: containers: - name: nginx image: registry-vpc.cn-beijing.aliyuncs.com/eci_open/nginx:1.14.2执行命令部署Service和Deployment。
kubectl create -f ccm-test.yaml部署后,CCM组件会为Service创建并配置阿里云负载均衡CLB,包括CLB实例、监听、后端服务器组等资源。
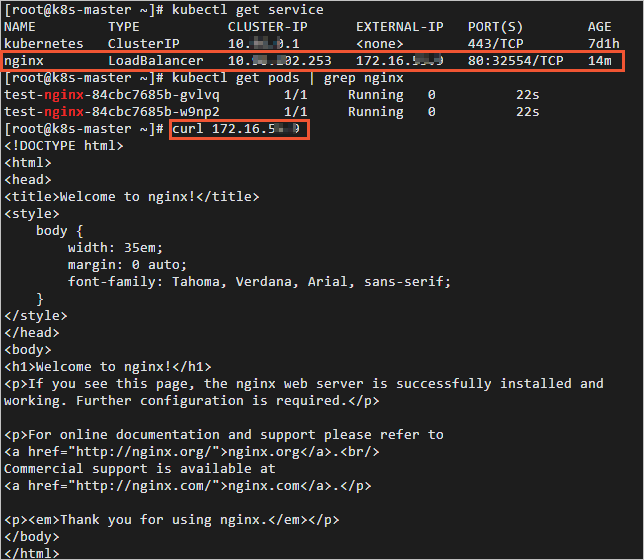
验证Service是否能够正常工作。
执行curl命令访问Service地址,可以看到已经能通过Service地址来访问后端的Nginx服务。

更多关于Service的使用方式,请参见CCM使用方式说明。
