多模态大语言模型(Multimodal Large Language Model, MLLM)能够同时处理多种模态的数据,将文本、图像、音频等不同类型的信息进行融合,从而更全面地理解复杂的情境和任务。适用于需要跨模态理解与生成的场景。通过EAS,您可以在5分钟内一键部署MLLM推理服务应用,获得大模型的推理能力。本文为您介绍如何通过EAS一键部署和调用MLLM推理服务。
背景信息
近年来,各类大语言模型(LLM)在语言任务中达到了前所未有的效果,不仅擅长生成自然语言文本,还在情感分析、机器翻译和文本摘要等多任务中展现了强大的能力。然而,这些模型局限在文本数据,难以处理其他形式的信息如图像、音频或视频,只有拥有多模态理解,模型才能更加接近人类的超级大脑。
因此,多模态大语言模型(Multimodal Large Language Model, MLLM)引发了研究热潮,随着GPT-4o等大模型在业界的广泛应用,MLLM成为当前热门的应用之一。这种新型的大语言模型能够同时处理多种模态的数据,将文本、图像、音频等不同类型的信息进行融合,从而更全面地理解复杂的情境和任务。
当您需要自动化部署MLLM时,EAS为您提供了一键式解决方案。通过EAS,您可以在5分钟内一键部署流行的MLLM推理服务应用,获得大模型的推理能力。
前提条件
已开通PAI并创建默认工作空间,详情请参见开通PAI并创建默认工作空间。
如果使用RAM用户来部署模型,需要为RAM用户授予EAS的管理权限,详情请参见云产品依赖与授权:EAS。
部署EAS服务
登录PAI控制台,在页面上方选择目标地域,并在右侧选择目标工作空间,然后单击进入EAS。
单击部署服务,然后在自定义模型部署区域,单击自定义部署。
在自定义部署页面,配置以下关键参数,其他参数配置说明,请参见控制台自定义部署参数说明。
参数
描述
环境信息
部署方式
选择镜像部署,并选中开启Web应用。
镜像配置
在官方镜像列表中选择chat-mllm-webui>chat-mllm-webui:1.0。
说明由于版本迭代迅速,部署时镜像版本选择最高版本即可。
运行命令
选择镜像后,系统会自动配置运行命令。您可以通过修改model_type来支持部署不同的模型,支持的模型列表如下表所示。
资源信息
部署资源
选择GPU类型的资源规格,推荐使用ml.gu7i.c16m60.1-gu30(性价比最高)。
参数配置完成后,单击部署。
调用服务
启动WebUI进行模型推理
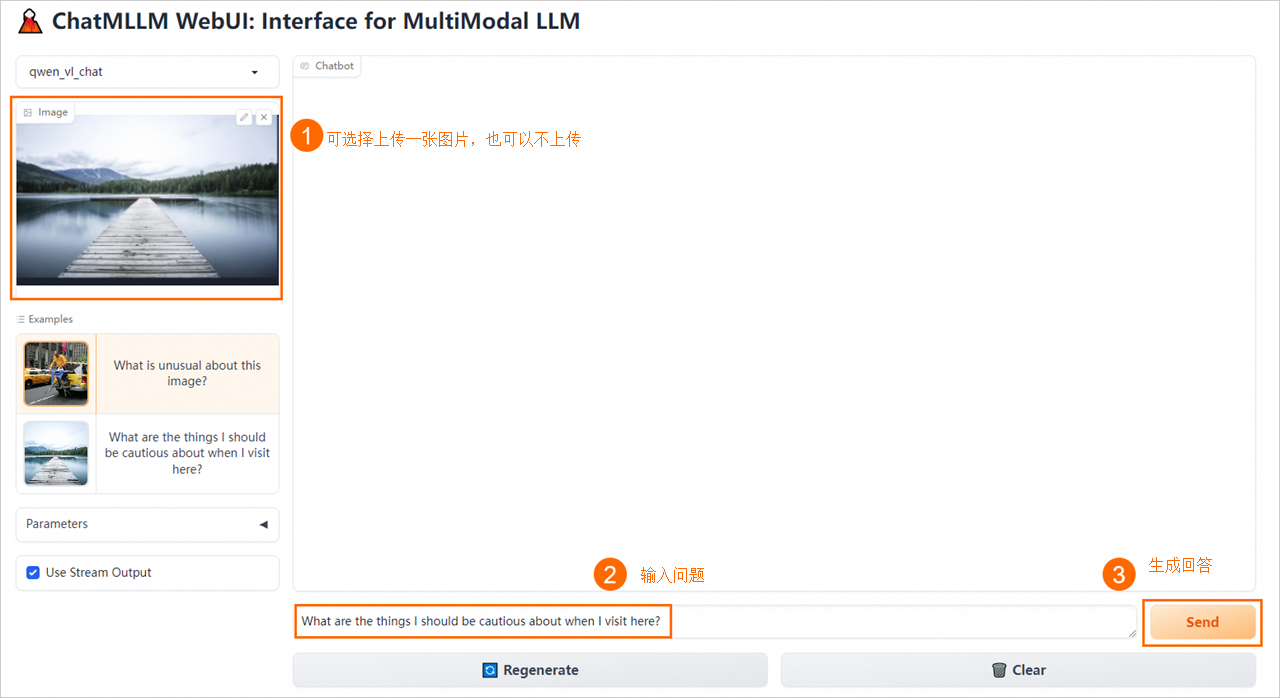
在模型在线服务(EAS)页面,单击目标服务名称,然后在页面右上角,单击查看Web应用,并按照控制台操作指引进入WebUI页面。
在WebUI页面,进行模型推理验证。

使用API进行模型推理
获取服务访问地址和Token。
在模型在线服务(EAS)页面,单击目标服务名称。然后在基本信息区域,单击查看调用信息。
在调用信息配置面板,获取服务Token和访问地址。
使用API进行模型推理。
PAI提供了以下三个API接口:
infer forward
获得推理结果。
说明WebUI和API调用无法同时使用。如果您已先通过WebUI进行调用,请先执行
clear chat history代码清理历史聊天记录,然后再运行infer forward代码获取推理结果。示例代码中需替换的关键参数说明如下:
参数
描述
hosts
配置为步骤1中获取的服务访问地址。
authorization
配置为步骤1中获取的服务Token。
prompt
提问内容,建议使用英文描述。
image_path
图片所在的本地路径。
示例代码如下,以Python为例:
import requests
import json
import base64


def post_get_history(url='http://127.0.0.1:7860', headers=None):
    r = requests.post(f'{url}/get_history', headers=headers, timeout=1500)
    data = r.content.decode('utf-8')
    return data


def post_infer(prompt, image=None, chat_history=[], temperature=0.2, top_p=0.7, max_output_tokens=512, use_stream = True, url='http://127.0.0.1:7860', headers={}):
    datas = {
        "prompt": prompt,
        "image": image,
        "chat_history": chat_history,
        "temperature": temperature,
        "top_p": top_p,
        "max_output_tokens": max_output_tokens,
        "use_stream": use_stream,
    }

    if use_stream:
        headers.update({'Accept': 'text/event-stream'})

        response = requests.post(f'{url}/infer_forward', json=datas, headers=headers, stream=True, timeout=1500)

        if response.status_code != 200:
            print(f"Request failed with status code {response.status_code}")
            return
        process_stream(response)

    else:
        r = requests.post(f'{url}/infer_forward', json=datas, headers=headers, timeout=1500)
        data = r.content.decode('utf-8')

        print(data)


def image_to_base64(image_path):
    """
    Convert an image file to a Base64 encoded string.

    :param image_path: The file path to the image.
    :return: A Base64 encoded string representation of the image.
    """
    with open(image_path, "rb") as image_file:
        # Read the binary data of the image
        image_data = image_file.read()
        # Encode the binary data to Base64
        base64_encoded_data = base64.b64encode(image_data)
        # Convert bytes to string and remove any trailing newline characters
        base64_string = base64_encoded_data.decode('utf-8').replace('\n', '')
    return base64_string


def process_stream(response, previous_text=""):
    MARK_RESPONSE_END = '##END'  # DONOT CHANGE
    buffer = previous_text
    current_response = ""

    for chunk in response.iter_content(chunk_size=100):
        if chunk:
            text = chunk.decode('utf-8')
            current_response += text

            parts = current_response.split(MARK_RESPONSE_END)
            for part in parts[:-1]:
                new_part = part[len(previous_text):]
                if new_part:
                    print(new_part, end='', flush=True)

                previous_text = part

            current_response = parts[-1]

    remaining_new_text = current_response[len(previous_text):]
    if remaining_new_text:
        print(remaining_new_text, end='', flush=True)


if __name__ == '__main__':
    # <service_url> 替换为服务访问地址
    hosts = '<service_url>'
    # <token> 替换为服务Token
    head = {
        'Authorization': '<token>'
    }

    # get chat history
    chat_history = json.loads(post_get_history(url=hosts, headers=head))['chat_history']

    # 提问内容,建议使用英文描述。
    prompt = 'Please describe the image'
    # path_to_your_image替换为图片所在的本地路径。
    image_path = 'path_to_your_image'
    image_base_64 = image_to_base64(image_path)

    post_infer(prompt = prompt, image = image_base_64, chat_history = chat_history, use_stream=False, url=hosts, headers=head)
get chat history
获取历史聊天记录。
示例代码中需替换的关键参数说明如下:
参数
描述
hosts
配置为步骤1已获取的服务访问地址。
authorization
配置为步骤1已获取的服务Token。
无需输入参数。
输出参数列表如下:
参数
类型
说明
chat_history
List[List]
对话历史。
示例代码如下,以Python为例:
import requests
import json

def post_get_history(url='http://127.0.0.1:7860', headers=None):
    r = requests.post(f'{url}/get_history', headers=headers, timeout=1500)
    data = r.content.decode('utf-8')
    return data


if __name__ == '__main__':
    # <service_url> 替换为服务访问地址
    hosts = '<service_url>'
    # <token> 替换为服务Token
    head = {
        'Authorization': '<token>'
    }

    chat_history = json.loads(post_get_history(url=hosts, headers=head))['chat_history']
    print(chat_history)
clear chat history
清空历史聊天记录。
示例代码中需替换的关键参数说明如下:
参数
描述
hosts
配置为步骤1中获取的服务访问地址。
authorization
配置为步骤1中获取的服务Token。
无需输入参数。
返回结果为success字符串。
示例代码如下,以Python为例:
import requests
import json


def post_clear_history(url='http://127.0.0.1:7860', headers=None):
    r = requests.post(f'{url}/clear_history', headers=headers, timeout=1500)
    data = r.content.decode('utf-8')
    return data


if __name__ == '__main__':
    # <service_url> 替换为服务访问地址
    hosts = '<service_url>'
    # <token> 替换为服务Token
    head = {
        'Authorization': '<token>'
    }
    clear_info = post_clear_history(url=hosts, headers=head)
    print(clear_info)
