本文档主要描述基于 JWT 应用如何获得网盘与相册服务PDS授权访问凭证access_token。
JWT 应用介绍
本文档中的JWT应用是指使用 JWT(JSON Web Token)机制进行身份认证的自定义应用。
JWT应用可以在服务端通过私钥对数据进行签名得到一个JWT字符串,该JWT字符串作为访问已经配置了公钥的服务端的凭证。
适用场景
企业已有内部的软件系统,包含独立的账号体系,想通过内部的登录页面登录,然后使用PDS的功能。
企业已有独立的账号体系和登录入口,想要使用已有的登录入口结合 PDS 搭建一套已有独立账号的云存储系统。
接入步骤概览
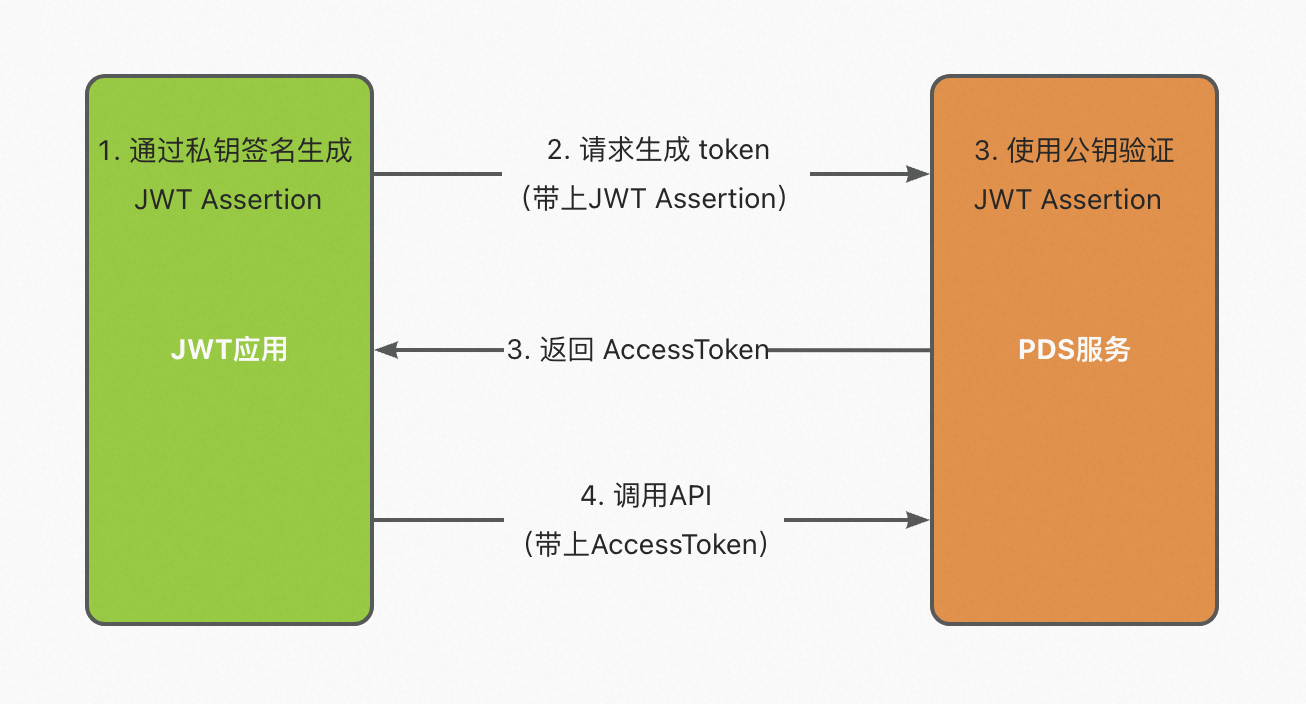
在 PDS 控制台创建自定义域和JWT应用。
利用RSA算法创建一对公私钥,将公钥保存到PDS服务端,私钥保存到JWT应用服务端。
JWT应用服务端将数据进行编码并用私钥进行签名生成JWT Assertion字符串,然后发送给PDS服务端。
PDS服务端使用公钥验证 JWT Assertion 字符串合法后,返回 AccessToken 给JWT应用服务端,JWT应用服务端可以通过 AccessToken 来调用PDS服务端提供的API。
详细步骤
1 配置密钥
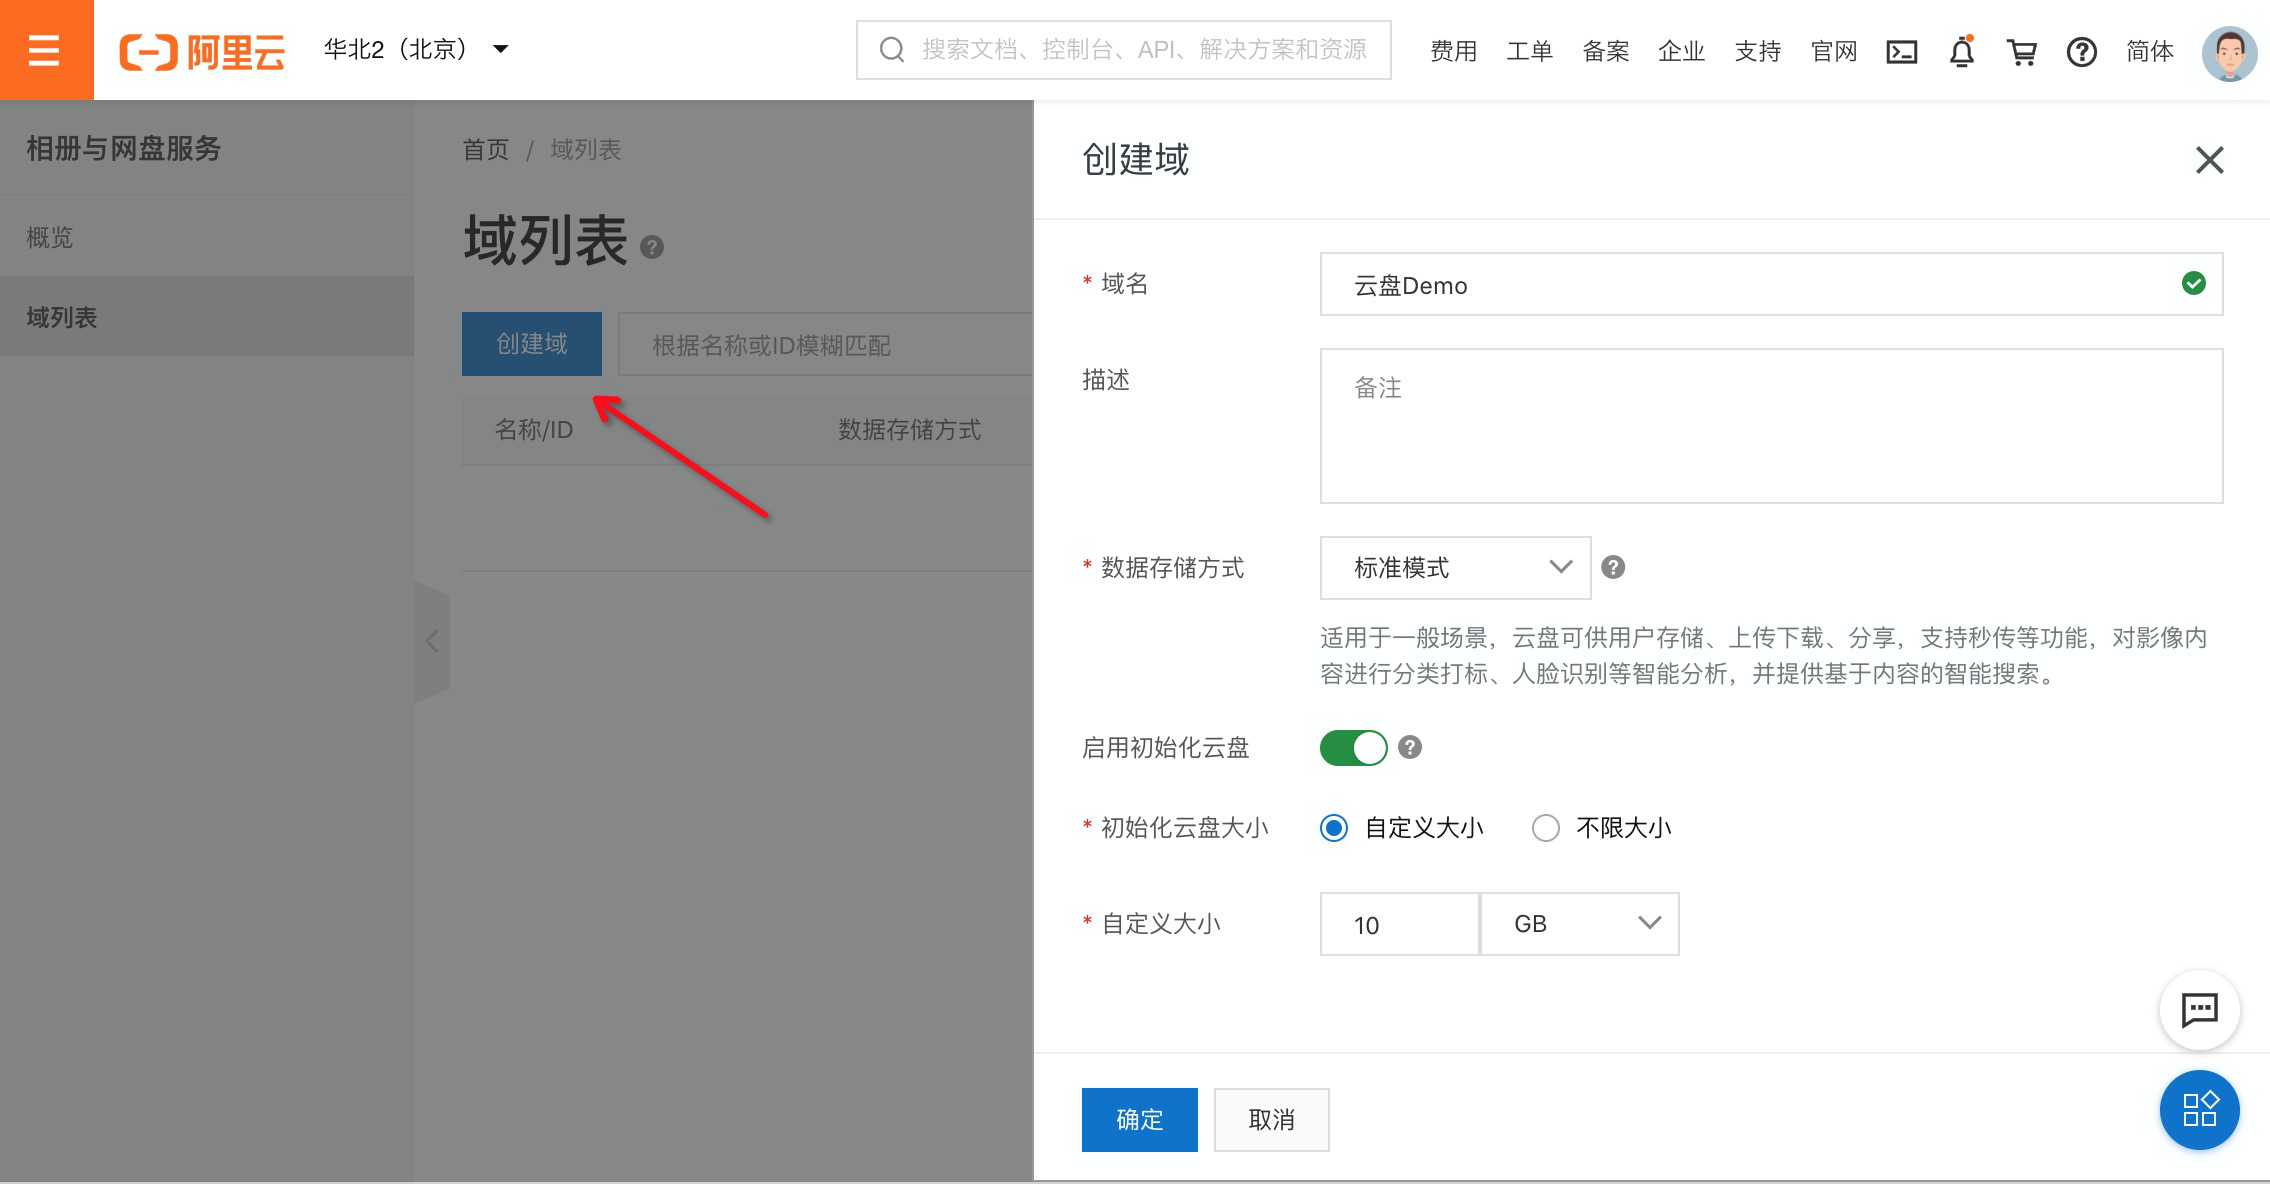
1.1 创建或选择域
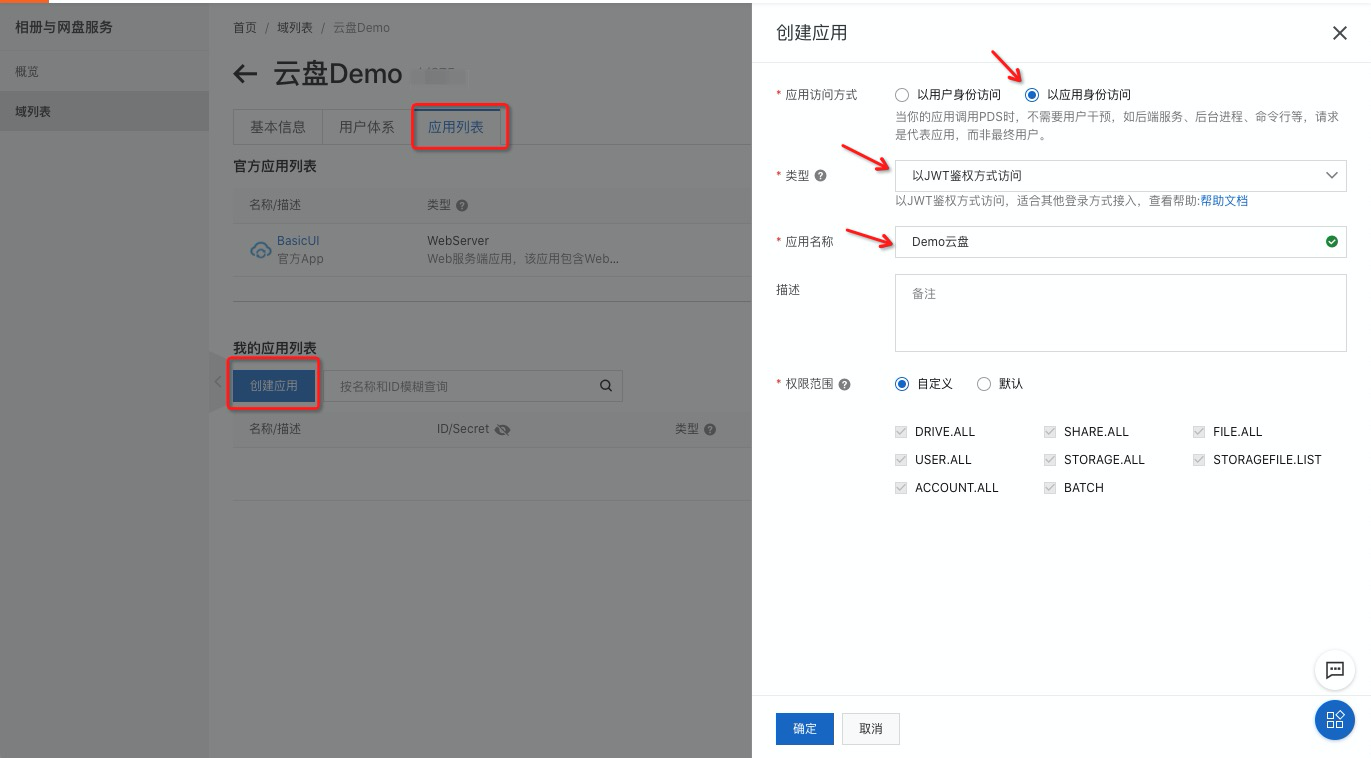
1.2 创建或选择应用
进入域详情,在应用列表界面,创建(选择)一个应用:
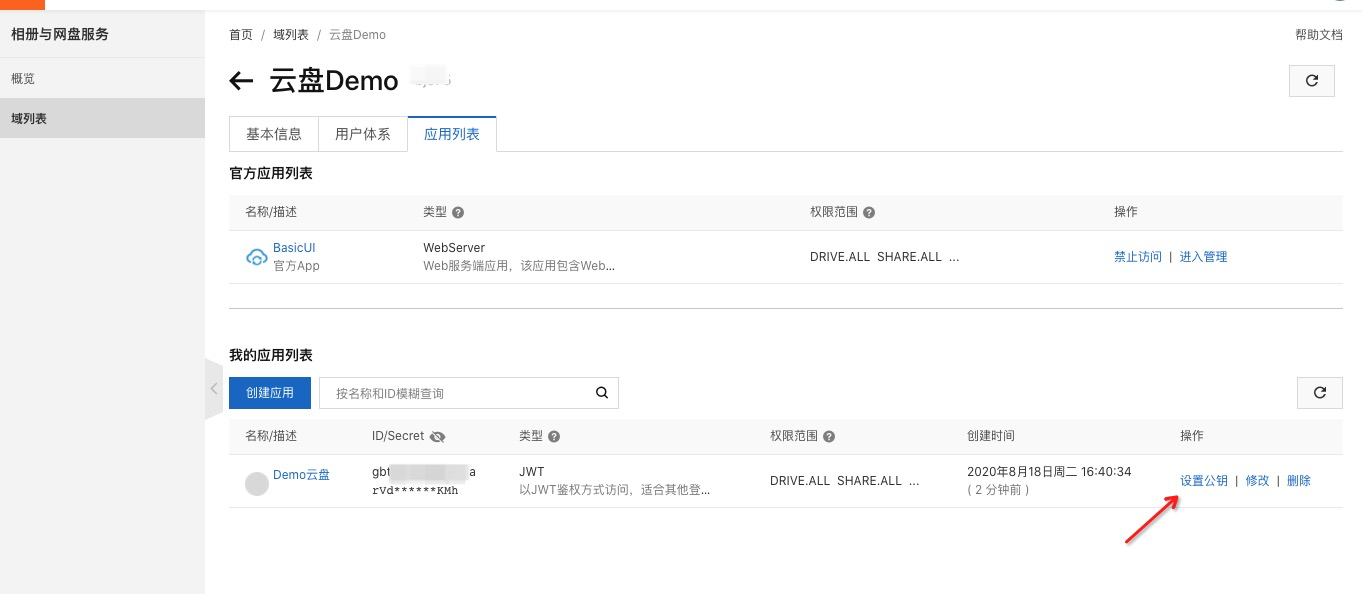
1.3 设置公钥
创建(选择)应用后,点击”设置公钥”:
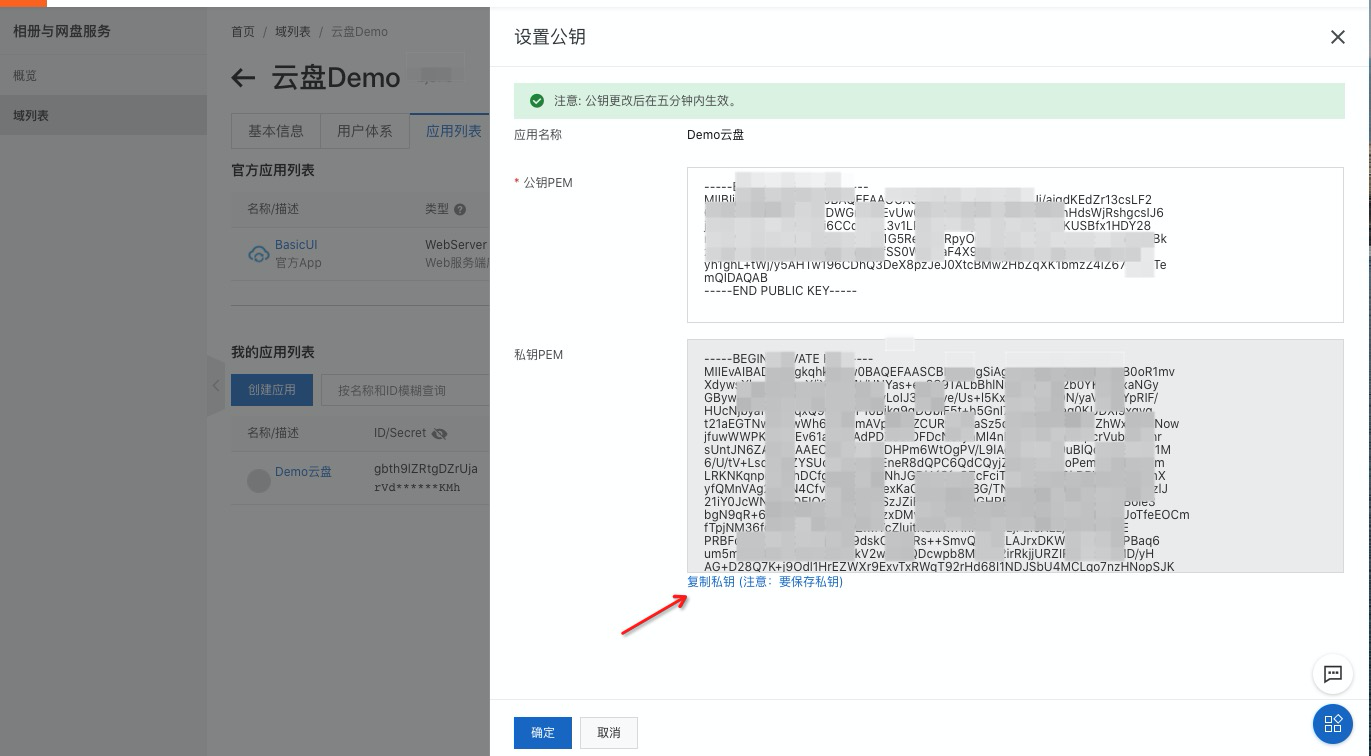
生成公私钥: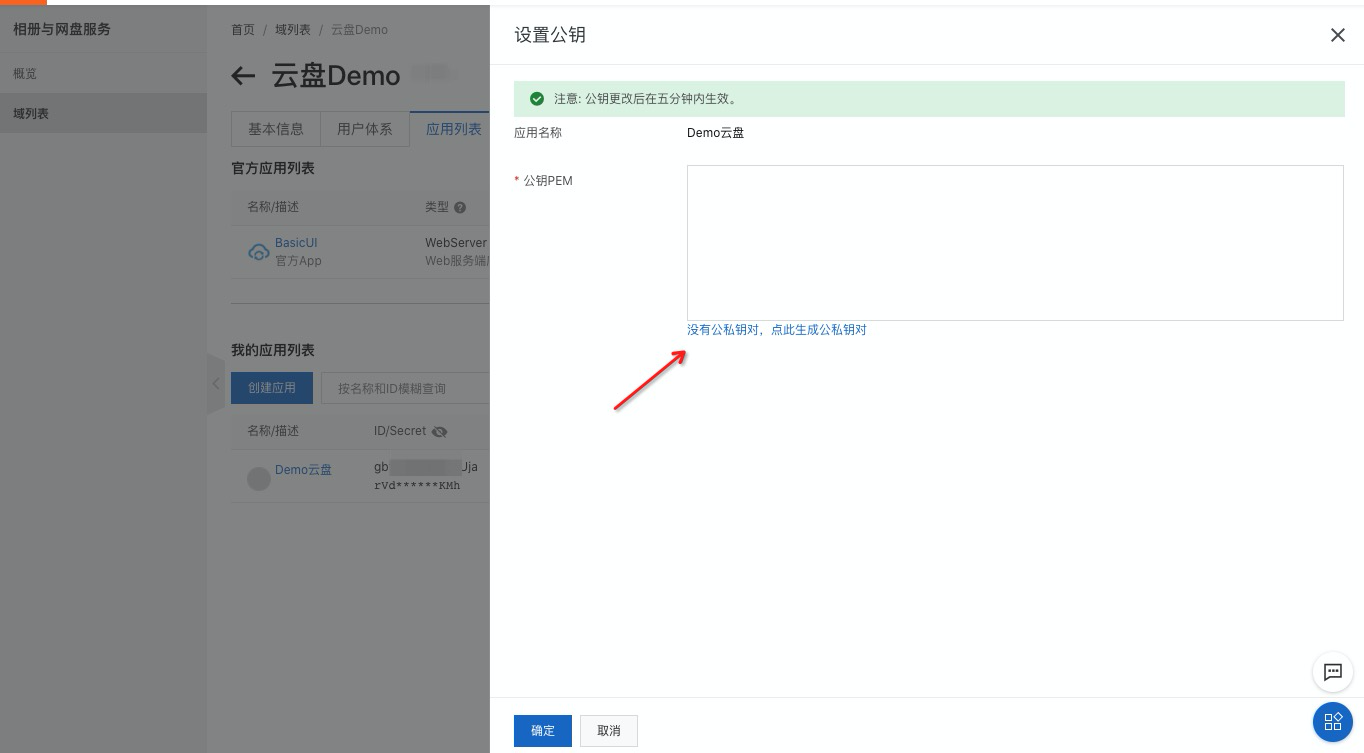
生成公私钥后,记得复制私钥,自己保存。然后点确定即可。
2 获取ACCESS_TOKEN
2.1 应用服务端计算JWT字符串
将待签名的数据进行编码,并使用私钥通过指定的加密算法对其进行签名,生成JWT字符串。下面是Node.js 的参考代码:
const JWT = require('jsonwebtoken');

function signAssertion({ domain_id, client_id, user_id, privateKeyPEM }) {
  var now_sec = parseInt(Date.now() / 1000);
  var opt = {
    iss: client_id,
    sub: user_id,
    sub_type: "user",
    aud: domain_id,
    jti: Math.random().toString(36).substring(2),
    exp: now_sec + 60,
    // iat: now_sec,
    // nbf: '',
    auto_create: false,
  };
  return JWT.sign(opt, privateKeyPEM, {
    algorithm: "RS256",
  });
}
opt 参数说明:
字段名 | 是否必选 | 类型 | 描述 |
iss | 必选 | String | App ID |
sub | 必选 | String | User ID、Domain ID |
sub_type(扩展字段) | 必选 | String | 账号类型,目前支持填 user、service,此处填user,则sub为userID,签发普通用户accessToken。 此处填service,则sub为domainID,签发domain服务账号accessToken(超级管理员权限) |
aud | 必选 | String | Domain ID |
jti | 必选 | String | 应用生成JWT的唯一标识,长度16-128位,推荐使用uuid即可 |
exp | 必选 | Integer | JWT过期时间, Unix Time,单位秒,生效时间和过期时间不能超过15分钟。为防止客户端和服务器时间不一致,此时间建议设置为当前时间加5分钟。 |
iat | 可选 | Integer | 签发时间,Unix Time,单位秒,在此时间之前无法使用,如:1577682075 |
nbf | 可选 | Integer | 生效时间,Unix Time,单位秒,不指定则默认为当前时间。生效时间和过期时间不能超过15分钟。 为防止客户端和服务器时间不一致,此时间建议设置为当前时间减5分钟,或者不设置。 |
auto_create(扩展字段) | 可选 | Boolean | 如果用户不存在,则自动创建,默认不创建用户。 |
更多关于JWT的三方库和计算方法请参考JWT官网。
2.2 通过JWT字符串换取的access_token
调用Authorize - OAuth请求授权换取access_token:
POST /v2/oauth/token
Content-Type: application/x-www-form-urlencoded

grant_type=urn:ietf:params:oauth:grant-type:jwt-bearer&client_id=${APP_ID}&assertion=xxxxxxxxxx注意:要设置请求的 content-type 为 application/x-www-form-urlencoded 注意:请求参数要放在body里
请求参数说明:
字段名 | 是否必选 | 类型 | 描述 |
grant_type | 必选 | String | 申请授权的类型,此处应为字符串常量: |
client_id | 必选 | String | 应用ID |
assertion | 必选 | String | 上一步骤计算出来的JWT |
返回 token json 样例:
{
  "access_token": "eyJh****eQdnUTsEk4",
  "refresh_token": "kL***Lt",
  "expires_in": 7200,
  "token_type": "Bearer"
}
应用服务端拿到 access_token 后返回给应用Web端,调用PDS API的时候带上 access_token 就可以访问用户在PDS 上的资源。
2.3 更新access_token
通过JWT方式获取的access_token的有效期只有2小时,超过2小时后access_token将过期,过期后可以再次执行步骤2.1和2.2的方法来获取一个新的access_token。 还有一种方法是在7天内可以调用PDS API通过过期的access_token来获取新的access_token,7天后需要重新按照步骤2.1和2.2获取access_token。
调用Authorize - OAuth请求授权换取access_token的请求内容如下:
POST /v2/oauth/token
Content-Type: application/x-www-form-urlencoded

client_id=${APPID}&refresh_token=${access_token}&grant_type=refresh_token&redirect_uri=${REDIRECT_URI}
字段名 | 是否必选 | 类型 | 描述 |
client_id | 必选 | String | 应用ID |
refresh_token | 必选 | String | 已过期的access_token |
grant_type | 必选 | String | 申请授权的类型,此处应为字符串常量”refresh_token” |
redirect_uri | 必选 | String | 创建App时填写的回调地址 |
3 使用 Basic UI (可选)
如果您不想自己开发UI,而我们官方提供的Basic UI可以满足您的要求,可以直接使用Basic UI。
方法1:
使用window.open 打开 basic ui,postMessage传递AccessToken过去即可。
示例代码:
const endpoint = `https://${domain_id}.apps.aliyunpds.com`
const url = `${endpoint}/accesstoken?origin=${location.origin}`
var win = window.open(url)

window.addEventListener('message', onMessage, false)
async function onMessage(e) {
  if (e.data.code == 'token' && e.data.message == 'ready') {
    var result = await getToken();//  从服务端获取 AccessToken
    //result = {"access_token": ...}
    win.postMessage({
      code: 'token',
      message: result
    }, endpoint || '*')

    window.removeEventListener('message', onMessage)
  }
}方法2:
使用 iframe 嵌入 basic ui,postMessage 传递 AccessToken 过去即可。
示例代码:
const endpoint = `https://${domain_id}.apps.aliyunpds.com`
//iframe嵌入URL构成:
const iframeURL = `${endponit}/accesstoken?origin=${location.origin}`html代码:
//注意替换变量iframeURL
<iframe id="ifr" src="iframeURL"></iframe>
window.addEventListener('message', onMessage)
async function onMessage(e) {
if (e.data.code == 'token' && e.data.message == 'ready') {
var result = await getToken();// 从服务端获取 AccessToken
//result = {"access_token": ......}
document.getElementById('ifr').contentWindow.postMessage({
code: 'token',
message: result
}, endpoint || '*')
window.removeEventListener('message', onMessage)
}
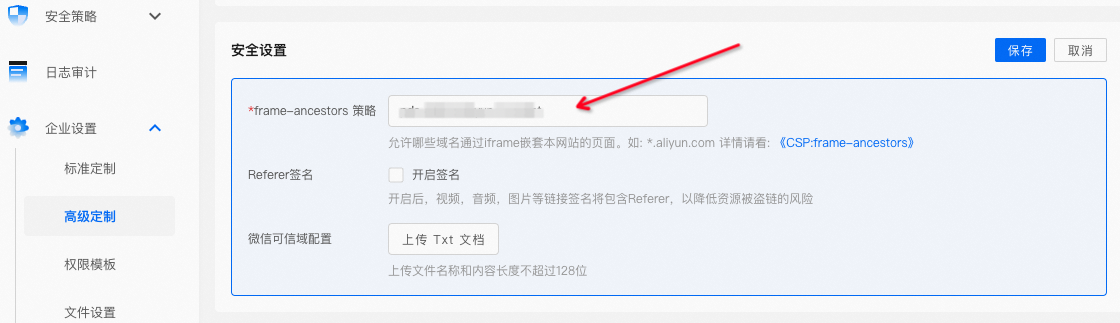
}注意:使用方法2,还需要在basic ui中配置这个安全设置,把宿主页的origin配置上
假设宿主页为 https://example.com/a.html, origin为 https://example.com, 这里配置example.com 即可。
方法3:
BasicUI 通过 iframe 嵌入自定义登录页面。
在系统配置中,配置自定义登录页面的 url,和 jwt 的APPID(让 BasicUI 自动刷新token):
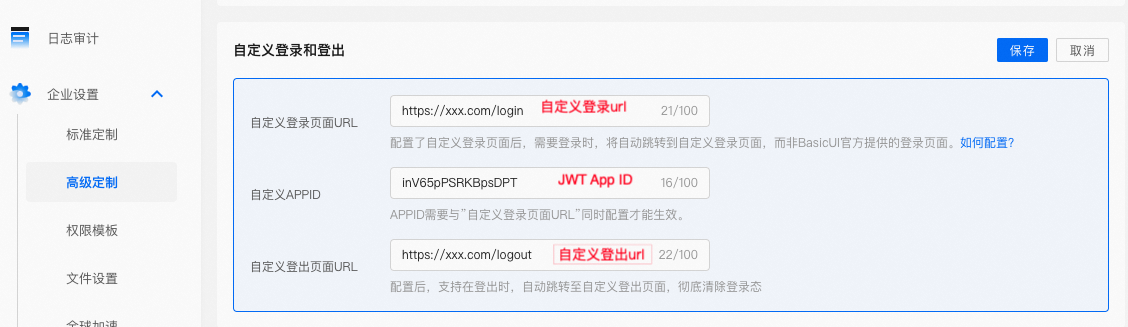
用户登录时,不在打开BasicUI的默认登录页面,而是iframe嵌入的打开自定义登录页面。
登录成功后, 通过postMessage 向宿主页传递 token:
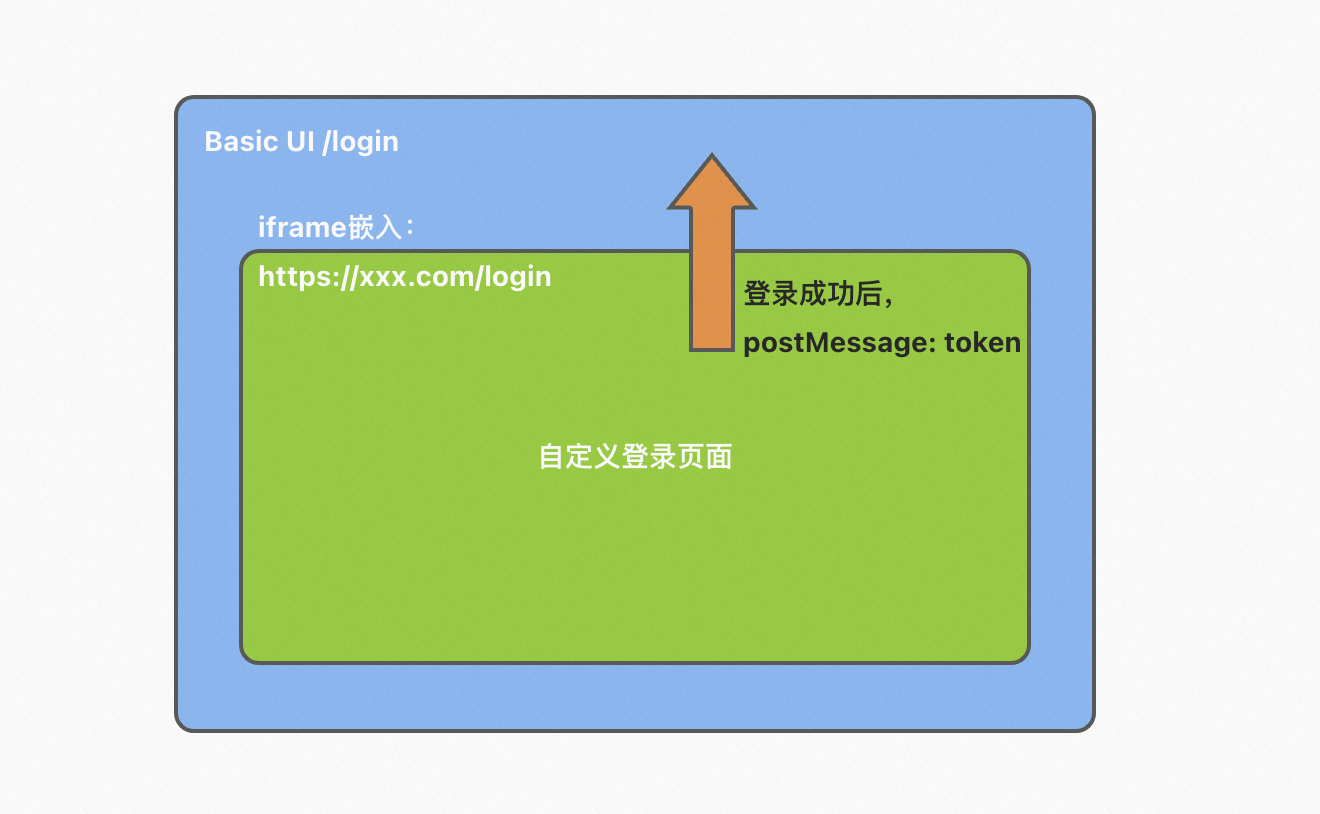
if(parent!=self){
  let origin = ''
  parent.postMessage({
    code: 'token',
    message: {
       access_token: 'xxxx',
       refresh_token: 'xxxx',
       ...
    }
  }, endpoint || "*")
}附录1:Node.js 代码实现
JWT应用获取 access_token 以及刷新 access_token 示例代码:
const fs = require('fs')
const JWT = require('jsonwebtoken');
const axios = require('axios')

const DOMAIN_ID = '' // 域ID
const APP_ID = '' // 应用ID
const USER_ID = '' // 用户UID
const PRIVATE_KEY_PEM = '' // 私钥,步骤1.3配置的私钥
const PRE = `https://${domain_id}.api.aliyunpds.com`

async function init() {
  try {
    //这几个变量需要根据实际情况填写
    var params = {
      domain_id: DOMAIN_ID,
      client_id: APP_ID,
      user_id: USER_ID,
      privateKeyPEM: PRIVATE_KEY_PEM,
    };
    var assertion = signAssertion(params)
    var obj = await getToken(assertion)
    return obj.data
  } catch (e) {
    if (e.response) {
      console.log(e.response.status)
      console.log(e.response.headers)
      console.log(e.response.data)
    } else {
      console.error(e)
    }
  }
}

function signAssertion({ domain_id, client_id, user_id, privateKeyPEM }) {
  var now_sec = parseInt(Date.now()/1000)
  var opt = {
    iss: client_id,
    sub: user_id,
    sub_type: 'user',
    aud: domain_id,
    jti: Math.random().toString(36).substring(2),
    exp: now_sec + 300,
    // iat: now_sec,
    // nbf: '',
    auto_create: true,
  };
  return JWT.sign(opt, privateKeyPEM, {
    algorithm: 'RS256'
  });
}

async function getToken(assertion) {
  return await axios({
    method: 'post',
    url: PRE + '/v2/oauth/token',
    //注意:要设置请求的 content-type 为 application/x-www-form-urlencoded
    headers: {
      'Content-Type': 'application/x-www-form-urlencoded'
    },
    //注意:请求参数要放在body里
    data: params({
      grant_type: 'urn:ietf:params:oauth:grant-type:jwt-bearer',
      client_id: APP_ID,
      assertion
    })
  })
}

async function refreshToken(refresh_token) {
  return await axios({
    method: 'post',
    url: PRE + '/v2/oauth/token',
    //注意:要设置请求的 content-type 为 application/x-www-form-urlencoded
    headers: {
      'Content-Type': 'application/x-www-form-urlencoded'
    },
    //注意:请求参数要放在body里
    data: params({
      grant_type: 'refresh_token',
      client_id: APP_ID,
      refresh_token,
    })
  })
}

function params(m){
  const params = new URLSearchParams();
  for(var k in m){
     params.append(k, m[k]);
  }
  return params;
}

//调用测试
;(async ()=>{
  let result = await init()
  console.log(result) // 返回token对象{access_token:...},对象结构参考附录2
  // access_token 失效后
  refreshToken(result.refreshToken) // 返回一个新的token对象{access_token:...},对象结构考附录2
})();
附录2:token对象结构
示例数据
{
  access_token: 'eyJhbG.....g7M0p28',
  refresh_token: '62f1acc.......9b781f3',
  expires_in: 7200,
  token_type: 'Bearer',
  ......
}参数说明请参考Token - 获取访问令牌。