
本文中含有需要您注意的重要提示信息,忽略该信息可能对您的业务造成影响,请务必仔细阅读。
本文主要介绍如何基于ROS CDK批量上传本地文件夹下的所有文件至阿里云OSS,且支持多种编程语言,包括TypeScript、JavaScript、Java、Python和C#。为您提供了一个高效、便捷的文件上传解决方案。
OSS Bucket是阿里云对象存储服务中创建的存储空间,用于存放和管理各种类型的数据文件。更多信息,请参见存储空间(Bucket)。
费用说明
ROS CDK本身不收费,但本方案需要使用OSS和函数计算,会产生相关的资源费用。具体费用信息,请参见OSS存储费用、函数计算按量付费。
准备工作
请确保您已经完成以下操作:
安装和配置阿里云CLI、安装ROS CDK。具体操作,请参见安装ROS CDK。
获取AccessKey信息,用于后续授权。如果没有,请参见创建AccessKey。
开发语言环境要求 。
TypeScript:Node.js 8.0或更高版本。
JavaScript:JSON解析工具包(工具包名称为
jq)。Java:JDK 1.8或以上版本、Maven 2.5或以上版本。
Python:Python 3.4以上版本。
C#:.NET Core 2.0以上版本、Visual Studio 2010 及以上版本。
步骤一:初始化工程
在命令行窗口依次输入以下命令,在当前目录创建并初始化工程。
TypeScript
mkdir demo
cd demo
ros-cdk init --language=typescript --generate-only=true
JavaScript
mkdir demo
cd demo
ros-cdk init --language=javascript --generate-only=true
Java
mkdir demo
cd demo
ros-cdk init --language=java --generate-only=true
Python
mkdir demo
cd demo
ros-cdk init --language=python --generate-only=true
执行以下命令,创建一个属于当前工程的虚拟环境。
Python工程的运行依赖于虚拟环境(virtualenv),所以在初始化Python工程之后需要创建一个属于当前工程的虚拟环境。
python3 -m venv .venv执行以下命令,进入虚拟环境。
source .venv/bin/activateC#
mkdir demo
cd demo
ros-cdk init --language=csharp --generate-only=true
步骤二:配置阿里云凭证信息
在命令行窗口执行以下命令,配置阿里云凭证信息。
ros-cdk config根据界面提示依次输入配置信息。
endpoint(optional, default:https://ros.aliyuncs.com):
defaultRegionId(optional, default:cn-hangzhou):cn-beijing

[1] AK
[2] StsToken
[3] RamRoleArn
[4] EcsRamRole
[0] CANCEL

Authenticate mode [1...4 / 0]: 1
accessKeyId:************************
accessKeySecret:******************************

  Your cdk configuration has been saved successfully!
配置内容说明如下:
参数
说明
defaultRegionId
ROS资源栈部署的地域。默认值为
cn-hangzhou。您可以调用DescribeRegionsAPI,获取RegionId参数选择地域。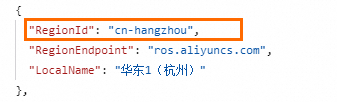
endpoint
ROS服务地址。默认值为
https://ros.aliyuncs.com。您可以调用DescribeRegionsAPI,获取地域对应的公网接入地址或VPC接入地址,选择ROS服务地址,并添加https://。
Authenticate mode
鉴权方式。本示例的鉴权方式为[1] AK,您需要输入准备工作中获取的AccessKey ID和AccessKey Secret。更多鉴权方式,请参见配置凭证。
步骤三:安装依赖
在工程中修改配置文件,并安装依赖。
TypeScript
将
package.json文件内容,全部更改为下面代码。{ "name": "demo", "version": "0.1.0", "bin": { "demo": "bin/demo.js" }, "scripts": { "build": "tsc", "test": "jest" }, "devDependencies": { "@types/jest": "^25.2.1", "@types/node": "10.17.5", "typescript": "^3.9.7", "jest": "^25.5.0", "ts-jest": "^25.3.1", "ts-node": "^8.1.0", "babel-jest": "^26.6.3", "@babel/core": "^7.12.9", "@babel/preset-env": "7.12.7", "@babel/preset-typescript": "^7.12.7", "@alicloud/ros-cdk-assert": "^1.4.0" }, "dependencies": { "@alicloud/ros-cdk-core": "^1.4.0", "@alicloud/ros-cdk-oss": "^1.4.0", "@alicloud/ros-cdk-ossdeployment": "^1.4.0" } }在命令行窗口执行以下命令,安装依赖。
npm install
JavaScript
将
package.json文件内容,全部更改为下面代码。{ "name": "demo", "version": "0.1.0", "bin": { "demo": "bin/demo.js" }, "scripts": { "build": "echo \"The build step is not required when using JavaScript!\" && exit 0", "cdk": "cdk", "test": "jest" }, "devDependencies": { "@types/jest": "^25.2.1", "@types/node": "10.17.5", "typescript": "^3.9.7", "jest": "^25.5.0", "ts-jest": "^25.3.1", "ts-node": "^8.1.0", "babel-jest": "^26.6.3", "@babel/core": "^7.12.9", "@babel/preset-env": "7.12.7", "@babel/preset-typescript": "^7.12.7", "@alicloud/ros-cdk-assert": "^1.0.25" }, "dependencies": { "@alicloud/ros-cdk-core": "^1.4.0", "@alicloud/ros-cdk-oss": "^1.4.0", "@alicloud/ros-cdk-ossdeployment": "^1.4.0" } }在命令行窗口执行以下命令,安装依赖。
npm install
Java
将
pom.xml文件内容,全部更改为下面代码。<?xml version="1.0" encoding="UTF-8"?> <project xsi:schemaLocation="http://maven.apache.org/POM/4.0.0 http://maven.apache.org/xsd/maven-4.0.0.xsd" xmlns="http://maven.apache.org/POM/4.0.0" xmlns:xsi="http://www.w3.org/2001/XMLSchema-instance"> <modelVersion>4.0.0</modelVersion> <groupId>com.myorg</groupId> <artifactId>demo</artifactId> <version>0.1</version> <properties> <project.build.sourceEncoding>UTF-8</project.build.sourceEncoding> <cdk.version>1.0.25</cdk.version> </properties> <build> <plugins> <plugin> <groupId>org.apache.maven.plugins</groupId> <artifactId>maven-compiler-plugin</artifactId> <version>3.8.1</version> <configuration> <source>1.8</source> <target>1.8</target> </configuration> </plugin> <plugin> <groupId>org.codehaus.mojo</groupId> <artifactId>exec-maven-plugin</artifactId> <version>1.6.0</version> <configuration> <mainClass>com.myorg.DemoApp</mainClass> </configuration> </plugin> </plugins> </build> <dependencies> <!-- AliCloud ROS Cloud Development Kit (ROS CDK) --> <dependency> <groupId>com.aliyun</groupId> <artifactId>ros-cdk-core</artifactId> <version>1.4.0</version> </dependency> <dependency> <groupId>com.aliyun</groupId> <artifactId>ros-cdk-oss</artifactId> <version>1.4.0</version> </dependency> <dependency> <groupId>com.aliyun</groupId> <artifactId>ros-cdk-ossdeployment</artifactId> <version>1.4.0</version> </dependency> <!-- https://mvnrepository.com/artifact/junit/junit --> <dependency> <groupId>junit</groupId> <artifactId>junit</artifactId> <version>4.12</version> <scope>test</scope> </dependency> </dependencies> </project>执行以下命令,安装依赖:
mvn compile
Python
将
requirements.txt文件内容,全部更改为下面代码。ros-cdk-core==1.4.0 ros-cdk-oss==1.4.0 ros-cdk-ossdeployment==1.4.0在命令行窗口执行以下命令,安装依赖。
pip install -r requirements.txt
C#
将src/Demo/Demo.csproj文件内容,全部更改为下面代码。
<Project Sdk="Microsoft.NET.Sdk">

  <PropertyGroup>
    <OutputType>Exe</OutputType>
    <TargetFramework>netcoreapp3.1</TargetFramework>
    <!-- Roll forward to future major versions of the netcoreapp as needed -->
    <RollForward>Major</RollForward>
  </PropertyGroup>

  <ItemGroup>
    <!-- CDK Construct Library dependencies -->
    <PackageReference Include="AlibabaCloud.SDK.ROS.CDK.Core" Version="1.4.0" />
    <PackageReference Include="AlibabaCloud.SDK.ROS.CDK.Oss" Version="1.4.0" />
    <PackageReference Include="AlibabaCloud.SDK.ROS.CDK.Ossdeployment" Version="1.4.0" />

    <!-- jsii Roslyn analyzers (un-comment to obtain compile-time checks for missing required props
    <PackageReference Include="Amazon.Jsii.Analyzers" Version="*" PrivateAssets="all" />
    -->

  </ItemGroup>

</Project>
步骤四:添加资源
为项目添加资源,本示例涉及到的资源有:
使用已有OSS Bucket并添加资源
TypeScript
如果您想使用已有的OSS Bucket来存放本地文件,将步骤一工程目录下的lib/demo-stack.ts文件内容,全部改为下面代码。
请将folderPath变量设置为本地文件夹的绝对路径,同时,将ossBucketName变量赋值为您想要存放项目文件的OSS Bucket名称。请确保该Bucket已存在。
import * as ros from '@alicloud/ros-cdk-core';
import * as oss_deployment from '@alicloud/ros-cdk-ossdeployment';
import * as oss from '@alicloud/ros-cdk-oss';
import * as fs from "fs";
import * as path from "path";


/**
 * Recursively reads all files in a directory including subdirectories.
 * @param dirPath The directory path to read.
 * @returns An array containing paths of all files.
 */
function getAllFiles(dirPath: string): oss_deployment.ISource[] {
  dirPath = dirPath.endsWith('/') ? dirPath : dirPath + '/';
  const result: oss_deployment.ISource[] = [];
  const files = fs.readdirSync(dirPath);
  for (const file of files) {
    const curPath = path.join(dirPath, file);
    if (fs.lstatSync(curPath).isDirectory()) {
      result.push(...getAllFiles(curPath));
    } else {
      const objectPrefix = path.dirname(curPath).substring(
          path.dirname(curPath).indexOf('/out') + '/out'.length) + '/';
      result.push(oss_deployment.Source.asset(curPath, {}, objectPrefix.substring(1)));
    }
  }
  return result;
}


export class DemoStack extends ros.Stack {
  constructor(scope: ros.Construct, id: string, props?: ros.StackProps) {
    super(scope, id, props);

    const folderPath = "my-folder";  // 本地文件夹路径
    const ossBucketName = "my-blog";  // OSS bucket名称

    const filePaths = getAllFiles(folderPath);
    new ros.RosInfo(this, ros.RosInfo.description, "Deploy the folder to OSS.");

    new oss_deployment.BucketDeployment(this, 'SampleFileDeployment', {
      sources: filePaths,
      destinationBucket: ossBucketName,
      timeout: 300,
      logMonitoring: true,  // 是否开启日志监控,设为false则不开启
    });
  }
}
JavaScript
如果您想使用已有的OSS Bucket来存放本地文件,将步骤一工程目录下的lib/demo-stack.js文件内容,全部改为下面代码。
请将folderPath变量设置为本地文件夹的绝对路径,同时,将ossBucketName变量赋值为您想要存放项目文件的OSS Bucket名称。请确保该Bucket已存在。
const ros = require('@alicloud/ros-cdk-core');
const oss_deployment = require('@alicloud/ros-cdk-ossdeployment');
const oss = require('@alicloud/ros-cdk-oss');
const fs = require("fs");
const path = require("path");

/**
 * Recursively reads all files in a directory including subdirectories.
 * @param dirPath The directory path to read.
 * @returns An array containing paths of all files.
 */
function getAllFiles(dirPath) {
  dirPath = dirPath.endsWith('/') ? dirPath : dirPath + '/';
  const result = [];
  const files = fs.readdirSync(dirPath);
  for (const file of files) {
    const curPath = path.join(dirPath, file);
    if (fs.lstatSync(curPath).isDirectory()) {
      result.push(...getAllFiles(curPath));
    } else {
      const objectPrefix = path.dirname(curPath).substring(
          path.dirname(curPath).indexOf('/out') + '/out'.length) + '/';
      result.push(oss_deployment.Source.asset(curPath, {}, objectPrefix.substring(1)));
    }
  }
  return result;
}

class DemoStack extends ros.Stack {
  constructor(scope, id, props) {
    super(scope, id, props);
    const folderPath = "my-folder";  // 本地文件夹路径
    const ossBucketName = "my-blog";  // OSS bucket名称
    const filePaths = getAllFiles(folderPath);
    new ros.RosInfo(this, ros.RosInfo.description, "Deploy the folder to OSS.");
    new oss_deployment.BucketDeployment(this, 'SampleFileDeployment', {
      sources: filePaths,
      destinationBucket: ossBucketName,
      timeout: 300,
      logMonitoring: true,  // 是否开启日志监控,设为false则不开启
    });
  }
}

module.exports = { DemoStack };
Java
如果您想使用已有的OSS Bucket来存放本地文件,将步骤一工程目录下的
src/main/java/com/myorg/DemoStack.java文件内容,全部改为下面代码。重要请将
folderPath变量设置为本地文件夹的绝对路径,同时,将ossBucketName变量赋值为您想要存放项目文件的OSS Bucket名称。请确保该Bucket已存在。package com.myorg; import com.aliyun.ros.cdk.core.Construct; import com.aliyun.ros.cdk.core.RosInfo; import com.aliyun.ros.cdk.core.Stack; import com.aliyun.ros.cdk.core.StackProps; import com.aliyun.ros.cdk.oss.Bucket; import com.aliyun.ros.cdk.ossdeployment.BucketDeployment; import com.aliyun.ros.cdk.ossdeployment.ISource; import com.aliyun.ros.cdk.ossdeployment.Source; import java.io.File; import java.util.ArrayList; import java.util.List; import java.util.stream.Collectors; public class DemoStack extends Stack { public DemoStack(final Construct scope, final String id) { this(scope, id, null); } public DemoStack(final Construct scope, final String id, final StackProps props) { super(scope, id, props); final String folderPath = "my-folder"; // 本地文件夹路径 final String ossBucketName = "my-blog"; // OSS bucket名称 List<ISource> filePaths = getAllFiles(folderPath); RosInfo.setDescription("Deploy the folder to OSS."); BucketDeployment.Builder.create(this, "SampleFileDeployment") .sources(filePaths) .destinationBucket(ossBucketName) .timeout(300) .logMonitoring(true) // 是否开启日志监控,设为false则不开启 .build(); } public static List<ISource> getAllFiles(String dirPath) { if (!dirPath.endsWith("/")) { dirPath += "/"; } List<File> files = listFilesRecursively(new File(dirPath)); return files.stream() .filter(file -> !file.isDirectory()) .map(file -> { String curPath = file.getPath(); String parentPath = file.getParent(); String objectPrefix = parentPath.substring(parentPath.indexOf("/out") + "/out".length()) + "/"; return Source.asset(curPath, null, objectPrefix.substring(1)); }) .collect(Collectors.toList()); } private static List<File> listFilesRecursively(File dir) { List<File> result = new ArrayList<>(); File[] files = dir.listFiles(); if (files != null) { for (File file : files) { result.add(file); if (file.isDirectory()) { result.addAll(listFilesRecursively(file)); } } } return result; } }运行
mvn compile以编译CDK项目。
Python
如果您想使用已有的OSS Bucket来存放本地文件,将步骤一工程目录下的demo/demo_stack.py文件内容,全部改为下面代码。
请将folderPath变量设置为本地文件夹的绝对路径,同时,将ossBucketName变量赋值为您想要存放项目文件的OSS Bucket名称。请确保该Bucket已存在。
import os
import ros_cdk_core as core
import ros_cdk_ossdeployment as oss_deployment
import ros_cdk_oss as oss


def get_all_files(dir_path: str):
    """
    Recursively reads all files in a directory including subdirectories.
    :param dir_path: The directory path to read.
    :returns: An array containing paths of all files.
    """
    if not dir_path.endswith('/'):
        dir_path += '/'
    result = []
    files = os.listdir(dir_path)
    for file in files:
        cur_path = os.path.join(dir_path, file)
        if os.path.isdir(cur_path):
            result.extend(get_all_files(cur_path))
        else:
            object_prefix = os.path.dirname(cur_path)[os.path.dirname(cur_path).index('/out') + len('/out'):] + '/'
            print(object_prefix[1:], cur_path)
            result.append(oss_deployment.Source.asset(cur_path, {}, object_prefix[1:]))
    return result


class DemoStack(core.Stack):
    def __init__(self, scope: core.Construct, construct_id: str, **kwargs):
        super().__init__(scope, construct_id, **kwargs)

        folder_path = "my-folder"  # 本地文件夹路径
        oss_bucket_name = "my-blog"  # OSS bucket名称
        file_paths = get_all_files(folder_path)

        core.RosInfo(self, core.RosInfo.description, "Deploy the folder to OSS.")

        oss_deployment.BucketDeployment(self, 'SampleFileDeployment',
                                        oss_deployment.BucketDeploymentProps(
                                            sources=file_paths,
                                            destination_bucket=oss_bucket_name,
                                            timeout=300,
                                            log_monitoring=True  # 是否开启日志监控,设为false则不开启
                                        ))
C#
如果您想使用已有的OSS Bucket来存放本地文件,将步骤一工程目录下的src/Demo/DemoStack.cs文件内容,全部改为下面代码。
请将folderPath变量设置为本地文件夹的绝对路径,同时,将ossBucketName变量赋值为您想要存放项目文件的OSS Bucket名称。请确保该Bucket已存在。
using System;
using System.Collections.Generic;
using System.IO;
using AlibabaCloud.SDK.ROS.CDK.Core;
using AlibabaCloud.SDK.ROS.CDK.Ossdeployment;
using AlibabaCloud.SDK.ROS.CDK.Oss;

namespace Demo
{
    public class DemoStack : Stack
    {
        /**
         * Recursively reads all files in a directory including subdirectories.
         * @param dirPath The directory path to read.
         * @returns A list containing paths of all files.
         */
        public static List<ISource> GetAllFiles(string dirPath)
        {
            if (!dirPath.EndsWith("/"))
            {
                dirPath += "/";
            }

            var result = new List<ISource>();
            var files = System.IO.Directory.GetFiles(dirPath, "*", SearchOption.AllDirectories);

            // Loop through each file and directory
            foreach (var file in files)
            {
                var curPath = Path.Combine(dirPath, file);
                if (System.IO.Directory.Exists(curPath))
                {
                    result.AddRange(GetAllFiles(curPath));
                }
                else
                {
                    var objectPrefix = Path.GetDirectoryName(curPath)
                                        .Substring(Path.GetDirectoryName(curPath).IndexOf("/out") + "/out".Length)
                                        + "/";
                    result.Add(Source.Asset(curPath, null, objectPrefix.Substring(1)));
                }
            }

            return result;
        }

        public DemoStack(Construct scope, string id, IStackProps props = null) : base(scope, id, props)
        {
            // The code that defines your stack goes here
            const string folderPath = "my-folder";  // 本地文件夹路径
            const string ossBucketName = "my-blog";  // OSS bucket名称
            var filePaths = GetAllFiles(folderPath);

            new RosInfo(this, RosInfo.Description, "Deploy the folder to OSS.");

            new BucketDeployment(this, "SampleFileDeployment", new BucketDeploymentProps
            {
                Sources = filePaths.ToArray(),
                DestinationBucket = ossBucketName,
                Timeout = 300,
                LogMonitoring = true  // 是否开启日志监控,设为false则不开启
            });
        }
    }
}创建OSS Bucket并添加资源
TypeScript
如果您没有OSS Bucket,此代码会创建一个OSS Bucket来存放您的本地文件,将步骤一工程目录下的lib/demo-stack.ts文件内容,全部改为下面代码。
请将folderPath变量设置为本地文件夹的绝对路径,同时,将ossBucketName变量指定为您计划创建的OSS Bucket名称,Bucket名称必须全局唯一!
import * as ros from '@alicloud/ros-cdk-core';
import * as oss_deployment from '@alicloud/ros-cdk-ossdeployment';
import * as oss from '@alicloud/ros-cdk-oss';
import * as fs from "fs";
import * as path from "path";


/**
 * Recursively reads all files in a directory including subdirectories.
 * @param dirPath The directory path to read.
 * @returns An array containing paths of all files.
 */
function getAllFiles(dirPath: string): oss_deployment.ISource[] {
  dirPath = dirPath.endsWith('/') ? dirPath : dirPath + '/';
  const result: oss_deployment.ISource[] = [];
  const files = fs.readdirSync(dirPath);
  for (const file of files) {
    const curPath = path.join(dirPath, file);
    if (fs.lstatSync(curPath).isDirectory()) {
      result.push(...getAllFiles(curPath));
    } else {
      const objectPrefix = path.dirname(curPath).substring(
          path.dirname(curPath).indexOf('/out') + '/out'.length) + '/';
      result.push(oss_deployment.Source.asset(curPath, {}, objectPrefix.substring(1)));
    }
  }
  return result;
}


export class DemoStack extends ros.Stack {
  constructor(scope: ros.Construct, id: string, props?: ros.StackProps) {
    super(scope, id, props);

    const folderPath = "my-folder";  // 本地文件夹路径
    const ossBucketName = "my-blog";  // OSS bucket名称

    const filePaths = getAllFiles(folderPath);
    new ros.RosInfo(this, ros.RosInfo.description, "Deploy the folder to OSS.");

    const destBucket = new oss.Bucket(this, 'SampleDestBucket', {
      bucketName: ossBucketName
    });

    new oss_deployment.BucketDeployment(this, 'SampleFileDeployment', {
      sources: filePaths,
      destinationBucket: destBucket,
      timeout: 300,
      logMonitoring: true,  // 是否开启日志监控,设为false则不开启
    });
  }
}
JavaScript
如果您没有OSS Bucket,此代码会创建一个OSS Bucket来存放您的本地文件,将步骤一工程目录下的lib/demo-stack.js文件内容,全部改为下面代码。
请将folderPath变量设置为本地文件夹的绝对路径,同时,将ossBucketName变量指定为您计划创建的OSS Bucket名称,Bucket名称必须全局唯一!
const ros = require('@alicloud/ros-cdk-core');
const oss_deployment = require('@alicloud/ros-cdk-ossdeployment');
const oss = require('@alicloud/ros-cdk-oss');
const fs = require("fs");
const path = require("path");

/**
 * Recursively reads all files in a directory including subdirectories.
 * @param dirPath The directory path to read.
 * @returns An array containing paths of all files.
 */
function getAllFiles(dirPath) {
  dirPath = dirPath.endsWith('/') ? dirPath : dirPath + '/';
  const result = [];
  const files = fs.readdirSync(dirPath);
  for (const file of files) {
    const curPath = path.join(dirPath, file);
    if (fs.lstatSync(curPath).isDirectory()) {
      result.push(...getAllFiles(curPath));
    } else {
      const objectPrefix = path.dirname(curPath).substring(
          path.dirname(curPath).indexOf('/out') + '/out'.length) + '/';
      result.push(oss_deployment.Source.asset(curPath, {}, objectPrefix.substring(1)));
    }
  }
  return result;
}

class DemoStack extends ros.Stack {
  constructor(scope, id, props) {
    super(scope, id, props);
    const folderPath = "my-folder";  // 本地文件夹路径
    const ossBucketName = "my-blog";  // OSS bucket名称
    const filePaths = getAllFiles(folderPath);
    new ros.RosInfo(this, ros.RosInfo.description, "Deploy the folder to OSS.");
    const destBucket = new oss.Bucket(this, 'SampleDestBucket', {
      bucketName: ossBucketName
    });
    new oss_deployment.BucketDeployment(this, 'SampleFileDeployment', {
      sources: filePaths,
      destinationBucket: destBucket,
      timeout: 300,
      logMonitoring: true,  // 是否开启日志监控,设为false则不开启
    });
  }
}

module.exports = { DemoStack };请将folderPath变量设置为你的本地文件夹路径,同时,将ossBucketName变量指定为你计划创建的OSS Bucket名称,Bucket 名称必须全局唯一!
Java
如果您没有OSS Bucket,此代码会创建一个OSS Bucket来存放您的本地文件,将步骤一工程目录下的
src/main/java/com/myorg/DemoStack.java文件内容,全部改为下面代码。重要请将
folderPath变量设置为本地文件夹的绝对路径,同时,将ossBucketName变量指定为您计划创建的OSS Bucket名称,Bucket名称必须全局唯一!package com.myorg; import com.aliyun.ros.cdk.core.Construct; import com.aliyun.ros.cdk.core.RosInfo; import com.aliyun.ros.cdk.core.Stack; import com.aliyun.ros.cdk.core.StackProps; import com.aliyun.ros.cdk.oss.Bucket; import com.aliyun.ros.cdk.ossdeployment.BucketDeployment; import com.aliyun.ros.cdk.ossdeployment.ISource; import com.aliyun.ros.cdk.ossdeployment.Source; import java.io.File; import java.util.ArrayList; import java.util.List; import java.util.stream.Collectors; public class DemoStack extends Stack { public DemoStack(final Construct scope, final String id) { this(scope, id, null); } public DemoStack(final Construct scope, final String id, final StackProps props) { super(scope, id, props); final String folderPath = "my-folder"; // 本地文件夹路径 final String ossBucketName = "my-blog"; // OSS bucket名称 List<ISource> filePaths = getAllFiles(folderPath); RosInfo.setDescription("Deploy the folder to OSS."); Bucket destBucket = Bucket.Builder.create(this, "SampleDestBucket") .bucketName(ossBucketName) .build(); BucketDeployment.Builder.create(this, "SampleFileDeployment") .sources(filePaths) .destinationBucket(destBucket) .timeout(300) .logMonitoring(true) // 是否开启日志监控,设为false则不开启 .build(); } public static List<ISource> getAllFiles(String dirPath) { if (!dirPath.endsWith("/")) { dirPath += "/"; } List<File> files = listFilesRecursively(new File(dirPath)); return files.stream() .filter(file -> !file.isDirectory()) .map(file -> { String curPath = file.getPath(); String parentPath = file.getParent(); String objectPrefix = parentPath.substring(parentPath.indexOf("/out") + "/out".length()) + "/"; return Source.asset(curPath, null, objectPrefix.substring(1)); }) .collect(Collectors.toList()); } private static List<File> listFilesRecursively(File dir) { List<File> result = new ArrayList<>(); File[] files = dir.listFiles(); if (files != null) { for (File file : files) { result.add(file); if (file.isDirectory()) { result.addAll(listFilesRecursively(file)); } } } return result; } }运行
mvn compile以编译CDK项目。
Python
如果您没有OSS Bucket,此代码会创建一个OSS Bucket来存放您的本地文件,将步骤一工程目录下的demo/demo_stack.py文件内容,全部改为下面代码。
请将folderPath变量设置为本地文件夹的绝对路径,同时,将ossBucketName变量指定为您计划创建的OSS Bucket名称,Bucket名称必须全局唯一!
import os
import ros_cdk_core as core
import ros_cdk_ossdeployment as oss_deployment
import ros_cdk_oss as oss


def get_all_files(dir_path: str):
    """
    Recursively reads all files in a directory including subdirectories.
    :param dir_path: The directory path to read.
    :returns: An array containing paths of all files.
    """
    if not dir_path.endswith('/'):
        dir_path += '/'
    result = []
    files = os.listdir(dir_path)
    for file in files:
        cur_path = os.path.join(dir_path, file)
        if os.path.isdir(cur_path):
            result.extend(get_all_files(cur_path))
        else:
            object_prefix = os.path.dirname(cur_path)[os.path.dirname(cur_path).index('/out') + len('/out'):] + '/'
            print(object_prefix[1:], cur_path)
            result.append(oss_deployment.Source.asset(cur_path, {}, object_prefix[1:]))
    return result


class DemoStack(core.Stack):
    def __init__(self, scope: core.Construct, construct_id: str, **kwargs):
        super().__init__(scope, construct_id, **kwargs)

        folder_path = "my-folder"  # 本地文件夹路径
        oss_bucket_name = "my-blog"  # OSS bucket名称
        file_paths = get_all_files(folder_path)

        core.RosInfo(self, core.RosInfo.description, "Deploy the folder to OSS.")

        dest_bucket = oss.Bucket(self, 'SampleDestBucket',
                                 oss.BucketProps(bucket_name=oss_bucket_name))

        oss_deployment.BucketDeployment(self, 'SampleFileDeployment',
                                        oss_deployment.BucketDeploymentProps(
                                            sources=file_paths,
                                            destination_bucket=dest_bucket,
                                            timeout=300,
                                            log_monitoring=True  # 是否开启日志监控,设为false则不开启
                                        ))
C#
如果您没有OSS Bucket,此代码会创建一个OSS Bucket来存放您的本地文件,将步骤一工程目录下的src/Demo/DemoStack.cs文件内容如下。
请将folderPath变量设置为本地文件夹的绝对路径,同时,将ossBucketName变量指定为您计划创建的OSS Bucket名称,Bucket名称必须全局唯一!
using System;
using System.Collections.Generic;
using System.IO;
using AlibabaCloud.SDK.ROS.CDK.Core;
using AlibabaCloud.SDK.ROS.CDK.Ossdeployment;
using AlibabaCloud.SDK.ROS.CDK.Oss;

namespace Demo
{
    public class DemoStack : Stack
    {
        /**
         * Recursively reads all files in a directory including subdirectories.
         * @param dirPath The directory path to read.
         * @returns A list containing paths of all files.
         */
        public static List<ISource> GetAllFiles(string dirPath)
        {
            if (!dirPath.EndsWith("/"))
            {
                dirPath += "/";
            }

            var result = new List<ISource>();
            var files = System.IO.Directory.GetFiles(dirPath, "*", SearchOption.AllDirectories);

            // Loop through each file and directory
            foreach (var file in files)
            {
                var curPath = Path.Combine(dirPath, file);
                if (System.IO.Directory.Exists(curPath))
                {
                    result.AddRange(GetAllFiles(curPath));
                }
                else
                {
                    var objectPrefix = Path.GetDirectoryName(curPath)
                                        .Substring(Path.GetDirectoryName(curPath).IndexOf("/out") + "/out".Length)
                                        + "/";
                    result.Add(Source.Asset(curPath, null, objectPrefix.Substring(1)));
                }
            }

            return result;
        }

        public DemoStack(Construct scope, string id, IStackProps props = null) : base(scope, id, props)
        {
            // The code that defines your stack goes here
            const string folderPath = "my-folder";  // 本地文件夹路径
            const string ossBucketName = "my-blog";  // OSS bucket名称
            var filePaths = GetAllFiles(folderPath);

            new RosInfo(this, RosInfo.Description, "Deploy the folder to OSS.");

            var destBucket = new Bucket(this, "SampleDestBucket", new BucketProps
            {
                BucketName = ossBucketName
            });

            new BucketDeployment(this, "SampleFileDeployment", new BucketDeploymentProps
            {
                Sources = filePaths.ToArray(),
                DestinationBucket = destBucket,
                Timeout = 300,
                LogMonitoring = true  // 是否开启日志监控,设为false则不开启
            });
        }
    }
}
步骤五:创建资源栈
在创建资源栈的同时,会将您文件目录下的所有文件上传至OSS Bucket。
在命令行窗口运行如下命令,创建资源栈。
ros-cdk deploy --sync=true命令行终端返回
The deployment(sync create stack) has completed!表示创建成功,全部信息如下。DemoStack: deploying... |DemoStack |2024-06-20T03:46:09 | CREATE_COMPLETE | ALIYUN::SLS::Logstore | ros-cdk-oss-deploy...gxxxx/funct ion-log | SLSLogStoregxxxx |DemoStack |2024-06-20T03:46:09 | CREATE_COMPLETE | ALIYUN::SLS::Project | ros-cdk-oss-deployment-gxxxx | S LSProjectgxxxx |DemoStack |2024-06-20T03:46:09 | CREATE_COMPLETE | ALIYUN::RAM::Role | ros-cdk-oss-deployment-gxxxx | F CRolegxxxx |DemoStack |2024-06-20T03:46:09 | CREATE_COMPLETE | ALIYUN::OSS::Bucket | yingzhao-blog-0001 | SampleDestB ucket |DemoStack |2024-06-20T03:46:09 | CREATE_COMPLETE | ALIYUN::FC::Service | 6ba8771f-a499-433d-a7ac-5e7axxxx eb4b | FCServicegxxxx |DemoStack |2024-06-20T03:46:09 | CREATE_COMPLETE | ALIYUN::FC::Function | 436f5ba6-7ce2-4627-be63-c67dxxxx 907a | FCFunctiongxxxx |DemoStack |2024-06-20T03:46:09 | CREATE_COMPLETE | ALIYUN::SLS::Index | ros-cdk-oss-deploy...function-lo g/index | SLSIndexgxxxx |DemoStack |2024-06-20T03:46:09 | CREATE_COMPLETE | ALIYUN::ROS::CustomResource | - | SampleFileDeployment The deployment(sync create stack) has completed! Status: CREATE_COMPLETE StatusReason: Stack CREATE completed successfully StackId: 070932bb-d6d3-4f08-8e6a-2a0740bxxxx验证文件是否上传成功。
登录OSS管理控制台。
单击Bucket列表,然后单击目标Bucket名称。
在左侧导航栏,选择文件管理>文件列表。
在文件列表中查看您的文件是否上传成功。
相关操作
更新资源栈
当您的本地文件夹中有新增文件,或文件内容有更新,可以选择更新资源栈。
更新资源栈的命令与创建相同,在命令行窗口执行以下命令以推送到OSS Bucket。
ros-cdk deploy --sync=true更新成功会显示如下信息。
 The deployment(sync update stack) has completed!
Status: UPDATE_COMPLETE
StatusReason: Stack successfully updated
StackId: 070932bb-d6d3-4f08-8e6a-2a0740bxxxx
删除资源栈
文件删除后无法恢复,请谨慎操作。
如果当您不再需要此资源栈时(如项目结束、环境清理、成本控制等),可以选择使用ROS CDK删除资源栈。
ROS CDK不会主动删除目标OSS Bucket中的内容,所以需要您手动登录OSS控制台全选并删除目标Bucket中的所有文件,才可删除资源栈。
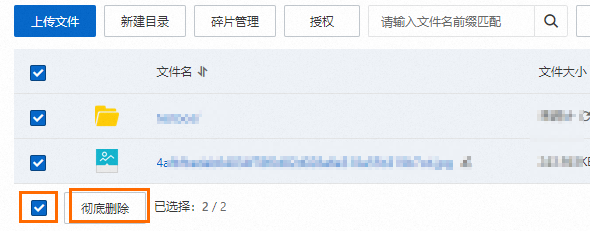
删除OOS Bucket中的所有文件。 本节以控制台操作为例,如需使用阿里云SDK、使用命令行工具ossutil等,可参见删除文件。
登录OSS管理控制台。
单击Bucket列表,然后单击目标Bucket名称。
在左侧导航栏,选择文件管理>文件列表。
全选所有文件,并单击彻底删除。
使用ROS CDK删除资源栈。
命令行窗口执行以下命令以删除资源栈。
ros-cdk destroy --sync=trueCDK会二次确认即将删除的资源栈。
The following stack(s) will be destroyed(Only deployed stacks will be displayed).

DemoStack

Please confirm.(Y/N)
输入
y并回车,删除成功会显示如下信息。The task(sync destroy stack) has finished! status: DELETE_COMPLETE StatusReason: Stack DELETE completed successfully StackId: 070932bb-d6d3-4f08-8e6a-2a0740bxxxx
更多参考
API参考页面
CDK构造库提供了一系列API,用于构建您的CDK应用程序。想要了解如何使用这些API及其特性,请参阅ROS CDK API参考。
命令简介
想要了解如何使用CDK命令行及其使用示例,请参阅ROS CDK命令简介。
功能简介
想要了解如何使用CDK输出、伪参数等功能及其使用示例,请参阅ROS CDK功能简介。
GitHub仓库
有关ROS CDK的官方GitHub存储库,请参阅Resource-Orchestration-Service-Cloud-Development-Kit。在这里,您可以提交问题,查看我们的许可证、发布记录等。