When you create an ACK managed cluster, you configure only the worker nodes. Container Service for Kubernetes (ACK) creates and manages the master nodes. This reduces O&M costs and lets you focus on your applications. This topic describes how to create an ACK managed cluster using the console, an API, Terraform, an SDK, and a CLI.
Before you create an ACK cluster, make sure that you understand basic concepts such as Kubernetes basics, Container Service for Kubernetes (ACK), and ACK managed clusters.
If this is your first time using an ACK managed cluster, see Quickly build a Rubik's Cube game application using ACK to get started. After you complete the tutorial, release the resources promptly to avoid unexpected charges.
Planning and design
Before you create a cluster, you must plan its design based on your requirements. This helps ensure that the cluster runs in a stable, efficient, and secure manner. Most configuration items can be modified after the cluster is created. However, some items, especially those related to cluster availability and networking, cannot be changed. During the planning phase, make sure that you consider the following factors.
|
Category |
Description |
|
Deployment location |
|
|
Version and specifications |
|
|
Network planning |
|
Preparations
Before you create a cluster, make sure that you have activated Container Service for Kubernetes (ACK), granted the ACK system service role to your Alibaba Cloud account or RAM user, and activated related cloud products such as VPC, Server Load Balancer (SLB), and NAT Gateway. ACK requires these permissions to call related services and perform cluster operations. For more information, see Quickly create an ACK managed cluster.
The cluster creation process involves purchasing pay-as-you-go resources such as Server Load Balancer (SLB) instances. Make sure that your account has a sufficient balance to prevent service interruptions due to overdue payments.
Create a cluster
You can create ACK clusters using the console, an API, an SDK, Terraform, and a CLI.
Console
Creation flow
To use a RAM user to create a cluster in the console, you must configure the required permissions. For more information about how to grant fine-grained permissions, see Permissions required for the ACK console.
You can follow the instructions in the console to create a cluster with the default configurations. If you want to use more granular configurations, see Configuration items for ACK managed clusters to learn about the available configuration items and how to enable them. The following section describes the process.

Step 1: Go to the creation page
-
Log on to the ACK console. In the left navigation pane, click Clusters.
-
At the top left of the page, select the resource group and region of the target resource.

-
On the Clusters page, click Create Cluster. On the ACK Managed Cluster page, follow the on-screen instructions to configure the cluster, node pool, and components.
The following steps do not enable intelligent hosting mode. To use this mode, see Create an ACK managed cluster (intelligent hosting mode).
Step 2: Configure the cluster
|
Configuration Type |
Description |
Example |
|
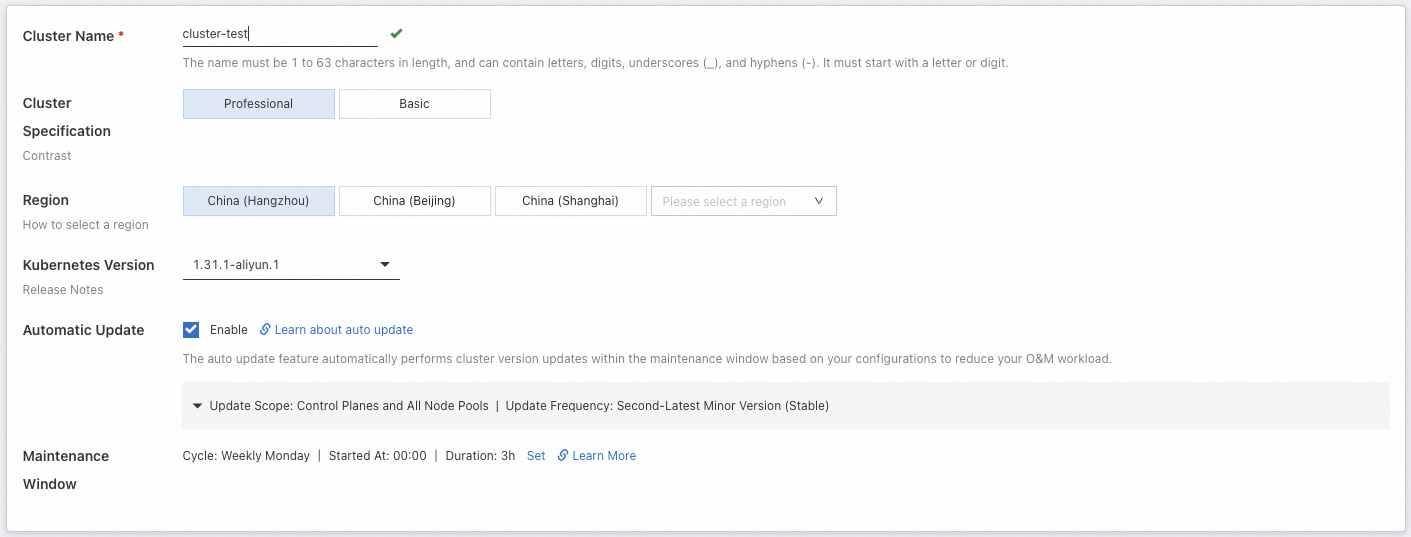
Basic Configuration |
Basic information about the cluster, including its name, edition, region, and version. You can enable automatic cluster version upgrades and configure a maintenance window for scheduled execution. |
|
|
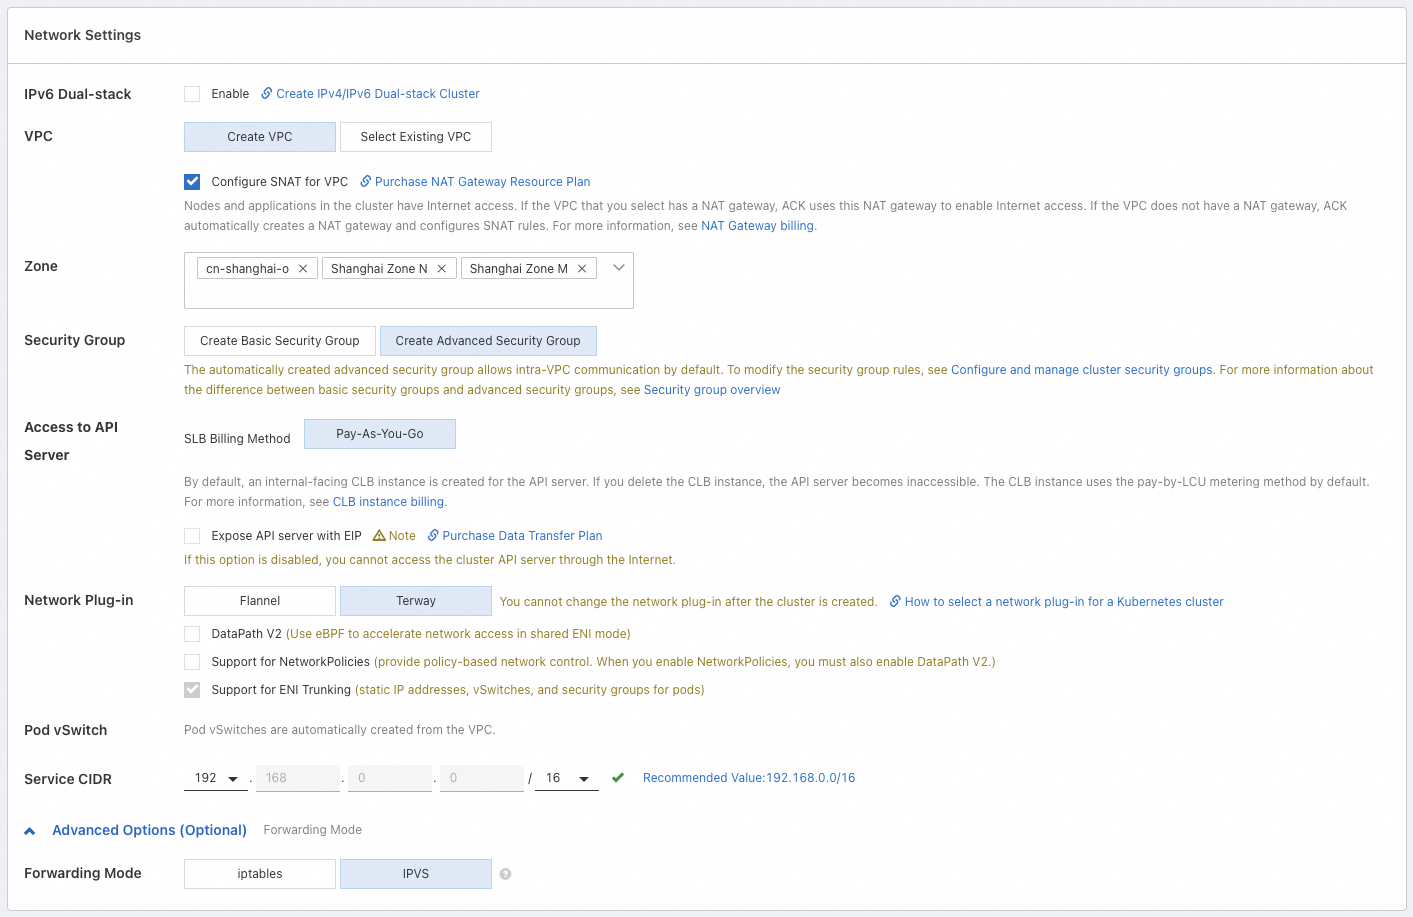
Network Configuration |
IPv6 dual-stack switch, VPC and vSwitch configurations, whether to allow public access to the API server, security group, container network plugin, and CIDR block configurations. We recommend using standard private CIDR blocks for the cluster VPC, such as 10.0.0.0/8, 172.16.0.0/12, and 192.168.0.0/16. If you have special requirements, go to Quota Center to apply for permission to use a public CIDR block to create a cluster. |
|
|
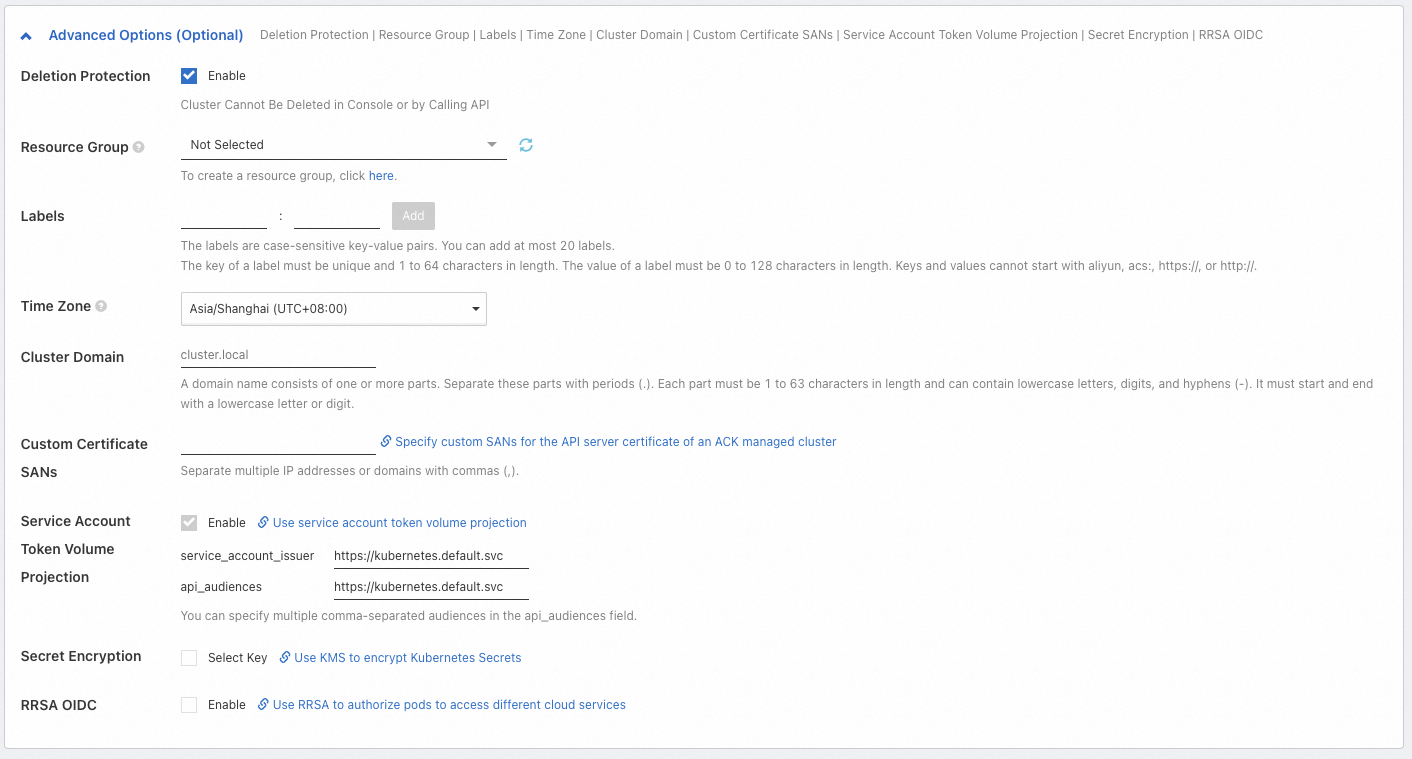
Advanced Configuration |
Configurations related to cluster resource management and cluster security. |
|
For more information about the configuration items, see Cluster configuration.
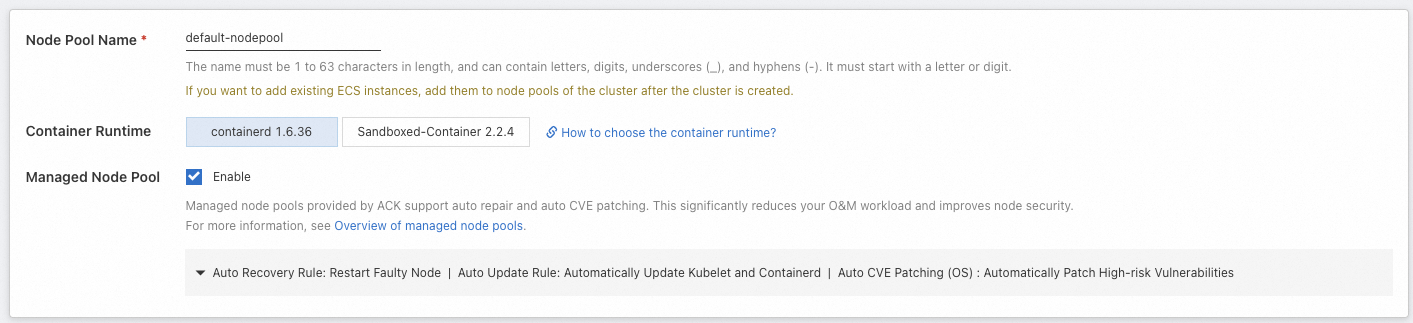
(Optional) Step 3: Configure the node pool
A node pool is used to group and manage nodes. It is a logical collection of nodes that have the same properties and is not a billable item. In simple terms, a node pool acts as a configuration template. Nodes that are scaled out from the node pool use this template. The node pool that you configure in this step becomes the default node pool for the cluster.
You can follow the on-screen instructions to skip the creation and configuration of a node pool. After the cluster is created, you can create more node pools to mix and isolate nodes of different types, such as by operating system, CPU architecture, billing method, and instance type. For more information, see Create and manage a node pool. You can also add existing ECS instances that you have purchased to the cluster. For more information, see Add existing nodes.
|
Configuration Type |
Description |
Example |
|
Basic Configuration |
Basic information about the nodes, including name and runtime. You can enable automated O&M capabilities. |
|
|
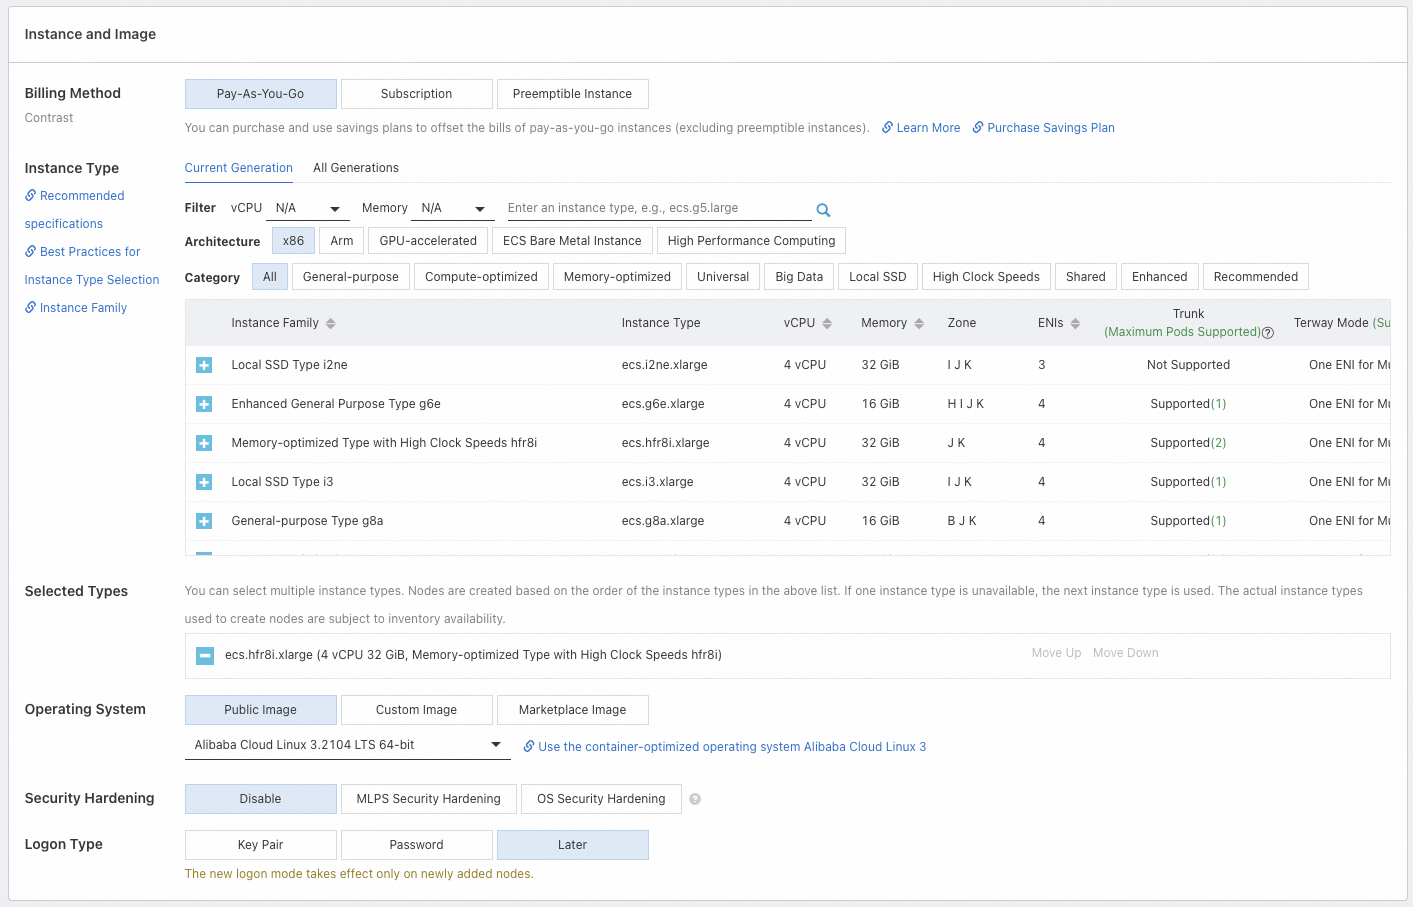
Instance and Image Configuration |
The billing method for the nodes, the instance types to use (we recommend selecting multiple types), the operating system, and more. |
|
|
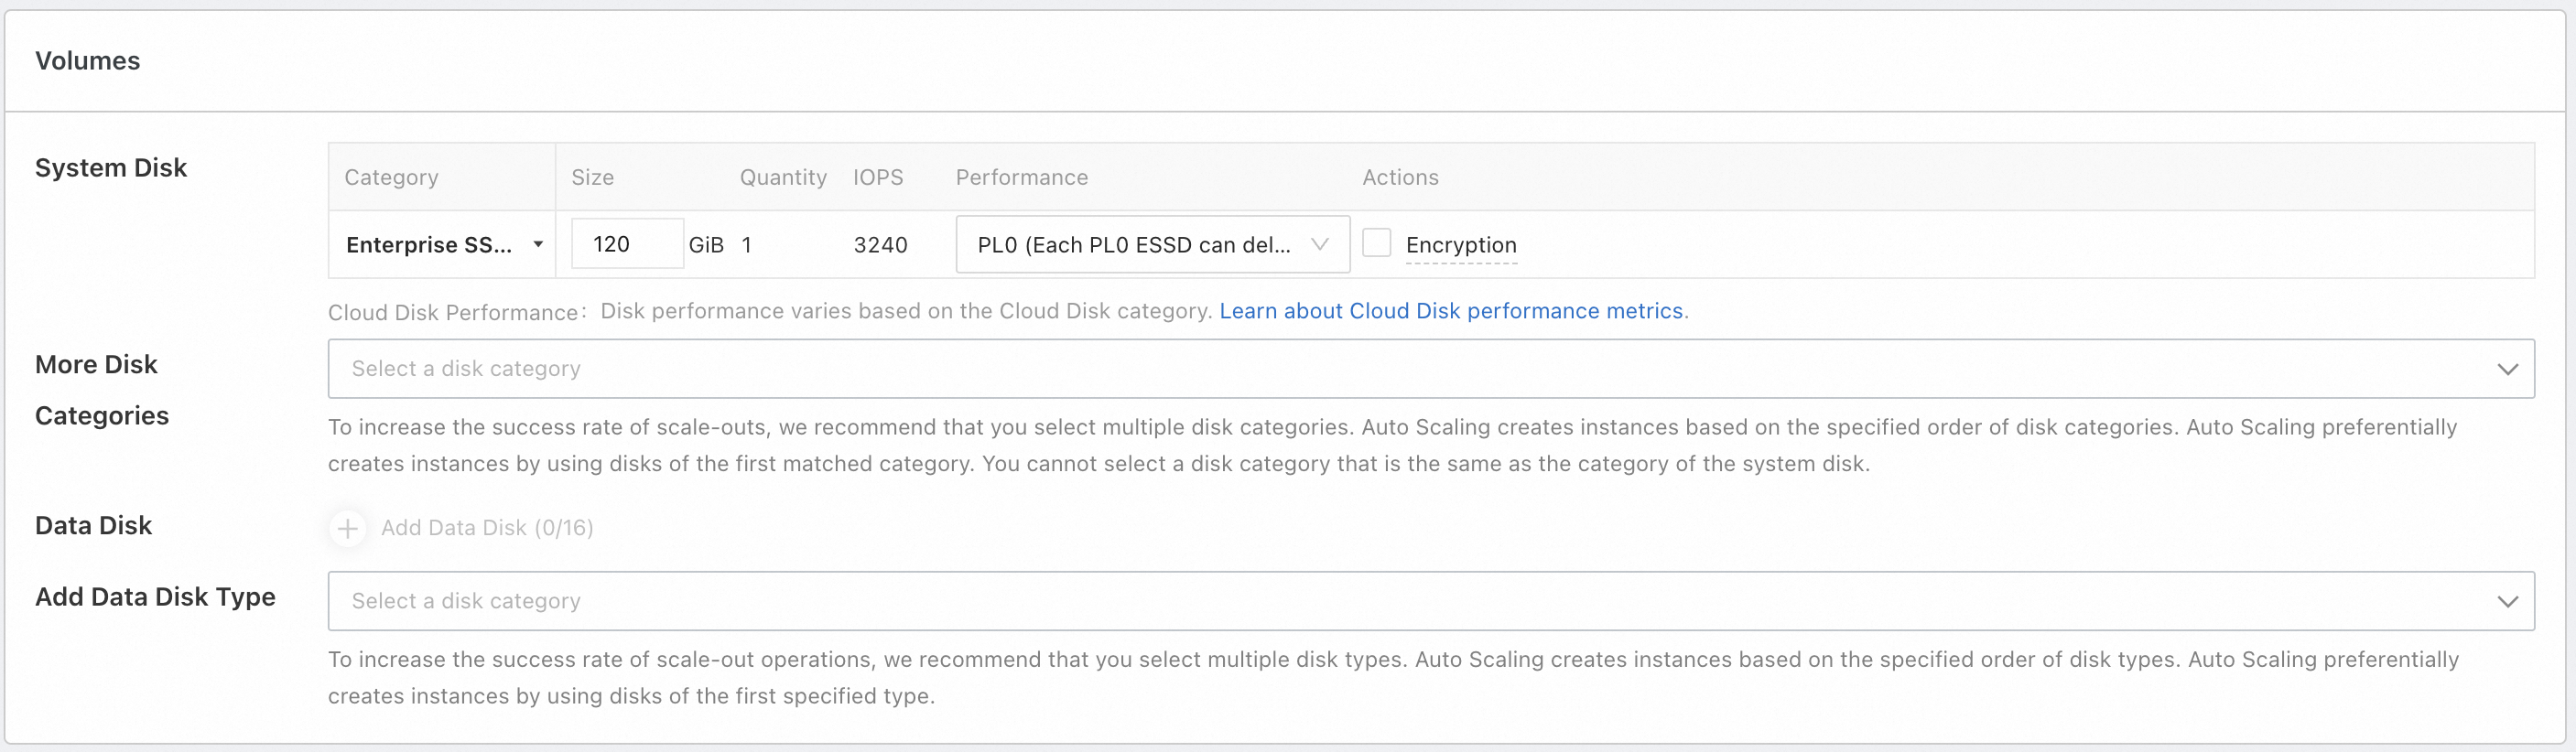
Storage Configuration |
The system disk (for installing and running the operating system) and data disks (for persistent storage of business data) used by the nodes. |
|
|
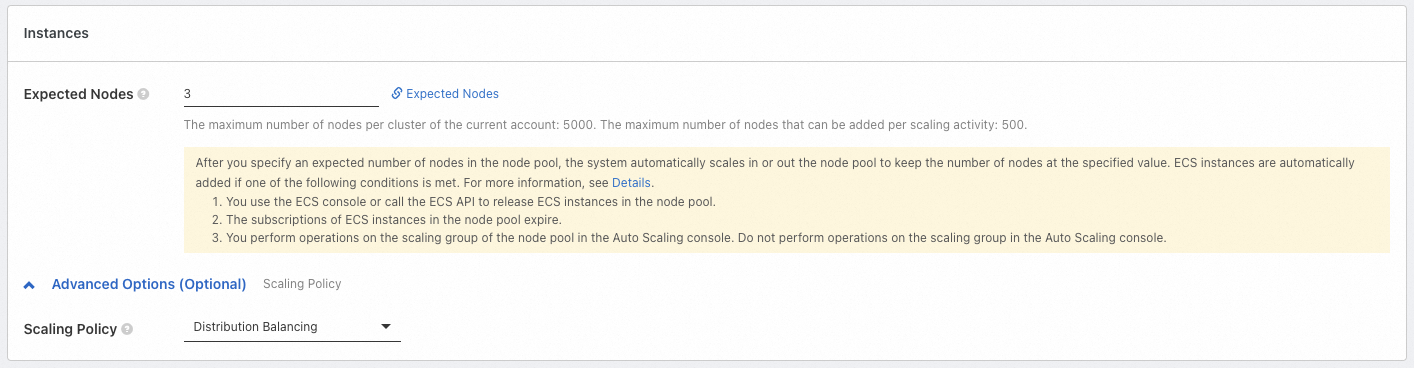
Instance Quantity Configuration |
The desired number of instances to maintain in the node pool, and the capacity and compensation configuration for spot instances (supported only when the billing method is spot instance). |
|
|
Advanced Configuration |
Advanced settings such as ECS tags, node labels, and taints. |
|

For more information about the configuration items, see Node pool configuration.
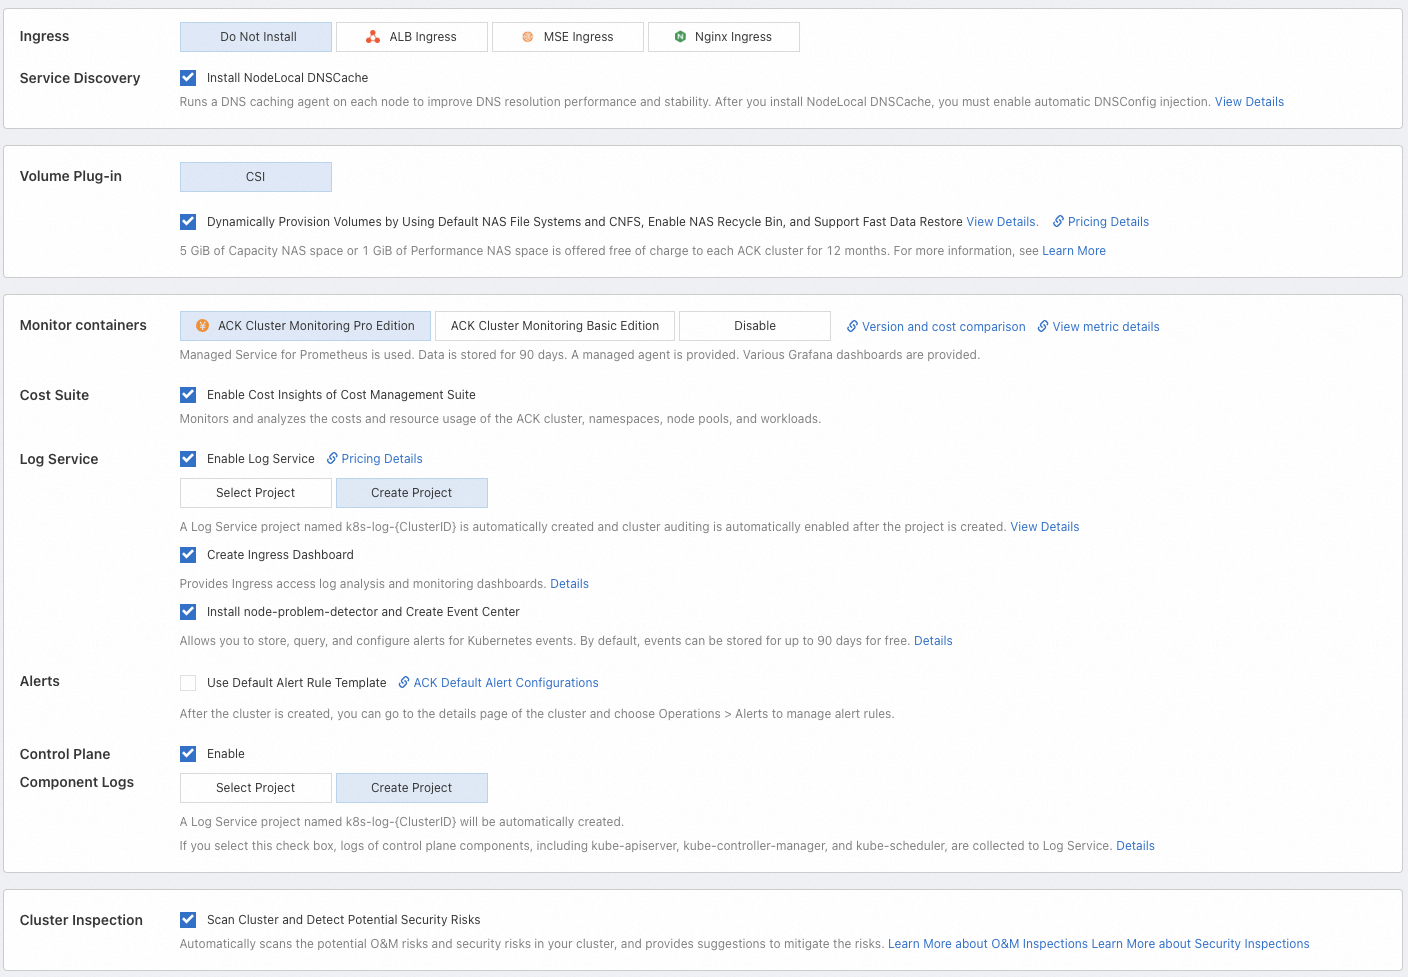
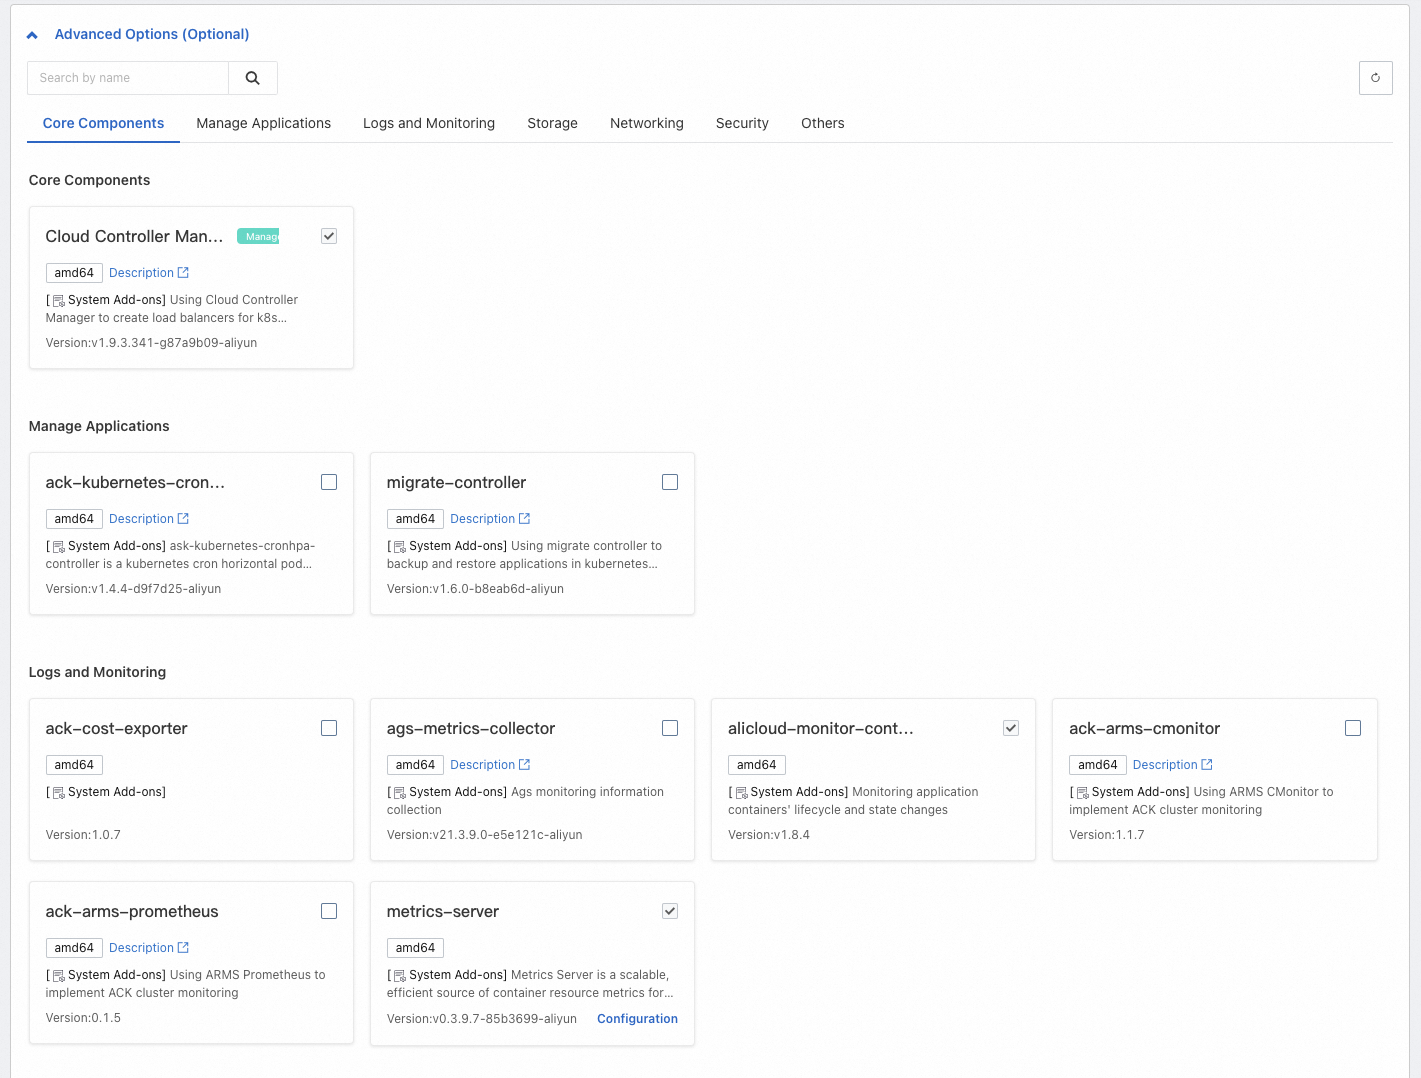
Step 4: Configure components
In addition to system components, ACK provides various functional components to extend cluster functionality. These components provide features for cluster networking, observability, cost optimization, and more.
ACK installs some components for you by default based on best practices. You can view and confirm them in this step. You can also install, uninstall, or upgrade components after the cluster is created. For more information, see Manage components.
|
Configuration Type |
Description |
Example |
|
Basic Components |
Networking, storage, and observability components. |
|
|
More Components |
Components for scenarios such as application management, log monitoring, and storage. |
|
For more information about the configuration items, see Component configuration.
Step 5: Confirm configuration and billing information
On the Confirm Configuration page, confirm the cluster configuration, including feature configurations, resource billing, and cloud product dependency checks. Then, read the Terms of Service.
ACK managed clusters incur cluster management fees (for the Pro edition only) and fees for other cloud products. You can view an overview of the fees for the cluster at the bottom of the creation page. You can also view the billing documentation for ACK and each product. For more information, see Billing overview and Cloud product resource fees.
You can also click Equivalent Code in the upper-right corner of the Confirm Configuration page to generate Terraform or SDK example parameters for the current cluster configuration.
API
Terraform
SDK
CLI
What to do next
-
Application deployment: Create and manage workloads, such as deployments, StatefulSets, and jobs. For more information, see Create a workload.
-
Service discovery and network management
-
Service: Provides a fixed access entry point for a group of pods to enable features such as intra-cluster access and public network access.
-
Ingress: Configures different forwarding rules, such as routing to different services based on domain names or access paths, to implement load balancing.
-
Service discovery DNS: Provides domain name resolution services for workloads within the cluster. This allows services inside the cluster to access each other by service name without requiring their specific IP addresses.
-
-
Observability configuration: Set up cluster log collection, monitoring, and alerting to diagnose issues and observe the cluster status. For more information about the observability solutions that ACK provides for infrastructure, containers, and workloads, see Observability.
-
Storage: Use Container Storage Interface (CSI) plugins to meet storage requirements such as persistent storage for application data, storage for sensitive and configuration data, and dynamic provisioning of storage resources.
-
Elastic scaling configuration: If your business resource requirements are difficult to predict or fluctuate cyclically (such as for web applications, game services, or online education), we recommend that you enable elastic scaling. This includes workload scaling (such as Horizontal Pod Autoscaler (HPA), CronHPA, and Vertical Pod Autoscaler (VPA)) and computing resource scaling (such as node autoscaling and instant node scaling).
-
Fine-grained authorization
If you require more fine-grained access control over the underlying resource layer (cloud products on which ACK depends) and internal cluster resources (Kubernetes resource objects), ACK provides multiple permission management solutions based on Alibaba Cloud RAM and the native Kubernetes role-based access control (RBAC) mechanism. For more information, see Authorization.
Quotas and limits
If you have a large cluster or your account contains many resources, you must be aware of the quotas and limits for using ACK clusters. For more information, see Quotas and limits.
-
Limits: These include ACK configuration limits (such as account balance) and single-cluster capacity limits (the maximum capacity of different Kubernetes resources within a single cluster).
-
Quota limits and quota increase requests: This includes quota limits for ACK clusters and the cloud products on which ACK depends, such as ECS and VPC. To request a quota increase, follow the instructions in the relevant documentation.
FAQ
If you encounter issues when you use an ACK cluster, see Troubleshooting and FAQ to troubleshoot the issues yourself.
Can I create a zero-node cluster?
Yes, you can. If you want to skip node creation or add existing ECS instances to the cluster after it is created, set Desired Number of Nodes to 0 during the configuration process. This sets the number of instances in the cluster to 0. After you complete the other required configurations, you can update the node pool configuration or create more node pools. For more information, see Create and manage a node pool. To add existing ECS instances to the cluster, see Add existing nodes.
How do I add purchased ECS instances to a cluster?
ACK supports adding existing ECS instances to a node pool manually or automatically. When you use the automatic method, the original operating system of the ECS instance is replaced with the operating system of the node pool, and the original system disk is released. If you want to keep the operating system of the ECS instance, choose the manual method. For more information about the precautions and procedure, see Add existing nodes.
We recommend that the ECS instances that you want to add have the same or similar configurations (such as billing method, disk configuration, and instance type) as the target node pool. This facilitates unified node management.
Can I add pay-as-you-go ECS instances to a subscription node pool?
Yes, you can. For more information, see Add existing nodes. However, if the billing method of the node pool is subscription, the nodes that are scaled out from the node pool are also subscription instances. We recommend that you create different node pools to manage nodes with different properties, such as billing method, disk configuration, and instance type. For more information, see Create and manage a node pool.
Why does a newly created cluster report an insufficient number of pods?
This issue may occur for the following reasons:
-
Component usage: Cluster components run as pods and consume node resources. Some components may use multiple replicas. If you enable many features when you configure components during cluster creation, these components may consume many pods on the nodes.
-
Small instance type: In Terway mode, the maximum number of pods that a single node can support depends on the number of elastic network interfaces (ENIs) provided by the ECS instance family. Although the maximum number of pods supported by a node is not directly proportional to the CPU and memory resources, smaller ECS instance types usually support fewer ENIs. This results in a smaller pod limit per node.
When the number of pods on a node reaches its limit, new pods cannot be scheduled. This affects the performance of your services. You can increase the number of available pods by scaling out the node pool to add more nodes or by upgrading the node configurations to increase the maximum number of pods per node. For more information, see Adjust the number of available pods on a node.
Why are the available CPU and memory resources less than what was defined by the instance type at purchase?
ACK reserves some node resources for kube components and system processes to ensure the proper functioning of the OS kernel, system services, and Kubernetes daemon processes. This results in a difference between the total resources of a node (Capacity) and the allocatable resources (Allocatable). For more information, see Node resource reservation policy.
References
-
Improper operations when you use an ACK cluster may cause service failures. For more information, see Usage notes and risky operations.
-
For more information about how to connect to a cluster, see Obtain the kubeconfig file of a cluster and use kubectl to connect to the cluster.
-
To avoid security and stability risks associated with outdated cluster versions, we recommend that you upgrade your cluster promptly. For more information, see Manually upgrade a cluster and Automatically upgrade a cluster.
-
To pull container images from sources outside China in an ACK cluster, see Use GA to accelerate cross-domain pulling of container images in ACK.
-
If you have any product suggestions or questions, contact us.