Resolve common Terway and Flannel issues such as plugin selection, IP exhaustion, network planning, and kube-proxy tuning.
Index
Terway
What's the difference between Terway's Shared ENI and Exclusive ENI network modes?
How can I tell if my ACK cluster is using Terway in Shared ENI or Exclusive ENI mode?
Does traffic bypass IPVS when using Terway's network acceleration modes (DataPathv2 or IPvlan+eBPF)?
Is it possible to switch the CNI network plugin on an existing ACK cluster?
Why can't my Pods access the Internet after adding a new vSwitch for Terway in my ACK cluster?
What's the difference between the Terway and Flannel network plugins for an ACK Kubernetes cluster?
What determines the maximum number of Pods per node in a Terway cluster?
What is Terway's DataPath V2 mode, and how is it different from the original IPvlan mode?
Why did my Terway component upgrade fail with the error eip pool is not supported?
Why do my Pods sometimes fail to create in a Terway cluster with the error can't found dev by mac?
Flannel
What's the difference between the Terway and Flannel network plugins for an ACK Kubernetes cluster?
In a Flannel cluster, why can my Pods ping some ECS instances but not others?
Why are newly added nodes in my Flannel cluster getting a NodeNetworkUnavailable taint?
How can I change the Pod CIDR, Service CIDR, or IPs per node for an existing ACK cluster?
kube-proxy
IPv6
How do I troubleshoot common issues in an IPv6 dual-stack cluster?
ACK container network data links
Other
How do I fix network latency issues immediately after a Pod starts?
What is the correct way to plan the network for an ACK cluster?
How do I identify the network plugin and vSwitches used by my cluster?
How can I increase the Linux connection tracking (conntrack) limit on my nodes?
Is it possible to install a third-party CNI network plugin on an ACK cluster?
Why do I get a no IP addresses available in range set error in my Flannel cluster?
What should I consider when configuring a custom Cluster Domain for my ACK cluster?
What's the difference between Terway's Shared ENI and Exclusive ENI network modes?
Terway has two ENI allocation modes for Pods.
Shared ENI mode: Multiple Pods share ENIs on each node. Default and most resource-efficient. Required for network acceleration (DataPathv2 or IPvlan+eBPF).
Exclusive ENI mode: Each Pod gets its own dedicated ENI. Best performance and isolation, but consumes significantly more ENI resources.
In Terway v1.8.0+, network acceleration is only available in Shared ENI mode and uses DataPathv2 (replacing IPvlan+eBPF).
How can I tell if my ACK cluster is using Terway in Shared ENI or Exclusive ENI mode?
You can identify the mode by checking the name of the Terway DaemonSet running in the kube-system namespace.
Run the following command to list the Terway DaemonSets in the kube-system namespace:
kubectl get ds -n kube-system | grep terwayIdentify the mode based on the output:
If the DaemonSet is named
terway-eniip, you are using Shared ENI mode.If the DaemonSet is named
terway-eni, you are using Exclusive ENI mode.
For Terway v1.11.0 and later, Shared ENI mode is the default. You can enable the exclusive ENI mode by configuring the exclusive ENI network mode for a node pool. In earlier versions, the mode was selected at cluster creation.
How do I check if my Terway Shared ENI mode is using DataPathv2 or the legacy IPvlan+eBPF for network acceleration?
Only Shared ENI mode supports network acceleration (DataPathv2 or IPvlan+eBPF). DataPathv2 replaced IPvlan+eBPF in Terway v1.8.0+; new clusters use DataPathv2 exclusively.
Check the eniip_virtual_type value in the eni-config ConfigMap in the kube-system namespace.
Run the following command to retrieve the eni-config ConfigMap data:
kubectl get cm eni-config -n kube-system -o yamlIn the output, check the value of the eniip_virtual_type field:
datapathv2: Your cluster uses the current DataPathv2 acceleration.ipvlan: Your cluster uses the legacy IPvlan+eBPF acceleration.If the field is absent, network acceleration is disabled.
Network acceleration is only supported in Shared ENI mode. For clusters on Terway v1.8.0+, only DataPathv2 is available.
Does traffic bypass IPVS when using Terway's network acceleration modes (DataPathv2 or IPvlan+eBPF)?
Yes, for Pod-to-Service traffic within the cluster, Terway's acceleration modes bypass IPVS.
With acceleration enabled, Terway uses eBPF to translate Service addresses to backend Pod IPs directly in the kernel, bypassing kube-proxy IPVS and the node's network stack for lower latency and higher throughput.
Is it possible to switch the CNI network plugin on an existing ACK cluster?
No, you cannot change the CNI network plugin (e.g., from Flannel to Terway) on an existing ACK cluster.
The plugin is set at cluster creation. To switch, create a new cluster and migrate workloads.
Why can't my Pods access the Internet after adding a new vSwitch for Terway in my ACK cluster?
The new vSwitch likely lacks a route to the Internet, so Pods using its IPs cannot establish outbound connections.
Solution
Configure a SNAT rule for the new vSwitch's CIDR block using a NAT Gateway to grant Pods Internet access.
My nodes are NotReady after upgrading my cluster to Kubernetes 1.16+. How do I fix a Flannel incompatibility?
This issue occurs because you manually updated the Flannel image without updating its CNI configuration to be compatible with newer Kubernetes versions.
Cause
Kubernetes 1.16+ requires a cniVersion in the CNI config. Older Flannel configs lack this field, causing nodes to become NotReady.
Solution
Add the cniVersion field to the Flannel ConfigMap.
Steps
Edit the
kube-flannel-cfgConfigMap:kubectl edit cm kube-flannel-cfg -n kube-systemIn the
net-conf.jsondata, add"cniVersion": "0.3.1"to the configuration object."name": "cb0", "cniVersion":"0.3.1", "type": "flannel",Restart the Flannel pods:
kubectl delete pod -n kube-system -l app=flannelNodes should now transition to the
Readystate.
How do I fix network latency issues immediately after a Pod starts?
Symptom
There is a noticeable delay (a few seconds) before a newly started Pod can communicate on the network.
Cause
Terway's NetworkPolicy engine introduces this delay while computing and applying eBPF rules or iptables entries for the new Pod.
Solution
If you do not use Network Policies, disable the feature to eliminate this startup delay.
Edit the Terway
eni-configConfigMap:kubectl edit cm -n kube-system eni-configIn the
data.eni_confsection, add thedisable_network_policy: "true"flag.disable_network_policy: "true"Optional:If you are not using the latest version of Terway, upgrade it in the console.
Log on to the ACK console. In the left navigation pane, click Clusters.
On the Clusters page, click the name of your cluster. In the left navigation pane, click Add-ons.
On the Add-ons page, click the Networking tab, and then click Upgrade for the Terway add-on.
In the dialog box that appears, follow the prompts to complete the configuration and click OK.
Restart the Terway pods:
kubectl delete pod -n kube-system -l app=terway-eniip
Why do my Pods get connection errors when trying to access a Service they expose themselves (hairpinning)?
This problem, known as "hairpinning," occurs when a Pod tries to access a Service that routes traffic back to itself. The behavior depends on your network plugin.
Cause
In Flannel clusters, especially older versions, hairpin traffic is often disabled by default, causing connections to fail.
Recommended solution
Use a Headless Service: A Headless Service has no
ClusterIPand bypasseskube-proxy. DNS resolves directly to Pod IPs, eliminating network loops.See Headless Services.
Recreate the cluster with the Terway network plugin.
Modify the Flannel configuration, then recreate the Flannel plugin and pods.
Alternative solutions
Enable Hairpin Mode in Flannel (Not Recommended): You can enable hairpinning manually, but upgrades may overwrite this configuration.
Edit the
kube-flannel-cfgConfigMap in thekube-systemnamespace.Add
hairpinMode: trueto thedelegatesection of the CNI configuration.Restart all Flannel pods, then recreate your application pods.
kubectl edit cm kube-flannel-cfg -n kube-systemExample:
cni-conf.json: |
{
"name": "cb0",
"cniVersion":"0.3.1",
"type": "flannel",
"delegate": {
"isDefaultGateway": true,
"hairpinMode": true
}
}kubectl delete pod -n kube-system -l app=flannel Use Terway Plugin: The Terway network plugin handles hairpin traffic correctly by default. If this is a critical requirement, consider creating a new cluster with Terway.
What's the difference between the Terway and Flannel network plugins for an ACK Kubernetes cluster?
Choosing the right network plugin depends on your specific feature and performance requirements.
What it is: A simple and stable CNI plugin from the open-source community that creates a basic overlay network for Pod communication.
Use when: You need a straightforward, reliable network and do not require advanced features like Kubernetes Network Policies.
Limitation: Does not support Kubernetes-native
NetworkPolicyresources for defining traffic rules between Pods.
What it is: An Alibaba Cloud-developed CNI plugin that provides high-performance networking by integrating directly with the underlying VPC. It assigns ENIs and VPC-native IPs to Pods.
Use when: You need advanced networking features, such as:
Kubernetes
NetworkPolicy: For fine-grained, secure traffic control.Pod-level Bandwidth Limiting: To control the throughput of individual Pods.
High Performance: Direct VPC integration often results in lower latency and higher throughput compared to an overlay network.
Recommendation: Terway is generally recommended for most use cases on ACK due to its powerful features and performance benefits.
What is the correct way to plan the network for an ACK cluster?
Proper network planning is crucial to avoid IP exhaustion and network conflicts. Before creating a cluster, you must decide on three key CIDR blocks:
VPC and vSwitch CIDR: This is the address space for your ECS nodes. Ensure it is large enough for your current and future nodes.
Pod CIDR Block: This is the address space for all Pods in the cluster.
It must not overlap with the VPC CIDR or any connected on-premises networks.
Size the block for your anticipated maximum Pod count. Choosing too small a block is a common mistake.
Service CIDR Block: This is the address space for virtual IPs assigned to Kubernetes Services (ClusterIPs).
It must not overlap with the VPC CIDR or the Pod CIDR.
Plan these ranges in advance — they cannot be changed after creation.
Does ACK support hostPort for Pods?
Support for hostPort depends on the CNI network plugin.
Flannel: Supports
hostPort.Terway: Does not support
hostPort.
Using hostPort is discouraged. Recommended alternatives:
NodePortService: Exposes the service on a static port on every node's IP.LoadBalancerService: Provisions an external cloud load balancer to route traffic to the service.
With Terway, Pods are directly accessible within the VPC via their own IPs, making hostPort unnecessary for intra-VPC communication.
How do I identify the network plugin and vSwitches used by my cluster?
Check the ACK console.
To find the network plugin:
Log on to the ACK console. In the navigation pane on the left, click Clusters.
On the Clusters page, click the name of your cluster. In the left navigation pane, click Cluster Information.
Click the Basic Information tab.
The Network Plug-in field will show either
FlannelorTerway.
To find the Node vSwitch(es):
Go to .
Click Details for a node pool.
The Node vSwitch field shows the vSwitch(es) where the nodes are located.
To find the Pod vSwitch(es) (Terway only):
Go to Add-ons on your cluster's page.
Find the terway-eniip component and click Configuration.
The PodVswitchId field lists the vSwitch(es) used for allocating Pod IPs. (This does not apply to Flannel).
How do I view the cloud resources used by my ACK cluster?
The Basic Information tab on your cluster's details page shows the core cloud resources:
VPC ID
vSwitch IDs
Security Group ID
Worker RAM Role
Kubernetes version and more
What is the correct way to modify the kube-proxy configuration in an ACK cluster?
Customize kube-proxy behavior, such as mode (IPVS/iptables) or connection tracking, by editing its ConfigMap.
Procedure
Identify the ConfigMap:
For ACK Managed Clusters, you only need to edit
kube-proxy-worker.For ACK Dedicated Clusters, you must edit both
kube-proxy-workerandkube-proxy-master.
Edit the ConfigMap:
Find the ConfigMap in the
kube-systemnamespace and edit its YAML. The configuration follows the standard KubernetesKubeProxyConfigurationAPI. See kube-proxy Configuration.Apply the Changes:
After saving, restart the
kube-proxypods. The DaemonSet controller automatically recreates them with the updated configuration.
Restarting kube-proxy does not interrupt existing connections, but new Service rules may be briefly delayed. Perform this during off-peak hours.
How can I increase the Linux connection tracking (conntrack) limit on my nodes?
If your kernel logs (dmesg) show nf_conntrack: table full, dropping packet, the node's conntrack table is full.
Solution
Analyze usage: First, identify what is consuming the connections.
Run
conntrack -Sto see statistics andconntrack -Lto list entries.If you see many short-lived TCP connections, consider modifying your application to use long-lived connections.
If you see high DNS traffic, consider enabling
NodeLocal DNSCache. See Use the ACK NodeLocal DNSCache add-on.
Increase the limit via kube-proxy: The recommended approach is to adjust the conntrack.maxPerCore setting in the kube-proxy ConfigMap.
Edit the
kube-proxy-workerConfigMap.Set
conntrack.maxPerCoreto a higher value (e.g.,65536). A value of0means the system's default is used.
# Snippet from kube-proxy config.conf
conntrack:
  maxPerCore: 65536
Restart the
kube-proxypods to apply the change.
Increase Limit via sysctl (Manual): You can also set the values directly on each node via
/etc/sysctl.conf, but this is less manageable.
In Terway's accelerated modes (DataPath V2, IPvlan), conntrack for container traffic is managed in an eBPF map, not the Linux conntrack table. See the Terway documentation for how to tune its eBPF map sizes.
How do I change the IPVS load balancing algorithm in kube-proxy?
If IPVS mode shows unbalanced traffic to backend Pods (common with long-lived connections), change the algorithm from round-robin to a better fit, such as least connection (lc).
Steps
Load Kernel Module (if necessary):
On older images, the IPVS scheduler module may not be loaded. Log into each worker node and load it. Replace
lcwith your chosen algorithm (e.g.,rr,wrr,sh).Modify kube-proxy ConfigMap:
Edit the
kube-proxy-worker(andkube-proxy-masterfor dedicated clusters) ConfigMap in thekube-systemnamespace. Set theipvs.schedulerfield.Restart kube-proxy Pods:
Delete the
kube-proxypods to force them to restart and pick up the new configuration.Verify: Check the logs of a new
kube-proxypod. It should showUsing ipvs Proxier.and not fall back toiptablesmode.
To capture in-container network traffic and diagnose load imbalance, see the Alibaba Cloud Developer Community.
How do I reduce the UDP session timeout in kube-proxy IPVS mode to fix DNS delays?
When a UDP backend (such as CoreDNS) is removed, kube-proxy in IPVS mode can black-hole traffic to it for up to 300 seconds (default timeout), causing DNS delays during rollouts or restarts.
Solution
Lower the UDP timeout in the kube-proxy configuration.
For Kubernetes v1.18 and later:
Edit the
kube-proxy-worker(andkube-proxy-masterfor dedicated clusters) ConfigMap in thekube-systemnamespace.Add or modify the
ipvs.udpTimeoutfield. A value of10sis a reasonable choice to minimize impact.Restart the
kube-proxypods to apply the change.
For Kubernetes v1.16 and earlier:
These versions lack udpTimeout support. Modify the setting on each node via ipvsadm. Use OOS (CloudOps Orchestration Service) to run commands in batch.
# This command sets the TCP, TCP-FIN, and UDP timeouts respectively.
# The third parameter '10' sets the UDP timeout to 10 seconds.
ipvsadm --set 900 120 10If your applications rely on long-lived UDP sessions, reducing this timeout may cause issues. Proceed with caution.
How do I troubleshoot common issues in an IPv6 dual-stack cluster?
Problem:
kubectl get podshows only an IPv4 address.Solution: A Pod can have multiple IPs. Use JSONPath to view all of them. An IPv6 address should be present in the
podIPslist.
Problem:
kubectl get svcshows only an IPv4CLUSTER-IP.Solution: Ensure the Service's
ipFamilyPolicyis set toPreferDualStackorRequireDualStack. View all cluster IPs with JSONPath:
Problem: I cannot access my Pod via its IPv6 address.
Cause: The application inside the container might not be listening on the IPv6 any-address (
::). For example, some web servers default to listening on0.0.0.0(IPv4 only).Solution:
execinto the Pod and runnetstat -anp. Check the "Local Address" column. Atcp6orudp6entry listening on:::indicates it is correctly listening on IPv6. If not, you must reconfigure your application.
Problem: My Pod is accessible via IPv6 within the cluster, but not from the internet.
Cause: The Pod's IPv6 address does not have public bandwidth configured.
Solution: In the Alibaba Cloud console, enable public bandwidth for the IPv6 address via an IPv6 Gateway.
Problem: Pods cannot access the internet over IPv6.
Solution: To enable outbound IPv6 internet access, you must have an IPv6 Gateway configured for your VPC and ensure the Pods have IPv6 addresses with public bandwidth enabled.
My Pods are stuck in ContainerCreating with "InvalidVSwitchId.IpNotEnough" errors. How do I add more IP addresses?
The vSwitch used for Pod IPs has exhausted its addresses. Add a new vSwitch to expand the IP pool.

Steps
Create a New vSwitch: In the VPC console, create a vSwitch in the same region and AZ. Use a large CIDR block (e.g.,
/19or smaller).Update Terway Configuration: In the ACK console, go to Add-ons > terway-eniip > Configuration. Add the ID of the newly created vSwitch to the
PodVswitchIdfield.Restart Terway Pods: Restart the Terway DaemonSet pods.
Verify: New Pods should start and acquire IPs from the new vSwitch.
Why are my Pods getting IPs from an old vSwitch CIDR block even after I updated the Terway configuration?
Existing ENIs on nodes remain tied to the old vSwitch. Terway applies new vSwitch settings only when creating a new ENI.
Cause
If a node already has an ENI, new Pods continue using that ENI's IP pool, ignoring updated vSwitch settings. This occurs when reusing nodes from another cluster or after modifying Terway config without recycling nodes.
Solution
Rotate the affected nodes to enforce the new configuration.
Steps to rotate a node
Drain and remove: Safely drain workloads and remove the node from the cluster.
Detach ENIs: In the ECS console, manually detach any lingering ENIs from the removed instance.
Re-add node: Add the instance back to the cluster. It will now start fresh and create new ENIs based on the current Terway configuration.
I added a new vSwitch to my Terway configuration, but my Pods are still failing to get an IP. Why is this happening?
This issue typically occurs when the nodes have reached their maximum ENI attachment quota for their ECS instance type.
Cause
Although the new vSwitch is configured, Terway cannot create a new ENI because the node has reached its hardware ENI attachment limit. Existing ENIs are tied to exhausted vSwitches, so no new IPs can be allocated.
Solution
Rotate the affected nodes to clear existing ENI attachments and allow new ones with the updated configuration.
Steps to rotate a node
Drain and remove: Safely drain workloads and remove the node from the cluster.
Detach ENIs: Go to the ECS console and manually detach all ENIs from the instance.
Re-add node: Add the instance back to the cluster. It will now be able to attach a new ENI using the updated vSwitch configuration.
How do I enable in-cluster load balancing for ExternalIP and LoadBalancer Services in an existing Terway IPvlan cluster?
Allows Pods to access LoadBalancer or ExternalIP services via their external IP with traffic routed internally. Enabled by default in new Terway IPvlan clusters (v1.2.0+) but requires manual activation on older clusters.
Prerequisites
Terway v1.2.0 or later.
The cluster must be configured in IPvlan mode.
Solution
Enable the feature by editing the eni-config ConfigMap.
Steps
Edit the
eni-configConfigMap in thekube-systemnamespace:In the
data.eni_confsection, add thein_cluster_loadbalance: "true"flag:Restart the Terway pods:
Verify by checking a new Terway pod's logs for
enable-in-cluster-loadbalance=true.
How can I assign Pods to a specific vSwitch/CIDR block in a Terway cluster for IP-based allowlisting?
Force Pods to use a specific CIDR block for IP-based allowlisting by overriding Terway's default vSwitch settings per node pool.
Solution
Create a custom Terway ConfigMap:
Create a new ConfigMap in the
kube-systemnamespace (e.g.,eni-config-fixed) that specifies the dedicated vSwitch for your allowlisted Pods.This example uses vsw-2zem796p76viir02c**** and 10.2.1.0/24.
apiVersion: v1
data:
  eni_conf: |
    {
       "vswitches": {"cn-beijing-h":["vsw-2zem796p76viir02c****"]},
       "security_group": "sg-bp19k3sj8dk3dcd7****",
       "security_groups": ["sg-bp1b39sjf3v49c33****","sg-bp1bpdfg35tg****"]
    }
kind: ConfigMap
metadata:
  name: eni-config-fixed
  namespace: kube-system
Configure a Node Pool:
Create a new node pool or use an existing one. Apply the following label to its nodes:
terway-config: eni-config-fixed.
It's also a best practice to add a taint (e.g., fixed=true:NoSchedule) to prevent other workloads from being scheduled on these nodes.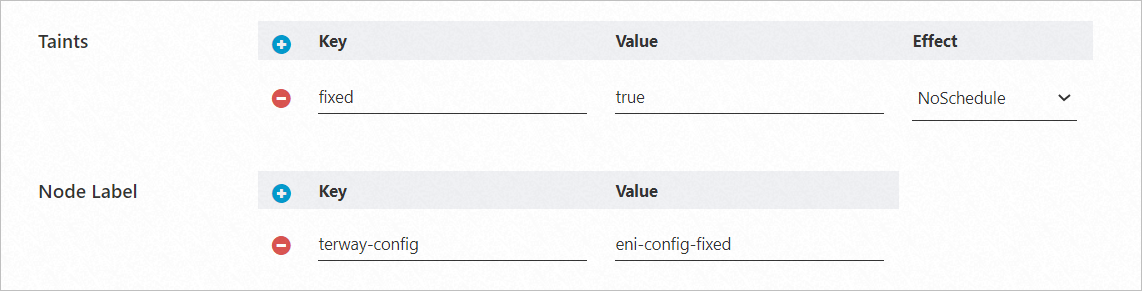
Deploy Pods with Node Selector and Toleration:
Deploy your application with a
nodeSelectorthat matches the label from step 2 and atolerationfor the taint.apiVersion: apps/v1 # For versions earlier than 1.8.0, use apps/v1beta1. kind: Deployment metadata: name: nginx-fixed labels: app: nginx-fixed spec: replicas: 2 selector: matchLabels: app: nginx-fixed template: metadata: labels: app: nginx-fixed spec: tolerations: # Add a toleration. - key: "fixed" operator: "Equal" value: "true" effect: "NoSchedule" nodeSelector: terway-config: eni-config-fixed containers: - name: nginx image: nginx:1.9.0 # Replace with your actual image <image_name:tags>. ports: - containerPort: 80Verification
Pods on this node pool get IPs exclusively from the
vsw-2zem796p76viir02c****vSwitch. Add this vSwitch's CIDR block to your external service's allowlist.
This method works best with newly created nodes. If you use existing nodes, you must first unbind any pre-existing ENIs from the ECS instances before adding them to the node pool to ensure they pick up the new configuration.
In a Flannel cluster, why can my Pods ping some ECS instances but not others?
Assuming your VPC routes are correctly configured for the Flannel overlay network, this issue is almost always caused by security group rules.
Cause 1: ECS instance is in the same VPC but a different security group.
Solution: Add an inbound rule to the target ECS instance's security group that allows traffic from the source IP range of your cluster's nodes. For a more robust solution, allow traffic from the cluster's Pod CIDR block.
Cause 2: ECS instance is in a different VPC.
Solution: Pods must access the ECS instance via its public IP address. You must add an inbound rule to the ECS instance's security group that allows traffic from your cluster's public egress IP address (e.g., the IP of your NAT Gateway).
Why are newly added nodes in my Flannel cluster getting a NodeNetworkUnavailable taint?
This taint means the node's network is not ready. The cloud-controller-manager (CCM) configures VPC routes and removes this taint; persistence indicates CCM failure.
Common causes
VPC route table is full: The VPC route table has reached its quota, and the CCM cannot add a new route for the new node's Pod CIDR block.
Multiple route tables in VPC: Your VPC uses multiple route tables, but the CCM is not configured to manage them. By default, it only interacts with the VPC's main route table.
Solution
Inspect the node's events for error messages from the CCM:
If the route table is full, you must delete unused routes to make space.
If you use multiple route tables, configure the CCM with all relevant route table IDs. See Use multiple route tables in a VPC.
Why are my Pods failing to start with the error failed to allocate for range 0: no IP addresses available in range set?
The node has exhausted its Pod IP subnet. This is typically caused by IP leaks — IPs not released after Pod deletion.
Common causes of IP leaks
Old Kubernetes versions (< 1.20): Rapid Pod restarts or short-lived CronJobs can cause IP leaks due to race conditions.
Old Flannel versions: Versions storing IP allocation on disk (
/var/lib/cni/networks/) may leave IPs marked allocated after unexpected shutdowns.
Long-term solution (recommended)
Upgrade cluster: Upgrade your ACK cluster to Kubernetes 1.20 or a later version.
Upgrade Flannel and configure
tmpfs: Upgrade Flannel, then edit thekube-flannel-cfgConfigMap to set the IPAM data directory to/var/run/cni/networks(cleared on reboot). Restart nodes after configuration.
Temporary workaround (if you cannot upgrade immediately):
Drain the affected node.
Log into the node and run a cleanup script that compares IP files in
/var/lib/cni/networks/cb0/with running containers (docker psorcrictl pods), deleting entries for non-existent containers.Uncordon the node.
This workaround only cleans up existing leaks. The underlying problem will persist until you upgrade.
How can I change the Pod CIDR, Service CIDR, or IPs per node for an existing ACK cluster?
You cannot modify these fundamental network parameters after an ACK cluster has been created.
Pod CIDR, Service CIDR, and per-node subnet size are fixed at cluster creation. To change them, create a new cluster with the correct network plan.
When do I need to configure the cloud-controller-manager (CCM) for multiple route tables in a Flannel cluster?
You must configure the CCM to manage multiple route tables in a Flannel cluster in the following scenarios:
Scenario 1: Using custom route tables
If your cluster nodes reside in subnets associated with a custom route table (not the main one), the CCM will fail to add routes for Pod CIDRs unless it is explicitly configured with the ID of that custom route table.
Scenario 2: CCM logs show
multiple route tables founderrorThis error message explicitly states that the CCM has detected more than one route table in the VPC and does not know which one to use for managing Pod network routes.
Scenario 3: Persistent
NodeNetworkUnavailabletaint on new nodesIf new nodes consistently get stuck with this taint, it's a strong indicator that the CCM cannot configure their routes, often due to an unconfigured custom route table.
Is it possible to install a third-party CNI network plugin on an ACK cluster?
No, ACK clusters do not support installing or configuring third-party network plugins.
ACK is deeply integrated with Terway and Flannel for VPC routing and ENI management. Installing another CNI plugin (such as Calico or Cilium) conflicts with the managed system and causes network failure.
Why do I get a no IP addresses available in range set error in my Flannel cluster?
This error means a node has no more IP addresses to assign to new Pods from its designated Pod CIDR subnet.
Cause
This is a hard limit. In a Flannel cluster, the total Pod CIDR block is divided into smaller subnets, and one subnet is assigned to each node. Once a node's subnet is full, it cannot create more Pods. This issue arises from inadequate network planning.
Solution
Short-term: Delete unused Pods on the affected node to free up IPs. You can also add a new node to the cluster, which will get its own fresh subnet of IPs.
Long-term: The only permanent fix is to recreate the cluster with a larger Pod CIDR block. Plan your network carefully to allocate enough IP addresses for your expected number of nodes and pods per node.
What determines the maximum number of Pods per node in a Terway cluster?
The maximum number of Pods per node in a Terway cluster is determined by the IP capacity of the underlying ECS instance type.
Terway assigns IPs from ENIs attached to the node. Each ECS instance type has a specific limit on:
The maximum number of ENIs it can attach.
The maximum number of private IP addresses per ENI.
The total number of available IPs (and thus Pods) is calculated as (Number of ENIs) × (IPs per ENI). You can find these limits in the Alibaba Cloud ECS documentation for your specific instance type.
What is Terway's DataPath V2 mode, and how is it different from the original IPvlan mode?
DataPath V2 is the next-generation data plane for Terway's network acceleration feature, serving as an enhancement to the original IPvlan+eBPF mode.
Key points
Default for new clusters: For clusters created with Terway v1.8.0 or later where IPvlan acceleration is enabled, DataPath V2 is used by default.
Backward compatibility: Existing clusters that were already using the legacy IPvlan mode will continue to use it even after upgrading the Terway component. The data plane is not automatically migrated to prevent disruptions.
Benefits: DataPath V2 offers improved compatibility and performance over the original implementation.
What do the different Pod statuses like Pending and ContainerCreating mean in a Terway network context?
Pod status reflects network initialization progress in a Terway environment.
Pending: The scheduler has not yet assigned the Pod to a node. This is usually due to resource constraints (CPU, memory) or scheduling rules (taints, affinity). Terway is not yet involved at this stage.ContainerCreating: The Pod is scheduled and the CNI plugin is setting up its network (attaching ENI, assigning IP). Delays here often indicate network resource issues, such as IP exhaustion in the vSwitch.Running: All containers in the Pod have been created, and Terway has successfully configured its network. The Pod should now be operational and reachable.
Inspect details with kubectl describe pod <pod-name>.
Why did my Terway component upgrade fail with the error eip pool is not supported?
This error occurs because the EIP (Elastic IP) pool feature has been deprecated and removed from recent versions of the Terway component.
Solution
Before upgrading, migrate EIP management from Terway to the ack-extend-network-controller component, which now handles Pod EIP assignments.
Why do my Pods sometimes fail to create in a Terway cluster with the error can't found dev by mac?
The error failed to do add; error parse config, can't found dev by mac... means Terway could not find the ENI matching the expected MAC address on the node.
There are two common causes:
Asynchronous ENI attachment (transient issue):
Explanation: A newly attached ENI takes a moment to initialize in the OS. If the CNI plugin configures the network during this window, it fails to find the device.
Solution: This is a transient timing issue. The CNI plugin retries automatically. If the Pod reaches
Running, ignore these log errors.
Node driver failure (persistent issue):
Explanation: If the error persists, the node's driver may have failed to initialize the ENI due to insufficient high-order memory.
Solution: Restarting the affected ECS instance will typically resolve this driver-level failure.
What should I consider when configuring a custom Cluster Domain for my ACK cluster?
The Cluster Domain (default: cluster.local) is the DNS suffix for all in-cluster services. If you customize it during cluster creation, you must follow these rules to avoid DNS resolution conflicts.
Cannot be changed: The Cluster Domain can only be set at cluster creation time and cannot be modified later.
Must be unique: The Cluster Domain must not overlap with any external public domains or private DNS zones you use (e.g., in Alibaba Cloud DNS PrivateZone).
Why is this important?
CoreDNS handles all Cluster Domain queries internally and does not forward them upstream (for security and performance).
If your Cluster Domain is mycompany.com and you have a public site at www.mycompany.com, Pods cannot resolve www.mycompany.com because CoreDNS treats mycompany.com as an internal-only zone and refuses to forward the query.