Fine-grained control of Agent permissions
By default, an AI Agent has full access permissions when calling external tools, which poses a risk of unauthorized operations. Use an Agent Identity policy set to enforce fine-grained access control over an Agent's MCP tool calls based on principals, resources, actions, and conditions. This tutorial uses an order management scenario to demonstrate how to create a backend service with Function Compute (FC), expose it as an MCP tool through AI Gateway, and configure an Agent Identity policy set to control tool access.
Architecture
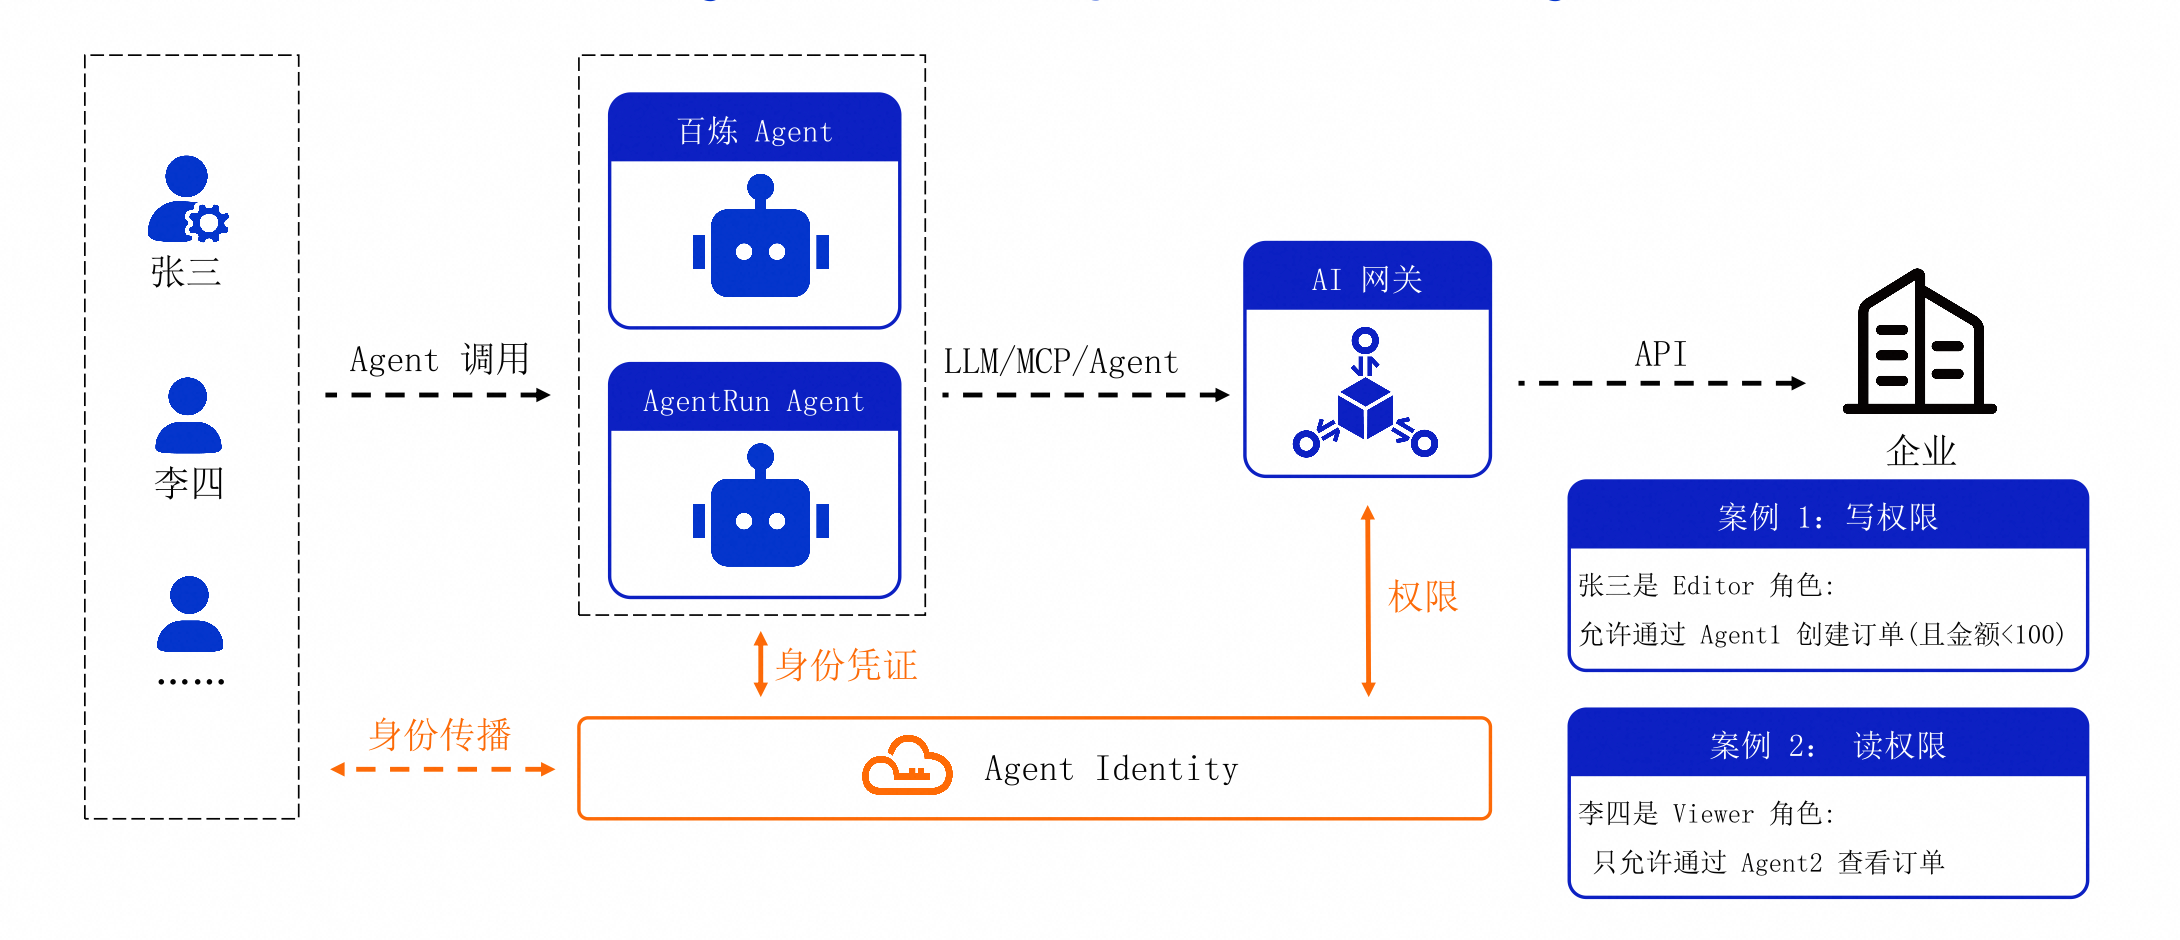
End-to-end process overview:
-
Set up and verify the Agent application on your local machine.
-
Deploy backend business APIs to Function Compute and expose them as an MCP tool through AI Gateway.
-
Configure the Agent to use the AI Gateway MCP Service and verify that tool calls work as expected.
-
Create an Agent Identity policy set and configure its policies.
-
Verify that the policies take effect: allowed actions are executed, and restricted actions are blocked.
Prerequisites
Environment requirements
Your local test environment must have Python (version 3.10 or later) and the pip package manager installed.
RAM User and permission requirements
You need a RAM User to run setup scripts and test the application locally. This user must have the following permissions:
{
  "Version": "1",
  "Statement": [
    {
      "Effect": "Allow",
      "Action": "agentidentity:*",
      "Resource": "*"
    },
    {
      "Effect": "Allow",
      "Action": "agentidentitydata:*",
      "Resource": "*"
    },
    {
      "Effect": "Allow",
      "Action": "ram:CreateServiceLinkedRole",
      "Resource": "*",
      "Condition": {
        "StringEquals": {
          "ram:ServiceName": ["agentidentity.aliyuncs.com"]
        }
      }
    },
    {
      "Effect": "Allow",
      "Action": [
        "ram:CreateApplication",
        "ram:CreateRole",
        "ram:CreatePolicy",
        "ram:AttachPolicyToRole",
        "ram:CreateAppSecret",
        "ram:DeleteApplication",
        "ram:ListUserBasicInfos",
        "ram:ListRoles"
      ],
      "Resource": "*"
    }
  ]
}
Model Studio (Bailian) API key
Obtain a Model Studio (Bailian) API key. If you do not have one, see Obtain an API Key to create and configure it.
Step 1: Install and test the application locally
Follow Step 1 in the Use Agent Identity in Model Studio (Bailian) High-Code tutorial to ensure the application tests successfully on your local machine.
Step 2: Create and configure Function Compute (FC)
Create a function instance
-
Log on to the Function Compute (FC) console.
-
In the left-side navigation pane, choose , and then click Create Function.
-
In the Select a function type window, on the default Web Function tab, click Create Web Function.
-
On the Create Web Function page, configure the following parameters:
-
Function Name: Enter a name for the function, such as
order-service-fc. -
Runtime Environment: Select Custom Runtime/Linux/Debian 10.
-
Startup command:
python3 app.py. -
Listening Port: 9000
Keep the default values for the other parameters.
-
-
Click Create. After the creation is complete, you are automatically redirected to the function details page.
Configure the function instance
-
On the function details page, switch to the Code tab. Replace the sample code with the following code:
import json from flask import Flask from flask import request app = Flask(__name__) @app.route('/', defaults={'path': ''}) @app.route('/<path:path>', methods=['GET', 'POST', 'PUT', 'DELETE']) def hello_world(path): data = request.stream.read() print("Path: " + path) print("Data: " + str(data)) response = {} if path == 'create-order': param = json.loads(data) response = { 'status': 'Done', 'orderId': param['orderId'], 'amount': param['amount'] } elif path == 'get-order': param = json.loads(data) response = { 'status': 'Done', 'orderId': param['orderId'], 'amount': 500 } elif path == 'add-budget': param = json.loads(data) response = { 'status': 'Done', 'year': param['year'], 'amount': param['amount'], 'reason': param['reason'] } return json.dumps(response) if __name__ == '__main__': app.run(host='0.0.0.0',port=9000) -
Click the Deploy Code button and wait for the console to indicate that the deployment is successful.
-
Switch to the Trigger tab, and click Edit in the Actions column.
-
In the Edit Trigger defaultTrigger panel, switch Authentication Method to No Authentication. Click OK.
-
On the Trigger tab, copy the internal access URL and the public access URL. You will need them in the following steps.
Test the function instance
Copy the Public Access URL from the Trigger tab, and execute the following command in your local terminal (replace <your-fc-public-facing-url> with the actual public access URL).
curl -X POST "<your-fc-public-access-url>/get-order" \
  -H "Content-Type: application/json" \
  -d '{"orderId":"ord-001"}'
Expected output:
{"status": "Done", "orderId": "ord-001", "amount": 500}(Optional) Disable public access
After you verify that the function works correctly using the public access URL, we recommend that you disable public access and use only the internal access URL.
-
On the function details page, on the Triggers tab, click Edit in the Actions column.
-
In the Edit Trigger defaultTrigger panel, enable Disable Public Access URL. Click OK.
Step 3: Create and configure AI Gateway
Create an AI Gateway instance
-
Log on to the AI Gateway console. On the instance list page, click Create Instance.
-
On the buy page, configure the following parameters:
-
Product Type: Select Dedicated Instance (Pay-As-You-Go).
-
Region: Select China (Beijing) (Agent Identity is currently available only in the China (Beijing) region).
-
Gateway Name: Enter a name for the gateway. For example,
test-ai-gateway. -
Network Access Type: Select Public Network.
-
Virtual Private Cloud (VPC): Select the VPC where the gateway instance runs.
-
vSwitch: Select the vSwitch where the gateway instance runs.
-
Log Service: Select Use Log Service (SLS).
Keep the default values for the other parameters.
-
-
Click Buy Now and wait for the instance to be created.
For more information, see Create a gateway instance.
Create a service
-
On the AI Gateway instance overview page, click Service in the left navigation bar, and click Create Service.
-
In the Create Service panel, configure the following parameters:
-
Service Source: Select Function Compute (FC).
-
Backend Service: Select the Function Compute instance that you created in the Create a function instance step.
-
-
Click OK. The service creation is complete.
Create an MCP Service
-
On the AI Gateway instance overview page, select MCP Management in the left navigation bar.
-
Click Create MCP Service and configure the following parameters:
-
Name: Enter the MCP Service name, for example,
order-service-mcp. -
Protocol: Select HTTP to MCP.
-
Backend Service: Select the service that you created in the Create a service step.
-
Description: Enter a description for the MCP service.
-
MCP Endpoint: Click Add Domain, enter a custom domain name (such as
order-service.<your-domain>.com), and click Create. In the domain name drop-down list, select the created domain.NoteFor testing purposes only, the domain name does not need to be real. To access the MCP service by using a custom domain name, you must also add a CNAME record in your domain's DNS service that points to the Gateway Endpoint Address (the public domain name of the AI Gateway).
Keep the default values for the other parameters.
-
-
Click Save and Publish.
Add and debug MCP tools
-
Click the created MCP Service, and on the Basic Information tab of the details page, click Add Tool.
-
In the Create panel, set the editing method to Custom YAML.
-
Paste the following YAML content into the configuration box.
server: name: order-service-mcp allowTools: - create-order - get-order tools: - name: create-order description: Create a new order with specific amount args: - name: orderId description: The unique ID of the order type: string required: true position: body - name: amount description: The amount of money for the order type: number required: true position: body requestTemplate: url: /create-order method: POST argsToJsonBody: true responseTemplate: body: | # Order Created - **Status**: {{.status}} - **Order ID**: {{.orderId}} - **Confirmed Amount**: {{.amount}} - name: get-order description: Retrieve order details by ID args: - name: orderId description: The ID of the order to search type: string required: true requestTemplate: url: /get-order method: POST argsToJsonBody: true responseTemplate: body: | # Order Details - **Status**: {{.status}} - **Order ID**: {{.orderId}} - **Amount**: {{.amount}} - name: add-budget description: Allocates additional budget to an existing project or budget entity. args: - name: year description: The year of budget type: string required: true - name: amount description: The amount of money for the budget type: number required: true position: body - name: reason description: The reason of budget type: string required: true requestTemplate: url: /add-budget method: POST argsToJsonBody: true responseTemplate: body: |- # Budget Details - **Status**: {{.status}} - **Year**: {{.year}} - **Amount**: {{.amount}} - **Reason**: {{.reason}} -
Click OK.
-
Click Debug in the upper-right corner of the MCP Service details page. The tool list should display 3 tools:
create-order,get-order, andadd-budget. Click any tool and enter parameter values to test it. A success result should be returned.For example, the create-order tool has two required parameters: amount and orderId. After you fill in the values and click Run, the results area will display a success status and the confirmed amount for the created order.
-
Go back to the MCP Service details page. In the Connect to MCP Service section on the right, click the domain name drop-down menu, select the default domain name, and copy the complete URL from the Streamable HTTP tab for use in subsequent steps.
The Streamable HTTP tab shows a sample JSON configuration. The structure contains an
mcpServersobject, which includes the service name (for example,order-service-mcp) and itsurlfield. Theurlvalue is populated with the selected domain. Click Copy in the upper-right corner to get the full configuration.
Step 4: Configure and test the Agent application
Now, configure the Agent proxy with the AI Gateway MCP Service URL to verify that the Agent can call the MCP tools.
Configure Agent proxy for AI Gateway
-
Set the MCP Service URL you obtained in the Add and debug MCP tools step as a local environment variable:
export AI_GATEWAY_MCP_SERVER="<your-ai-gateway-mcp-server-url>" -
In the
.config.jsonfile within the local end-to-end sample directory (agent-identity-dev-kit/agent_identity_python_samples/end-to-end_sample), find and copy the value ofworkload_identity_name. Run the following command to set the workload identity name as an environment variable:export AGENT_IDENTITY_WORKLOAD_IDENTITY_NAME="<your-workload-identity-name>"
Test the application
-
Open a terminal and navigate from the project root directory (
agent-identity-dev-kit) to thefetch-workload-access-token_sampledirectory:cd agent_identity_python_samples/fetch-workload-access-token_sample -
Install dependencies. We recommend that you create and activate a Python virtual environment, and then install the project dependencies.
pip install -r requirements.txt -
In the
fetch-workload-access-token_sampledirectory, run the following command to start the Agent:python -m deploy_starter.main -
Open another terminal. Navigate from the project root directory (
agent-identity-dev-kit) to theend-to-end_sampledirectory and start the front-end and back-end applications:cd agent_identity_python_samples/end-to-end_sample python -m application.backend.app -
After the services have started, open
http://localhost:8090in your browser. -
After you log on to Alibaba Cloud and grant user authorization, interact with the model in the chat window. For example, enter "Query order: ord-001". If the application is working correctly, the application returns the order details. The order data comes from the MCP Service published through AI Gateway.
The returned order details show that the status is Done and the amount is
500.
Step 5: Create and configure a policy set
Create a policy set
Log on to the Agent Identity console and follow the steps in Create a policy set to create a policy set.
Create and configure policies
-
In the policy set list, find the target policy set and click its name.
-
On the policy set details page, on the Policy tab, click Edit Policy.
-
The editor automatically adds a new policy and pre-fills its name. On the policy editing page, configure the following parameters:
-
Policy Name: Keep the default or change it to a more semantic name, such as
allow-get-order-action. -
Policy Statement:
-
Effect: Select Allow.
-
Principal: Select Specific Principal. In the Principal Type drop-down menu, select OAuth User.
-
Resource: Select the AI Gateway that you created.
-
Action: Select Specify Action. Click Edit Action, select the
get-orderMCP tool, and click OK.
-
-
-
Click Add Policy on the Edit Policy Content page and repeat the preceding steps to create a second policy. In Actions, select the
create-orderMCP tool and add the following condition under Conditions:-
Condition Key: Select Operation Input Parameter
amount. -
Conditional operator: Select
<. -
Condition Value: Enter
1000.
-
-
Click Submit. The policy set now contains two policies:
-
allow-get-order-action: Allows all authenticated users to call theget-ordertool. -
allow-create-order-with-condition: Allows authenticated users to call thecreate-ordertool, but only if theamountparameter value is less than1000.
-
Bind the AI Gateway to the policy set
Follow the steps in Bind an AI Gateway to a policy set to bind the AI Gateway to the policy set. Set the execution mode to Interception Mode.
In a production environment, we recommend that you first set the mode to Observe. Monitor the Log Service (SLS) logs for the AI Gateway for a period to confirm that the policies are working as expected, and then switch to Enforce mode.
Configure policy permissions for the workload identity
The RAM role for the workload identity needs permissions to evaluate Agent Identity policies at runtime.
-
Log on to the Agent Identity console. In the left navigation bar, select .
-
On the Workload Identity list page, find and click the workload identity name that you configured in the Configure the agent to use the AI Gateway MCP Service step.
-
On the workload identity details page, click the name of the runtime RAM role under the Authentication Process tab.
-
On the Permissions tab of the RAM role details page, click the custom policy that you created.
-
On the permission policy details page, on the Policy Content tab, click Edit Policy. Add the following policy block to the
Statementarray.{ "Effect": "Allow", "Action": [ "agentidentitydata:EvaluatePolicy", "agentidentitydata:SearchAuthorizedActions" ], "Resource": "*" }
Step 6: Verify policy behavior
Restart the Agent proxy service and the front-end and back-end applications. After you log in again, use the following scenarios to verify that the policies are working as expected.
Test get-order
In the chat window, enter "Query order: ord-001". The Agent calls the get-order tool. The policy allows this action, so the order details should be returned as expected.
Test create-order (amount ≥ 1000)
In the chat window, enter "Create order, order ID ord-002, amount 1500". When the Agent calls the create-order tool, the amount parameter does not meet the condition of being less than 1000, so the policy denies the action. An error message (403 Forbidden) appears in the window.
Test create-order (amount < 1000)
In the chat window, enter "Create order, order ID ord-002, amount 900". The Agent calls the create-order tool. The amount parameter meets the condition, so the policy allows the action. The information for the successfully created order is returned as expected.
Step 7 (Optional): Deploy Agent to Model Studio
Follow Step 2 and Step 3 in Use Agent Identity in Model Studio (Bailian) High-Code to deploy the Agent to the Model Studio (Bailian) High-Code platform.